🔧 阿川の電商水電行

編輯 - ⚠️ 隨著 oh-my-posh 的新版本以及 V2 的重大變化,本文已經過時了。請注意,這仍然可以在 oh-my-posh 的 V2 中完美執行。
Windows 終端機是一個現代、快速、高效、強大且高效的終端應用程式,適用於命令列工具和 shell(例如命令提示字元、PowerShell 和 WSL)的使用者。

讓我們從Windows 終端機安裝開始 -
-
從 Microsoft Store 安裝 Windows 終端機。當我們發布具有自動升級功能的新版本時,這使您可以始終使用最新版本。
-
另類方式(透過巧克力)
- `choco install microsoft-windows-terminal`
下一步是修改 Windows 終端設定。
啟動已安裝的 Windows 終端,然後開啟其設置,這將在預設編輯器中開啟 settings.json。
- 在設定檔列表下將 powershell 設定檔更新為 -
 {
       // Make changes here to the powershell.exe profile.
       "guid": "{61c54bbd-c2c6-5271-96e7-009a87ff44bf}",
       "name": "Linnea",
       "commandline": "powershell.exe -NoLogo -NoExit",
       "hidden": false,
       "colorScheme": "Blue Matrix",
       "fontFace": "Cascadia Code PL",
       "fontSize": 10,
       "icon": "xxxxxxxxxxxxxxxxxxxxxx",
       "backgroundImage": "xxxxxxxxxxxxxxxxxxx",
       "backgroundImageOpacity": 0.2,
       "acrylicOpacity": 0.8,
       "useAcrylic": true,
       "startingDirectory": "Q:\\Development"
 },
屬性 -名稱-[在頂部欄中顯示為標題]
**acrylicOpacity**-[ *its just the opacity of window* ]
**useAcrylic**-[ *to use acrylicOpacity it must be true*]
**icon**-[ *appears as favicon to window* ]
(註 1-確保根據您的個人喜好更新圖示和背景圖像)
(註2-確保您的defaultProfile具有您的powershell的guid)
- 下一步是更新我們的計劃清單 -
     "schemes": [
        {
            "name": "Blue Matrix",
            "black": "#101116",
            "red": "#ff5680",
            "green": "#00ff9c",
            "yellow": "#fffc58",
            "blue": "#00b0ff",
            "purple": "#d57bff",
            "cyan": "#76c1ff",
            "white": "#c7c7c7",
            "brightBlack": "#686868",
            "brightRed": "#ff6e67",
            "brightGreen": "#5ffa68",
            "brightYellow": "#fffc67",
            "brightBlue": "#6871ff",
            "brightPurple": "#d682ec",
            "brightCyan": "#60fdff",
            "brightWhite": "#ffffff",
            "background": "#1d2342",
            "foreground": "#b8ffe1"
        }
],更多主題位於-atomcorp.github.io/themes/
Windows 終端設定就差不多了,讓我們開始加入一些很酷的插件 🔥。
電力線設定 ⚡


編輯 - ⚠️ 使用新版本的 oh-my-posh,以及與 V2 相比的重大變更。這篇文章需要更新。請注意,這仍然可以在 oh-my-posh 的 V2 中完美執行。
先決條件 -
-
安裝Cascadia code PL字型。 (否則你的終端機上可能會出現一些亂碼)
-
Windows 版Git
-
安裝 Posh-git 和 Oh-my-posh (使用 powershell )
 Install-Module posh-git -Scope CurrentUser
Install-Module oh-my-posh -Scope CurrentUser
自訂您的 PowerShell 提示字元 🔨
-
使用
notepad $PROFILE或您選擇的文字編輯器開啟您的 PowerShell 設定檔。這不是您的 Windows 終端設定檔。您的 PowerShell 設定檔是每次 PowerShell 啟動時執行的腳本。 -
如果您的 powershell 還沒有設定文件,請建立一個 ->
if (!(Test-Path -Path $PROFILE)) { New-Item -ItemType File -Path ROFILE -Force }- 現在繼續將以下程式碼新增至您的 powershell 設定檔中 -
Import-Module posh-git
Import-Module oh-my-posh
Set-Theme Paradox
更多主題位於 - oh-my-posh 主題
( ⚠️ 如果您的 powershell 給出模組未找到錯誤 )將以下具有預設模組位置的程式碼新增至您的 Powershell 設定檔的頂部。
$env:PSModulePath = $env:PSModulePath + "$([System.IO.Path]::PathSeparator)C:\Users\xxxx\Documents\WindowsPowerShell\Modules"修改 Oh-my-posh 主題 ( 🦄🔥🚀 表情符號 )

請記住,我們將預設的 oh-my-posh 主題設為 paradox,讓我們開始自訂它。
- 導覽至 PSmodules 目錄,然後進入 oh-my-posh 主題目錄
- `Documents\WindowsPowerShell\Modules\oh-my-posh\2.0.412\Themes`
- 打開 Paradox 文件,向下滾動到底部並更新以下行 -
$sl.PromptSymbols.StartSymbol = [char]::ConvertFromUtf32(0x01F984) + [char]::ConvertFromUtf32(0x0001F525) + ' '
$sl.PromptSymbols.PromptIndicator = [char]::ConvertFromUtf32(0x01F680) +[char]::ConvertFromUtf32(0x276F)
(此行將在 StartSymbol 和 PromptIndicator 之前加入很酷的表情符號)
將自訂橫幅加入到您的 Powershell 🏳️🌈
如果您想在橫幅中加入複雜的圖像,這是一項非常繁瑣的任務。
(對於 Windows 有更簡單的 Neofetch方法,但每當您打開 Windows 終端時,它都會帶來自己的延遲開銷)
- 無聊但開銷少的方法
- Change your powershell file to add your custom ascii art.
- In my case, I changed my Profile Image to Ascii Art via [https://www.topster.net/ascii-generator/](https://www.topster.net/ascii-generator/).
- Next problem is color support, by default powershell doesn't allow you to write multipler colored text on a single line.
- ( You could proceed without this ) If want the above function install Write color module.
`Install-Module -Name PSWriteColor`
- Now just below your $psenvmodule path add the following lines to display your customized banner .
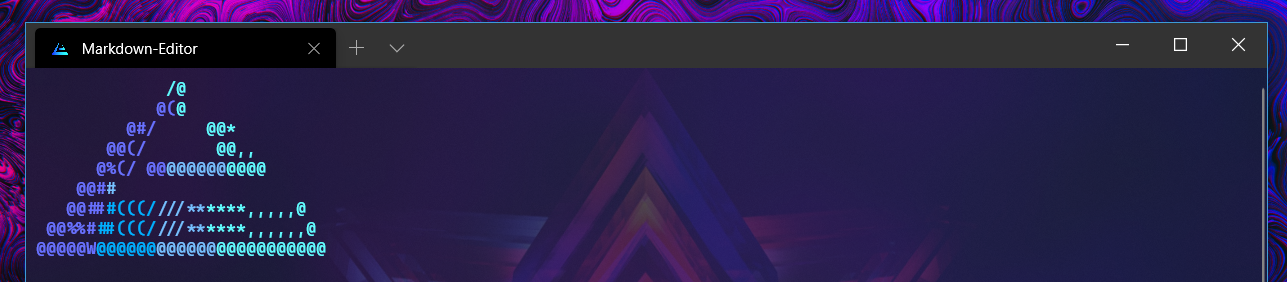
Write-Color -Text  "             /@ "         -Color Cyan
Write-Color -Text "            @(","@ "               -Color Blue,Cyan
Write-Color -Text "          @@/","    @*  "         -Color Blue, Cyan
Write-Color -Text "         @#/","     @@*  "        -Color Blue, Cyan
Write-Color -Text "       @@(/","       @@,, "       -Color Blue, Cyan
Write-Color -Text "      @%(/ @@","@@@@@@","@@@@ "      -Color Blue, DarkCyan, Cyan
Write-Color -Text "    @@#","#","                 "  -Color Blue, DarkCyan, Cyan
Write-Color -Text "   @@##","#(((/","///**","****,,,,,@ "  -Color Blue, DarkBlue, DarkCyan, Cyan
Write-Color -Text " @@%%#","##(((/","///**","****,,,,,,@ " -Color Blue, DarkBlue, DarkCyan, Cyan
Write-Color -Text "@@@@@W","@@@@@@","@@@@@@","@@@@@@@@@@@ "   -Color Blue, DarkBlue, DarkCyan, Cyan
Write-Color -Text " "
(注意- 您可以選擇的顏色數量有些有限:黑色、深藍色、深綠色、深青色、深紅色、深洋紅色、深黃色、灰色、深灰色、藍色、綠色、青色、紅色、洋紅色、黃色和白色)
編輯 1.-您的 Powershell 設定檔應如下所示-pastebin.com/JAX3Ce23
編輯2.-背景圖像來源-facets.la
編輯 3. - 在新版本的 oh-my-posh 中,很少有命令(ex-set-theme)已被棄用。我計劃更新文章的具體細節,然後使用他們的文件來更新語法 - Repo Link
製作人員
原文出處:https://dev.to/anupa/beautify-your-windows-terminal-1la8
1) --- 會變成分隔線(上一行必須是空白)
2) # 會變成一級標題
3) ## 會變成二級標題
4) ### 會變成三級標題
5) **粗體文字**會顯示粗體文字
6) ```當第一行與最後一行會顯示程式碼
7) 請搜尋 Markdown 語法,了解各種格式