

在本文中,您將學習如何建立 GitHub 星數監視器 來檢查您幾個月內的星數以及每天獲得的星數。
-
使用 GitHub API 取得目前每天收到的星星數量。
-
在螢幕上每天繪製美麗的星星圖表。
-
創造一個工作來每天收集新星星。

你的後台工作平台🔌
Trigger.dev 是一個開源程式庫,可讓您使用 NextJS、Remix、Astro 等為您的應用程式建立和監控長時間執行的作業!

請幫我們一顆星🥹。
這將幫助我們建立更多這樣的文章💖
https://github.com/triggerdotdev/trigger.dev
這是你需要知道的 😻
取得 GitHub 上星星數量的大部分工作將透過 GitHub API 完成。
GitHub API 有一些限制:
-
每個請求最多 100 名觀星者
-
最多 100 個同時請求
-
每小時最多 60 個請求
TriggerDev 儲存庫擁有超過 5000 顆星,實際上不可能在合理的時間內(即時)計算所有星數。
因此,我們將採用與 GitHub Stars History 相同的技巧。
-
取得星星總數 (5,715) 除以每頁 100 結果 = 58 頁
-
設定我們想要的最大請求量(20 頁最大)除以 58 頁 = 跳過 3 頁。
-
從這些頁面中獲取星星(2000 顆星),然後獲取剩餘的星星,我們將按比例加入到其他日期(3715 顆星)。
它會為我們繪製一個漂亮的圖表,並在需要的地方用星星凸起。
當我們每天獲取新數量的星星時,事情就會變得容易得多。
我們將用目前擁有的星星總數減去 GitHub 上的新星星數量。 我們不再需要迭代觀星者。
讓我們來設定一下 🔥
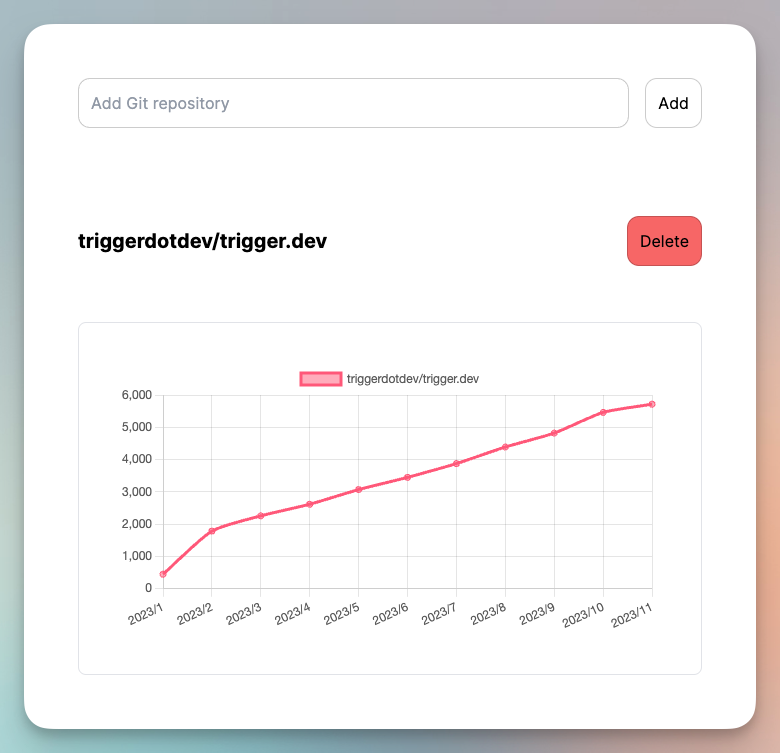
我們的申請將包含一頁:
-
新增您想要監控的儲存庫。
-
查看儲存庫清單及其 GitHub 星圖。
-
刪除那些你不再想要的。
💡 我們將使用 NextJS 新的應用程式路由器,在安裝專案之前請確保您的節點版本為 18+。
使用 NextJS 設定一個新專案
npx create-next-app@latest我們必須將所有星星保存到我們的資料庫中!
在我們的示範中,我們將使用 SQLite 和 Prisma。
它非常容易安裝,但可以隨意使用任何其他資料庫。
npm install prisma @prisma/client --save在我們的專案中安裝 Prisma
npx prisma init --datasource-provider sqlite轉到“prisma/schema.prisma”並將其替換為以下模式:
generator client {
  provider = "prisma-client-js"
}

datasource db {
  provider = "sqlite"
  url      = env("DATABASE_URL")
}

model Repository {
    id        String   @id @default(uuid())
    month     Int
    year      Int
    day       Int
    name      String
    stars     Int
    @@unique([name, day, month, year])
}
然後執行
npx prisma db push我們基本上已經在 SQLite 資料庫中建立了一個名為「Repository」的新表:
-
「月」、「年」、「日」是日期。
-
name儲存庫的名稱 -
「星星」以及該特定日期的星星數量。
你還可以看到我們在底部加入了一個@@unique,這意味著我們可以將name,month,year,day一起重複記錄。它會拋出一個錯誤。
讓我們新增 Prisma 客戶端。
建立一個名為「helper」的新資料夾,並新增一個名為「prisma.ts」的新文件,並在其中新增以下程式碼:
import {PrismaClient} from '@prisma/client';

export const prisma = new PrismaClient();
我們稍後可以使用該「prisma」變數來查詢我們的資料庫。
應用程式 UI 骨架 💀
我們需要一些函式庫來完成本教學:
-
Axios - 向伺服器發送請求(如果您覺得更舒服,可以隨意使用 fetch)
-
Dayjs - 很棒的處理日期的函式庫。它是 moment.js 的替代品,但不再完全維護。
-
Lodash - 很酷的資料結構庫。
-
react-hook-form - 處理表單的最佳函式庫(驗證/值/等)
-
chart.js - 我選擇繪製 GitHub 星圖的函式庫。
讓我們安裝它們:
npm install axios dayjs lodash @types/lodash chart.js react-hook-form react-chartjs-2 --save建立一個名為“components”的新資料夾並新增一個名為“main.tsx”的新文件
新增以下程式碼:
"use client";
import {useForm} from "react-hook-form";
import axios from "axios";
import {Repository} from "@prisma/client";
import {useCallback, useState} from "react";

export default function Main() {
    const [repositoryState, setRepositoryState] = useState([]);
    const {register, handleSubmit} = useForm();

    const submit = useCallback(async (data: any) => {
        const {data: repositoryResponse} = await axios.post('/api/repository', {todo: 'add', repository: data.name});
        setRepositoryState([...repositoryState, ...repositoryResponse]);
    }, [repositoryState])

    const deleteFromList = useCallback((val: List) => () => {
        axios.post('/api/repository', {todo: 'delete', repository: `https://github.com/${val.name}`});
        setRepositoryState(repositoryState.filter(v => v.name !== val.name));
    }, [repositoryState])

    return (
        <div className="w-full max-w-2xl mx-auto p-6 space-y-12">
            <form className="flex items-center space-x-4" onSubmit={handleSubmit(submit)}>
                <input className="flex-grow p-3 border border-black/20 rounded-xl" placeholder="Add Git repository" type="text" {...register('name', {required: 'true'})} />
                <button className="flex-shrink p-3 border border-black/20 rounded-xl" type="submit">
                    Add
                </button>
            </form>
            <div className="divide-y-2 divide-gray-300">
                {repositoryState.map(val => (
                    <div key={val.name} className="space-y-4">
                        <div className="flex justify-between items-center py-10">
                            <h2 className="text-xl font-bold">{val.name}</h2>
                            <button className="p-3 border border-black/20 rounded-xl bg-red-400" onClick={deleteFromList(val)}>Delete</button>
                        </div>
                        <div className="bg-white rounded-lg border p-10">
                            <div className="h-[300px]]">
                                {/* Charts Component */}
                            </div>
                        </div>
                    </div>
                ))}
            </div>
        </div>
    )
}
超簡單的React元件
-
允許我們新增新的 GitHub 庫並將其發送到伺服器 POST 的表單 -
/api/repository{todo: 'add'} -
刪除我們不需要 POST 的儲存庫 -
/api/repository{todo: 'delete'} -
所有新增的庫及其圖表的清單。
讓我們轉到本文的複雜部分,新增儲存庫。
數星星

在「helper」內部建立一個名為「all.stars.ts」的新檔案並新增以下程式碼:
import axios from "axios";
import dayjs from "dayjs";
import utc from 'dayjs/plugin/utc';
dayjs.extend(utc);

const requestAmount = 20;

export const getAllGithubStars = async (owner: string, name: string) => {
    // Get the amount of stars from GitHub
    const totalStars = (await axios.get(`https://api.github.com/repos/${owner}/${name}`)).data.stargazers_count;

    // get total pages
    const totalPages = Math.ceil(totalStars / 100);

    // How many pages to skip? We don't want to spam requests
    const pageSkips = totalPages < requestAmount ? requestAmount : Math.ceil(totalPages / requestAmount);

    // Send all the requests at the same time
    const starsDates = (await Promise.all([...new Array(requestAmount)].map(async (_, index) => {
        const getPage = (index * pageSkips) || 1;
        return (await axios.get(`https://api.github.com/repos/${owner}/${name}/stargazers?per_page=100&page=${getPage}`, {
            headers: {
                Accept: "application/vnd.github.v3.star+json",
            },
        })).data;
    }))).flatMap(p => p).reduce((acc: any, stars: any) => {
        const yearMonth = stars.starred_at.split('T')[0];
        acc[yearMonth] = (acc[yearMonth] || 0) + 1;
        return acc;
    }, {});

    // how many stars did we find from a total of `requestAmount` requests?
    const foundStars = Object.keys(starsDates).reduce((all, current) => all + starsDates[current], 0);

    // Find the earliest date
    const lowestMonthYear = Object.keys(starsDates).reduce((lowest, current) => {
        if (lowest.isAfter(dayjs.utc(current.split('T')[0]))) {
            return dayjs.utc(current.split('T')[0]);
        }
        return lowest;
    }, dayjs.utc());

    // Count dates until today
    const splitDate = dayjs.utc().diff(lowestMonthYear, 'day') + 1;

    // Create an array with the amount of stars we didn't find
    const array = [...new Array(totalStars - foundStars)];

    // Set the amount of value to add proportionally for each day
    let splitStars: any[][] = [];
    for (let i = splitDate; i > 0; i--) {
        splitStars.push(array.splice(0, Math.ceil(array.length / i)));
    }

    // Calculate the amount of stars for each day
    return [...new Array(splitDate)].map((_, index, arr) => {
        const yearMonthDay = lowestMonthYear.add(index, 'day').format('YYYY-MM-DD');
        const value = starsDates[yearMonthDay] || 0;
        return {
            stars: value + splitStars[index].length,
            date: {
                month: +dayjs.utc(yearMonthDay).format('M'),
                year: +dayjs.utc(yearMonthDay).format('YYYY'),
                day: +dayjs.utc(yearMonthDay).format('D'),
            }
        };
    });
}
那麼這裡發生了什麼事:
-
totalStars- 我們計算圖書館擁有的星星總數。 -
totalPages- 我們計算頁數 (每頁 100 筆記錄) -
pageSkips- 由於我們最多需要 20 個請求,因此我們檢查每次必須跳過多少頁。 -
starsDates- 我們填充每個日期的星星數量。 -
foundStars- 由於我們跳過日期,我們需要計算實際找到的星星總數。 -
lowestMonthYear- 尋找我們擁有的恆星的最早日期。 -
splitDate- 最早的日期和今天之間有多少個日期? -
array- 一個包含splitDate專案數量的空陣列。 -
splitStars- 我們缺少的星星數量,需要按比例加入每個日期。 -
最終返回 - 新陣列包含自開始以來每天的星星數量。
所以,我們已經成功建立了一個每天可以給我們星星的函數。
我嘗試過這樣顯示,結果很混亂。
您可能想要顯示每個月的星星數量。
此外,您可能想要累積星星而不是:
-
二月 - 300 顆星
-
三月 - 200 顆星
-
四月 - 400 顆星
如果有這樣的就更好了:
-
二月 - 300 顆星
-
三月 - 500 顆星
-
四月 - 900 顆星
兩個選項都有效。 這取決於你想展示什麼!
因此,讓我們轉到 helper 資料夾並建立一個名為「get.list.ts」的新檔案。
這是文件的內容:
import {prisma} from "./prisma";
import {groupBy, sortBy} from "lodash";
import {Repository} from "@prisma/client";

function fixStars (arr: any[]): Array<{name: string, stars: number, month: number, year: number}> {
    return arr.map((current, index) => {
        return {
            ...current,
            stars: current.stars + arr.slice(index + 1, arr.length).reduce((acc, current) => acc + current.stars, 0),
        }
    }).reverse();
}

export const getList = async (data?: Repository[]) => {
    const repo = data || await prisma.repository.findMany();
    const uniqMonth = Object.values(
        groupBy(
            sortBy(
                Object.values(
                    groupBy(repo, (p) => p.name + '-' + p.year + '-' + p.month))
                    .map(current => {
                        const stars = current.reduce((acc, current) => acc + current.stars, 0);
                        return {
                            name: current[0].name,
                            stars,
                            month: current[0].month,
                            year: current[0].year
                        }
                    }),
            [(p: any) => -p.year, (p: any) => -p.month]
        ),p => p.name)
    );

    const fixMonthDesc = uniqMonth.map(p => fixStars(p));

    return fixMonthDesc.map(p => ({
        name: p[0].name,
        list: p
    }));
}
首先,它將所有按日的星星轉換為按月的星星。
稍後我們會累積每個月的星星數量。
這裡要注意的一件主要事情是 data?: Repository[] 是可選的。
我們制定了一個簡單的邏輯:如果我們不傳遞資料,它將為我們資料庫中的所有儲存庫傳遞資料。
如果我們傳遞資料,它只會對其起作用。
為什麼問?
-
當我們建立一個新的儲存庫時,我們需要在將其新增至資料庫後處理特定的儲存庫資料。
-
當我們重新載入頁面時,我們需要取得所有資料。
現在,讓我們來處理我們的星星建立/刪除路線。
轉到“src/app/api”並建立一個名為“repository”的新資料夾。在該資料夾中,建立一個名為「route.tsx」的新檔案。
在那裡加入以下程式碼:
import {getAllGithubStars} from "../../../../helper/all.stars";
import {prisma} from "../../../../helper/prisma";
import {Repository} from "@prisma/client";
import {getList} from "../../../../helper/get.list";

export async function POST(request: Request) {
    const body = await request.json();
    if (!body.repository) {
        return new Response(JSON.stringify({error: 'Repository is required'}), {status: 400});
    }

    const {owner, name} = body.repository.match(/github.com\/(?<owner>.*)\/(?<name>.*)/).groups;
    if (!owner || !name) {
        return new Response(JSON.stringify({error: 'Repository is invalid'}), {status: 400});
    }

    if (body.todo === 'delete') {
        await prisma.repository.deleteMany({
            where: {
                name: `${owner}/${name}`
            }
        });

        return new Response(JSON.stringify({deleted: true}), {status: 200});
    }

    const starsMonth = await getAllGithubStars(owner, name);
    const repo: Repository[] = [];
    for (const stars of starsMonth) {
        repo.push(
            await prisma.repository.upsert({
                where: {
                    name_day_month_year: {
                        name: `${owner}/${name}`,
                        month: stars.date.month,
                        year: stars.date.year,
                        day: stars.date.day,
                    },
                },
                update: {
                    stars: stars.stars,
                },
                create: {
                    name: `${owner}/${name}`,
                    month: stars.date.month,
                    year: stars.date.year,
                    day: stars.date.day,
                    stars: stars.stars,
                }
            })
        );
    }
    return new Response(JSON.stringify(await getList(repo)), {status: 200});
}
我們共享 DELETE 和 CREATE 路由,這些路由通常不應在生產中使用,但我們在本文中這樣做是為了讓您更輕鬆。
我們從請求中取得 JSON,檢查「repository」欄位是否存在,並且它是 GitHub 儲存庫的有效路徑。
如果是刪除請求,我們使用 prisma 根據儲存庫名稱從資料庫中刪除儲存庫並傳回請求。
如果是建立,我們使用 getAllGithubStars 來獲取資料以保存到我們的資料庫中。
💡 由於我們已經在
name、month、year和day上放置了唯一索引,如果記錄已經存在,我們可以使用prismaupsert來更新資料
最後,我們將新累積的資料回傳給客戶端。
最困難的部分完成了🍾
主頁人口 💽
我們還沒有建立我們的主頁元件。
我們開始做吧。
前往“app”資料夾建立或編輯“page.tsx”並新增以下程式碼:
"use server";

import Main from "@/components/main";
import {getList} from "../../helper/get.list";

export default async function Home() {
  const list: any[] = await getList();
  return (
      <Main list={list} />
  )
}
我們使用與 getList 相同的函數來取得累積的所有儲存庫的所有資料。
我們還修改主要元件以支援它。
編輯 components/main.tsx 並將其替換為:
"use client";
import {useForm} from "react-hook-form";
import axios from "axios";
import {Repository} from "@prisma/client";
import {useCallback, useState} from "react";

interface List {
    name: string,
    list: Repository[]
}

export default function Main({list}: {list: List[]}) {
    const [repositoryState, setRepositoryState] = useState(list);
    const {register, handleSubmit} = useForm();

    const submit = useCallback(async (data: any) => {
        const {data: repositoryResponse} = await axios.post('/api/repository', {todo: 'add', repository: data.name});
        setRepositoryState([...repositoryState, ...repositoryResponse]);
    }, [repositoryState])

    const deleteFromList = useCallback((val: List) => () => {
        axios.post('/api/repository', {todo: 'delete', repository: `https://github.com/${val.name}`});
        setRepositoryState(repositoryState.filter(v => v.name !== val.name));
    }, [repositoryState])

    return (
        <div className="w-full max-w-2xl mx-auto p-6 space-y-12">
            <form className="flex items-center space-x-4" onSubmit={handleSubmit(submit)}>
                <input className="flex-grow p-3 border border-black/20 rounded-xl" placeholder="Add Git repository" type="text" {...register('name', {required: 'true'})} />
                <button className="flex-shrink p-3 border border-black/20 rounded-xl" type="submit">
                    Add
                </button>
            </form>
            <div className="divide-y-2 divide-gray-300">
                {repositoryState.map(val => (
                    <div key={val.name} className="space-y-4">
                        <div className="flex justify-between items-center py-10">
                            <h2 className="text-xl font-bold">{val.name}</h2>
                            <button className="p-3 border border-black/20 rounded-xl bg-red-400" onClick={deleteFromList(val)}>Delete</button>
                        </div>
                        <div className="bg-white rounded-lg border p-10">
                            <div className="h-[300px]]">
                                {/* Charts Components */}
                            </div>
                        </div>
                    </div>
                ))}
            </div>
        </div>
    )
}
顯示圖表! 📈
前往“components”資料夾並新增一個名為“chart.tsx”的新檔案。
新增以下程式碼:
"use client";
import {Repository} from "@prisma/client";
import {useMemo} from "react";
import React from 'react';
import {
    Chart as ChartJS,
    CategoryScale,
    LinearScale,
    PointElement,
    LineElement,
    Title,
    Tooltip,
    Legend,
} from 'chart.js';
import { Line } from 'react-chartjs-2';

ChartJS.register(
    CategoryScale,
    LinearScale,
    PointElement,
    LineElement,
    Title,
    Tooltip,
    Legend
);

export default function ChartComponent({repository}: {repository: Repository[]}) {
    const labels = useMemo(() => {
        return repository.map(r => `${r.year}/${r.month}`);
    }, [repository]);

    const data = useMemo(() => ({
        labels,
        datasets: [
            {
                label: repository[0].name,
                data: repository.map(p => p.stars),
                borderColor: 'rgb(255, 99, 132)',
                backgroundColor: 'rgba(255, 99, 132, 0.5)',
                tension: 0.2,
            },
        ],
    }), [repository]);

    return (
        <Line options={{
            responsive: true,
        }} data={data} />
    );
}
我們使用“chart.js”函式庫來繪製“Line”類型的圖表。
這非常簡單,因為我們在伺服器端完成了所有資料結構。
這裡需要注意的一件大事是我們「匯出預設值」我們的 ChartComponent。那是因為它使用了「Canvas」。這在伺服器端不可用,我們需要延遲載入該元件。
讓我們修改“main.tsx”:
"use client";
import {useForm} from "react-hook-form";
import axios from "axios";
import {Repository} from "@prisma/client";
import dynamic from "next/dynamic";
import {useCallback, useState} from "react";
const ChartComponent = dynamic(() => import('@/components/chart'), { ssr: false, })

interface List {
    name: string,
    list: Repository[]
}

export default function Main({list}: {list: List[]}) {
    const [repositoryState, setRepositoryState] = useState(list);
    const {register, handleSubmit} = useForm();

    const submit = useCallback(async (data: any) => {
        const {data: repositoryResponse} = await axios.post('/api/repository', {todo: 'add', repository: data.name});
        setRepositoryState([...repositoryState, ...repositoryResponse]);
    }, [repositoryState])

    const deleteFromList = useCallback((val: List) => () => {
        axios.post('/api/repository', {todo: 'delete', repository: `https://github.com/${val.name}`});
        setRepositoryState(repositoryState.filter(v => v.name !== val.name));
    }, [repositoryState])

    return (
        <div className="w-full max-w-2xl mx-auto p-6 space-y-12">
            <form className="flex items-center space-x-4" onSubmit={handleSubmit(submit)}>
                <input className="flex-grow p-3 border border-black/20 rounded-xl" placeholder="Add Git repository" type="text" {...register('name', {required: 'true'})} />
                <button className="flex-shrink p-3 border border-black/20 rounded-xl" type="submit">
                    Add
                </button>
            </form>
            <div className="divide-y-2 divide-gray-300">
                {repositoryState.map(val => (
                    <div key={val.name} className="space-y-4">
                        <div className="flex justify-between items-center py-10">
                            <h2 className="text-xl font-bold">{val.name}</h2>
                            <button className="p-3 border border-black/20 rounded-xl bg-red-400" onClick={deleteFromList(val)}>Delete</button>
                        </div>
                        <div className="bg-white rounded-lg border p-10">
                            <div className="h-[300px]]">
                                <ChartComponent repository={val.list} />
                            </div>
                        </div>
                    </div>
                ))}
            </div>
        </div>
    )
}
您可以看到我們使用“nextjs/dynamic”來延遲載入元件。
我希望將來 NextJS 能為客戶端元件加入類似「使用延遲載入」的內容 😺
但是新星呢?來認識一下 Trigger.Dev!
每天加入新星星的最佳方法是執行 cron 請求來檢查新加入的星星並將其加入到我們的資料庫中。
不要使用 Vercel cron / GitHub 操作,或(上帝禁止)為此建立一個新伺服器。
我們可以使用 Trigger.DEV 直接與我們的 NextJS 應用程式搭配使用。
那麼就讓我們來設定一下吧!
註冊 Trigger.dev 帳號。
註冊後,建立一個組織並為您的工作選擇一個專案名稱。

選擇 Next.js 作為您的框架,並按照將 Trigger.dev 新增至現有 Next.js 專案的流程進行操作。

否則,請點選專案儀表板側邊欄選單上的「環境和 API 金鑰」。
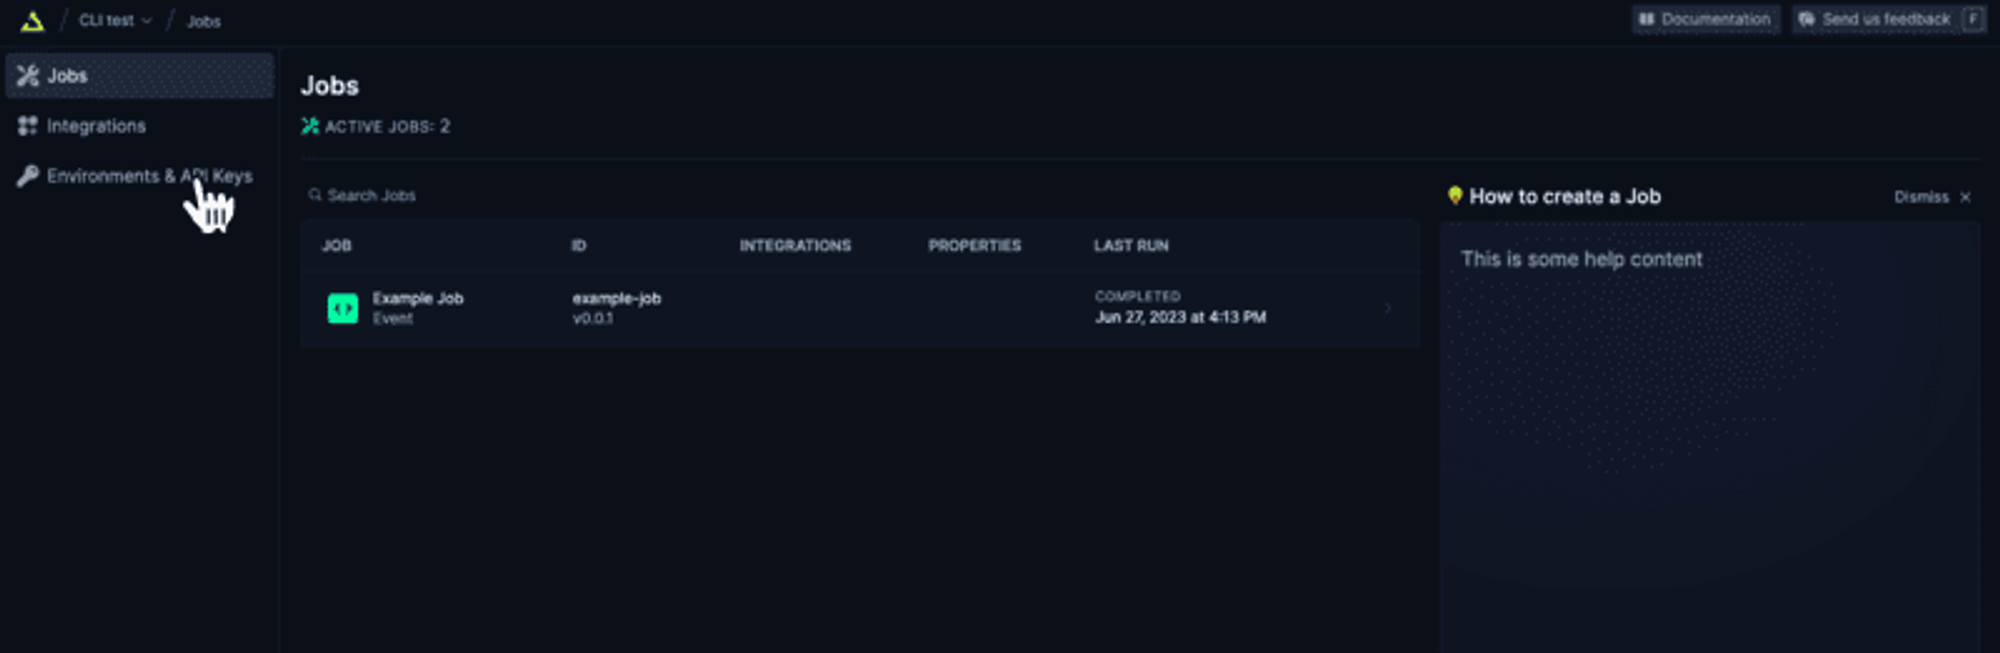
複製您的 DEV 伺服器 API 金鑰並執行下面的程式碼片段以安裝 Trigger.dev。
仔細按照說明進行操作。
npx @trigger.dev/cli@latest init在另一個終端中執行以下程式碼片段,在 Trigger.dev 和您的 Next.js 專案之間建立隧道。
npx @trigger.dev/cli@latest dev讓我們建立 TriggerDev 作業!
您將看到一個新建立的資料夾,名為“jobs”。
在那裡建立一個名為“sync.stars.ts”的新文件
新增以下程式碼:
import { cronTrigger, invokeTrigger } from "@trigger.dev/sdk";
import { client } from "@/trigger";
import { prisma } from "../../helper/prisma";
import axios from "axios";
import { z } from "zod";

// Your first job
// This Job will be triggered by an event, log a joke to the console, and then wait 5 seconds before logging the punchline.
client.defineJob({
  id: "sync-stars",
  name: "Sync Stars Daily",
  version: "0.0.1",
  // Run a cron every day at 23:00 AM
  trigger: cronTrigger({
    cron: "0 23 * * *",
  }),
  run: async (payload, io, ctx) => {
    const repos = await io.runTask("get-stars", async () => {
      // get all libraries and current amount of stars
      return await prisma.repository.groupBy({
        by: ["name"],
        _sum: {
          stars: true,
        },
      });
    });

    //loop through all repos and invoke the Job that gets the latest stars
    for (const repo of repos) {
      getStars.invoke(repo.name, {
        name: repo.name,
        previousStarCount: repo?._sum?.stars || 0,
      });
    }
  },
});

const getStars = client.defineJob({
  id: "get-latest-stars",
  name: "Get latest stars",
  version: "0.0.1",
  // Run a cron every day at 23:00 AM
  trigger: invokeTrigger({
    schema: z.object({
      name: z.string(),
      previousStarCount: z.number(),
    }),
  }),
  run: async (payload, io, ctx) => {
    const stargazers_count = await io.runTask("get-stars", async () => {
      const { data } = await axios.get(
          `https://api.github.com/repos/${payload.name}`,
          {
            headers: {
              authorization: `token ${process.env.TOKEN}`,
            },
          }
      );
      return data.stargazers_count as number;
    });

    await prisma.repository.upsert({
      where: {
        name_day_month_year: {
          name: payload.name,
          month: new Date().getMonth() + 1,
          year: new Date().getFullYear(),
          day: new Date().getDate(),
        },
      },
      update: {
          stars: stargazers_count - payload.previousStarCount,
      },
      create: {
        name: payload.name,
        stars: stargazers_count - payload.previousStarCount,
        month: new Date().getMonth() + 1,
        year: new Date().getFullYear(),
        day: new Date().getDate(),
      },
    });
  },
});
我們建立了一個名為“Sync Stars Daily”的新作業,該作業將在每天下午 23:00 執行 - 它在 cron 文本中的表示為:0 23 * * *
我們在資料庫中取得所有目前儲存庫,按名稱將它們分組,並對星星進行求和。
由於一切都在 Vercel 無伺服器上執行,因此我們可能會在檢查所有儲存庫時遇到逾時。
為此,我們將每個儲存庫傳送到不同的作業。
我們使用“invoke”建立新作業,然後在“獲取最新的星星”中處理它們
我們迭代所有新儲存庫並獲取當前的星星數量。
我們用舊的星星數量去除新的星星數量,得到今天的星星數量。
我們使用“prisma”將其新增至資料庫。沒有比這更簡單的了!
最後一件事是編輯“jobs/index.ts”並將內容替換為:
export * from "./sync.stars";你就完成了🥳
讓我們聯絡吧! 🔌
作為開源開發者,我們邀請您加入我們的社群,以做出貢獻並與維護者互動。請隨時造訪我們的 GitHub 儲存庫,貢獻並建立與 Trigger.dev 相關的問題。
本教學的源程式碼可在此處取得:
https://github.com/triggerdotdev/blog/tree/main/stars-monitor
感謝您的閱讀!
原文出處:https://dev.to/triggerdotdev/take-nextjs-to-the-next-level-create-a-github-stars-monitor-130a
1) --- 會變成分隔線(上一行必須是空白)
2) # 會變成一級標題
3) ## 會變成二級標題
4) ### 會變成三級標題
5) **粗體文字**會顯示粗體文字
6) ```當第一行與最後一行會顯示程式碼
7) 請搜尋 Markdown 語法,了解各種格式