

總結
在本教程中,我們將引導您逐步建立由AI 驅動的投資和儲蓄 Copilot ,以幫助您使用Maybe Finance 、Nextjs 和CopilotKit 🪁 規劃儲蓄和投資。

以下是我們將要介紹的內容:
-
為 AI Investment & Savings Copilot 建立 Next.js 專案。
-
將 CopilotKit UI 元件和 API 端點新增至您的應用程式。
-
整合 Maybe Finance API 以提供個人化的投資和儲蓄見解。
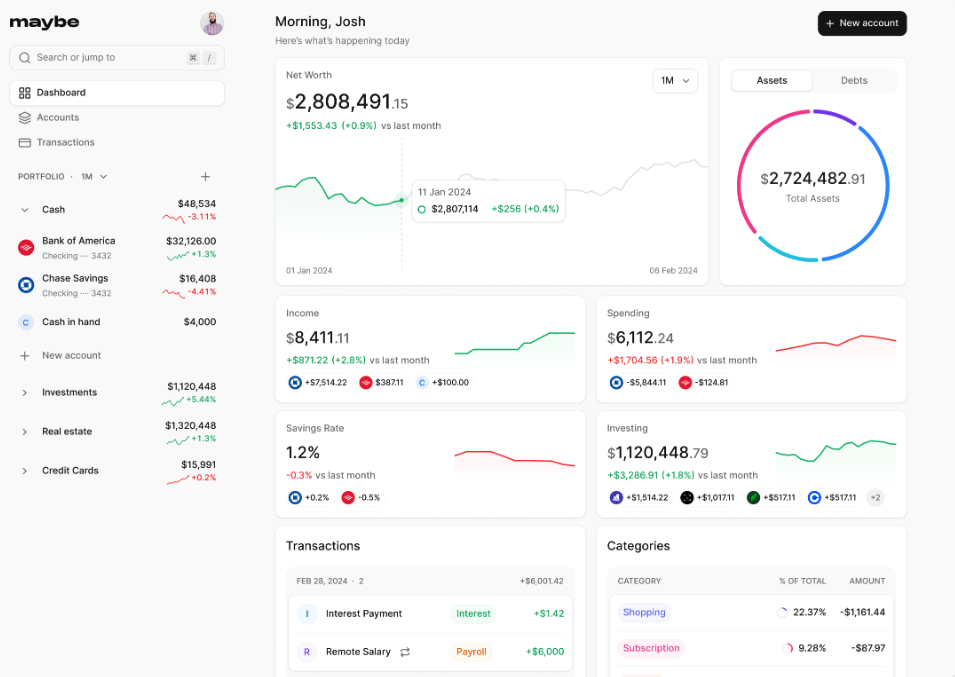
以下是人工智慧財務應用程式實施的預覽:
讓我們開始吧!
什麼是 CopilotKit
CopilotKit是一個用於建立使用者互動代理和副駕駛的全端框架。它為代理提供了使用應用程式的工具,並提供了功能豐富的 SDK ,支援各種 AI 副駕駛用例,包括情境感知、副駕駛動作和生成 UI 。

這使您可以定義副駕駛的角色,而無需處理複雜的設定或整合。
https://go.copilotkit.ai/copilotkit 查看 CopilotKit 的 GitHub ⭐️
Maybe Finance 是什麼?
Maybe Finance是個人理財的開源作業系統,提供安全管理、規劃和優化您的儲蓄和投資的工具。
在我們的專案中,我們將利用 Maybe Finance 的即時資料和分析來增強我們的副駕駛洞察力,幫助用戶優化他們的儲蓄和投資。
先決條件
在開始之前,請確保您已:
技術知識
-
對 Next.js 和 React 有中階理解
-
TypeScript 基礎知識
-
熟悉 MongoDB
所需帳戶
-
CopilotKit Cloud用於取得 AI 助理的 API 金鑰
-
用於資料庫託管的 MongoDB Atlas
-
用於 OAuth 驗證的 Google Cloud Platform 帳戶
開發環境
-
Node.js 18+ 和 npm
-
程式碼編輯器(建議使用 VS Code)
一旦您解決這個問題,我們就可以開始開發! 🚀
這是我們將要建立的 Web 應用程式

設定專案
1.建立一個新的 Next.js 專案
開啟終端機並執行此命令來建立一個新的 Next.js 專案
npx create-next-app@latest finance_ai --typescript
導航到專案目錄並啟動開發伺服器:
cd finance_ai
npm run dev您的應用程式現在應該在http://localhost:3000上執行。

2.安裝軟體包
接下來,讓我們安裝該專案必要的依賴項。這些包括:
-
CopilotKit 包。
-
Axios(取得 API)
-
Shadcn/ui(用於預先建置的 UI 元件)
-
Recharts(用於圖表表示)
執行以下命令來安裝它們:
npm install @copilotkit/react-ui @copilotkit/react-core axios然後,對於 Shadcn UI,執行此命令
npx shadcn@latest add button card input label badge tabs
注意:如果您使用 CopilotKit Cloud,則不需要包含執行時間包,因為 CopilotKit Cloud 會自動管理執行階段環境。但是,如果您自行託管後端,則可能需要手動處理執行時間配置。在本教程中,我們將重點介紹自託管,但請記住,CopilotKit Cloud 是簡化執行時間管理的選項。
現在,讓我們建立專案結構。我們將建立的關鍵文件和目錄包括:
-
src/app/ui/service/index.ts– 處理 API 呼叫以取得財務資料。 -
src/app/ui/components/FinanceCopilot.tsx我們人工智慧財務助理的主要 UI 元件。 -
src/app/lib/types/investment.ts為投資和儲蓄資料定義 TypeScript 類型。 -
src/app/lib/data/mockData.ts– 包含用於測試的財務資料。 -
src/app/api/copilotkit/route.ts– CopilotKit 的 API 端點。 -
src/app/api/finance/route.ts– 用於取得財務見解的 API。
專案結構
以下是我們的應用程式的檔案樹:

建構財務 AI 前端
1. 在layout.tsx中設定全域提供商
首先,請造訪cloud.copilotkit.ai以取得您的 CopilotKit Cloud 金鑰,以進行驗證和 API 存取。您可以使用 GitHub 或 Google 註冊。

然後,複製您的 API 金鑰並將其保存在您的.env檔案中。然後,更新您的全域佈局以使用 CopilotKit 提供者包裝您的應用程式。這使得副駕駛功能可在整個應用程式中使用。

現在已設定完畢,在此目錄中輸入以下程式碼finance_ai/app/layout.tsx
import { Metadata } from "next";
import { Geist, Geist_Mono } from "next/font/google";
import "./globals.css";
import { CopilotKit } from "@copilotkit/react-core";
import "@copilotkit/react-ui/styles.css";

// Load fonts for styling
const geistSans = Geist({
  variable: "--font-geist-sans",
  subsets: ["latin"],
});
const geistMono = Geist_Mono({
  variable: "--font-geist-mono",
  subsets: ["latin"],
});

// Metadata for SEO and display
export const metadata: Metadata = {
  title: "Coyamin - AI Investment Copilot",
  description: "Make informed financial decisions with AI-powered insights.",
};

// Retrieve the Copilot API key from environment variables
const copilotApiKey = process.env.NEXT_PUBLIC_COPILOTKIT_API_KEY;

export default function RootLayout({
  children,
}: Readonly<{ children: React.ReactNode }>) {
  return (
    <html lang="en">
      <body className={`${geistSans.variable} ${geistMono.variable} antialiased`}>
        {/* Conditionally wrap with CopilotKit if the API key is available */}
        {copilotApiKey ? (
          <CopilotKit publicApiKey={copilotApiKey}>{children}</CopilotKit>
        ) : (
          <>{children}</>
        )}
      </body>
    </html>
  );
}
在上面的程式碼中,我們首先匯入全域樣式和字體,確保整個應用程式的設計一致。
接下來,我們使用CopilotKit提供者包裝應用程式以使用 API 金鑰; <CopilotKitProvider apiKey={process.env.NEXT_PUBLIC_COPILOTKIT_API_KEY}><App /> </CopilotKitProvider>
此設定使得 AI 功能可在應用程式的所有元件中存取。
2. 建立登入和入門螢幕
若要建立登入表單元件,請在app/api/auth/[...nextauth]/route.ts中輸入以下程式碼:
import NextAuth from "next-auth";
import GoogleProvider from "next-auth/providers/google";
import { PrismaAdapter } from "@auth/prisma-adapter";
import { prisma } from "@/lib/db";

export const authOptions = {
  adapter: PrismaAdapter(prisma),
  providers: [
    GoogleProvider({
      clientId: process.env.GOOGLE_CLIENT_ID as string,
      clientSecret: process.env.GOOGLE_CLIENT_SECRET as string,
    }),
  ],
  callbacks: {
    async session({ session, user }) {
      if (session?.user) {
        session.user.id = user.id;
        session.user.isOnboarded = user.isOnboarded;
      }
      return session;
    },
  },
  pages: {
    signIn: "/",
  },
};

const handler = NextAuth(authOptions);
export { handler as GET, handler as POST };
身份驗證頁面分為兩個選項卡:登入和註冊。每個表單都使用標記的輸入欄位和一個按鈕,在驗證成功後會重新導向到入職頁面。

入職頁面
入職頁面有一個聊天介面,作為入職流程的一部分詢問財務目標、風險承受能力和投資偏好等問題。
在app/onboarding目錄中,建立一個page.tsx檔案並輸入以下程式碼:
"use client"

import { useState, useEffect } from "react"
import { useRouter } from "next/navigation"
import { Button } from "@/components/ui/button"
import { Card, CardContent } from "@/components/ui/card"
import { Badge } from "@/components/ui/badge"
import { ArrowRight, Bot, User, Sparkles } from "lucide-react"

interface Message {
  type: "bot" | "user"
  content: string
  options?: string[]
}

export default function OnboardingChat() {
  const router = useRouter()
  const [messages, setMessages] = useState<Message[]>([
    {
      type: "bot",
      content: "Welcome to Coyamin! I'm your AI Investment & Savings Copilot. Let's set up your financial profile. What are your main financial goals?",
      options: [
        "Short-term savings (1-2 years)",
        "Long-term investments (5+ years)",
        "Retirement planning",
        "Emergency fund",
        "Wealth building",
      ],
    },
  ])
  const [currentStep, setCurrentStep] = useState(0)
  const [selectedOptions, setSelectedOptions] = useState<Record<number, string[]>>({})
在這裡,我們匯入 Shadcn UI 按鈕、卡片和徽章元件,並使用import { useState, useEffect } from "react".我們還包含一個OnboardingChat()函數,其中包含一條訊息來歡迎用戶並詢問他們的財務目標,他們可以從以下選項中進行選擇:

處理使用者選擇和聊天流程
當您選擇選項時,聊天機器人會動態回應並完成入職的不同階段。我們還提供了一個下拉式選單來解釋每個風險承受程度:
  // Define the steps of the onboarding process
  const steps = [
    { title: "Financial Goals", progress: 33 },
    { title: "Risk Tolerance", progress: 66 },
    { title: "Investment Preferences", progress: 100 },
  ];

  const handleOptionSelect = (option: string) => {
    setMessages((prev) => [...prev, { type: "user", content: option }]);
    setSelectedOptions((prev) => ({
      ...prev,
      [currentStep]: [...(prev[currentStep] || []), option],
    }));

    setTimeout(() => {
      if (currentStep === 0) {
        setMessages((prev) => [
          ...prev,
          {
            type: "bot",
            content: "Great choice! Now, what's your risk tolerance level?",
            options: ["Conservative (Low Risk)", "Moderate (Medium Risk)", "Aggressive (High Risk)"],
          },
        ]);
        setCurrentStep(1);
      } else if (currentStep === 1) {
        setMessages((prev) => [
          ...prev,
          {
            type: "bot",
            content: "Perfect! Finally, which investment types interest you? (You can select multiple)",
            options: ["Stocks", "ETFs", "Bonds", "Crypto", "Real Estate", "Mutual Funds"],
          },
        ]);
        setCurrentStep(2);
      } else if (currentStep === 2) {
        setMessages((prev) => [
          ...prev,
          {
            type: "bot",
            content: "Thanks! I'll now create your personalized investment profile based on your preferences.",
          },
        ]);
        setTimeout(() => {
          router.push("/dashboard");
        }, 1500);
      }
    }, 500);
  };
3. 建立儀表板
儀表板顯示財務概覽和人工智慧產生的建議。在app/dashboard/page.tsx中輸入以下程式碼片段
將儀表板包裝器與 CopilotKit 側邊欄集成
這會用CopilotSidebar元件包裝整個儀表板,並為儀表板內容設定主彈性容器。
"use client"

import { CopilotSidebar } from "@copilotkit/react-ui";

export default function DashboardPage() {
  return (
    <CopilotSidebar
      defaultOpen={true}
      instructions="You are assisting the user as best as you can. Answer in the best way possible given the data you have."
      labels={{
        title: "Coyamin Assistant",
        initial: "How can I help you today?",
      }}
    >
      {/* Main container: fills the available viewport height */}
      <div className="flex h-[calc(100vh-3.5rem)]">
        <div className="flex-1 p-4 sm:p-6 lg:p-8 overflow-auto">
          {/* Dashboard content goes here */}
        </div>
      </div>
    </CopilotSidebar>
  );
}
CopilotSidebar提供了一個持久的 AI 聊天介面,而彈性容器(具有flex h-[calc(100vh-3.5rem)]的div )確保儀表板佔據視口的整個高度減去標題偏移量。
此外,內部容器( <div className="flex-1 p-4 sm:p-6 lg:p-8 overflow-auto"> )已填入並可捲動,可容納概覽和圖表元件。
在儀表板中實作概覽卡
儀表板的「概覽」部分定義了一個卡片網格,每個卡片顯示一個關鍵的財務指標,例如總餘額、投資、每月儲蓄和風險評分。
仍然在page.tsx檔案中,輸入以下程式碼
<div className="grid gap-4 sm:grid-cols-2 lg:grid-cols-4">
  <Card>
    <CardHeader className="flex flex-row items-center justify-between space-y-0 pb-2">
      <CardTitle className="text-sm font-medium">Total Balance</CardTitle>
    </CardHeader>
    <CardContent>
      <div className="text-xl sm:text-2xl font-bold">$45,231.89</div>
      <p className="text-xs sm:text-sm text-muted-foreground">+20.1% from last month</p>
    </CardContent>
  </Card>
  <Card>
    <CardHeader className="flex flex-row items-center justify-between space-y-0 pb-2">
      <CardTitle className="text-sm font-medium">Investments</CardTitle>
    </CardHeader>
    <CardContent>
      <div className="text-xl sm:text-2xl font-bold">$32,123.45</div>
      <p className="text-xs sm:text-sm text-muted-foreground">78 active positions</p>
    </CardContent>
  </Card>
  <Card>
    <CardHeader className="flex flex-row items-center justify-between space-y-0 pb-2">
      <CardTitle className="text-sm font-medium">Monthly Savings</CardTitle>
    </CardHeader>
    <CardContent>
      <div className="text-xl sm:text-2xl font-bold">$2,400.00</div>
      <p className="text-xs sm:text-sm text-muted-foreground">+12% from last month</p>
    </CardContent>
  </Card>
  <Card>
    <CardHeader className="flex flex-row items-center justify-between space-y-0 pb-2">
      <CardTitle className="text-sm font-medium">Risk Score</CardTitle>
    </CardHeader>
    <CardContent>
      <div className="text-xl sm:text-2xl font-bold">7.2/10</div>
      <p className="text-xs sm:text-sm text-muted-foreground">Moderate risk profile</p>
    </CardContent>
  </Card>
</div>每張Card由標籤的標題( CardHeader和CardTitle )和指標值和描述的內容( CardContent )組成。網格佈局( grid gap-4 sm:grid-cols-2 lg:grid-cols-4 )是為了確保卡片間距均勻且反應迅速。
使用 Rechart 新增圖表
我們使用 Recharts 在應用程式中建立兩種類型的圖表:用於作品集概覽的折線圖和用於資產配置的圓餅圖。這些圖表是為了清楚顯示財務趨勢和資產分佈。有關 Recharts 的更多詳細訊息,請查看Recharts 文件。
執行此命令來安裝 Recharts:
npm install recharts然後將此程式碼新增至儀表板目錄中的page.tsx檔案:
import {
  LineChart,
  Line,
  XAxis,
  YAxis,
  CartesianGrid,
  Tooltip,
  ResponsiveContainer,
  PieChart,
  Pie,
  Cell,
} from "recharts";

const chartData = [
  { name: "Jan", value: 4000 },
  { name: "Feb", value: 3000 },
  { name: "Mar", value: 2000 },
  { name: "Apr", value: 2780 },
  { name: "May", value: 1890 },
  { name: "Jun", value: 2390 },
];

const pieData = [
  { name: "Stocks", value: 400 },
  { name: "Bonds", value: 300 },
  { name: "Real Estate", value: 300 },
  { name: "Crypto", value: 200 },
];

const COLORS = ["#0088FE", "#00C49F", "#FFBB28", "#FF8042"];

export default function ChartsSection() {
  return (
    <div className="grid gap-4 sm:grid-cols-1 md:grid-cols-2 lg:grid-cols-7 mt-4">
      {/* Portfolio Overview - Line Chart */}
      <div className="col-span-1 md:col-span-2 lg:col-span-4">
        <div className="border rounded shadow p-4">
          <h3 className="text-lg font-semibold mb-2">Portfolio Overview</h3>
          <ResponsiveContainer width="100%" height="250px">
            <LineChart data={chartData}>
              <CartesianGrid strokeDasharray="3 3" />
              <XAxis dataKey="name" />
              <YAxis />
              <Tooltip />
              <Line type="monotone" dataKey="value" stroke="#8884d8" />
            </LineChart>
          </ResponsiveContainer>
        </div>
      </div>

      {/* Asset Allocation - Pie Chart */}
      <div className="col-span-1 md:col-span-2 lg:col-span-3">
        <div className="border rounded shadow p-4">
          <h3 className="text-lg font-semibold mb-2">Asset Allocation</h3>
          <ResponsiveContainer width="100%" height="250px">
            <PieChart>
              <Pie data={pieData} innerRadius={50} outerRadius={80} paddingAngle={5} dataKey="value">
                {pieData.map((entry, index) => (
                  <Cell key={`cell-${index}`} fill={COLORS[index % COLORS.length]} />
                ))}
              </Pie>
              <Tooltip />
            </PieChart>
          </ResponsiveContainer>
        </div>
      </div>
    </div>
  );
}在上面的程式碼中,折線圖(作品集概覽)使用ResponsiveContainer來確保圖表完全回應。 LineChart元件使用CartesianGrid繪製資料以供視覺參考,而XAxis和YAxis提供標籤以提高可讀性。以這種模組化方式使用 Recharts 可以讓程式碼保持清晰且易於維護。
然後,更新pages/index.tsx以在主應用程式中顯示儀表板。
import Dashboard from '../components/Dashboard';

export default function Home() {
  return (
    <main className="min-h-screen bg-gray-100 p-10">
      <Dashboard />
    </main>
  );
}
4.設定後端端點
CopilotKit 端點
在pages/api/copilotkit.ts中,設定後端端點以處理來自 Copilot UI 的請求。此端點將請求轉發到我們的 AI 引擎(並與 Maybe Finance 互動):
import { NextApiRequest, NextApiResponse } from 'next';
import { copilotRuntimeNextJSAppRouterEndpoint } from '@copilotkit/runtime';
可能是財務 API 端點
現在,讓我們將 Maybe Finance 與我們的 Coyamin 應用程式整合。我們將建立多個 API 路由,充當前端和 Maybe Finance API 之間的安全中介。
首先,設定環境變數來儲存我們的 API 憑證:
API_KEY=your_maybe_finance_api_key
BASE_URL=https://api.synthfinance.com
我們將建立一系列 API 路由,作為我們的財務資料管道。每條路線將處理特定類型的財務資料:
貨幣資訊API
這會為聊天過程中所需的任何資訊獲取不同的貨幣。在app/api/rates/live目錄中建立一個route.ts檔案:
import { NextResponse } from "next/server";
import axios from "axios";

const API_KEY = process.env.API_KEY;
const BASE_URL = process.env.BASE_URL;

export async function GET(req: Request) {
  try {
    const { searchParams } = new URL(req.url);
    const to = searchParams.get("to");

    if (!to) {
      return NextResponse.json(
        { message: "Missing required query parameter: to" },
        { status: 400 }
      );
    }

    const response = await axios.get(`${BASE_URL}/rates/live`, {
      params: { to },
      headers: {
        Authorization: `Bearer ${API_KEY}`,
        Accept: "application/json",
      },
    });

    return NextResponse.json(response.data, { status: 200 });
  } catch (error: unknown) {
    if(error instanceof Error) {
      return NextResponse.json(
        { message: "Error fetching live rates", error: error.message },
        { status: 500 }
      );
    }
    return NextResponse.json(
      { message: "Error fetching live rates"},
      { status: 500 }
    );
  }
}
這個端點可讓您查看貨幣價值和投資機會隨時間的變化情況,以便做出資料驅動的決策。
5.執行應用程式
啟動你的開發伺服器:
npm run dev在瀏覽器中開啟http://localhost:3000 。您應該會看到帶有 Copilot 側邊欄的儀表板。登入、完成入會聊天,然後與副駕駛互動以獲取由 CopilotKit 和 Maybe Finance 提供的財務洞察。
註冊頁面

入職

最終成果是一個使用 CopilotKit 功能齊全的 AI 驅動財務應用程式:
若要從GitHub克隆專案並在本地執行,請打開終端機並執行以下命令:
git clone https://github.com/Tabintel/finance_ai.git然後執行npm install來安裝專案所需的所有依賴項,並npm run dev來執行 Web 應用程式。
概括
在本指南中,我們介紹了使用CopilotKit和Maybe Finance建立 AI 驅動的投資和儲蓄 Copilot 的過程,以幫助用戶有效地規劃財務。
雖然我們已經介紹了主要功能,但這只是個開始 - CopilotKit 支援無數由 AI 驅動的用例,從個人化的財務助理到金融科技應用程式中的智慧自動化。
點擊此處查看 GitHub 上的完整原始碼
在Twitter上關注 CopilotKit 並打招呼,如果您想建立一些很酷的東西,請加入Discord社群。
1) --- 會變成分隔線(上一行必須是空白)
2) # 會變成一級標題
3) ## 會變成二級標題
4) ### 會變成三級標題
5) **粗體文字**會顯示粗體文字
6) ```當第一行與最後一行會顯示程式碼
7) 請搜尋 Markdown 語法,了解各種格式