🔧 阿川の電商水電行

介紹
過去一年,生成式人工智慧一直是科技領域的熱門話題。每個人都在使用它來建造很酷的專案。谷歌有自己的生成人工智慧,稱為 Gemini。
最近,Google 為 Gemini 開發者推出了 API。它附帶了幾個庫和框架,開發人員可以使用它們將其合併到他們的應用程式中。
在本文中,我們將建立一個簡單的 Node.js 應用程式並將 Google Gemini 整合到其中。我們將使用Google Gemini SDK 。
那麼,事不宜遲,讓我們開始吧!
什麼是雙子座?

Google Gemini 是由 Google AI 開發的強大且多方面的 AI 模型。 Gemini 不僅處理文字;也處理文字。它可以理解和操作各種格式,如程式碼、音訊、圖像和視訊。這為您的 Node.js 專案帶來了令人興奮的可能性。
專案設定:
1.建立Node.js專案:
要啟動我們的專案,我們需要設定 Node.js 環境。那麼,讓我們建立一個節點專案。在終端機中執行以下命令。
npm init這將初始化一個新的 Node.js 專案。
2.安裝依賴項:
現在,我們將安裝專案所需的依賴項。
npm install express body-parser @google/generative-ai dotenv這將安裝以下軟體包:
-
express:流行的 Node.js Web 框架
-
body-parser:用來解析請求體的中介軟體
-
@google/generative-ai:用於存取 Gemini 模型的套件
-
dotenv:從 .env 檔案載入環境變數
3.設定環境變數:
接下來,我們將建立一個.env資料夾來安全地儲存 API 憑證等敏感資訊。
//.env
API_KEY=YOUR_API_KEY
PORT=30004.取得API金鑰:
在使用 Gemini 之前,我們需要從 Google Developers Console 設定 API 憑證。為此,我們需要註冊 Google 帳戶並建立 API 金鑰。
登入後,前往https://makersuite.google.com/app/apikey 。我們會得到這樣的結果:
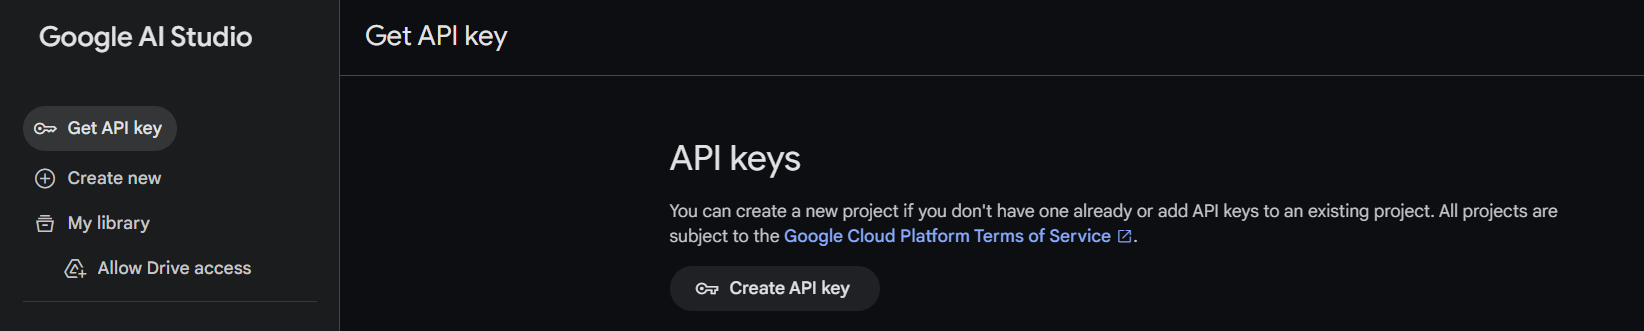
然後我們將點擊“建立 API 金鑰”按鈕。這將產生一個唯一的 API 金鑰,我們將使用它來驗證對 Google Generative AI API 的請求。
要測試您的 API,您可以執行以下 Curl 命令:
捲曲\\

-H '內容類型:application/json' \\

-d '{"contents":\[{"parts":\[{"text":"寫一個關於魔法背包的故事"}\]}\]}' \\

-X POST https://generativelanguage.googleapis.com/v1beta/models/gemini-pro:generateContent?key=YOUR\_API\_KEY
將
YOUR_API_KEY替換為我們先前獲得的實際 API 金鑰。
取得 API 金鑰後,我們將使用 API 金鑰更新.env檔。
5. 建立 Express 伺服器:
現在,我們將在根目錄中建立一個index.js檔案並設定一個基本的express 伺服器。請看下面的程式碼:
const express = require("express");
const dotenv = require("dotenv");

dotenv.config();

const app = express();
const port = process.env.PORT;

app.get("/", (req, res) => {
  res.send("Hello World");
});

app.listen(port, () => {
  console.log(`Server running on port ${port}`);
});在這裡,我們使用“dotenv”套件從.env檔案存取連接埠號碼。
在專案的頂部,我們使用dotenv.config()載入環境變數,使其可以在整個檔案中存取。
6. 執行專案:
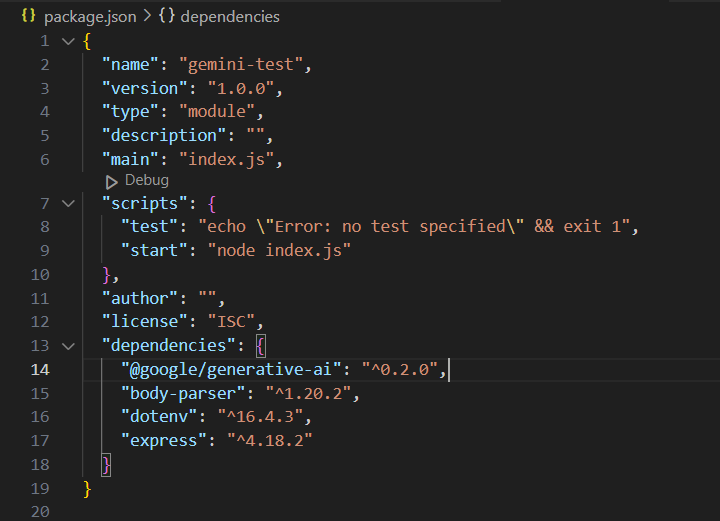
在此步驟中,我們將向package.json檔案新增一個啟動腳本,以輕鬆執行我們的專案。
因此,將以下腳本新增至 package.json 檔案中。
"scripts": {
  "start": "node index.js"
}
package.json 檔案應如下所示:
要檢查一切是否正常,讓我們使用以下命令執行該專案:
npm run start這將啟動 Express 伺服器。現在如果我們造訪這個 URL http://localhost:3000/我們會得到:
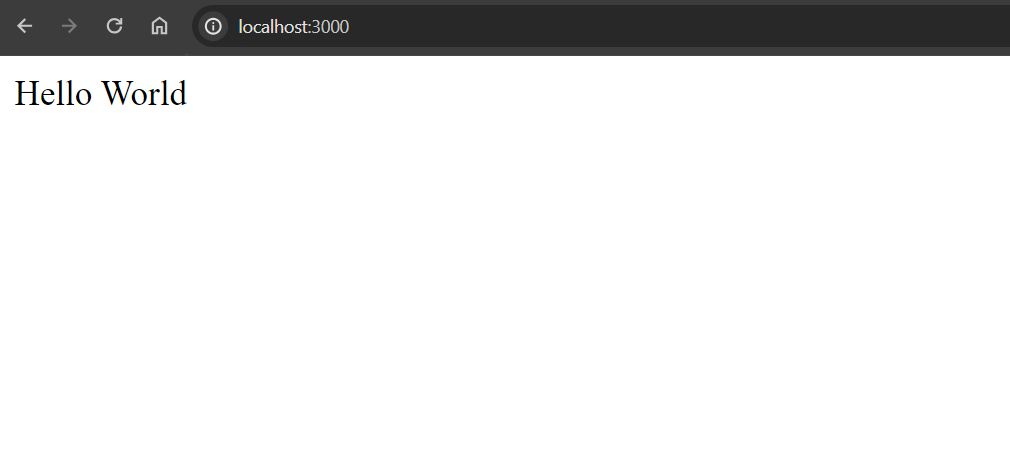
驚人的!專案設定已完成並且執行完美。接下來,我們將在下一節中將 Gemini 加入我們的專案中
新增Google雙子座:
1. 設定路由和中介軟體:
要將 Gemini 新增至我們的專案中,我們將建立一個/generate路由,以便與 Gemini AI 進行通訊。
為此,將以下程式碼新增至index.js檔案。
const bodyParser = require("body-parser");
const { generateResponse } = require("./controllers/index.js");

//middleware to parse the body content to JSON
app.use(bodyParser.json());

app.post("/generate", generateResponse);在這裡,我們使用body-parser中間件將內容解析為 JSON 格式。
2.設定Google Generative AI:
現在,我們將建立一個控制器資料夾,並在其中建立一個index.js檔案。在這裡,我們將建立一個新的控制器函數來處理上面程式碼中聲明的生成路由。
const { GoogleGenerativeAI } = require("@google/generative-ai");
const dotenv = require("dotenv");

dotenv.config();

// GoogleGenerativeAI required config
const configuration = new GoogleGenerativeAI(process.env.API_KEY);

// Model initialization
const modelId = "gemini-pro";
const model = configuration.getGenerativeModel({ model: modelId });
在這裡,我們透過傳遞環境變數中的 API 金鑰來為 Google Generative AI API 建立一個配置物件。
然後,我們透過向配置物件的getGenerativeModel方法提供模型 ID(“gemini-pro”)來初始化模型。
型號配置:
我們也可以依照自己的方便配置模型參數
這些參數值控制模型如何產生回應。
例子:
常量產生配置 = {

停止序列:\[“紅色”\],

最大輸出令牌:200,

溫度:0.9,

頂部P:0.1,

頂級K:16,

};

const model = configuration.getGenerativeModel({ model: modelId, GenerationConfig });
安全設定:
我們可以使用安全設定來防止有害的反應。預設情況下,安全性設定配置為阻止在各個維度上具有中等到高可能性不安全的內容。
這是一個例子:
const { HarmBlockThreshold, HarmCategory } = require("@google/generative-ai");

常量安全設定 = \[

{
category: HarmCategory.HARM_CATEGORY_HARASSMENT,
threshold: HarmBlockThreshold.BLOCK_ONLY_HIGH,
},

{
category: HarmCategory.HARM_CATEGORY_HATE_SPEECH,
threshold: HarmBlockThreshold.BLOCK_MEDIUM_AND_ABOVE,
},

\];

const model = genAI.getGenerativeModel({ model: "MODEL\_NAME", safetySettings });
透過這些安全設置,我們可以透過最大限度地減少有害內容生成的可能性來增強安全性。
3. 管理對話歷史記錄:
為了追蹤對話歷史記錄,我們建立了一個陣列history並將其從控制器檔案中匯出:
export const history = [];4.實現控制器功能:
現在,我們將編寫一個控制器函數generateResponse來處理產生路由(/generate)並產生對使用者請求的回應。
/**
 * Generates a response based on the given prompt.
 * @param {Object} req - The request object.
 * @param {Object} res - The response object.
 * @returns {Promise} - A promise that resolves when the response is sent.
 */
export const generateResponse = async (req, res) => {
  try {
    const { prompt } = req.body;

    const result = await model.generateContent(prompt);
    const response = await result.response;
    const text = response.text();
    console.log(text);

    history.push(text);
    console.log(history);

    res.send({ response: text });
  } catch (err) {
    console.error(err);
    res.status(500).json({ message: "Internal server error" });
  }
};在這裡,我們從請求正文中獲取提示,並使用model.generateContent方法根據提示產生回應。
為了追蹤響應,我們將響應推送到歷史陣列。
5. 查看回覆紀錄:
現在,我們將建立一條路線來檢查我們的回應歷史記錄。該端點傳回history陣列。
將簡單程式碼加入./index.js資料夾中。
app.get("/generate", (req, res) => {
  res.send(history);
});
我們就完成了!
6.執行專案:
現在,我們必須檢查我們的應用程式是否正常運作!
讓我們使用以下命令來執行我們的專案:
npm run start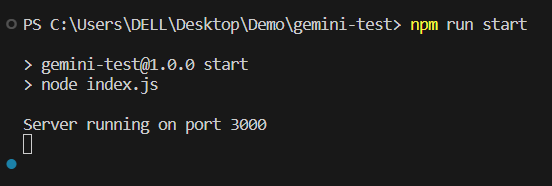
沒有錯誤!感謝上帝! :) 它運作正常。
7. 檢查功能
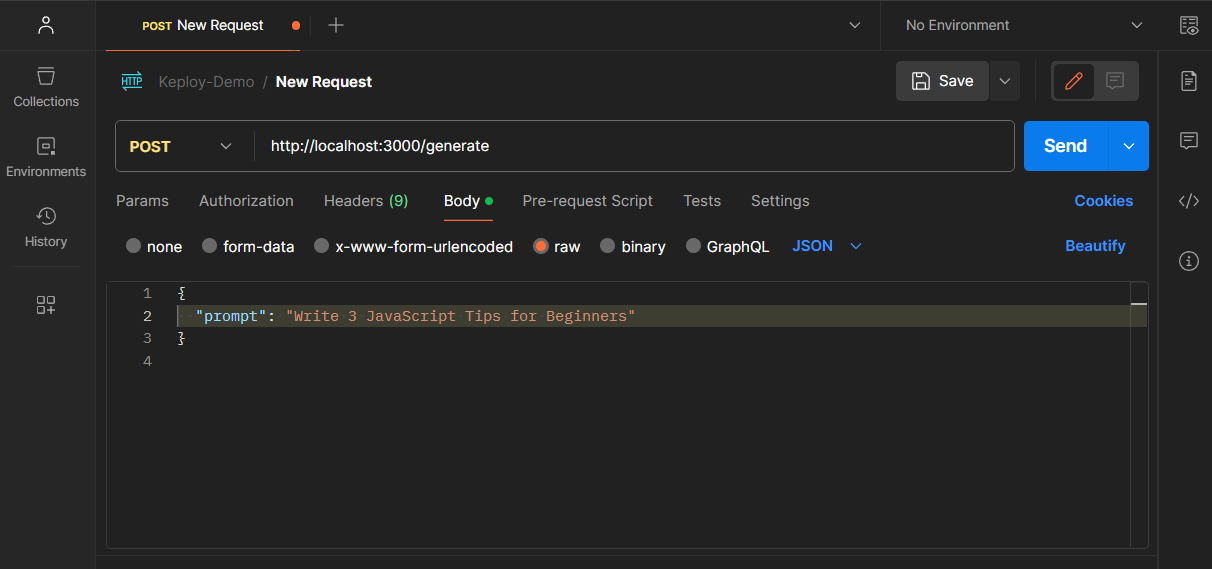
接下來,我們將使用 Postman 發出 Post 請求來驗證我們的控制器功能。
我們將使用以下 JSON 負載向http://localhost:3000/generate發送 POST 請求:
{
  "prompt": "Write 3 Javascript Tips for Beginners"
}
我們得到了回應:
{
    "response": "1. **Use console.log() for Debugging:**\n   - console.log() is a useful tool for debugging your JavaScript code. It allows you to inspect the values of variables and expressions, and to see how your code is executing. This can be especially helpful when you encounter errors or unexpected behavior in your program.\n\n2. **Learn the Basics of Data Types:**\n   - JavaScript has several built-in data types, including strings, numbers, booleans, and objects. Understanding the properties and behaviors of each data type is crucial for writing effective code. For instance, strings can be manipulated using string methods, while numbers can be used in mathematical operations.\n\n3. **Use Strict Mode:**\n   - Strict mode is a way to opt-in to a restricted and secure subset of JavaScript. It helps you to write more secure and reliable code, as it throws errors for common mistakes that would otherwise go unnoticed in regular JavaScript mode. To enable strict mode, simply add \"use strict;\" at the beginning of your JavaScript file or module."
}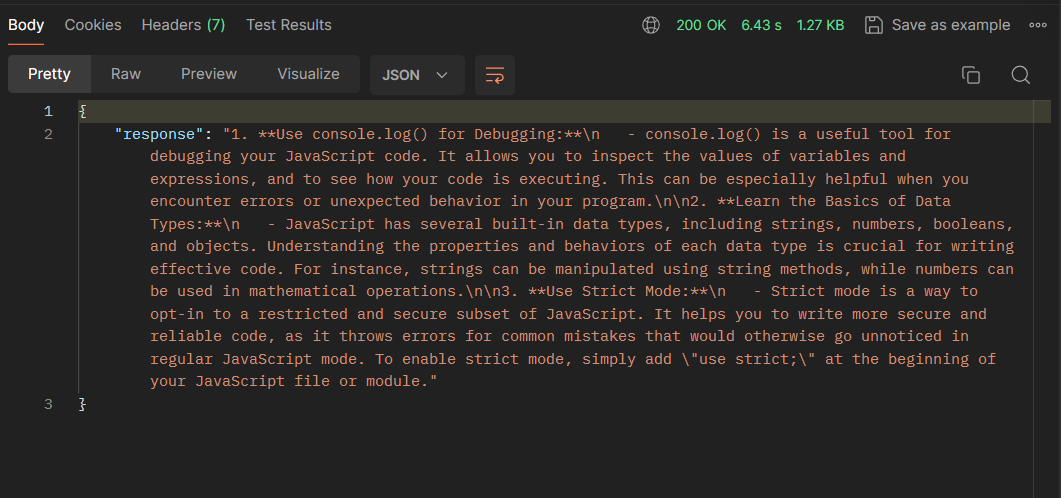
偉大的!我們的 Gemini AI 整合正在按預期工作!
此外,我們可以造訪http://localhost:3000/generate 的歷史記錄端點來查看對話歷史記錄。
這樣,我們就將 Gemini AI 整合到了 Node.js 應用程式中。在接下來的文章中,我們將探索 Gemini AI 的更多用例。
到那時,請繼續關注!
結論
如果您發現這篇部落格文章有幫助,請考慮與可能受益的其他人分享。您也可以關注我,以了解更多有關 Javascript、React 和其他 Web 開發主題的內容。
要贊助我的工作,請存取: Arindam 的贊助頁面並探索各種贊助選項。
在Twitter 、 LinkedIn 、 Youtube和GitHub上與我聯絡。
感謝您的閱讀:)

原文出處:https://dev.to/arindam_1729/how-to-use-google-gemini-with-nodejs-2d39
1) --- 會變成分隔線(上一行必須是空白)
2) # 會變成一級標題
3) ## 會變成二級標題
4) ### 會變成三級標題
5) **粗體文字**會顯示粗體文字
6) ```當第一行與最後一行會顯示程式碼
7) 請搜尋 Markdown 語法,了解各種格式