

はじめまして。株式会社PRUM 的工程師人見。
我平時會整理並分享在程式學習與實務工作中,
容易卡關的重點,以及工作上常出現的「落差」。
希望能幫助到某些人。
9成沒有工程師經驗的人會卡關的「第一道牆」
但還是想做出應用程式 - 來試著在 30 分鐘內做出一個應用程式吧 -

前言
前一篇我們談了「應用程式到底是什麼?」
這次要實際做出一個應用程式。不過,
- 安裝 Java
- 安裝 Python
- Docker
- AWS
這類麻煩的準備都不需要。
只要有 Google 帳號就可以了。
先來體驗看看「原來我也能做出應用程式!」
這件事吧。
這次要做的內容
這次要做的是這個。
- 參加
- 不參加
可以登錄的簡單應用程式。
登錄的內容會保存到試算表中。
完成示意
【完成畫面截圖】

STEP1 建立試算表
首先開啟 Google。
【圖片① Google 首頁畫面】選擇右上角的應用程式清單。

【圖片② 應用程式清單】選擇試算表。

【圖片③ 試算表首頁】選擇「空白」。

【圖片④ 空白工作表】

STEP2 幫試算表命名
【圖片⑤ 變更標題】命名為 參加管理應用程式。

STEP3 開啟 Apps Script
從上方選單選擇
擴充功能 → Apps Script。
【圖片⑥】

接著會顯示如下畫面。
【圖片⑦】

STEP4 撰寫程式
【圖片⑧】刪除預先存在的程式碼,貼上以下程式碼。

Code.gs ← 要貼上的程式碼在這裡
點此展開```
const SHEET_NAME_RESPONSES = '回答一覧';
const SHEET_NAME_MEMBERS = 'メンバー一覧';
const EVENT_NAME = '本日の朝会';
function doGet() {
setupSheets_();
return HtmlService.createHtmlOutputFromFile('index')
.setTitle('參加・不參加確認應用程式');
}
function submitAnswer(data) {
setupSheets_();
const name = String(data.name || '').trim();
const status = String(data.status || '').trim();
const memo = String(data.memo || '').trim();
if (!name) {
throw new Error('請輸入姓名。');
}
if (status !== '參加' && status !== '不參加') {
throw new Error('請選擇參加或不參加。');
}
registerMemberIfNeeded(name);
upsertResponse(name, status, memo);
return getSummary();
}
function getSummary() {
setupSheets_();
const members = getMembers();
const responses = getLatestResponses();
const joined = [];
const absent = [];
const unanswered = [];
members.forEach(name => {
const response = responses[name];
if (!response) {
  unanswered.push(name);
  return;
}

if (response.status === '參加') {
  joined.push({
    name: name,
    memo: response.memo,
    updatedAt: response.updatedAt
  });
  return;
}

if (response.status === '不參加') {
  absent.push({
    name: name,
    memo: response.memo,
    updatedAt: response.updatedAt
  });
  return;
}
});
return {
eventName: EVENT_NAME,
total: members.length,
answered: joined.length + absent.length,
joinedCount: joined.length,
absentCount: absent.length,
unansweredCount: unanswered.length,
joined: joined,
absent: absent,
unanswered: unanswered,
generatedAt: Utilities.formatDate(new Date(), 'Asia/Tokyo', 'yyyy/MM/dd HH:mm')
};
}
function sendSlackSummary() {
const webhookUrl = PropertiesService.getScriptProperties().getProperty('SLACK_WEBHOOK_URL');
if (!webhookUrl) {
throw new Error('尚未在腳本屬性中設定 SLACK_WEBHOOK_URL。');
}
const summary = getSummary();
const message = buildSlackMessage_(summary);
const payload = {
text: message
};
const options = {
method: 'post',
contentType: 'application/json',
payload: JSON.stringify(payload),
muteHttpExceptions: true
};
const response = UrlFetchApp.fetch(webhookUrl, options);
const statusCode = response.getResponseCode();
if (statusCode < 200 || statusCode >= 300) {
throw new Error('Slack 通知失敗。status=' + statusCode + ' body=' + response.getContentText());
}
}
function createDailySlackTrigger() {
deleteDailySlackTriggers_();
ScriptApp.newTrigger('sendSlackSummary')
.timeBased()
.everyDays(1)
.atHour(8)
.create();
}
function deleteDailySlackTriggers_() {
const triggers = ScriptApp.getProjectTriggers();
triggers.forEach(trigger => {
if (trigger.getHandlerFunction() === 'sendSlackSummary') {
ScriptApp.deleteTrigger(trigger);
}
});
}
function buildSlackMessage_(summary) {
const joinedNames = summary.joined.length > 0
? summary.joined.map(item => '・' + item.name).join('\n')
: '無';
const absentNames = summary.absent.length > 0
? summary.absent.map(item => '・' + item.name).join('\n')
: '無';
const unansweredNames = summary.unanswered.length > 0
? summary.unanswered.map(name => '・' + name).join('\n')
: '無';
return [
'【參加確認】' + summary.eventName,
'',
'目前 ' + summary.total + ' 人中,已有 ' + summary.answered + ' 人回覆。',
'',
'參加:' + summary.joinedCount + ' 人',
'不參加:' + summary.absentCount + ' 人',
'未回覆:' + summary.unansweredCount + ' 人',
'',
'■ 參加',
joinedNames,
'',
'■ 不參加',
absentNames,
'',
'■ 未回覆',
unansweredNames,
'',
'尚未回覆的人,請確認參加狀況。'
].join('\n');
}
function setupSheets_() {
const spreadsheet = SpreadsheetApp.getActiveSpreadsheet();
let responsesSheet = spreadsheet.getSheetByName(SHEET_NAME_RESPONSES);
if (!responsesSheet) {
responsesSheet = spreadsheet.insertSheet(SHEET_NAME_RESPONSES);
responsesSheet.appendRow(['更新時間', '姓名', '回答', '備註']);
}
let membersSheet = spreadsheet.getSheetByName(SHEET_NAME_MEMBERS);
if (!membersSheet) {
membersSheet = spreadsheet.insertSheet(SHEET_NAME_MEMBERS);
membersSheet.appendRow(['姓名']);
membersSheet.appendRow(['佐藤']);
membersSheet.appendRow(['鈴木']);
membersSheet.appendRow(['田中']);
membersSheet.appendRow(['山田']);
membersSheet.appendRow(['高橋']);
}
}
function getMembers_() {
const sheet = SpreadsheetApp.getActiveSpreadsheet().getSheetByName(SHEET_NAME_MEMBERS);
const values = sheet.getDataRange().getValues();
return values
.slice(1)
.map(row => String(row[0] || '').trim())
.filter(name => name);
}
function getLatestResponses_() {
const sheet = SpreadsheetApp.getActiveSpreadsheet().getSheetByName(SHEET_NAME_RESPONSES);
const values = sheet.getDataRange().getValues();
const responses = {};
values.slice(1).forEach(row => {
const updatedAt = row[0];
const name = String(row[1] || '').trim();
const status = String(row[2] || '').trim();
const memo = String(row[3] || '').trim();
if (!name) {
  return;
}

responses[name] = {
  status: status,
  memo: memo,
  updatedAt: Utilities.formatDate(new Date(updatedAt), 'Asia/Tokyo', 'yyyy/MM/dd HH:mm')
};
});
return responses;
}
function registerMemberIfNeeded_(name) {
const sheet = SpreadsheetApp.getActiveSpreadsheet().getSheetByName(SHEET_NAMEMEMBERS);
const members = getMembers();
if (!members.includes(name)) {
sheet.appendRow([name]);
}
}
function upsertResponse_(name, status, memo) {
const sheet = SpreadsheetApp.getActiveSpreadsheet().getSheetByName(SHEET_NAME_RESPONSES);
const values = sheet.getDataRange().getValues();
for (let i = 1; i < values.length; i++) {
const rowName = String(values[i][1] || '').trim();
if (rowName === name) {
  const rowNumber = i + 1;
  sheet.getRange(rowNumber, 1, 1, 4).setValues([[
    new Date(),
    name,
    status,
    memo
  ]]);
  return;
}
}
sheet.appendRow([
new Date(),
name,
status,
memo
]);
}
[](#step5-html%E3%83%95%E3%82%A1%E3%82%A4%E3%83%AB%E3%82%92%E4%BD%9C%E3%82%8B)STEP5 建立 HTML 檔案
-----------------------------------------------------------------------------------------------
【圖片9】 從左上角的「+」按鈕選擇「HTML」,建立 HTML 檔案。

【圖片⑩】 檔案名稱請命名為 **index**。

【圖片⑪】 刪除預先存在的程式碼,
貼上以下程式碼。

### [](#indexhtml-%E8%B2%BC%E3%82%8B%E4%BB%98%E3%81%91%E3%82%8B%E3%82%B3%E3%83%BC%E3%83%89%E3%81%AF%E3%82%B3%E3%83%81%E3%83%A9)index.html ← 要貼上的程式碼在這裡
點此展開```
參加・不參加確認應用程式
==========================================================================================================
只要按下按鈕就能完成參加確認的 GAS 示範應用程式。
回答會保存到試算表,彙整結果也可以自動通知到 Slack。
<section class="grid">
<div class="card">
<h2>回覆</h2>
<label for="name">姓名</label>
<input id="name" type="text" placeholder="例如:佐藤">

<label for="memo" style="margin-top: 16px;">備註</label>
<textarea id="memo" placeholder="可選:會稍微晚到、只參加上午等"></textarea>

<div class="button-row">
  <button id="joinButton" class="join" onclick="submitAnswer('參加')">參加</button>
  <button id="absentButton" class="absent" onclick="submitAnswer('不參加')">不參加</button>
</div>

<div id="status" class="status"></div>
</div>
<div class="card">
<h2>目前彙整</h2>
<div id="summaryArea">
載入中...
</div>
<button class="reload" onclick="loadSummary()">更新為最新資料</button>
</div>
<div class="card full">
<h2>回覆列表</h2>
<div id="listArea">
載入中...
</div>
</div>
</section>
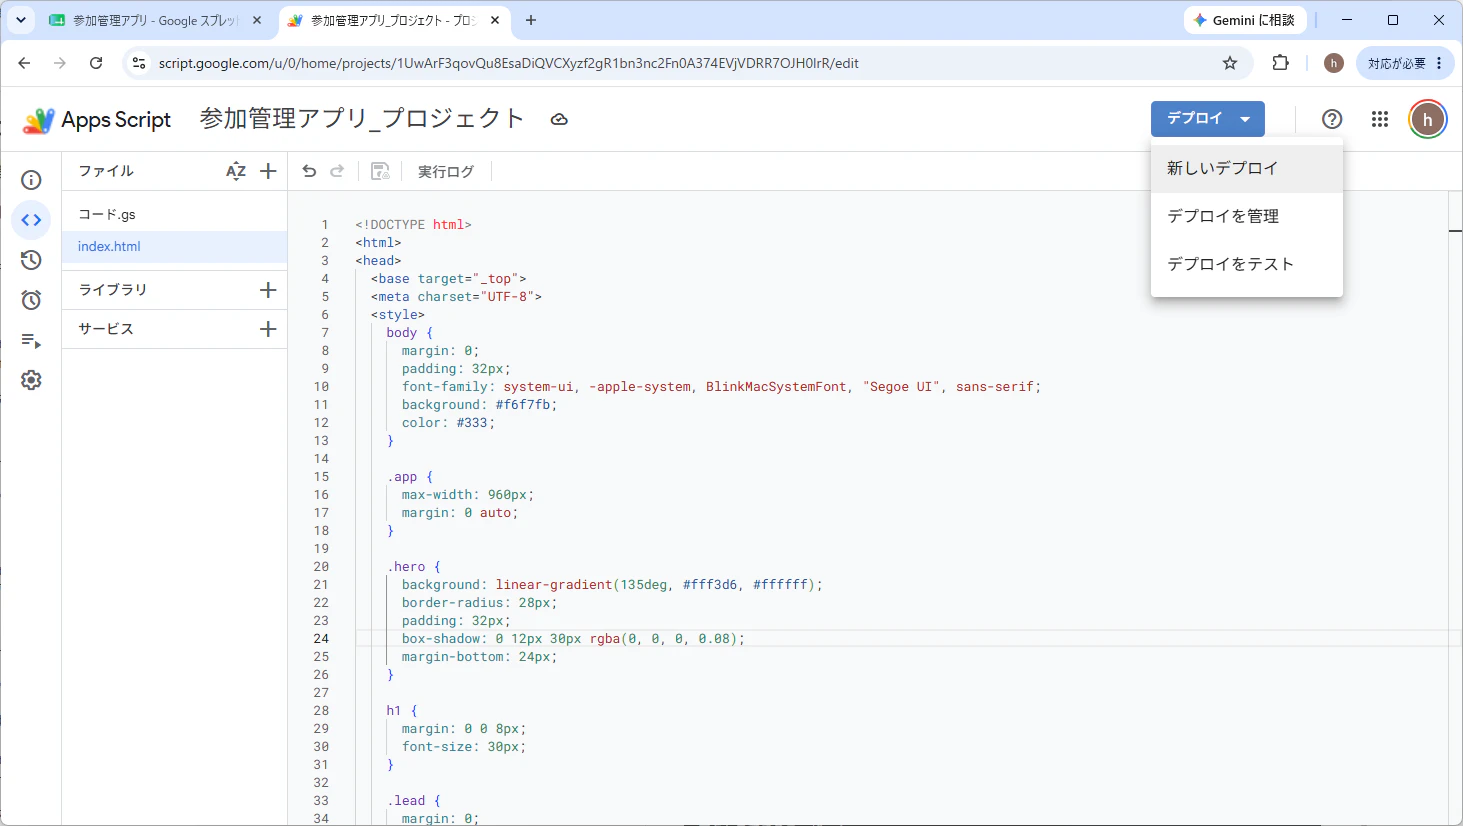
``` --- [](#step6-web%E3%82%A2%E3%83%97%E3%83%AA%E3%81%A8%E3%81%97%E3%81%A6%E5%85%AC%E9%96%8B%E3%81%99%E3%82%8B)STEP6 以 Web 應用程式公開
---------------------------------------------------------------------------------------------------------------------------
【圖片⑫】 在右上角選擇「部署」→「新增部署」。
【圖片⑬】 類型選擇「網頁應用程式」。

【圖片⑭】 依照以下設定,點擊「部署」按鈕。

Google 會要求授權,相關設定請各自查詢後執行。

【圖片⑮】 顯示 Web 應用程式的 URL 後就完成了。

[](#step8-url%E3%82%92%E9%96%8B%E3%81%8F)STEP8 開啟 URL
-----------------------------------------------------
【圖片⑯】開啟發行的 URL。

【完成!】
這樣就完成應用程式了。
你現在做出的,也是名副其實的 Web 應用程式。
[](#%E3%81%AA%E3%81%9C%E3%82%A2%E3%83%97%E3%83%AA%E3%81%AB%E3%81%AA%E3%81%A3%E3%81%9F%E3%81%AE)為什麼變成應用程式了?
----------------------------------------------------------------------------------------------------------

很神奇對吧。我們並沒有
- 租用伺服器
- 安裝 Java
- 使用 AWS
但卻做出了能從網際網路存取的應用程式。
其實是因為 Google 已經幫我們準備好了
> - 伺服器
> - 執行環境
> - 公開功能
。
[](#%E6%AC%A1%E5%9B%9E%E4%BA%88%E5%91%8A)下次預告
---------------------------------------------
這次已經做到「顯示畫面」了。
果然實際跑起來的瞬間最有趣呢!!
下次會進一步說明,這到底哪裡算是應用程式,
同時也會接觸到製作應用程式最有趣的部分。
---
PRUM 的工程師中,95% 以上都是從無經驗招募進來的。
如果你對我們公司有興趣,歡迎來看看。
[企業網站](https://recruit-lp.prum.jp/engineer/?utm_source=qiita&utm_medium=article&utm_campaign=hitomi_20260608&utm_content=om)
---
原文出處:https://qiita.com/hitomin_poke/items/ffcc67d985d4ab47631e1) --- 會變成分隔線(上一行必須是空白)
2) # 會變成一級標題
3) ## 會變成二級標題
4) ### 會變成三級標題
5) **粗體文字**會顯示粗體文字
6) ```當第一行與最後一行會顯示程式碼
7) 請搜尋 Markdown 語法,了解各種格式