

當開發人員長期製作一個網站時,顯然很少有人會考慮這樣的功能,但想像一下,您的服務已經變得流行並且您想要擴展。
一個倉庫似乎足以應付工作,但如果一個服務(公司)有 10 個網站,那麼所有網站都必須使用相同的元件,因為重新設計根本無利可圖。 GitHub 和 YouTube 等服務的用戶甚至無法想像會有多少個子網站。
2010 年的 Web 開發和 2025 年的 Web 開發幾乎截然不同。因此,了解當今的現代實踐至關重要。元件共享就是其中之一。在本文中,我們將探討它!
🔩 元件
例如,我們可以採用按鈕元件,並在元件之間進行傳輸。它看起來如下:
<button class="button">Click Me</button>
<style>
  .button {
    background-color: #4caf50;
    color: white;
    border: none;
    padding: 12px 24px;
    text-align: center;
    text-decoration: none;
    font-size: 16px;
    border-radius: 5px;
    cursor: pointer;
    transition: background-color 0.3s, transform 0.2s;
  }

  .button:hover {
    background-color: #45a049;
  }

  .button:active {
    transform: scale(0.95);
  }
</style>
網站上的結果如下:

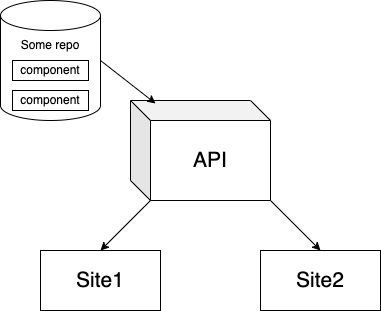
現在,我們假設有兩個站點需要將元件通用。假設它們分別是 example1 和 example2。它們可以分別託管在不同的主機上。其中一個網站部署在 GithHub 上,另一個部署在本機上。
現在,主要問題出現了──如何分享?
🛤️ 多種分享方式
我將描述幾種常用的方法,從最普通的到最實用的。
這兩種方法看起來都像這樣。
🔗 1. 輸出到檔案並透過腳本連接
此方法假設有一個傳回 HTML 標籤的函數。並且,該函數可以透過檔案遠端連接。該文件位於何處並不重要,您只需從那裡進行連接即可。
createButton.js
// buttonModule.js
(function (global) {
  // Define the createButton function
  function createButton() {
    // Create a <style> element and add styles
    const style = document.createElement('style');
    style.textContent = `
      .button {
        background-color: #4caf50;
        color: white;
        border: none;
        padding: 12px 24px;
        text-align: center;
        text-decoration: none;
        font-size: 16px;
        border-radius: 5px;
        cursor: pointer;
        transition: background-color 0.3s, transform 0.2s;
      }
      .button:hover {
        background-color: #45a049;
      }
      .button:active {
        transform: scale(0.95);
      }
    `;

    // Create the button element
    const button = document.createElement('button');
    button.className = 'button';
    button.textContent = 'Click Me';

    // Return the elements (style and button)
    return { style, button };
  }

  // Expose the function to the global scope
  global.buttonModule = {
    createButton,
  };
})(window);
**example1/root/index.html,
範例2/root/index.html**
<!DOCTYPE html>
<html lang="en">
<head>
  <meta charset="UTF-8">
  <meta name="viewport" content="width=device-width, initial-scale=1.0">
  <title>Button Module</title>
  <script src="https://.../buttonModule.js"></script>
</head>
<body>
  <div id="wrapper"></div>
  <script>
    // Use the buttonModule
    const { style, button } = buttonModule.createButton();
    const wrapper = document.getElementById("wrapper");
    wrapper.append(style); // Attach styles to the document
    wrapper.append(button); // Add the button to the page
  </script>
</body>
</html>
這裡我們透過一個與我們兩個站點無關的站點來連接模組。這個網站可以是同一個 GitHub。
特點(優點):
-
使用 HTML 中的標準
<script>標籤即可輕鬆實現,無需額外設定。 -
不需要像 Webpack 或 Vite 這樣的現代工具或配置。
-
適用於小型單頁應用程式或快速實驗。
-
最少的設置,實現更快的開發。
-
可以無縫整合到已經依賴全域變數的現有專案中。
缺點:
-
如果元件很多的話,就會有上千個腳本,這種方式只適合單一用途。
-
將變數或物件新增至全域範圍,增加命名衝突的風險。
-
使用多個腳本時很難避免衝突。
-
使得專案更難擴展或重構。
-
腳本依賴正確的載入順序,必須手動管理。
-
維護性較差且不符合目前的最佳實務。
🌐 2. 使用第三方函式庫並將元件移至 API
對於這種方法,我們將使用諸如HMPL之類的模組。它允許您使用基於物件的簡單模板從伺服器連接元件。首先,讓我們將元件傳輸到伺服器。建立一個單獨的HTML ,並透過 API 請求提供它.html檔案應該是什麼樣子的?
按鈕.html
<button class="button">Click Me</button>
<style>
  .button {
    background-color: #4caf50;
    color: white;
    border: none;
    padding: 12px 24px;
    text-align: center;
    text-decoration: none;
    font-size: 16px;
    border-radius: 5px;
    cursor: pointer;
    transition: background-color 0.3s, transform 0.2s;
  }

  .button:hover {
    background-color: #45a049;
  }

  .button:active {
    transform: scale(0.95);
  }
</style>
之後,我們需要以某種方式將此檔案傳輸到伺服器。後端使用 Node.js。我們將使用 express.js 作為建立 API 的最受歡迎框架之一。首先,我們將設定接收元件的路由:
buttonController.js
const express = require("express");
const expressRouter = express.Router();
const path = require("path");

const buttonController = (req, res) => {
  res.sendFile(path.join(__dirname, "../button.html"));
};

expressRouter.use("/getButton", buttonController);
應用程式.js
const express = require("express");
const path = require("path");
const bodyParser = require("body-parser");
const cors = require("cors");
const PORT = 8000;
const app = express();
const routes = require("./routes/buttonController");

app.use(bodyParser.urlencoded({ extended: false }));
app.use(cors({ origin: true, credentials: true }));

app.set(express.static(path.join(__dirname, "src")));

app.use("/api", routes);

app.listen(PORT);
完成此操作後,我們將獲得一條可以輕鬆獲取元件的路線。在網站上,我們連接 HMPL。它可以透過多種方式連接,讓我們考慮一下主要幾種:
透過腳本
<script src="https://unpkg.com/json5/dist/index.js"></script>
<script src="https://unpkg.com/hmpl-js/dist/hmpl.min.js"></script>
<script src="https://unpkg.com/dompurify/dist/purify.min.js"></script>
透過導入
import hmpl from "hmpl-js";我們使用方法 1,因為 index.html 是我們網站上的預設方法。
<!DOCTYPE html>
<html lang="en">
  <head>
    <meta charset="UTF-8" />
    <meta name="viewport" content="width=device-width, initial-scale=1.0" />
    <title>Button Module</title>
  </head>
  <body>
    <script src="https://unpkg.com/json5/dist/index.js"></script>
    <script src="https://unpkg.com/hmpl-js/dist/hmpl.min.js">
    <script src="https://unpkg.com/dompurify/dist/purify.min.js">
    </script>
</script>
    <script>
      const templateFn = hmpl.compile(
        `<div id="wrapper">
          {{#request src="https://.../api/getButton"}}
          {{/request}}
        </div>`
      );
      const btnWrapper = templateFn().response;
      document.body.append(btnWrapper);
    </script>
  </body>
</html>
這裡的操作與第一種方法幾乎相同,但訣竅在於,現在您可以安全地重複使用該元件。假設您可以這樣做:
const btnWrapper1 = templateFn().response;
const btnWrapper2 = templateFn().response;
此外,此模組還具有許多附加功能 - 指示器、請求錯誤處理等。由於該模組基於 fetch,因此您可以有效地自訂請求並執行更多操作。
特點(優點):
-
重複使用元件
-
適用於具有數千個元件的小型和大型應用程式
-
大量功能專門針對這種面向伺服器的方法,用於在客戶端顯示元件
-
使用靈活
缺點:
-
連接兩個腳本文件
-
建立附加 API
這種方法在某種程度上實現了 SSR 方法,但在客戶端上沒有它的關鍵元素——機器人的可見性,但除此之外——這是一種很酷的方法,可以使問題的解決更容易。
結論
根據具體情況,您可以使用第一種方法或第二種方法。第一種方法可以完全控制整個過程,但當您需要處理多個元件時,它仍然不合適,因為您必須不斷地匯入文件,這並不好。
感謝大家的閱讀!希望這篇文章對你們有幫助❤️!
PS 另外,別忘了幫我並給 HMPL 加星號!
https://github.com/hmpl-language/hmpl 🌱 星標 HMPL
1) --- 會變成分隔線(上一行必須是空白)
2) # 會變成一級標題
3) ## 會變成二級標題
4) ### 會變成三級標題
5) **粗體文字**會顯示粗體文字
6) ```當第一行與最後一行會顯示程式碼
7) 請搜尋 Markdown 語法,了解各種格式