🔧 阿川の電商水電行

TL;DR
在本指南中,您將學習如何使用AG-UI 協定和CopilotKit為代理程式開發套件 (ADK)代理程式建立前端。 ADK 將為 AI 代理後端提供支持,而 CopilotKit 將為前端提供支持,然後 AG-UI 將建立一個橋樑,使前端能夠與後端進行通信。
這本質上是一個快速入門指南,可幫助您快速入門,並了解代理<>用戶部分如何完全組合在一起。
在開始之前,我們想特別感謝 [Mark Fogle](https://www.linkedin.com/in/markfogle/)
) 和Syed Fakher最初建構了ADK/AG-UI 整合。接下來我們將介紹以下內容:
-
什麼是代理開發套件 (ADK)?
-
使用 CLI 設定 ADK + AG-UI + CopilotKit 代理
-
在後端將 ADK 代理與 AG-UI 協定集成
-
使用 CopilotKit 為您的 ADK + AG-UI 代理程式建立前端
以下是使用 AG-UI + CopilotKit 將 ADK 代理程式帶到前端時可以建置的內容的預覽。
{% 嵌入 https://youtu.be/cA0H7s-E4Tw %}
什麼是代理開發套件 (ADK)?
代理開發套件 (ADK) 是一個開源框架,旨在簡化建構複雜且可投入生產的 AI 代理的過程。
開箱即用,ADK 為您的 AI 代理程式配備:
-
規劃——多步驟推理與執行。
-
工具使用-與外部 API、服務和資料來源整合。
-
狀態管理-無需建立連結邏輯或手動追蹤進度。
借助 ADK,您可以在數小時內將想法轉化為可執行的原型,同時保持完全的靈活性來擴展和自訂您的 AI 代理。
如果您想深入了解,請查看ADK 文件。

現在您已經了解了 ADK,讓我們看看如何將它與 AG-UI 和 CopilotKit 一起使用來建立全端 AI 代理程式。
先決條件
要完全理解本教程,您需要對 React 或 Next.js 有基本的了解
我們還將利用以下內容:
-
Python——一種用於使用 AI 代理框架建立 AI 代理的流行程式語言;確保它已安裝在您的電腦上。
-
AG-UI 協定- 由 CopilotKit 開發的代理使用者互動協議 (AG-UI) 是一種開源、輕量級、基於事件的協議,可促進前端和 AI 代理後端之間的豐富即時互動。
{% cta https://go.copilotkit.ai/ag-ui-github %} 看 AG-UI ⭐️ GitHub {% endcta %}
-
Gemini API 金鑰- 一個 API 金鑰,讓您能夠使用 Gemini 模型為 ADK 代理執行各種任務。
-
CopilotKit - 一個開源副駕駛框架,用於建立自訂 AI 聊天機器人、應用程式內 AI 代理程式和文字區域。
{% cta https://go.copilotkit.ai/copilot %} 看看 CopilotKit ⭐️ GitHub {% endcta %}
使用 CLI 設定全端 ADK 代理
在本節中,您將學習如何使用 CLI 命令設定全端 ADK 代理,該命令使用 AG-UI 協定設定後端,並使用 CopilotKit 設定前端。 CopilotKit 文件中的入門指南詳細介紹了此流程。
讓我們開始吧。
步驟 1:執行 CLI 命令
如果您還沒有 ADK 代理,則可以透過在終端機中執行下面的 CLI 命令來快速設定一個。
npx copilotkit@latest create -f adk然後為你的專案命名,如下所示。

第 2 步:安裝依賴項
成功建立專案後,使用您首選的套件管理器安裝相依性:
# Using pnpm (recommended)
pnpm install

# Using npm
npm install

# Using yarn
yarn install

# Using bun
bun install
步驟 3:設定您的 Gemini API 金鑰
安裝依賴項後,在根資料夾中建立一個env檔案並新增您的 [Gemini API 金鑰]。 (https://makersuite.google.com/app/apikey)
GOOGLE_API_KEY="your-google-api-key-here”步驟 4:執行開發伺服器
然後使用您喜歡的套件管理器啟動開發伺服器:
# Using pnpm
pnpm dev

# Using npm
npm run dev

# Using yarn
yarn dev

# Using bun
bun run dev一旦開發伺服器執行,導航到http://localhost:3000/您應該會看到您的 ADK + AG-UI + CopilotKit 代理程式啟動並執行。
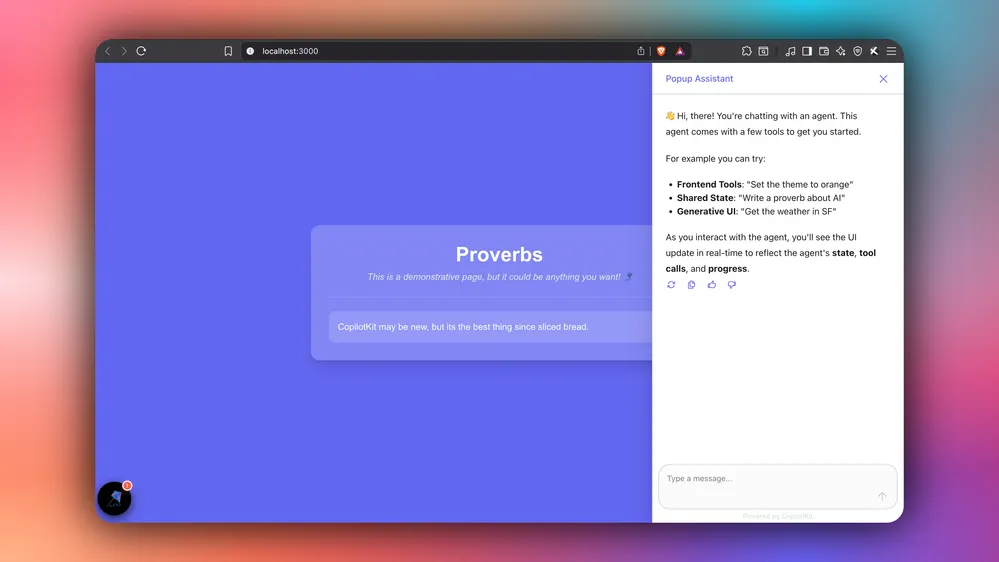
恭喜!您已成功將 ADK Agent 聊天機器人整合到您的應用中。首先,請嘗試使用提供的工具來設定網頁主題、編寫諺語或獲取天氣訊息,如下所示。
你們的ADK代理程式是如何與後端的AG-UI協定整合的?
在本節中,您將了解 ADK 代理程式如何與 AG-UI 協定整合並作為 ASGI 應用程式公開給前端。
讓我們開始吧。
步驟1:安裝AG-UI套件
首先,安裝 AG-UI ADK 套件以及其他必要的依賴項(例如 FastAPI 和 uvicorn),以便使用它們來執行您的 ADK 代理程式。
pip install ag_ui_adk uvicorn fastapi步驟 2:設定 ADK 代理
安裝 AG-UI 套件後,透過定義代理名稱、指定 Gemini 2.5 Flash 作為大型語言模型 (LLM) 以及定義代理的指令來配置 ADK 代理,如下面的./agent.py檔案所示。
# Import core ADK (Agent Development Kit) components
from google.adk.agents import LlmAgent
from google.adk.agents.callback_context import CallbackContext
from google.adk.sessions import InMemorySessionService, Session
from google.adk.runners import Runner
from google.adk.events import Event, EventActions
from google.adk.tools import FunctionTool, ToolContext
from google.genai.types import Content, Part, FunctionDeclaration
from google.adk.models import LlmResponse, LlmRequest
from google.genai import types

// ...

proverbs_agent = LlmAgent(
        # Define the agent name for identification
        name="ProverbsAgent",

        # Specify the LLM model to use (Gemini 2.5 Flash)
        model="gemini-2.5-flash",

        # Step 10c: Define the agent's core instructions and behavior
        instruction=f"""
        When a user asks you to do anything regarding proverbs, you MUST use the set_proverbs tool.

        IMPORTANT RULES ABOUT PROVERBS AND THE SET_PROVERBS TOOL:
        1. Always use the set_proverbs tool for any proverbs-related requests
        2. Always pass the COMPLETE LIST of proverbs to the set_proverbs tool. If the list had 5 proverbs and you removed one, you must pass the complete list of 4 remaining proverbs.
        3. You can use existing proverbs if one is relevant to the user's request, but you can also create new proverbs as required.
        4. Be creative and helpful in generating complete, practical proverbs
        5. After using the tool, provide a brief summary of what you created, removed, or changed.

        Examples of when to use the set_proverbs tool:
        - "Add a proverb about soap" → Use the tool with an array containing the existing list of proverbs with the new proverb about soap at the end.
        - "Remove the first proverb" → Use a tool with an array containing all of the existing proverbs except the first one.
        - "Change any proverbs about cats to mention that they have 18 lives." → If no proverbs mention cats, do not use the tool. If one or more proverbs mention cats, change them to mention cats having 18 lives, and use the tool with an array of all of the proverbs, including ones that were changed and ones that did not require changes.

        Do your best to ensure proverbs plausibly make sense.

        IMPORTANT RULES ABOUT WEATHER AND THE GET_WEATHER TOOL:
        1. Only call the get_weather tool if the user asks you for the weather in a given location.
        2. If the user does not specify a location, you can use the location "Everywhere ever in the whole wide world"

        Examples of when to use the get_weather tool:
        - "What's the weather today in Tokyo?" → Use the tool with the location "Tokyo"
        - "What's the weather right now?" → Use the location "Everywhere ever in the whole wide world"
        - "Is it raining in London?" → Use the tool with the location "London"
        """,

        # Register the available tools that the agent can use
        tools=[set_proverbs, get_weather],

        # Register callback functions for different lifecycle events
        before_agent_callback=on_before_agent,        # Runs before processing starts
        before_model_callback=before_model_modifier,  # Runs before LLM call
        after_model_callback=simple_after_model_modifier  # Runs after LLM responds
    )
步驟3:建立ADK中間件代理實例
配置 ADK 代理程式後,建立一個 ADK 中間件代理實例,該實例包裝您的 ADK 代理程式以將其與 AG-UI 協定集成,如下面的./agent.py檔案所示。
# Import ADK middleware components from AG-UI
from ag_ui_adk import ADKAgent

// ...

adk_proverbs_agent = ADKAgent(
    adk_agent=proverbs_agent,           # Your ADK agent
    app_name="proverbs_app",            # Application identifier
    user_id="demo_user",                # User identifier for session management
    session_timeout_seconds=3600,       # Session expires after 1 hour of inactivity
    use_in_memory_services=True         # Use memory-based services (good for demos)
)
步驟 4:設定 FastAPI 端點
建立 ADK 中介軟體代理程式實例後,設定 FastAPI 端點,將 AG-UI 包裝的 ADK 代理程式公開到前端。
# FastAPI for web framework
from fastapi import FastAPI

# AG-UI ADK imports for agent functionality
from ag_ui_adk import ADKAgent, add_adk_fastapi_endpoint

# Create FastAPI app instance
app = FastAPI(title="ADK Middleware Proverbs Agent")

# Add the ADK endpoint to the FastAPI app
add_adk_fastapi_endpoint(app, adk_proverbs_agent, path="/")

# Main execution block
if __name__ == "__main__":
    import os
    import uvicorn

    # Check for required environment variable
    if not os.getenv("GOOGLE_API_KEY"):
        print("⚠️  Warning: GOOGLE_API_KEY environment variable not set!")
        print("   Set it with: export GOOGLE_API_KEY='your-key-here'")
        print("   Get a key from: https://makersuite.google.com/app/apikey")
        print()

    # Get port from environment or default to 8000
    port = int(os.getenv("PORT", 8000))
    # Run the FastAPI app with the uvicorn server
    uvicorn.run(app, host="0.0.0.0", port=port)
恭喜!您已成功整合 ADK 代理程式和 AG-UI 協議,並且可以透過http://localhost:8000 (或指定連接埠)端點存取。現在,讓我們看看如何為 AG-UI 包裝的 ADK 代理程式加入前端。
使用 CopilotKit 為您的 ADK + AG-UI 代理程式建立前端
在本節中,您將學習如何使用 CopilotKit 為您的 ADK + AG-UI 代理程式新增前端,CopilotKit 可以在 React 執行的任何地方執行。
讓我們開始吧。
步驟 1:安裝 CopilotKit 軟體包
首先,將 CopilotKit 的最新軟體包安裝到您的前端。
npm install @copilotkit/react-ui @copilotkit/react-core @copilotkit/runtime步驟 2:設定 Copilot Runtime 實例
安裝 CopilotKit 套件後,在/api/copilotkit API 路由中使用 HttpAgent 實例設定 Copilot 執行時期實例,使前端能夠向後端發出 HTTP 請求。
import {
  CopilotRuntime, // Main runtime that manages agent communication
  ExperimentalEmptyAdapter, // Service adapter for single-agent setups
  copilotRuntimeNextJSAppRouterEndpoint, // Next.js App Router endpoint handler
} from "@copilotkit/runtime";

// Import AG-UI client for connecting to ADK agents
import { HttpAgent } from "@ag-ui/client";

// Import Next.js types for request handling
import { NextRequest } from "next/server";

// Create a service adapter for the CopilotKit runtime
const serviceAdapter = new ExperimentalEmptyAdapter();

// Create the main CopilotRuntime instance that manages communication between the frontend and backend agents
const runtime = new CopilotRuntime({

  // Define the agents that will be available to the frontend
    agents: {

    // Configure the ADK agent connection
    my_agent: new HttpAgent({

      // Specify the URL where the ADK agent is running
      url: "http://localhost:8000/",
    }),
  },
});

// Export the POST handler for the API route
export const POST = async (req: NextRequest) => {

  // Create the request handler using CopilotKit's Next.js helper
  const { handleRequest } = copilotRuntimeNextJSAppRouterEndpoint({
    runtime, // The CopilotRuntime instance we configured
    serviceAdapter, // The service adapter for agent coordination
    endpoint: "/api/copilotkit", // The endpoint path (matches this file's location)
  });

  return handleRequest(req);
};
步驟 3:設定 CopilotKit 提供者
設定 Copilot Runtime 實例後,設定管理 ADK 代理程式會話的 CopilotKit 提供者元件。
要設定 CopilotKit 提供程序, [<CopilotKit>](https://docs.copilotkit.ai/reference/components/CopilotKit)元件必須包裝應用程式中支援 Copilot 的部分。
對於大多數用例來說,將 CopilotKit 提供者包裝在整個應用程式中是合適的,例如,在您的layout.tsx檔案中。
// Step 1: Import necessary types and components from Next.js and CopilotKit
import type { Metadata } from "next";

import { CopilotKit } from "@copilotkit/react-core";
import "./globals.css";
import "@copilotkit/react-ui/styles.css";

// Step 2: Define metadata for the application, used by Next.js for SEO and page headers
export const metadata: Metadata = {
  title: "Create Next App",
  description: "Generated by create next app",
};

// Step 3: Define the RootLayout component, which wraps the entire application
export default function RootLayout({
  children,
}: Readonly<{
  children: React.ReactNode;
}>) {
  // Step 4: Return the JSX structure for the layout
  return (
    <html lang="en">
      <body className={"antialiased"}>
        {/* Step 5: Wrap the children components with CopilotKit provider to enable CopilotKit functionality */}
        <CopilotKit runtimeUrl="/api/copilotkit" agent="my_agent">
          {children}
        </CopilotKit>
      </body>
    </html>
  );
}
步驟 4:設定 Copilot UI 元件
設定 CopilotKit 提供者後,請設定一個 Copilot UI 元件,以便您與 ADK 代理程式進行互動。 CopilotKit 隨附多個內建聊天元件,包括CopilotPopup 、 CopilotSidebar和CopilotChat 。
若要設定 Copilot UI 元件,請將其與核心頁面元件一起定義,例如在page.tsx檔案中。
"use client";
import { CopilotKitCSSProperties, CopilotSidebar } from "@copilotkit/react-ui";
import { useState } from "react";
export default function CopilotKitPage() {
const [themeColor, setThemeColor] = useState("#6366f1");
// ...
return (
<main style={{ "--copilot-kit-primary-color": themeColor } as CopilotKitCSSProperties}>
<YourMainContent themeColor={themeColor} />
<CopilotSidebar
clickOutsideToClose={false}
defaultOpen={true}
labels={{
title: "Popup Assistant",
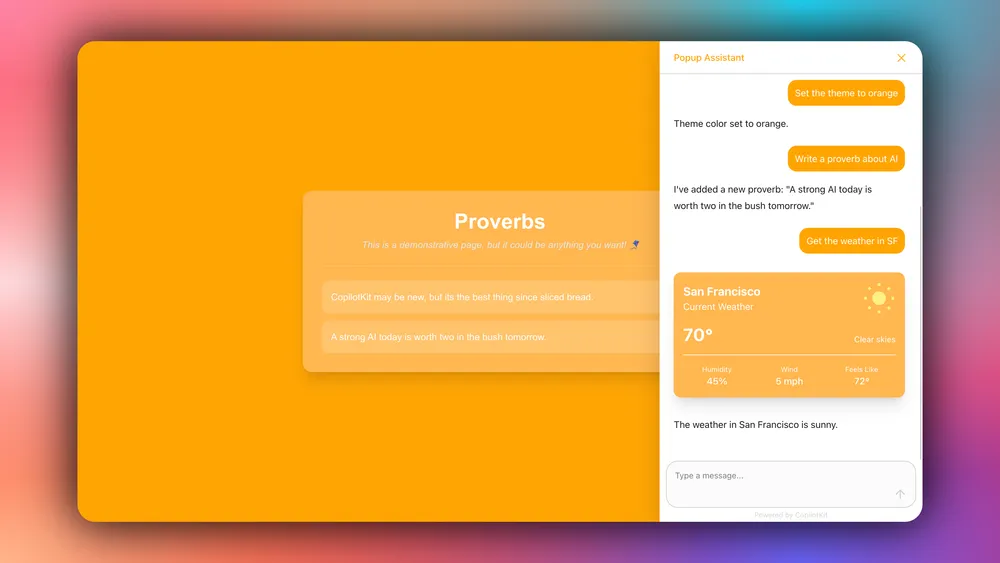
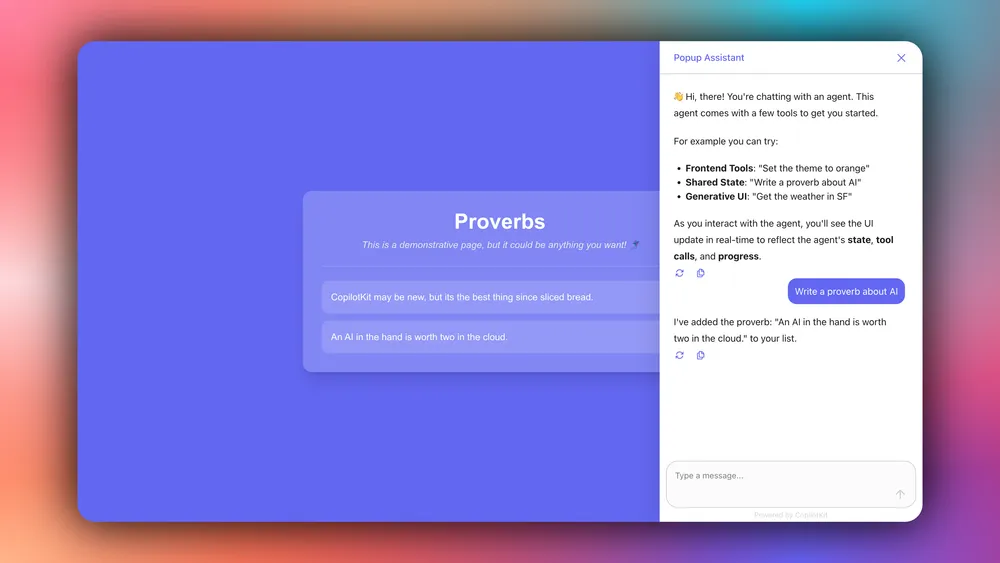
initial: "👋 Hi, there! You're chatting with an agent. This agent comes with a few tools to get you started.\n\nFor example you can try:\n- **Frontend Tools**: \"Set the theme to orange\"\n- **Shared State**: \"Write a proverb about AI\"\n- **Generative UI**: \"Get the weather in SF\"\n\nAs you interact with the agent, you'll see the UI update in real-time to reflect the agent's **state**, **tool calls**, and **progress**."
}}
/>
</main>
);
}步驟 5:將 ADK 代理程式狀態與前端同步
設定 Copilot UI 元件後,使用 CopilotKit 掛鉤將 ADK 代理程式狀態與前端同步。
要將您的 ADK 代理程式狀態與前端同步,請使用CopilotKit useCoAgent 鉤子,它允許您在應用程式和代理之間雙向共用狀態。
"use client";

import { useCoAgent } from "@copilotkit/react-core";

// State of the agent, make sure this aligns with your agent's state.
type AgentState = {
  proverbs: string[];
}

function YourMainContent({ themeColor }: { themeColor: string }) {

  // 🪁 Shared State: https://docs.copilotkit.ai/coagents/shared-state
  const { state, setState } = useCoAgent<AgentState>({
    name: "my_agent",
    initialState: {
      proverbs: [
        "CopilotKit may be new, but it's the best thing since sliced bread.",
      ],
    },
  })

     // ...
  return (

  // ...
  )
若要使用自訂 UI 元件即時呈現代理程式的狀態、進度、輸出或工具呼叫,您可以使用基於工具的生成 UI 。
"use client";
import { useCoAgent, useCopilotAction } from "@copilotkit/react-core";
// ...
function YourMainContent({ themeColor }: { themeColor: string }) {
// ...
//🪁 Generative UI: https://docs.copilotkit.ai/coagents/generative-ui
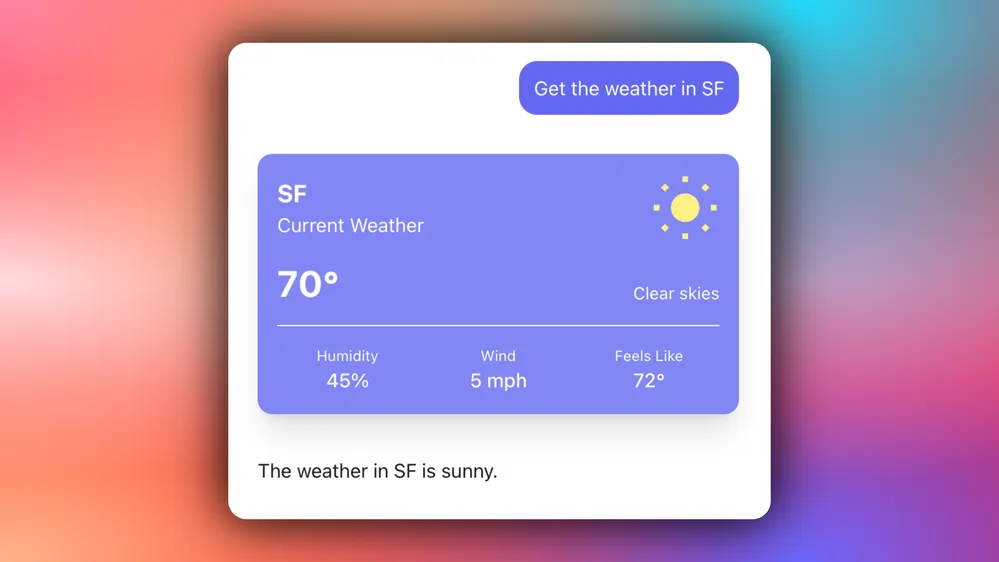
useCopilotAction({
name: "get_weather",
description: "Get the weather for a given location.",
available: "disabled",
parameters: [
{ name: "location", type: "string", required: true },
],
render: ({ args }) => {
return <WeatherCard location={args.location} themeColor={themeColor} />
},
});
return ( ... )然後嘗試讓代理商取得某個地點的天氣資訊。您應該會看到我們加入的自訂 UI 元件,該元件用於渲染get weather工具的呼叫,並顯示傳遞給該工具的參數。
步驟 6:在前端串流 ADK 代理程式回應
將 ADK 代理程式狀態與前端同步後,請在前端串流 ADK 代理程式回應或結果。
若要在前端串流傳輸 ADK 代理程式回應或結果,請將代理程式的狀態欄位值傳遞給前端元件,如下所示。
"use client";

import { useCoAgent } from "@copilotkit/react-core";

// State of the agent, make sure this aligns with your agent's state.
type AgentState = {
  proverbs: string[];
}

function YourMainContent({ themeColor }: { themeColor: string }) {
  // 🪁 Shared State: https://docs.copilotkit.ai/coagents/shared-state
  const { state, setState } = useCoAgent<AgentState>({
    name: "my_agent",
    initialState: {
      proverbs: [
        "CopilotKit may be new, but it's the best thing since sliced bread.",
      ],
    },
  })

  // ...

  return (
    <div
      style={{ backgroundColor: themeColor }}
      className="h-screen w-screen flex justify-center items-center flex-col transition-colors duration-300"
    >
      <div className="bg-white/20 backdrop-blur-md p-8 rounded-2xl shadow-xl max-w-2xl w-full">
        <h1 className="text-4xl font-bold text-white mb-2 text-center">Proverbs</h1>
        <p className="text-gray-200 text-center italic mb-6">This is a demonstrative page, but it could be anything you want! 🪁</p>
        <hr className="border-white/20 my-6" />
        <div className="flex flex-col gap-3">
          {state.proverbs?.map((proverb, index) => (
            <div
              key={index}
              className="bg-white/15 p-4 rounded-xl text-white relative group hover:bg-white/20 transition-all"
            >
              <p className="pr-8">{proverb}</p>
              <button
                onClick={() => setState({
                  ...state,
                  proverbs: state.proverbs?.filter((_, i) => i !== index),
                })}
                className="absolute right-3 top-3 opacity-0 group-hover:opacity-100 transition-opacity
                  bg-red-500 hover:bg-red-600 text-white rounded-full h-6 w-6 flex items-center justify-center"
              >
                ✕
              </button>
            </div>
          ))}
        </div>
        {state.proverbs?.length === 0 && <p className="text-center text-white/80 italic my-8">
          No proverbs yet. Ask the assistant to add some!
        </p>}
      </div>
    </div>
  );
}
如果您查詢 ADK 代理,您應該會在 UI 中看到代理程式的回應或結果流,如下所示。
結論
在本指南中,我們介紹了使用 AG-UI 協定和 CopilotKit 為您的 ADK 代理程式建立前端的步驟。
雖然我們已經探索了一些功能,但我們僅僅觸及了 CopilotKit 無數用例的表面,從建置互動式 AI 聊天機器人到建置代理解決方案——本質上,CopilotKit 可讓您在幾分鐘內為您的產品加入大量有用的 AI 功能。
希望本指南能幫助您更輕鬆地將 AI 驅動的 Copilots 整合到您現有的應用程式中。
在Twitter上關注 CopilotKit 並打招呼,如果您想建立一些很酷的東西,請加入Discord社群。
原文出處:https://dev.to/copilotkit/build-a-frontend-for-your-adk-agents-with-ag-ui-2alo
1) --- 會變成分隔線(上一行必須是空白)
2) # 會變成一級標題
3) ## 會變成二級標題
4) ### 會變成三級標題
5) **粗體文字**會顯示粗體文字
6) ```當第一行與最後一行會顯示程式碼
7) 請搜尋 Markdown 語法,了解各種格式