

TL;DR
在本指南中,您將學習如何使用 A2A 協定、AG-UI 協定和 CopilotKit 在來自不同 AI 代理框架的 AI 代理程式之間建立全端代理程式到代理程式 (A2A) 通訊。
在我們開始之前,我們將介紹以下內容:
-
什麼是 A2A 協議?
-
使用 CLI 設定 A2A 多代理通信
-
將來自不同代理框架的 AI 代理與 A2A 協定集成
-
使用 CopilotKit 建構 AG-UI 和 A2A 多代理通訊的前端
以下是我們將要建立的內容的預覽:
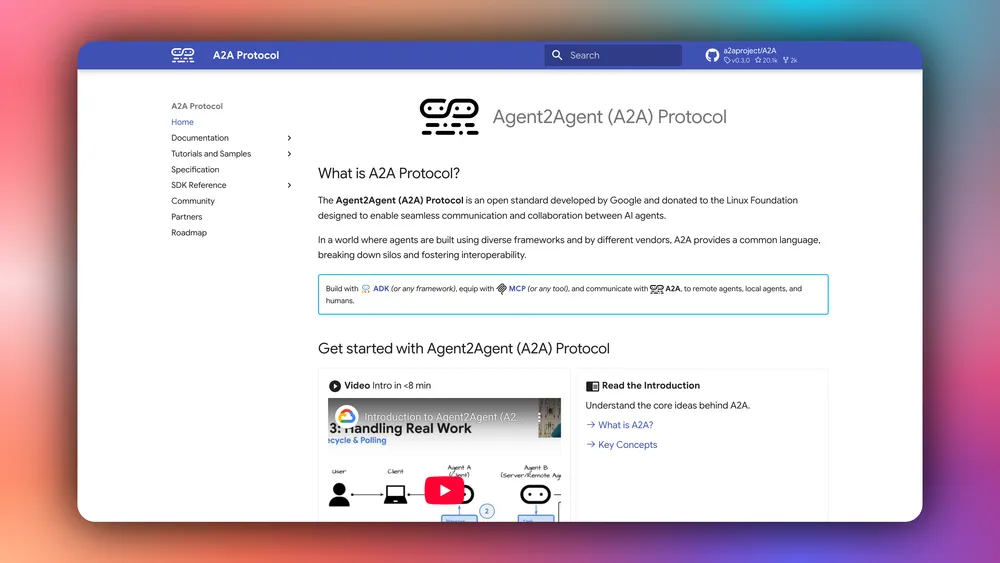
什麼是 A2A 協議?

A2A(Agent-to-Agent)協定是Google推出的標準化通訊框架,使得不同的AI代理程式能夠在分散式系統中不受框架限制地發現、通訊和協作。
A2A 協定旨在促進代理間通信,其中代理可以呼叫其他代理作為工具或服務,從而建立專門的 AI 功能網路。
A2A 協議的主要特點包括:
-
A2A 客戶端:這是啟動一切的「老闆代理」(我們稱之為「客戶代理」)。它會確定需要做什麼,找到合適的輔助代理,並將任務交給它們。你可以把它想像成程式碼中的專案經理。
-
A2A 代理:一款 AI 代理,它會根據 A2A 規則設定一個簡單的 Web 位址(HTTP 端點)。它會監聽傳入的請求,處理任務,並傳回結果或更新。這對於讓你的代理商「公開」並隨時準備好協作非常有用。
-
代理卡:想像一下 JSON 格式的數位身分證——易於閱讀和分享。它包含 A2A 代理的基本訊息,例如其名稱、功能以及如何連接。
-
代理技能:這些就像是代理的職位描述。每項技能都概括了其擅長的一項具體技能(例如,「總結文章」或「生成圖像」)。客戶閱讀這些技能後,就能確切知道需要分配哪些任務──無需猜測!
-
A2A Executor :幕後大腦。它是程式碼中的一個函數,負責執行繁重的工作:接收請求,執行邏輯以解決任務,並輸出回應或觸發事件。
-
A2A 伺服器:Web 伺服器端。它將您代理的技能轉化為可在網路上分享的內容。您將使用 A2A 的請求處理程序進行設置,使用 Starlette(一個 Python Web 框架)建立一個輕量級 Web 應用,並使用 Uvicorn(一個快速的伺服器執行器)啟動它。轟隆隆-您的代理商已上線並準備就緒!
如果您想深入了解 A2A 協定的工作原理及其設置,請查看此處的文件: A2A 協議文件。
現在您已經了解了 A2A 協定是什麼,讓我們看看如何將它與 AG-UI 和 CopilotKit 一起使用來建立全端 A2A AI 代理程式。
先決條件
要完全理解本教程,您需要對 React 或 Next.js 有基本的了解
我們還將利用以下內容:
-
Python——一種用於使用 AI 代理框架建立 AI 代理的流行程式語言;確保它已安裝在您的電腦上。
-
AG-UI 協定- 由 CopilotKit 開發的代理使用者互動協議 (AG-UI) 是一種開源、輕量級、基於事件的協議,可促進前端和 AI 代理後端之間的豐富即時互動。
-
Google ADK—由 Google 設計的開源框架,旨在簡化建構複雜且可投入生產的 AI 代理的過程。
-
LangGraph - 用於建立和部署 AI 代理程式的框架。它還有助於定義代理要執行的控制流程和操作。
-
Gemini API 金鑰- 一個 API 金鑰,讓您能夠使用 Gemini 模型為 ADK 代理執行各種任務。
-
CopilotKit - 一個開源副駕駛框架,用於建立自訂 AI 聊天機器人、應用程式內 AI 代理程式和文字區域。
使用 CLI 設定 A2A 多代理通信
在本節中,您將學習如何使用 CLI 命令設定 A2A 用戶端(編排器代理)+ A2A 代理,該命令使用具有 AG-UI 協定的 Google ADK 設定後端,並使用 CopilotKit 設定前端。
https://go.copilotkit.ai/ag-ui-github 查看 AG-UI 的 GitHub ⭐️
讓我們開始吧。
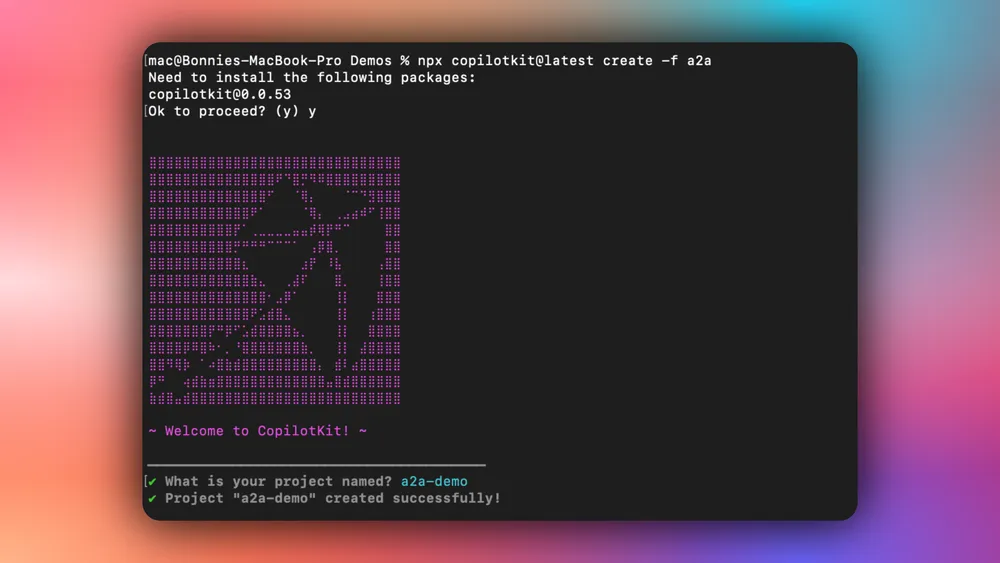
步驟 1:執行 CLI 命令
如果您還沒有預先設定的 AG-UI 代理,則可以透過在終端機中執行下面的 CLI 命令來快速設定一個。
npx copilotkit@latest create -f a2a然後為你的專案命名,如下所示。
步驟 2:安裝前端相依性
成功建立專案後,使用您首選的套件管理器安裝相依性:
npm install步驟 3:安裝後端依賴項
安裝前端相依性後,安裝後端相依性:
cd agents
python3 -m venv .venv
source .venv/bin/activate  # On Windows: .venv\Scripts\activate
pip install -r requirements.txt
cd ..
步驟 4:設定環境變數
安裝後端依賴項後,設定環境變數:
cp .env.example .env
# Edit .env and add your API keys:
# GOOGLE_API_KEY=your_google_api_key
# OPENAI_API_KEY=your_openai_api_key
步驟 5:啟動所有服務
設定好環境變數後,啟動包括後端和前端在內的所有服務。
npm run dev一旦開發伺服器執行,導航到http://localhost:3000/您應該會看到您的 A2A 多代理前端啟動並執行。
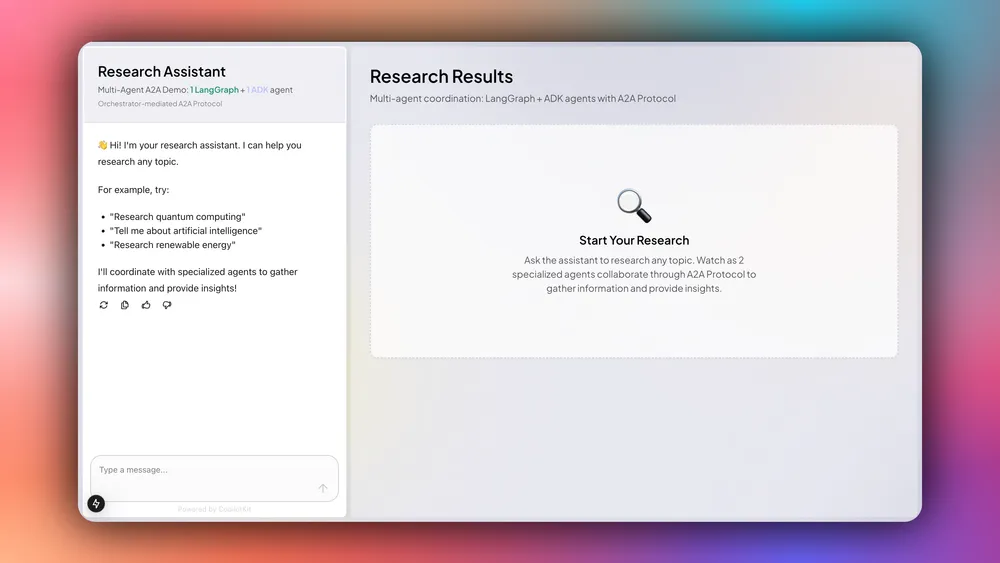
恭喜!您已成功設定 A2A 多智能體通訊。嘗試讓您的智能體研究一個主題,例如“請研究量子計算”。您會看到它會向研究智能體和分析智能體發送訊息。然後,它會將完整的研究和分析結果呈現給使用者。
在後端將 Orchestrator 代理與 Google ADK 和 AG-UI 協定集成
在本節中,您將學習如何將您的編排代理與 Google ADK 和 AG-UI 協定集成,以將其作為 ASGI 應用程式公開給前端。
讓我們開始吧。
步驟 1:設定後端
首先,克隆由基於 Python 的後端(代理)和 Next.js 前端組成的A2A-Travel 儲存庫。
接下來,導航到後端目錄:
cd agents然後建立一個新的Python虛擬環境:
python -m venv .venv之後,啟動虛擬環境:
source .venv/bin/activate # On Windows: .venv\Scripts\activate最後,安裝requirements.txt檔案中列出的所有 Python 相依性。
pip install -r requirements.txt步驟 2:設定 Orchestrator ADK 代理
設定後端後,透過定義代理名稱、指定 Gemini 2.5 Pro 作為大型語言模型 (LLM) 以及定義代理的指令來配置您的 Orchestrator ADK 代理,如下面的agents/orchestrator.py檔案所示。
# Import Google ADK components for LLM agent creation
from google.adk.agents import LlmAgent

# === ORCHESTRATOR AGENT CONFIGURATION ===
# Create the main orchestrator agent using Google ADK's LlmAgent
# This agent coordinates all travel planning activities and manages the workflow

orchestrator_agent = LlmAgent(
    name="OrchestratorAgent",
    model="gemini-2.5-pro",  # Use the more powerful Pro model for complex orchestration
    instruction="""
    You are a travel planning orchestrator agent. Your role is to coordinate specialized agents
    to create personalized travel plans.

    AVAILABLE SPECIALIZED AGENTS:

    1. **Itinerary Agent** (LangGraph) - Creates day-by-day travel itineraries with activities
    2. **Restaurant Agent** (LangGraph) - Recommends restaurants for breakfast, lunch, and dinner by day
    3. **Weather Agent** (ADK) - Provides weather forecasts and packing advice
    4. **Budget Agent** (ADK) - Estimates travel costs and creates budget breakdowns

    CRITICAL CONSTRAINTS:
    - You MUST call agents ONE AT A TIME, never make multiple tool calls simultaneously
    - After making a tool call, WAIT for the result before making another tool call
    - Do NOT make parallel/concurrent tool calls - this is not supported

    RECOMMENDED WORKFLOW FOR TRAVEL PLANNING:

    // ...

    """,
)
步驟 3:建立 ADK 中介軟體代理實例
配置您的 Orchestrator ADK 代理程式後,建立一個 ADK 中間件代理實例,該實例包裝您的 Orchestrator ADK 代理程式以將其與 AG-UI 協定集成,如下面的agents/orchestrator.py檔案所示。
# Import AG-UI ADK components for frontend integration
from ag_ui_adk import ADKAgent

// ...

# === AG-UI PROTOCOL INTEGRATION ===
# Wrap the orchestrator agent with AG-UI Protocol capabilities
# This enables frontend communication and provides the interface for user interactions

adk_orchestrator_agent = ADKAgent(
    adk_agent=orchestrator_agent,          # The core LLM agent we created above
    app_name="orchestrator_app",           # Unique application identifier
    user_id="demo_user",                   # Default user ID for demo purposes
    session_timeout_seconds=3600,          # Session timeout (1 hour)
    use_in_memory_services=True            # Use in-memory storage for simplicity
)
步驟 4:設定 FastAPI 端點
建立 ADK 中介軟體代理程式實例後,設定一個 FastAPI 端點,將 AG-UI 包裝的編排器 ADK 代理程式公開到前端,如下方的agents/orchestrator.py檔案所示。
# Import necessary libraries for web server and environment variables
import os
import uvicorn

# Import FastAPI for creating HTTP endpoints
from fastapi import FastAPI

// ...

# === FASTAPI WEB APPLICATION SETUP ===
# Create the FastAPI application that will serve the orchestrator agent
# This provides HTTP endpoints for the AG-UI Protocol communication

app = FastAPI(title="Travel Planning Orchestrator (ADK)")

# Add the ADK agent endpoint to the FastAPI application
# This creates the necessary routes for AG-UI Protocol communication
add_adk_fastapi_endpoint(app, adk_orchestrator_agent, path="/")

# === MAIN APPLICATION ENTRY POINT ===
if __name__ == "__main__":
    """
    Main entry point when the script is run directly.

    This function:
    1. Checks for required environment variables (API keys)
    2. Configures the server port
    3. Starts the uvicorn server with the FastAPI application
    """

    # Check for required Google API key
    if not os.getenv("GOOGLE_API_KEY"):
        print("⚠️  Warning: GOOGLE_API_KEY environment variable not set!")
        print("   Set it with: export GOOGLE_API_KEY='your-key-here'")
        print("   Get a key from: https://aistudio.google.com/app/apikey")
        print()

    # Get server port from environment variable, default to 9000
    port = int(os.getenv("ORCHESTRATOR_PORT", 9000))

    # Start the server with detailed information
    print(f"🚀 Starting Orchestrator Agent (ADK + AG-UI) on http://localhost:{port}")

    # Run the FastAPI application using uvicorn
    # host="0.0.0.0" allows external connections
    # port is configurable via the environment variable
    uvicorn.run(app, host="0.0.0.0", port=port)
恭喜!您已成功將 Orchestrator ADK 代理程式與 AG-UI 協定集成,並且可在http://localhost:9000 (或指定連接埠)端點上使用。
將來自不同代理框架的 AI 代理與 A2A 協定集成
在本節中,您將學習如何將來自不同代理框架的 AI 代理與 A2A 集成
協定.
讓我們開始吧!
步驟 1:設定 A2A 遠端代理
首先,設定您的 A2A 遠端代理,例如使用 LangGraph 框架的行程代理,如agents/itinerary_agent.py檔案所示。
# Import LangGraph components for workflow management
from langgraph.graph import StateGraph, END

// ...

# === MAIN AGENT CLASS ===
class ItineraryAgent:
    """
    Main agent class that handles itinerary generation using LangGraph workflow.

    """

    def __init__(self):

        self.llm = ChatOpenAI(model="gpt-4o-mini", temperature=0.7)

        # Build and compile the LangGraph workflow
        self.graph = self._build_graph()

    def _build_graph(self):
        workflow = StateGraph(ItineraryState)
        workflow.add_node("parse_request", self._parse_request)
        workflow.add_node("create_itinerary", self._create_itinerary)
        workflow.set_entry_point("parse_request")
        workflow.add_edge("parse_request", "create_itinerary")
        workflow.add_edge("create_itinerary", END)

        # Compile the workflow into an executable graph
        return workflow.compile()

    def _parse_request(self, state: ItineraryState) -> ItineraryState:
        message = state["message"]

        # Create a focused prompt for the extraction task
        prompt = f"""
        Extract the destination and number of days from this travel request.
        Return ONLY a JSON string with 'destination' and 'days' fields.

        Request: {message}

        Example output: {{"destination": "Tokyo", "days": 3}}
        """

        # Get LLM response for parsing
        response = self.llm.invoke(prompt)

        # Debug: Print the LLM response for troubleshooting
        print(response.content)

        try:
            # Attempt to parse the JSON response
            parsed = json.loads(response.content)
            state["destination"] = parsed.get("destination", "Unknown")
            state["days"] = int(parsed.get("days", 3))
        except:
            # Fallback values if parsing fails
            print("⚠️  Failed to parse request, using defaults")
            state["destination"] = "Unknown"
            state["days"] = 3

        return state

    def _create_itinerary(self, state: ItineraryState) -> ItineraryState:
        destination = state["destination"]
        days = state["days"]

        # Create detailed prompt for itinerary generation
        prompt = f"""
        Create a detailed {days}-day travel itinerary for {destination}.

        // ...

        Make it realistic, interesting, and include specific place names.
        Return ONLY valid JSON, no markdown, no other text.
        """

        # Generate itinerary using LLM
        response = self.llm.invoke(prompt)
        content = response.content.strip()

        # Clean up response - remove markdown formatting if present
        if "```json" in content:
            content = content.split("```json")[1].split("```")[0].strip()
        elif "```" in content:
            content = content.split("```")[1].split("```")[0].strip()

        try:
            # Step 1: Parse JSON from LLM response
            structured_data = json.loads(content)

            # Step 2: Validate structure using Pydantic model
            validated_itinerary = StructuredItinerary(**structured_data)

            # Step 3: Store both validated data and formatted JSON string
            state["structured_itinerary"] = validated_itinerary.model_dump()
            state["itinerary"] = json.dumps(validated_itinerary.model_dump(), indent=2)

            print("✅ Successfully created structured itinerary")

        // ...

        return state

    async def invoke(self, message: Message) -> str:

        # Extract text content from A2A message format
        message_text = message.parts[0].root.text
        print("Invoking itinerary agent with message: ", message_text)

        # Execute the LangGraph workflow with initial state
        result = self.graph.invoke({
            "message": message_text,
            "destination": "",  # Will be populated by parse_request
            "days": 3,          # Default, will be updated by parse_request
            "itinerary": ""     # Will be populated by create_itinerary
        })

        # Return the final itinerary JSON string
        return result["itinerary"]
步驟 2:設定 A2A 遠端座席技能和座席卡
配置 A2A 遠端代理程式後,請設定該代理以便其他代理程式可以發現和呼叫。
為此,定義每個代理提供的特定技能,以及其他代理可以發現的公共代理卡,如agents/itinerary_agent.py檔案中所示。
from a2a.types import ( AgentCapabilities, AgentCard, AgentSkill)

// ...

# Define the specific skill this agent provides
skill = AgentSkill(
    id='itinerary_agent',
    name='Itinerary Planning Agent',
    description='Creates detailed day-by-day travel itineraries using LangGraph',
    tags=['travel', 'itinerary', 'langgraph'],
    examples=[
        'Create a 3-day itinerary for Tokyo',
        'Plan a week-long trip to Paris',
        'What should I do in New York for 5 days?'
    ],
)

# Define the public agent card that other agents can discover
public_agent_card = AgentCard(
    name='Itinerary Agent',
    description='LangGraph-powered agent that creates detailed day-by-day travel itineraries in plain text format with activities and meal recommendations.',
    url=f'http://localhost:{port}/',
    version='1.0.0',
    defaultInputModes=['text'],      # Accepts text input
    defaultOutputModes=['text'],     # Returns text output
    capabilities=AgentCapabilities(streaming=True),  # Supports streaming responses
    skills=[skill],                  # List of skills this agent provides
    supportsAuthenticatedExtendedCard=False,  # No authentication required
)
步驟3:設定A2A代理執行器
設定好每個代理程式的技能和代理卡後,為每個代理程式設定一個 A2A 代理執行器,用於處理 A2A 請求和回應,如agents/itinerary_agent.py檔案所示。
from a2a.server.agent_execution import AgentExecutor, RequestContext

// ...

# === A2A PROTOCOL EXECUTOR ===
class ItineraryAgentExecutor(AgentExecutor):
    """
    An executor class that bridges the A2A Protocol with our ItineraryAgent.

    This class handles the A2A Protocol lifecycle:
    - Receives execution requests from other agents
    - Delegates to our ItineraryAgent for processing
    - Sends results back through the event queue
    """

    def __init__(self):
        """Initialize the executor with an instance of our agent"""
        self.agent = ItineraryAgent()

    async def execute(
        self,
        context: RequestContext,
        event_queue: EventQueue,
    ) -> None:
        """
        Execute an itinerary generation request.

        This method:
        1. Calls our agent with the incoming message
        2. Formats the result as an A2A text message
        3. Sends the response through the event queue

        Args:
            context: Request context containing the message and metadata
            event_queue: Queue for sending response events back to caller
        """
        # Generate itinerary using our agent
        result = await self.agent.invoke(context.message)

        # Send result back through A2A Protocol event queue
        await event_queue.enqueue_event(new_agent_text_message(result))

    async def cancel(
        self, context: RequestContext, event_queue: EventQueue
    ) -> None:
        """
        Handle cancellation requests (not implemented).

        For this agent, we don't support cancellation since the itinerary
        Generation is typically fast and non-interruptible.
        """
        raise Exception('cancel not supported')
步驟 4:設定 A2A 代理伺服器
為每個遠端代理程式設定 A2A 代理執行器後,設定每個代理程式的 A2A 代理伺服器,該伺服器設定 A2A 協定請求處理程序,建立 Starlette Web 應用程式,並啟動 uvicorn 伺服器,如agents/itineray_agent.py檔案中所示。
# Import A2A Protocol components for inter-agent communication
from a2a.server.apps import A2AStarletteApplication
from a2a.server.request_handlers import DefaultRequestHandler
from a2a.server.tasks import InMemoryTaskStore

// ...

# Get port from environment variable, default to 9001
port = int(os.getenv("ITINERARY_PORT", 9001))

# === MAIN APPLICATION SETUP ===
def main():
    """
    Main function that sets up and starts the A2A Protocol server.

    This function:
    1. Checks for required environment variables
    2. Sets up the A2A Protocol request handler
    3. Creates the Starlette web application
    4. Starts the uvicorn server
    """

    # Check for required OpenAI API key
    if not os.getenv("OPENAI_API_KEY"):
        print("⚠️  Warning: OPENAI_API_KEY environment variable not set!")
        print("   Set it with: export OPENAI_API_KEY='your-key-here'")
        print()

    # Create the A2A Protocol request handler
    # This handles incoming requests and manages the task lifecycle
    request_handler = DefaultRequestHandler(
        agent_executor=ItineraryAgentExecutor(),  # Our custom executor
        task_store=InMemoryTaskStore(),           # Simple in-memory task storage
    )

    # Create the A2A Starlette web application
    # This provides the HTTP endpoints for A2A Protocol communication
    server = A2AStarletteApplication(
        agent_card=public_agent_card,           # Public agent information
        http_handler=request_handler,           # Request processing logic
        extended_agent_card=public_agent_card,  # Extended agent info (same as public)
    )

    # Start the server
    print(f"🗺️  Starting Itinerary Agent (LangGraph + A2A) on http://localhost:{port}")
    uvicorn.run(server.build(), host='0.0.0.0', port=port)

# === ENTRY POINT ===
if __name__ == '__main__':
    """
    Entry point when the script is run directly.

    This allows the agent to be started as a standalone service:
    python itinerary_agent.py
    """
    main()
恭喜!您已成功將遠端代理與 A2A 協定集成,現在 Orchestrator 代理程式可以將任務委託給代理程式。
使用 CopilotKit 建構 AG-UI 和 A2A 多代理通訊的前端
在本節中,您將學習如何使用 CopilotKit 為 AG-UI 和 A2A 多代理通訊加入前端,CopilotKit 可以在 React 執行的任何地方執行。
讓我們開始吧。
步驟 1:設定前端
首先,在您先前複製的A2A-Travel 儲存庫中安裝前端相依性。
npm install然後配置環境變數並編輯.env文件,加入你的GOOGLE_API_KEY和OPENAI_API_KEY。
cp .env.example .env最後,啟動所有後端和前端伺服器:
npm run dev指令在http://localhost:3000上啟動 UI,在http://localhost:9000上啟動 Orchestrator,在http://localhost:9001上啟動 Itinerary Agent,在http://localhost:9002上啟動 Budget Agent,在http://localhost:9003上啟動開啟 Agent, http://localhost:9005上啟動上啟動 Agent。
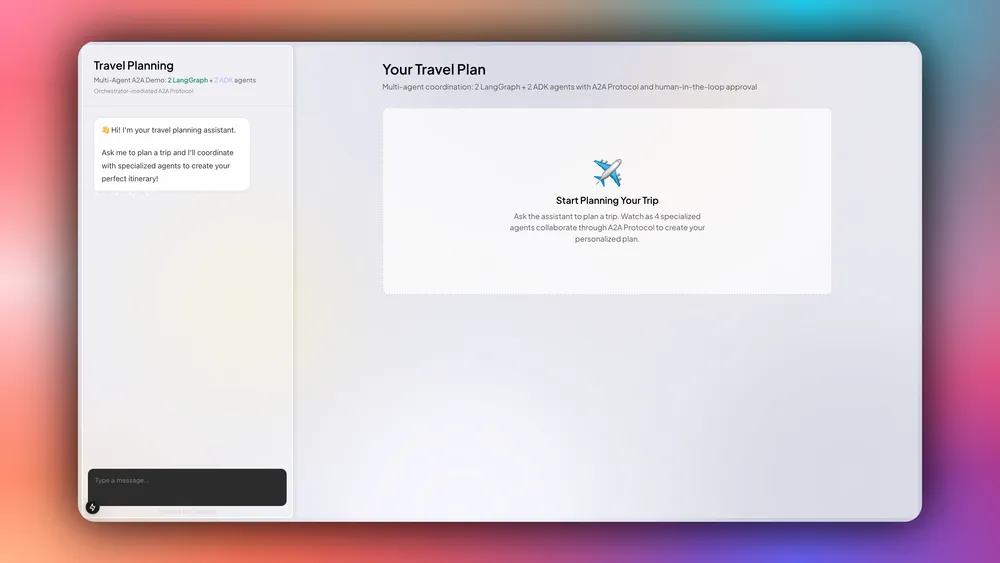
如果您導航到http://localhost:3000/ ,您應該會看到旅行計畫 A2A 多代理前端已啟動並正在執行。
步驟 2:使用 A2A 中介軟體設定 CopilotKit API 路由
設定好前端後,使用 A2A 中介軟體設定 CopilotKit API 路由,以建立前端、AG-UI + ADK Orchestrator 代理程式和 A2A 代理程式之間的連接,如app/api/copilotkit/route.ts檔案所示。
import {
  CopilotRuntime,
  ExperimentalEmptyAdapter,
  copilotRuntimeNextJSAppRouterEndpoint,
} from "@copilotkit/runtime";
import { HttpAgent } from "@ag-ui/client";
import { A2AMiddlewareAgent } from "@ag-ui/a2a-middleware";
import { NextRequest } from "next/server";

export async function POST(request: NextRequest) {
  // STEP 1: Define A2A agent URLs
  const itineraryAgentUrl =
    process.env.ITINERARY_AGENT_URL || "http://localhost:9001";
  const budgetAgentUrl =
    process.env.BUDGET_AGENT_URL || "http://localhost:9002";
  const restaurantAgentUrl =
    process.env.RESTAURANT_AGENT_URL || "http://localhost:9003";
  const weatherAgentUrl =
    process.env.WEATHER_AGENT_URL || "http://localhost:9005";

  // STEP 2: Define orchestrator URL (speaks AG-UI Protocol)
  const orchestratorUrl =
    process.env.ORCHESTRATOR_URL || "http://localhost:9000";

  // STEP 3: Wrap orchestrator with HttpAgent (AG-UI client)
    // the orchestrator agent we pass to the middleware needs to be an instance of a derivative of an ag-ui `AbstractAgent`
    // In this case, we have access to the agent via url, so we can gain an instance using the `HttpAgent` class
  const orchestrationAgent = new HttpAgent({
    url: orchestratorUrl,
  });

  // STEP 4: Create A2A Middleware Agent
  // This bridges AG-UI and A2A protocols by:
  // 1. Wrapping the orchestrator
  // 2. Registering all A2A agents
  // 3. Injecting send_message_to_a2a_agent tool
  // 4. Routing messages between orchestrator and A2A agents
  const a2aMiddlewareAgent = new A2AMiddlewareAgent({
    description:
      "Travel planning assistant with 4 specialized agents: Itinerary and Restaurant (LangGraph), Weather and Budget (ADK)",

    agentUrls: [
      itineraryAgentUrl, // LangGraph + OpenAI
      restaurantAgentUrl, // ADK + Gemini
      budgetAgentUrl, // ADK + Gemini
      weatherAgentUrl, // ADK + Gemini
    ],

    orchestrationAgent,
  });

  // STEP 5: Create CopilotKit Runtime
  const runtime = new CopilotRuntime({
    agents: {
      a2a_chat: a2aMiddlewareAgent, // Must match frontend: <CopilotKit agent="a2a_chat">
    },
  });

  // STEP 6: Set up Next.js endpoint handler
  const { handleRequest } = copilotRuntimeNextJSAppRouterEndpoint({
    runtime,
    serviceAdapter: new ExperimentalEmptyAdapter(),
    endpoint: "/api/copilotkit",
  });

  return handleRequest(request);
}
步驟 3:設定 CopilotKit 提供者
使用 A2A 中介軟體設定 CopilotKit API 路由後,設定管理 A2A 多代理會話的 CopilotKit 提供者元件。
要設定 CopilotKit 提供程序, [<CopilotKit>](https://docs.copilotkit.ai/reference/components/CopilotKit)元件必須包裝應用程式中支援 Copilot 的部分,如components/travel-chat.tsx檔案所示。
import { CopilotKit } from "@copilotkit/react-core";

// ...

/**
 * MAIN COMPONENT: CopilotKit Provider Wrapper
 *
 * This is the main export that wraps the chat component with the CopilotKit provider.
 * The provider configuration enables:
 * - Runtime connection to backend agents via /api/copilotkit endpoint
 * - A2A agent communication protocol
 * - Development console for debugging (disabled in production)
 */
export default function TravelChat({
  onItineraryUpdate,
  onBudgetUpdate,
  onWeatherUpdate,
  onRestaurantUpdate,
}: TravelChatProps) {
  return (
    <CopilotKit
      runtimeUrl="/api/copilotkit" // Backend endpoint for agent communication
      showDevConsole={false} // Disable dev console in production
      agent="a2a_chat" // Specify A2A agent protocol
    >
      <ChatInner
        onItineraryUpdate={onItineraryUpdate}
        onBudgetUpdate={onBudgetUpdate}
        onWeatherUpdate={onWeatherUpdate}
        onRestaurantUpdate={onRestaurantUpdate}
      />
    </CopilotKit>
  );
}
步驟 4:設定 Copilot UI 元件
設定 CopilotKit 提供者後,請設定一個 Copilot UI 元件,以便您與 AG-UI + A2A 代理程式進行互動。 CopilotKit 隨附多個內建聊天元件,包括CopilotPopup 、 CopilotSidebar和CopilotChat 。
要設定 Copilot UI 元件,請將其與核心頁面元件一起定義,如components/travel-chat.tsx檔案中所示。
import { CopilotChat } from "@copilotkit/react-ui";

// ...

const ChatInner = ({
  onItineraryUpdate,
  onBudgetUpdate,
  onWeatherUpdate,
  onRestaurantUpdate,
}: TravelChatProps) => {

  // ...

  /**
   * COPILOTKIT CHAT COMPONENT: Main chat interface
   *
   * The CopilotChat component provides the core chat interface with:
   * - Message history and real-time conversation
   * - Integration with all registered actions
   * - Customizable labels and instructions
   * - Built-in support for generative UI and HITL workflows
   */
  return (
    <div className="h-full">
      <CopilotChat
        className="h-full"
        labels={{
          initial:
            "👋 Hi! I'm your travel planning assistant.\n\nAsk me to plan a trip and I'll coordinate with specialized agents to create your perfect itinerary!",
        }}
        instructions="You are a helpful travel planning assistant. Help users plan their trips by coordinating with specialized agents."
      />
    </div>
  );
};
步驟 5:使用產生 UI 呈現代理間通信
設定 Copilot UI 元件後,使用聊天元件中的產生 UI呈現代理程式的通訊。
要在聊天元件中即時呈現代理到代理的通信,請定義一個名為send_message_to_a2a_agent的useCopilotAction()鉤子,如components/travel-chat.tsx檔案所示。
import { useCopilotAction } from "@copilotkit/react-core";
//A2A Communication visualization components
import { MessageToA2A } from "./a2a/MessageToA2A";
import { MessageFromA2A } from "./a2a/MessageFromA2A";
// ...
const ChatInner = ({
onItineraryUpdate,
onBudgetUpdate,
onWeatherUpdate,
onRestaurantUpdate,
}: TravelChatProps) => {
// ...
useCopilotAction({
name: "send_message_to_a2a_agent",
description: "Sends a message to an A2A agent",
available: "frontend", // This action runs on frontend only - no backend processing
parameters: [
{
name: "agentName",
type: "string",
description: "The name of the A2A agent to send the message to",
},
{
name: "task",
type: "string",
description: "The message to send to the A2A agent",
},
],
// Custom render function creates visual A2A communication components
render: (actionRenderProps: MessageActionRenderProps) => {
return (
<>
{/* MessageToA2A: Shows outgoing message (green box) */}
<MessageToA2A {...actionRenderProps} />
{/* MessageFromA2A: Shows agent response (blue box) */}
<MessageFromA2A {...actionRenderProps} />
</>
);
},
});
// ...
return (
<div className="h-full">
{*/ ... /*}
</div>
);
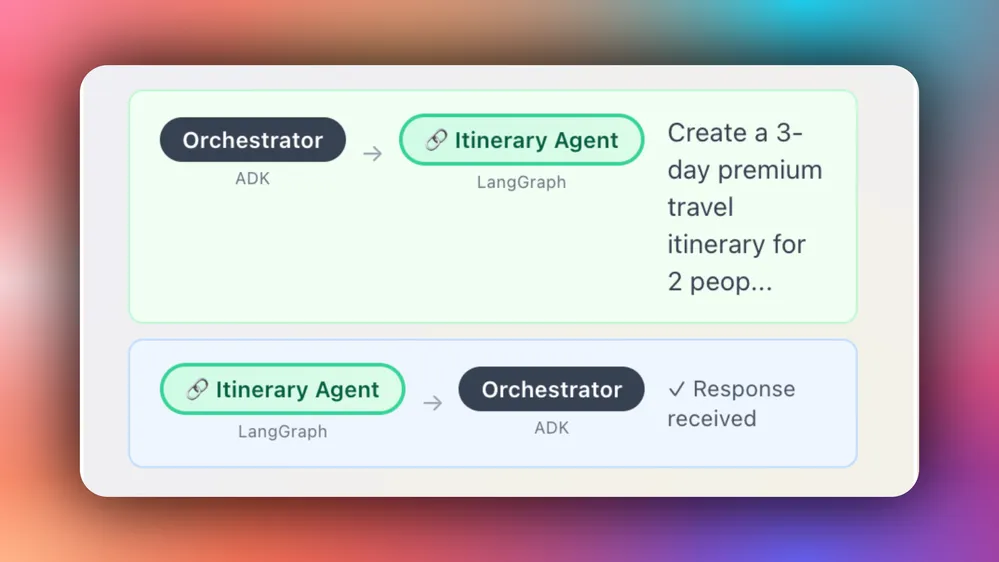
};當協調器代理程式發送請求或接收來自 A2A 代理程式的回應時,您應該會看到聊天元件上呈現的通信,如下所示。
步驟 6:在前端實現人機互動(HITL)
人機在環 (HITL) 允許代理在執行過程中請求人工輸入或批准,從而提高 AI 系統的可靠性和可信度。在建立需要處理複雜決策或需要人工判斷的操作的 AI 應用程式時,這種模式至關重要。
您可以在CopilotKit 文件中了解有關 Human in the Loop 的更多資訊。
要在前端實現人機互動 (HITL),您需要使用帶有renderAndWaitForResponse方法的 CopilotKit useCopilotKitAction鉤子,該方法允許從渲染函數非同步傳回值,如components/travel-chat.tsx檔案所示。
const ChatInner = ({
onItineraryUpdate,
onBudgetUpdate,
onWeatherUpdate,
onRestaurantUpdate,
}: TravelChatProps) => {
// State management for HITL budget approval workflow
// Tracks approval/rejection status for different budget proposals
const [approvalStates, setApprovalStates] = useState<
Record<string, { approved: boolean; rejected: boolean }>
>({});
/**
* HITL FEATURE: Budget approval workflow with renderAndWaitForResponse
*
* This useCopilotAction demonstrates CopilotKit's Human-in-the-Loop (HITL)
* capabilities, which pause agent execution and wait for user interaction
* before continuing the workflow.
*
* Key features:
* - renderAndWaitForResponse: Blocks agent until user provides input
* - State management: Tracks approval/rejection status across re-renders
* - Business logic integration: Only proceeds with approved budgets
* - Custom UI: Renders an interactive approval card with approve/reject buttons
* - Response handling: Sends the user's decision back to the agent
*/
useCopilotAction(
{
name: "request_budget_approval",
description: "Request user approval for the travel budget",
parameters: [
{
name: "budgetData",
type: "object",
description: "The budget breakdown data requiring approval",
},
],
// renderAndWaitForResponse pauses agent execution until the user responds
renderAndWaitForResponse: ({ args, respond }) => {
// Step 1: Validate budget data structure
if (!args.budgetData || typeof args.budgetData !== "object") {
return (
<div className="text-xs text-gray-500 p-2">
Loading budget data...
</div>
);
}
const budget = args.budgetData as BudgetData;
if (!budget.totalBudget || !budget.breakdown) {
return (
<div className="text-xs text-gray-500 p-2">
Loading budget data...
</div>
);
}
// Step 2: Create a unique key for this budget to track approval state
const budgetKey = `budget-${budget.totalBudget}`;
const currentState = approvalStates[budgetKey] || {
approved: false,
rejected: false,
};
// Step 3: Define approval handler - updates state and responds to agent
const handleApprove = () => {
setApprovalStates((prev) => ({
...prev,
[budgetKey]: { approved: true, rejected: false },
}));
// Send approval response back to the agent to continue the workflow
respond?.({ approved: true, message: "Budget approved by user" });
};
// Step 4: Define rejection handler - updates state and responds to agent
const handleReject = () => {
setApprovalStates((prev) => ({
...prev,
[budgetKey]: { approved: false, rejected: true },
}));
// Send rejection response back to the agent to handle accordingly
respond?.({ approved: false, message: "Budget rejected by user" });
};
// Step 5: Render interactive budget approval card
return (
<BudgetApprovalCard
budgetData={budget}
isApproved={currentState.approved}
isRejected={currentState.rejected}
onApprove={handleApprove}
onReject={handleReject}
/>
);
},
},
[approvalStates] // Re-register when approval states change
);
// ...
return (
<div className="h-full">
{/* ... */}
</div>
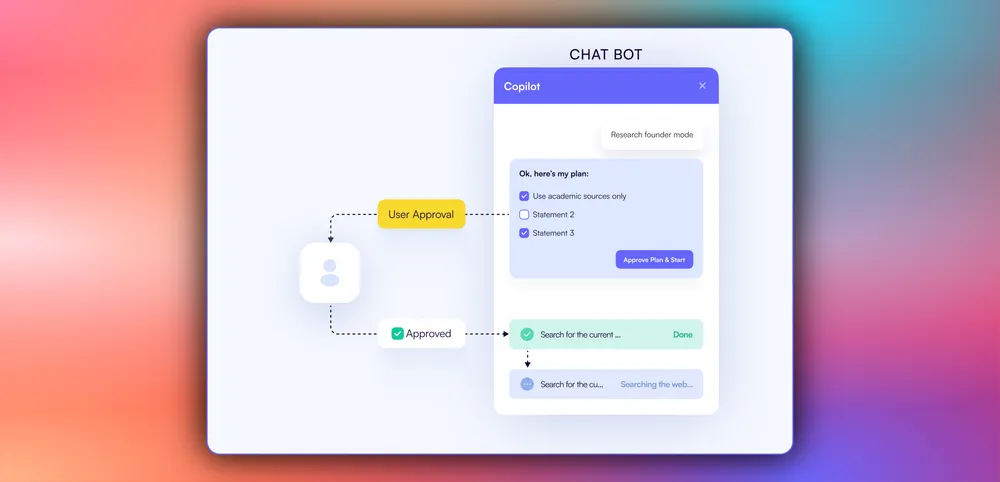
);當代理程式透過工具/操作名稱觸發前端操作,以在執行過程中請求手動輸入或回饋時,系統會提示最終使用者進行選擇(該選項會呈現在聊天介面中)。然後,用戶可以透過按下聊天介面中的按鈕進行選擇,如下所示。

步驟 6:在前端串流代理到代理程式的回應
若要在前端串流代理到代理程式的回應,請定義一個 useEffect() 鉤子,該鉤子解析 AI 代理程式回應以提取結構化資料(如行程、預算、天氣或餐廳推薦),如components/travel-chat.tsx檔案所示。
const ChatInner = ({
  onItineraryUpdate,
  onBudgetUpdate,
  onWeatherUpdate,
  onRestaurantUpdate,
}: TravelChatProps) => {
  // State management for HITL budget approval workflow
  // Tracks approval/rejection status for different budget proposals
  const [approvalStates, setApprovalStates] = useState<
    Record<string, { approved: boolean; rejected: boolean }>
  >({});

  // CopilotKit hook to access chat messages for data extraction
  // visibleMessages contains all messages currently displayed in the chat
  const { visibleMessages } = useCopilotChat();

  /**
   * GENERATIVE UI FEATURE: Auto-extract structured data from agent responses
   *
   * This useEffect demonstrates CopilotKit's ability to automatically parse and
   * extract structured data from AI agent responses, converting them into
   * interactive UI components.
   *
   * Process:
   * 1. Monitor all visible chat messages for agent responses
   * 2. Parse JSON data from the A2A agent message results
   * 3. Identify data type (itinerary, budget, weather, restaurant)
   * 4. Update parent component state to render corresponding UI components
   * 5. Apply business logic (e.g., budget approval checks)
   */
  useEffect(() => {
    const extractDataFromMessages = () => {
      // Step 1: Iterate through all visible messages in the chat
      for (const message of visibleMessages) {
        const msg = message as any;

        // Step 2: Filter for A2A agent response messages specifically
        if (
          msg.type === "ResultMessage" &&
          msg.actionName === "send_message_to_a2a_agent"
        ) {
          try {
            const result = msg.result;
            let parsed;

            // Step 3: Parse the agent response data (handle both string and object formats)
            if (typeof result === "string") {
              let cleanResult = result;
              // Remove A2A protocol prefix if present
              if (result.startsWith("A2A Agent Response: ")) {
                cleanResult = result.substring("A2A Agent Response: ".length);
              }
              parsed = JSON.parse(cleanResult);
            } else if (typeof result === "object" && result !== null) {
              parsed = result;
            }

            // Step 4: Identify data type and trigger appropriate UI updates
            if (parsed) {
              // Itinerary data: destination + itinerary array
              if (
                parsed.destination &&
                parsed.itinerary &&
                Array.isArray(parsed.itinerary)
              ) {
                onItineraryUpdate?.(parsed as ItineraryData);
              }
              // Budget data: requires user approval before displaying
              else if (
                parsed.totalBudget &&
                parsed.breakdown &&
                Array.isArray(parsed.breakdown)
              ) {
                const budgetKey = `budget-${parsed.totalBudget}`;
                const isApproved = approvalStates[budgetKey]?.approved || false;
                // Step 5: Apply HITL approval check - only show if user approved
                if (isApproved) {
                  onBudgetUpdate?.(parsed as BudgetData);
                }
              }
              // Weather data: destination + forecast array
              else if (
                parsed.destination &&
                parsed.forecast &&
                Array.isArray(parsed.forecast)
              ) {
                const weatherDataParsed = parsed as WeatherData;
                onWeatherUpdate?.(weatherDataParsed);
              }
              // Restaurant data: destination + meals array
              else if (
                parsed.destination &&
                parsed.meals &&
                Array.isArray(parsed.meals)
              ) {
                onRestaurantUpdate?.(parsed as RestaurantData);
              }
            }
          } catch (e) {
            // Silently handle parsing errors - not all messages contain structured data
          }
        }
      }
    };

    extractDataFromMessages();
  }, [
    visibleMessages,
    approvalStates,
    onItineraryUpdate,
    onBudgetUpdate,
    onWeatherUpdate,
    onRestaurantUpdate,
  ]);

  // ...

  return (
    <div className="h-full">
      {/* ... */}
    </div>
  );
};
然後,提取的結構化資料觸發 UI 更新以呈現互動式元件,如app/page.tsx檔案所示。
"use client";

import { useState } from "react";
import TravelChat from "@/components/travel-chat";
import { ItineraryCard, type ItineraryData } from "@/components/ItineraryCard";
import { BudgetBreakdown, type BudgetData } from "@/components/BudgetBreakdown";
import { WeatherCard, type WeatherData } from "@/components/WeatherCard";
import { type RestaurantData } from "@/components/ItineraryCard";

export default function Home() {
  const [itineraryData, setItineraryData] = useState<ItineraryData | null>(null);
  const [budgetData, setBudgetData] = useState<BudgetData | null>(null);
  const [weatherData, setWeatherData] = useState<WeatherData | null>(null);
  const [restaurantData, setRestaurantData] = useState<RestaurantData | null>(null);

  return (
    <div className="relative flex h-screen overflow-hidden bg-[#DEDEE9] p-2">

      // ...

      <div className="flex flex-1 overflow-hidden z-10 gap-2">

        // ...

        <div className="flex-1 overflow-hidden">
          <TravelChat
            onItineraryUpdate={setItineraryData}
            onBudgetUpdate={setBudgetData}
            onWeatherUpdate={setWeatherData}
            onRestaurantUpdate={setRestaurantData}
          />
        </div>
      </div>

      <div className="flex-1 overflow-y-auto rounded-lg bg-white/30 backdrop-blur-sm">
        <div className="max-w-5xl mx-auto p-8">

          // ...

          {itineraryData && (
            <div className="mb-4">
              <ItineraryCard data={itineraryData} restaurantData={restaurantData} />
            </div>
          )}

          {(weatherData || budgetData) && (
            <div className="grid grid-cols-1 lg:grid-cols-2 gap-4">
              {weatherData && (
                <div>
                  <WeatherCard data={weatherData} />
                </div>
              )}

              {budgetData && (
                <div>
                  <BudgetBreakdown data={budgetData} />
                </div>
              )}
            </div>
          )}
        </div>
      </div>
      </div>
    </div>
  );
}
如果您查詢代理並批准其回饋請求,您應該會在 UI 中看到代理程式的回應或結果流,如下所示。
結論
特別感謝:
我要特別感謝Mark Morgan ,他建立了 A2A 旅行演示,包括所有後端多代理功能以及美觀的前端。真是太棒了!
在GitHub上追蹤他!
讓我快速回顧一下我們已經建立的內容:
在本指南中,我們介紹了使用 A2A + AG-UI 協定和 CopilotKit 建置全端代理程式到代理通訊的步驟。
雖然我們已經探索了一些功能,但我們僅僅觸及了 CopilotKit 無數用例的表面,從建置互動式 AI 聊天機器人到建置代理解決方案——本質上,CopilotKit 可讓您在幾分鐘內為您的產品加入大量有用的 AI 功能。
希望本指南能幫助您更輕鬆地將 AI 驅動的 Copilots 整合到您現有的應用程式中。
在Twitter上關注 CopilotKit 並打招呼,如果您想建立一些很酷的東西,請加入Discord社群。
原文出處:https://dev.to/copilotkit/how-to-make-agents-talk-to-each-other-and-your-app-using-a2a-ag-ui-4amo
1) --- 會變成分隔線(上一行必須是空白)
2) # 會變成一級標題
3) ## 會變成二級標題
4) ### 會變成三級標題
5) **粗體文字**會顯示粗體文字
6) ```當第一行與最後一行會顯示程式碼
7) 請搜尋 Markdown 語法,了解各種格式