

您是否曾註意到網頁在執行繁重任務時會凍結?發生這種情況是因為 JavaScript 預設在單執行緒上執行,導致了糟糕的使用者體驗。使用者無法交互,必須等到任務完成。這個問題可以透過使用 Web Worker 來解決。在本文中,我們將透過建立圖像壓縮應用程式,討論什麼是 Web Worker、為什麼它們有用以及如何使用它們作為實際範例。很令人興奮,對吧?讓我們開始吧。
什麼是 Web Worker?
Web Workers 讓 JavaScript 在後台執行任務而不阻塞主線程,從而使您的 UI 保持流暢且響應迅速。您可以使用 Web Workers API 建立它們,它接受兩個參數: url和options 。這是一個建立 Web Worker 的簡單範例。
const worker = new Worker('./worker.js', { type: 'module' });為什麼要使用 Web Worker?
如前所述,Web Worker 在背景執行任務。以下是使用它們的一些原因
-
防止大量計算期間頁面延遲
-
高效處理大資料
-
提高複雜 Web 應用程式的效能
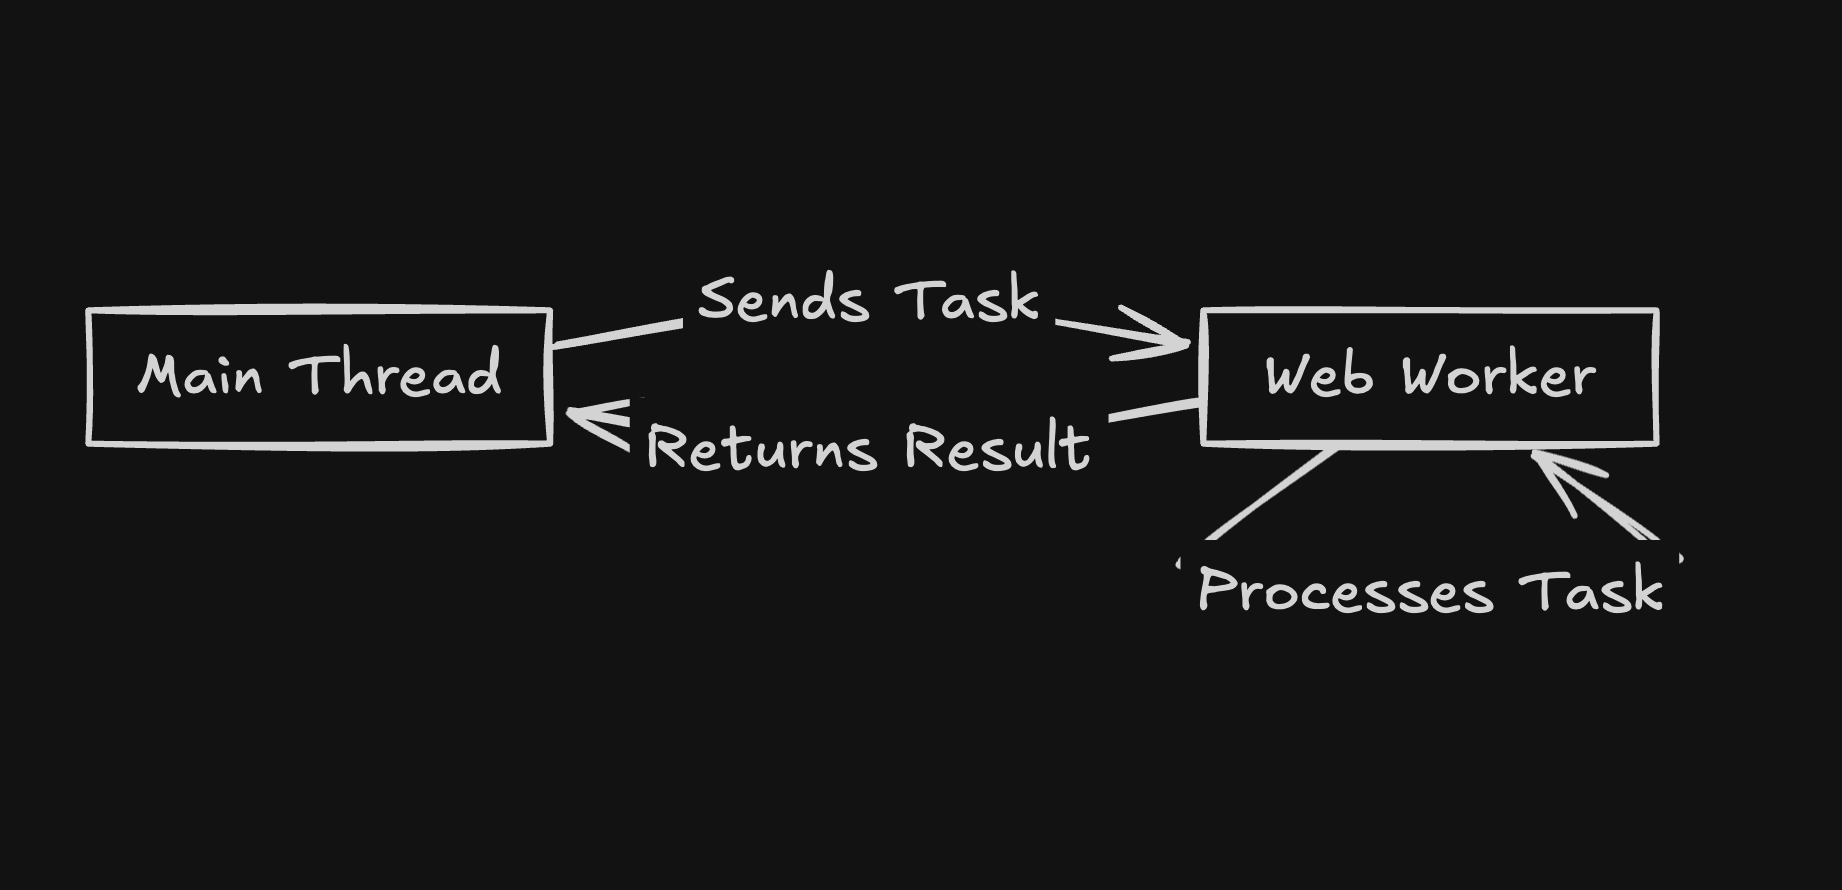
它們如何運作?
-
主線程建立一個 worker並賦予它一個任務
-
worker在後台處理任務
-
完成後,將結果傳回主線程
好了,現在我們知道了什麼是 Web Worker、為什麼要使用它們以及它們如何運作。但這還不夠,對吧?因此讓我們建立圖像壓縮應用程式並看看如何在實踐中使用 Web 工作者。
專案設定
使用 TypeScript 和 Tailwind CSS 建立 Next.js 專案
npx create-next-app@latest --typescript web-worker-with-example

cd web-worker-with-example
為了在瀏覽器中壓縮圖像,我們將使用@jsquash/web npm 庫對 WebP 圖像進行編碼和解碼。該庫由 WebAssembly 提供支持,因此讓我們安裝它。
npm install @jsquash/webp太好了,我們的專案設定已經完成。在下一節中,我們將建立一個工作腳本來管理映像壓縮。
建立工作者腳本
工作腳本是一個 JavaScript 或 TypeScript 文件,其中包含處理工作訊息事件的程式碼。
在src/worker資料夾中建立一個imageCompressionWorker.ts檔案並新增以下程式碼。
/// <reference lib="webworker" />

const ctx = self as DedicatedWorkerGlobalScope;

import { decode, encode } from '@jsquash/webp';

ctx.onmessage = async (
  event: MessageEvent<{
    id: number;
    imageFile: File;
    options: { quality: number };
  }>
) => {
  // make sure the wasm is loaded
  await import('@jsquash/webp');

  const { imageFile, options, id } = event.data;
  const fileBuffer = await imageFile.arrayBuffer();
  try {
    const imageData = await decode(fileBuffer);
    const compressedBuffer = await encode(imageData, options);
    const compressedBlob = new Blob([compressedBuffer], {
      type: imageFile.type,
    });
    ctx.postMessage({ id, blob: compressedBlob });
  } catch (error: unknown) {
    const message = error instanceof Error ? error.message : 'Unknown error';
    ctx.postMessage({ id, error: message });
  }
};

export {};在這裡,我們從@jsquash/webp庫導入encode和decode方法,並使用 worker 全域範圍self來監聽來自主執行緒的訊息。
當訊息到達時,我們會獲取圖像檔案和選項,然後透過先解碼然後用品質選項對其進行編碼來壓縮圖像。最後,我們使用postMessage將壓縮的映像 blob 傳送回主執行緒。如果發生錯誤,我們將處理它並使用postMessage發回錯誤訊息。
工作腳本已準備就緒。在下一節中,我們將建立 Imagelist 元件、更新樣式、更新頁面,並使用 worker 腳本來處理壓縮。
使用 Web Worker
在開始之前,讓我們用以下內容更新global.css檔案並刪除預設樣式。
@tailwind base;
@tailwind components;
@tailwind utilities;在src/components資料夾中建立一個ImageList.tsx並新增以下程式碼。
/* eslint-disable @next/next/no-img-element */
import React from 'react';

export type ImgData = {
  id: number;
  file: File;
  status: 'compressing' | 'done' | 'error';
  originalUrl: string;
  compressedUrl?: string;
  error?: string;
  compressedSize?: number;
};

interface ImageListProps {
  images: ImgData[];
}

const formatBytes = (bytes: number): string => {
  if (bytes === 0) return '0 Bytes';
  const k = 1024;
  const dm = 2;
  const sizes = ['Bytes', 'KB', 'MB', 'GB', 'TB'];
  const i = Math.floor(Math.log(bytes) / Math.log(k));
  return parseFloat((bytes / Math.pow(k, i)).toFixed(dm)) + ' ' + sizes[i];
};

const ImageList: React.FC<ImageListProps> = ({ images }) => {
  return (
    <div className="mt-4">
      <h2 className="text-xl font-semibold mb-2">Image List</h2>
      <div className="space-y-4">
        {images.map((img) => (
          <div
            key={img.id}
            className="flex flex-col md:flex-row items-center border p-4 rounded"
          >
            <div className="flex-1 flex flex-col items-center">
              <p className="font-bold mb-2">Original</p>
              <img
                src={img.originalUrl}
                alt="Original"
                className="w-32 h-32 object-cover rounded border mb-2"
              />
              <p className="text-sm">Size: {formatBytes(img.file.size)}</p>
            </div>
            {img.status === 'done' && img.compressedUrl ? (
              <div className="flex-1 flex flex-col items-center mt-4 md:mt-0">
                <p className="font-bold mb-2">Compressed</p>
                <img
                  src={img.compressedUrl}
                  alt="Compressed"
                  className="w-32 h-32 object-cover rounded border mb-2"
                />
                <p className="text-sm">
                  Size:{' '}
                  {img.compressedSize ? formatBytes(img.compressedSize) : 'N/A'}
                </p>
                <a
                  href={img.compressedUrl}
                  download={`${img.file.name.replace(
                    /\.[^/.]+$/,
                    ''
                  )}-compressed.webp`}
                  className="mt-2 inline-block px-3 py-1 bg-blue-500 text-white rounded"
                >
                  Download
                </a>
              </div>
            ) : img.status === 'compressing' ? (
              <div className="flex-1 flex flex-col items-center mt-4 md:mt-0">
                <p className="font-bold">Compressing...</p>
              </div>
            ) : img.status === 'error' ? (
              <div className="flex-1 flex flex-col items-center mt-4 md:mt-0">
                <p className="font-bold text-red-500">Error in compression</p>
              </div>
            ) : null}
          </div>
        ))}
      </div>
    </div>
  );
};

export default ImageList;
ImageList 元件接受一個 prop,即images ,它是一個ImgData列表。然後,它顯示原始圖像和壓縮圖像,顯示它們的大小並提供壓縮圖像的下載選項。
接下來,用下面的程式碼更新app/page.tsx ,讓我們一起來看看各個部分。
'use client';

import { useState, useRef, useEffect } from 'react';
import ImageList, { ImgData } from '../components/ImageList';

export default function Home() {
  const [images, setImages] = useState<ImgData[]>([]);
  const [text, setText] = useState('');

  const workerRef = useRef<Worker | null>(null);

  const handleFileChange = (e: React.ChangeEvent<HTMLInputElement>) => {
    const files = e.target.files;
    if (!files || !workerRef.current) return;
    const filesArray = Array.from(files);
    filesArray.forEach((file, index) => {
      const id = Date.now() + index;

      const originalUrl = URL.createObjectURL(file);
      setImages((prev) => [
        ...prev,
        { id, file, status: 'compressing', originalUrl },
      ]);

      // Send the file with its id to the worker.
      workerRef.current!.postMessage({
        id,
        imageFile: file,
        options: { quality: 75 },
      });
    });
  };

  // Initialize the worker once when the component mounts.
  useEffect(() => {
    const worker = new Worker(
      new URL('../worker/imageCompressionWorker.ts', import.meta.url),
      { type: 'module' }
    );
    workerRef.current = worker;

    // Listen for messages from the worker.
    worker.onmessage = (
      event: MessageEvent<{ id: number; blob?: Blob; error?: string }>
    ) => {
      const { id, blob: compressedBlob, error } = event.data;
      setImages((prev) =>
        prev.map((img) => {
          if (img.id === id) {
            if (error) return { ...img, status: 'error', error };
            const compressedSize = compressedBlob!.size;
            const compressedUrl = URL.createObjectURL(compressedBlob!);
            return { ...img, status: 'done', compressedUrl, compressedSize };
          }
          return img;
        })
      );
    };

    return () => {
      worker.terminate();
    };
  }, []);

  return (
    <div className="min-h-screen p-8">
      <h1 className="text-2xl font-bold text-center mb-4">
        Image Compression with Web Workers
      </h1>
      <div className="rounded shadow p-4 mb-4 flex flex-col gap-2">
        <p className="text-sm">
          While images are compressing, you can interact with the textarea below
          and observe the text being typed and UI is not frozen.
        </p>
        <p className="text-sm">
          Even you can open the dev tools and then open the performance tab and
          see the INP(Interaction to Next Paint) is very low.
        </p>
        <textarea
          className="w-full h-32 border rounded p-2 text-black"
          placeholder="Type here while images are compressing..."
          value={text}
          onChange={(e) => setText(e.target.value)}
        ></textarea>
      </div>
      <div className="rounded shadow p-4">
        <input
          type="file"
          multiple
          accept="image/webp"
          onChange={handleFileChange}
        />
        <ImageList images={images} />
      </div>
    </div>
  );
}
首先,我們匯入鉤子和 ImageList 元件,以及 ImgData 類型。
import { useState, useRef, useEffect } from 'react';
import ImageList, { ImgData } from '../components/ImageList';
然後,我們建立一個 ref 來儲存 worker 實例,因為我們不想在每次重新渲染時重複建立 worker。如果工作實例發生變化,我們也希望避免重新渲染元件。
const workerRef = useRef<Worker | null>(null);在 useEffect 中,我們使用先前建立的imageCompressionWorker.ts工作腳本初始化工作實例。
我們使用帶有
import.meta.urlURL API。這使得路徑相對於當前腳本而不是 HTML 頁面。這樣,捆綁器就可以安全地進行最佳化,例如重命名,因為否則,worker.jsURL 可能會指向捆綁器未管理的文件,從而阻止它做出假設。點擊此處了解更多。
一旦工作者初始化完畢,我們就會監聽來自它的訊息。當我們收到訊息時,我們會提取 id、blob 和 error,然後使用新值更新映像狀態。
最後,我們在元件卸載時清理工作進程。
useEffect(() => {
    const worker = new Worker(
      new URL('../worker/imageCompressionWorker.ts', import.meta.url),
      { type: 'module' }
    );
    workerRef.current = worker;

    // Listen for messages from the worker.
    worker.onmessage = (
      event: MessageEvent<{ id: number; blob?: Blob; error?: string }>
    ) => {
      const { id, blob: compressedBlob, error } = event.data;
      setImages((prev) =>
        prev.map((img) => {
          if (img.id === id) {
            if (error) return { ...img, status: 'error', error };
            const compressedSize = compressedBlob!.size;
            const compressedUrl = URL.createObjectURL(compressedBlob!);
            return { ...img, status: 'done', compressedUrl, compressedSize };
          }
          return img;
        })
      );
    };

    return () => {
      worker.terminate();
    };
}, []);為了管理映像檔的上傳,我們使用handleFileChange方法。此方法監聽文件輸入的onchange事件,處理文件,並傳送給worker進行壓縮。
const handleFileChange = (e: React.ChangeEvent<HTMLInputElement>) => {
    const files = e.target.files;
    if (!files || !workerRef.current) return;
    const filesArray = Array.from(files);
    filesArray.forEach((file, index) => {
      const id = Date.now() + index;

      const originalUrl = URL.createObjectURL(file);
      setImages((prev) => [
        ...prev,
        { id, file, status: 'compressing', originalUrl },
      ]);

      // Send the file with its id to the worker.
      workerRef.current!.postMessage({
        id,
        imageFile: file,
        options: { quality: 75 },
      });
    });
  };
最後,渲染元素文字區域、圖像輸入和圖像列表。
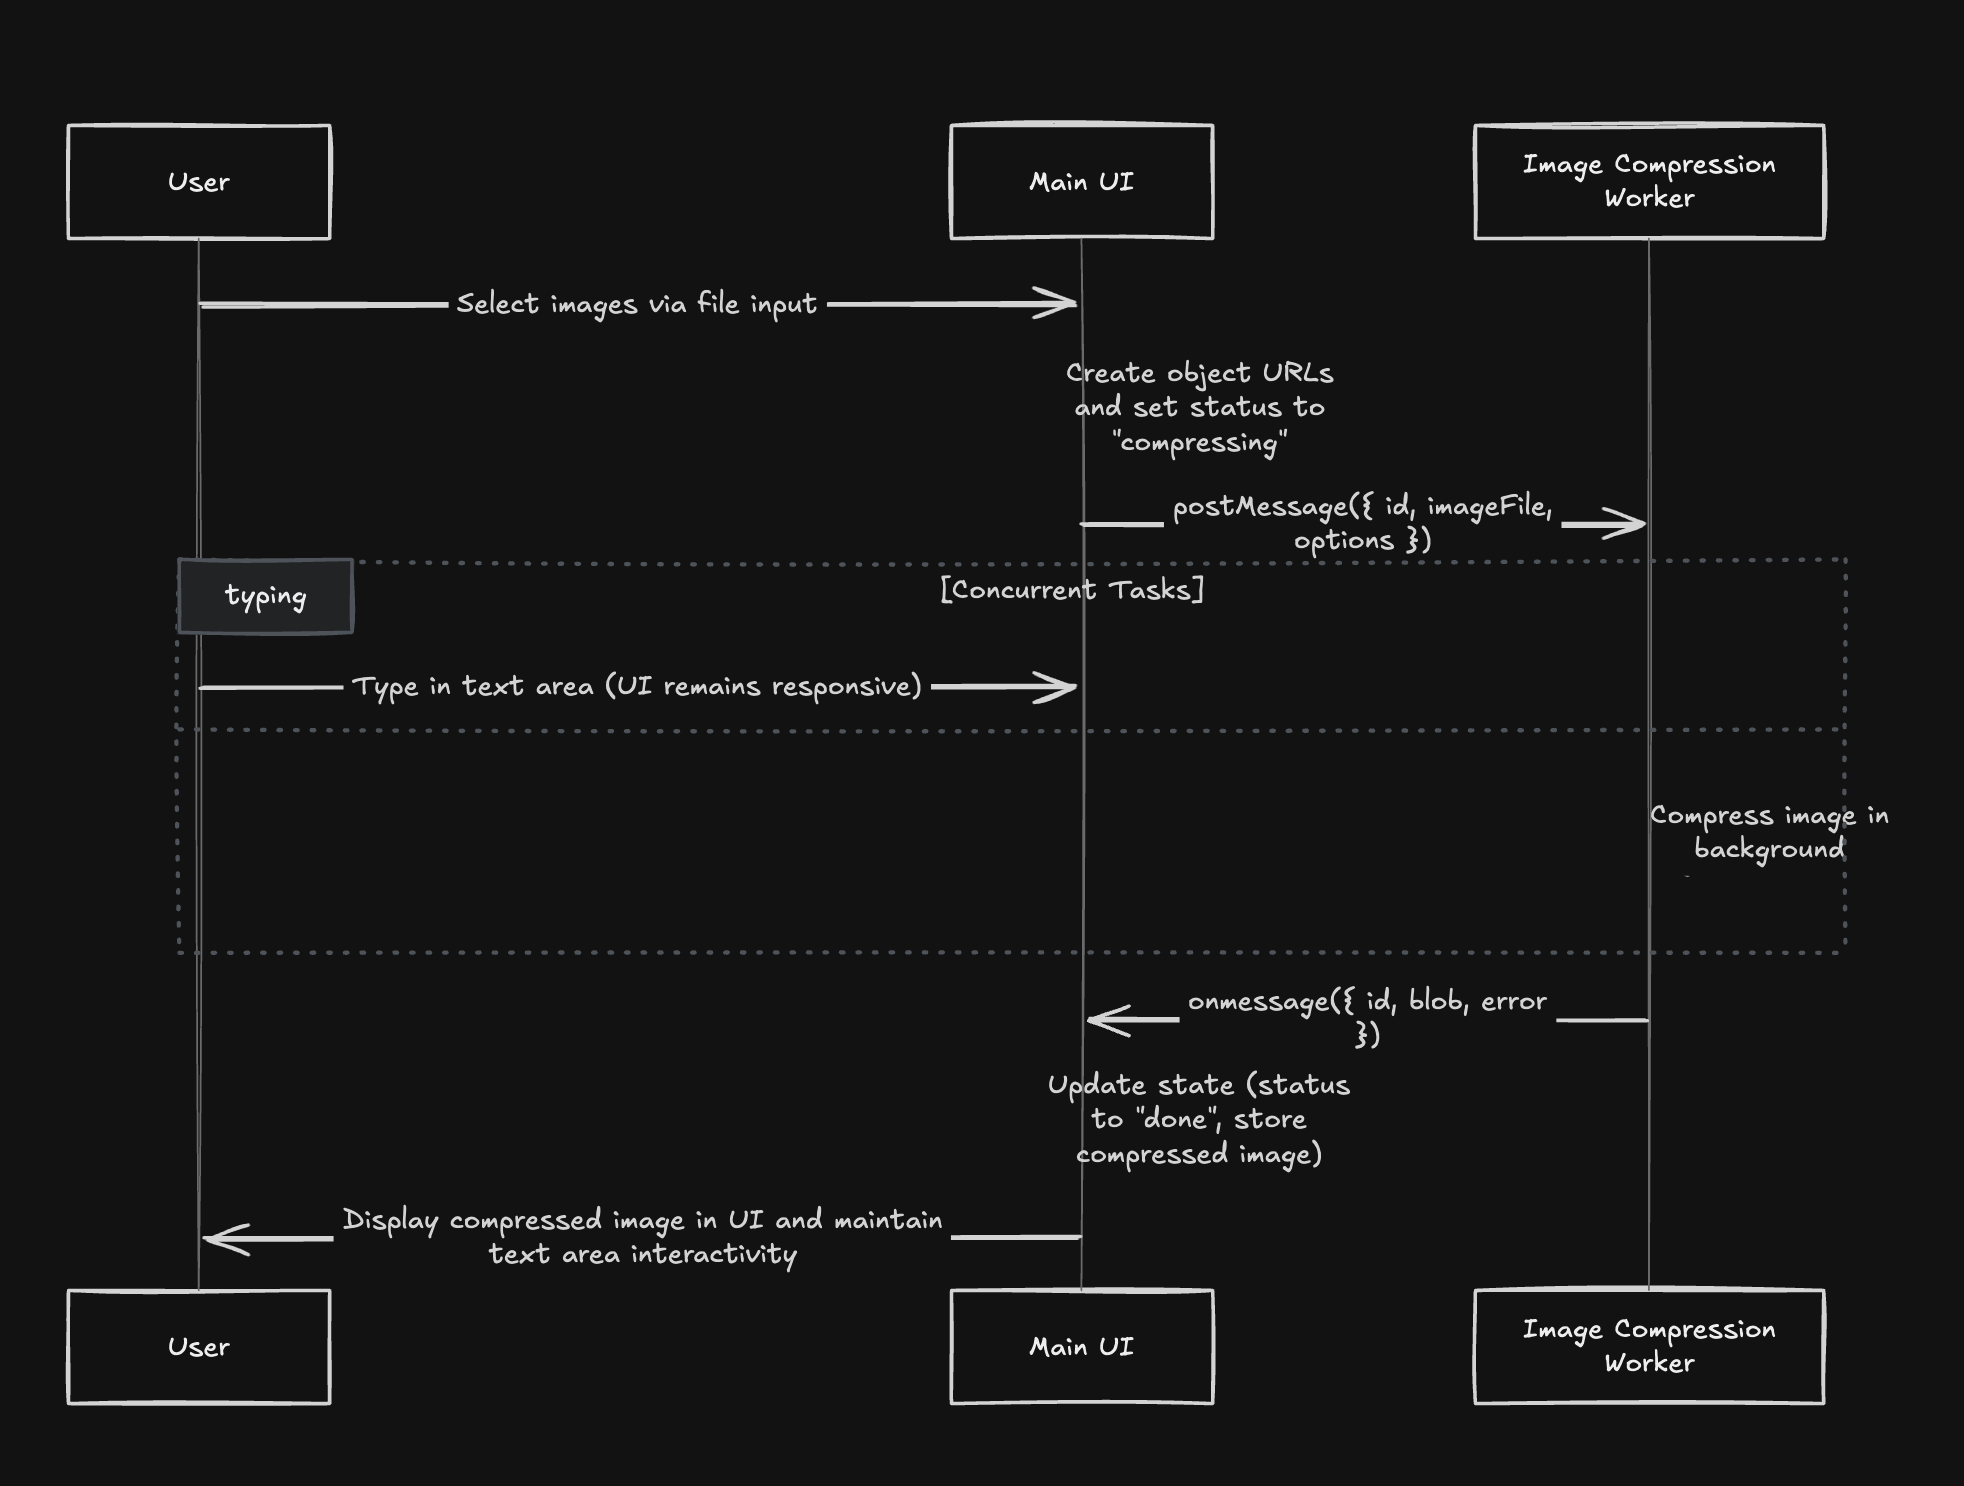
-
使用者選擇圖像:使用者使用檔案輸入選擇圖像,這使得元件建立物件 URL 並將每個圖像標記為「壓縮」。
-
工作者通訊:元件將每個影像檔案(帶有選項)傳送到 Web 工作者。
-
平行進程:
* **Text Area Interaction:** At the same time, the user can type in the text area, showing that the UI is not blocked.
* **Image Compression:** The worker compresses the image in the background.
- 完成:壓縮完成後,工作者將結果傳回元件,元件使用壓縮影像更新 UI,同時文字區域保持平穩運作。
太好了,一切都設定好了。在下一節中,我們將執行該應用程式並了解 Web Worker 的工作原理。

執行範例
開啟終端機並執行以下命令,然後前往http://localhost:3000/ 。
npm run dev
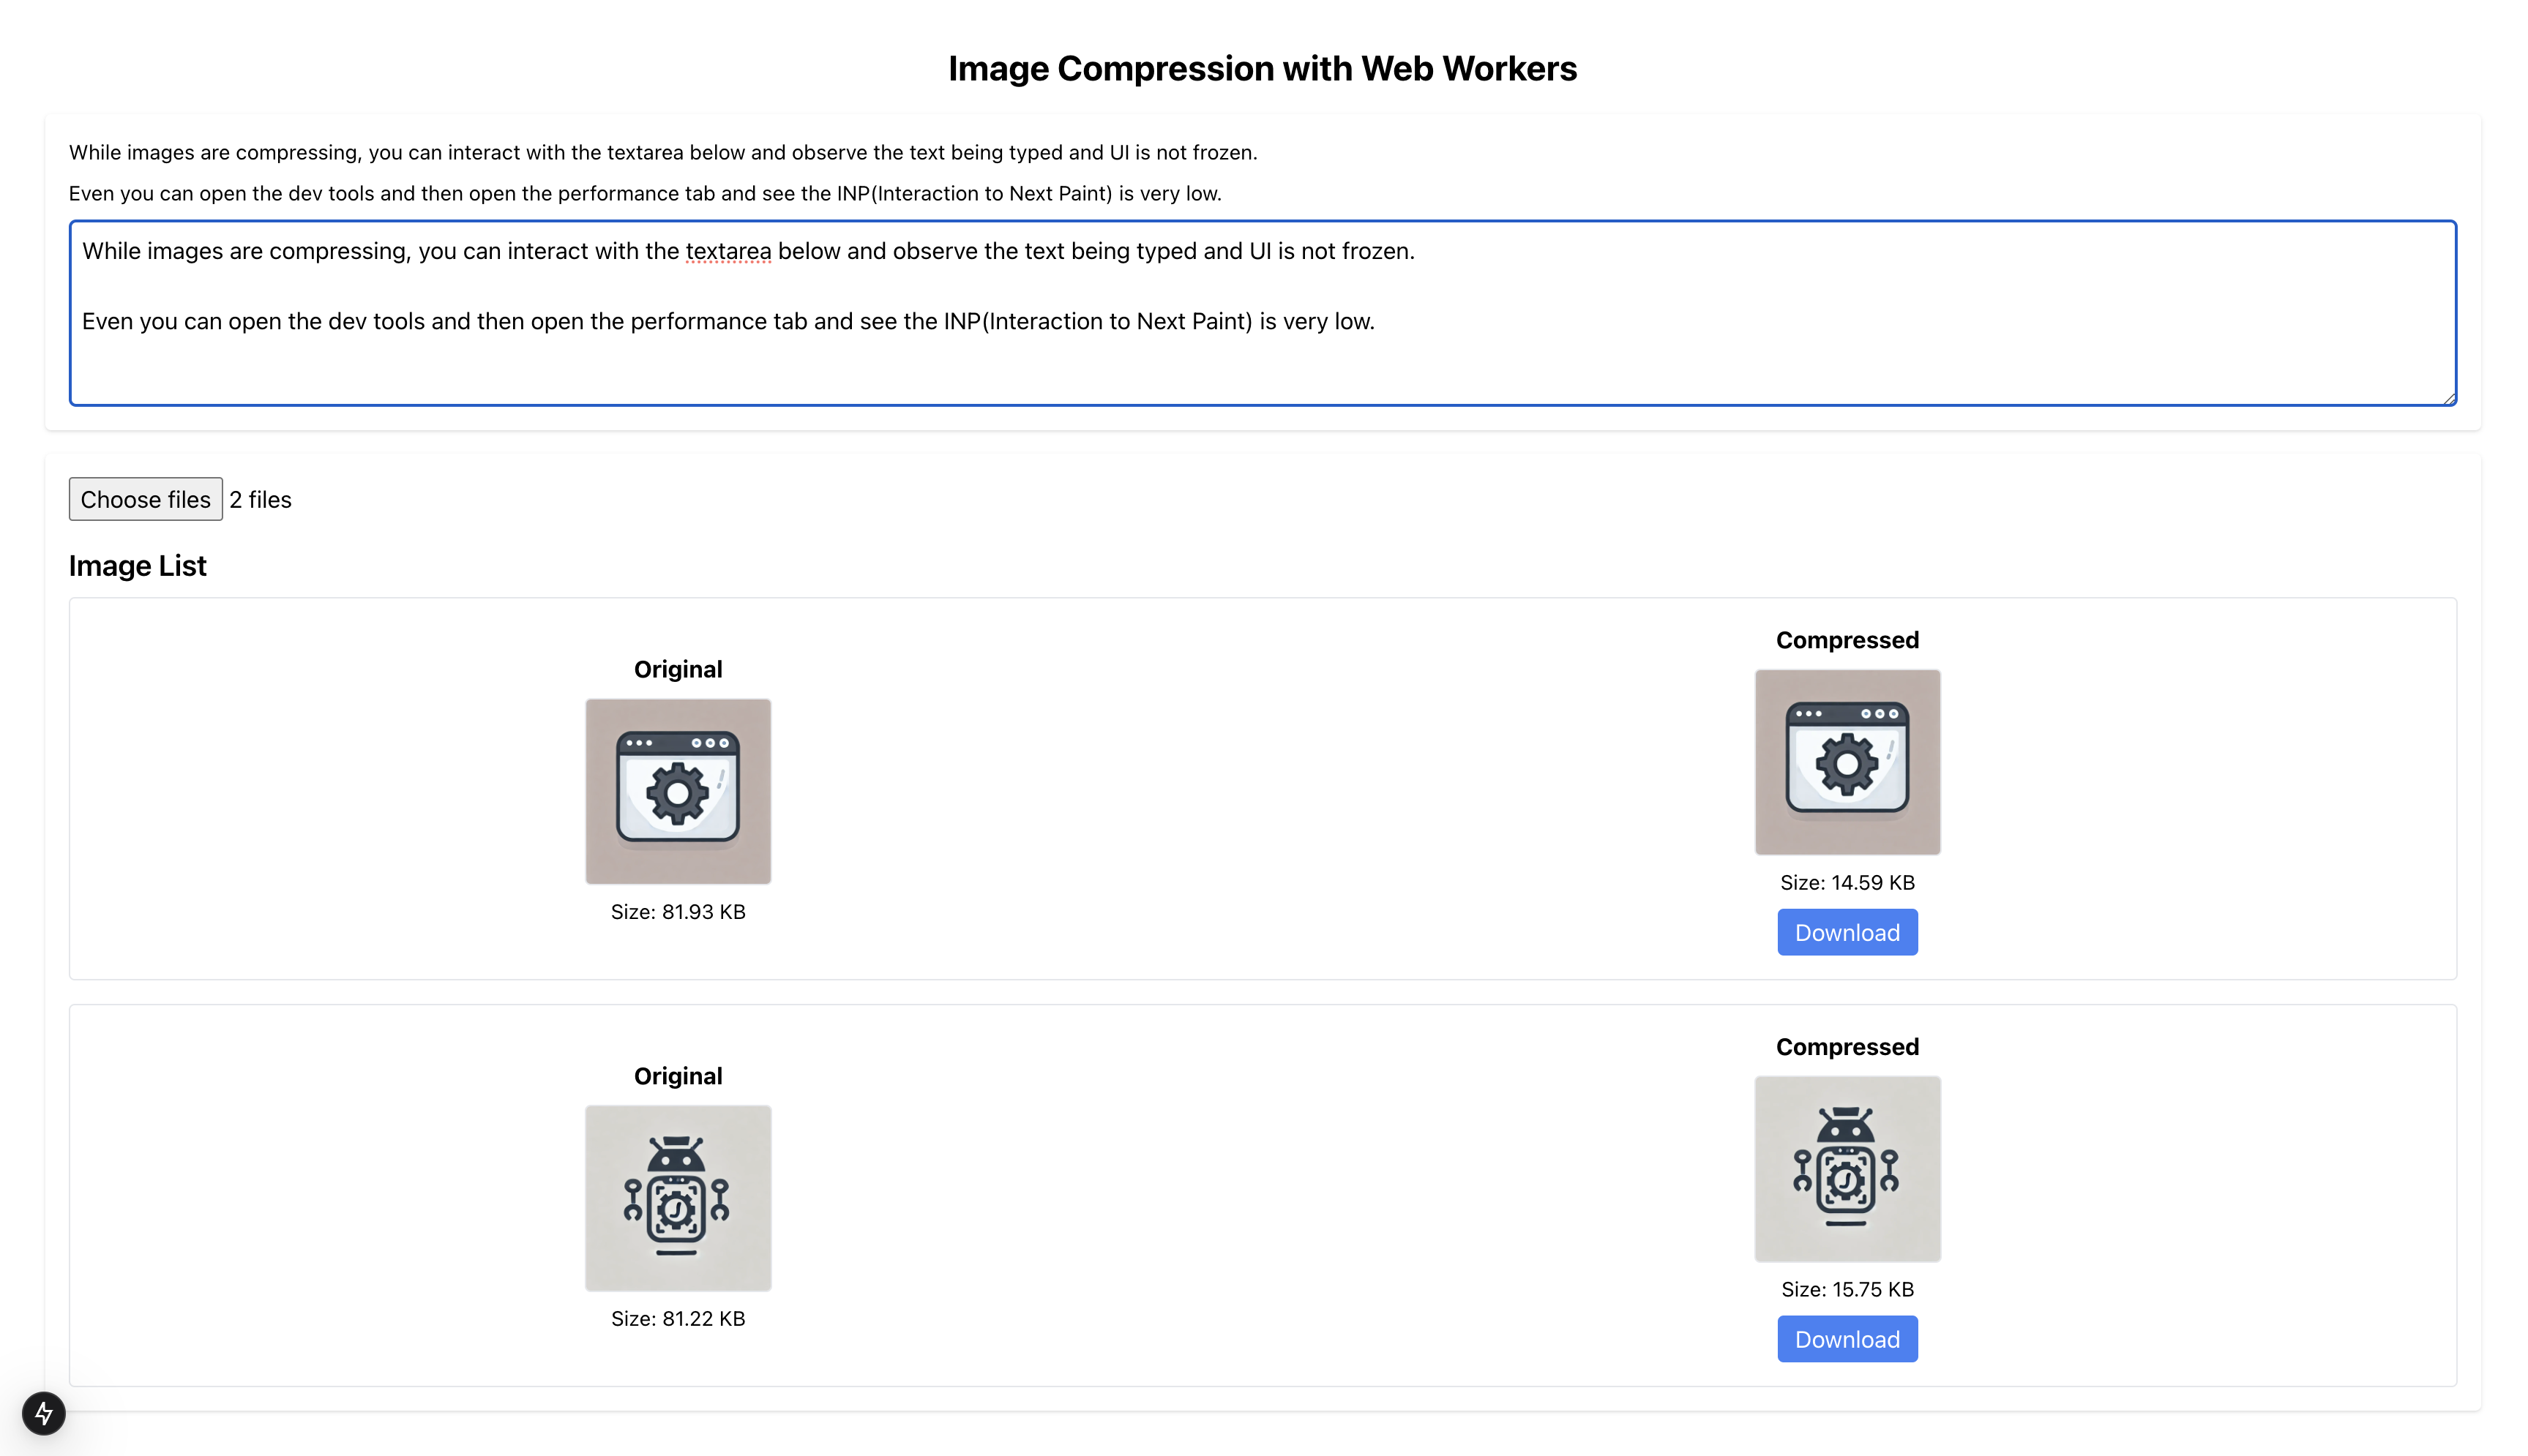
在此嘗試現場演示: https://web-worker-with-example.vercel.app/
結論
Web Worker 是提升應用程式效能的絕佳工具。透過使用 Web Workers,您可以確保應用程式更快、更流暢、更容易回應。然而,它們不應過度使用,並且只應在必要時使用。另外,請檢查瀏覽器支援情況,目前全球支援率約 98%。您可以在這裡查看。
這就是本主題的全部內容。感謝您的閱讀!如果您發現這篇文章有用,請考慮按讚、留言並與他人分享。
資源
原文出處:https://dev.to/sachinchaurasiya/how-web-worker-works-with-a-practical-example-c98

1) --- 會變成分隔線(上一行必須是空白)
2) # 會變成一級標題
3) ## 會變成二級標題
4) ### 會變成三級標題
5) **粗體文字**會顯示粗體文字
6) ```當第一行與最後一行會顯示程式碼
7) 請搜尋 Markdown 語法,了解各種格式