

有沒有這樣的經驗:忘了關水泵,回來後發現露台上竟然有個迷你游泳池?我有過。所以,我用 ESP32、Firebase 和一個簡單的 Web 儀錶板來建立了這個智慧水泵控制器。現在,只需一個瀏覽器,我就可以打開或關閉水泵、檢測漏水,甚至計算用水量。沒錯,它聽起來就很酷。
無論你是想深入研究物聯網,還是只是厭倦了忘記關掉水泵,這都是一個有趣且實用的專案,值得一試。它還能讓你輕鬆體驗雲端連接硬件,避免不知所措。
🔍 為什麼要做這個專案?
在每家每戶,總是有人喊著“嘿,關掉馬達!”,而另一個人則回答說“哦不,我忘了!”🤦🏼♂️
這種日常的混亂啟發了我,讓我建立了一個更聰明的解決方案——一個可以讓我透過手機或筆記型電腦遠端控制馬達的系統。它簡單實用,即時運作的效果也讓我驚喜不已。
所以我想,為什麼不建立一個控制器呢:
-
可在任何網頁瀏覽器上執行
-
使用 Firebase 進行即時資料同步
-
不需要昂貴的元件
-
讓我免於每天在家打水仗
-
甚至計算用水費用
這是一個了解物聯網 + 雲端 + Web UI 的絕佳入門專案。
此外,由於 ESP32 自帶 Wi-Fi,非常適合這類專案。搭配 Firebase 即時資料庫,即可實現即時更新,無需自訂後端。雙贏!
🛠️ 你需要什麼
在開始建置之前,請確保您已收集所有必要的硬體和軟體工具。
硬體
以下是我使用的方法:
-
ESP32 開發板 – 您的專案的大腦,內建 Wi-Fi。
-
5V 繼電器模組-充當控制幫浦的電子開關。
-
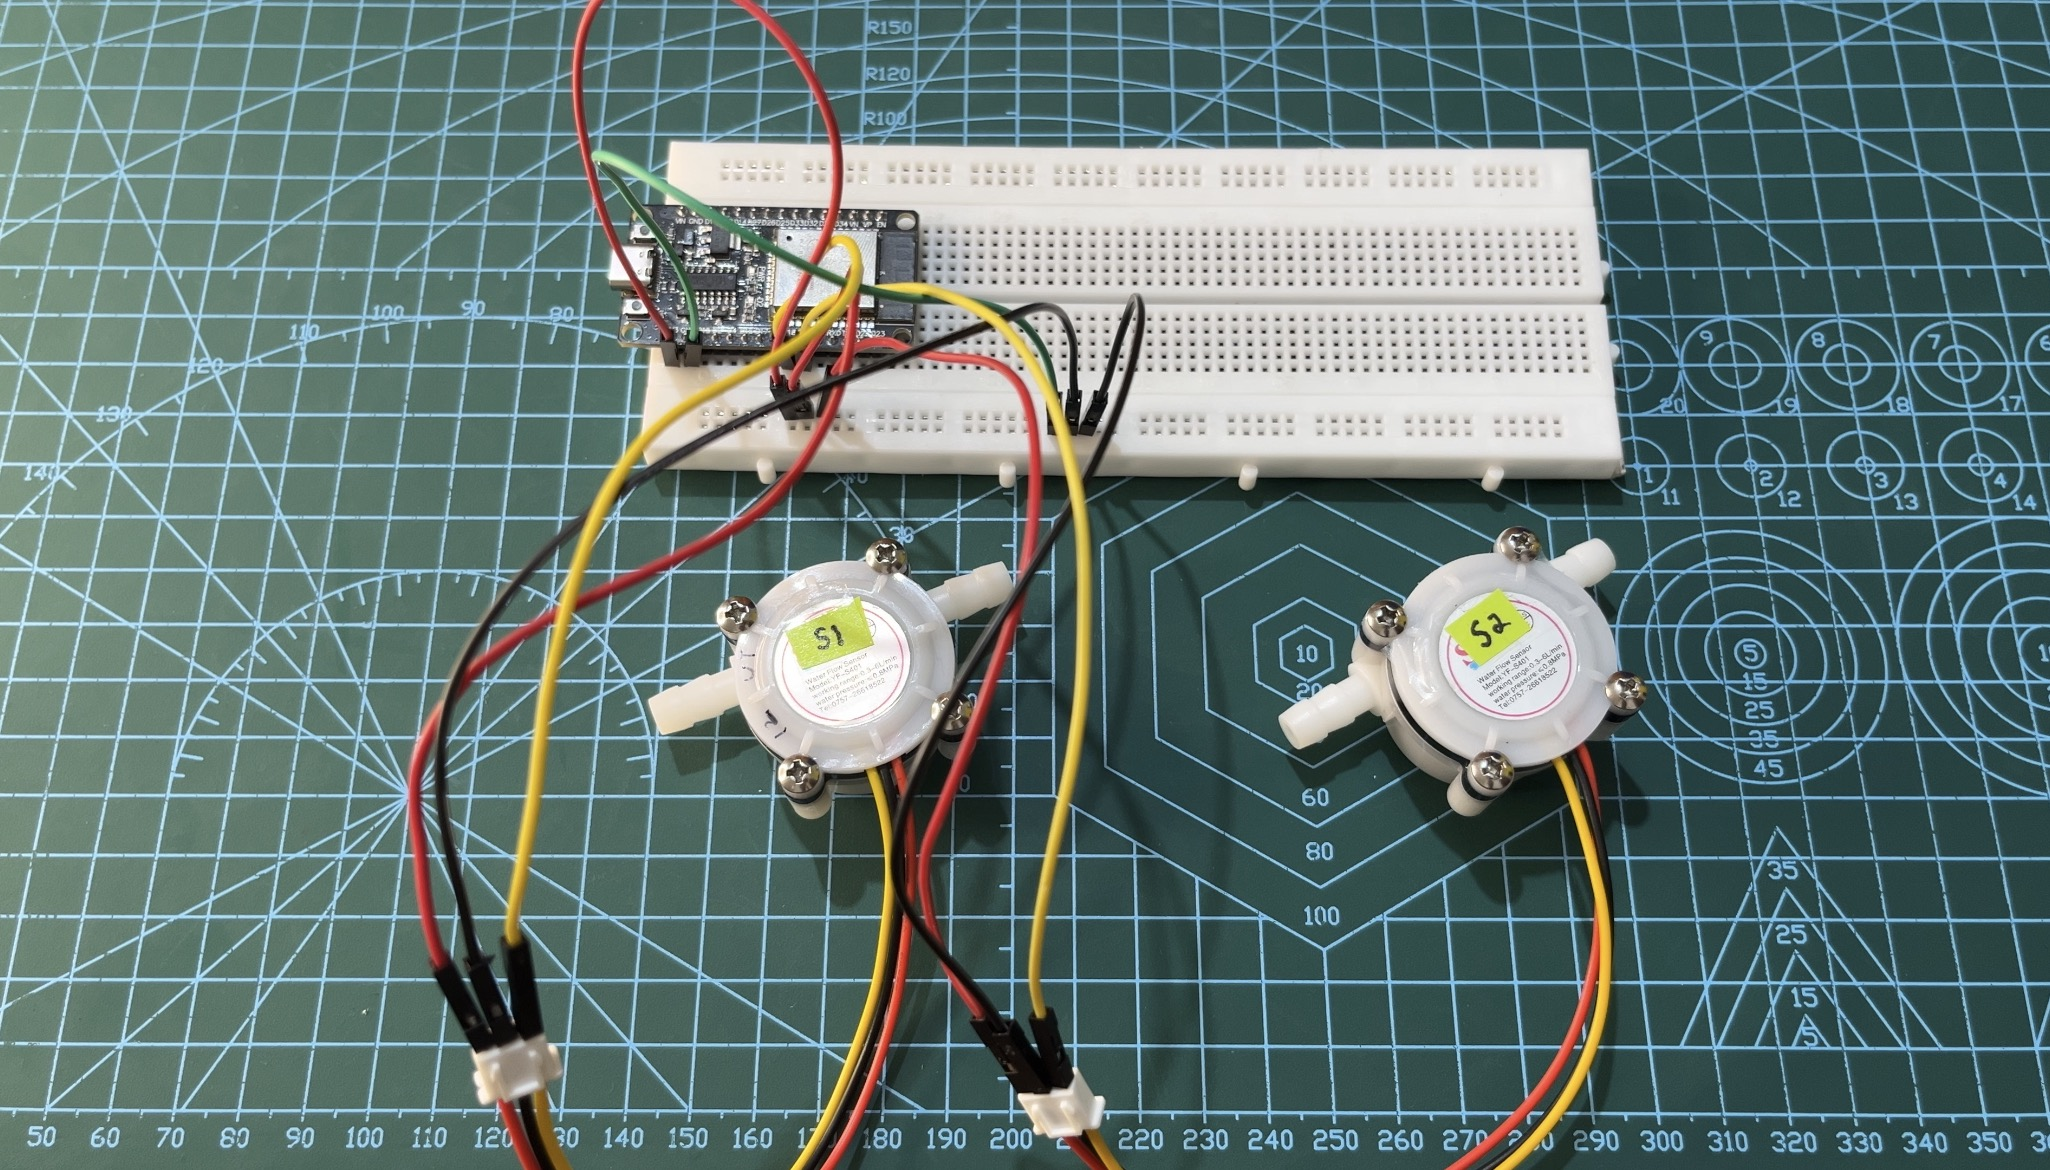
兩個 YF-S201 水流量感測器 - 測量水箱輸入和房屋使用的水流量。
-
直流潛水泵浦(3V–5V)-用於測試的基本微型泵浦。
-
麵包板和跳線-方便接線和原型製作。
-
5V 電源或電池-獨立於 ESP32 為幫浦供電。
-
透明 PVC 軟水管 – 用於連接感測器和幫浦。
軟體
你不需要複雜的開發設定。只需要以下基本配置:
-
Arduino IDE – 用於編寫 ESP32
-
Firebase 控制台 – 您的雲端資料庫
-
Web 瀏覽器 – 在本機上執行 UI 或線上託管
-
(可選)VS Code – 如果您喜歡使用進階編輯器來調整 HTML/JS
如果這是你的第一個 Firebase 專案,不用擔心。它實際上非常適合初學者,我會一步一步指導你。
🛠️ 分步教程
讓我們分解一下。你可以一次看一個部分。
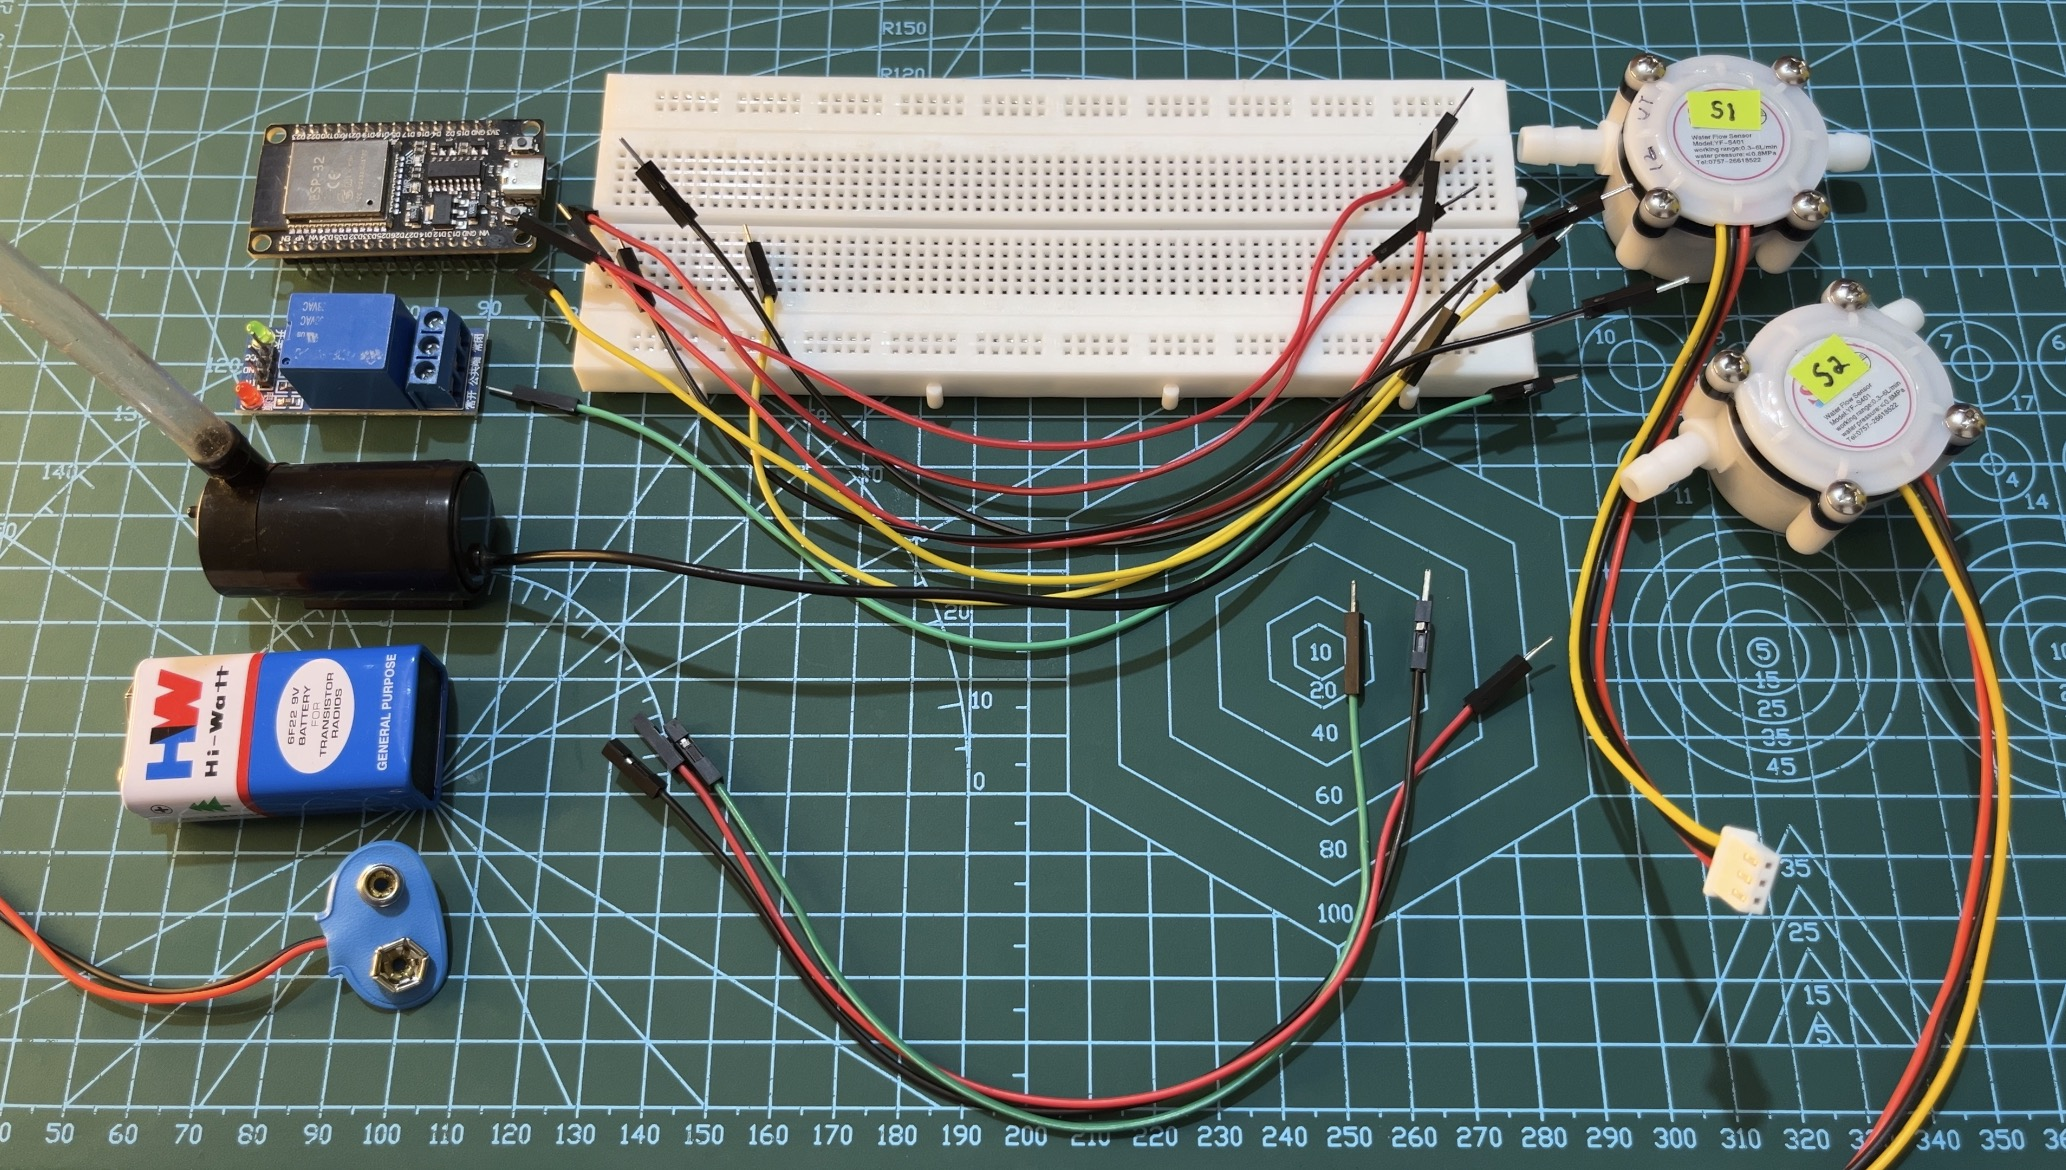
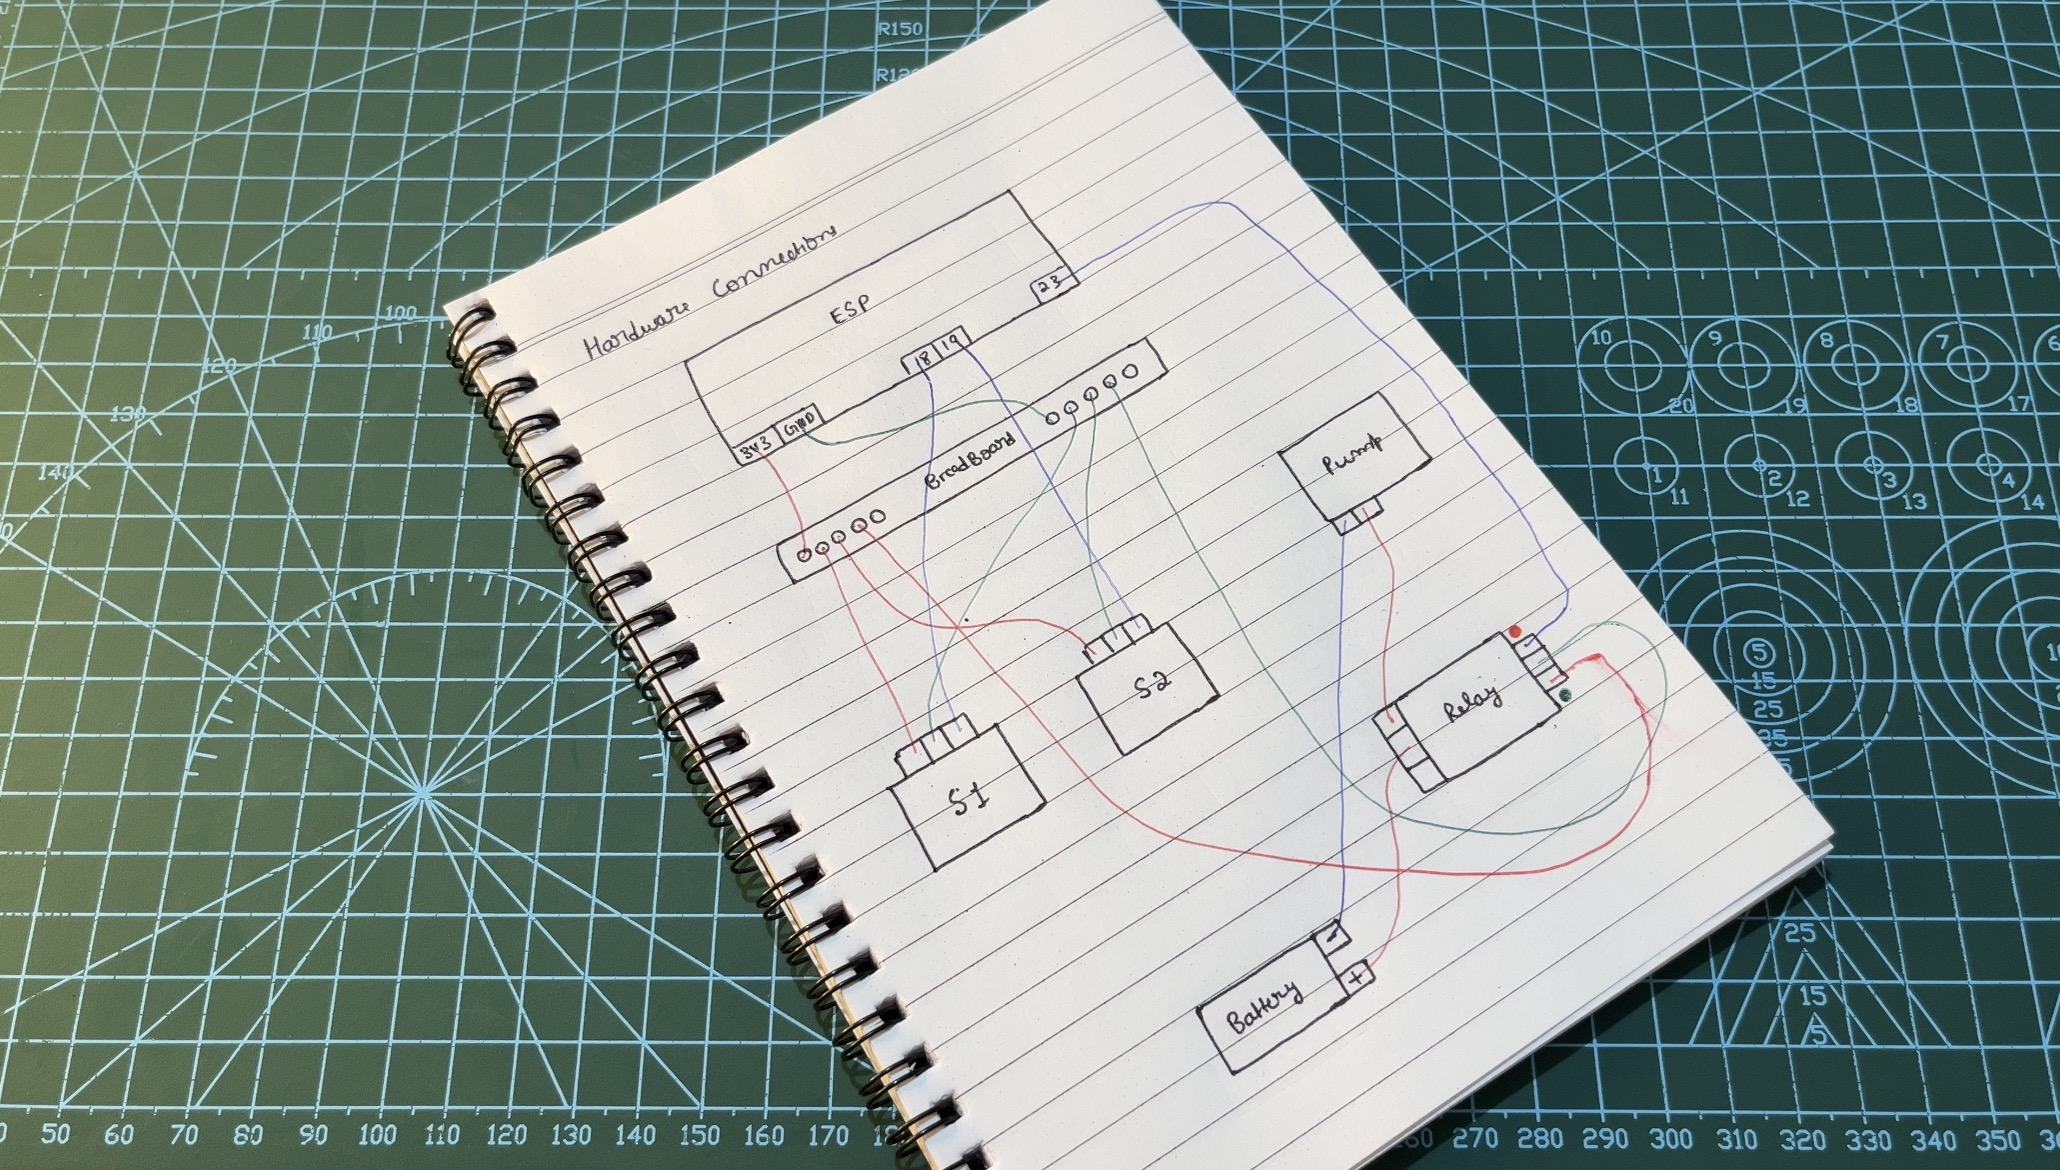
✅ 1.硬體連接
讓我們連接所有元件並使系統運作。
- 請參閱下面的電路圖以了解連接概況。
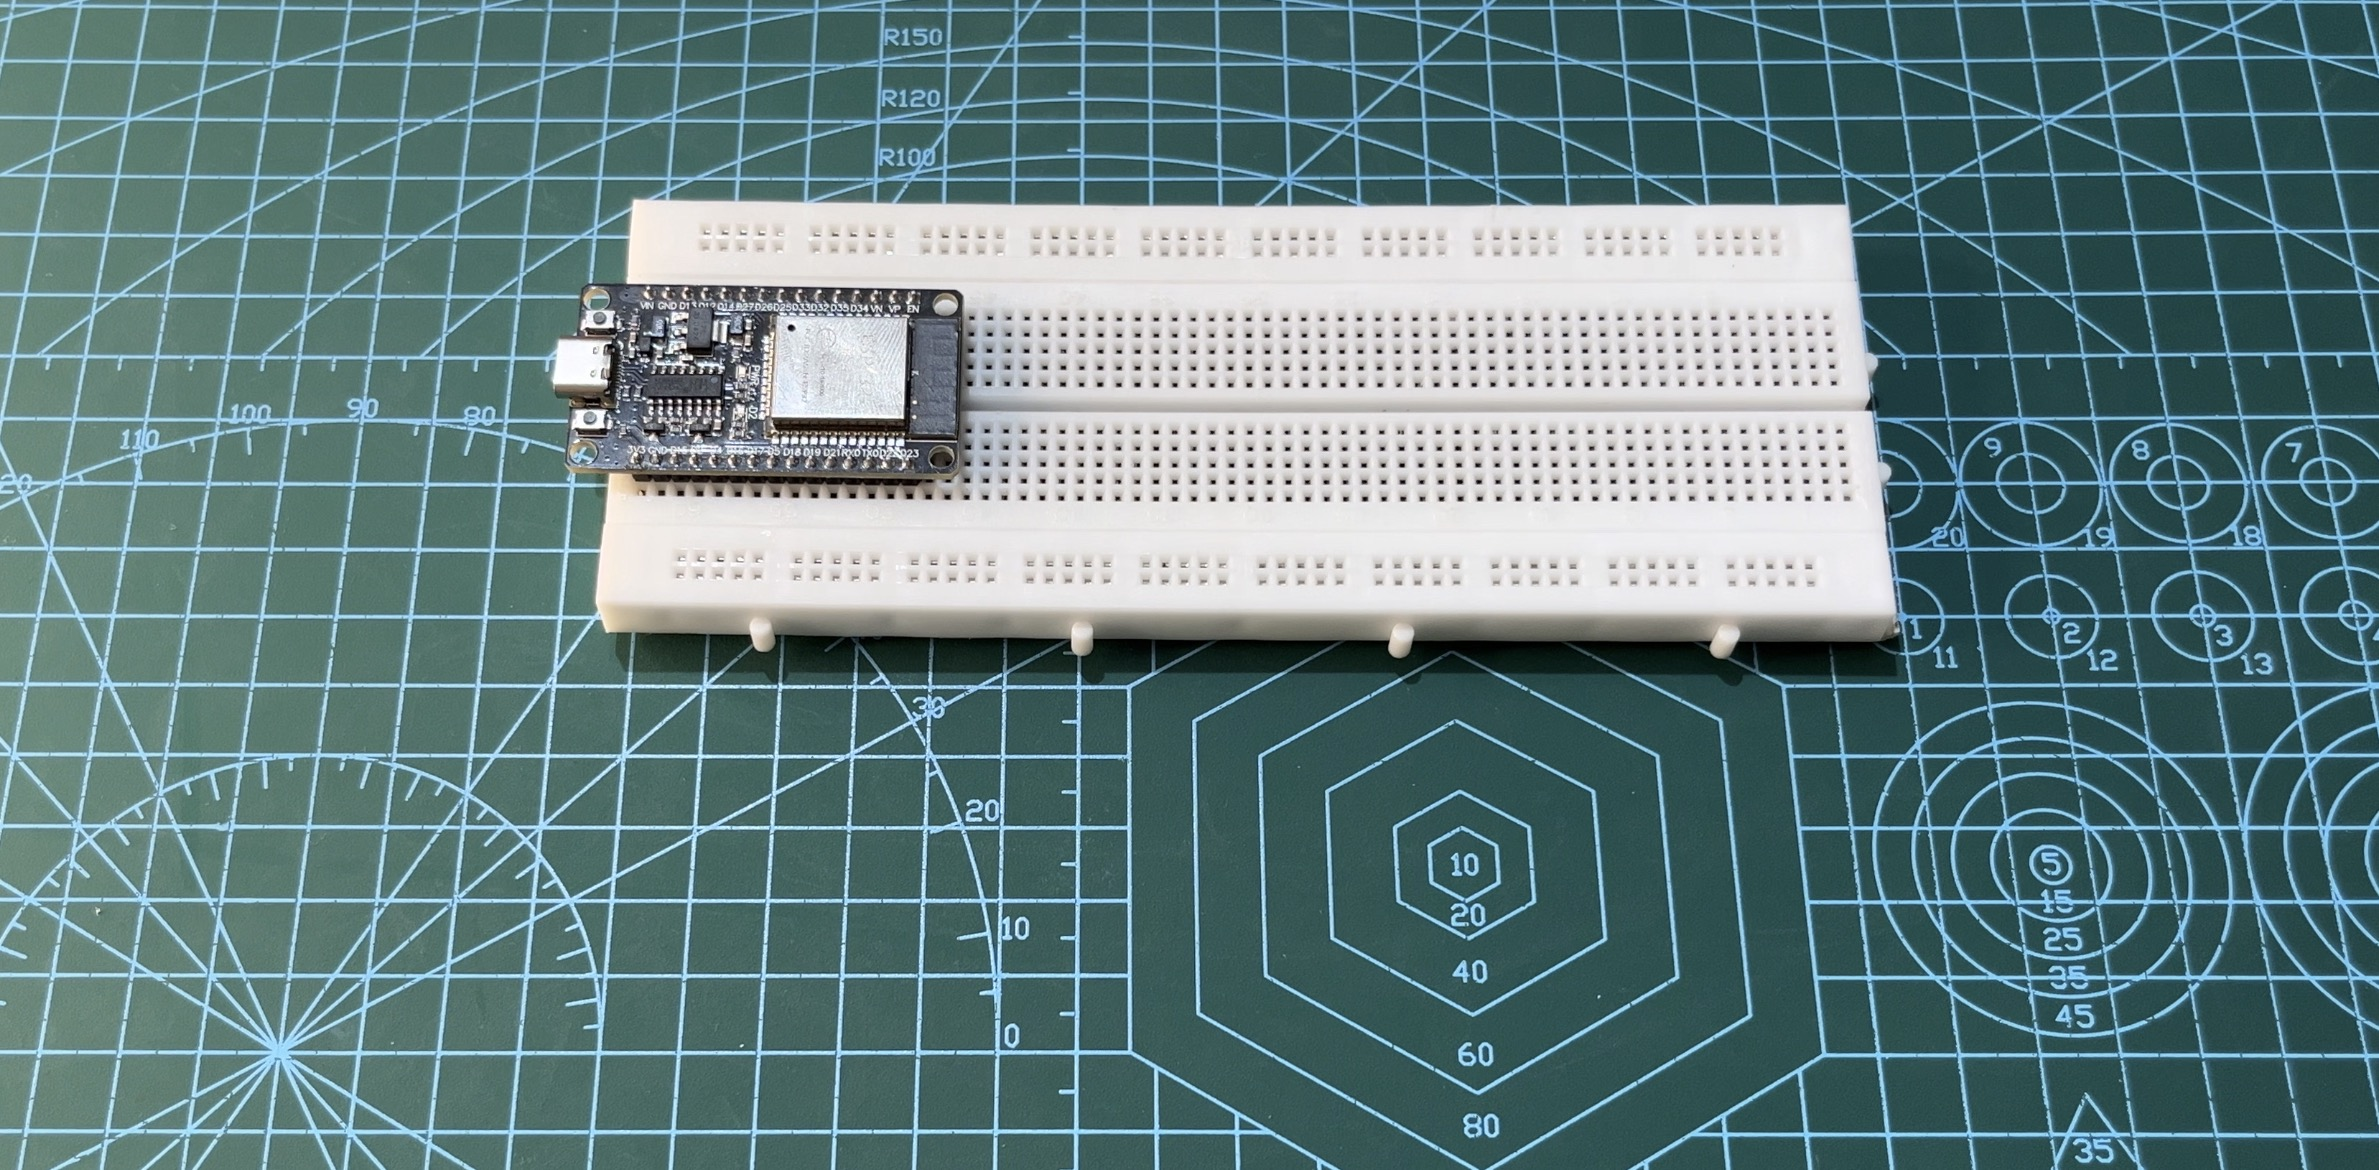
- 將 ESP32 牢固地安裝在麵包板上。
-
連接電源:
-
使用紅線將 ESP32 的 3V3 接腳連接到麵包板上的正極(電源)軌。
-
使用綠線將 ESP32 的 GND 引腳連接到負極(接地)軌。

-
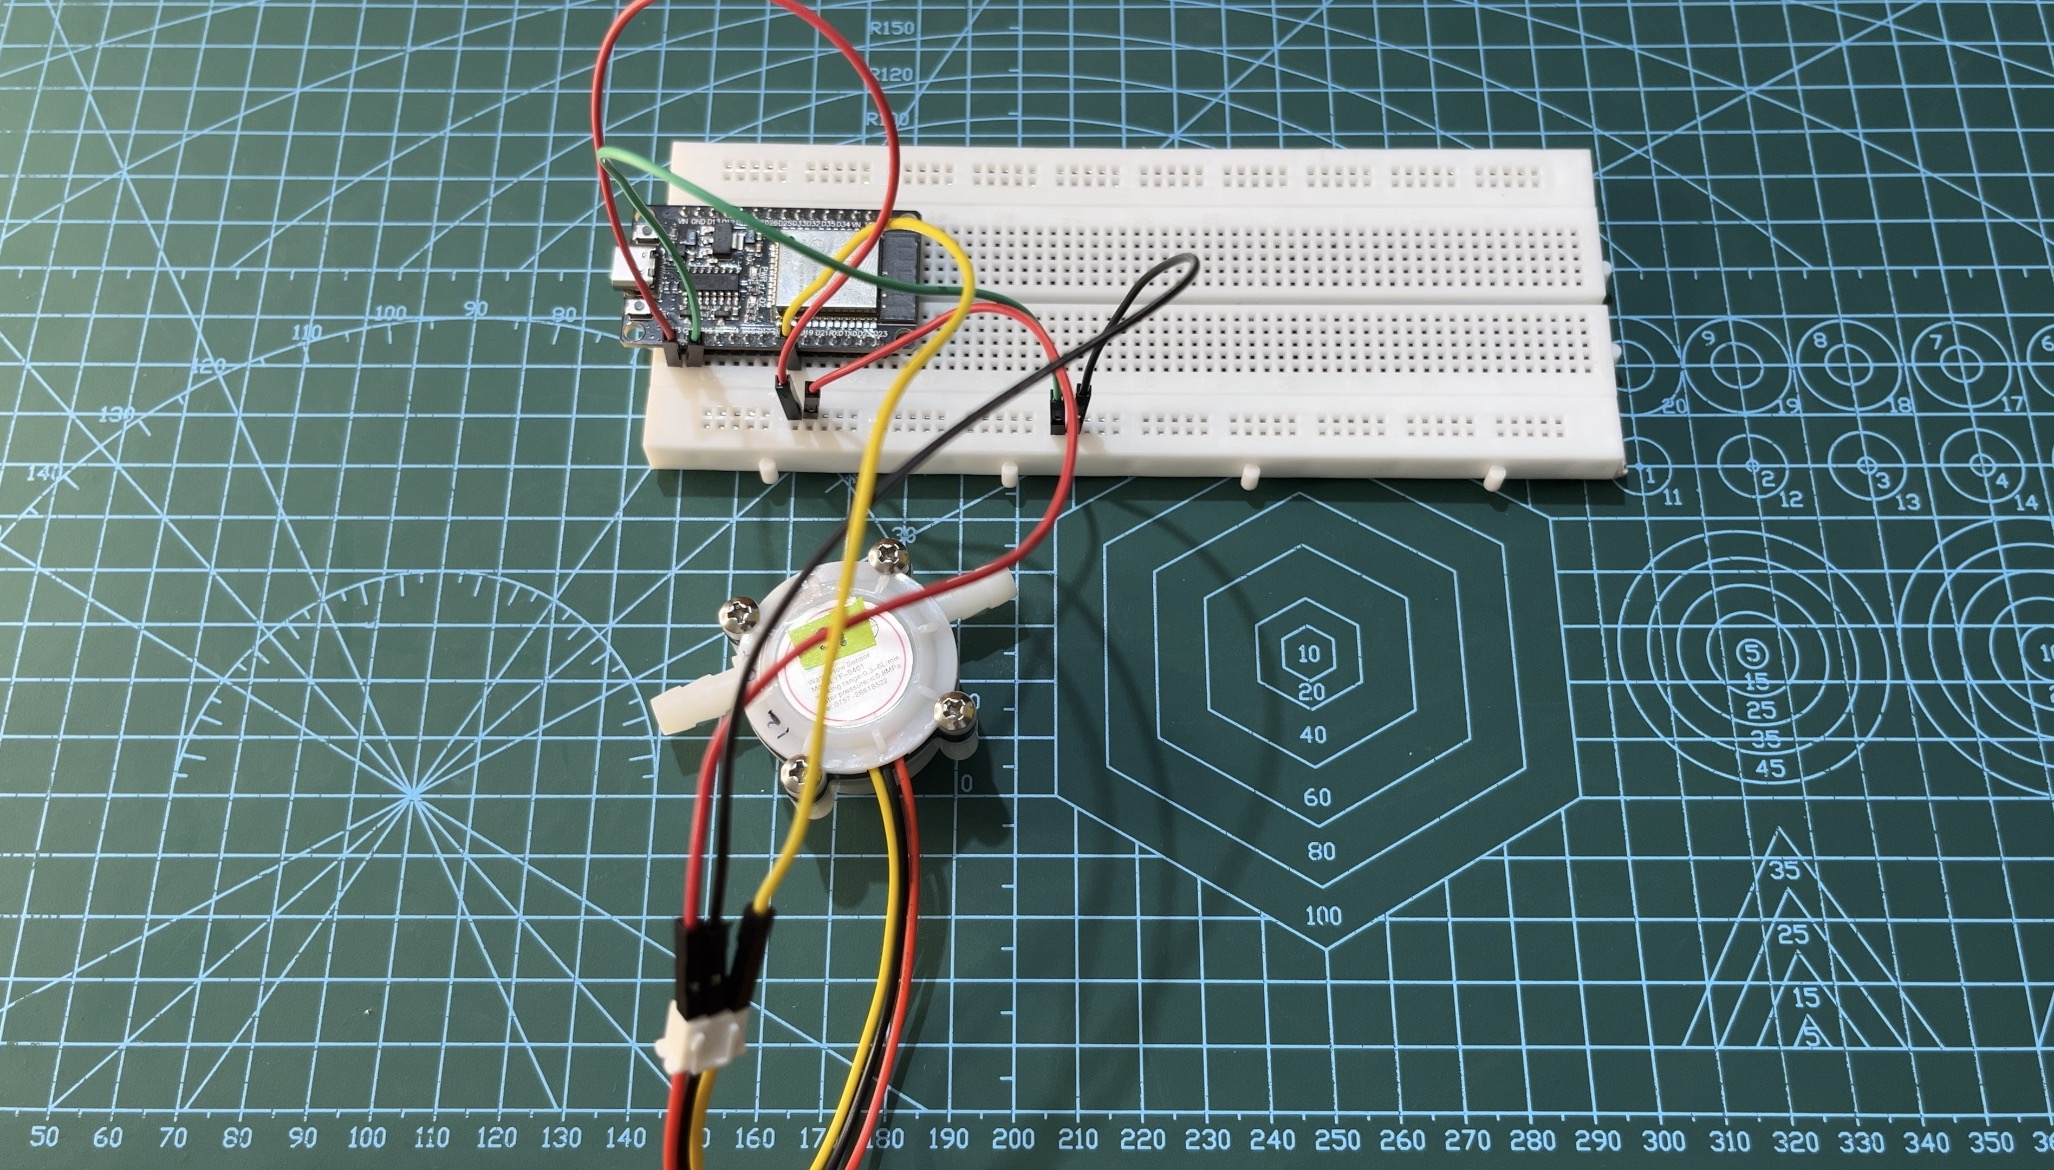
連接水流感測器 1:
-
紅線→電源軌(+3.3V)
-
黑線→地線(GND)
-
黃線→ESP32上的GPIO D18(訊號接腳)
-
連接水流感測器 2:
-
紅線→電源軌(+3.3V)
-
黑線→地線(GND)
-
黃線→ESP32上的GPIO D19
-
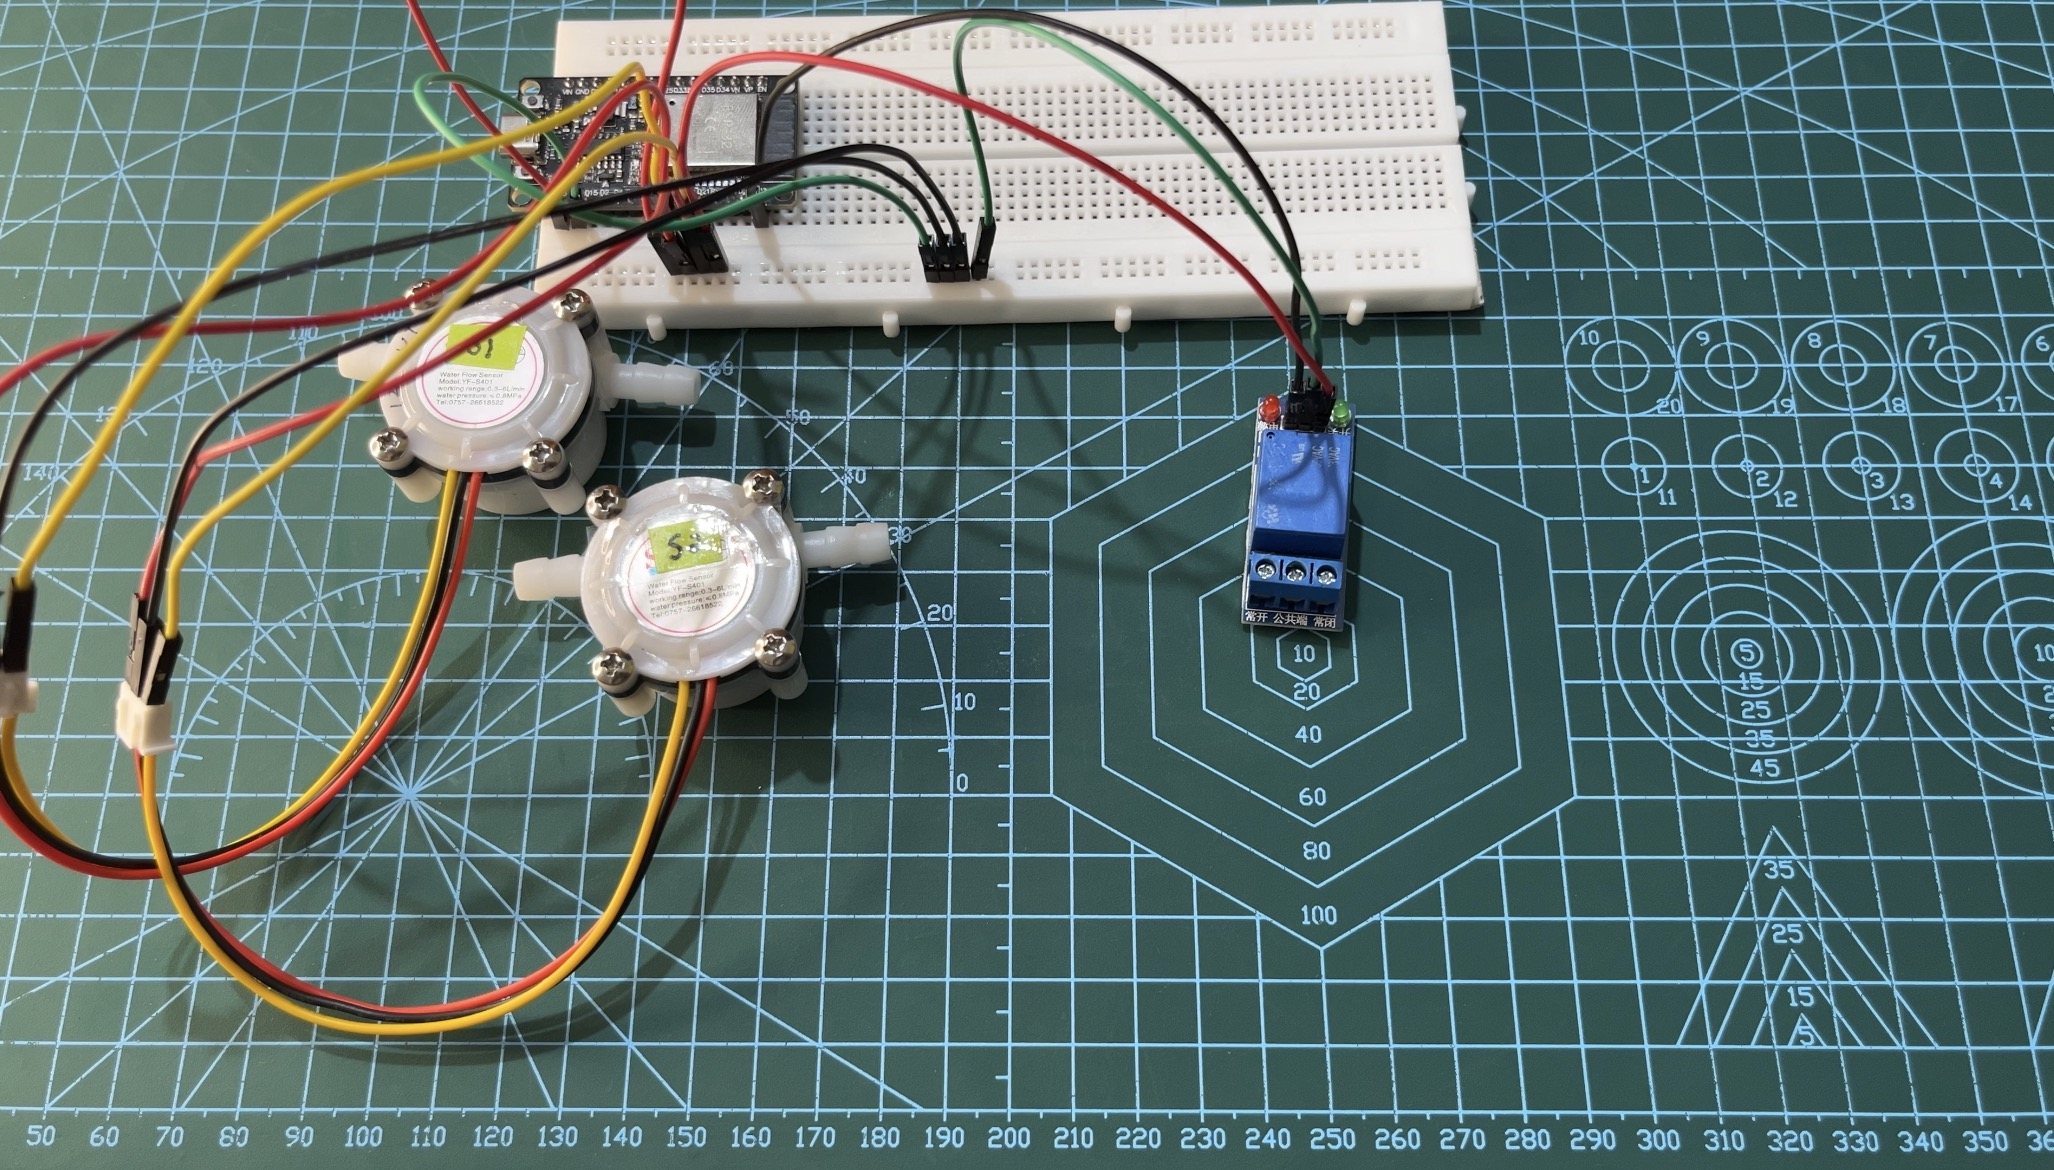
連接繼電器模組:
-
紅線(VCC)→電源軌(+3.3V 或 +5V,取決於您的繼電器模組)
-
綠線(GND)→接地軌
-
黑線(IN)→ESP32上的GPIO D23
-
連接幫浦和電源:
-
將電池的正極連接到繼電器上的 COM(公共)針腳。
-
將電池的負極端子連接到水泵的負極端子。
-
最後,將幫浦的正極連接到繼電器的 NC(常閉)接腳。
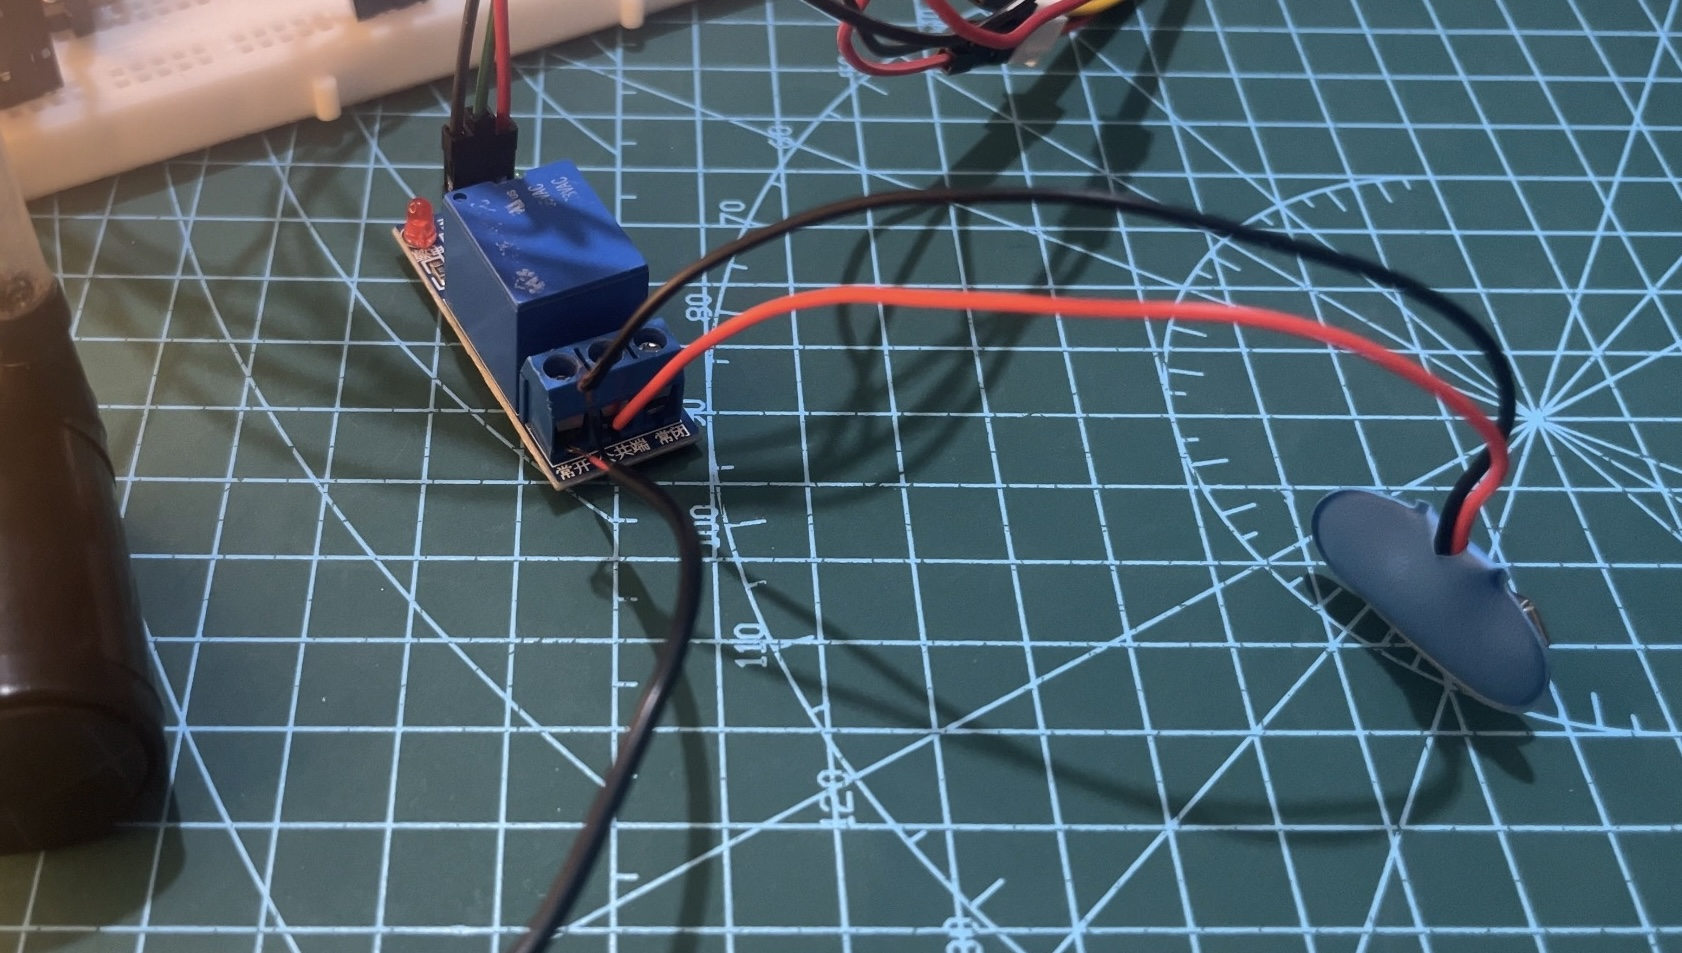
就是這樣,您的硬體連線現已完成!
在打開電路之前,請仔細檢查接線,以確保所有連接都安全且正確。
✅ 2. 設定 Firebase
- 前往 Firebase 控制台
然後點選“開始”。
- 建立一個新專案 - 將其命名為“AquaFlowproj”。
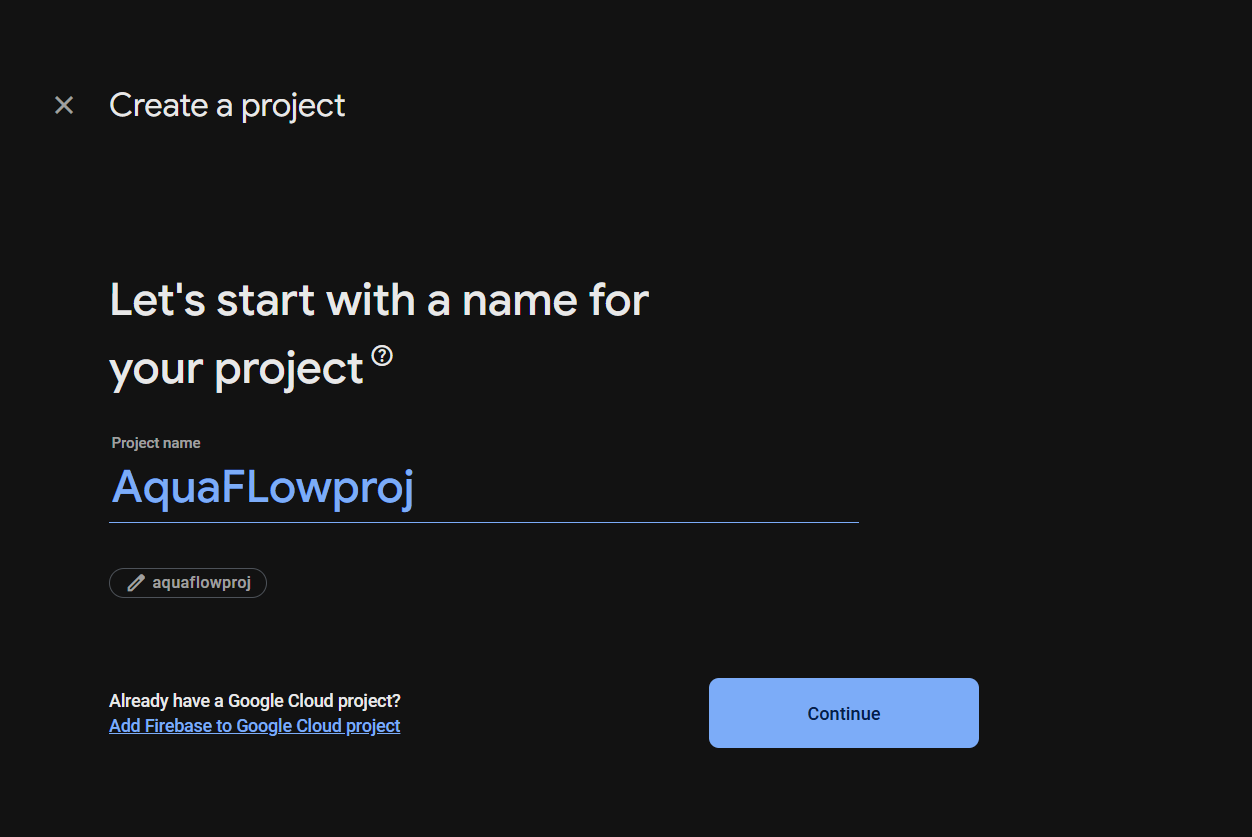
-
關閉 Gemini 和 Google Analytics,然後按一下建立專案。
-
準備好後,請轉到左側邊欄的“建置”部分並選擇“即時資料庫”。
-
點擊建立資料庫,選擇您最近的地區(我使用了亞洲新加坡),然後選擇“以測試模式啟動”並點擊啟用。
-
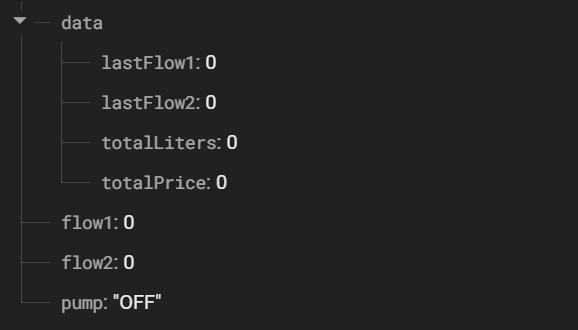
在資料庫的根路徑下,新增以下鍵:
資料
流程1
流程2
泵浦
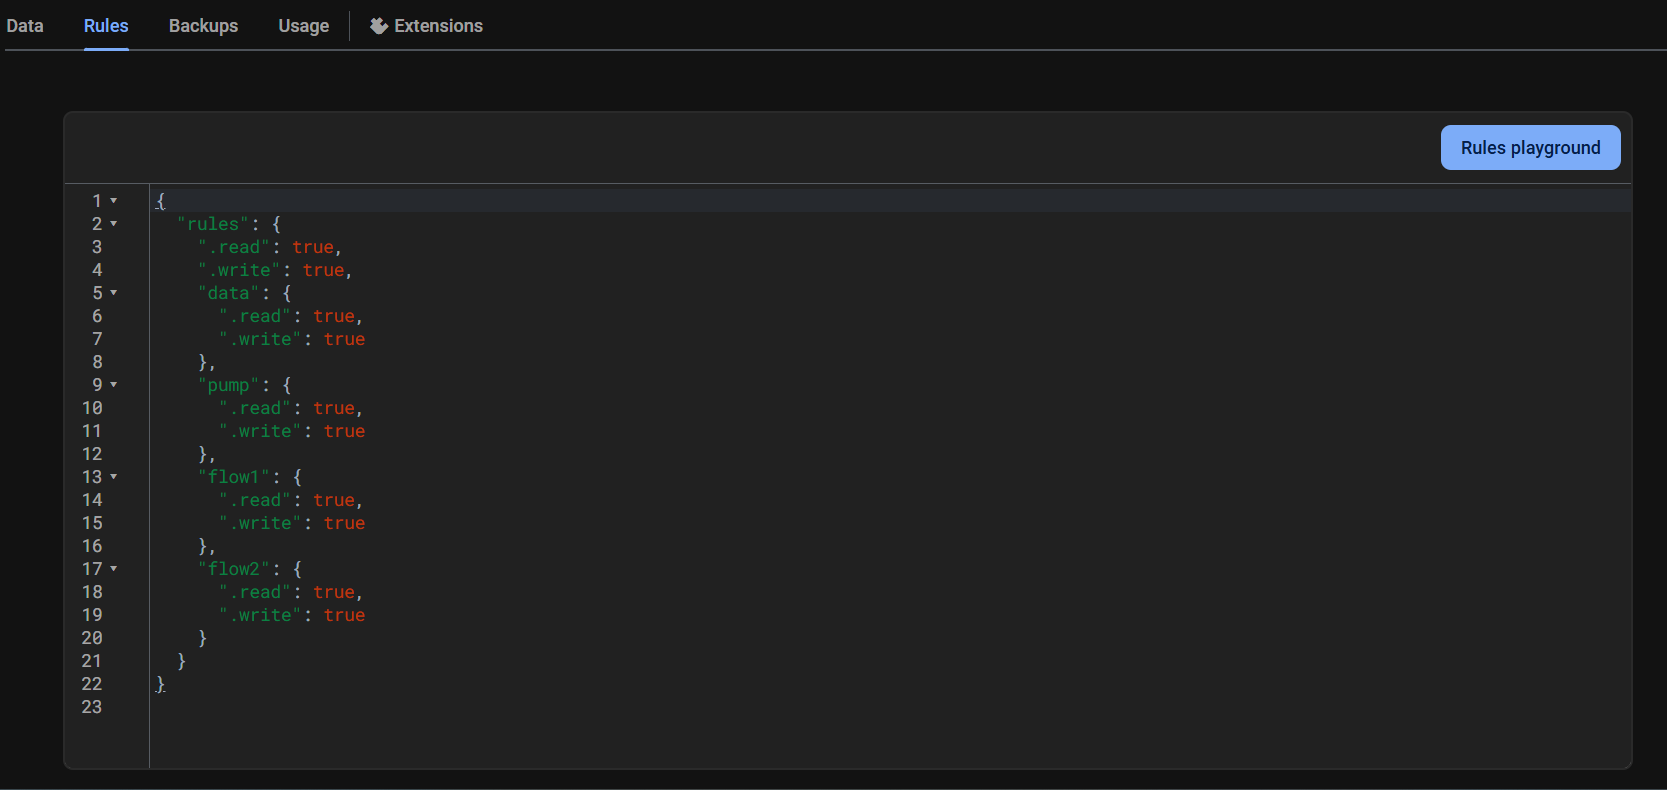
- 接下來,開啟「規則」選項卡,用下面給出的自訂規則取代現有規則,然後按一下「發布」。
{
  "rules": {
    ".read": true,
    ".write": true,
    "data": {
      ".read": true,
      ".write": true
    },
    "pump": {
      ".read": true,
      ".write": true
    },
    "flow1": {
      ".read": true,
      ".write": true
    },
    "flow2": {
      ".read": true,
      ".write": true
    }
  }
}
- 現在點擊齒輪圖示⚙️→專案設定。
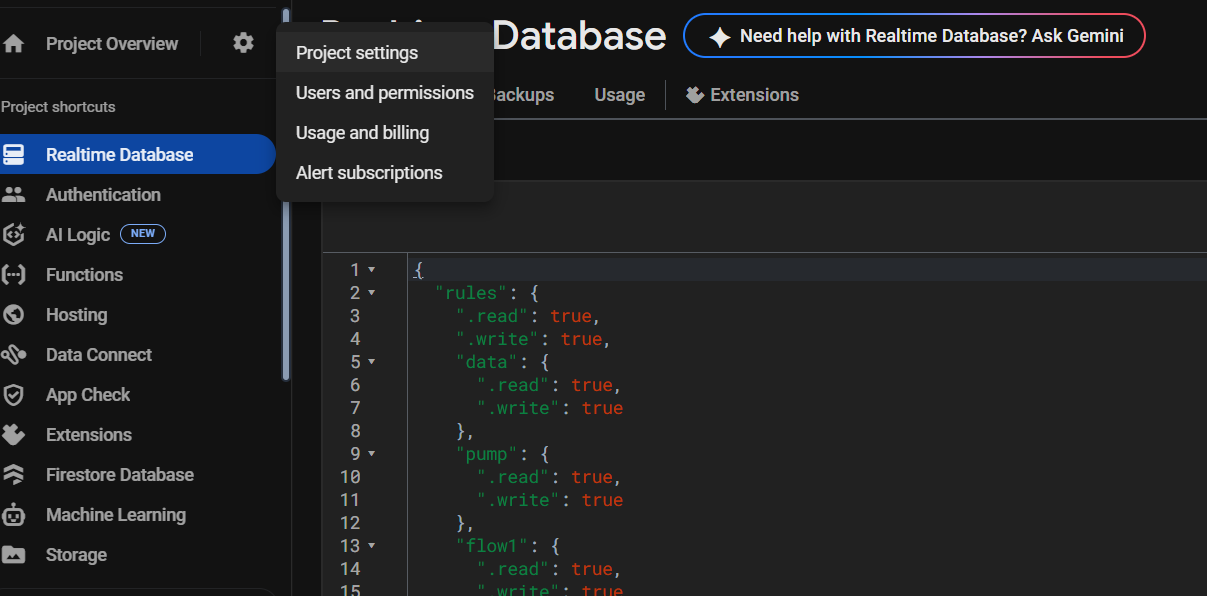
-
在“常規”選項卡下,捲動到“您的應用程式”部分並選擇“Web”。
-
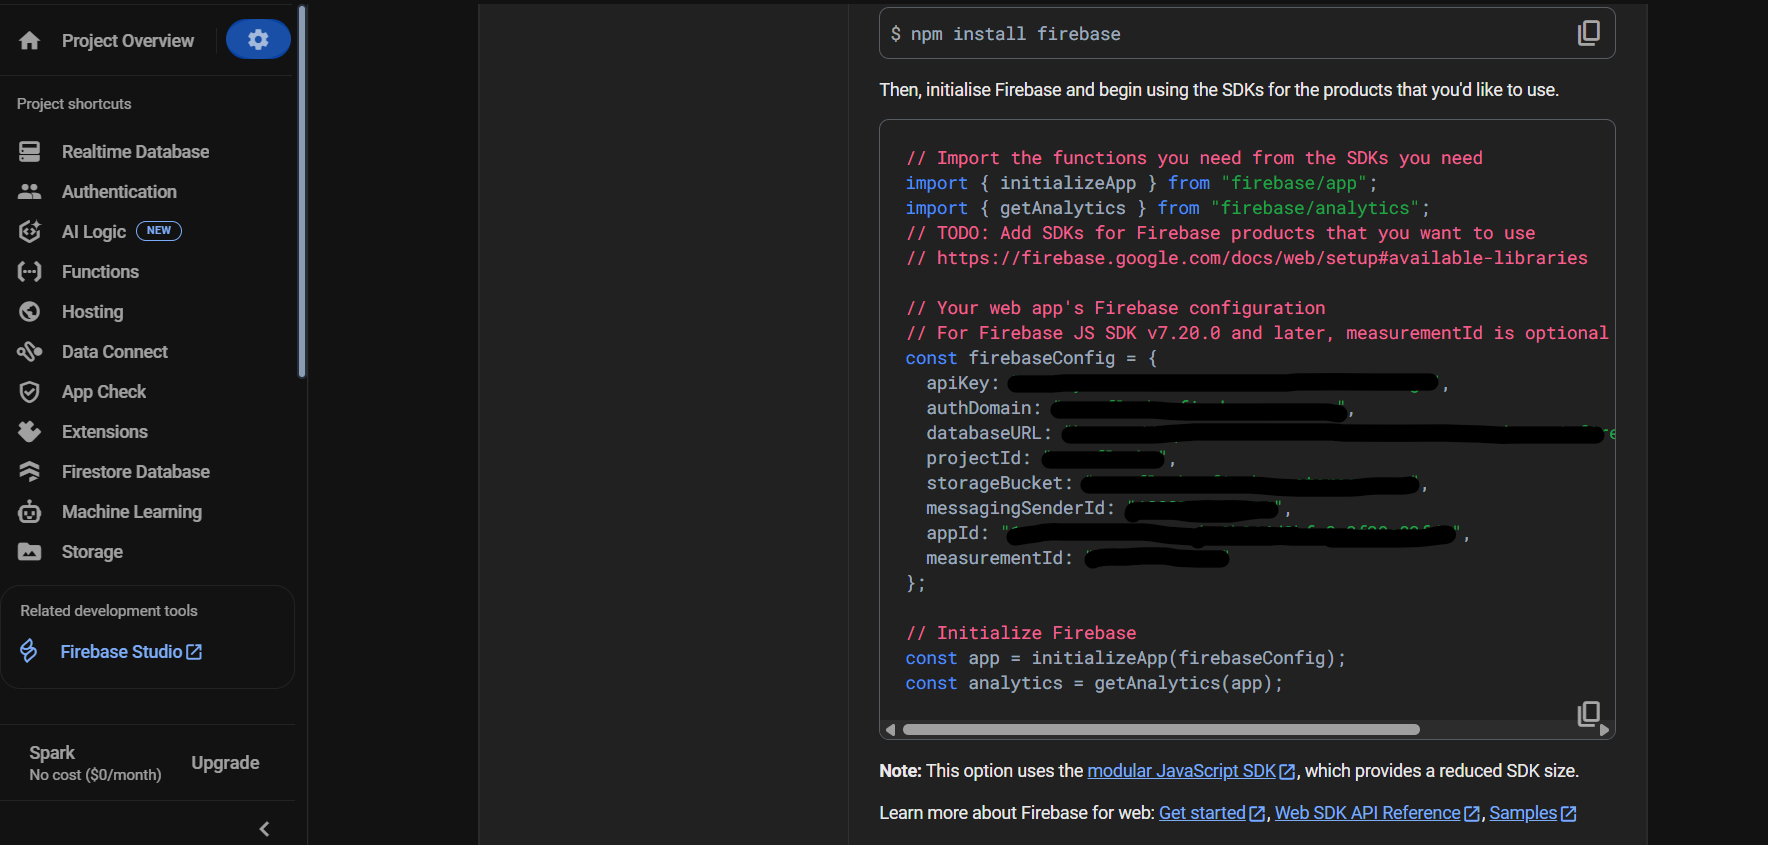
新增應用程式暱稱,按一下註冊應用程式,然後按一下繼續到控制台。
-
現在您將看到所有 Firebase 配置詳細訊息,例如 apiKey、authDomain、databaseURL 等。將它們複製到記事本中以供日後使用。
-
接下來,轉到建置→身份驗證。
-
按一下“開始”,然後選擇“電子郵件/密碼”作為登入方式,然後按一下“啟用”→“儲存”。
-
在「使用者」標籤下,按一下「新增使用者」。
例子:
-
電子郵件:[email protected]
-
密碼:project123
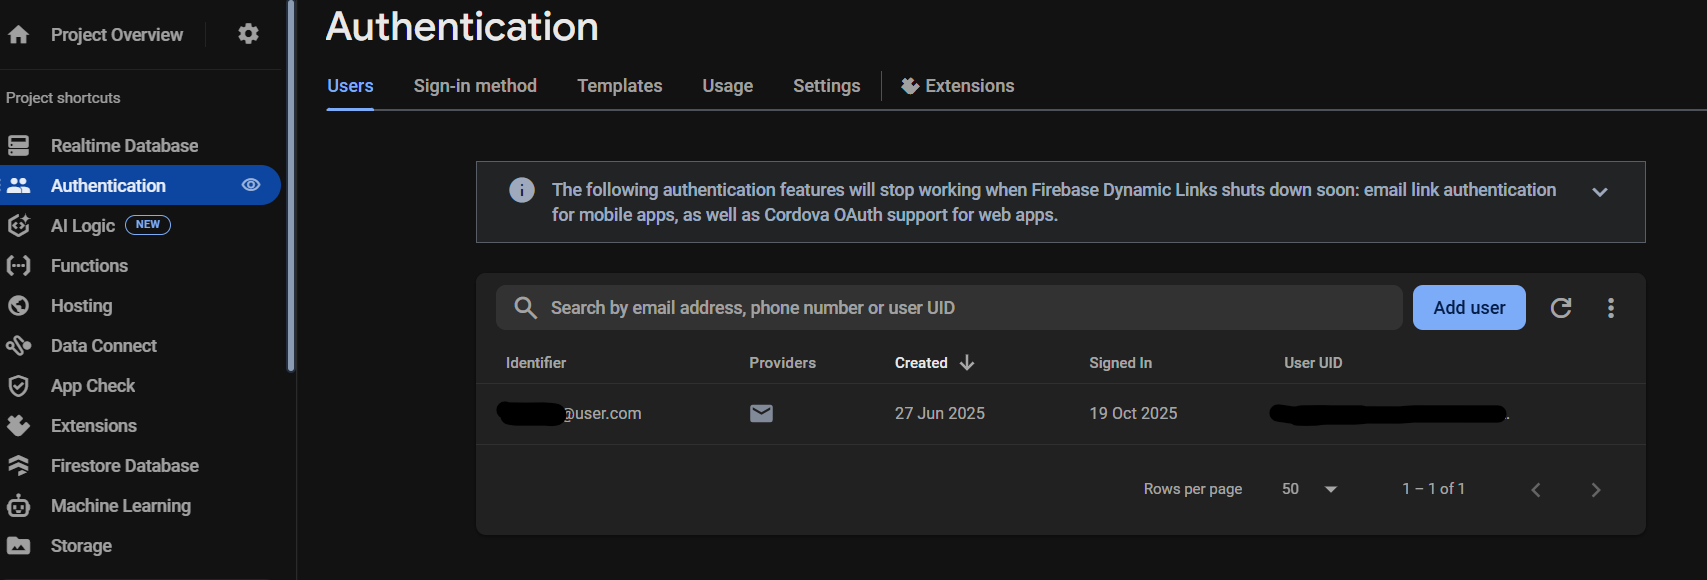
- 將這些登入憑證與您的 Firebase 詳細資訊一起儲存,我們很快就會在網站程式碼中需要它們。
✅ 3. 設定 Arduino IDE
- 打開 Arduino IDE 並貼上此 ESP32 程式碼。
/*
AquaFlow - By Yugesh

This code connects an ESP32 to Firebase and monitors
two water flow sensors (YF-S401) along with a relay
for pump control. Data (flow1 & flow2) is sent to Firebase
every second, and pump commands (ON/OFF/AUTO) are received
from the database in real time.

Before running this code:

1. Replace Wi-Fi and Firebase credentials with your own.
2. Ensure your Firebase Realtime Database structure (contains nodes: /pump, /flow1, /flow2)
3. Connect components according to the pin config below.
*/

#include <WiFi.h>
#include <Firebase_ESP_Client.h>
#include "addons/TokenHelper.h"

// Wi-Fi Configuration – CHANGE THESE VALUES

#define WIFI_SSID "Your_WiFi_Name"         // Replace with your Wi-Fi name
#define WIFI_PASSWORD "Your_WiFi_Password" // Replace with your Wi-Fi password

// Firebase Configuration – CHANGE THESE VALUES

#define API_KEY "Your_Firebase_API_Key"                          // Get from Firebase project settings
#define DATABASE_URL "https://your-database-url.firebaseio.com/" // Your Firebase RTDB URL
#define USER_EMAIL "[email protected]"                      // Must be a registered Firebase user
#define USER_PASSWORD "your_password"                            // Corresponding password

// Firebase Objects
FirebaseData fbdo;
FirebaseAuth auth;
FirebaseConfig config;

// Pin Configuration (ESP32 GPIO pins)
// You can change these if your wiring differs.
const int relayPin = 23;      // Relay control pin (Active LOW)
const int flowSensor1 = 18;   // Flow sensor 1 input pin (YF-S401)
const int flowSensor2 = 19;   // Flow sensor 2 input pin (YF-S401)

// Flow Measurement Variables
volatile int pulseCount1 = 0;
volatile int pulseCount2 = 0;
unsigned long lastSendTime = 0;

// Interrupt Service Routines for Flow Sensors
void IRAM_ATTR pulseCounter1()
{
pulseCount1++;
}
void IRAM_ATTR pulseCounter2()
{
pulseCount2++;
}

// Setup Function
void setup()
{
Serial.begin(115200);

// Relay setup
pinMode(relayPin, OUTPUT);
digitalWrite(relayPin, HIGH); // Relay OFF initially (active LOW)

// Flow sensor setup
pinMode(flowSensor1, INPUT_PULLUP);
pinMode(flowSensor2, INPUT_PULLUP);
attachInterrupt(digitalPinToInterrupt(flowSensor1), pulseCounter1, FALLING);
attachInterrupt(digitalPinToInterrupt(flowSensor2), pulseCounter2, FALLING);

// Wi-Fi connection
WiFi.begin(WIFI_SSID, WIFI_PASSWORD);
Serial.print("Connecting to Wi-Fi");
while (WiFi.status() != WL_CONNECTED) {
Serial.print(".");
delay(300);
}
Serial.println("\nWi-Fi Connected");

// Firebase setup
config.api_key = API_KEY;
config.database_url = DATABASE_URL;
auth.user.email = USER_EMAIL;
auth.user.password = USER_PASSWORD;
config.token_status_callback = tokenStatusCallback;

Firebase.begin(&config, &auth);
Firebase.reconnectWiFi(true);
Serial.println("Firebase Initialized");
}

// Loop Function
void loop()
{
if (Firebase.ready()) {

// Read pump status from Firebase
if (Firebase.RTDB.getString(&fbdo, "/pump")) {  // Path: /pump (do not change unless needed)
String command = fbdo.to<String>();
Serial.print("Firebase command: ");
Serial.println(command);

if (command == "ON")
{
digitalWrite(relayPin, LOW);   // Turn ON pump
}
else if (command == "OFF")
{
digitalWrite(relayPin, HIGH);  // Turn OFF pump
}
else if (command == "AUTO") {
// Optional: Add automation logic based on sensor data
}
} else
{
Serial.print("Failed to read pump: ");
Serial.println(fbdo.errorReason());
}

// Send flow data every 1 second
if (millis() - lastSendTime > 1000) {
detachInterrupt(digitalPinToInterrupt(flowSensor1));
detachInterrupt(digitalPinToInterrupt(flowSensor2));

// Convert pulse counts to flow rate (L/min)
float flowRate1 = (pulseCount1 / 7.5);
float flowRate2 = (pulseCount2 / 7.5);

pulseCount1 = 0;
pulseCount2 = 0;
lastSendTime = millis();

attachInterrupt(digitalPinToInterrupt(flowSensor1), pulseCounter1, FALLING);
attachInterrupt(digitalPinToInterrupt(flowSensor2), pulseCounter2, FALLING);
Serial.printf("Flow1: %.2f L/min | Flow2: %.2f L/min\n", flowRate1, flowRate2);

// Send data to Firebase
bool success1 = Firebase.RTDB.setFloat(&fbdo, "/flow1", flowRate1); // Path: /flow1
if (success1)
{
Serial.println("flow1 sent to Firebase");
}
else
{
Serial.print("flow1 failed: ");
Serial.println(fbdo.errorReason());
}
bool success2 = Firebase.RTDB.setFloat(&fbdo, "/flow2", flowRate2); // Path: /flow2
if (success2)
{
Serial.println("flow2 sent to Firebase");
}
else
{
Serial.print("flow2 failed: ");
Serial.println(fbdo.errorReason());
}
}
}
delay(100); // Keep loop responsive for accurate flow measurement
}

/*
Notes:
- Wi-Fi and Firebase credentials must be updated before upload.
- Ensure you’ve installed the “Firebase ESP Client” library by Mobizt.
- Flow sensor calibration constant (7.5) is for YF-S401; adjust if using a different model.
- Database paths (/pump, /flow1, /flow2) should exist in your Firebase RTDB.
*/
-
使用您先前儲存的 Firebase 詳細資訊更新佔位符(API 金鑰、Auth 網域等)。
-
透過 USB 將您的 ESP32 開發板連接到您的電腦。
-
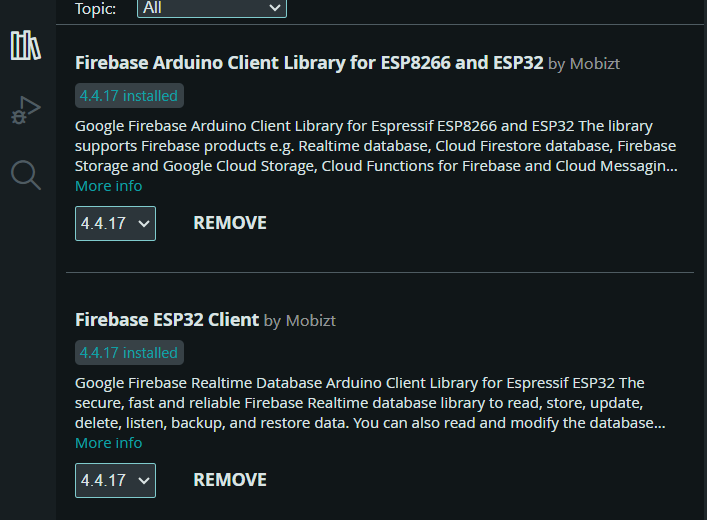
開啟庫管理器(Sketch → Include Library → Manage Libraries)並安裝這兩個庫:
-
Mobizt 為 ESP8266 和 ESP32 開發的 Firebase Arduino 用戶端程式庫
-
Mobizt 的 Firebase ESP32 用戶端
-
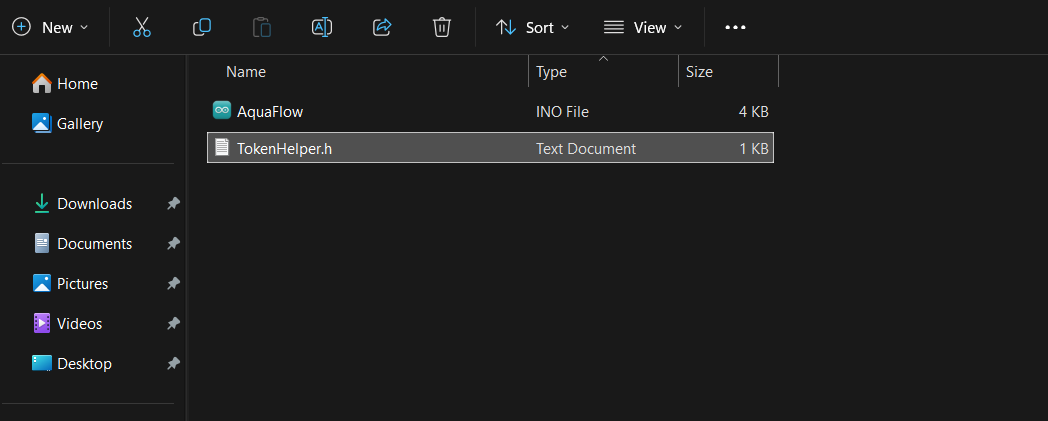
將您的草圖(檔案 → 儲存為)儲存在新資料夾中,例如命名為 AquaFlow。
-
在同一資料夾中,建立一個名為 TokenHelper.h 的新檔案並貼上下面給出的程式碼。
#ifndef TOKEN_HELPER_H
#define TOKEN_HELPER_H

// Provide the token generation process info
void tokenStatusCallback(TokenInfo info){
  Serial.printf("Token info: type = %s, status = %s\n",
                getTokenType(info).c_str(),
                getTokenStatus(info).c_str());
}

#endif
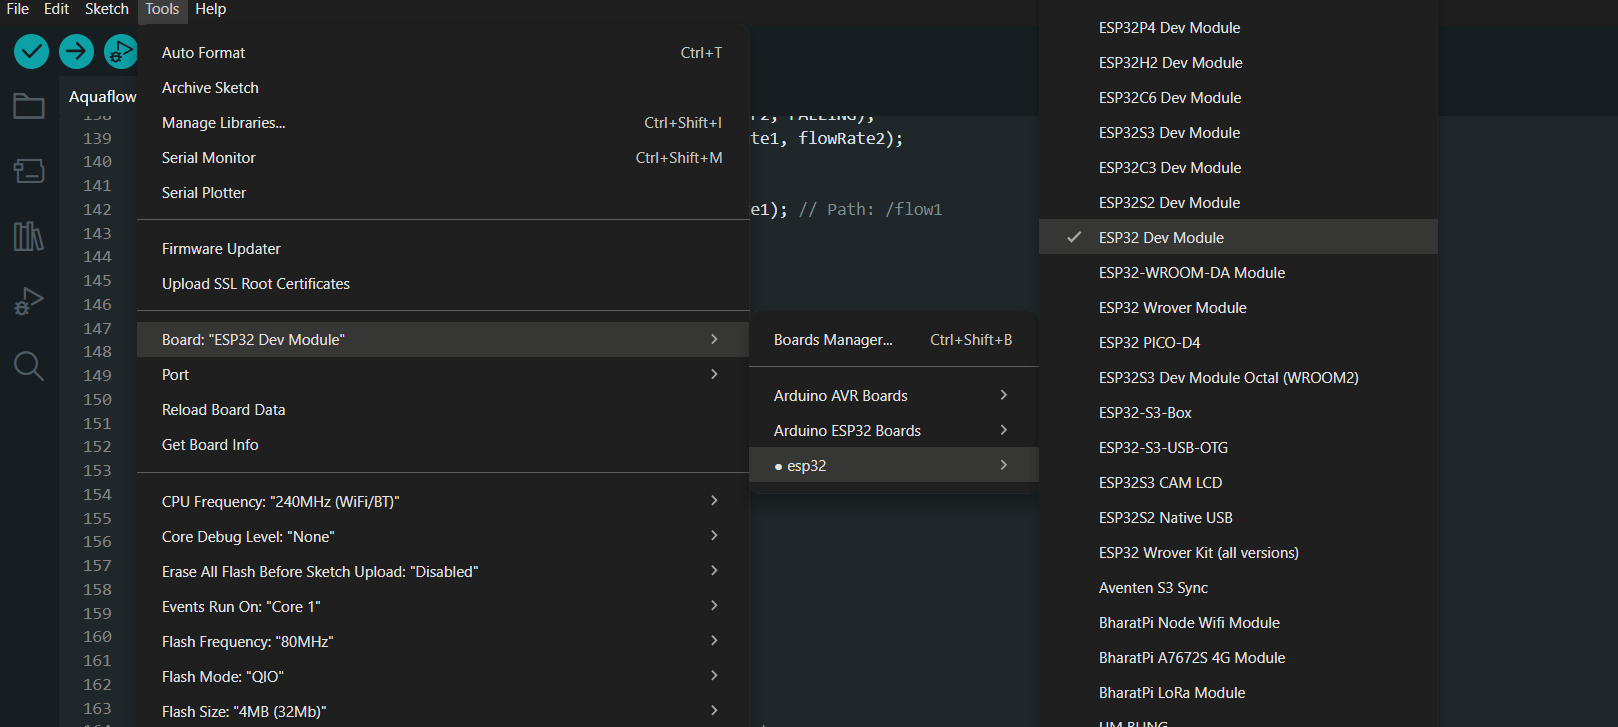
- 到工具 → 開發板 → ESP32 → ESP32 開發模組。
-
然後轉到工具→連接埠並選擇正確的 COM 連接埠(例如,COM3)。
-
點擊上傳(→)圖示將程式碼刷入您的 ESP32。
-
上傳完成後,開啟序列監視器確認 ESP32 已成功連線至 Wi-Fi。
-
如果您看到您的裝置已連接,那麼恭喜您,您的 ESP 現在正在與 Firebase 通訊!
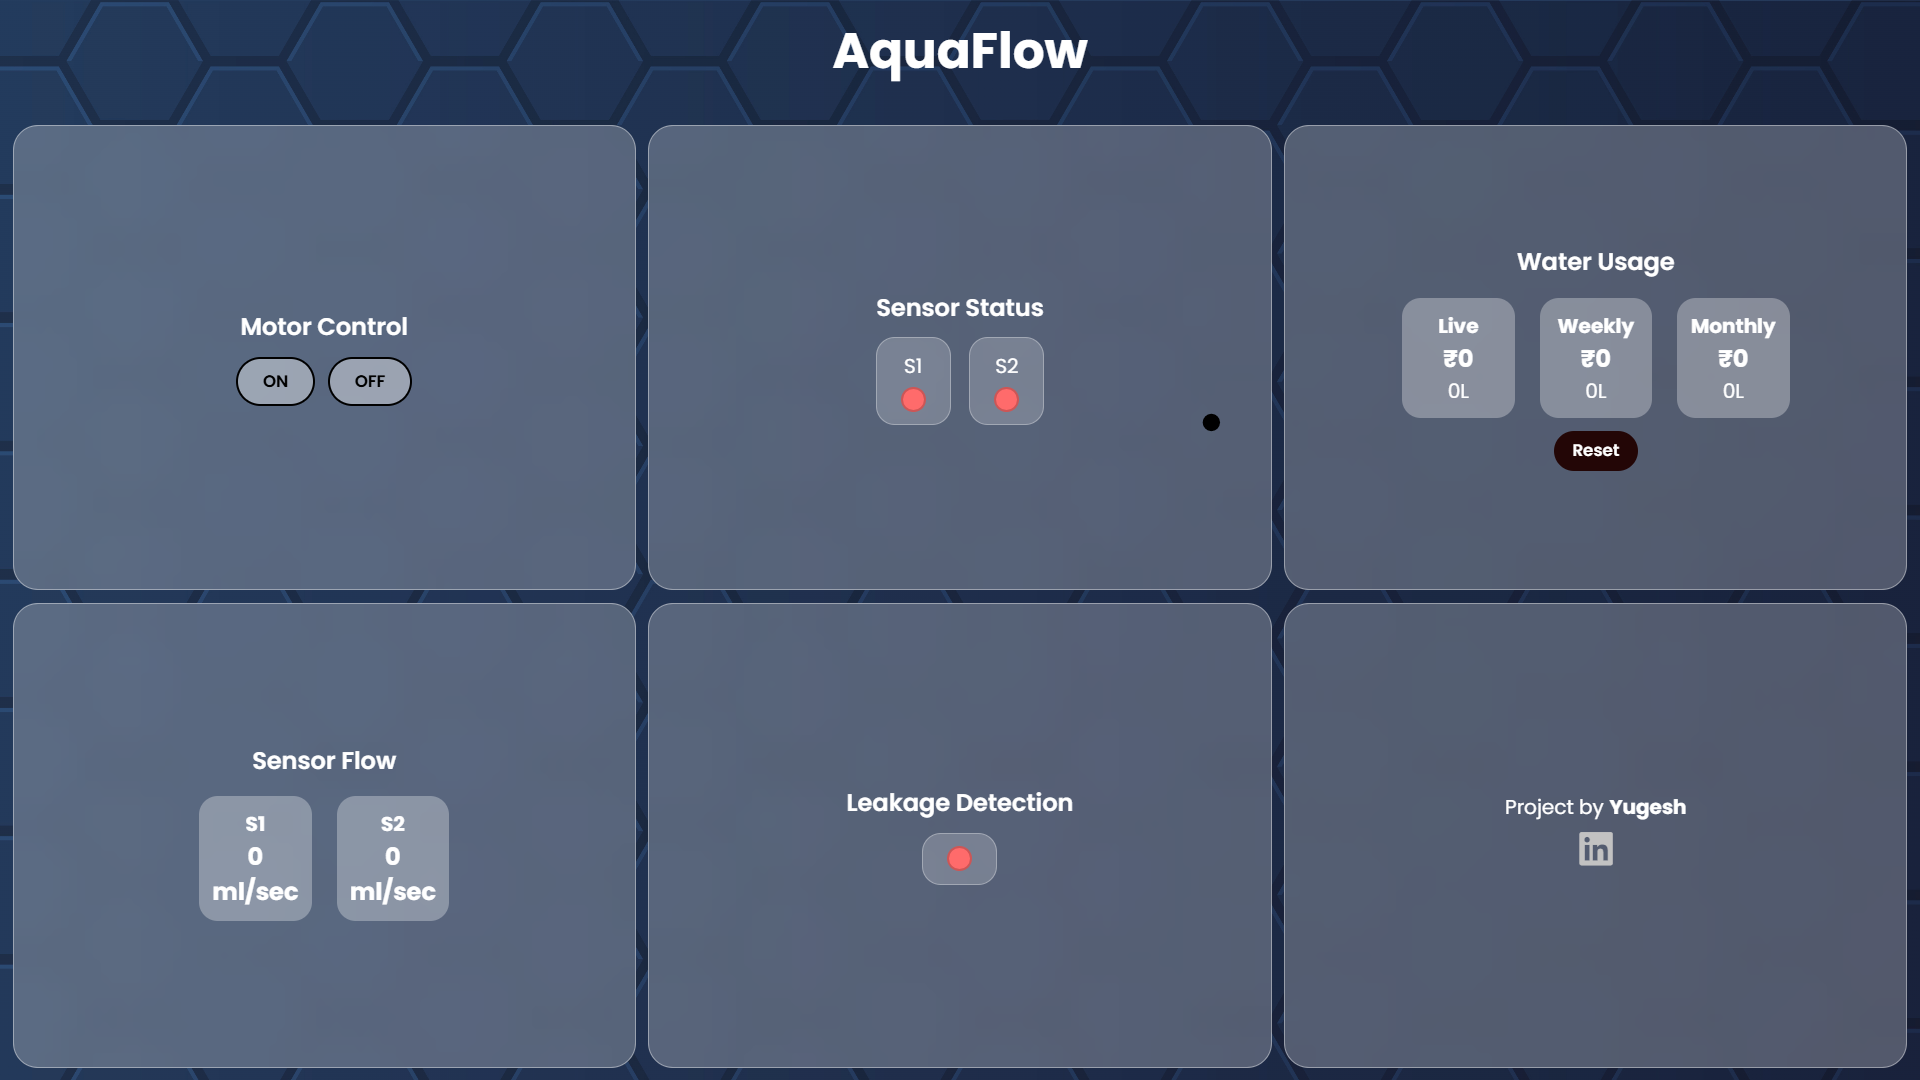
✅ 4. 設定 Web 儀表板
-
開啟 Visual Studio Code(或任何程式碼編輯器)。
-
在資料夾中建立三個檔案:
建立 index.html 檔案並貼上以下程式碼
<!DOCTYPE html>
<html lang="en">
<head>
<link rel="stylesheet" href="https://cdnjs.cloudflare.com/ajax/libs/font-awesome/6.5.0/css/all.min.css">
<meta charset="UTF-8" />
<meta name="viewport" content="width=device-width, initial-scale=1.0" />
<title>AquaFlow Dashboard</title>
<link href="https://fonts.googleapis.com/css2?family=Poppins:wght@400;600;700&display=swap" rel="stylesheet">
<link rel="stylesheet" href="style.css">
</head>
<body>
<h1>AquaFlow</h1>
<div class="dashboard">

  <!-- MOTOR CONTROL -->
  <div class="section">
    <h2>Motor Control</h2>
    <div class="switches">
      <button id="onBtn" onclick="setPump('ON')">ON</button>
      <button id="offBtn" onclick="setPump('OFF')">OFF</button>
    </div>
  </div>

  <!-- SENSOR STATUS -->
  <div class="section">
    <h2>Sensor Status</h2>
    <div class="sensor-status">
      <div><p>S1</p><div id="s1Status" class="status-dot"></div></div>
      <div><p>S2</p><div id="s2Status" class="status-dot"></div></div>
    </div>
  </div>

  <!-- WATER USAGE -->
  <div class="section">
    <h2>Water Usage</h2>
    <div class="usage">
      <div class="card"><p><b>Live</b></p><div class="value">₹<span id="livePrice">0</span></div><p><span id="liveLiters">0</span>L</p></div>
      <div class="card"><p><b>Weekly</b></p><div class="value">₹<span id="weekPrice">0</span></div><p><span id="weekLiters">0</span>L</p></div>
      <div class="card"><p><b>Monthly</b></p><div class="value">₹<span id="monthPrice">0</span></div><p><span id="monthLiters">0</span>L</p></div>
    </div>
    <button id="resetBtn">Reset</button>
  </div>

  <!-- LIVE FLOW -->
  <div class="section">
    <h2>Sensor Flow</h2>
    <div class="flow">
      <div class="card"><p><b>S1</b></p><div class="value"><span id="flow1">0</span> ml/sec</div></div>
      <div class="card"><p><b>S2</b></p><div class="value"><span id="flow2">0</span> ml/sec</div></div>
    </div>
  </div>

 <!-- LEAKAGE DETECTION -->
<div class="section">
  <h2>Leakage Detection</h2>
  <div class="sensor-status">
    <div>
      <div id="leakStatus" class="status-dot"></div>
    </div>
  </div>
</div>

<!-- ABOUT SECTION -->
<div class="section">
  <p>Project by <b>Yugesh</b></p>
  <div class="social">
  <a href="https://www.linkedin.com/in/yugeshweb" target="_blank" title="LinkedIn">
    <i class="fa-brands fa-linkedin"></i>
  </a>
</div>
  </div>
</div>

<script type="module" src="script.js"></script>
</body>
</html>
建立 style.css 檔案並貼上以下程式碼
* {
  margin: 0;
  padding: 0;
  box-sizing: border-box;
  font-family: 'Poppins', sans-serif;
}

html, body {
  height: 100%;
}

body {
  background: url('Aquabg.jpg') repeat center center/cover;
  display: grid;
  grid-template-rows: 80px 1fr;
  gap: 10px;
  padding: 10px;
  color: #ffffff;
  overflow: hidden;
  position: relative;
}

@media(max-width: 768px){
  body {
    overflow: auto;
    height: auto;
  }
}

body::before {
  content: '';
  position: absolute;
  top: 0;
  left: 0;
  right: 0;
  bottom: 0;
  background: linear-gradient(135deg, rgba(102,126,234,0.1), rgba(118,75,162,0.1));
  z-index: 0;
}

h1 {
  text-align: center;
  font-size: 2.5rem;
  font-weight: 700;
  z-index: 1;
}

.dashboard {
  display: grid;
  grid-template-columns: repeat(3, 1fr);
  grid-template-rows: repeat(2, 1fr);
  gap: 10px;
  height: 100%;
  z-index: 1;
}

@media(max-width: 900px){
  .dashboard {
    grid-template-columns: repeat(2, 1fr);
    grid-template-rows: repeat(3, 1fr);
  }
}

@media(max-width: 600px){
  .dashboard {
    grid-template-columns: 1fr;
    grid-template-rows: repeat(6, 1fr);
  }
}

.section {
  background: rgba(255,255,255,0.25);
  border-radius: 20px;
  backdrop-filter: blur(15px);
  padding: 15px;
  display: flex;
  flex-direction: column;
  align-items: center;
  justify-content: center;
  border: 1px solid rgba(255,255,255,0.4);
}

.section h2 {
  margin-bottom: 10px;
  font-size: 1.2rem;
  font-weight: 600;
  text-align: center;
}

.switches {
  display: flex;
  gap: 10px;
}

button {
  background: rgba(255,255,255,0.4);
  border: 2px solid #000;
  color: #000;
  font-weight: 600;
  padding: 8px 20px;
  border-radius: 25px;
  cursor: pointer;
  transition: 0.3s;
}

button.active {
  background: #000;
  color: #fff;
}

.sensor-status {
  display: flex;
  gap: 15px;
  justify-content: center;
}

.sensor-status > div {
  display: flex;
  flex-direction: column;
  align-items: center;
  gap: 5px;
  padding: 10px;
  background: rgba(255,255,255,0.2);
  border-radius: 15px;
  min-width: 60px;
  border: 1px solid rgba(255,255,255,0.3);
}

.status-dot {
  width: 20px;
  height: 20px;
  border-radius: 50%;
  background: #ff6b6b;
  border: 2px solid rgba(0,0,0,0.2);
  transition: 0.3s;
}

.status-dot.active {
  background: #51cf66;
  animation: pulse 2s infinite;
}

@keyframes pulse {
  0%, 100% { transform: scale(1); }
  50% { transform: scale(1.1); }
}

.card {
  background: rgba(255,255,255,0.3);
  border-radius: 15px;
  padding: 10px;
  text-align: center;
  width: 90px;
  margin: 5px;
}

.value {
  font-size: 1.2rem;
  font-weight: 700;
}

.usage, .flow, .leakage {
  display: flex;
  justify-content: center;
  gap: 10px;
  flex-wrap: wrap;
}

#resetBtn {
  background: rgb(35, 6, 6);
  color: #fff;
  border: none;
  padding: 6px 15px;
  border-radius: 25px;
  cursor: pointer;
  margin-top: 5px;
}

.social-links {
  display: flex;
  flex-direction: column;
  gap: 5px;
  align-items: center;
  margin-top: 10px;
}

.social-links a {
  text-decoration: none;
  color: #000;
  font-weight: 600;
  transition: 0.3s;
}

.social-links a:hover {
  color: #51cf66;
  transform: scale(1.05);
}

.social a {
  color: #c2c2c2;
  font-size: 30px;
  text-decoration: none;
}

.social a:hover {
  color: #000000;
}
建立 script.js 檔案並貼上以下程式碼
import { initializeApp } from "https://www.gstatic.com/firebasejs/11.0.1/firebase-app.js";
import { getDatabase, ref, onValue, set, get } from "https://www.gstatic.com/firebasejs/11.0.1/firebase-database.js";

// Replace these values with your own Firebase credentials
const firebaseConfig = {
  apiKey: "YOUR_API_KEY_HERE",
  authDomain: "YOUR_PROJECT_ID.firebaseapp.com",
  databaseURL: "https://YOUR_PROJECT_ID-default-rtdb.YOUR_REGION.firebasedatabase.app",
  projectId: "YOUR_PROJECT_ID",
  storageBucket: "YOUR_PROJECT_ID.appspot.com",
  messagingSenderId: "XXXXXX",
  appId: "1:XXXX:web:XXXX"
};

const app = initializeApp(firebaseConfig);
const db = getDatabase(app);

const flow1Ref = ref(db, "flow1");
const flow2Ref = ref(db, "flow2");
const pumpRef = ref(db, "pump");
const dataRef = ref(db, "data");

let totalLiters = 0, totalPrice = 0, lastF1 = 0, lastF2 = 0, lastFlow1 = 0, lastFlow2 = 0;

// Load permanent data once
async function loadData() {
  const snap = await get(dataRef);
  if (snap.exists()) {
    const d = snap.val();
    totalLiters = d.totalLiters || 0;
    totalPrice = d.totalPrice || 0;
    lastFlow1 = d.lastFlow1 || 0;
    lastFlow2 = d.lastFlow2 || 0;
    updateUsageDisplay();
  }
}
loadData();

// Save permanent data
function saveData() {
  set(dataRef, { totalLiters, totalPrice, lastFlow1, lastFlow2 });
}

const onBtn = document.getElementById("onBtn");
const offBtn = document.getElementById("offBtn");

window.setPump = (state) => {
  set(pumpRef, state);
  onBtn.classList.toggle('active', state === 'ON');
  offBtn.classList.toggle('active', state === 'OFF');
};

function updateUsageDisplay() {
  document.getElementById("liveLiters").innerText = totalLiters.toFixed(2);
  document.getElementById("livePrice").innerText = totalPrice.toFixed(2);
}

// Listen for flow updates
onValue(flow1Ref, snap => {
  const f1 = snap.val() || 0;
  document.getElementById("flow1").innerText = (f1 * 1000 / 60).toFixed(1);
  document.getElementById("s1Status").classList.toggle('active', f1 > 0);
  lastF1 = f1;
  checkLeak();
  if (f1 > lastFlow1) {
    lastFlow1 = f1;
    saveData();
  }
});

onValue(flow2Ref, snap => {
  const f2 = snap.val() || 0;
  document.getElementById("flow2").innerText = (f2 * 1000 / 60).toFixed(1);
  document.getElementById("s2Status").classList.toggle('active', f2 > 0);
  lastF2 = f2;
  checkLeak();

  if (f2 > lastFlow2) {
    const diff = f2 - lastFlow2;
    totalLiters += diff;
    totalPrice = totalLiters * 0.3; // Adjust pricing logic as needed
    lastFlow2 = f2;
    saveData();
    updateUsageDisplay();
  }
});

document.getElementById("resetBtn").addEventListener('click', () => {
  totalLiters = 0;
  totalPrice = 0;
  lastFlow1 = 0;
  lastFlow2 = 0;
  saveData();
  updateUsageDisplay();
});

function checkLeak() {
  const leakDot = document.getElementById("leakStatus");
  const isNormal = Math.abs(lastF1 - lastF2) < 0.05;
  leakDot.classList.toggle('active', isNormal);
  leakDot.style.background = isNormal ? '#51cf66' : '#ff6b6b';
}
-
在您的 script.js 中,更新 Firebase 設定值:
-
api密鑰
-
授權網域
-
資料庫URL
-
專案編號
-
儲存桶
(使用您先前從 Firebase 儲存的相同詳細資訊。)
- 一切設定完成後,啟動網站(您可以直接在瀏覽器中開啟index.html)。
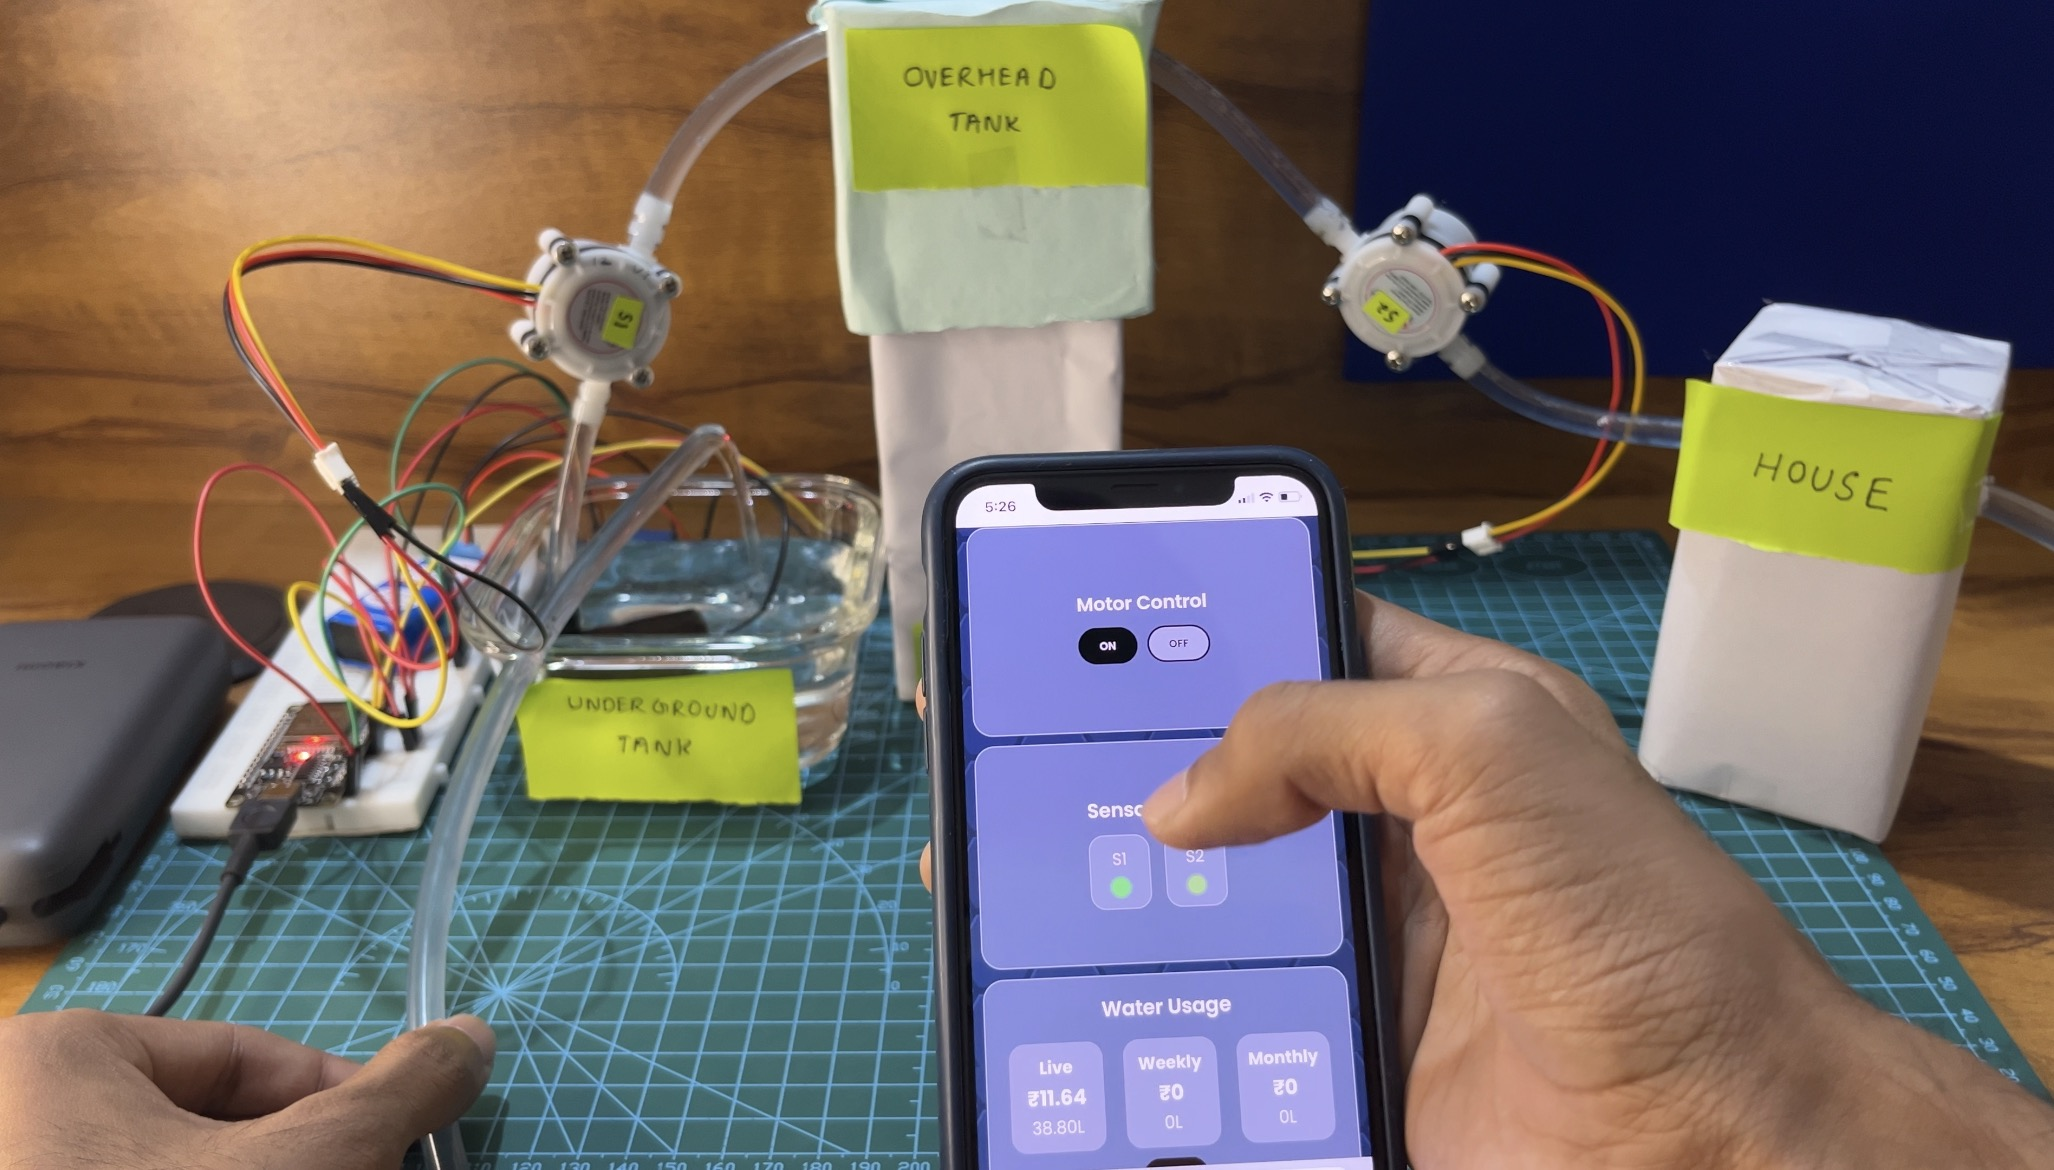
- 現在您可以從網路儀表板控制泵,即時打開或關閉它,並透過 Firebase 立即同步資料。
轟!您已經成功建造了自己的智慧水泵控制器。
✅工作模型
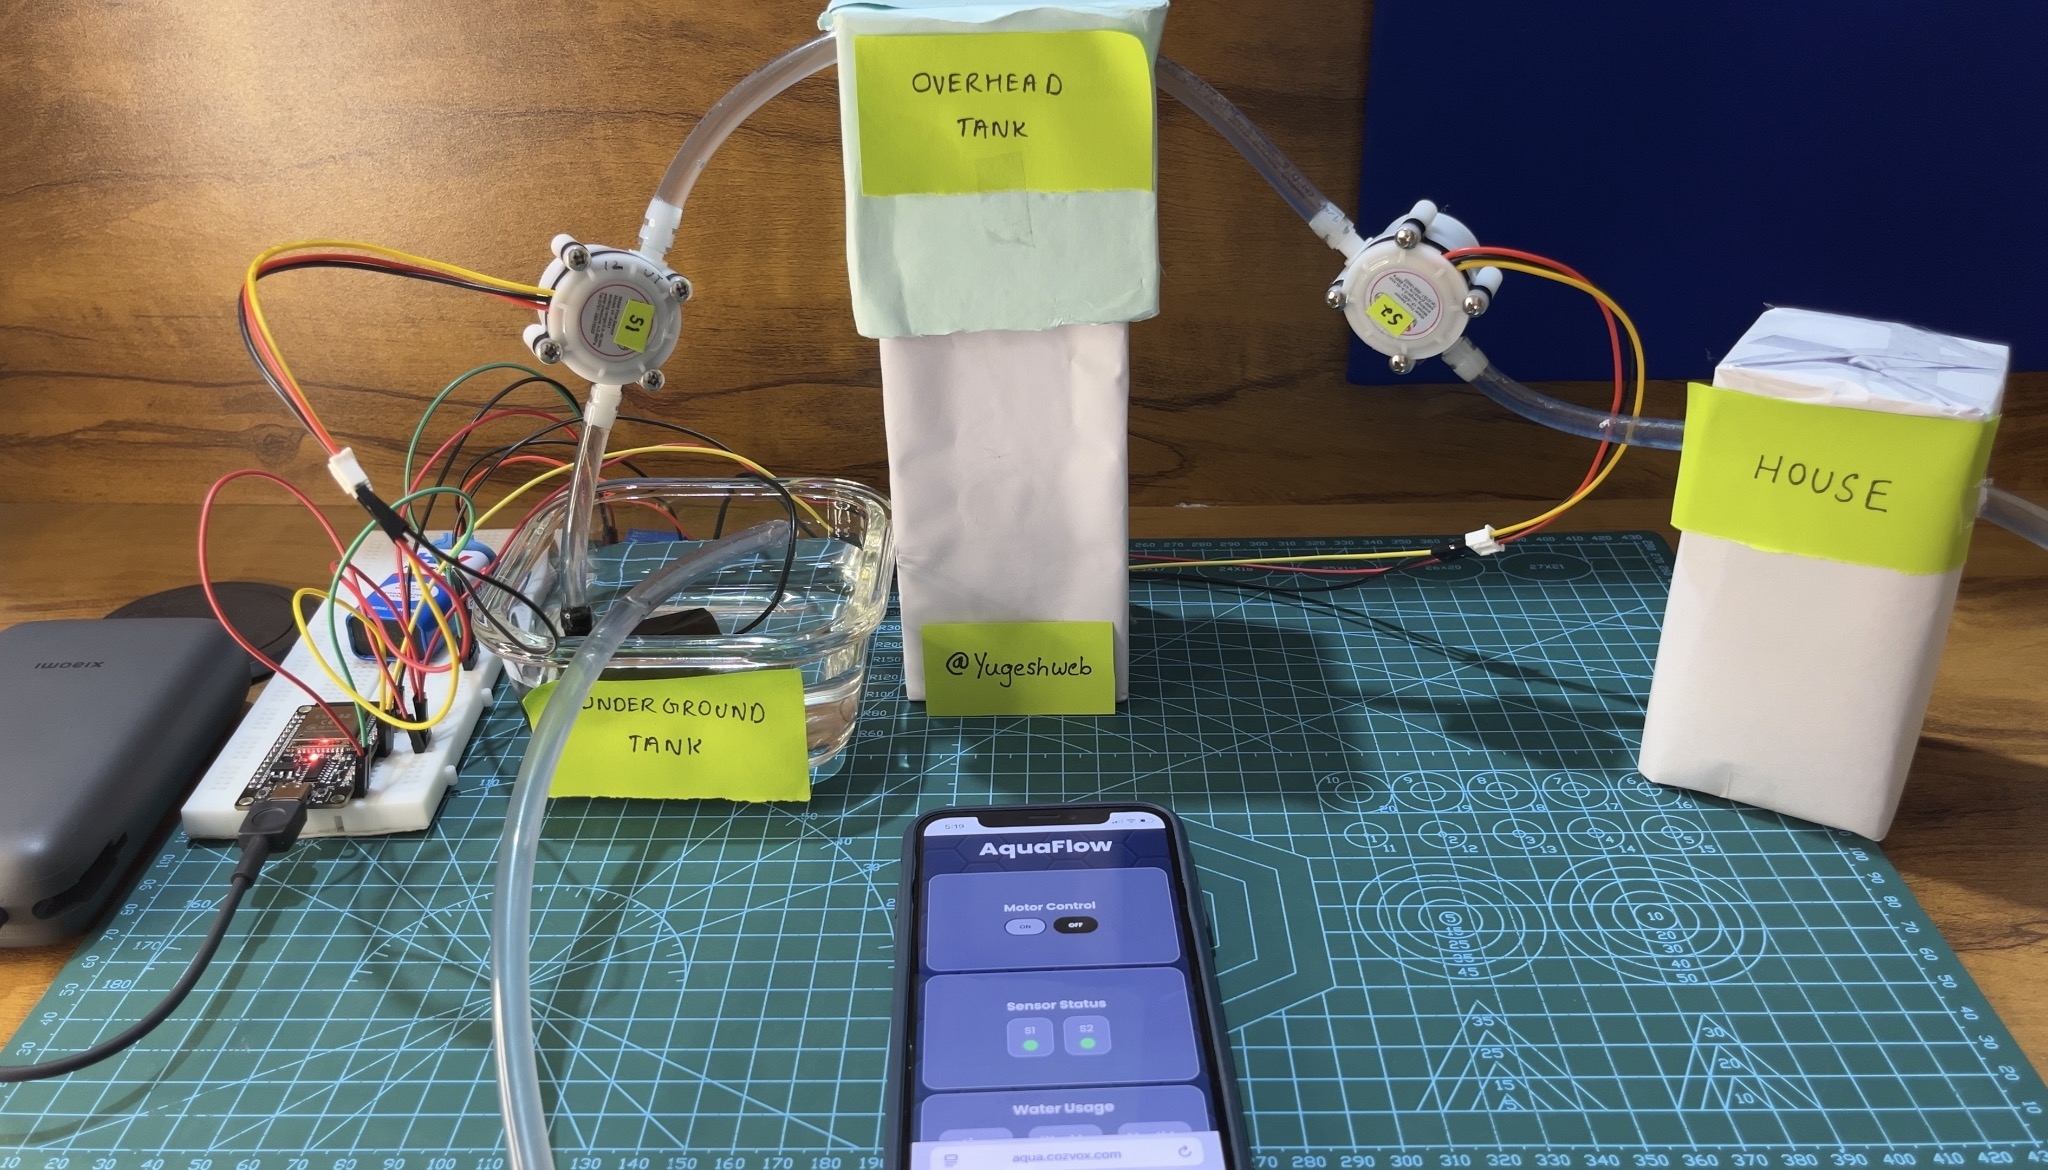
- 從網站控制
🧩 最後說明
由於這個專案還只是原型模型,所以水量的測量精度並不完美。我還沒有校準流量感測器以獲得精確的讀數。
您還會注意到,即使刷新頁面,計算出的價格和升數也不會重置。這是因為資料是持久性儲存的,只能使用「重置」按鈕進行重置。
您可能還會注意到洩漏檢測指示燈變紅。這是因為兩個感測器之間的流速不匹配。在實際系統中,這表示可能有洩漏,但在這個小規模模型中,洩漏主要是由於水流的壓力和高度差異造成的,而不是實際的洩漏。
-
為了將來的改進,該系統可以擴展為:
-
支持多戶住宅,每戶都有單獨的用水追蹤和計費
-
透過電子郵件自動發送每月帳單
-
甚至允許用戶登入並直接從儀表板檢查他們的用水量
GitHub連結:https://github.com/yugeshweb/AquaFlow
如果您有任何問題或建議,請隨時在下面的評論中提出!
謝謝閱讀:)
原文出處:https://dev.to/yugeshweb/smart-water-pump-controller-using-esp32-and-firebase-iot-project-3flj
1) --- 會變成分隔線(上一行必須是空白)
2) # 會變成一級標題
3) ## 會變成二級標題
4) ### 會變成三級標題
5) **粗體文字**會顯示粗體文字
6) ```當第一行與最後一行會顯示程式碼
7) 請搜尋 Markdown 語法,了解各種格式