🔧 阿川の電商水電行

等等實驗室手冊?
就目前情況而言,我的一些非常好的朋友即將參加一場有關 DevOps 的考試。由於大學提供的材料缺乏,再加上師資不強,這門學科很快就成為了他們的噩夢。
不要害怕,因為我被召喚來幫助解決這場危機。是時候對 devops 的名字給予一些尊重了,並在過程中嘗試讓我的一些朋友的生活變得更輕鬆。
注意:本講義將包含以下所有 6 個問題的答案和解釋:
本指南的編寫不僅是為了幫助那些參加課程程式碼22CBL54的人,而且是為了任何想要進入 DevOps 的人。
介紹
我是 Akash Singh,來自班加羅爾的三年級工程專業學生和開源貢獻者。

我在網路上使用的名字是 SkySingh04。
什麼是 DevOps?
DevOps 是您無法迴避的流行詞,這是有充分理由的。它是開發和*營運的結合——一種旨在透過改善開發人員和 IT 營運團隊之間的協作來**簡化軟體開發生命週期 (SDLC)* 的方法。
將 DevOps 視為一種配方,其中:
-
Dev = 建造菜餚(編碼)
-
Ops = 為飢餓的使用者提供熱氣騰騰的服務(部署和維護)
為什麼你應該關心?
-
速度:更快交付功能。
-
協作:不再互相指責-「它可以在我的機器上運作」在這裡是行不通的。
-
可靠性:生產中的錯誤更少(接觸木頭)。
-
可擴展性:像老闆一樣處理用戶流量。
-
安全性:自動執行無聊但重要的安全檢查。
希望這是有道理的嗎?基本上,如果應用程式在生產時崩潰,他們首先會來問我出了什麼問題。作為一名 DevOps 工程師,由於我已經設置了部署管道,我應該能夠查看監控工具、日誌或基礎設施,並告訴他們好吧,這就是搞砸的人(9/10 倍於開發人員) ,1/ 10 次我在設置基礎設施或管道時犯了錯誤,呵呵)
好吧,我希望現在這是有道理的,基本上我們的 DevOps 工程師是一個雜交品種,並認為我們是主角。
好的,現在前提已經確定,讓我們開始了解這個實驗室的內部結構吧?
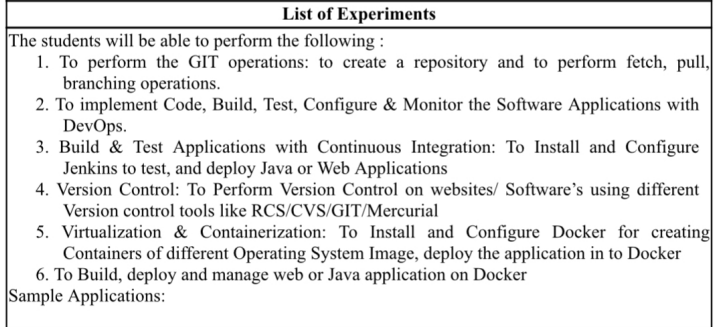
問題一:GIT操作
問題陳述
執行 Git 操作,例如建立儲存庫以及取得、拉取和分支。
解決方案
第1步:安裝Git
像專業人士一樣使用您的終端:
sudo apt update
sudo apt install git
第 2 步:建立儲存庫
- 導航到您的專案資料夾:
cd ~/your_project- 初始化Git:
git init- 新增並提交文件:
    git add .
    git commit -m "Initial commit"
第 3 步:取得並拉取
- Fetch從遠端儲存庫帶來更改,但不合併它們:
git fetch origin- 拉取並合併更改:
git pull origin main第四步:分支
- 建立一個新分支:
git branch feature-branch- 切換到它:
git checkout feature-branch- 合併回主目錄:
    git checkout main
git merge feature-branch總的來說,這是一個非常不言自明的程序。我希望閱讀本文的人一生中曾經使用過git 。對三年級學生的要求是否太過分了? Wdym 得到了天空的生活嗎?
問題 2:DevOps 生命週期
DevOps 生命週期涉及一系列階段——編碼、建置、測試、配置和監控——旨在簡化軟體開發流程。
-
程式碼:協作編寫和管理程式碼。
-
建置:將原始程式碼編譯為可執行工件。
-
測試:自動化測試以確保程式碼品質。
-
配置:設定部署環境。
-
監控:追蹤生產中的應用程式運作狀況。
好吧,我們將建立一個非常小的 Web 應用程式,顯示“Hello, Devops!”然後在裡面執行上面的5個步驟。
這是一個非常模糊的問題,有一百萬種方法來實現和回答這個問題。我會嘗試給出最簡單的解決方案,理想情況下應該獲得滿分,否則我會刪除我的 Linkedin。
第 1 步:程式碼
- 建立 Flask 應用程式
`File: app.py`
    from flask import Flask
    app = Flask(__name__)

    @app.route('/')
    def home():
        return "Hello, DevOps!"

    if __name__ == "__main__":
app.run(host='0.0.0.0', port=5000)- 設定虛擬環境
python3 -m venv venv
source venv/bin/activate # Linux/Mac
venv\Scripts\activate # Windows
pip install flask
pip freeze > requirements.txt
- 執行應用程式
`python app.py`
- 在瀏覽器中開啟:http://localhost:5000。
第 2 步:建置
如果你知道的話,Python 是一種解釋性語言。可以說沒有建置步驟,因為程式碼是逐行執行的。所以這裡的建置是指準備環境並確保應用程式準備好執行。
- 我們將編寫一個簡單的shell 腳本(build.sh) 來安裝依賴項並確保應用程式執行:
#!/bin/bash
    echo "Setting up environment..."
    python3 -m venv venv
    source venv/bin/activate
    pip install -r requirements.txt
echo "Environment setup complete. Run the app with: python app.py"- 執行腳本:
bash build.sh第三步:測試
現在,由於程式要求我們編寫一些測試,因此我們將編寫一個非常簡單的測試來檢查應用程式是否正在執行。順便說一句,無恥的插件,但如果你想用 0 程式碼寫測試,請查看我的Keploy Vscode 擴充 xD
- **測試檔案(test_app.py):
    import unittest
    from app import app

    class TestApp(unittest.TestCase):
        def test_home(self):
            tester = app.test_client(self)
            response = tester.get('/')
            self.assertEqual(response.status_code, 200)
            self.assertEqual(response.data, b"Hello, DevOps!")

    if __name__ == "__main__":
unittest.main()- 執行測試:
python -m unittest test_app.py第 4 步:配置
這裡的配置重點是確保應用程式可以在不同的環境中執行。一種簡單的方法是使用環境變數。
- 建立一個 .env 檔案:
FLASK_PORT=5000- 修改app.py讀取環境變數:
    import os
    from flask import Flask

    app = Flask(__name__)

    @app.route('/')
    def home():
        return "Hello, DevOps!"

    if __name__ == "__main__":
        port = int(os.getenv("FLASK_PORT", 5000))
app.run(port=port)- 使用 python-dotenv 自動載入 .env 檔案:
pip install python-dotenv- 加入app.py:
    from dotenv import load_dotenv

    load_dotenv()
第 5 步:監控
現在,當您引入 Prometheus、Grafana、Loki 等高級工具時,監控變得非常非常複雜。一般來說,監控意味著只是查看應用程式在執行時正在做什麼,例如日誌、執行狀況、任何錯誤等。
- 新增 /health 端點以檢查應用程式是否正在執行:
    @app.route('/health')
    def health():
return {"status": "up"}, 200- 將請求記錄到文件中:
    import logging

    logging.basicConfig(filename='app.log', level=logging.INFO)

    @app.before_request
    def log_request():
        logging.info(f"Request: {request.method} {request.path}")
現在,當教師詢問在哪裡進行監控時,請向他展示 localhost:5000/health 路徑和 app.log 檔案。讓他高興吧,因為如果我們想讓事情變得更花哨,事情就會變得非常複雜。
那我們到底做了什麼?
-
程式碼:使用基本編碼實踐建立的 Python Flask 應用程式。
-
建置:使用 venv 和建置腳本準備環境。
-
測試:使用Python的單元測試來驗證應用程式的行為。
-
設定:使用 .env 和 python-dotenv 來管理環境變數。
-
監視器:新增了 /health 端點和請求日誌記錄。
這就是我們如何以簡單的方式進行 DevOps ! 🎉
問題 3:與 Jenkins 持續集成
詹金斯這個新馬戲團是什麼?還記得我說過身為 DevOps 人員,我必須設定管道以確保應用程式/程式碼已部署嗎?是的,所以管道通常是使用 github actions 建構的,在更高級的公司中,他們使用這個名為Jenkins的工具
安裝詹金斯的步驟:
這應該已經在你的實驗室系統中完成,如果沒有告訴你的老師嘿詹金斯沒有安裝或在線查找安裝說明,請不要記住這一點。只有啟動jenkins的命令。
請記住,您需要一個現有的應用程式來使用 jenkins 部署它,為簡單起見,我使用我們在第二季度建立的相同 python 應用程式。它需要被推送到 github,因為您需要將管道連接到您的儲存庫。
- 安裝 Java(Jenkins 必需):
    sudo apt update
sudo apt install openjdk-11-jdk- 新增詹金斯存儲庫:
    curl -fsSL https://pkg.jenkins.io/debian/jenkins.io.key | sudo tee \
    /usr/share/keyrings/jenkins-keyring.asc > /dev/null
    echo deb [signed-by=/usr/share/keyrings/jenkins-keyring.asc] \
    https://pkg.jenkins.io/debian binary/ | sudo tee
/etc/apt/sources.list.d/jenkins.list > /dev/null- 安裝詹金斯:
    sudo apt update
sudo apt install jenkins- 啟動 Jenkins 並檢查狀態:
    sudo systemctl start jenkins
    sudo systemctl status jenkins
配置詹金斯
- 存取詹金斯:
Open a browser and go to http://<your_server_ip>:8080 or http://localhost:8080.
- 解鎖詹金斯:
Use the admin password found in: (cant memorise , the password is unique always, you'll find it here)
cat /var/lib/jenkins/secrets/initialAdminPassword- 安裝推薦插件:
Follow the on-screen setup to install necessary plugins (e.g., Git, NodeJS, Pipeline).
Web 應用程式的 Jenkins 管道
- 建立新工作:
- Go to Jenkins Dashboard and click *"New Item"*.
- Choose *"Pipeline"* and give it a name.
- 配置 Git 儲存庫:
- In the Pipeline configuration, specify the repository URL:
- *Source Code Management* > Select *Git* > Enter your repository URL.
- Add credentials if needed.
- 定義管道腳本:
pipeline {
    agent any

    environment {
        VIRTUAL_ENV = 'venv' // Virtual environment directory
        FLASK_PORT = '5000' // Port to run the Flask app
    }

    stages {
        stage('Clone Repository') {
            steps {
                echo 'Cloning the repository...'
                git branch: 'main', url: 'https://github.com/ahanasrinath/myflaskapp.git'
            }
        }

        stage('Set Up Environment') {
            steps {
                echo 'Setting up virtual environment and installing dependencies...'
                sh '''
                python3 -m venv $VIRTUAL_ENV
                source $VIRTUAL_ENV/bin/activate
                pip install -r requirements.txt
                '''
            }
        }

        stage('Run Tests') {
            steps {
                echo 'Running unit tests...'
                sh '''
                source $VIRTUAL_ENV/bin/activate
                python -m unittest discover -s . -p "test_*.py"
                '''
            }
        }

        stage('Build and Package') {
            steps {
                echo 'Packaging the application...'
                sh '''
                tar -czf flask-app.tar.gz app.py requirements.txt .env
                '''
            }
        }

        stage('Deploy') {
            steps {
                echo 'Deploying the application...'
                sh '''
                # Copy the application to the deployment server
                scp flask-app.tar.gz user@your-server:/path/to/deployment

                # SSH into the server and deploy
                ssh user@your-server << EOF
                cd /path/to/deployment
                tar -xzf flask-app.tar.gz
                source $VIRTUAL_ENV/bin/activate
                nohup python app.py > app.log 2>&1 &
                EOF
                '''
            }
        }
    }

    post {
        success {
            echo 'Pipeline completed successfully!'
        }
        failure {
            echo 'Pipeline failed. Check the logs for more details.'
        }
    }
}
現在事情是這樣的......由於我們一開始就沒有伺服器,因此詹金斯沒有地方可以部署我們的應用程式。這再次讓我想知道為什麼他們他媽的告訴你們部署一些東西而沒有任何上下文關於它應該部署在哪裡?
學院會提供你們專用伺服器來部署嗎?不太可能。他們甚至知道他們需要這樣做嗎?也不太可能。因此,對最後的部署階段持保留態度。

希望這不是你們在考場,而是我的每一天。
筆記:
*如果他們給你一個隨機的應用程式來使用詹金斯部署,*不要驚慌。您會意識到我們在 jenkins 文件中編寫的任何步驟都是我們在第二季度執行的實際命令。因此,它們可以替換為任何特定應用程式/技術堆疊的任何特定指令集。
例如:
如果他們給你一個 React 應用程式,安裝環境將被 npm install 替換,建置將被 npm run build 取代。類似地,對於 java app ,它可能會有所不同,例如 ac 檔案的 javac app.java 或 cpp main.c 。
重點是不要驚慌,他們不知道自己在教什麼或問問題。只要你把步驟寫得跟上面差不多,他們就會知道你煮了東西。
問題4:版本控制工具
Git 是這裡的王者,但像CVS 、 RCS和Mercurial這樣的替代品也值得一提。每個都有其優點和缺點:
-
RCS :適用於單一文件專案。
-
CVS :老派,非常適合團隊。
-
Mercurial :Git 的不太出名的兄弟,受到 Mozilla 等專案的青睞。
Chalo,讓我們先安裝這些(希望它們已經安裝在你們將要使用的實驗室電腦中)。對於Mac 使用brew 指令,對於linux 使用apt。
- RCS
sudo apt install rcs
brew install rcs
- CVS
sudo apt install cvs
brew install cvs
- git
sudo apt install git
brew install git
- 水銀
sudo apt install mercurial
brew install mercurial
以下是所有這些命令的基本命令:
1. 版本控制系統(RCS)
# Initialize RCS directory
mkdir RCS
# Check-in a file to create its first revision
ci -u filename
# Check-out a file for editing
co -l filename
# View version history
rlog filename
2. 並發版本系統(CVS)
# Initialize a repository
cvs -d /path/to/repo init
# Add a project to CVS
cvs import -m "Initial import" project_name vendor_tag release_tag
# Checkout a project
cvs checkout project_name
# Commit changes
cvs commit -m "Commit message"
3. git
# Initialize a repository
git init
# Add files to the repository
git add .
# Commit changes
git commit -m "Initial commit"
# View history
git log
# Push changes to a remote repository
git remote add origin <repository-url>
git push -u origin main
4. 水銀
# Initialize a repository
hg init
# Add files to the repository
hg add
# Commit changes
hg commit -m "Initial commit"
# View history
hg log
# Push changes to a remote repository
hg push <repository-url>
問題 5:Docker 基礎知識
好吧,我們只需要了解這個Docker是什麼。 Docker 是每個 DevOps 工程師的核心。沒有 Docker,只有混亂、苦難和痛苦。
什麼是 Docker?
Docker 是一個開源平台,可讓您在容器內開發、發布和執行應用程式。將容器視為一個輕量級、可移植且一致的環境,其中包含應用程式執行所需的所有內容 - 程式碼、程式庫、依賴項,甚至執行時。
為什麼要使用 Docker?
基本上是為了解決“ye code mere system pe chal raha h,但不在你的系統上”的問題。 docker 容器模擬整個環境和所有依賴項,因此無論您在哪裡執行容器,它都會可靠地執行,不會出現任何馬戲。現在,您不必與擁有 Mac 的富有朋友或只靠 Linux 生活的書呆子作鬥爭。 Kahi bhi 程式碼 likho,chalega ekdam aram se 使用 Docker。
Docker 的核心概念
- Docker 映像:
- A blueprint for a container.
- Contains the app code, libraries, and dependencies.
- Example: The image we will build using the Dockerfile.
- 碼頭貨櫃:
- A running instance of a Docker image.
- Isolated, lightweight, and portable.
- Dockerfile :
- A text file containing the instructions to build a Docker image.
- Example:
        FROM python:3.8-slim
        WORKDIR /app
        COPY . .
CMD ["python", "app.py"]- 碼頭工人中心:
- A cloud-based registry for sharing Docker images.
- Think of it as "GitHub for containers."
Docker 在 DevOps 中被廣泛使用,因為它:
-
簡化應用程式部署。
-
與 CI/CD 管道無縫協作。
-
允許微服務架構,其中每個服務都在自己的容器中執行。
強烈建議觀看Fireship on Docker的這段影片和Coderized的這段影片
用非常簡單的話來說:想像一下你正在收拾行李去旅行:
-
Docker 映像檔就像一個手提箱,預先裝滿了所有必需品(牙刷、衣服等)。
-
Docker 容器是您在旅途中實際攜帶的行李箱。
-
Docker Hub是您購買預包裝手提箱(圖)的商店。
回到我們的實驗室程序,我們如何 Dockerise 我們的 Python 應用程式?首先從[此處](https://www.docker.com/products/docker-desktop/下載Docker Desktop,然後按照此處的說明進行操作https://docs.docker.com/desktop/setup/install /windows-install/ )
現在他們提到你應該執行不同的容器作業系統,這很容易:
1. 拉取作業系統鏡像
Docker Hub 提供了多種作業系統映像。
- 搜尋作業系統映像:
`docker search <os-name>`
Example for Ubuntu:
`docker search ubuntu`
- 拉取作業系統鏡像:
`docker pull <os-name>:<tag>`
Example for Ubuntu:
`docker pull ubuntu:latest`
2. 從作業系統映像執行容器
- 執行互動式容器:
`docker run -it <os-name>:<tag> /bin/bash`
Example:
`docker run -it ubuntu:latest /bin/bash`
This will give you a shell prompt inside the container.
- 列出正在執行的容器:
`docker ps`
- 列出所有容器(包括已停止的容器):
`docker ps -a`
- 停止正在執行的容器:
`docker stop <container-id>`
- 移除一個容器:
`docker rm <container-id>`
3. 建立自訂應用程式容器
現在我們將對您的 Flask 應用程式進行 docker 化!對於此步驟來說,上述步驟2並不是必要的。
- 在根目錄中建立 Dockerfile
    FROM python:3.8-slim

    WORKDIR /app

    COPY requirements.txt requirements.txt
    RUN pip install -r requirements.txt

    COPY . .

CMD ["python", "app.py"]- 建置 Docker 映像
`docker build -t flask-devops-app .`
- 執行容器
`docker run -d -p 5000:5000 flask-devops-app`
- 透過 http://localhost:5000 存取該應用程式。
我還是會寫出每一步的作用,如果你能記得的話可以跳過:
FROM python:3.8-slim
- 目的:
This specifies the base image for your container.
- python:3.8-slim is a lightweight version of the Python 3.8 image. It contains only the essential components required to run Python, making it smaller and faster to download.
WORKDIR /app
- 目的:
This sets the working directory inside the container to /app.
- Any subsequent commands like COPY or RUN will execute relative to this directory.
- It ensures your application code and dependencies stay organized in a specific directory within the container.
COPY requirements.txt requirements.txt
- 目的:
This copies the requirements.txt file from your local system (host) to the /app directory inside the container.
- The requirements.txt file contains all the Python libraries your app depends on.
RUN pip install -r requirements.txt
- 目的:
This installs all the Python dependencies specified in the requirements.txt file using pip.
- For example, if your app uses Flask, the requirements.txt might contain:
`flask==2.1.2`
COPY . .
- 目的:
This copies *all files* from your local working directory (host) to the /app directory inside the container.
- It ensures your app.py and any other necessary files (e.g., templates, static assets) are available in the container.
CMD ["python", "app.py"]
- 目的:
This specifies the command the container should run when it starts.
- Here, it tells Docker to execute python app.py, which starts your Flask application.
- The CMD command runs the app in the foreground to keep the container alive while your app is running.
就是這樣!您的 Docker 應用程式現已上線!
4. 管理 Docker 容器和映像
一些額外的命令,因為它們可能有用 yk
- 看所有圖片:
`docker images`
- 刪除影像:
`docker rmi <image-id>`
- 停止並刪除所有容器:
    docker stop $(docker ps -aq)
docker rm $(docker ps -aq)- 修剪未使用的資料(停止的容器、網路等):
`docker system prune -a`
問題 6:使用 Docker 部署應用程式
恭喜!如果你已經走到這一步,我為你感到驕傲!這是你的獎勵:你不必研究問題 6。您也可以使用此處相同的步驟 3 部署相同的 Flask 應用程式。為了安全起見,這裡也是java實現,你需要一個用java寫的簡單的hello world順便說一句,這裡是:
在專案目錄中建立Main.java
public class Main {
    public static void main(String[] args) {
        System.out.println("Hello, Dockerized Java App!");
    }
}
然後將 Dockerfile 新增到同一資料夾:
Java 應用程式的 Dockerfile
FROM openjdk:11
COPY . /app
WORKDIR /app
RUN javac Main.java
CMD ["java", "Main"]
這裡的步驟說明與 Flask 應用程式的 Dockerfile 相同,只是我們使用 java 命令而不是 python 命令:
FROM openjdk:11
- 目的:
This specifies the base image for your container.
- openjdk:11 is a lightweight image containing the Java Development Kit (JDK) for Java 11.
- It provides everything needed to compile and run Java applications.
- Using a specific version (11) ensures consistency and avoids issues from version mismatches.
COPY . /app
- 目的:
This copies *all files* from your current working directory on the host machine to the /app directory inside the container.
- For example, this will include your Java source files (Main.java) and any other files needed to run your application.
WORKDIR /app
- 目的:
This sets the working directory inside the container to /app.
- All subsequent commands (like RUN or CMD) will execute relative to this directory.
- It ensures your application files are in the right location before compilation or execution.
RUN javac Main.java
- 目的:
This compiles your Main.java file using the javac (Java Compiler) command inside the container.
- The javac command generates the bytecode .class file (e.g., Main.class), which is necessary to run the Java application.
- If your application has multiple Java files or dependencies, make sure they are all copied and accessible for compilation.
CMD ["java", "Main"]
- 目的:
This specifies the command the container should run when it starts.
- java Main executes your compiled Java program (Main.class).
- CMD runs the application in the foreground, ensuring the container remains active while the application runs.
建置並執行容器後,您的 Java 應用程式將執行並將結果輸出到終端(或您的應用程式編程為發送結果的任何地方)。
建置並執行
- 建構圖像:
docker build -t my-java-app .- 執行容器:
docker run my-java-app- 輸出:
你應該看到:
Hello, World!!
結論
我希望這個部落格可以幫助你們通過這次實驗考試。編寫和解決這個問題確實很有趣,如果你的教師不分享這些材料,我不確定他/她整個學期都做了什麼。雖然所有這些都可以在網路上找到,並且可能寫得和解釋得更好,但我盡力用我的術語解釋它以及我將如何解決所有這些問題。
話又說回來,您的實驗室系統將有網路。如果沒有網路,您就無法執行上述任何程式嗎?所以,是的,在考試期間很容易通過谷歌搜尋步驟或找到這份講義。
感到感激嗎?我接受吉百利保險絲、芒果奶昔和偶爾 *ganne ka 果汁形式的付款。是的,這是我在 Vance 以及作為 DevOps 工程師的工作的一部分。是的,這是devops 海洋中的一個非常非常小的一滴,隨著監控、kubernetes 和yaml 等,事情很快就會變得複雜。都非常歡迎<3
感謝您的閱讀:))
1) --- 會變成分隔線(上一行必須是空白)
2) # 會變成一級標題
3) ## 會變成二級標題
4) ### 會變成三級標題
5) **粗體文字**會顯示粗體文字
6) ```當第一行與最後一行會顯示程式碼
7) 請搜尋 Markdown 語法,了解各種格式