

AI編排器備受關注;然而,當部署變得緩慢且成本高昂時,開發人員往往會忽略一項關鍵功能:ADK回調鉤子。回調鉤子的設計模式和最佳實踐使開發人員能夠將邏輯從代理重構到回調鉤子,從而增強可觀測性、降低成本和延遲,並動態修改會話狀態。
本文探討如何在 ADK 代理程式的各個階段建立回呼鉤子,以示範以下設計模式:
-
記錄和監控效能
-
管理動態狀態
-
修改請求和回應
-
有條件地跳過步驟
演示概述
sequentialEvaluationAgent器將專案描述路由到sequentialEvaluationAgent由專案、反模式、決策、推薦、稽核、上傳、合併和電子郵件子代理組成。
在project中,我實現了anti-patterns 、 decision 、 recommendation和merger代理的回呼鉤子,以展示它們的功能和實用性。
建築學
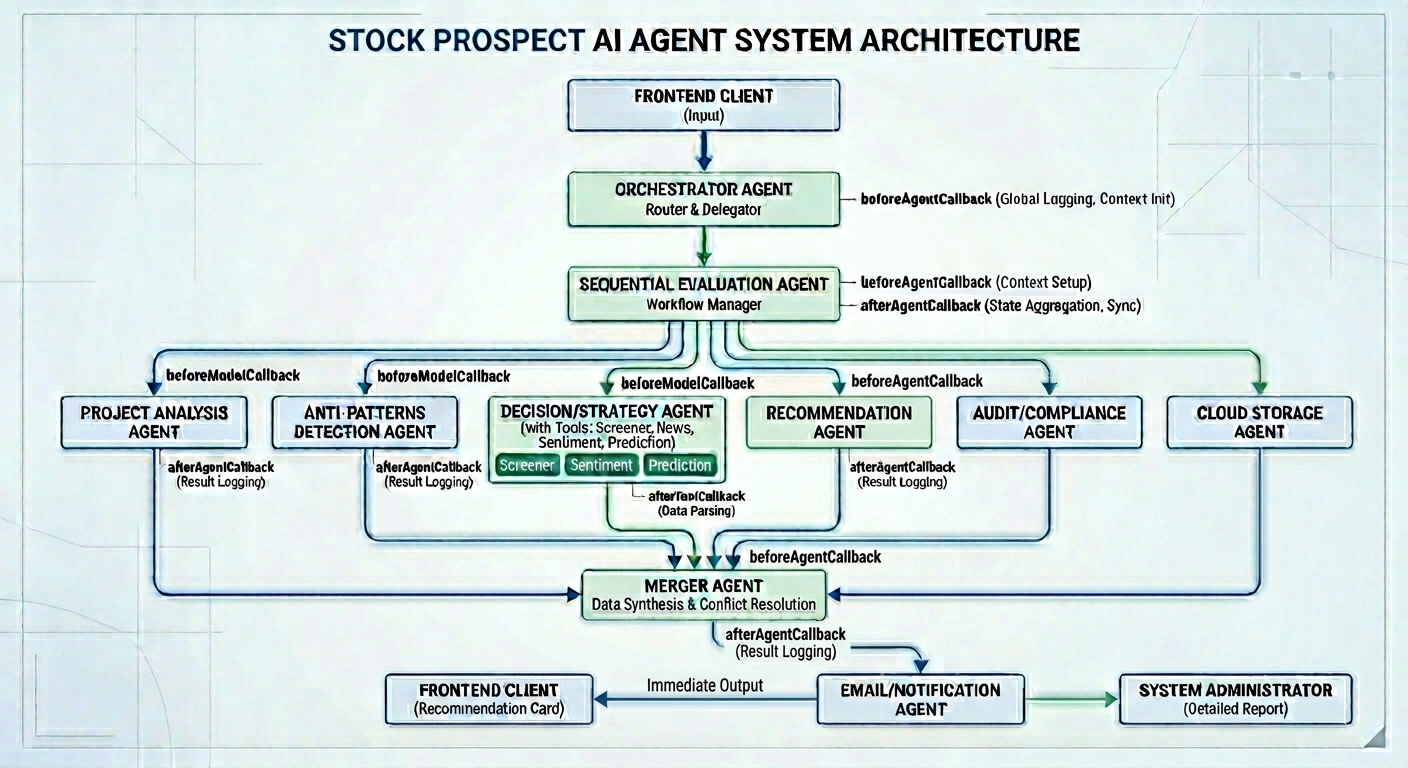
Google ADK 代表 Agent Development Kit(代理開發工具包)。它是一個開源代理框架,使開發人員能夠以便捷的方式建置和部署 AI 代理程式。
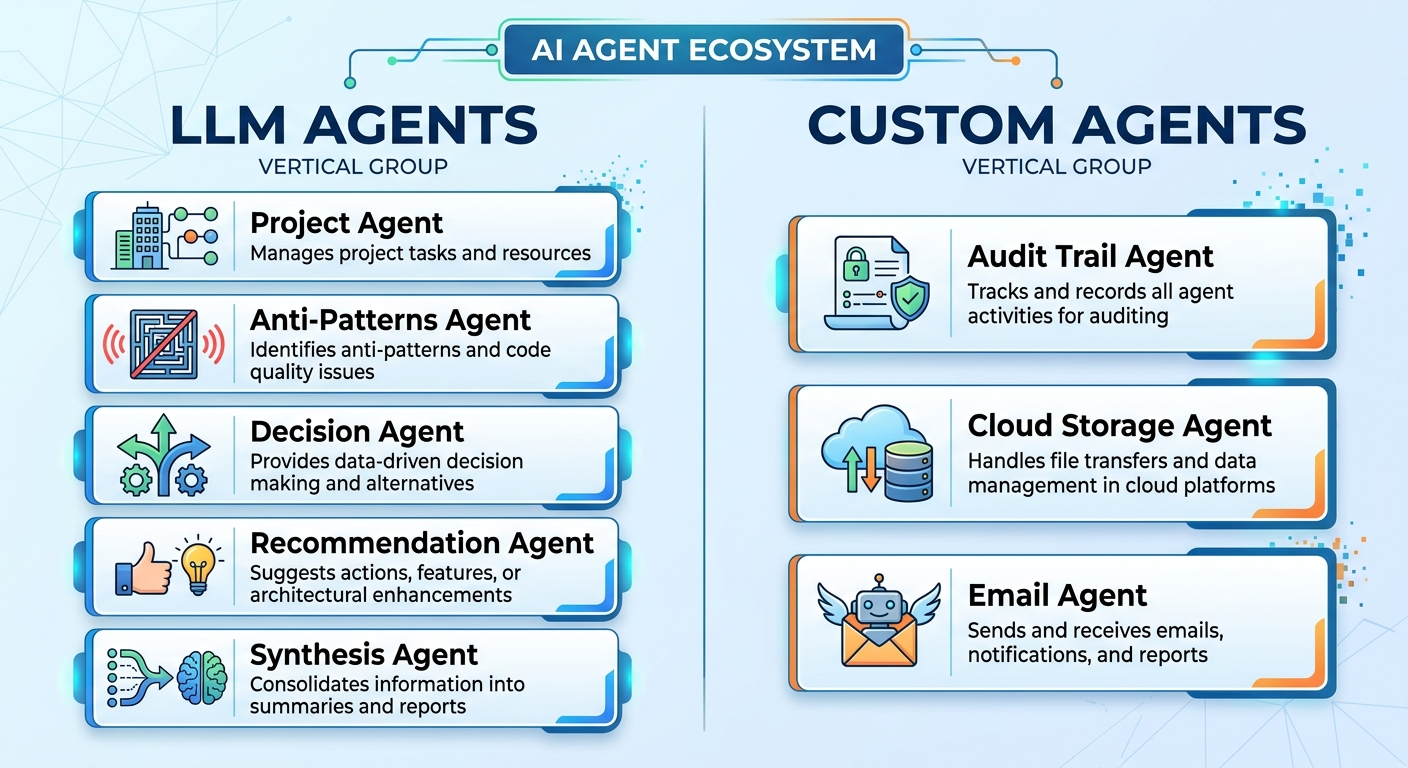
專案、反模式、決策、推薦和合成代理都是LLM代理。這些代理需要Gemini進行推理並產生文字回應。
審計追蹤、雲端儲存和電子郵件代理程式與外部 API 或資源集成,從而觸發確定性操作。
回調類型
ADK 提供了六種類型的回調鉤子,分別在代理執行之前和之後、模型執行之前和之後以及工具執行之前和之後呼叫。
| 回呼類型 | 描述 |
| :--- | :--- |
| 代理回撥前| 在代理新周期開始前呼叫 |
| afterAgentCallback | 代理週期結束後的回呼 |
| beforeModelCallback | 在呼叫 LLM 之前呼叫 |
| afterModelCallback | 在 LLM 回傳回應後呼叫 |
| beforeToolCallback | 在呼叫工具之前呼叫 |
| afterToolCallback | 工具呼叫後呼叫 |
我何時以及為何開始使用 ADK 回呼鉤子
當我使用 ADK Web 進行本機測試和偵錯時,我的首要任務是確保測試結果的正確性。效能和令牌使用情況的優先順序較低,直到代理程式部署到 QA 環境後才會考慮。
當產品經理和品質保證團隊發現明顯的運作緩慢和成本過高時,他們會通知我。接下來,我會檢查代理程序,找出效能瓶頸以及可以在回調鉤子或應用程式程式碼中處理的確定性步驟。
回調的好處
在我的子代理程式中,使用回調鉤子具有幾個關鍵優勢:
| 類型 | 益處 |
| :--- | :--- |
|短路| 呼叫beforeModelCallback來驗證會話資料,如果資料無效則跳過 LLM 流程 |
|關注點分離| 在beforeAgentCallback中重置會話資料,使工具保持精簡,專注於業務邏輯 |
|可觀測性| 在beforeAgentCallback和afterAgentCallback中新增日誌記錄,以記錄效能指標 |
|動態狀態管理| 建立一個可重複使用的afterToolCallback ,以增加驗證嘗試次數並將回應狀態修改為 FATAL_ERROR |
先決條件
要求
-
TypeScript 5.9.3 或更高版本
-
Node.js 24.13.0 或更高版本
-
npm 11.8.0 或更高版本
-
Docker(用於在本機上執行 MailHog)
-
Google ADK(用於建立自訂代理程式)
-
Vertex AI 中的 Gemini(用於在 LLM 代理程式中呼叫模型,但自訂代理程式不需要)
附註:由於區域可用性限制,我使用了 Vertex AI 中的 Gemini 進行身份驗證。 Gemini 目前在香港不可用;因此,我改用了 Vertex AI 中的 Gemini。
安裝 npm 依賴項
npm i --save-exact @google/adk
npm i --save-dev --save-exact @google/adk-devtools
npm i --save-exact nodemailer
npm i --save-dev --save-exact @types/nodemailer rimraf
npm i --save-exact marked
npm i --save-exact zod
在本機測試期間,我安裝了建置 ADK 代理程式、將 Markdown 字串轉換為 HTML 以及向 MailHog 發送電子郵件所需的依賴項。
固定依賴項可確保企業級應用程式在開發環境和生產環境中的版本保持一致。
環境變數
將.env.example複製到.env並填寫憑證:
GEMINI_MODEL_NAME="gemini-3.1-flash-lite-preview"
GOOGLE_CLOUD_PROJECT="<Google Cloud Project ID>"
GOOGLE_CLOUD_LOCATION="global"
GOOGLE_GENAI_USE_VERTEXAI=TRUE

# SMTP Settings (MailHog)
SMTP_HOST="localhost"
SMTP_PORT=1025
SMTP_USER=""
SMTP_PASS=""
SMTP_FROM="[email protected]"
ADMIN_EMAIL="[email protected]"要設定MailHog進行本機電子郵件測試,需要SMTP_HOST 、 SMTP_PORT 、 SMTP_USER和SMTP_PASS 。
SMTP_FROM是寄件者電子郵件地址,在本機測試中可以是任何字串。
ADMIN_EMAIL是管理員郵件地址,用於接收EmailAgent發送的郵件。在我的使用場景中,它是一個環境變數,因為它是唯一的收件人。如果其他場景需要向客戶發送郵件,則應移除此環境變數。
ADK回呼模式實戰
以下是我在實務上如何實現這四種回呼設計模式的方法。
日誌記錄和監控
使用的回呼函數: beforeAgentCallback和afterAgentCallback
agentStartCallback將目前時間(以毫秒為單位)儲存在會話狀態的start_time變數中。
import { SingleAgentCallback } from '@google/adk';

export const START_TIME_KEY = 'start_time';

export const agentStartCallback: SingleAgentCallback = (context) => {
  if (!context || !context.state) {
    return undefined;
  }

  context.state.set(START_TIME_KEY, Date.now());
  return undefined;
};agentEndCallback從會話狀態中取得開始時間並計算持續時間。然後,它使用console.log記錄效能指標。回調函數傳回undefined ,以便任何子代理程式始終按順序流向下一個子代理。
export const agentEndCallback: SingleAgentCallback = (context) => {
  if (!context || !context.state) {
    return undefined;
  }

  const now = Date.now();
  const startTime = context.state.get<number>(START_TIME_KEY) || now;
  console.log(
    `Performance Metrics for Agent "${context.agentName}": Total Elapsed Time: ${(now - startTime) / 1000} seconds.`,
  );
  return undefined;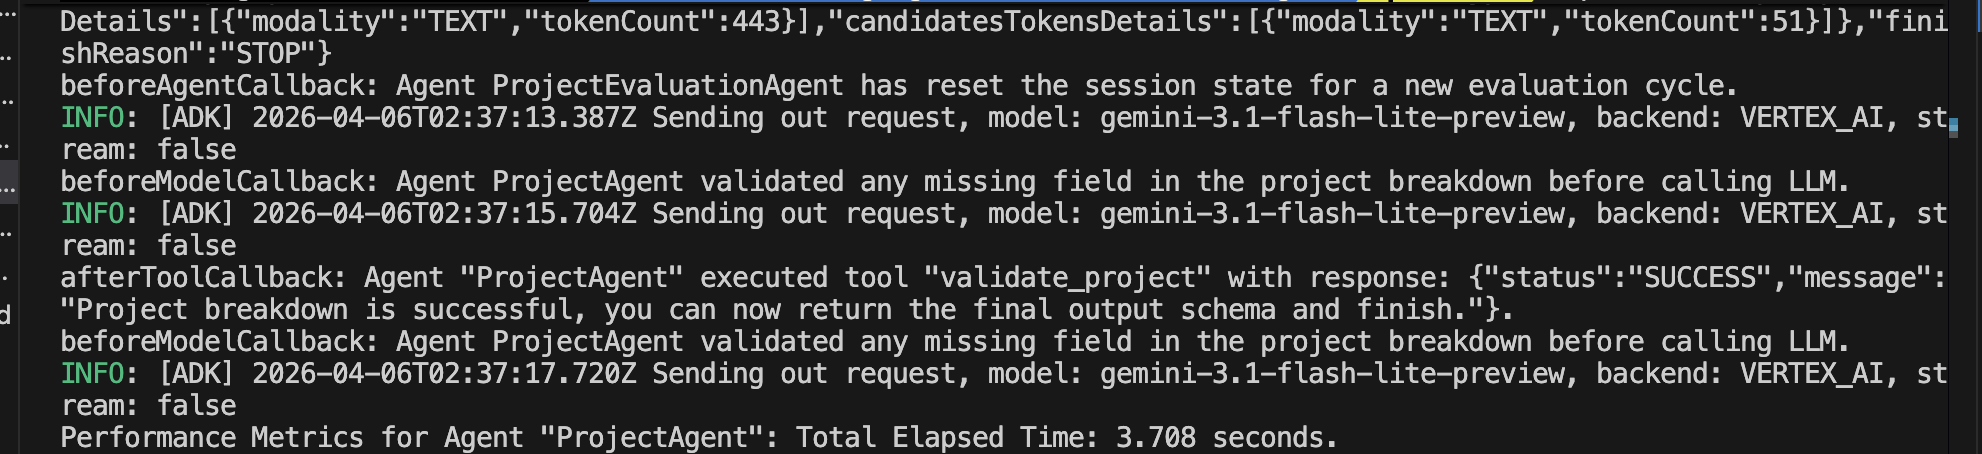
};接下來,我呼叫子代理中的兩個回調鉤子,以了解它們的執行時間。以下範例展示了我如何記錄project子代理程式的效能指標。
export function createProjectAgent(model: string) {
  const projectAgent = new LlmAgent({
    name: 'ProjectAgent',
    model,
    beforeAgentCallback: agentStartCallback,
    instruction: (context) => {
      ... LLM instruction ....
    },
    afterAgentCallback: agentEndCallback,
    ...
  });

  return projectAgent;
}
重置會話狀態
使用的回呼函數: beforeAgentCallback
協調器在代理生命週期開始之前重置會話狀態中的變數。
export const AUDIT_TRAIL_KEY = 'auditTrail';
export const RECOMMENDATION_KEY = 'recommendation';
export const CLOUD_STORAGE_KEY = 'cloudStorage';
export const DECISION_KEY = 'decision';
export const PROJECT_KEY = 'project';
export const ANTI_PATTERNS_KEY = 'antiPatterns';
export const MERGED_RESULTS_KEY = 'mergedResults';
export const PROJECT_DESCRIPTION_KEY = 'project_description';
export const VALIDATION_ATTEMPTS_KEY = 'validation_attempts';
const resetNewEvaluationCallback: SingleAgentCallback = (context) => {
if (!context || !context.state) {
return undefined;
}
const state = context.state;
// Clear all previous evaluation data
state.set(PROJECT_KEY, null);
state.set(ANTI_PATTERNS_KEY, null);
state.set(DECISION_KEY, null);
state.set(RECOMMENDATION_KEY, null);
state.set(AUDIT_TRAIL_KEY, null);
state.set(CLOUD_STORAGE_KEY, null);
state.set(MERGED_RESULTS_KEY, null);
state.set(VALIDATION_ATTEMPTS_KEY, 0);
console.log(
`beforeAgentCallback: Agent ${context.agentName} has reset the session state for a new evaluation cycle.`,
);
return undefined;
};編排器在beforeAgentCallback中將變數設為null 。在prepareEvaluationTool中,編排器僅將description替換為新的專案描述。
const prepareEvaluationTool = new FunctionTool({
  name: 'prepare_evaluation',
  description: 'Stores the new project description to prepare for a fresh evaluation.',
  parameters: z.object({
    description: z.string().describe('The validated project description from the user.'),
  }),
  execute: ({ description }, context) => {
    if (!context || !context.state) {
      return { status: 'ERROR', message: 'No session state found.' };
    }

    // Set the new description for the ProjectAgent to find
    context.state.set(PROJECT_DESCRIPTION_KEY, description);

    return { status: 'SUCCESS', message: 'Description updated.' };
  },
});
此工具邏輯更有效率,令牌使用量減少。
export const rootAgent = new LlmAgent({
  name: 'ProjectEvaluationAgent',
  model: 'gemini-3.1-flash-lite-preview',
  beforeAgentCallback: resetNewEvaluationCallback,
  instruction: `
    ... LLM instruction ....
  `,
  tools: [prepareEvaluationTool],
  subAgents: [sequentialEvaluationAgent],
});編排器使用resetNewEvaluationCallback重置會話變數,並使用prepareEvaluationTool取代專案描述。最後, sequentialEvaluationAgent啟動代理工作流程,以得出決策並產生建議。
動態狀態管理
前提條件:子代理程式使用工具呼叫來執行操作
使用的回呼函數: afterToolCallback
此用例旨在增加會話狀態中的validation_attempts值。經 AI 評估, project和decision子代理人的afterToolCallback階段是增加該值的理想位置。因此,我定義了一個元函數,用於建立一個 `afterToolCallback來增加驗證嘗試次數。
export const VALIDATION_ATTEMPTS_KEY = 'validation_attempts';export const MAX_ITERATIONS = 3;import { AfterToolCallback } from '@google/adk';
import { VALIDATION_ATTEMPTS_KEY } from '../output-keys.const.js';
import { MAX_ITERATIONS } from '../validation.const.js';
export function createAfterToolCallback(fatalErrorMessage: string, maxAttempts = MAX_ITERATIONS): AfterToolCallback {
return ({ tool, context, response }) => {
if (!tool || !context || !context.state) {
return undefined;
}
const toolName = tool.name;
const agentName = context.agentName;
const state = context.state;
if (!response || typeof response !== 'object' || !('status' in response)) {
return undefined;
}
// [1] Dynamic state management
const attempts = (state.get<number>(VALIDATION_ATTEMPTS_KEY) || 0) + 1;
state.set(VALIDATION_ATTEMPTS_KEY, attempts);
// [2] Response modification
const status = response.status || 'ERROR';
if (status === 'ERROR' && attempts >= maxAttempts) {
context.actions.escalate = true;
return {
status: 'FATAL_ERROR',
message: fatalErrorMessage,
};
}
};
}在project子代理程式和decision代理程式中,我呼叫createAfterToolCallback來建立它們自己的afterToolCallback以增加驗證嘗試次數。
const projectAfterToolCallback = createAfterToolCallback(
  `STOP processing immediately. Max validation attempts reached. Return the most accurate data found so far or empty strings if none.`,
);
const decisionAfterToolCallback = createAfterToolCallback(
`STOP processing immediately and output the final JSON schema with verdict: "None".`,
);接下來,我在project代理程式的afterToolCallback階段呼叫projectAfterToolCallback 。
export function createProjectAgent(model: string) {
  const projectAgent = new LlmAgent({
    name: 'ProjectAgent',
    model,
    beforeAgentCallback: agentStartCallback,
    instruction: (context) => {
      ... LLM instruction ....
    },
    afterToolCallback: projectAfterToolCallback,
    afterAgentCallback: agentEndCallback,
    tools: [validateProjectTool],
    ...
  });

  return projectAgent;
}接下來,我在decision子代理程式的afterToolCallback階段呼叫decisionAfterToolCallback 。
export function createDecisionTreeAgent(model: string) {
  const decisionTreeAgent = new LlmAgent({
    name: 'DecisionTreeAgent',
    model,
    beforeAgentCallback: [resetAttemptsCallback, agentStartCallback],
    instruction: (context) => {
      ... instruction  of the LLM flow ...
    },
    afterToolCallback: decisionAfterToolCallback,
    afterAgentCallback: agentEndCallback,
    tools: [validateDecisionTool],
    ...
  });

  return decisionTreeAgent;
}
請求/回應修改
前提條件:子代理程式使用工具呼叫來執行操作
使用的回呼函數: AfterToolCallback
當驗證嘗試次數超過最大迭代次數時,同樣的AfterToolCallback也會修改回應。
當狀態為ERROR且validation_attempts的值至少為maximum_iterations時, context.actions.escalate標誌會被設為true以跳出循環。此外,狀態將變更為FATAL_ERROR ,並傳回自訂的致命錯誤訊息。
有條件地跳過步驟
這是避免不必要的 LLM 執行的重要設計模式。
使用的回呼函數: beforeModelCallback 。
在我的子代理程式中,我執行此回調函數來驗證會話資料。當滿足特定條件時,回呼函數會立即傳回內容,以跳過後續的 LLM 流程。
例 1
如果project代理能夠將專案描述分解為任務、問題、限制和目標,則會立即傳回分解結果。否則,代理人會提示 Gemini 使用推理功能進行分解。
import { SingleBeforeModelCallback } from '@google/adk';

const beforeModelCallback: SingleBeforeModelCallback = ({ context }) => {
  const { project } = getEvaluationContext(context);
  const { isCompleted } = isProjectDetailsFilled(project);

  if (isCompleted) {
    return {
      content: {
        role: 'model',
        parts: [
          {
            text: JSON.stringify(project),
          },
        ],
      },
    };
  }

  return undefined;
};
然後, beforeModelCallback連接到project代理程式的 beforeModelCallback 階段。
export function createProjectAgent(model: string) {
  const projectAgent = new LlmAgent({
    name: 'ProjectAgent',
    model,
    description:
      'Analyzes the user-provided project description to extract and structure its core components, including the primary task, underlying problem, ultimate goal, and architectural constraints.',
    beforeAgentCallback: agentStartCallback,
    beforeModelCallback,
    instruction: (context) => {
      const { projectDescription } = getEvaluationContext(context);
      if (!projectDescription) {
        return '';
      }

      return generateProjectBreakdownPrompt(projectDescription);
    },
    afterToolCallback: projectAfterToolCallback,
    afterAgentCallback: agentEndCallback,
    tools: [validateProjectTool],
    outputSchema: projectSchema,
    outputKey: PROJECT_KEY,
    disallowTransferToParent: true,
    disallowTransferToPeers: true,
  });

  return projectAgent;
}
例 2
decision代理在beforeModelCallback中驗證verdict屬性。如果verdict不為None ,則回呼函數立即傳回有效決策。如果 `verdict為None ,則回呼函數會檢查專案分解和反模式。當提供了專案分解和反模式時,回呼函數會傳回 undefined 以觸發 LLM 流程。否則, decision代理沒有有效輸入來得出決策。在這種特殊情況下,回呼函數會傳回None 。
import { SingleBeforeModelCallback } from '@google/adk';

const beforeModelCallback: SingleBeforeModelCallback = ({ context }) => {
  const { decision } = getEvaluationContext(context);

  if (decision && decision.verdict !== 'None') {
    return {
      content: {
        role: 'model',
        parts: [
          {
            text: JSON.stringify(decision),
          },
        ],
      },
    };
  }

  const { project, antiPatterns } = getEvaluationContext(context);
  const { isCompleted } = isProjectDetailsFilled(project);

  if (isCompleted && antiPatterns) {
    return undefined;
  }

  return {
    content: {
      role: 'model',
      parts: [
        {
          text: JSON.stringify({
            verdict: 'None',
            nodes: [],
          }),
        },
      ],
    },
  };
};
然後, beforeModelCallback連接到project代理程式的beforeModelCallback階段。
export function createDecisionTreeAgent(model: string) {
  const decisionTreeAgent = new LlmAgent({
    name: 'DecisionTreeAgent',
    model,
    beforeAgentCallback: [resetAttemptsCallback, agentStartCallback],
    beforeModelCallback,
    instruction: (context) => {
      ... instruction  of the LLM flow ...
    },
    afterToolCallback: decisionAfterToolCallback,
    afterAgentCallback: agentEndCallback,
    tools: [validateDecisionTool],
    outputSchema: decisionSchema,
    outputKey: DECISION_KEY,
    disallowTransferToParent: true,
    disallowTransferToPeers: true,
  });

  return decisionTreeAgent;
}
例 3
recommendation代理人使用beforeModelCallback來檢查專案分解、反模式和最終結果。有兩種情況需要 LLM 產生推薦。第一種情況是專案分解完整、存在反模式且最終結果不為 None。第二種情況是專案分解不完整且最終結果None需要描述專案分解中缺少的字段,以及該字段對於獲得有效決策的重要性。對於其他情況,回呼函數會立即傳回靜態推薦,並跳過後續的 LLM 流程。
function constructRecommendation(recommendation: string) {
  return {
    content: {
      role: 'model',
      parts: [
        {
          text: JSON.stringify({
            text: recommendation,
          }),
        },
      ],
    },
  };
}

const beforeModelCallback: SingleBeforeModelCallback = ({ context }) => {
  const { project, antiPatterns, decision } = getEvaluationContext(context);

  const { isCompleted } = isProjectDetailsFilled(project);
  const isDecisionNone = decision && decision.verdict === 'None';

  if ((isCompleted && antiPatterns && decision && decision.verdict !== 'None') || (!isCompleted && isDecisionNone)) {
    return undefined;
  } else if (isCompleted && isDecisionNone) {
    return constructRecommendation(
      '## Recommendation: Manual Review Required\n\n**Status:** Abnormal Case Detected\n\nThe provided project is complete and valid, but the decision tree could not reach a conclusive verdict (Result: `None`).\n\n**Possible Reasons:**\n- The requirements fall outside of known architectural patterns.\n- There are conflicting constraints and goals that cannot be resolved automatically.\n\n**Next Steps:**\n- Review and refine the constraints or goals.\n- Escalate for manual architectural review.',
    );
  }

  return constructRecommendation(
    '## Recommendation: Data Required\n\n**Status:** Abnormal Case Detected\n\nNo decision is reached.',
  );
};與先前的project和decision代理類似, beforeModelCallback函數連接到recommendation代理的beforeModelCallback階段。
export function createRecommendationAgent(model: string) {
  const recommendationAgent = new LlmAgent({
    name: 'RecommendationAgent',
    model,
    beforeModelCallback,
    beforeAgentCallback: agentStartCallback,
    instruction: (context) => {
      const { project, antiPatterns, decision } = getEvaluationContext(context);
      const { isCompleted, missingFields } = isProjectDetailsFilled(project);

      if (project) {
        if (!isCompleted && decision && decision.verdict === 'None') {
          console.log('RecommendationAgent -> generateFailedDecisionPrompt');
          return generateFailedDecisionPrompt(project, missingFields);
        } else if (isCompleted && antiPatterns && decision && decision.verdict !== 'None') {
          console.log('RecommendationAgent -> generateRecommendationPrompt');
          return generateRecommendationPrompt(project, antiPatterns, decision);
        }
      }
      return 'Skipping LLM due to missing data.';
    },
    afterAgentCallback: agentEndCallback,
    outputSchema: recommendationSchema,
    outputKey: RECOMMENDATION_KEY,
    disallowTransferToParent: true,
    disallowTransferToPeers: true,
  });

  return recommendationAgent;
}
這些是代理採用的回調設計模式。下一節,我將介紹如何啟動代理程式以在終端機中查看日誌訊息。
環境設定
我從 Docker Hub 拉取了最新版本的MailHog Docker 映像,並在本地啟動它以接收測試郵件並在 Web UI 中顯示它們。 docker docker-compose.yml檔案包含了設定配置。
services:
  mailhog:
    image: mailhog/mailhog
    container_name: mailhog
    ports:
      - '1025:1025' # SMTP port
      - '8025:8025' # HTTP (Web UI) port
    restart: always
    networks:
      - decision-tree-agent-network

networks:
  decision-tree-agent-network:
SMTP 伺服器監聽連接埠 1025,Web UI 可透過http://localhost:8025存取。
docker compose up -d在 Docker 中啟動 MailHog。
測試
在package.json中新增腳本以建立和啟動 ADK Web 介面。
  "scripts": {
    "prebuild": "rimraf dist",
    "build": "npx tsc --project tsconfig.json",
    "web": "npm run build && npx @google/adk-devtools web --host 127.0.0.1 dist/agent.js"
},-
開啟終端機並輸入
npm run web來啟動 API 伺服器。 -
開啟新的瀏覽器標籤頁,輸入
http://localhost:8000。 -
請將以下文字貼到訊息框中:
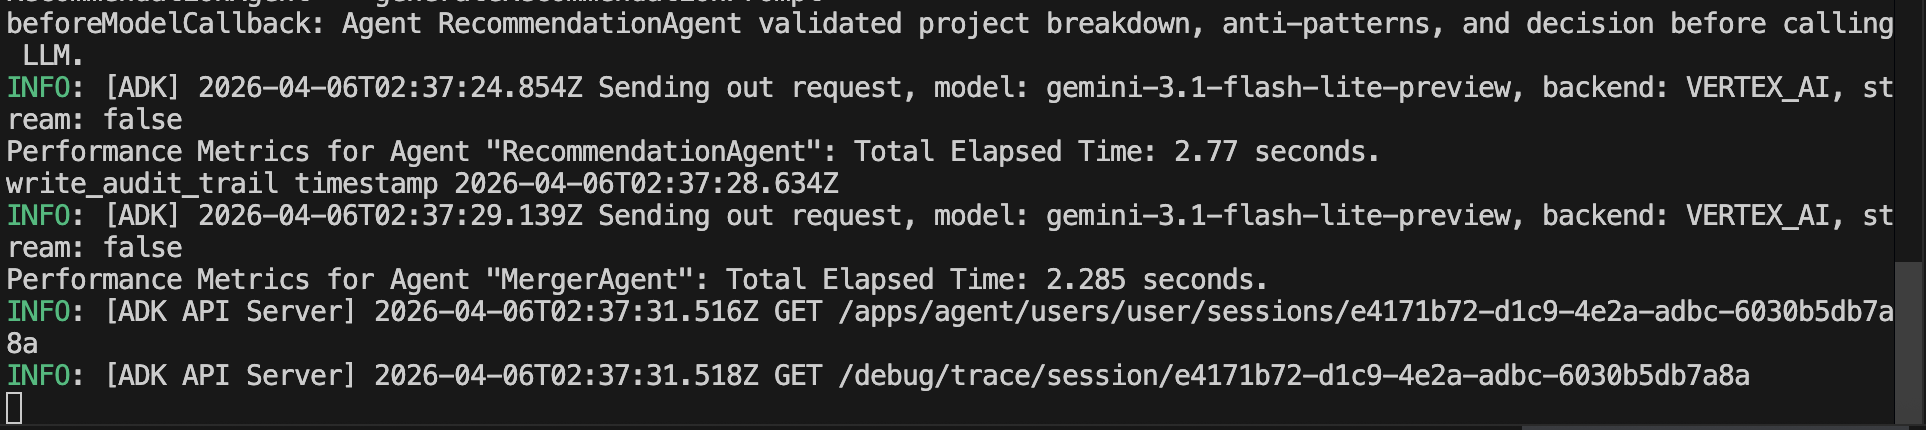
One of my favorite tech influencers just tweeted about a 'breakthrough in solid-state batteries.' Find which public company they might be referring to, check that company’s recent patent filings to see if it’s true, and then check their stock price to see if the market has already 'priced it in'.- 確保根代理在郵件代理終止時執行並停止。協調器和專案代理程式觸發回調鉤子,以重置會話狀態、記錄效能指標、驗證會話資料、增加驗證嘗試次數並修改回應。
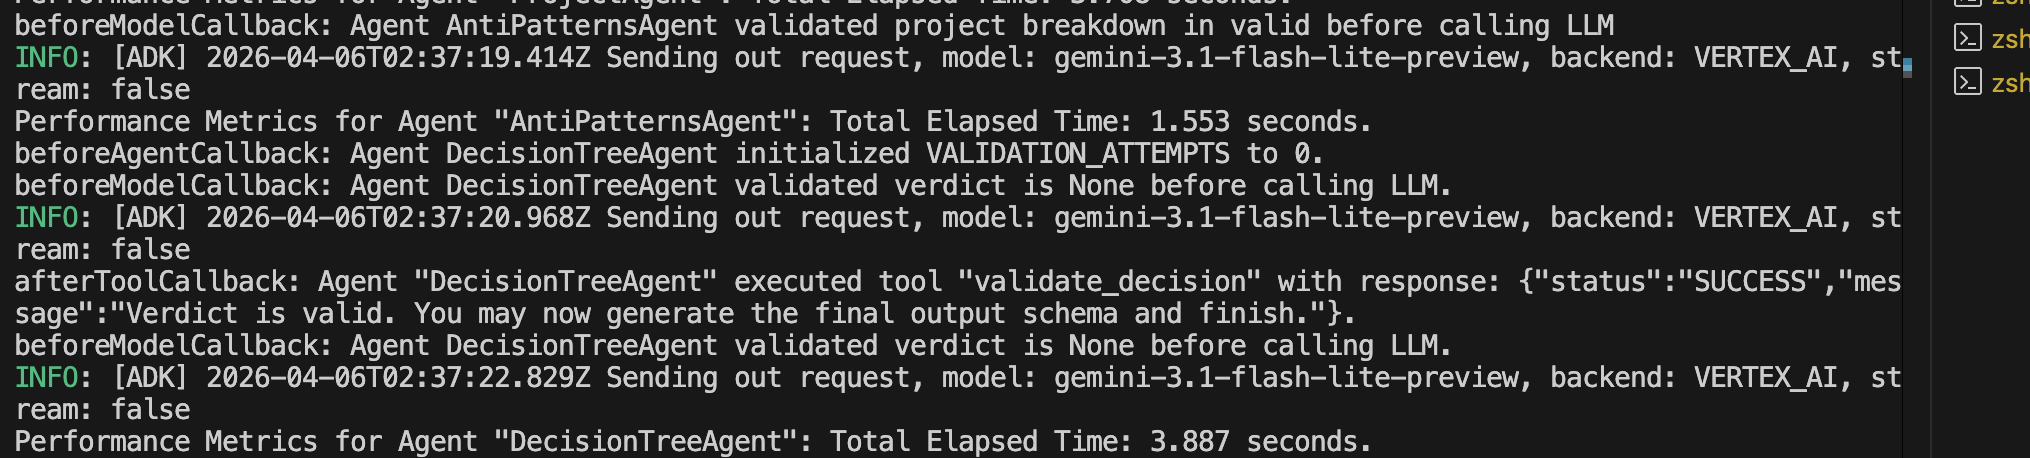
- 類似地,反模式和決策代理都使用
beforeAgentCallback和afterAgentCallback來記錄效能指標。它們還使用beforeModelCallback在呼叫 LLM 產生回應之前驗證會話資料。此外,當afterToolCallback中的驗證嘗試次數超過或等於最大迭代次數時,決策代理會增加驗證嘗試次數並將狀態修改為FATAL_ERROR。
- 同樣,推薦代理程式和合併代理程式都使用
beforeAgentCallback和afterAgentCallback來記錄效能指標。推薦代理也使用beforeModelCallback在呼叫 LLM 產生推薦之前驗證會話資料。
結論
ADK 支援適用於不同用例的生命週期回呼鉤子。本文將介紹如何在beforeAgentCallback和afterAgentCallback中記錄效能指標。我重構了編排器beforeAgentCallback中的重置會話狀態邏輯,讓工具更加精簡有效率。當驗證重試循環中的循環次數超過最大迭代次數時, afterToolCallback會將請求升級到更高層級的代理,並將回應狀態修改為FATAL_ERROR 。當有條件地跳過 LLM 呼叫時, beforeModelCallback會立即傳回自訂內容。這樣,代理就不會增加不必要的流程時間,也不會消耗令牌。
重點:遵循代理各個階段的回調設計模式和最佳實踐,以記錄效能指標、降低成本和延遲並修改回應。
資源
1) --- 會變成分隔線(上一行必須是空白)
2) # 會變成一級標題
3) ## 會變成二級標題
4) ### 會變成三級標題
5) **粗體文字**會顯示粗體文字
6) ```當第一行與最後一行會顯示程式碼
7) 請搜尋 Markdown 語法,了解各種格式