

谷歌近期發布了Gemini 2.5 Flash Image ,這是一款功能強大的全新圖像生成和編輯模型,其代號為 Nano Banana。該模型引入了最先進的圖像建立和處理功能,解鎖了一系列全新應用。
本指南為希望使用Gemini Developer API將 Gemini 2.5 Flash Image 又名 Nano Banana 整合到其應用程式中的開發人員提供了全面的指導。
本指南將涵蓋:
-
在 AI Studio 中使用 Nano Banana
-
專案設定
-
影像建立
-
圖像編輯
-
照片修復
-
多幅輸入影像
-
對話式圖像編輯
-
最佳實踐和有效提示
-
社區範例和靈感
-
資源
以下是您將在本教程中建立的範例:
prompt = "Restore and colorize this image from 1932"

response = client.models.generate_content(
    model="gemini-2.5-flash-image-preview",
    contents=[prompt, image],
)
讓我們開始吧!
如果您更喜歡此帖子的影片版本,您可以在這裡觀看:
https://www.youtube.com/watch?v=UTdfxFyOQTI
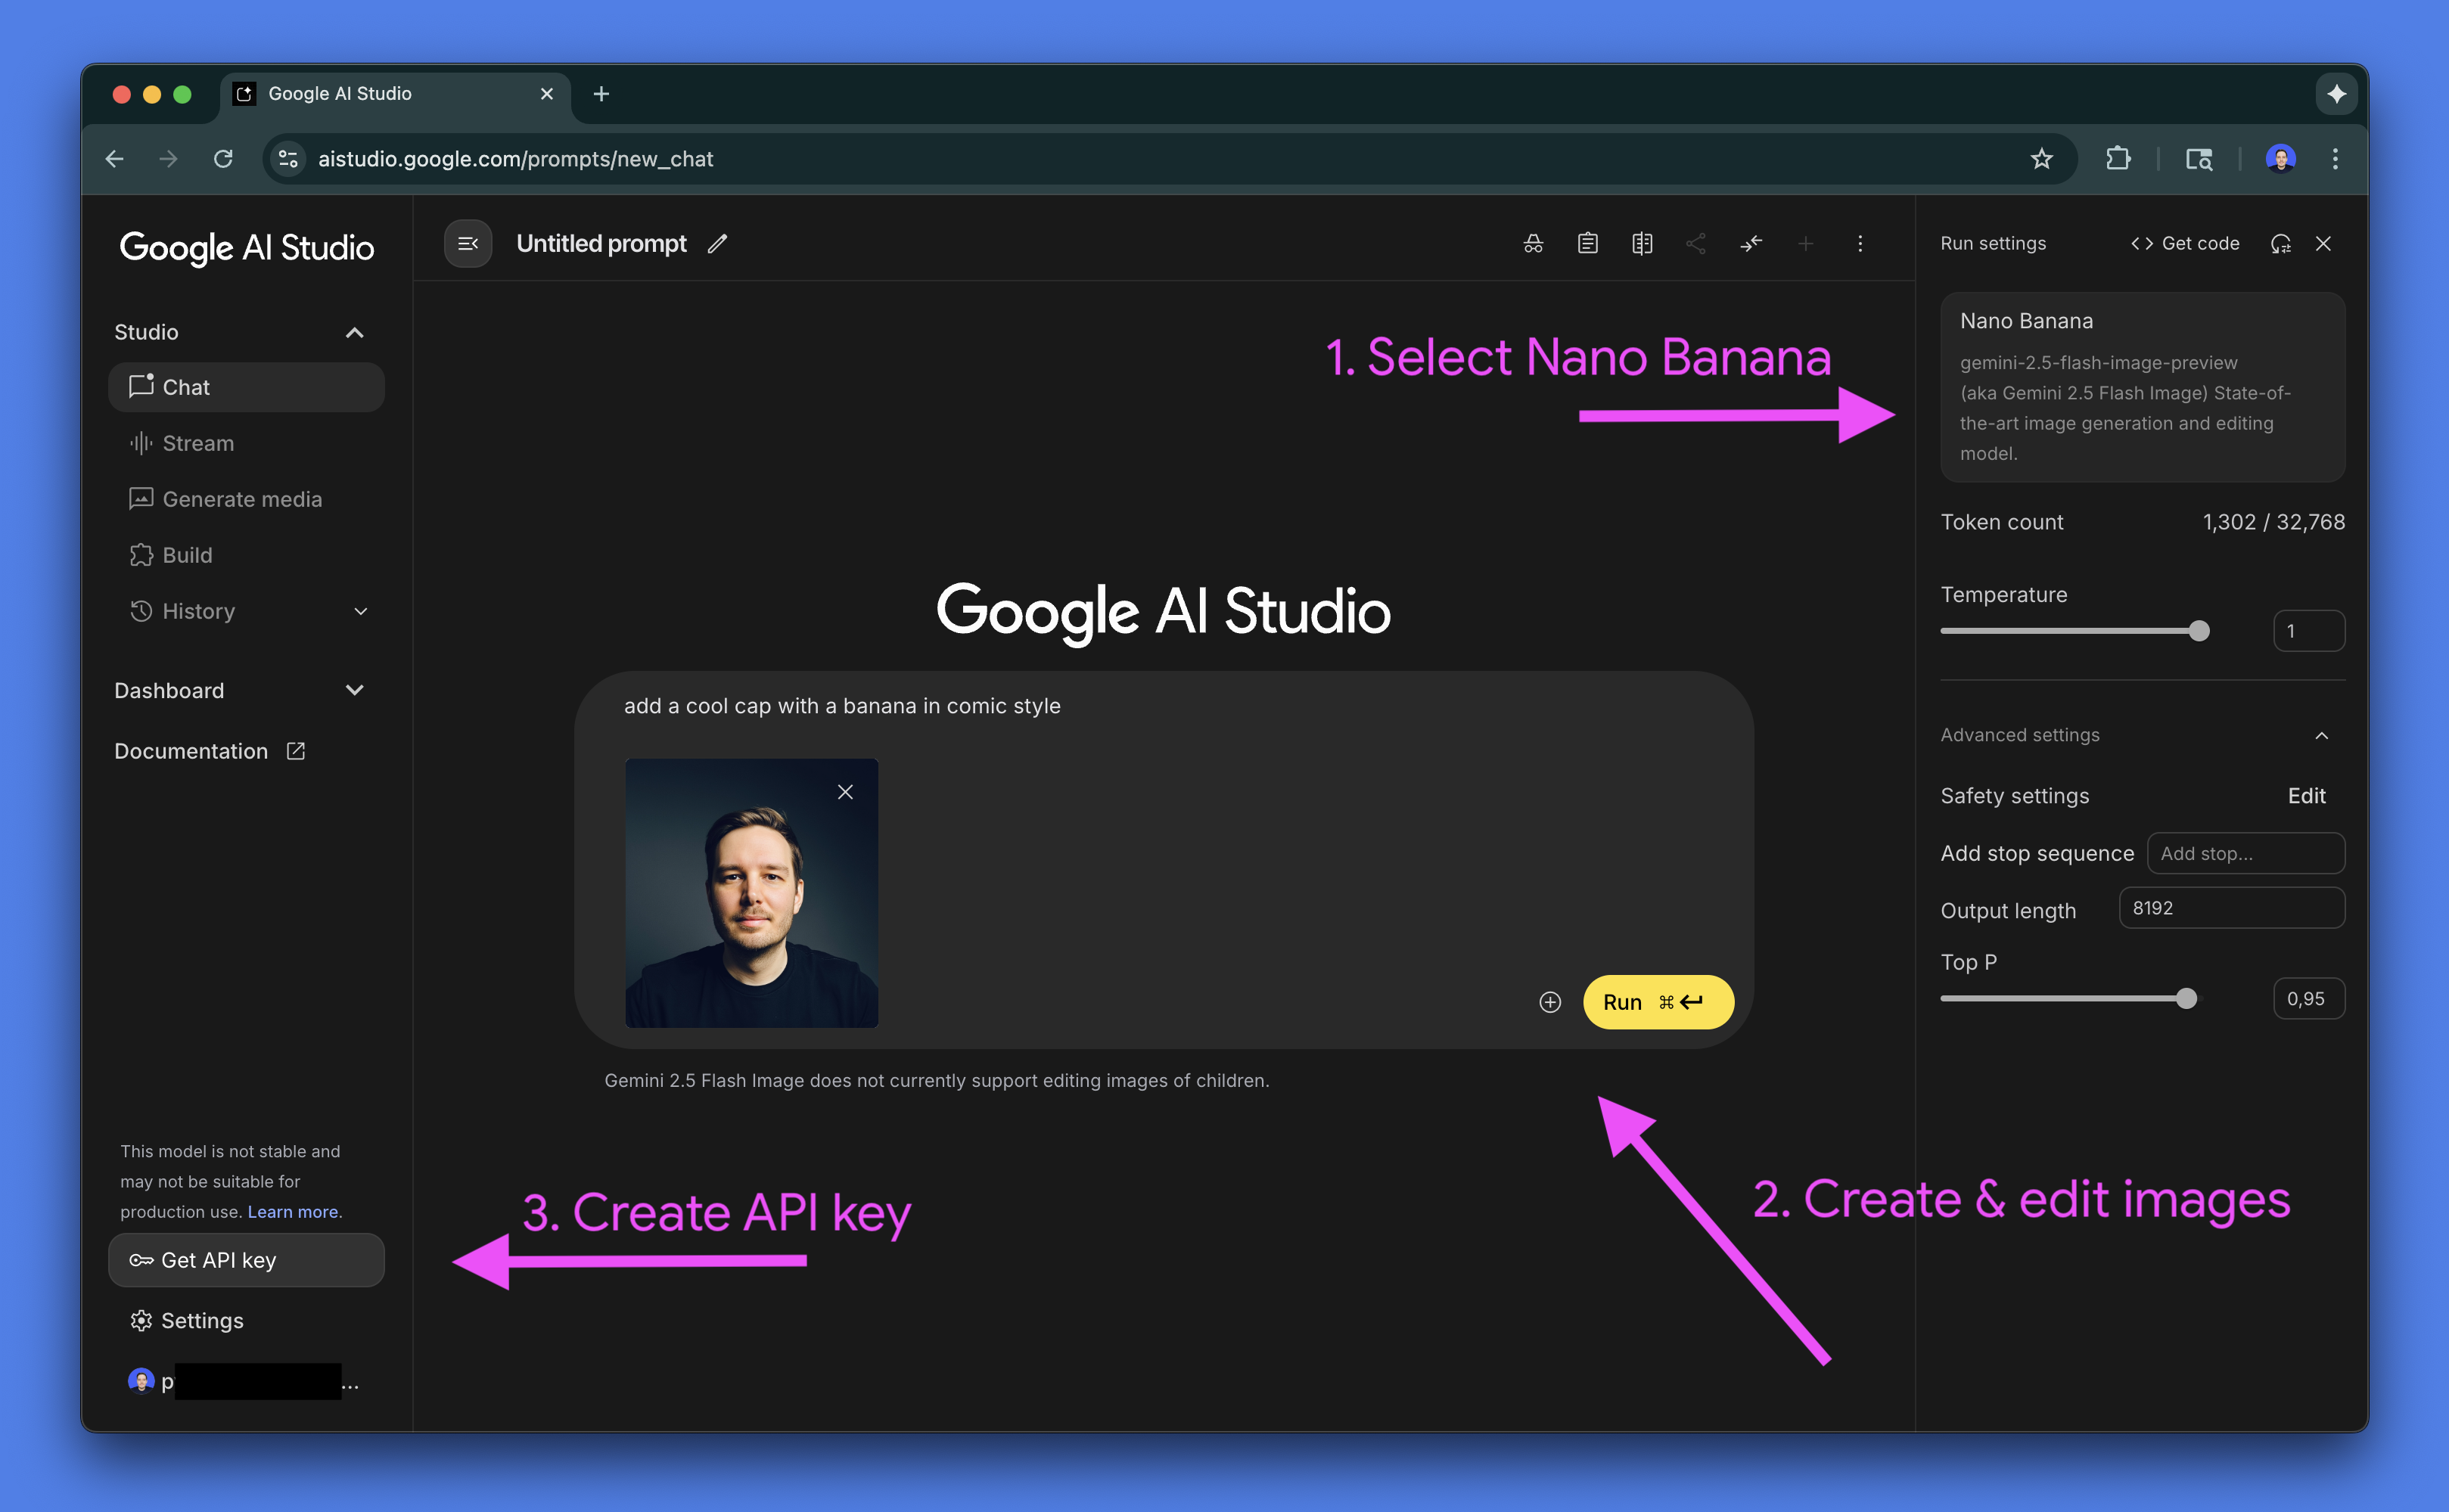
1)在 Google AI Studio 中使用 Nano Banana
雖然最終用戶可以在Gemini 應用程式中存取 Nano Banana,但對於開發人員來說,製作原型和測試提示的最佳環境是Google AI Studio。 AI Studio 是在編寫任何程式碼之前試驗所有可用 AI 模型的遊樂場,也是使用 Gemini API 進行建置的入口點。
您可以在 AI Studio 中免費使用 Nano Banana。首先,請造訪aistudio.google.com ,使用您的 Google 帳戶登錄,然後從模型選擇器中選擇Nano Banana 。
對於直接存取,請使用此連結開始與模型的新會話:
提示:您也可以直接在 AI Studio (ai.studio/apps)中為 Nano Banana 網路應用程式編寫程式碼,或探索程式碼並重新混合現有應用程式之一。
2)專案設置
要遵循本指南,您需要以下內容:
-
來自Google AI Studio 的API 金鑰。
-
為您的專案設定計費。
-
適用於Python或JavaScript/TypeScript 的Google Gen AI SDK。
步驟A:產生API金鑰
請依照以下步驟操作:
-
在 Google AI Studio 中,點擊左側導覽面板中的取得 API 金鑰。
-
在下一頁上,按一下建立 API 金鑰。
-
選擇現有的 Google Cloud 專案或建立一個新專案。此專案用於管理 API 使用計費。
過程完成後,將顯示您的 API 金鑰。請複製並安全儲存。
步驟 B:啟用計費
雖然在 AI Studio 中進行原型設計是免費的,但透過 API 使用模型則需要付費。您必須在 Google Cloud 專案中啟用結算功能。
在 API 金鑰管理畫面中,按一下專案旁的「設定計費」並依照螢幕上的指示進行操作。

納米香蕉多少錢?
使用 Nano Banana 生成圖像的成本為每張圖片 0.039 美元*。只需 1 美元,您就可以產生大約 25 張圖片。
* 官方定價為每 100 萬個輸入代幣 0.30 美元,每 100 萬個輸出代幣 30 美元。一張標準的 1024x1024 像素輸出影像需要 1290 個代幣,相當於每張圖片 0.039 美元。詳情請參閱Gemini 2.5 Flash 圖像定價表。
步驟C:安裝SDK
選擇適合您首選語言的 SDK。
Python:
pip install -U google-genai
# Install the Pillow library for image manipulation
pip install Pillow
JavaScript / TypeScript:
npm install @google/genai以下範例使用 Python SDK 進行示範。在GitHub Gist中提供了在 JavaScript 中使用 Nano Banana 的等效程式碼片段。
3)從文字生成圖像
使用 Nano Banana 根據描述性文字提示產生一張或多張圖片。所有 API 請求均使用模型 ID gemini-2.5-flash-image-preview 。
from google import genai
from PIL import Image
from io import BytesIO

# Configure the client with your API key
client = genai.Client(api_key="YOUR_API_KEY")

prompt = """Create a photorealistic image of an orange cat
with a green eyes, sitting on a couch."""

# Call the API to generate content
response = client.models.generate_content(
    model="gemini-2.5-flash-image-preview",
    contents=prompt,
)

# The response can contain both text and image data.
# Iterate through the parts to find and save the image.
for part in response.candidates[0].content.parts:
    if part.text is not None:
        print(part.text)
    elif part.inline_data is not None:
        image = Image.open(BytesIO(part.inline_data.data))
        image.save("cat.png")
輸出:
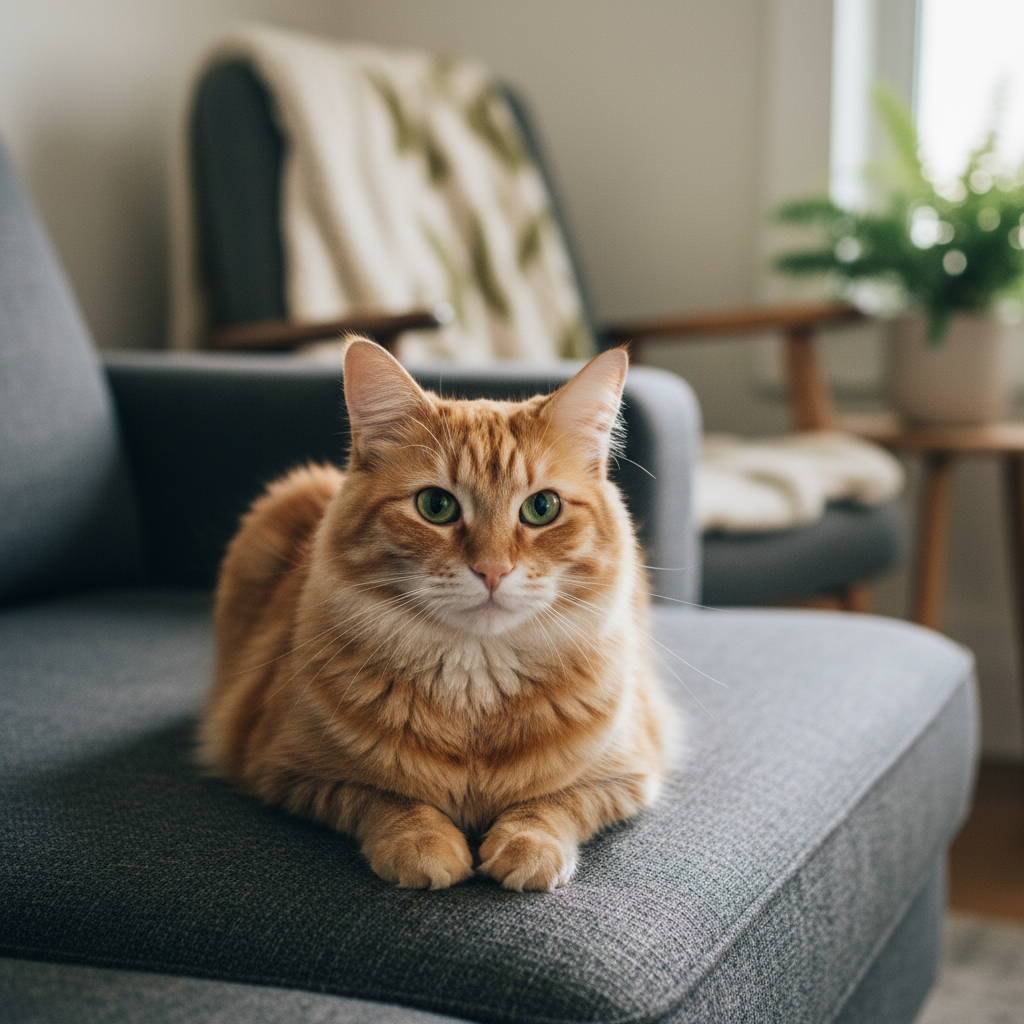
此模型是多模態的,因此回應被建構為一個包含交錯文字和圖像資料( inline_data )的parts清單。上面的程式碼迭代這些部分以提取並保存生成的圖像。
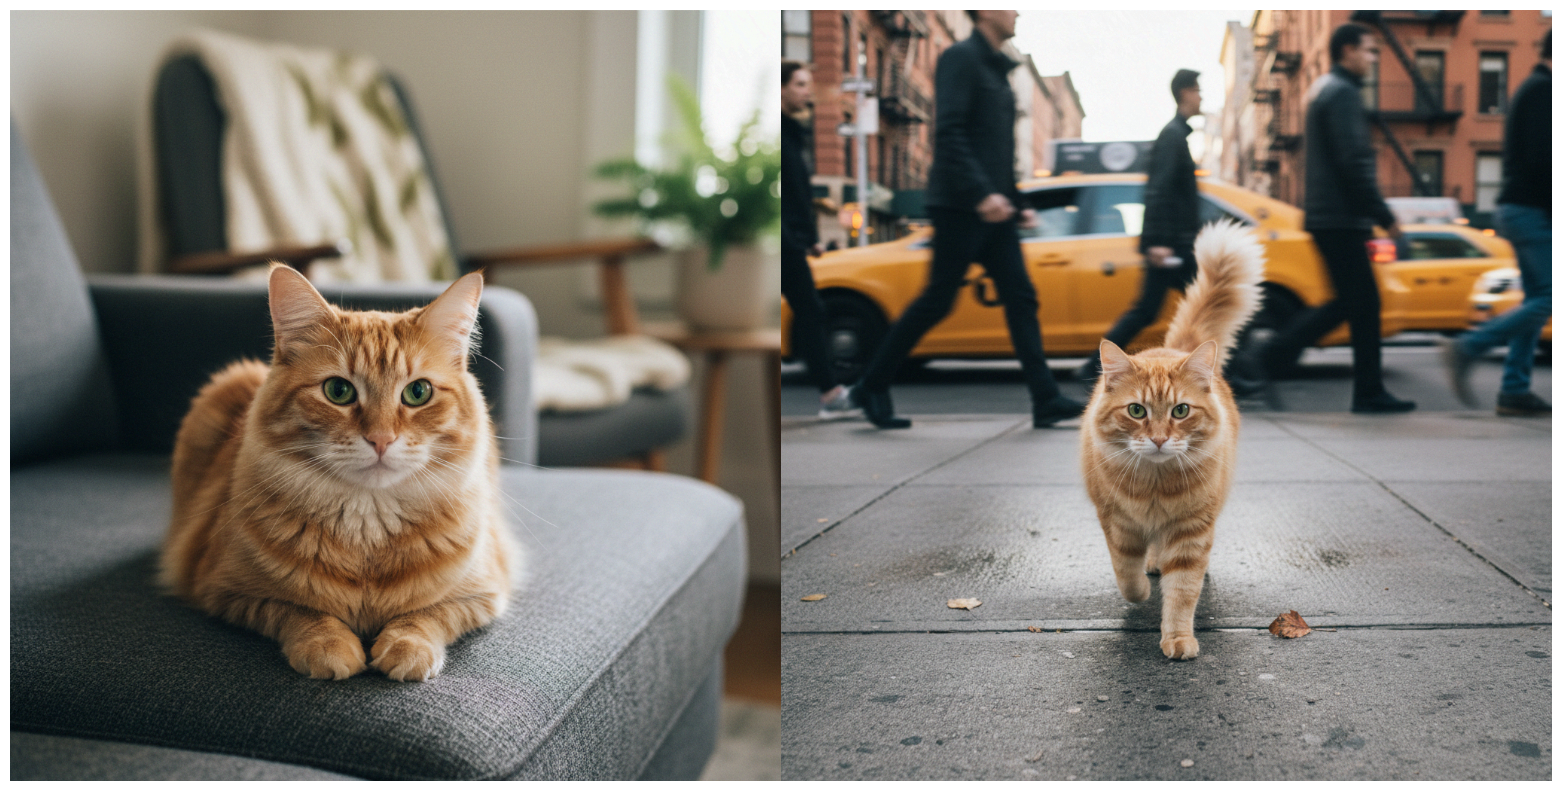
4)使用文字和圖像輸入進行圖像編輯
提供現有圖像以及用於執行編輯的文字提示。此模型擅長保持輸入影像的字元和內容一致性。
from google import genai
from PIL import Image
from io import BytesIO

client = genai.Client(api_key="YOUR_API_KEY")

prompt = """Using the image of the cat, create a photorealistic,
street-level view of the cat walking along a sidewalk in a
New York City neighborhood, with the blurred legs of pedestrians
and yellow cabs passing by in the background."""

image = Image.open("cat.png")

# Pass both the text prompt and the image in the 'contents' list
response = client.models.generate_content(
    model="gemini-2.5-flash-image-preview",
    contents=[prompt, image],
)

for part in response.candidates[0].content.parts:
    if part.text is not None:
        print(part.text)
    elif part.inline_data is not None:
        image = Image.open(BytesIO(part.inline_data.data))
        image.save("cat2.png")
輸入和輸出:
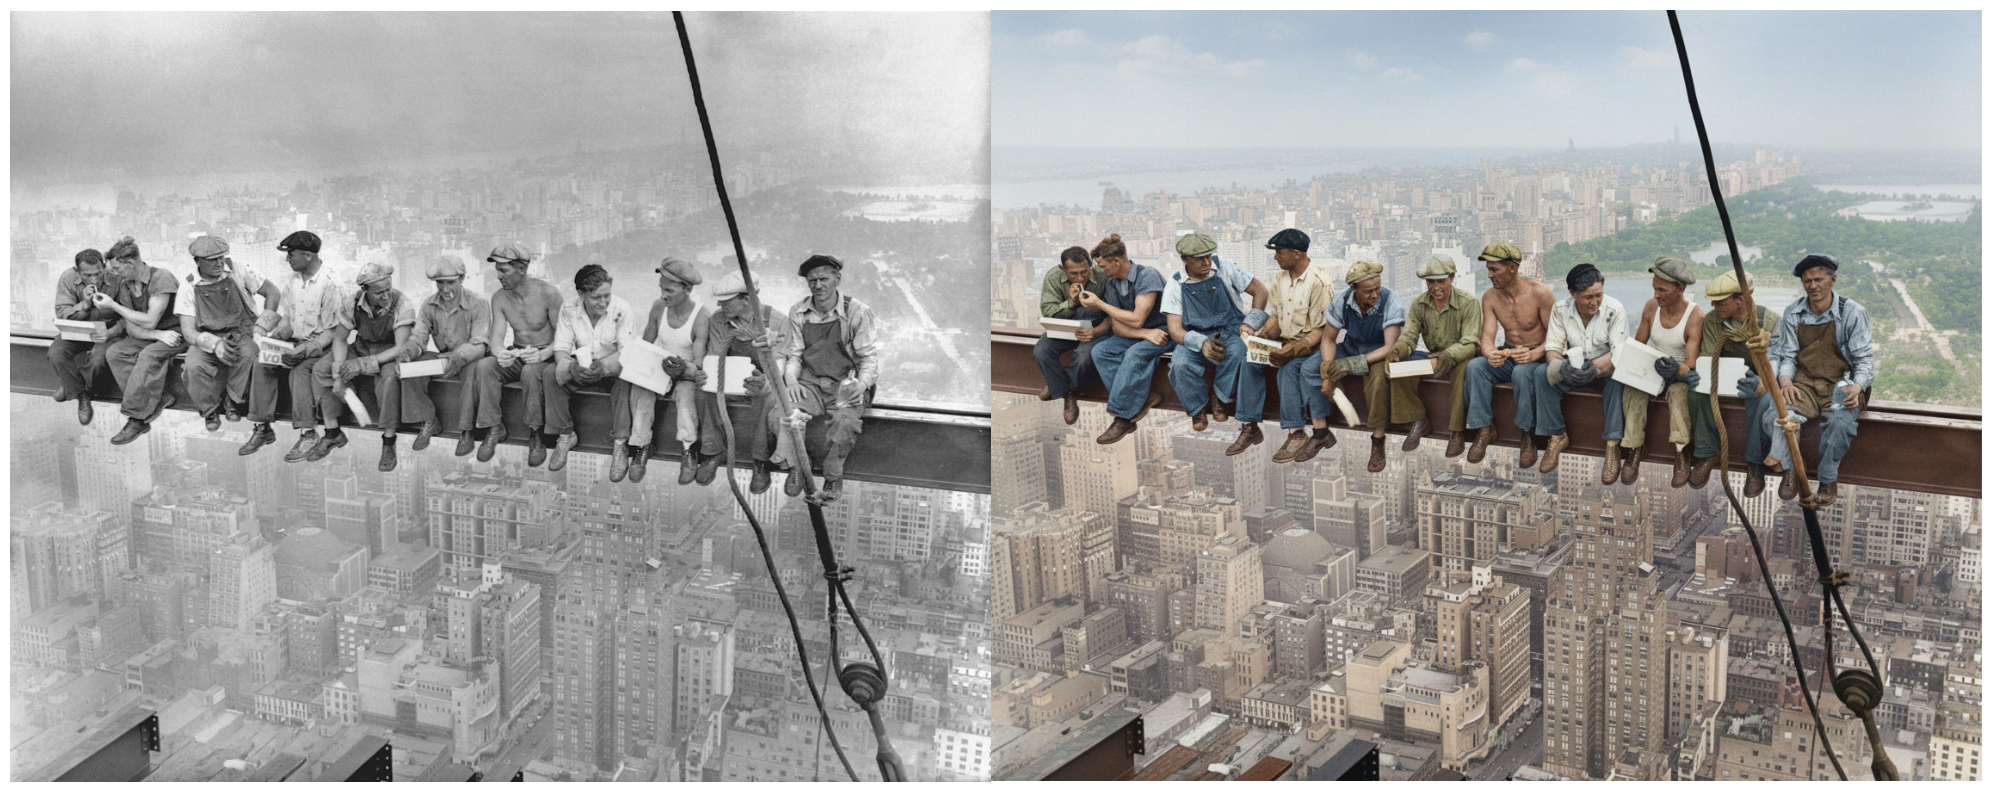
5)使用奈米香蕉修復照片
該模型的強大應用之一是照片修復。只需簡單的提示,它就能修復和著色舊照片,效果令人印象深刻。
from google import genai
from PIL import Image
from io import BytesIO

client = genai.Client(api_key="YOUR_API_KEY")

prompt = "Restore and colorize this image from 1932"

image = Image.open("lunch.jpg")  # "Lunch atop a Skyscraper, 1932"

response = client.models.generate_content(
    model="gemini-2.5-flash-image-preview",
    contents=[prompt, image],
)

for part in response.candidates[0].content.parts:
    if part.text is not None:
        print(part.text)
    elif part.inline_data is not None:
        image = Image.open(BytesIO(part.inline_data.data))
        image.save("lunch-restored.png")
原件和輸出:
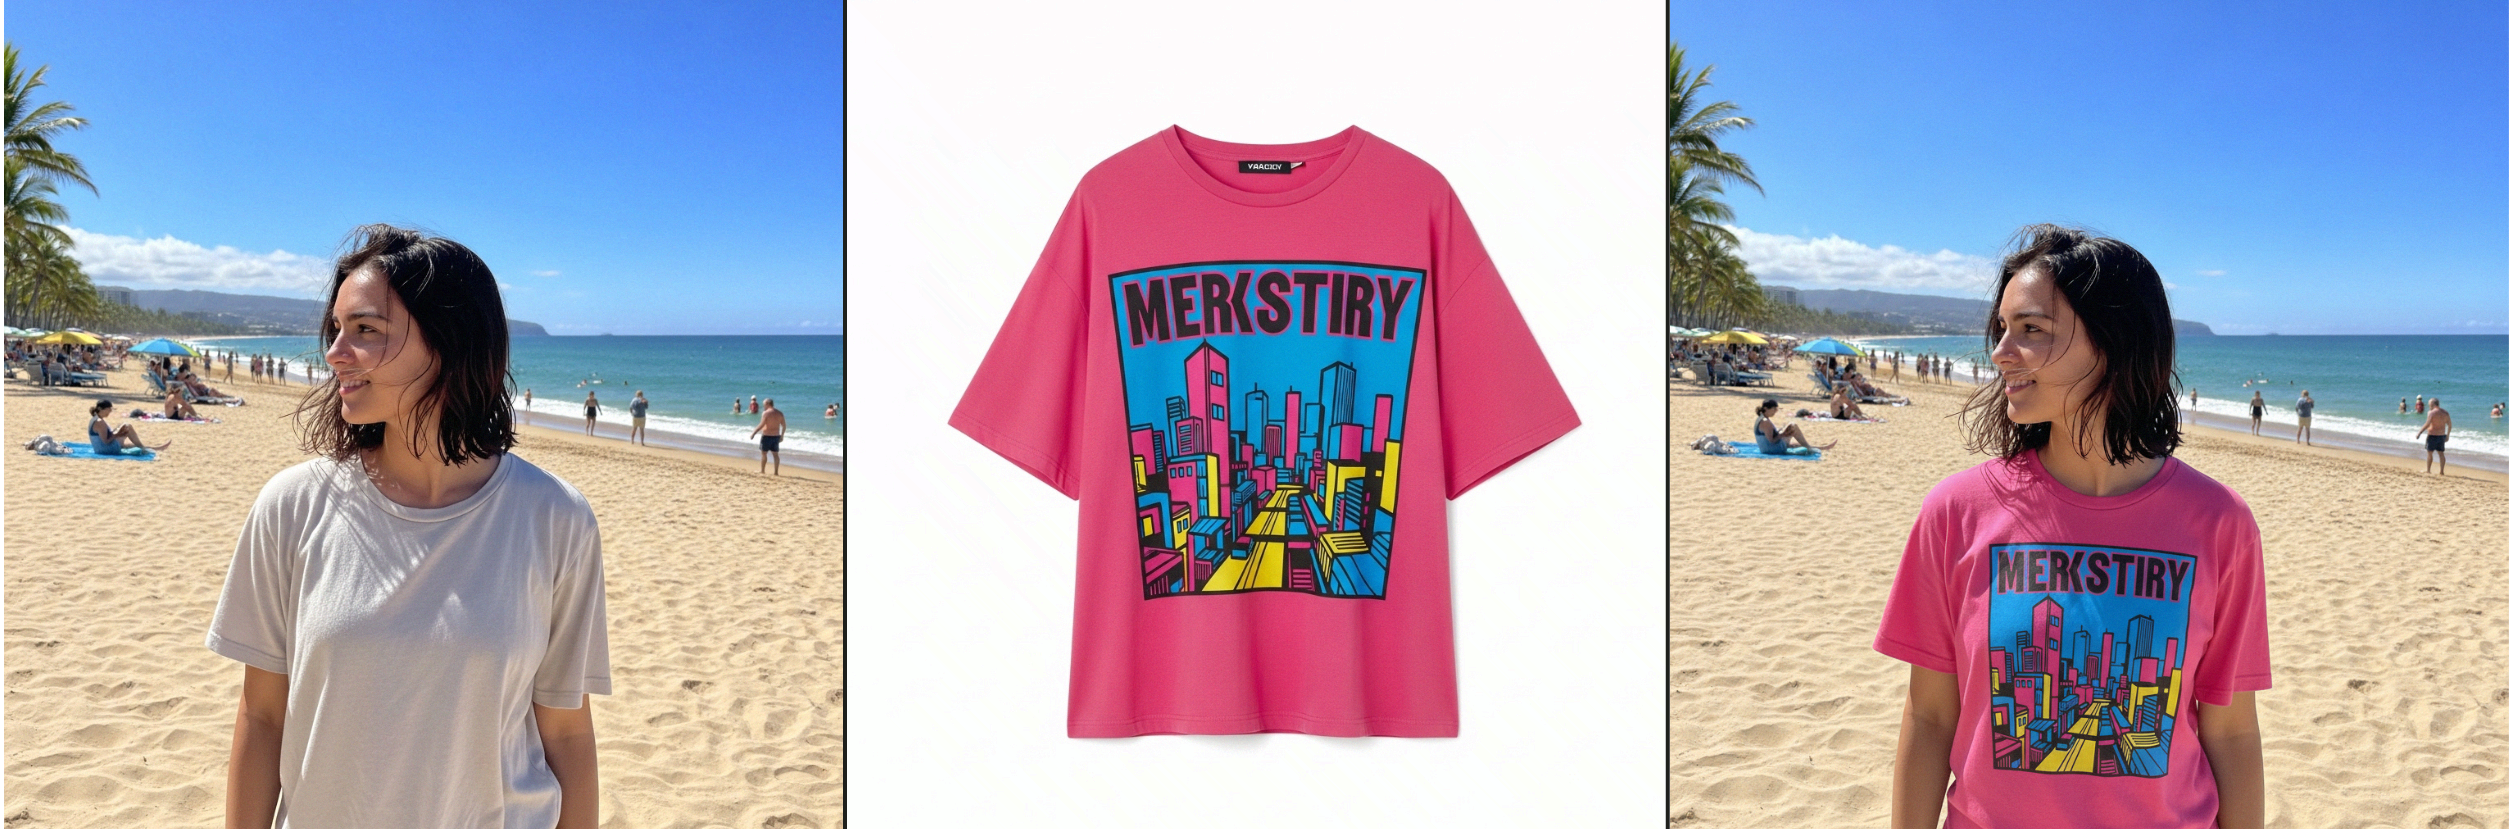
6)處理多個輸入影像
您可以提供多個影像作為更複雜的編輯任務的輸入。
from google import genai
from PIL import Image
from io import BytesIO

client = genai.Client(api_key="YOUR_API_KEY")

prompt = "Make the girl wear this t-shirt. Leave the background unchanged."

image1 = Image.open("girl.png")
image2 = Image.open("tshirt.png")

response = client.models.generate_content(
    model="gemini-2.5-flash-image-preview",
    contents=[prompt, image1, image2],
)

for part in response.candidates[0].content.parts:
    if part.text is not None:
        print(part.text)
    elif part.inline_data is not None:
        image = Image.open(BytesIO(part.inline_data.data))
        image.save("girl-with-tshirt.png")
輸入 1 和 2 以及輸出:
7)對話式圖像編輯
為了進行迭代優化,您可以使用chats會話來維護多個請求之間的上下文。這允許您以對話的方式編輯圖像。
from google import genai
from PIL import Image
from io import BytesIO

client = genai.Client(api_key="YOUR_API_KEY")

# Create a chat
chat = client.chats.create(
    model="gemini-2.5-flash-image-preview"
)

# Make the first image edit
response1 = chat.send_message(
    [
        "Change the cat to a bengal cat, leave everything else the same",
        Image.open("cat.png"),
    ]
)
# display / save image...

# Continue chatting and editing
response2 = chat.send_message("The cat should wear a funny party hat")
# display / save image...
輸入和輸出 1 和 2:
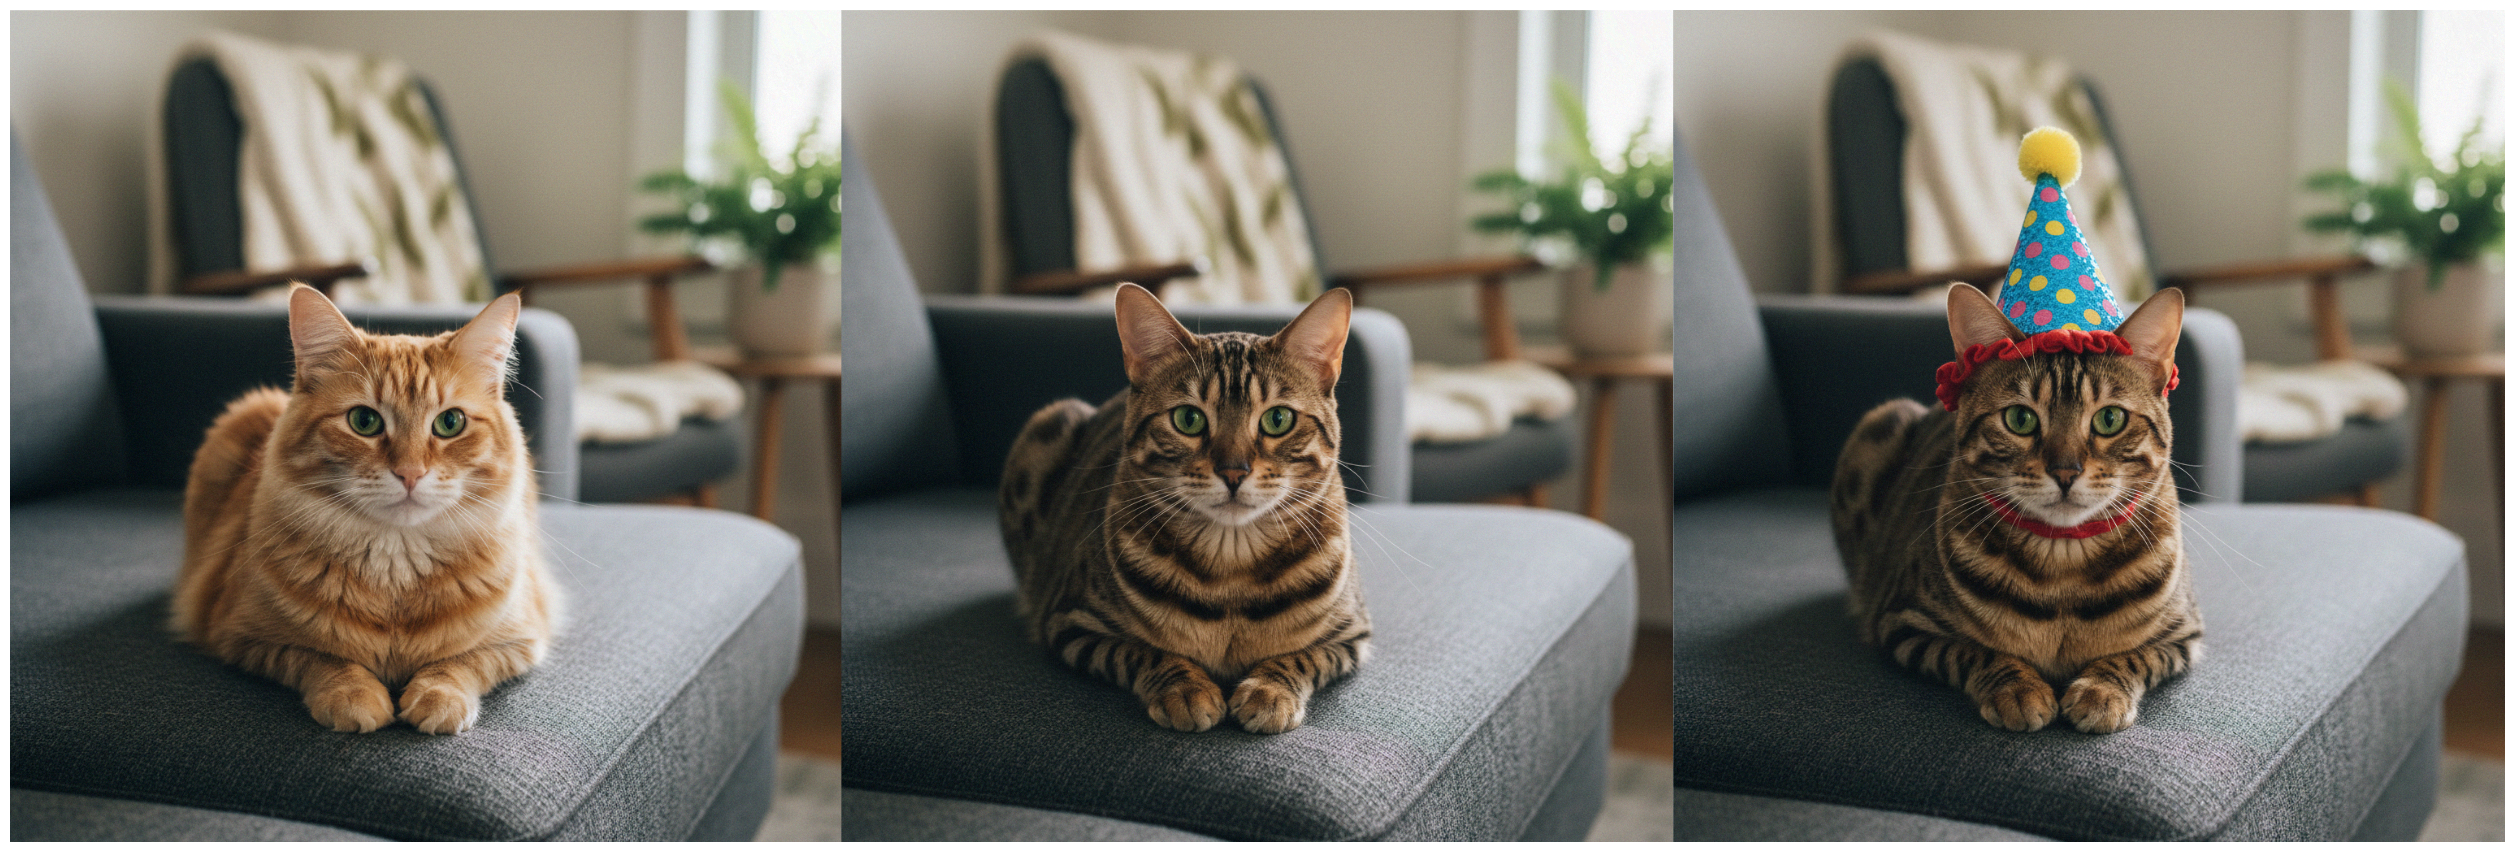
提示:如果您注意到經過多次對話編輯後圖像特徵開始退化或“漂移”,最好使用最新圖像和更詳細、更整合的提示開始新的會話,以保持高保真度。
8)Nano Banana 的最佳實踐和提示
為了讓 Nano Banana 獲得最佳效果,請遵循以下提示指南:
-
高度具體:您提供的有關主題、顏色、燈光和構圖的細節越多,您對輸出的控制就越強。
-
提供背景和意圖:解釋圖像的目的或想要表達的情緒。模特兒對背景的理解會影響其創作選擇。
-
迭代和完善:不要期望第一次就完美。利用模型的對話能力進行漸進式修改,不斷完善您的影像。
-
使用逐步說明:對於複雜的場景,將提示分解為一系列清晰、連續的說明。
-
使用積極的框架:不要使用“沒有汽車”這樣的消極提示,而是積極地描述所需的場景:“空曠、荒涼的街道,沒有交通跡象。”
-
控制相機:使用攝影和電影術語來指導構圖,例如“廣角拍攝”、“微距拍攝”或“低角度透視”。
要深入了解最佳實踐,請查看有關提示最佳實踐的官方部落格文章和文件中的提示指南。
9)社區範例與啟發
探索社群使用 Nano Banana 建構的內容:
-
@henrydaubrez的轉換鏡頭視角: X post
-
@multimodalart透過小樣本學習實現一致的角色設計: X 帖子
-
「紅色箭頭看到的是什麼」谷歌地圖由@tokumin改造: X 帖子
-
由@yachimat_manga的火柴人註釋生成圖像: X post
-
@deedydas從靜態圖像建立 3D 模型: X 帖子
-
@bilawalsidhu生成基於位置的 AR 體驗: X 帖子
-
將 2D 地圖轉換為 3D 圖形,作者: @demishassabis : X post
10)資源與後續步驟
本指南涵蓋了使用 Nano Banana(又稱 Gemini 2.5 Flash 鏡像)進行建置的基礎知識。您已經學習如何設定環境、生成和編輯鏡像,以及如何應用進階技術。現在,您可以開始將這些強大的功能融入您自己的專案中。
如需進一步閱讀,請查看官方資源:
-
AI Studio 中的Pixshop 應用程式
如果你用這個做了一些很酷的東西,我很樂意看看!歡迎直接私訊我或在 X: @patloeber上標記我。
原文出處:https://dev.to/googleai/how-to-build-with-nano-banana-complete-developer-tutorial-646
1) --- 會變成分隔線(上一行必須是空白)
2) # 會變成一級標題
3) ## 會變成二級標題
4) ### 會變成三級標題
5) **粗體文字**會顯示粗體文字
6) ```當第一行與最後一行會顯示程式碼
7) 請搜尋 Markdown 語法,了解各種格式