

第一次接觸大型程式碼庫是件痛苦的事。你克隆了程式碼庫,發現裡面有 300 個文件,卻完全不知道它們都放在哪裡。
你可以詢問人工智慧助手,但它很快就會忽略上下文,你永遠不知道它是否臆想出了一個根本不存在的檔案路徑。
Codebase Navigator可以解決這個問題。貼上一個 URL,用簡單的英文提問,即可即時查看由實際導入語句建立的真實依賴關係圖。
它使用CopilotKit 、 Zenflow 、GitHub API 和React Flow來建構。您可以使用Ollama在本地完全免費地執行它。
在這篇部落格中,我們將介紹架構、關鍵模式以及端到端的工作原理。
我們正在建造什麼?
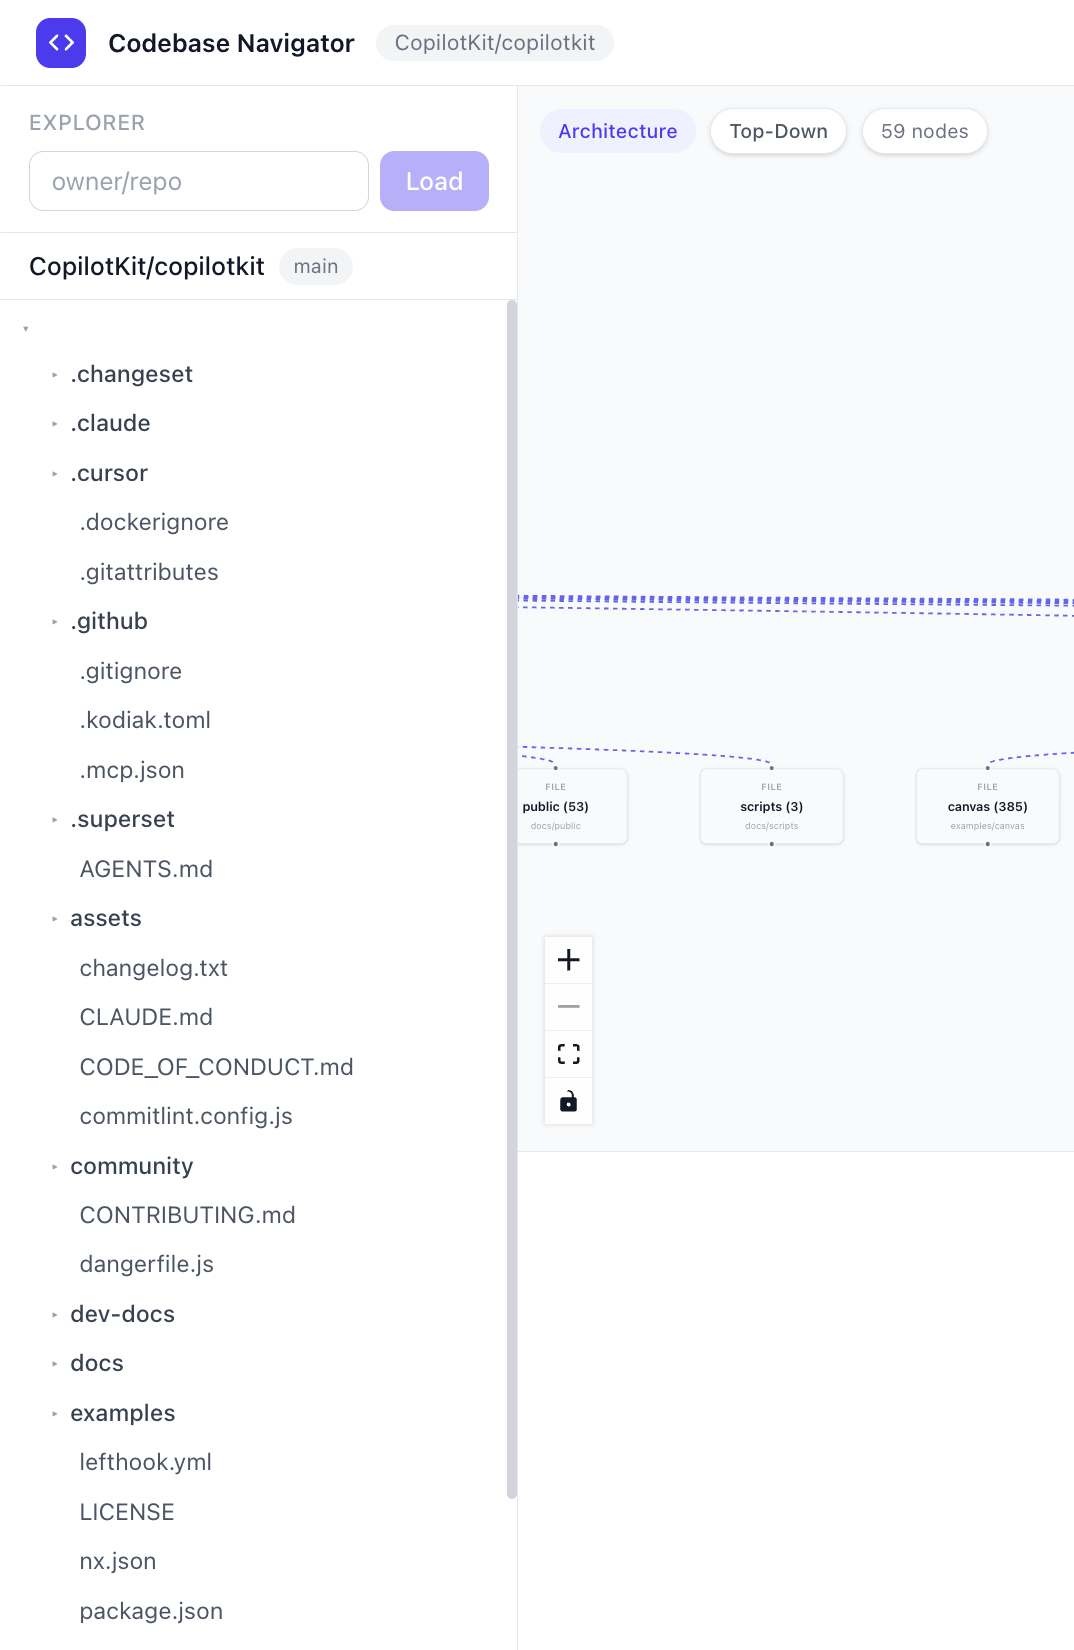
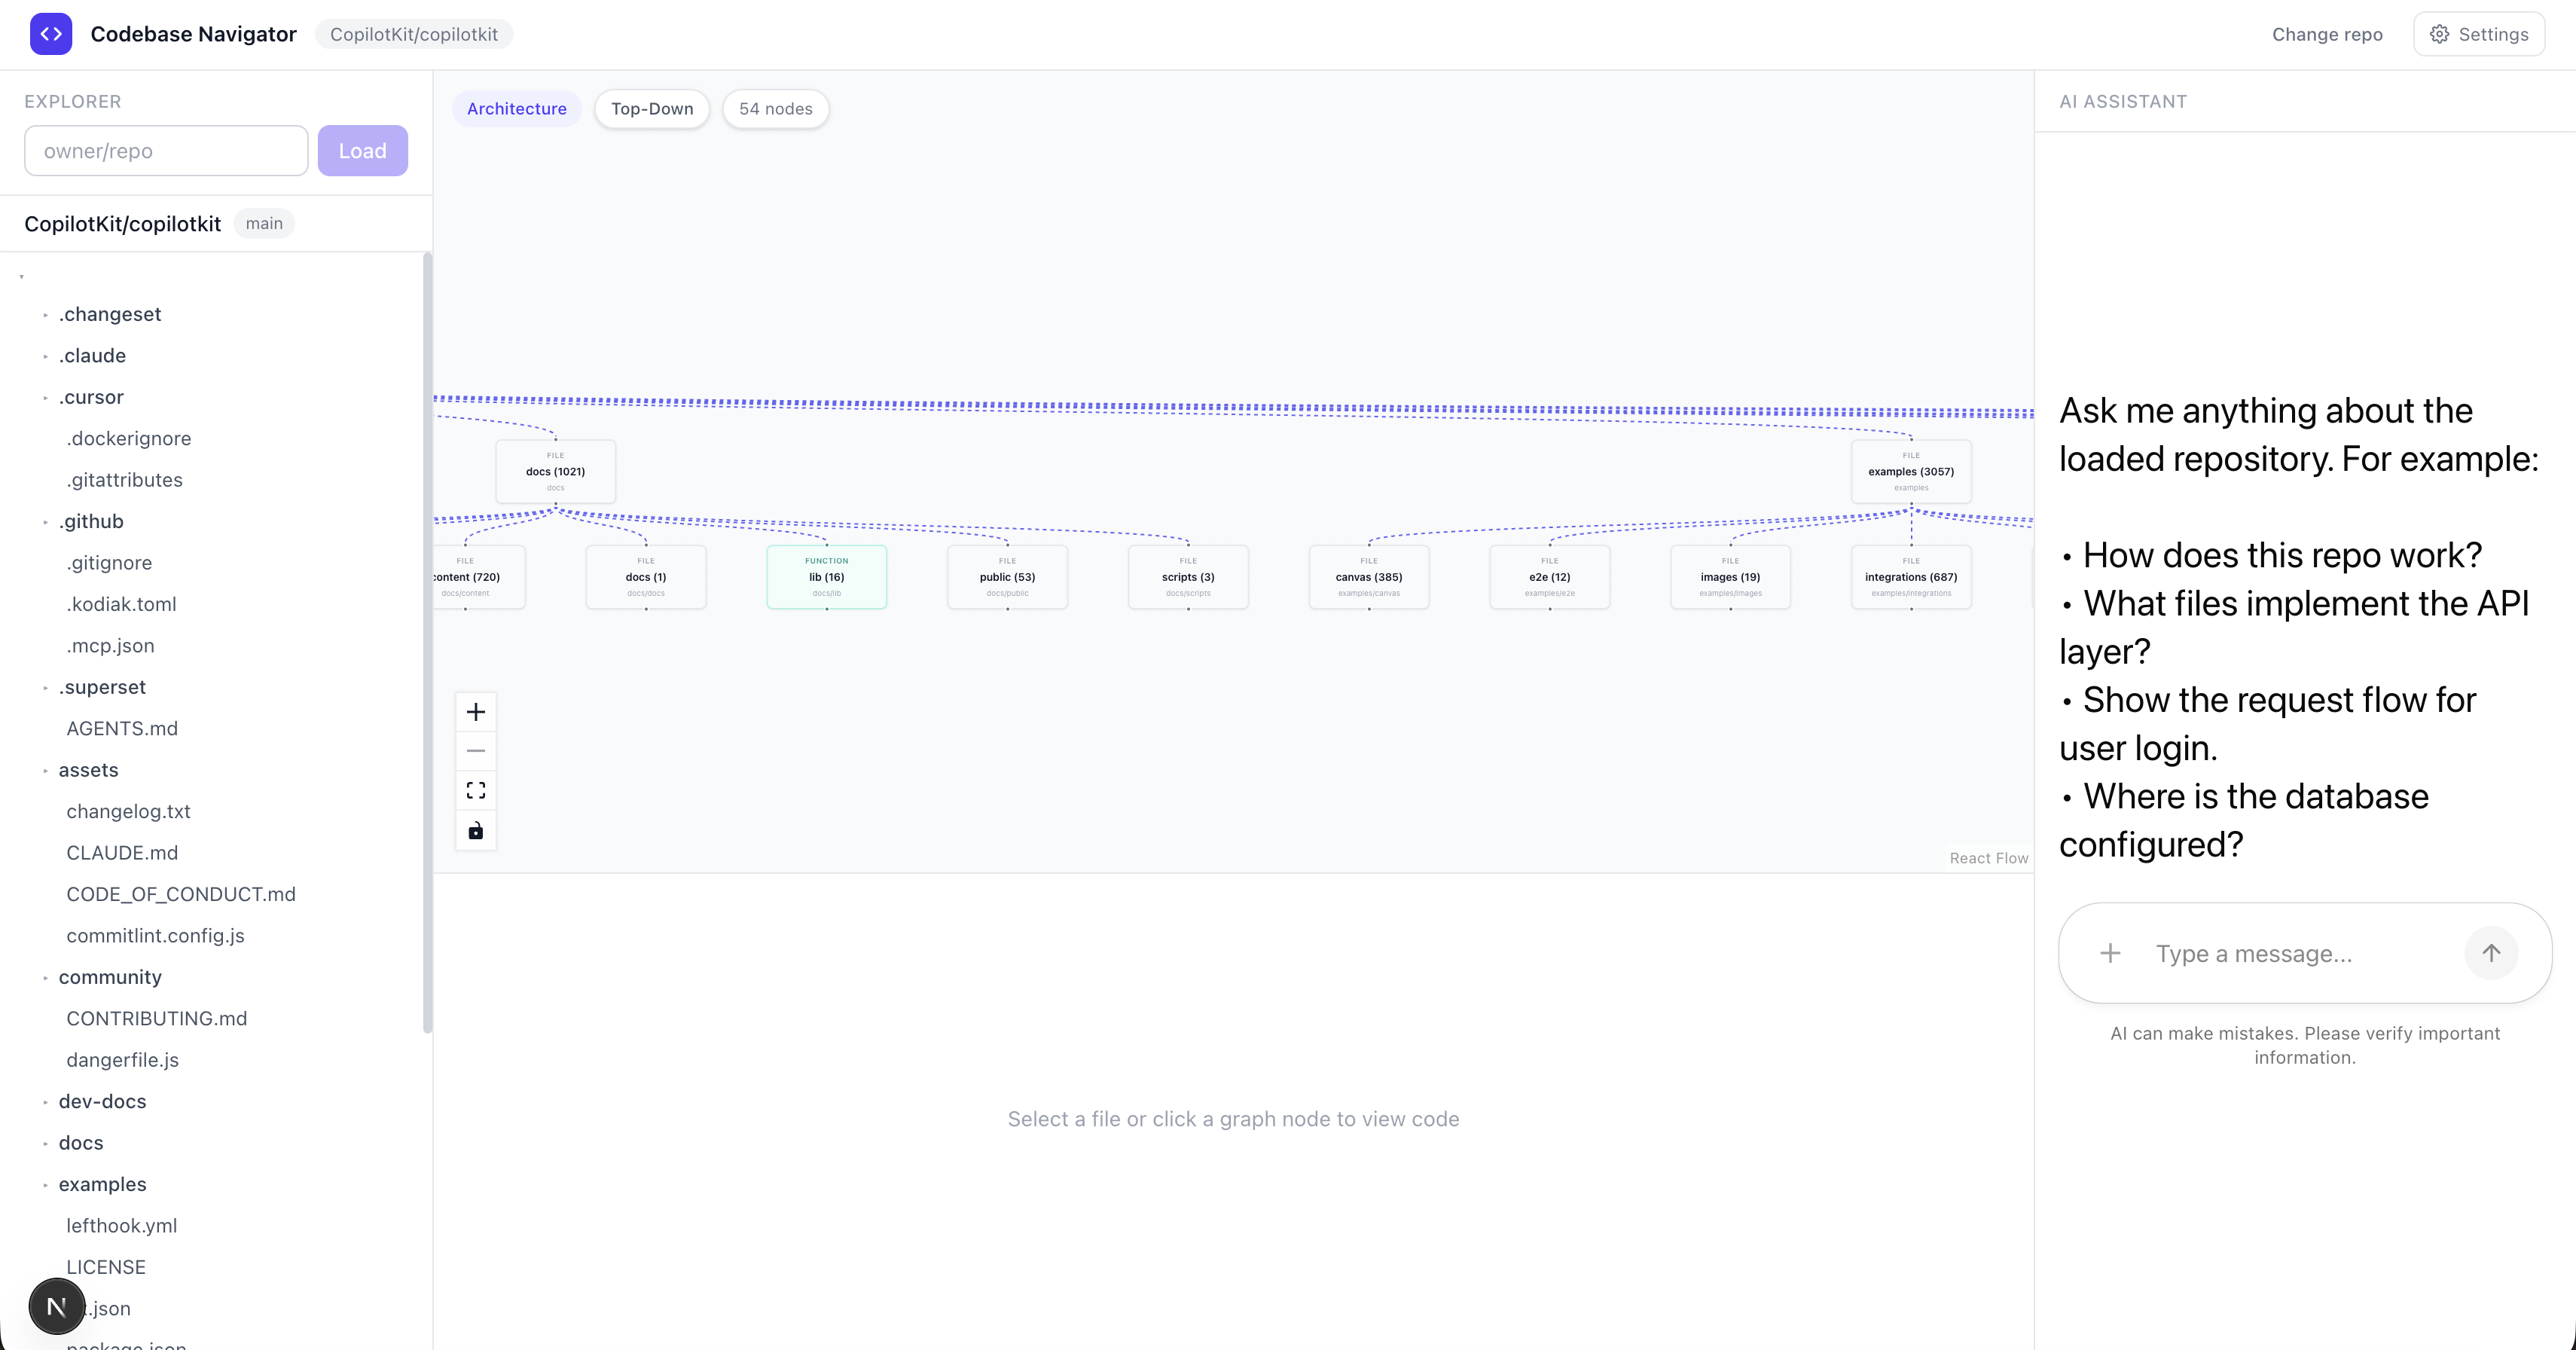
Codebase Navigator 可讓您貼上任何公開的 GitHub 程式碼庫 URL,並以純英文提出相關問題。您不會收到一大段文字,而是會看到四個面板同時更新。
| 面板 | 它的功能 |
|------------- |----------------------------------------------------------------- |
| Graph Canvas | 基於真實導入語句所建構的即時依賴關係圖 |
| 程式碼檢視器 | 檔案內容即時從 GitHub 獲取,相關行高亮顯示 |
| 倉庫瀏覽器 | 完整文件樹,點擊任一文件即可開啟 |
| 聊天 | 後續問題與簡明英文解釋 |
圖表會動態變化,顯示所有相關的檔案及其實際匯入關係;程式碼檢視器會開啟檔案;聊天視窗會解釋每個部分的功能。無需切換上下文。
您可以使用 Ollama 在本地完全免費執行它,而無需任何 API 金鑰。
以下是提出問題時完整的請求→回應流程:
User types "how does auth work?"
     ↓
CopilotChat → POST /api/copilotkit
     ↓
LLM receives repo context (file paths, current selection, system rules)
     ↓
LLM calls analyzeRepository tool
     ↓
Tool fetches relevant files via /api/github/file
     ↓
Extracts import/require statements → resolves paths → builds dependency graph
     ↓
Zustand store updates
     ↓
All four panels re-render live: graph, file tree, code viewer, chat response
技術堆疊和工具
從宏觀層面來看,該專案是透過以下方式建構的:
-
Next.js 16 - 前端和 API 路由
-
CopilotKit - 代理程式 UI 狀態同步和聊天介面。提供內建鉤子和元件,例如
useAgentContext、useFrontendTool和CopilotChat -
Zenflow-一款用於規劃、測試和協調建置流程的工作流程工具
-
React Flow和dagre - 具有自動佈局的互動式依賴關係圖
-
Octokit - 用於取得倉庫樹和文件內容的 GitHub API 代理
-
Zustand - 四個面板共享的狀態
-
Tailwind CSS - 樣式
-
Ollama/OpenAI - 可透過使用者介面切換本地或雲端LLM後端
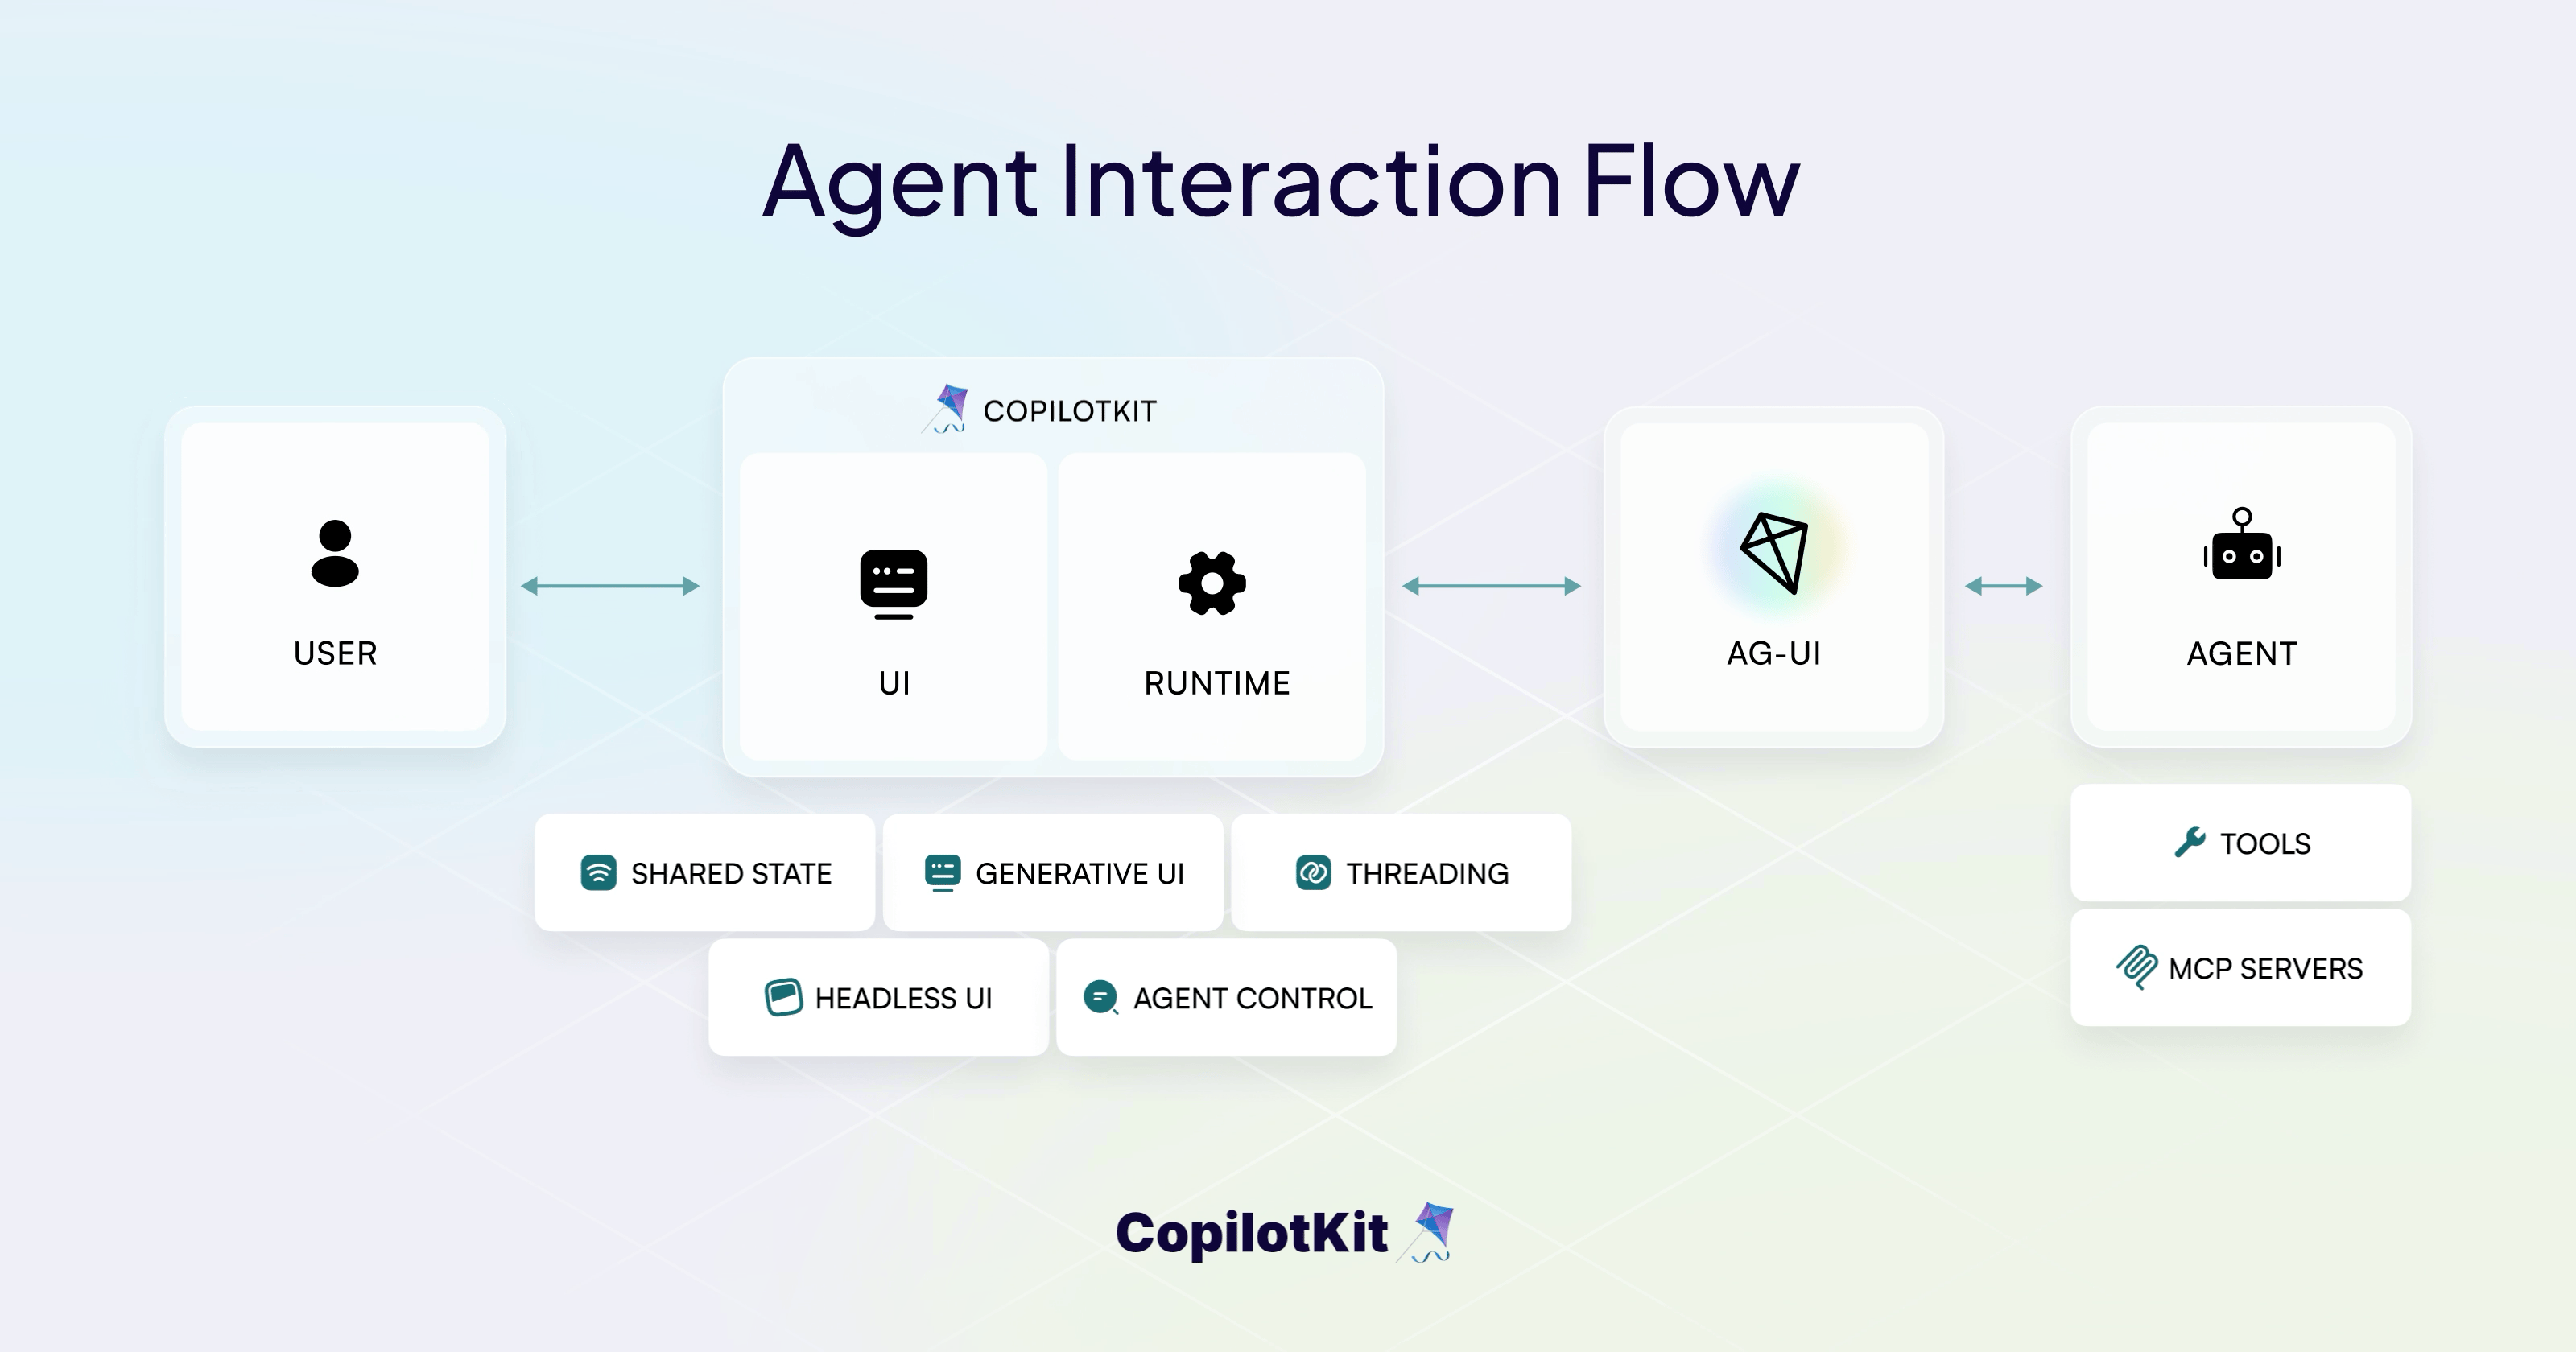
CopilotKit 執行時在 Next.js API 路由中自託管,這使您可以插入任何 OpenAI 相容的後端(包括 Ollama),從而實現完全免費的本地推理。
它將您的使用者介面、代理和工具連接成一個單一的互動循環。
Zenflow是什麼?
Zenflow是一款人工智慧開發工具,它將軟體建置視為一個結構化的工程流程,而不僅僅是自動完成程式碼。
本專案使用 Zenflow(Zencoder 的工作流程引擎)在一次會議中完成了規劃、建置、測試、審查和部署。
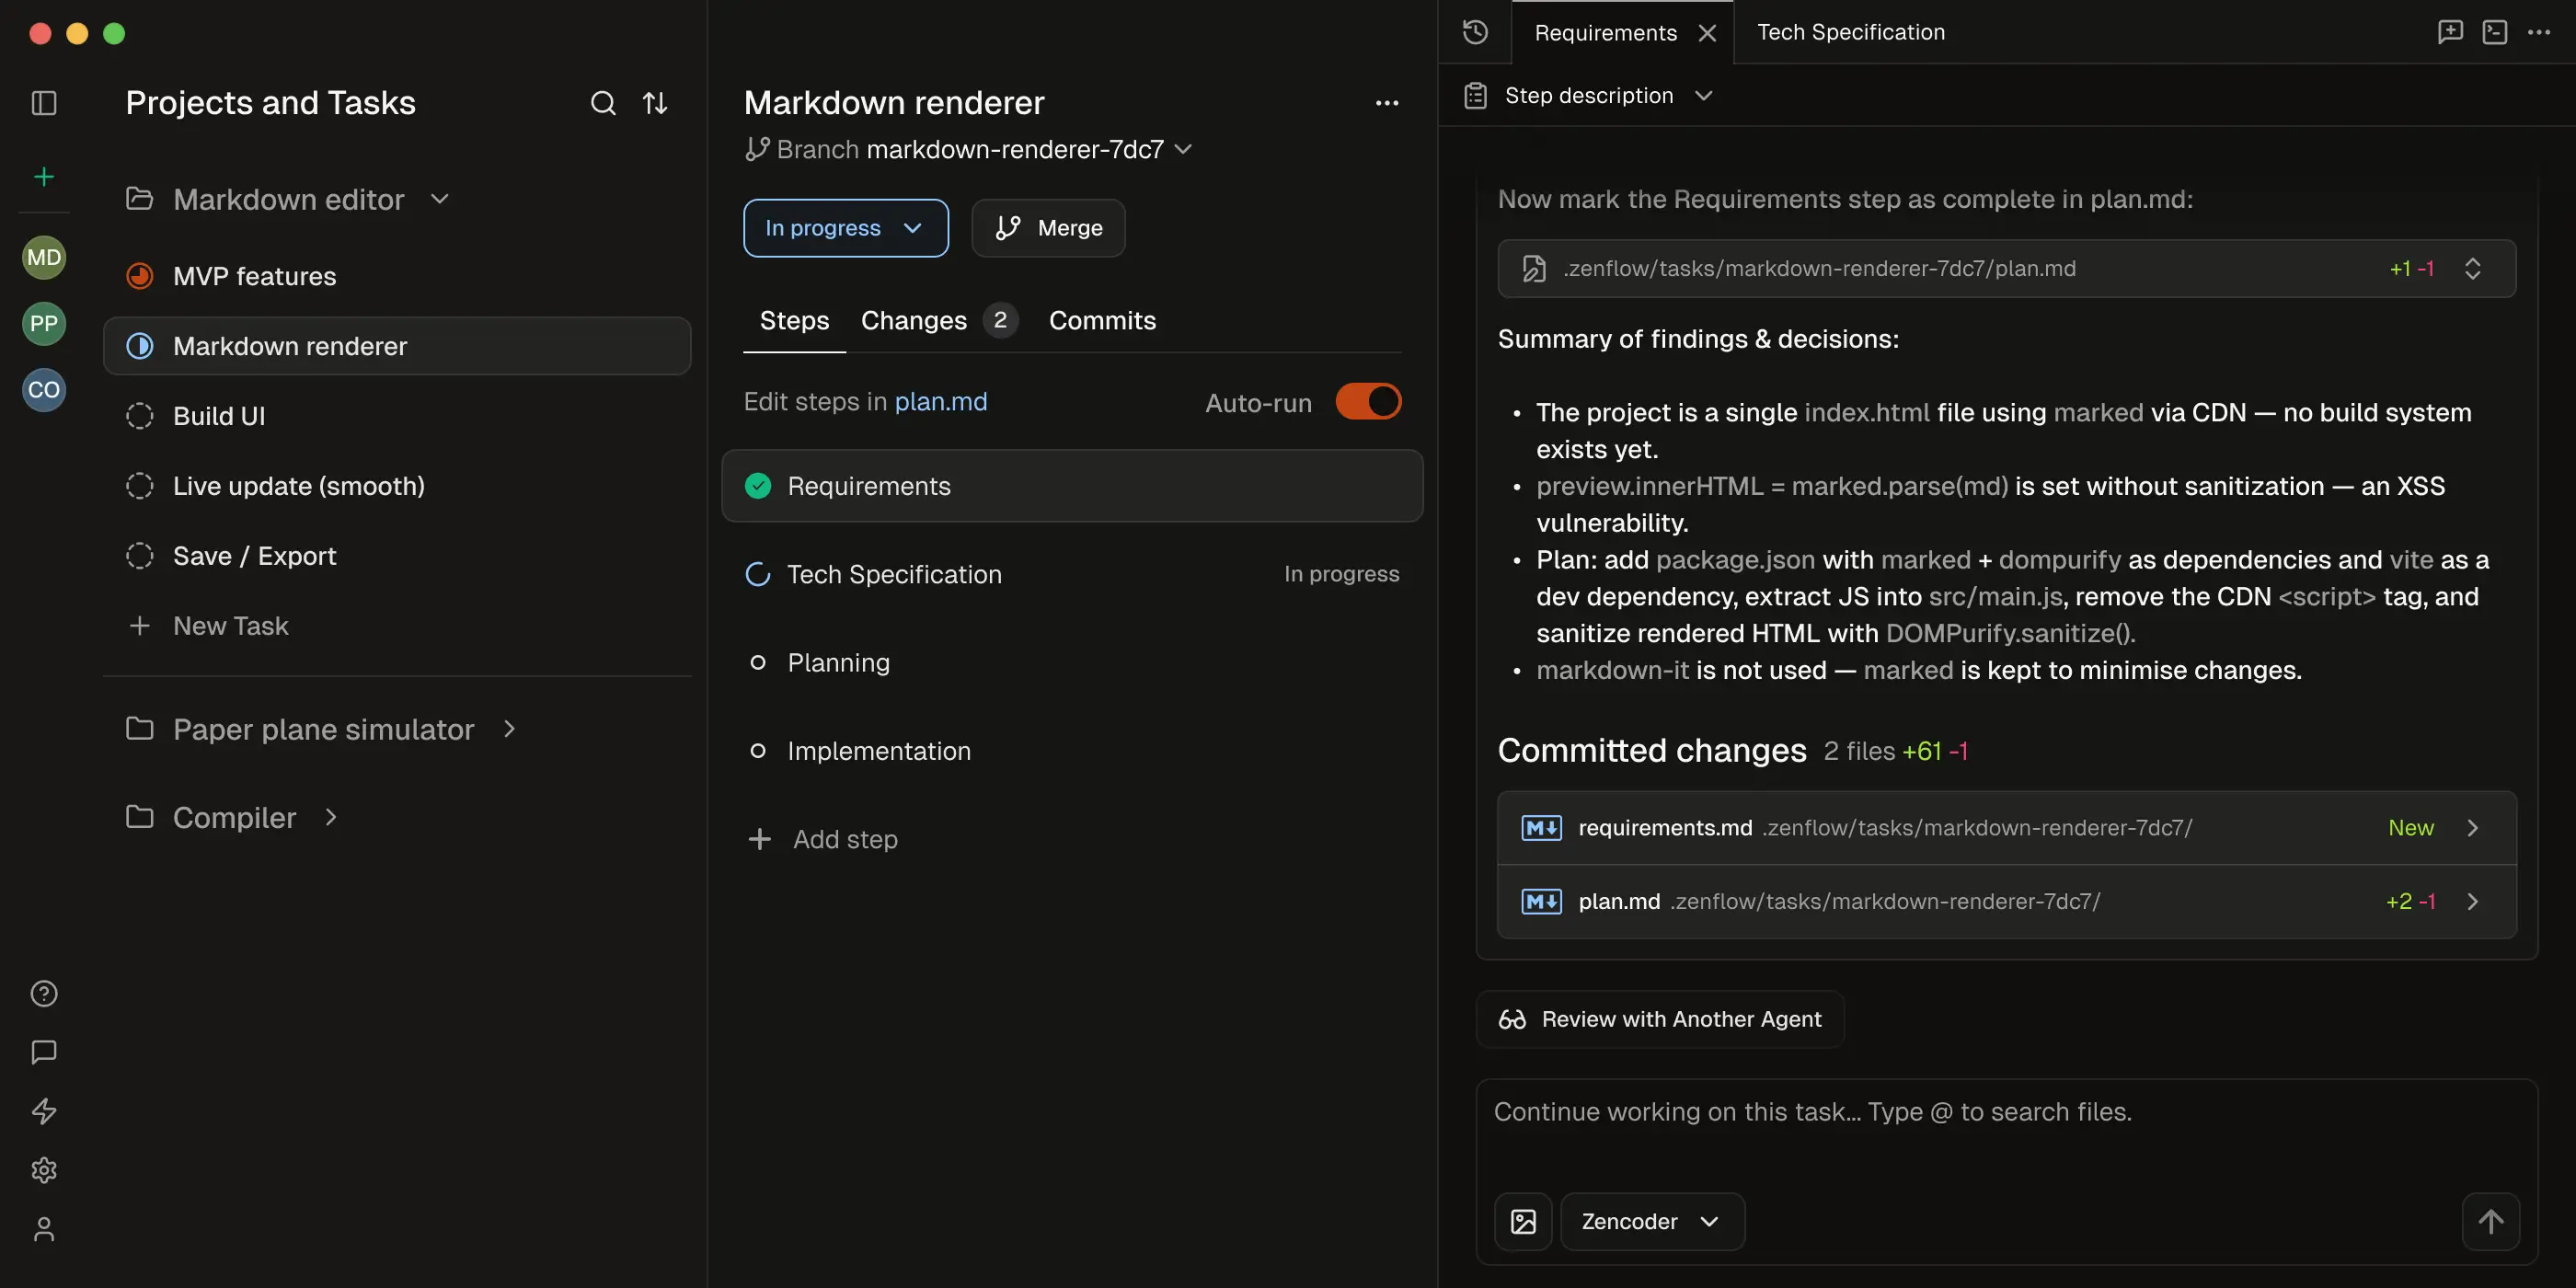
它從零開始執行了一個六階段流程:
-
架構和規格
-
鷹架和地基
-
資料層(GitHub API 整合)
-
AI層(CopilotKit操作與上下文)
-
可視化層(React流程圖)
-
最後組裝和接線
每個階段在進入下一階段之前都經過了程式碼檢查、類型檢查和測試。建置完成後,進行了程式碼審查,發現了 14 個問題,並系統地修復了 11 個問題:
-
API 金鑰在標頭中暴露 → 已移至 httpOnly cookie
-
虛假的星形圖 → 被真正的基於導入的依賴關係解析所取代
-
重複的檔案取得邏輯 → 合併為一個快取實用程序
倉庫中的.zenflow/資料夾包含它在過程中產生的任務計劃、規格和報告文件。
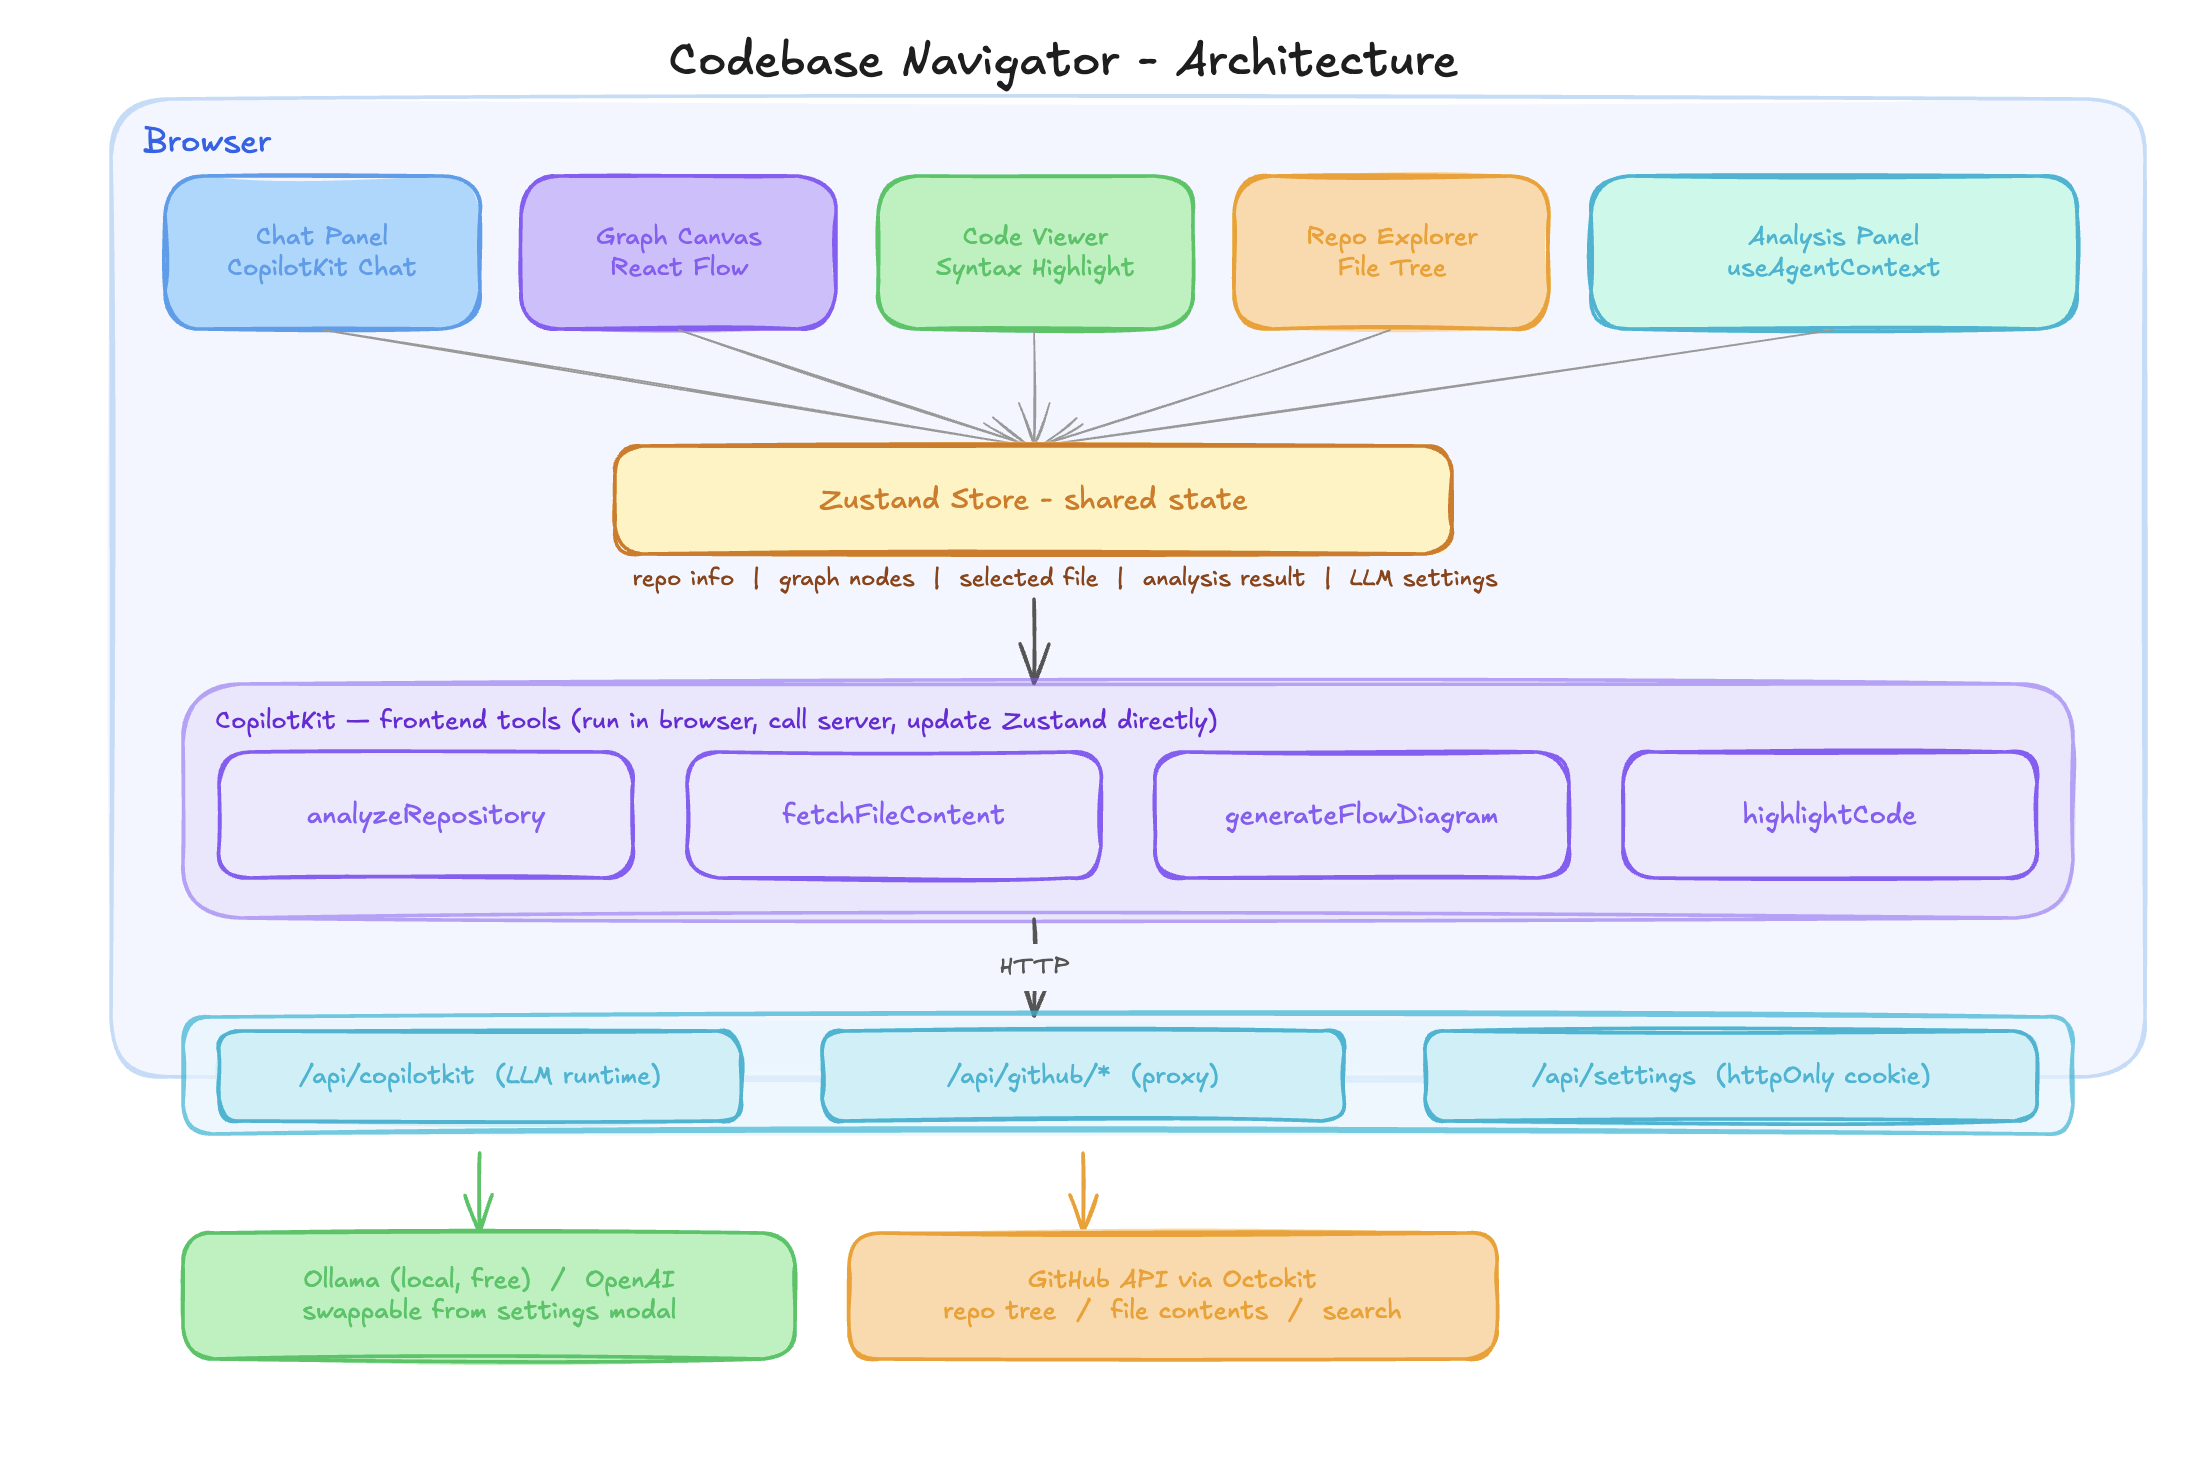
我們就是這樣用 Zenflow 建構的。以下是最終的架構圖。
建築與專案結構
應用分為三層:瀏覽器層處理所有使用者介面和人工智慧工具邏輯;Next.js API 路由作為外部服務和 GitHub API 的安全代理;底層是 LLM 後端。瀏覽器中的任何程式碼都不會直接與 GitHub 或 LLM 通訊。
以下對所有層及其組織方式進行了高層的概述。
┌─────────────────────────────────────────────────────────┐
│                        BROWSER                          │
│                                                         │
│  ┌─────────┐  ┌──────────┐  ┌──────────┐  ┌────────┐    │
│  │  Chat   │  │  Graph   │  │  Code    │  │  File  │    │
│  │  Panel  │  │  Canvas  │  │  Viewer  │  │  Tree  │    │
│  └────┬────┘  └────┬─────┘  └────┬─────┘  └───┬────┘    │
│       └────────────┴─────────────┴────────────┘         │
│                          │                              │
│                   ┌──────▼──────┐                       │
│                   │   Zustand   │  ← shared state       │
│                   └──────┬──────┘                       │
│                          │                              │
│              ┌───────────▼────────────┐                 │
│              │      CopilotKit        │                 │
│              │   frontend tools       │                 │
│              │  analyzeRepository     │                 │
│              │  fetchFileContent      │                 │
│              │  highlightCode         │                 │
│              └───────────┬────────────┘                 │
└──────────────────────────┼──────────────────────────────┘
                           │
┌──────────────────────────▼──────────────────────────────┐
│                    NEXT.JS API ROUTES                   │
│                                                         │
│   /api/copilotkit     /api/github/*     /api/settings   │
│   (LLM runtime)       (proxy)          (httpOnly cookie)│
└──────────┬────────────────┬─────────────────────────────┘
           │                │
     ┌─────▼─────┐   ┌──────▼──────┐
     │  Ollama   │   │  GitHub API │
     │  / OpenAI │   │  (Octokit)  │
     └───────────┘   └─────────────┘
以下是專案結構的簡化視圖。
src/
├── app/api/
│   ├── copilotkit/route.ts    → CopilotKit runtime endpoint
│   ├── github/
│   │   ├── tree/route.ts      → fetch repo tree
│   │   ├── file/route.ts      → fetch + base64-decode file
│   │   └── search/route.ts    → code search
│   └── settings/route.ts      → LLM config (httpOnly cookie)
├── components/
│   ├── panels/     → 5 UI panels (chat, graph, code, analysis, repo)
│   └── flow/       → custom React Flow node types
├── hooks/          → AI tool registration, agent context sync, repo loading
├── lib/            → import extraction, dagre layout, Octokit client
├── store/          → Zustand (AppState + SettingsState)
└── .zenflow/       → Zenflow task plan, spec and report
讓我們深入了解幕後運作機制。這將有助於你理解關鍵模式。
底層工作原理
現在你已經了解了整體情況,讓我們來詳細分析每個部分。
表面之下發生了很多事情,所以我們將把它分解成十個部分,從你第一次加載存儲庫開始,一直到狀態如何在面板之間流動。
1. 載入儲存庫
當您貼上 GitHub URL 並點擊「探索」時, useRepository.loadRepository()會觸發(來自useRepository.ts鉤子)。
它呼叫伺服器上的/api/github/tree ,該 API 使用 Octokit 來執行以下操作:
-
將倉庫 URL 解析為
{ owner, repo } -
取得預設分支
-
從 GitHub Trees API 取得完整的遞歸文件樹
-
將扁平陣列轉換為巢狀的
TreeNode結構
以下是src/api/github/tree/route.ts路由配置的內容:
export async function GET(request: NextRequest) {
  const { owner, repo } = parseRepoUrl(repoUrl);
  const resolvedBranch = branch || (await getDefaultBranch(owner, repo));
  const tree = await getRepoTree(owner, repo, resolvedBranch);

  return NextResponse.json({ owner, repo, branch: resolvedBranch, tree });
}
這個嵌套樹狀結構為側邊欄文件資源管理器提供支持,並成為其他一切的起點。
所有 GitHub 呼叫都透過 Next.js API 路由進行代理程式。為了確保令牌安全,瀏覽器絕不會直接與 GitHub 通訊。
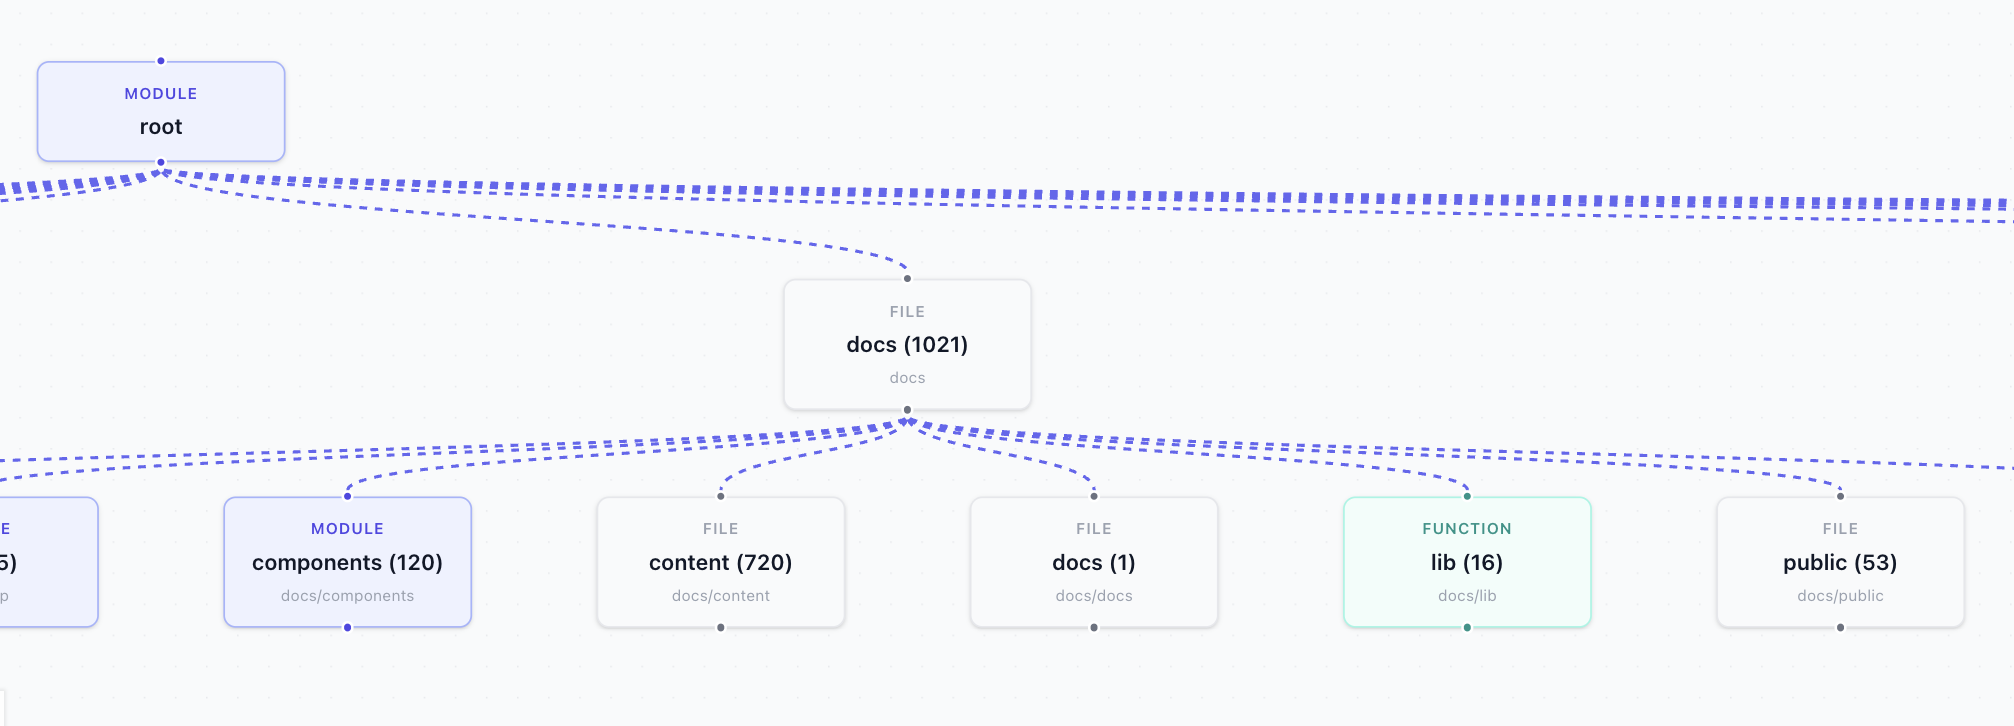
2. 從架構視圖到依賴關係圖
正是這視覺瞬間讓應用顯得生動鮮活。載入時看到的圖表(架構視圖)和提問後看到的圖表(依賴關係圖)是完全不同的兩件事,它們採用的是兩種不同的建構方式。
兩者都位於src/lib/analyzer.ts中 - buildOverviewGraph用於架構視圖, buildDependencyNodes用於依賴關係圖。
當倉庫載入時, useRepository.ts會在樹狀回應返回後立即呼叫buildOverviewGraph ,並將結果直接推送到圖中:
const overview = buildOverviewGraph(data.tree);
setVisualization(overview.nodes, overview.edges, "architecture");buildOverviewGraph從不取得任何檔案。它只是遍歷樹狀結構並建立資料夾映射:根節點位於頂部,頂級目錄作為子節點,再往下是一層子資料夾:
export function buildOverviewGraph(tree: TreeNode) {
  const rootId = `node-${nodeId++}`;
  nodes.push({ id: rootId, type: "module", label: tree.path || "root" });

  const topDirs = (tree.children || []).filter((c) => c.type === "directory");

  for (const dir of topDirs) {
    const fileCount = flattenTree(dir).length;
    nodes.push({ id, label: `${dir.name} (${fileCount})`, type: categorizeDirType(dir.path) });
    edges.push({ source: rootId, target: id, type: "flow" });
  }
}
這裡的邊緣除了「這個資料夾在那個資料夾裡面」之外,沒有任何其他意義。
一旦你提出問題, useCopilotActions.ts就會取得實際的檔案內容並呼叫buildDependencyNodes :
const graph = buildDependencyNodes(fileData);
setVisualization(graph.nodes, graph.edges, "dependency");buildDependencyNodes會為每個檔案建立一個節點,並為每個實際的導入語句建立一個邊:
export function buildDependencyNodes(files: { path: string; imports: string[] }[]) {
  const nodes = files.map((file) => ({
    id: file.path,
    type: "file",
    label: file.path.split("/").pop() || file.path,
    metadata: { fullPath: file.path },
  }));

  for (const file of files) {
    for (const imp of file.imports) {
      const resolved = resolveImportPath(imp, file.path, filePathSet);
      if (resolved) {
        edges.push({ source: file.path, target: resolved, type: "import" });
      }
    }
  }

  return { nodes, edges };
}相同的setVisualization呼叫,不同的資料。 React Flow 重新渲染,圖表從資料夾映射轉變為真正的依賴關係圖,精確地聚焦於與您的問題相關的檔案。
3. CopilotKit 執行時
<a href="">/api/copilotkit</a>路由是 LLM 請求實際到達的位置。 API 金鑰和提供者配置儲存在 httpOnly cookie 中,這表示它們僅存在於伺服器端,永遠不會傳送到瀏覽器。
此路由讀取該配置,建立一個與 OpenAI 相容的客戶端,並將請求傳遞給 CopilotKit 執行時間:
export const POST = async (req: NextRequest) => {
  const { baseURL, apiKey, model } = await getLLMConfig();

  const openai = new OpenAI({ baseURL, apiKey });
  const serviceAdapter = new OpenAIAdapter({ openai, model });
  const runtime = new CopilotRuntime();

  const { handleRequest } = copilotRuntimeNextJSAppRouterEndpoint({
    runtime,
    serviceAdapter,
    endpoint: "/api/copilotkit",
  });

  return handleRequest(req);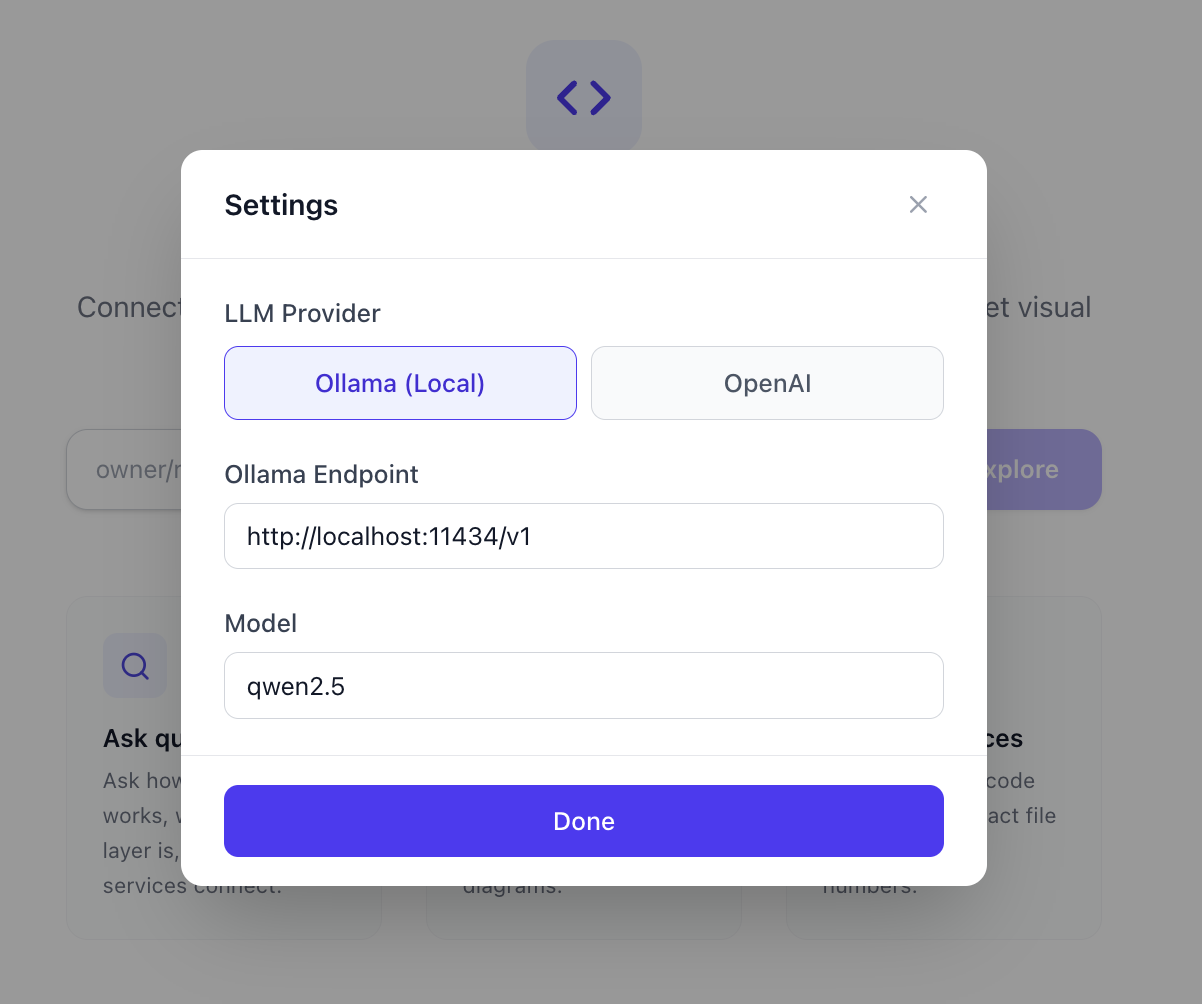
};預設指向localhost:11434/v1上的 Ollama,版本為qwen2.5 。
由於 OpenAI SDK 接受自訂baseURL ,因此切換到 OpenAI、Groq 或任何其他提供者只需更改配置,無需更改程式碼。
4. 為LLM背景提供資訊
在 LLM 能夠給出任何有用的答案之前,它需要知道載入了哪個程式碼庫以及其中存在哪些檔案。這正是useCopilotContext.ts鉤子函數的作用。
它呼叫了useAgentContext ,這是一個 CopilotKit 鉤子函數,可以將結構化資料附加到您發送的每個訊息中。您可以多次呼叫它來附加不同的上下文資訊。
這裡它被呼叫了兩次:一次用於文件列表,一次用於告訴 LLM 如何執行的系統指令:
useAgentContext({
  description: "File paths in the repository (max 500), one per line",
  value: fileList,  // flattened from the TreeNode structure
});

useAgentContext({
  description: "System instructions",
  value: `You are a Codebase Navigator assistant. You MUST use tool calls to answer questions.
CRITICAL RULES:
1. For ANY question about the repository call the "analyzeRepository" tool.
2. To show a file, call "fetchFileContent" with the exact file path.
3. NEVER respond with only text. ALWAYS call a tool first.
4. Use ONLY file paths from the file list above.`
});
為避免超出令牌限制,檔案清單路徑數量上限為 500 個。
因為每次 Zustand 儲存發生變更時,此鉤子都會重新執行,所以 LLM 始終可以看到當前的儲存庫、選定的檔案和分析狀態,而不是頁面載入時的過時快照。
注意:如果您正在執行具有較大上下文視窗的本機模型,則可以在useCopilotContext.ts中提高此限制。
5. 四種前端工具
這就是該應用程式的核心工作原理。 LLM 不僅可以回覆文本,還可以呼叫各種工具。每個工具都有一個名稱、一組可接受的參數以及一個處理程序,該程序實際上是一個在 LLM 呼叫它時執行的函數。
CopilotKit 可讓您使用useFrontendTool鉤子直接在瀏覽器中註冊這些工具,該鉤子在useCopilotActions.ts中定義。
當工具的處理程序執行時,它會直接更新 Zustand 狀態,這就是為什麼所有四個面板(圖表、程式碼檢視器、分析面板和聊天)無需任何額外接線即可同時做出反應的原因。
analyzeRepository是 LLM 幾乎對所有問題都會呼叫的主要工具。以下是它的詳細操作步驟:
useFrontendTool({
  name: "analyzeRepository",
  parameters: z.object({
    query: z.string(),
    explanation: z.string(),
  }),
  handler: async ({ query, explanation }) => {
    // 1. Find relevant files using keyword matching
    const matchedPaths = findFilesByQuery(repo.tree, query);

    // 2. Cap at 15 files to keep things fast
    const capped = matchedPaths.slice(0, 15);

    // 3. Fetch each file content (cached)
    const fileData = await Promise.all(
      capped.map(async (p) => ({
        path: p,
        imports: extractImports(await fetchFile(owner, repo, p, branch)),
      }))
    );

    // 4. Build real dependency graph from actual import statements
    const graph = buildDependencyNodes(fileData);

    // 5. Categorize each node by file type
    graph.nodes.forEach(node => {
      node.type = categorizeFileType(node.metadata.fullPath);
    });

    // 6. Push to Zustand - all four panels react
    setAnalysisResult({ explanation, relevantFiles, flowDiagram: graph });
    setVisualization(graph.nodes, graph.edges, "dependency");
  },
});
fetchFileContent 函數會在程式碼檢視器中開啟特定檔案。當您要求 LLM 顯示某個檔案時,LLM 會呼叫此函數,它會取得檔案內容並呼叫setCodeViewer 。
useFrontendTool({
  name: "fetchFileContent",
  parameters: z.object({
    filePath: z.string(),
  }),
  handler: async ({ filePath }) => {
    const content = await fetchFile(repo.repoInfo.owner, repo.repoInfo.repo, filePath, repo.repoInfo.branch);
    setCodeViewer(filePath, content);
  },
});generateFlowDiagram與analyzeRepository類似,但更專注於特定目標。它不會搜尋整個程式碼庫,而是提供一個特定的檔案路徑列表,並僅針對這些檔案建立流程圖。當您想要視覺化程式碼庫的一部分(例如 API 層)時,此函數非常有用:
useFrontendTool({
  name: "generateFlowDiagram",
  parameters: z.object({
    files: z.array(z.string()),
    diagramType: z.enum(["dependency", "flow", "architecture"]),
  }),
  handler: async ({ files, diagramType }) => {
    const fileData = await Promise.all(files.slice(0, 20).map(async (f) => ({
      path: f,
      imports: extractImports(await fetchFile(repo.repoInfo.owner, repo.repoInfo.repo, f, repo.repoInfo.branch)),
    })));
    const graph = buildDependencyNodes(fileData);
    setVisualization(graph.nodes, graph.edges, diagramType);
  },
});
highlightCode 函數會取得一個文件,並高亮顯示特定的行號,同時加入解釋說明。 LLM 在需要精確指出程式碼中某個事件發生的位置時會使用此功能:
useFrontendTool({
  name: "highlightCode",
  parameters: z.object({
    filePath: z.string(),
    lines: z.array(z.number()),
    explanation: z.string(),
  }),
  handler: async ({ filePath, lines, explanation }) => {
    const content = await fetchFile(repo.repoInfo.owner, repo.repoInfo.repo, filePath, repo.repoInfo.branch);
    setCodeViewer(filePath, content, lines, explanation);
  },
});
請注意,這些工具都不會向聊天視窗傳回文字。它們都只是更新狀態。 LLM 不會描述它發現的內容,而是直接控制螢幕上顯示的內容。
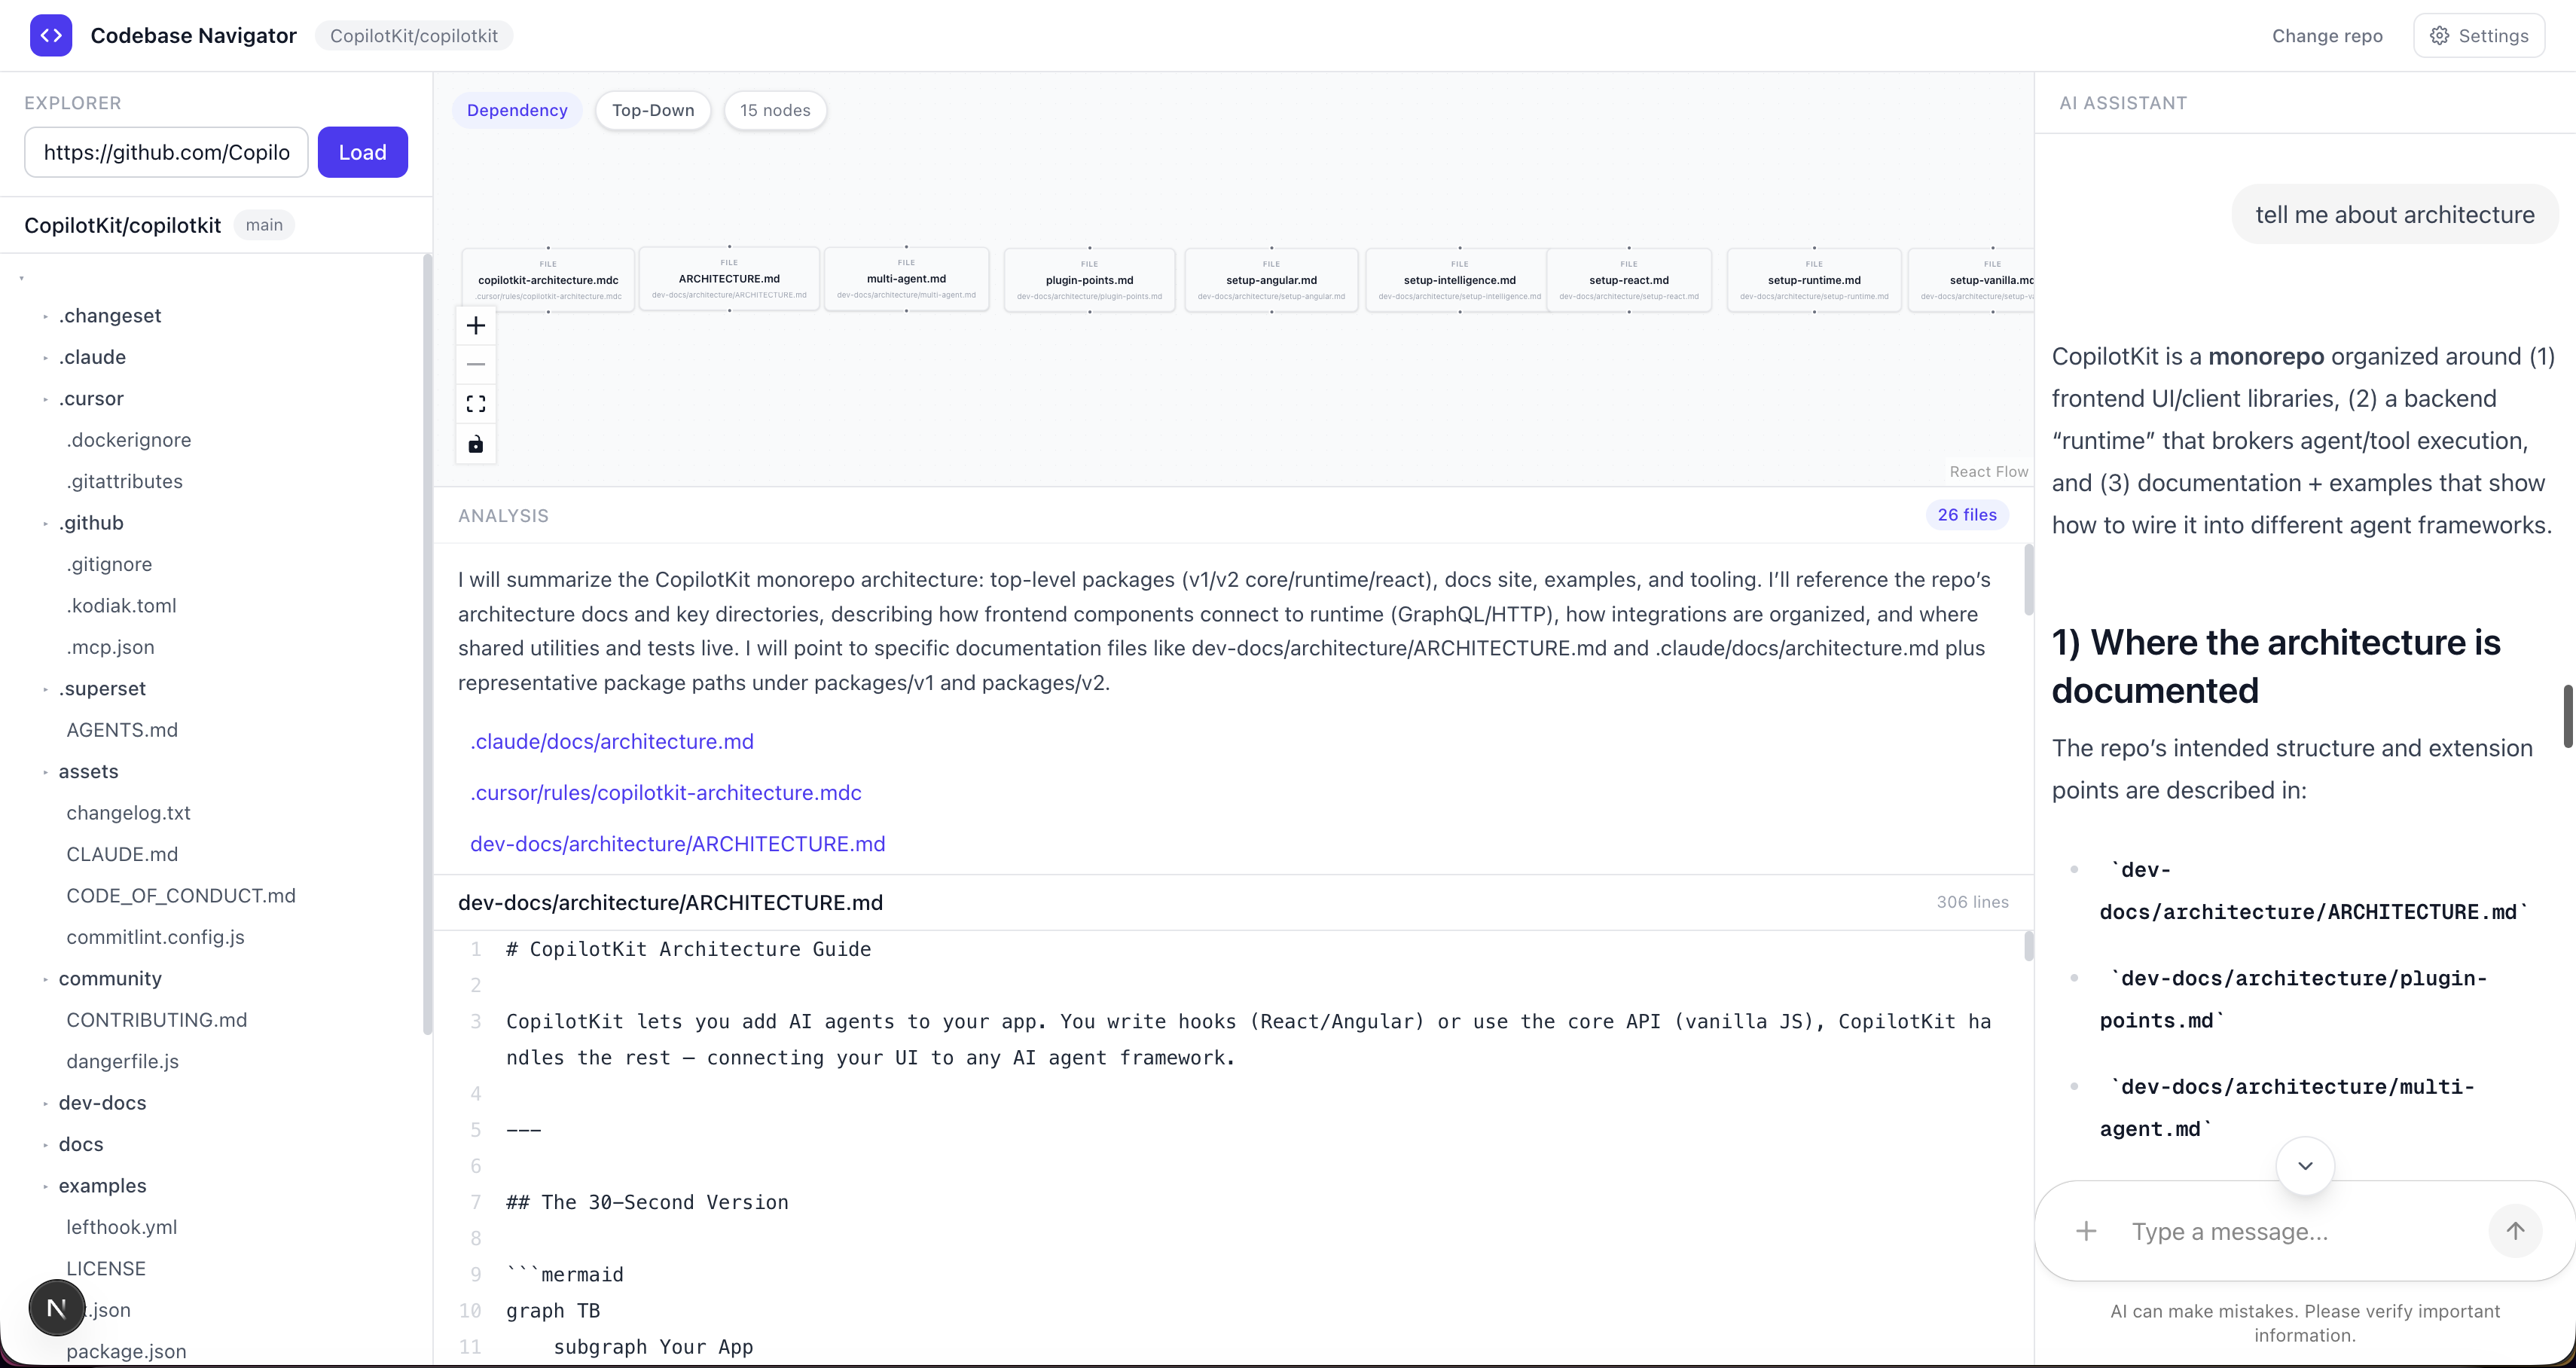
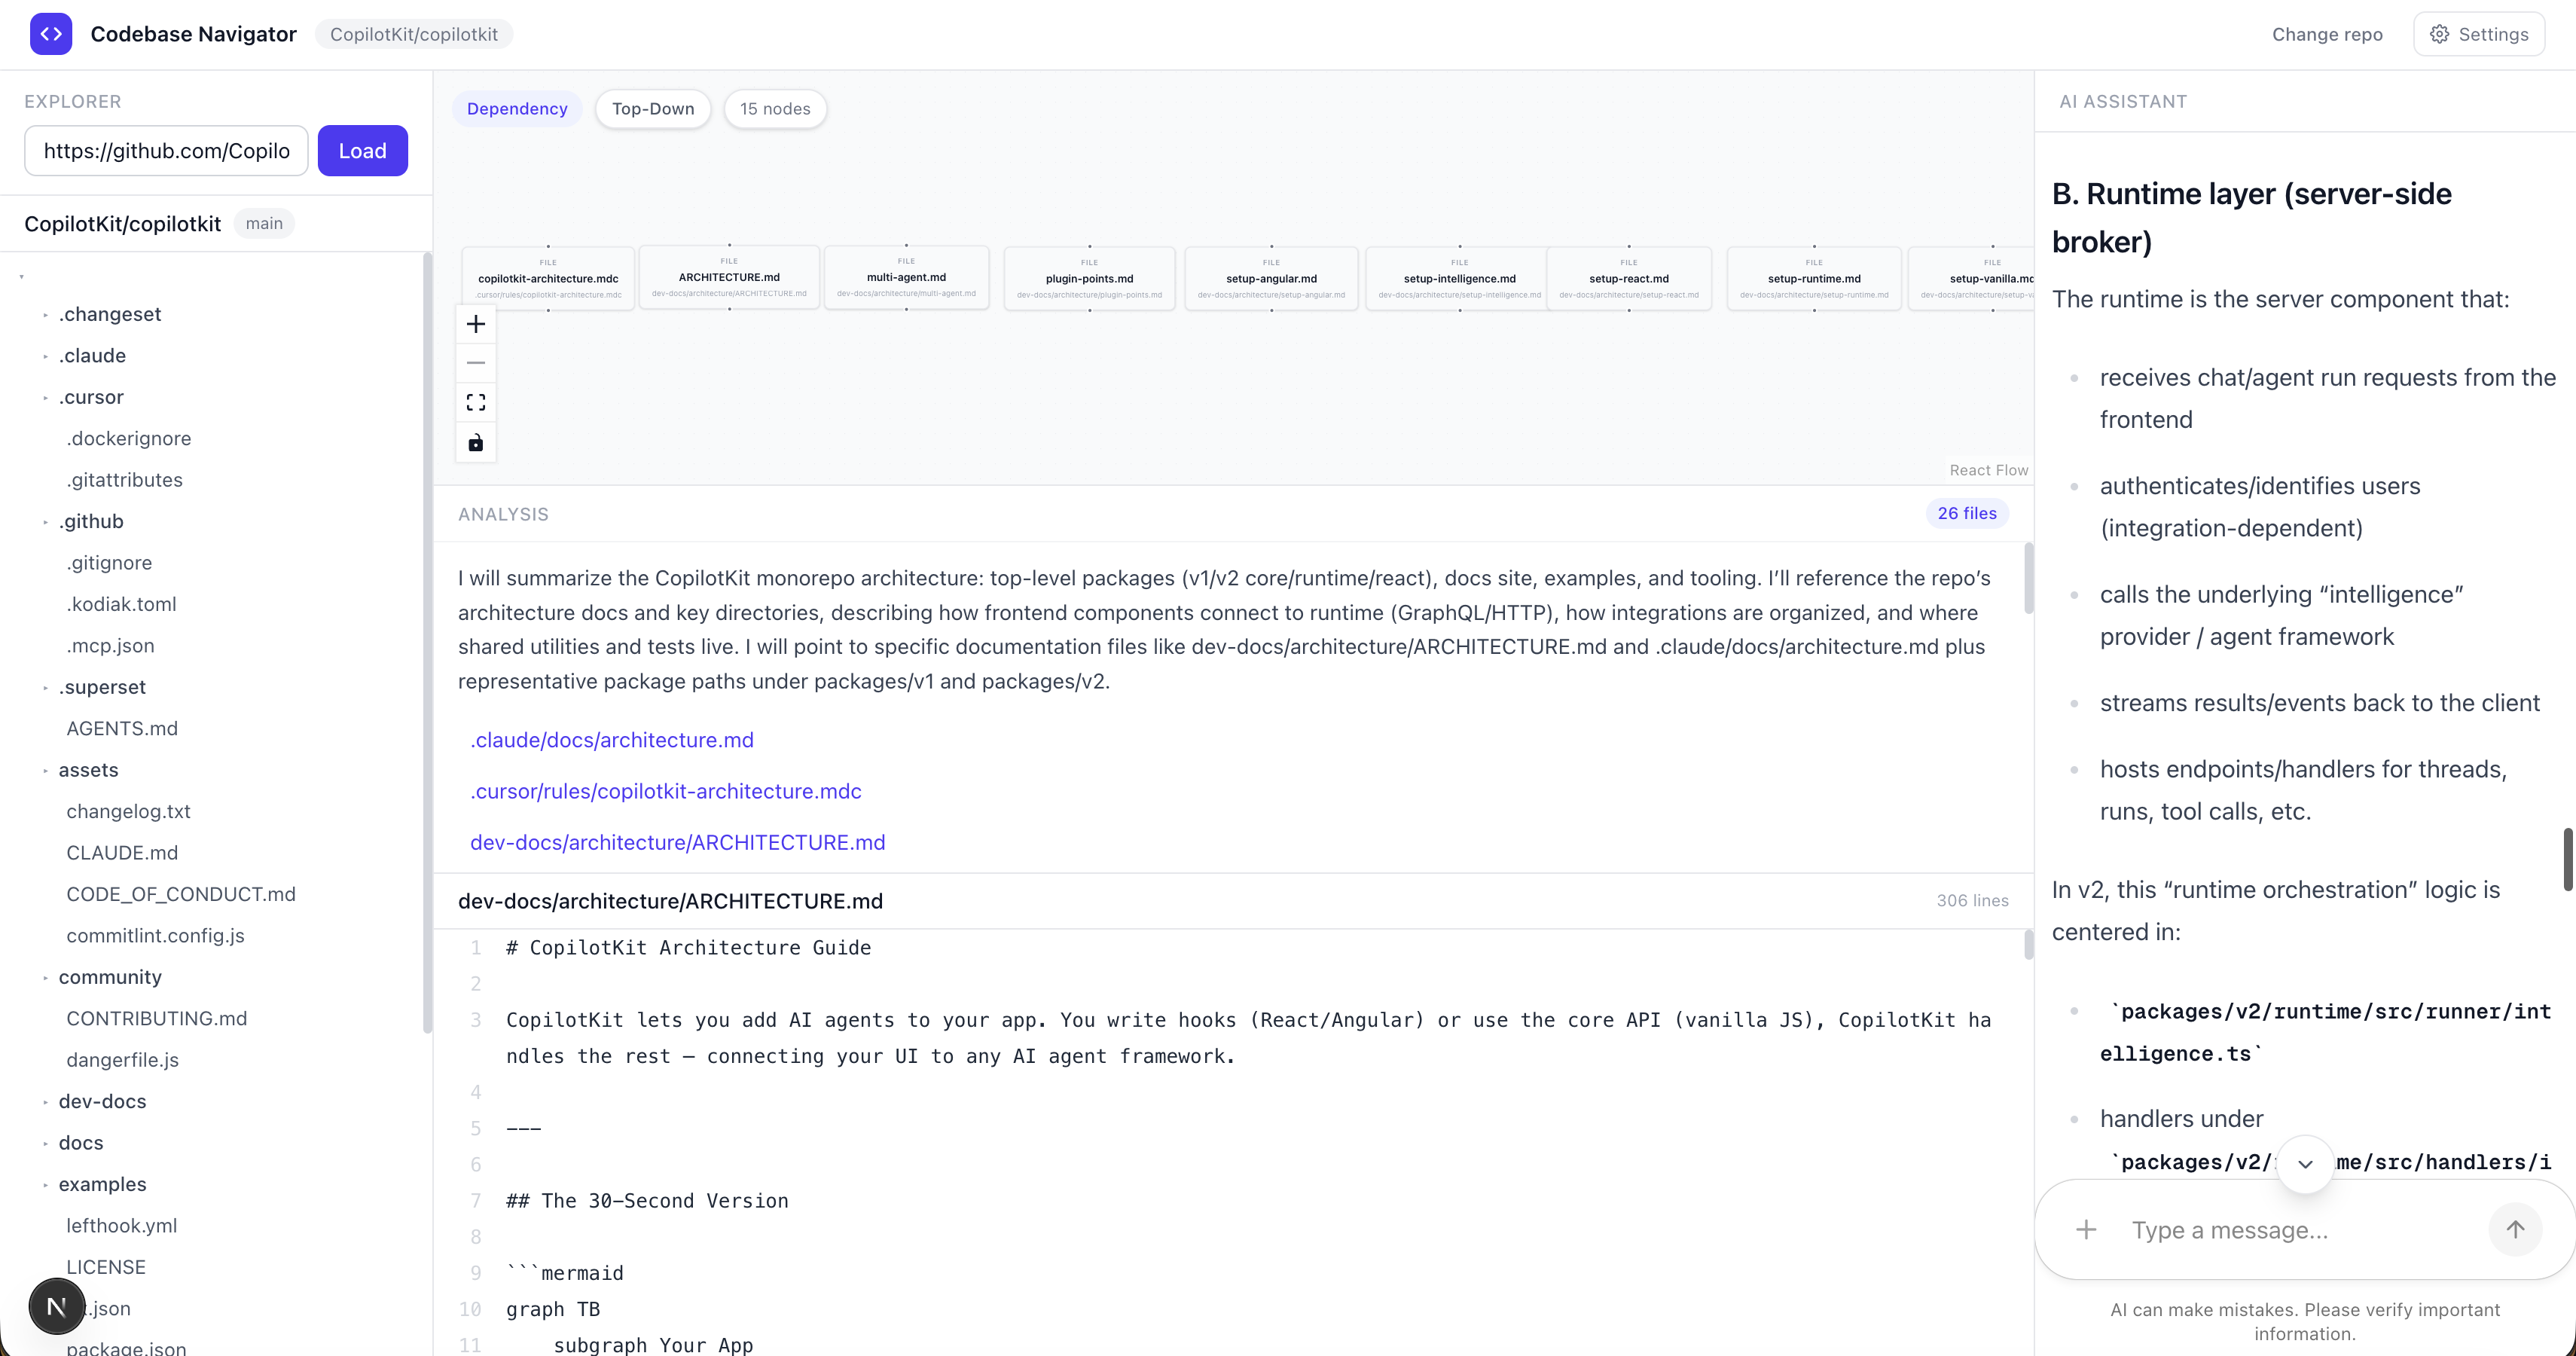
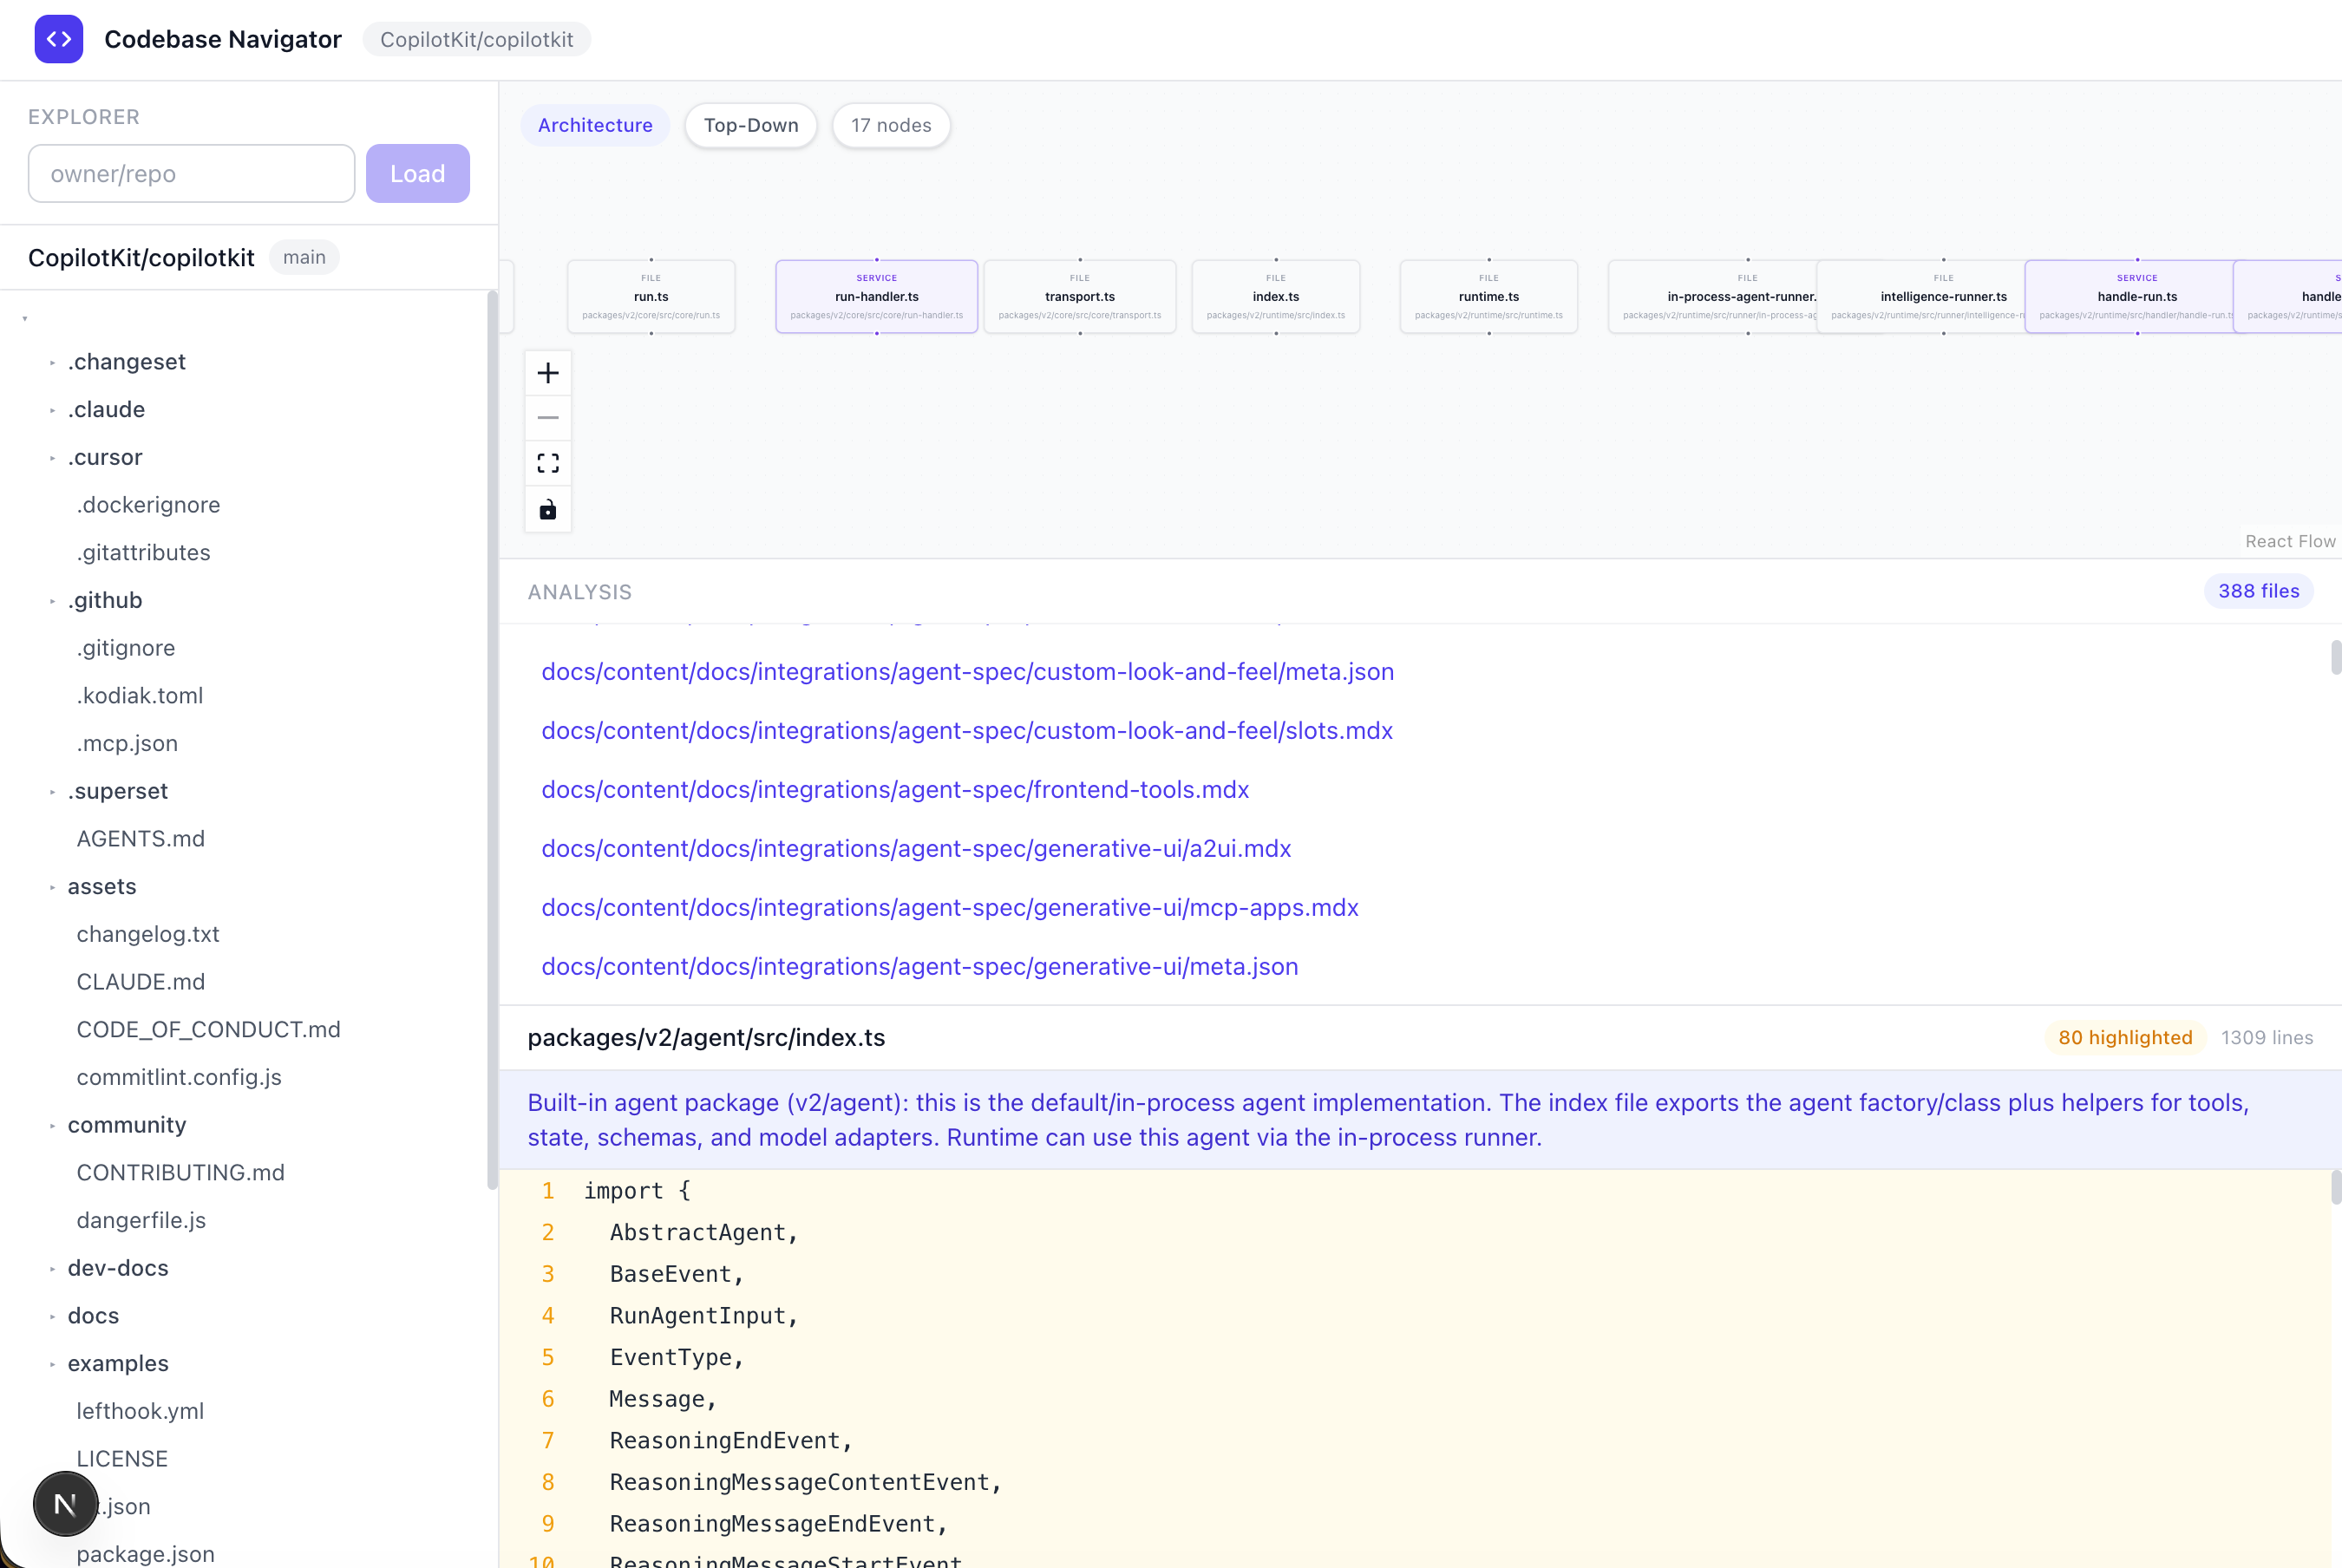
例如,我詢問了 v2 軟體包的架構。
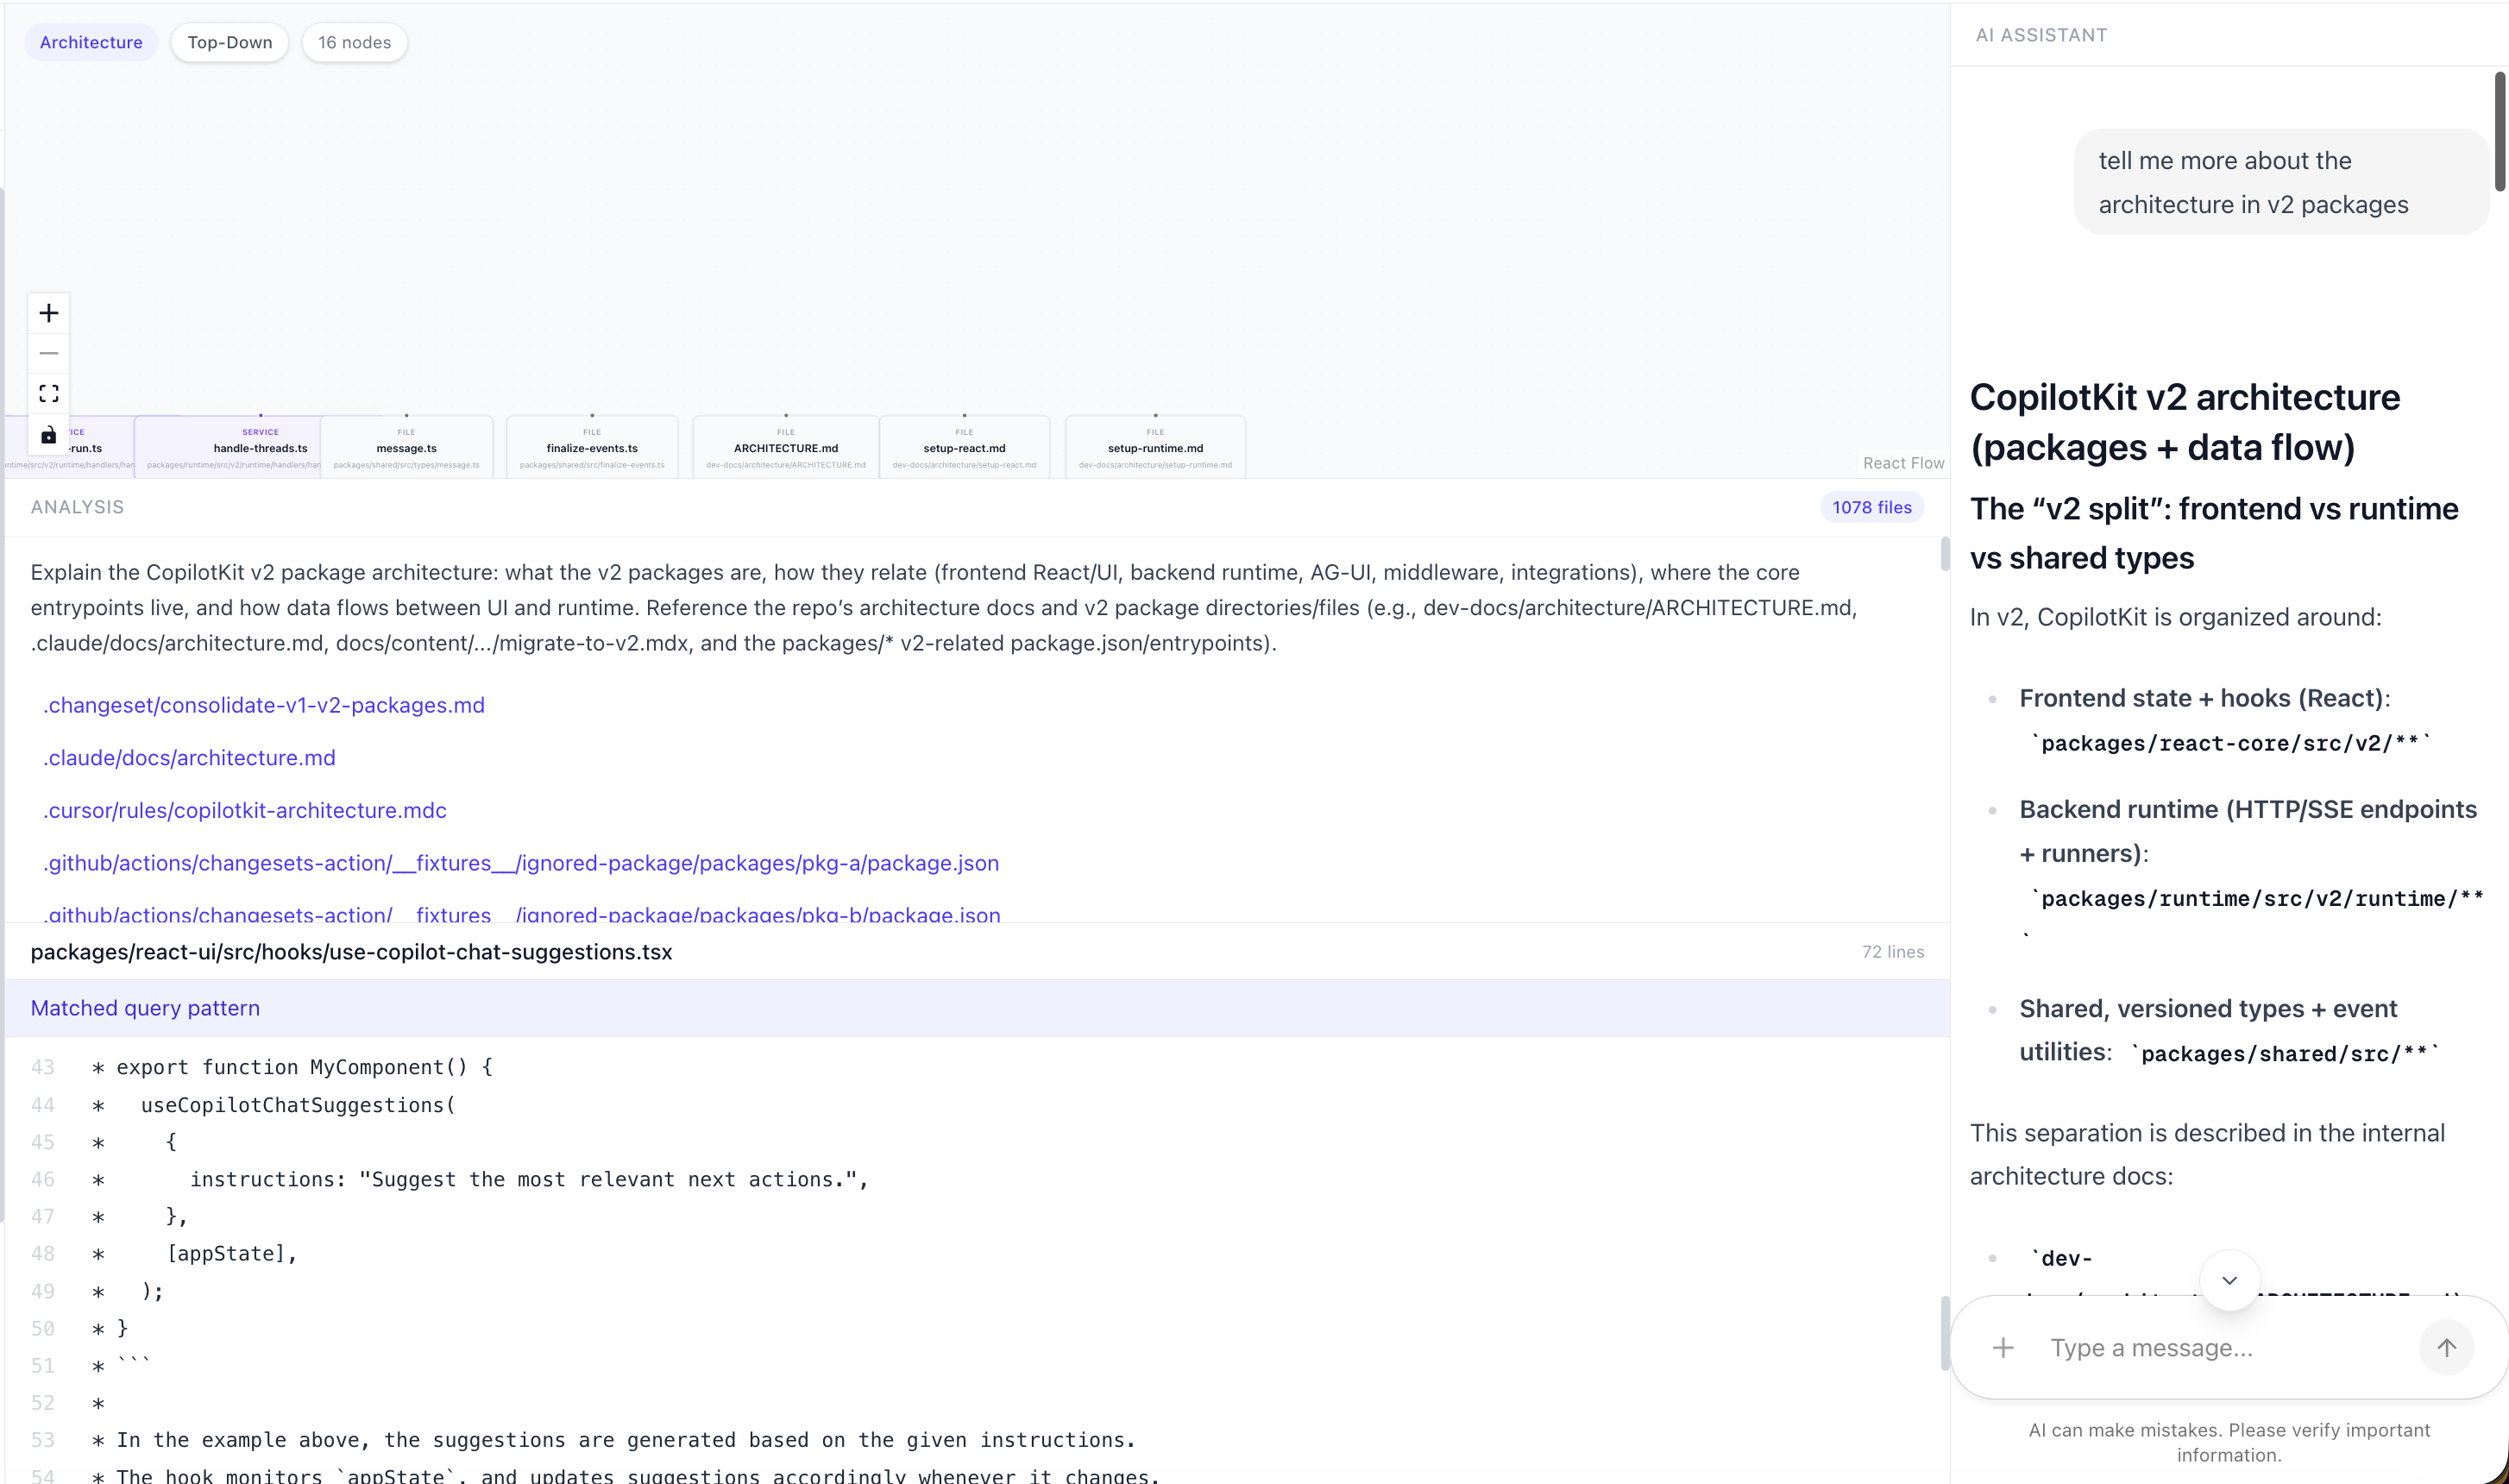
6. 尋找相關文件
當analyzeRepository收到類似「身份驗證是如何運作的?」的查詢時,它需要確定要實際查看哪些文件。這是由src/lib/analyzer.ts中的findFilesByQuery處理的。
它會檢查查詢是否與六個預定義類別之一匹配,每個類別都有一組關鍵字和檔案路徑模式:
const ANALYSIS_CATEGORIES = [
  {
    name: "authentication",
    keywords: ["auth", "login", "logout", "token", "jwt", "session", "oauth"],
    filePatterns: [/auth/i, /login/i, /session/i, /oauth/i, /jwt/i],
  },
  {
    name: "database",
    keywords: ["database", "db", "model", "schema", "prisma", "mongoose"],
    filePatterns: [/model/i, /schema/i, /migration/i, /prisma/i, /db/i],
  },
  // ... api, configuration, testing, styling
]
如果查詢符合某個類別,則使用該類別的正規表示式模式過濾所有檔案路徑。
如果沒有匹配項,它會將查詢拆分成單字條,並檢查是否存在包含這些詞條的檔案路徑。因此,即使是像「設定檔在哪裡」這樣模糊的查詢,也能找到檔案名稱中包含「config」的檔案。
這種方法刻意追求簡單。沒有嵌入,沒有向量搜尋,只用正規表示式來匹配檔案名稱。它之所以有效,是因為結構良好的專案中,檔案名稱通常都足夠描述性,匹配檔案名稱就能找到正確的檔案。
7. 文件緩存
每次工具取得檔案時,都會存取src/lib/fetch-file.ts ,該檔案維護一個 TTL 為 5 分鐘的記憶體快取:
const cache = new Map<string, { content: string; timestamp: number }>();
const CACHE_TTL = 5 * 60 * 1000; // 5 minutes

export async function fetchFile(owner, repo, path, ref) {
  const key = `${owner}/${repo}/${ref}/${path}`;
  const cached = cache.get(key);

  if (cached && Date.now() - cached.timestamp < CACHE_TTL) {
    return cached.content; // serve from cache
  }

  const res = await fetch(`/api/github/file?repo=...&path=...&ref=...`);
  const data = await res.json();
  cache.set(key, { content: data.content, timestamp: Date.now() });

  // LRU eviction: if over 200 items, drop the oldest 50
  if (cache.size > 200) {
    const oldest = [...cache.entries()].sort((a, b) => a[1].timestamp - b[1].timestamp);
    for (let i = 0; i < 50; i++) cache.delete(oldest[i][0]);
  }

  return data.content;
}這一點很重要,因為analyzeRepository一次最多會取得 15 個檔案。如果後續查詢也涉及相同的文件,則會直接存取緩存,而無需發出 15 個額外的 API 請求。
如果沒有 GitHub 令牌,您每小時只能發出 60 個請求,因此快取使得重複查詢快速且免費。
當快取超過 200 個條目時,快取也會清除最舊的條目,因此在長時間會話中,快取永遠不會無限增長。
8. 解析導入語句和解析路徑
一旦analyzeRepository取得了相關的檔案路徑,它就會取得每個檔案並解析其中的導入語句。處理此操作的兩個函數都位於src/lib/analyzer.ts中。
extractImports直接處理原始檔案內容,擷取所有導入語句,同時支援 ES6 和 CommonJS 語法:
export function extractImports(content: string): string[] {
  const imports: string[] = [];

  // ES6: import X from 'y' and import 'y'
  const esImports = content.matchAll(
    /(?:import\s+.*?\s+from\s+['"](.+?)['"]|import\s+['"](.+?)['"])/g
  );
  for (const match of esImports) imports.push(match[1] || match[2]);

  // CommonJS: require('y')
  const requires = content.matchAll(/require\s*\(\s*['"](.+?)['"]\s*\)/g);
  for (const match of requires) imports.push(match[1]);

  return imports;
}但是像"./utils"或"@/lib/github"這樣的原始導入字串還不是檔案路徑。
buildDependencyNodes會對每個依賴節點呼叫resolveImportPath函數,將它們轉換為倉庫中實際存在的路徑:
function resolveImportPath(importPath, fromFile, filePathSet) {
  // Skip npm packages (no ./ or @/)
  if (!importPath.startsWith(".") && !importPath.startsWith("@/")) return null;

  // Resolve @/ alias to src/
  if (importPath.startsWith("@/")) {
    resolved = "src/" + importPath.slice(2);
  }

  // Try with common extensions: .ts, .tsx, .js, /index.ts, etc.
  const extensions = ["", ".ts", ".tsx", ".js", ".jsx", "/index.ts", "/index.tsx"];
  for (const ext of extensions) {
    if (filePathSet.has(resolved + ext)) return resolved + ext;
  }
  return null;
}由於像react或zod這樣的 npm 套件不以./或@/開頭,因此會被立即跳過。對於本機匯入,它會嘗試常見的副檔名,例如.ts 、 .tsx和/index.ts ,因此它既可以處理直接檔案匯入,也可以處理透過索引檔案匯出的資料夾。
如果解析後的路徑在倉庫中不存在,則傳回 null,並且不會建立任何邊。這確保了圖的完整性。
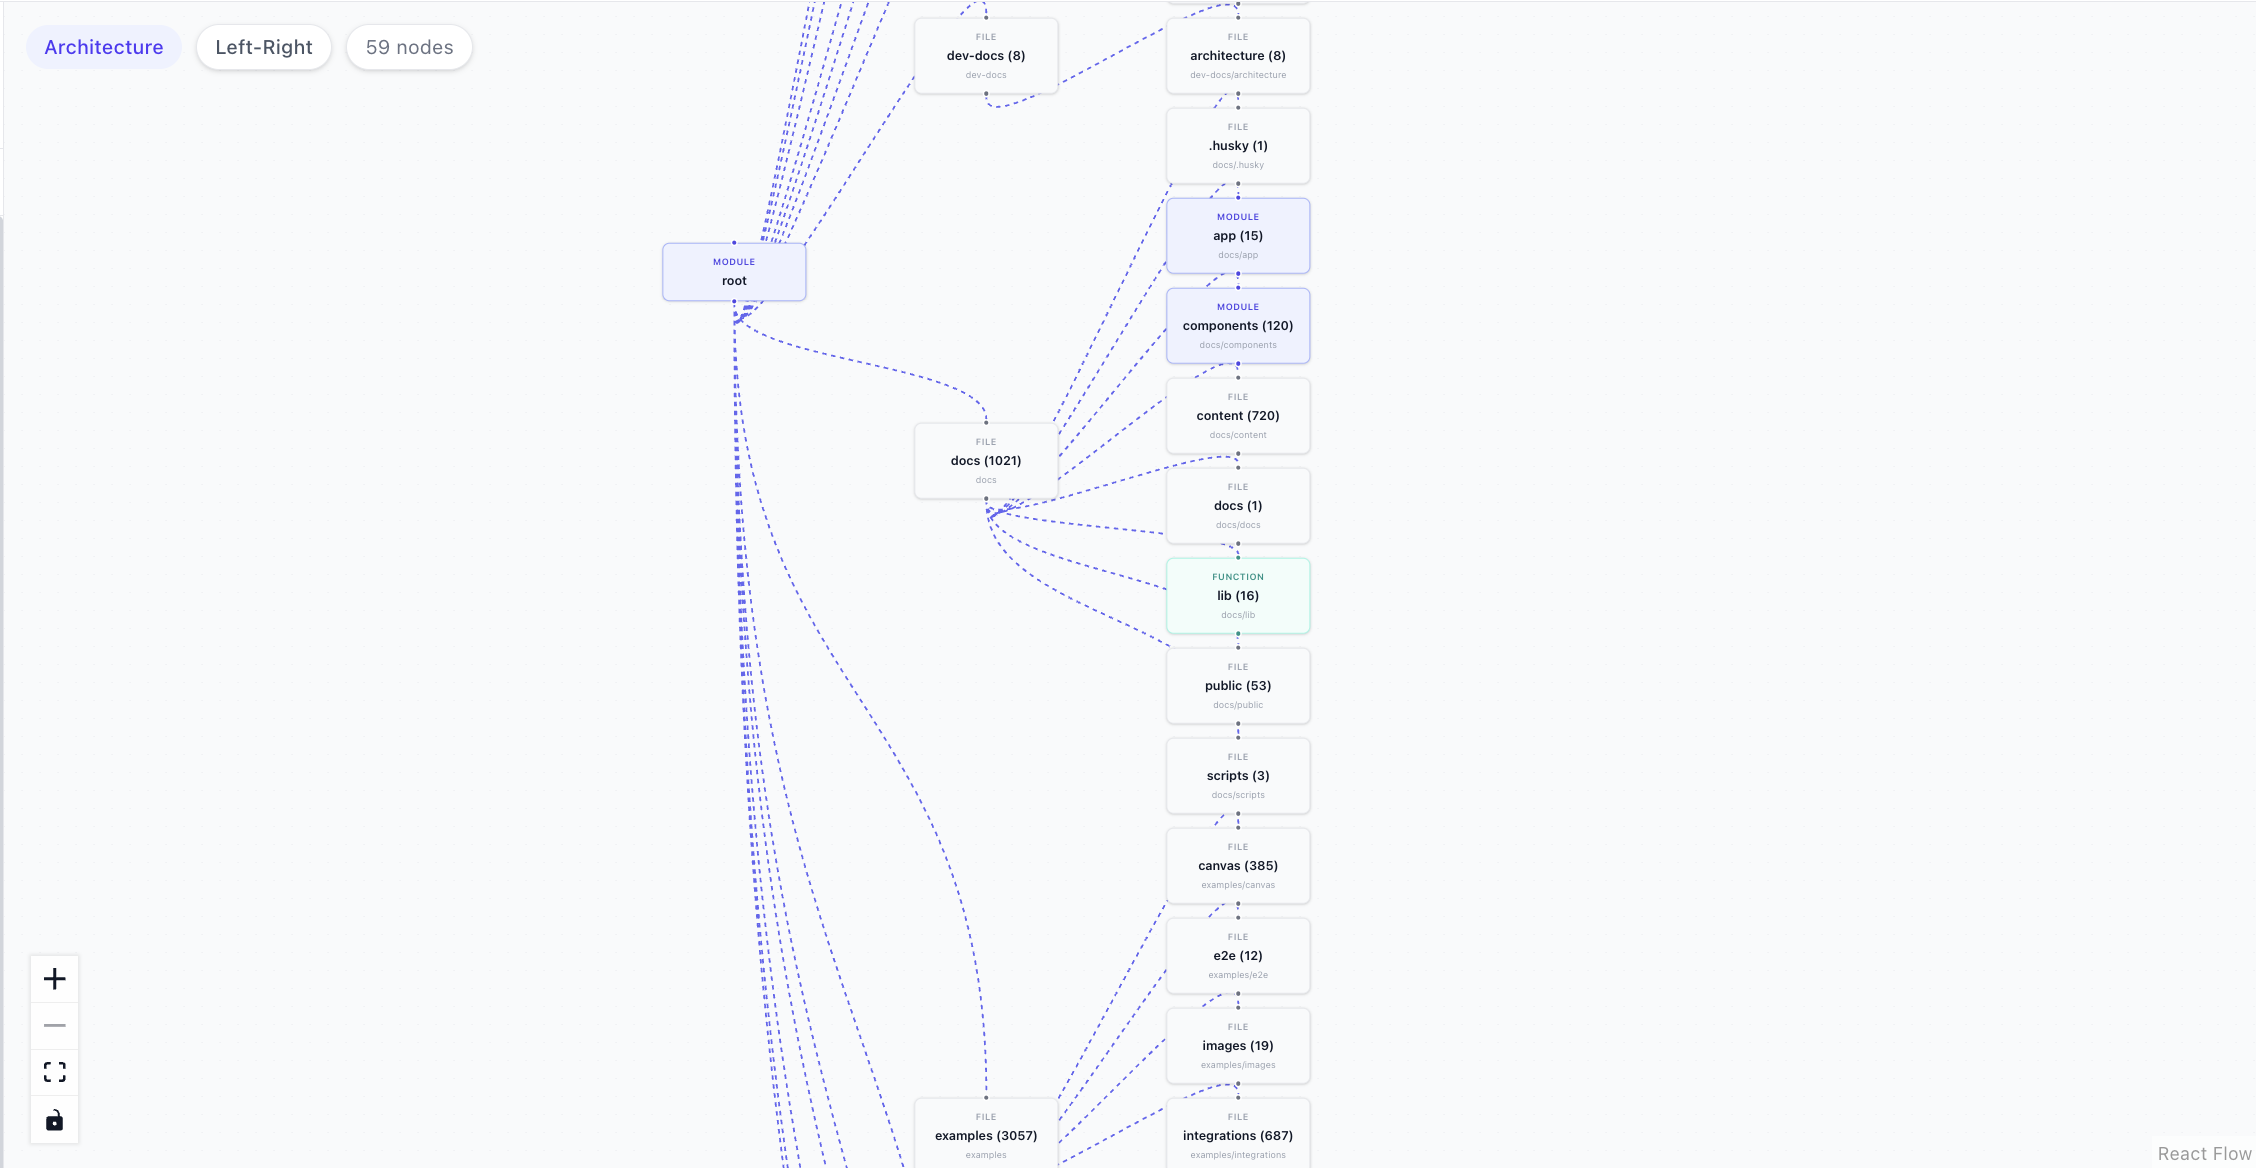
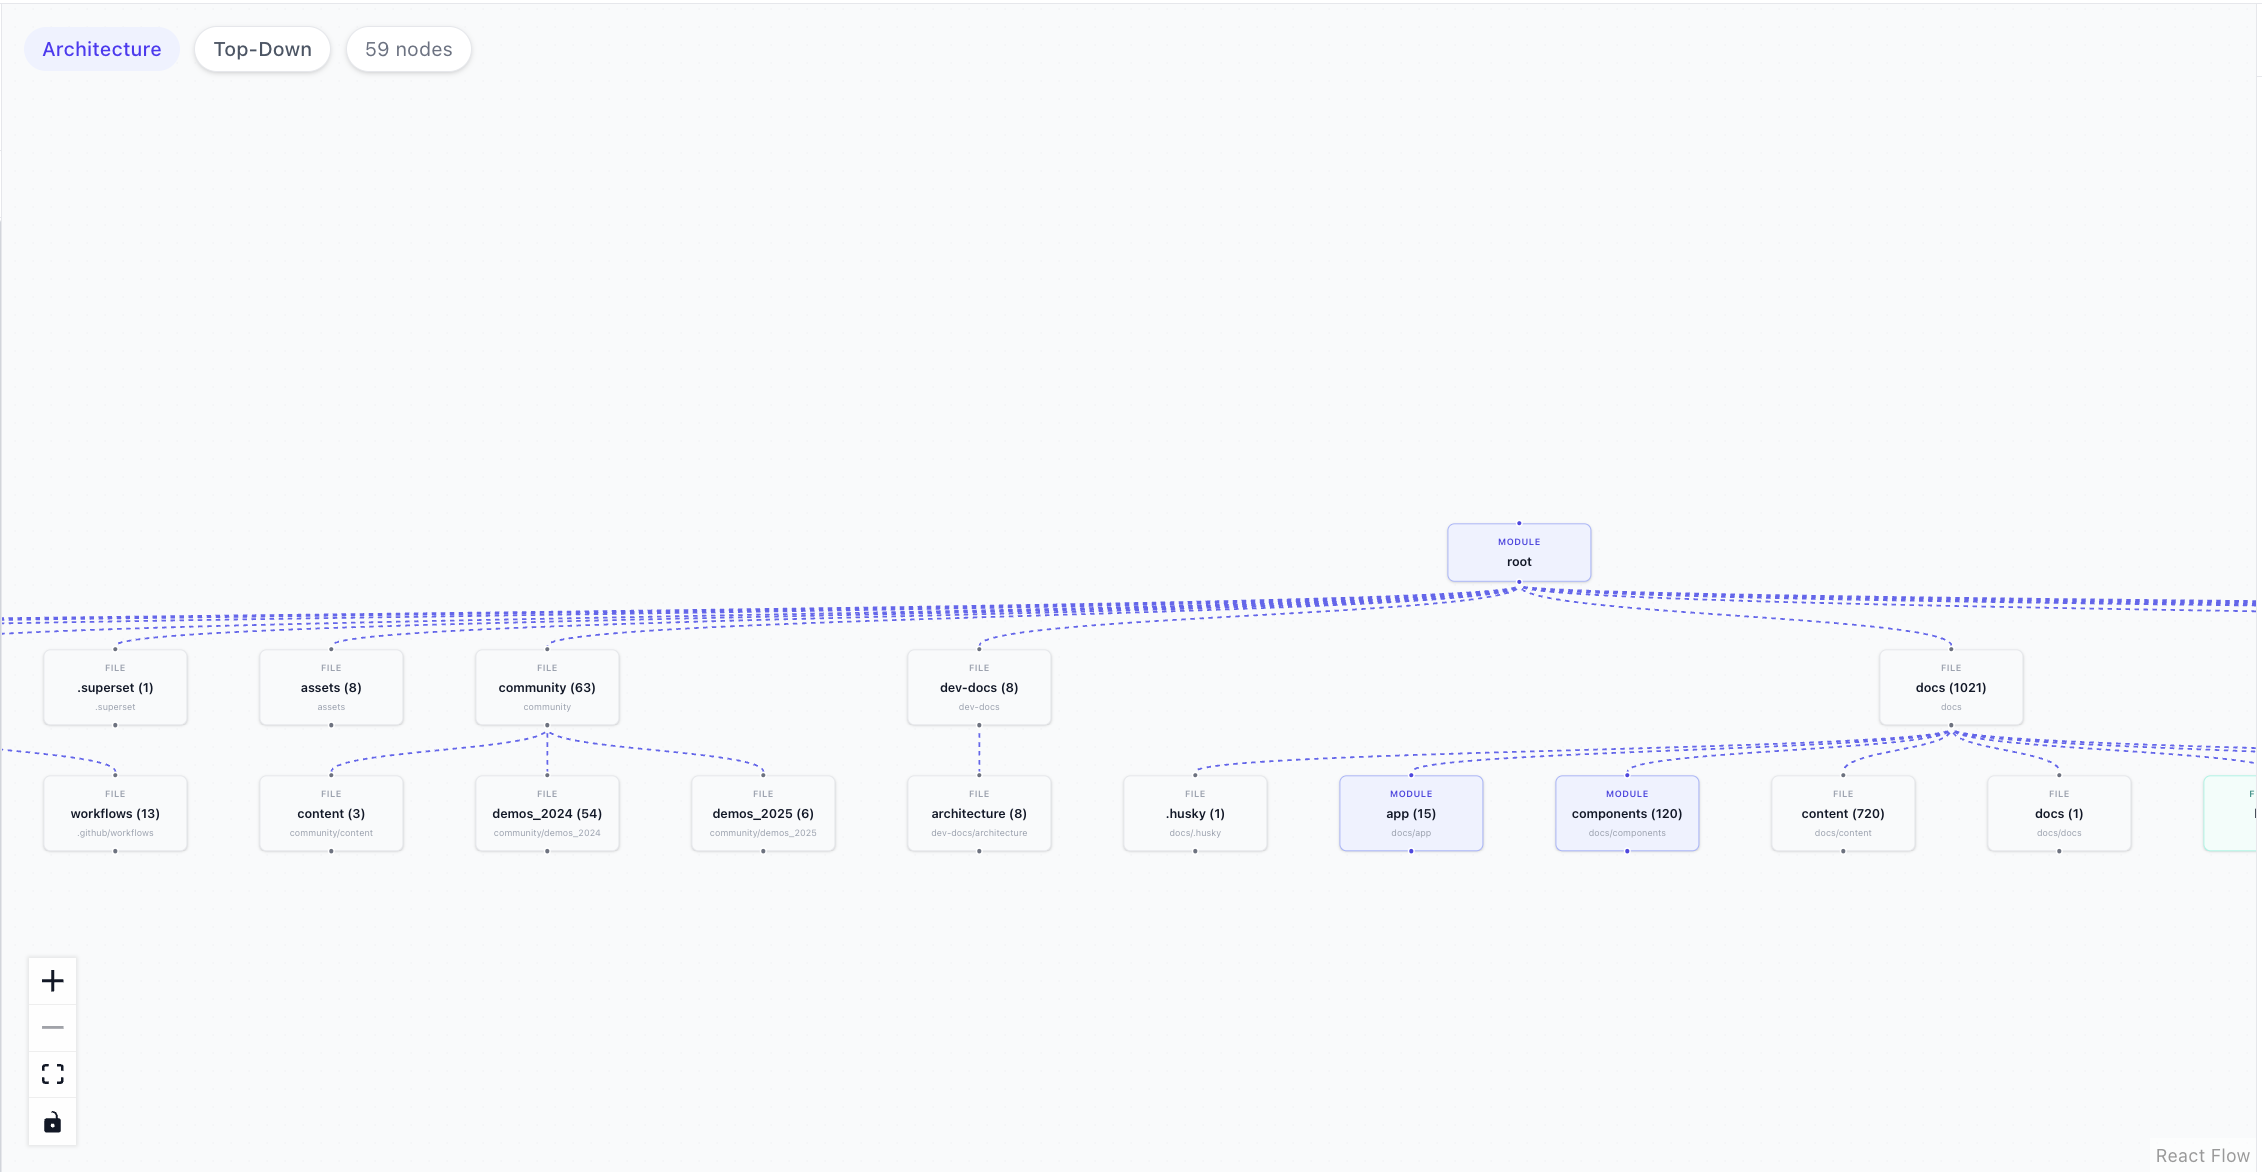
9. 使用 Dagre 進行圖表佈局
節點和邊建置完成後,需要它們在螢幕上的實際位置,React Flow 才能渲染它們。這就是src/lib/graph-layout.ts中的applyDagreLayout所做的。
它使用Dagre ,這是一個 JavaScript 庫,可以自動計算有向圖中每個節點的 x 和 y 座標,從而避免節點重疊,所有操作都在客戶端完成,無需伺服器端支援:
export function applyDagreLayout(nodes, edges, options = {}) {
  const g = new dagre.graphlib.Graph();
  g.setGraph({ rankdir: "TB", ranksep: 80, nodesep: 40 });

  // Tell dagre the size of each node
  for (const node of nodes) {
    g.setNode(node.id, { width: 200, height: 60 });
  }
  for (const edge of edges) {
    g.setEdge(edge.source, edge.target);
  }

  dagre.layout(g); // dagre calculates x,y for every node

  return nodes.map((node) => {
    const pos = g.node(node.id);
    return { ...node, position: { x: pos.x - 100, y: pos.y - 30 } };
  });
}
可以透過使用者介面在從上到下 ( TB ) 和從左到右 ( LR ) 之間切換方向。
每個節點類型都映射到一個 React Flow 元件,該元件基於先前分配的檔案類型categorizeFileType :
-
module/service→ModuleNode(indigo) -
function→FunctionNode(青色) -
file→FileNode(灰色)
10. 使用 Zustand 進行狀態管理
四個面板保持同步,因為它們都讀取位於src/store/index.ts中的同一個 Zustand 儲存。該儲存有四個切片,每個切片對應一個主要關注點:
interface AppState {
  repo: {
    repoInfo: RepoInfo | null;   // owner, repo, branch
    tree: TreeNode | null;        // full file tree
    selectedFile: string | null;  // active file path
    loading: boolean;
    error: string | null;
  };
  analysis: {
    result: AnalysisResult | null; // explanation + relevant files + graph
    loading: boolean;
    error: string | null;
  };
  visualization: {
    nodes: FlowNode[];
    edges: FlowEdge[];
    graphType: "dependency" | "flow" | "architecture" | null;
  };
  codeViewer: {
    filePath: string | null;
    content: string | null;
    highlightedLines: number[];
    explanation: string | null;
  };
}每個面板都使用類似useAppStore((s) => s.visualization)的選擇器來訂閱它所需的切片。
因此,當工具呼叫setVisualization時,只有圖表面板會重新渲染。當setCodeViewer觸發時,只有程式碼檢視器會更新,其他部分都不會改變。
諸如LLM提供者、API金鑰和模型之類的設定儲存在單獨的SettingsState儲存中。它會同步到兩個地方:
-
localStorage可以讓瀏覽器在重新載入後記住你的設定。 -
一個 httpOnly cookie,這樣伺服器端的
/api/copilotkit路由就可以讀取它們,而無需在請求頭中出現 API 金鑰。
這就是所有底層運作原理。現在是時候在本地執行一下了。
本地執行
複製 GitHub 倉庫並安裝相依性。
git clone <repo-url>
cd codebase-navigator
npm install
npm run dev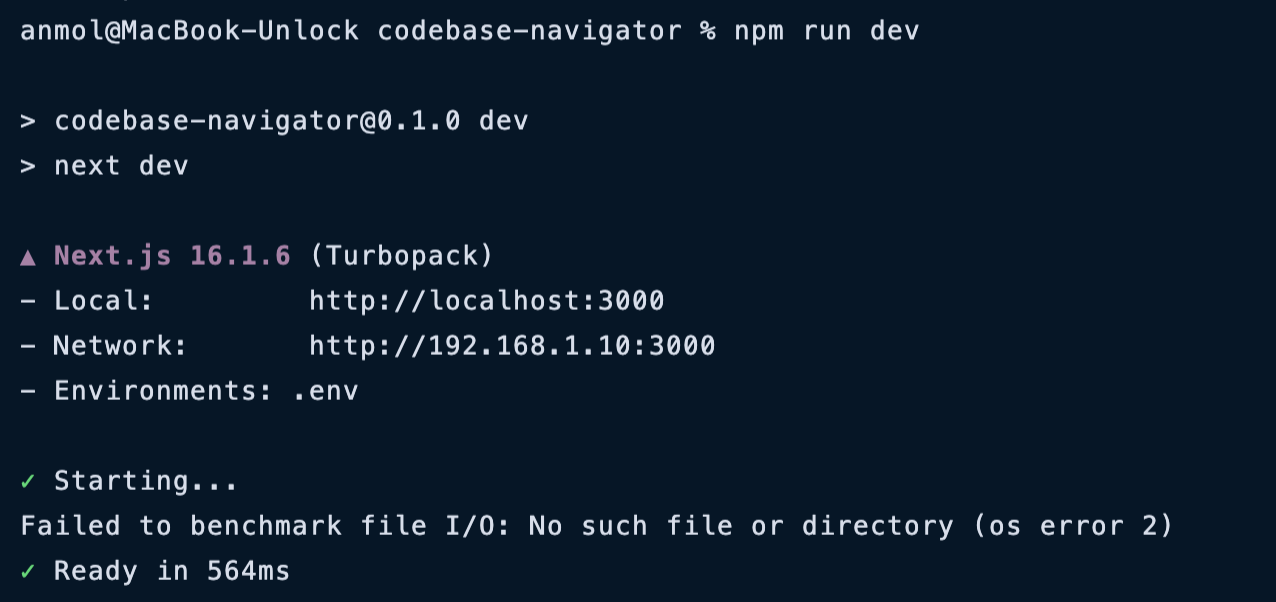
開啟http://localhost:3000即可在瀏覽器中查看即時畫面。以下是如何設定各個服務提供者。
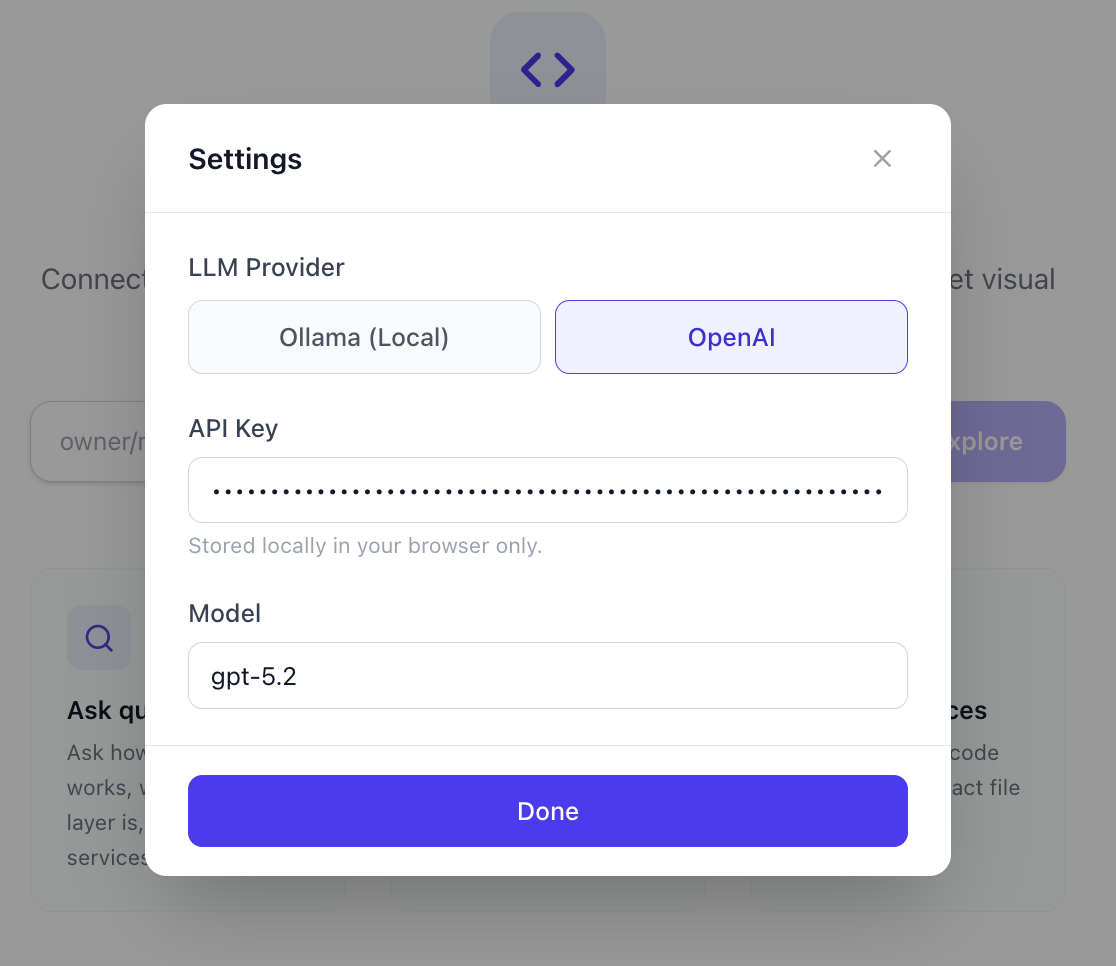
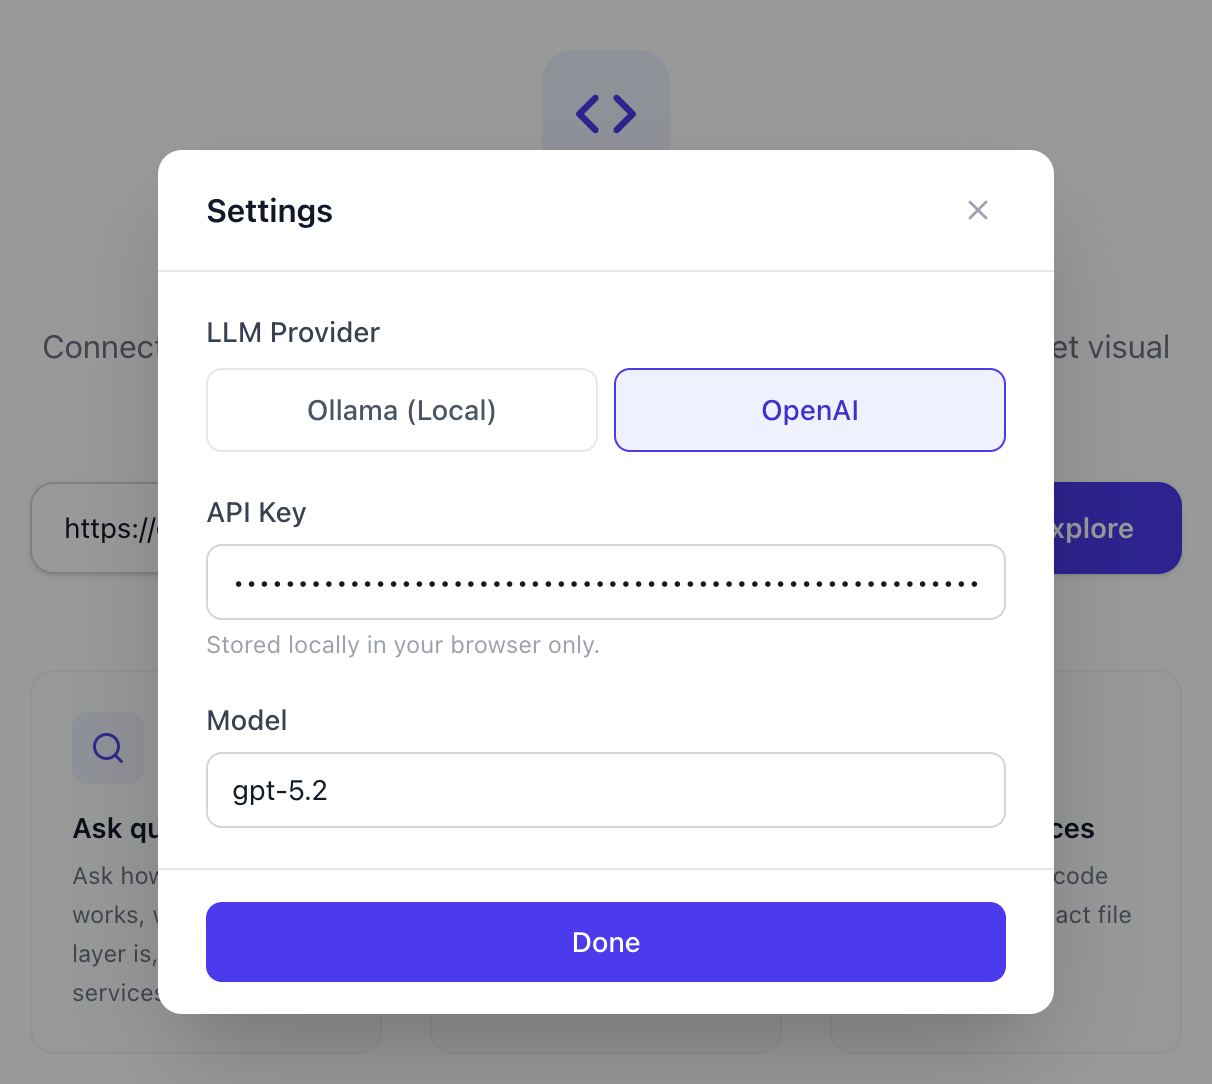
使用 OpenAI
您需要一個OpenAI API 金鑰。然後點擊右上角的設定圖標,將提供者切換到 OpenAI,貼上您的 API 金鑰,然後選擇一個模型,例如gpt-5.2 。就這麼簡單。
使用 Ollama(免費,本地執行)
您可以從ollama.com下載,或根據您使用的作業系統透過以下命令進行安裝。
brew install ollama #macOS
curl -fsSL https://ollama.com/install.sh | sh #linux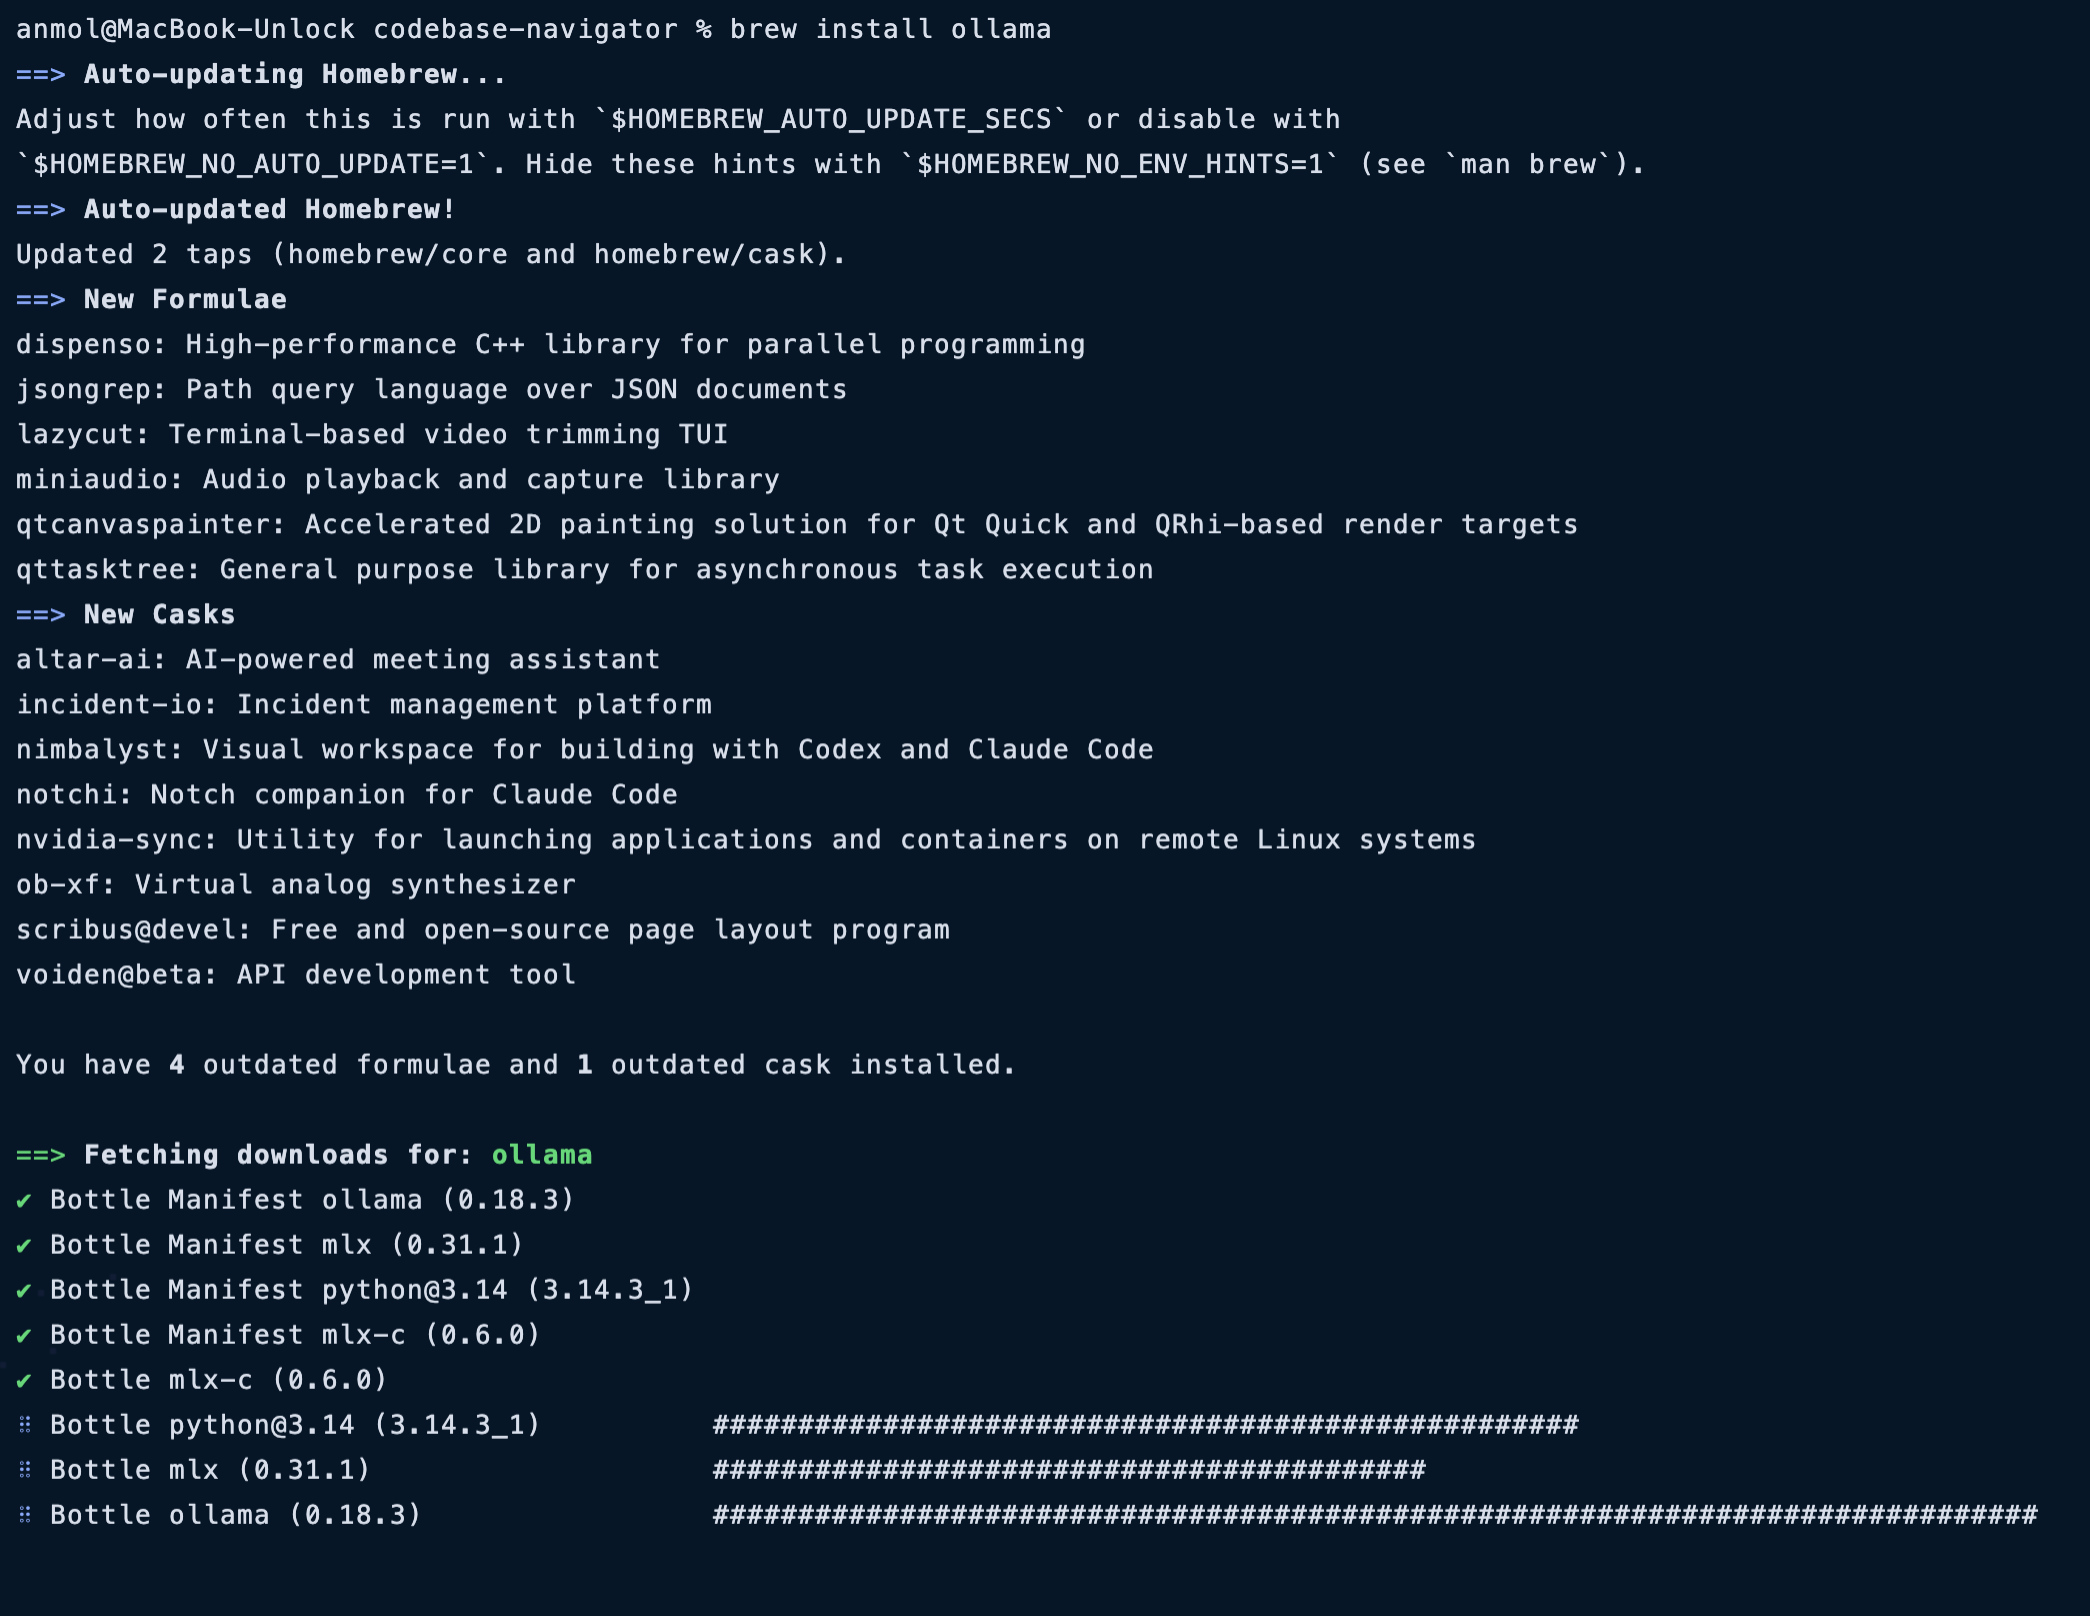
然後拉取模型並啟動伺服器:
ollama serve
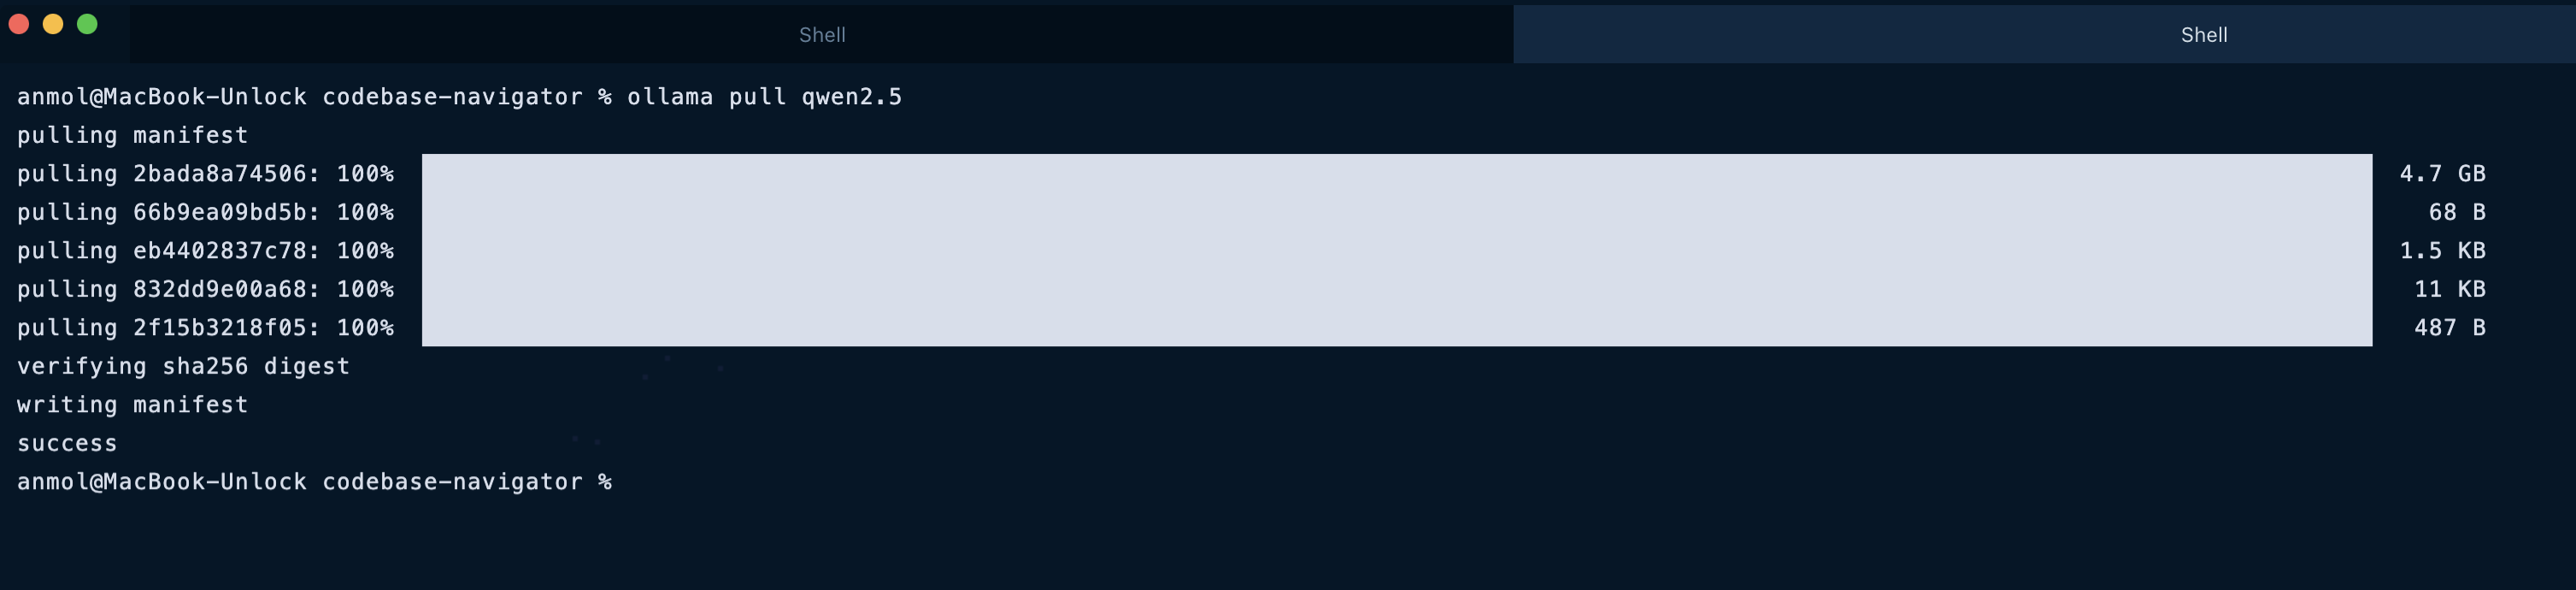
ollama pull qwen2.5 # in another terminal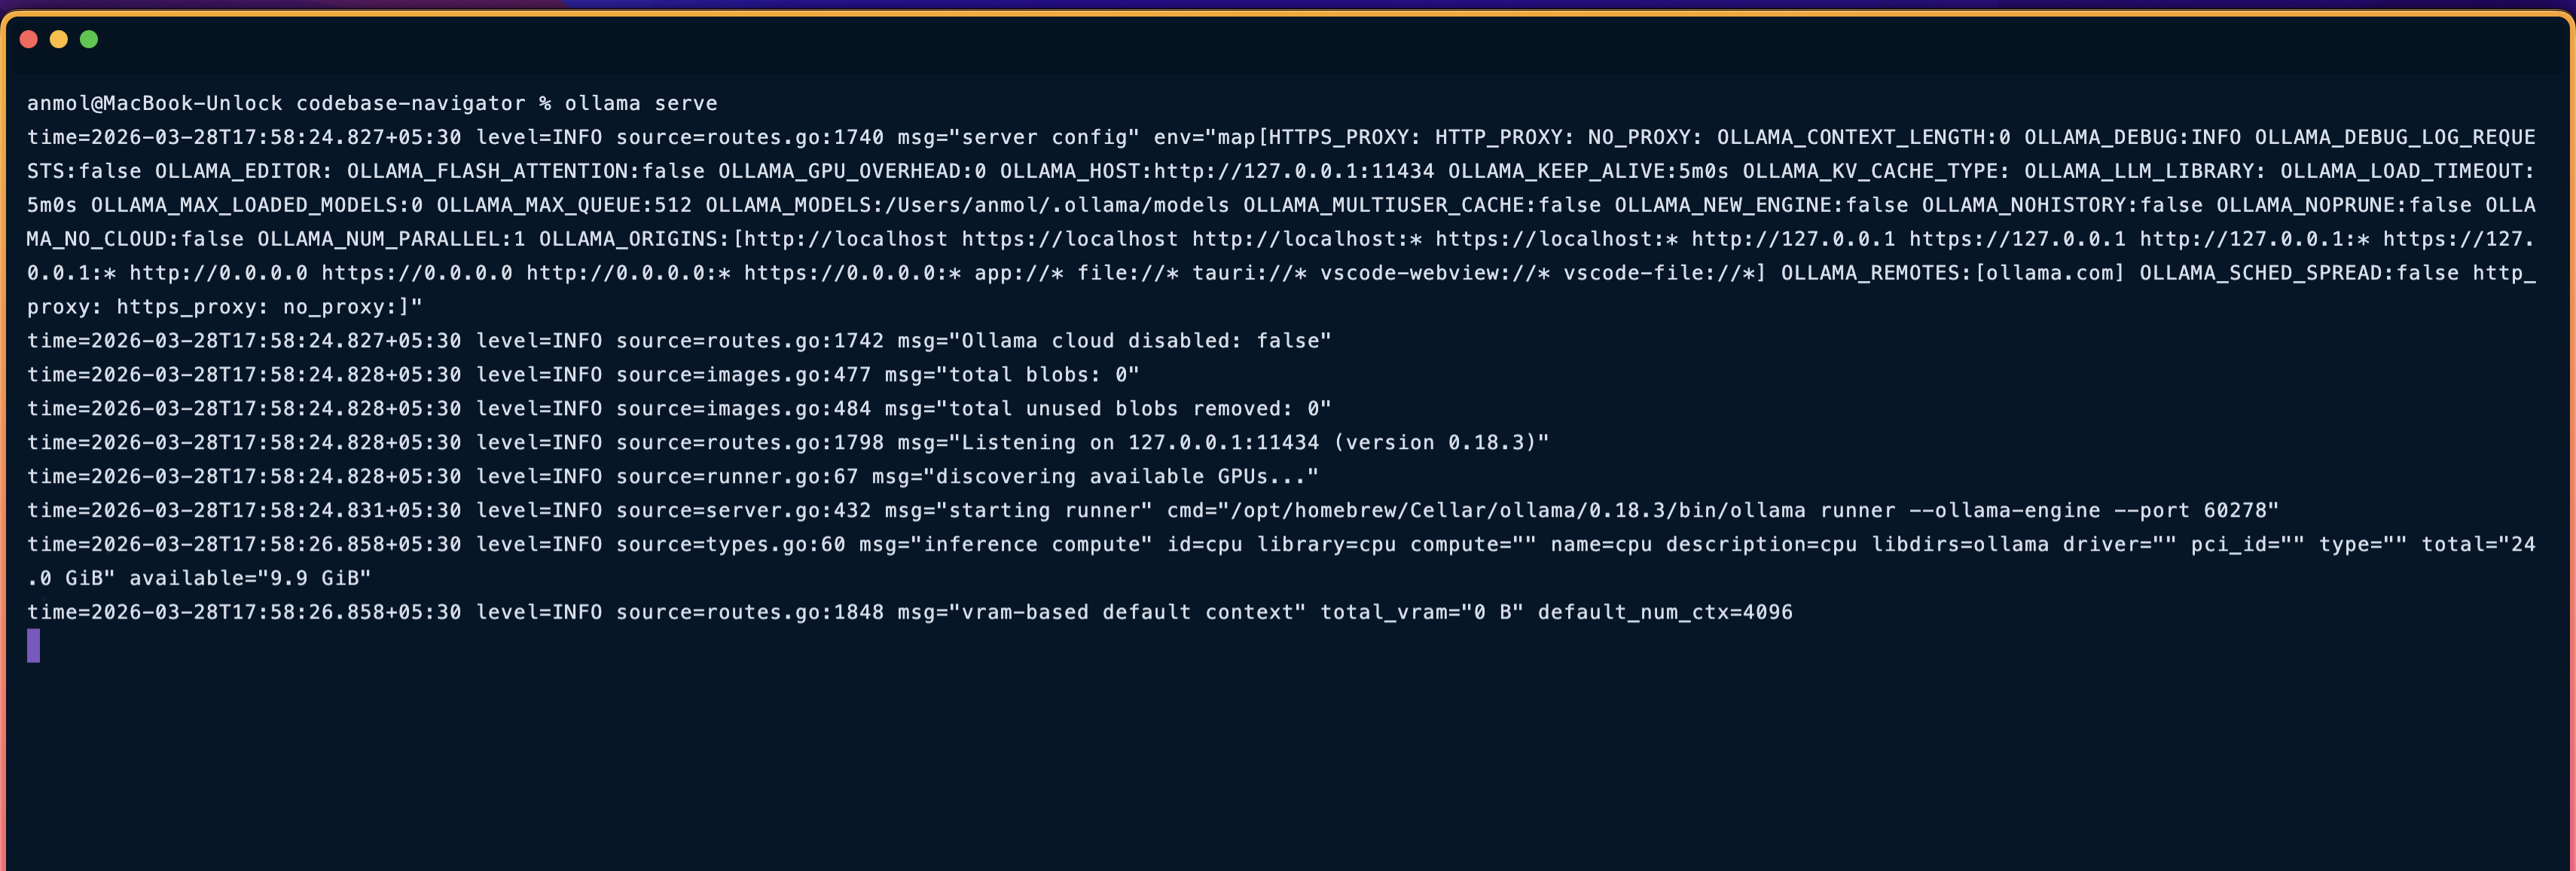
該應用程式預設指向 Ollama 伺服器,因此無需進行其他變更。只要開啟http://localhost:3000即可。
對於 GitHub,公共倉庫無需令牌即可工作(唯一的限制是每小時 60 次請求)。若要提高請求限制,請在.env.local檔案中新增GITHUB_TOKEN :
GITHUB_TOKEN=your_token_here我用 CopilotKit GitHub 倉庫試了一下,它立刻繪製出了整個倉庫結構。
我問它:“告訴我一些關於建築的知識”,它回答說:
-
一張圖表,展示了所有相關文件透過實際導入連接起來的情況
-
用簡單易懂的語言解釋每個檔案的功能
-
從 GitHub 即時取得的原始程式碼
-
詳細的聊天回复,我可以繼續跟進。
我嘗試了一些比較難懂和比較模糊的問題,它都回答了。
大局觀
這個專案的緣起是將三個想法結合起來,看看會發生什麼。
GitHub 是資料來源,而不僅僅是託管平台。人工智慧引用的每個文件都會即時取得、解析並立即進行推理。沒有臆想,也沒有憑記憶猜測。
CopilotKit 改變了 AI 在瀏覽器中的實際操作方式。它不再回復文本,而是呼叫工具直接更新狀態。圖表隨之改變,程式碼檢視器開啟。 AI 不再描述它發現的內容,而是直接展示給你。
依賴關係是真實存在的。很多工具繪製的圖表看起來很厲害,但其實毫無意義。這裡的每一條邊都存在,因為一個檔案確實包含指向另一個檔案的導入語句。僅此而已。
將這三者結合起來,你就能得到一個真正理解程式碼庫而不是只搜尋程式碼庫的工具。
這裡還有很多可以擴展的功能:PR差異分析、多倉庫對比、安全審計模式等等。但作為理解任何程式碼庫的起點,它已經完全滿足了需求。
請在評論區告訴我你的想法!
您可以透過GitHub 、 Twitter和LinkedIn與我聯繫。
在Twitter上關注 CopilotKit 並打個招呼,如果你想開發一些很酷的東西,請加入Discord社群。
原文出處:https://dev.to/copilotkit/google-maps-for-codebases-paste-a-github-url-ask-anything-3hk8
1) --- 會變成分隔線(上一行必須是空白)
2) # 會變成一級標題
3) ## 會變成二級標題
4) ### 會變成三級標題
5) **粗體文字**會顯示粗體文字
6) ```當第一行與最後一行會顯示程式碼
7) 請搜尋 Markdown 語法,了解各種格式