🔧 阿川の電商水電行

總結
在本文中,我們將建立一個 Next.js 應用程式,該應用程式與 Notion API 整合以管理使用者資料庫並使用CopilotKit與這些資料進行互動。
在本文結束時,您將了解如何:
-
設定伺服器操作以取得使用者的 Notion 資料庫。
-
使用CopilotKit查詢資料庫實現聊天功能。
-
使用CopilotKit直接在聊天中編輯使用者的 Notion 資料庫。
此外,我們還將探索在 Next.js 專案的環境變數中實作類型安全的方法。 👀

什麼是 CopilotKit
CopilotKit是領先的開源框架,用於將可投入生產的 AI 驅動副駕駛整合到您的應用程式中。它提供了功能豐富的 SDK ,支援各種 AI 副駕駛用例,包括情境感知、副駕駛動作和生成 UI 。

這意味著您可以專注於定義副駕駛的角色,而不是陷入從頭開始建立或處理複雜整合的技術問題。
{% cta https://github.com/CopilotKit/CopilotKit %} 查看 CopilotKit 的 GitHub ⭐️ {% endcta %}
設定專案
首先,使用以下命令初始化 Next.js 專案:
ℹ️您可以使用任何您選擇的套件管理器。在這裡,我將使用 npm。
npx create-next-app@latest copilotkit-with-notion-api --typescript --tailwind --eslint --app --use-npm
導航到專案目錄:
cd copilotkit-with-notion-api
安裝依賴項
我們需要幾個依賴項。執行此命令來安裝我們的專案所需的所有依賴項:
npm install @copilotkit/react-core @copilotkit/react-ui @copilotkit/runtime @notionhq/client @t3-oss/env-nextjs openai zod
為了獲得更好的編碼體驗,請安裝以下開發依賴項:
npm i --save-dev prettier-plugin-organize-imports prettier-plugin-package prettier-plugin-tailwindcss
配置 Prettier
現在 Prettier 已經安裝,讓我們根據我們的偏好進行配置。在專案根目錄中建立一個.prettierrc文件,其設定如下:
// 👇 .prettierrc
{
    "arrowParens": "avoid",
    "printWidth": 80,
    "semi": false,
    "singleQuote": true,
    "jsxSingleQuote": true,
    "trailingComma": "all",
    "proseWrap": "always",
    "tabWidth": 2,
    "plugins": [
        "prettier-plugin-tailwindcss",
        "prettier-plugin-organize-imports",
        "prettier-plugin-package"
    ]
}
請隨意調整這些規則以適合您的喜好。
設定Shadcn UI
對於可立即使用的 UI 元件集合,我們將使用shadcn/ui 。透過執行以下命令使用預設設定進行初始化:
npx shadcn@latest init -d
新增類型安全的環境變數
為了管理環境變數,我們將超越典型的.env設定並使用 TypeScript 實作類型安全性。這確保了應用程式不會在所有必需變數均未正確定義的情況下執行。
為此,我們將使用@t3-oss/env-nextjs庫和zod模式驗證庫。
建立一個新檔案lib/env.ts內容如下:
// 👇 lib/env.ts

import { createEnv } from '@t3-oss/env-nextjs'
import { z } from 'zod'

export const env = createEnv({
  /*
   * Serverside Environment variables, not available on the client.
   * Will throw if you access these variables on the client.
   */
  server: {
    NOTION_SECRET_API_KEY: z.string().min(1),
    NOTION_DB_ID: z.string().min(1),
    OPENAI_API_KEY: z.string().min(1),
  },
  /*
   * Environment variables available on the client (and server).
   *
   * 💡 You'll get type errors if these are not prefixed with NEXT_PUBLIC_.
   */
  client: {},
  /*
   * Due to how Next.js bundles environment variables on Edge and Client,
   * we need to manually destructure them to make sure all are included in bundle.
   *
   * 💡 You'll get type errors if not all variables from `server` & `client` are included here.
   */
  runtimeEnv: {
    NOTION_SECRET_API_KEY: process.env.NOTION_SECRET_API_KEY,
    NOTION_DB_ID: process.env.NOTION_DB_ID,
    OPENAI_API_KEY: process.env.OPENAI_API_KEY,
  },
})
這種方法在執行時驗證環境變數。如果任何必需的變數缺失或無效,應用程式將無法啟動。
您可能已經猜到了,所有這些env變數都必須在.env檔案中定義。這包括 Notion API 金鑰,最重要的是 OpenAI API 金鑰。
現在,只需使用您的 OpenAI API 金鑰填充.env檔:
OPENAI_API_KEY=<YOUR-OPENAI-API-KEY>
設定 Notion
要使用 Notion API,我們首先需要設定 Notion 整合。
建立新集成
存取notion.so/my-integrations並建立一個新的整合。提供名稱、選擇工作區並記下內部整合機密。
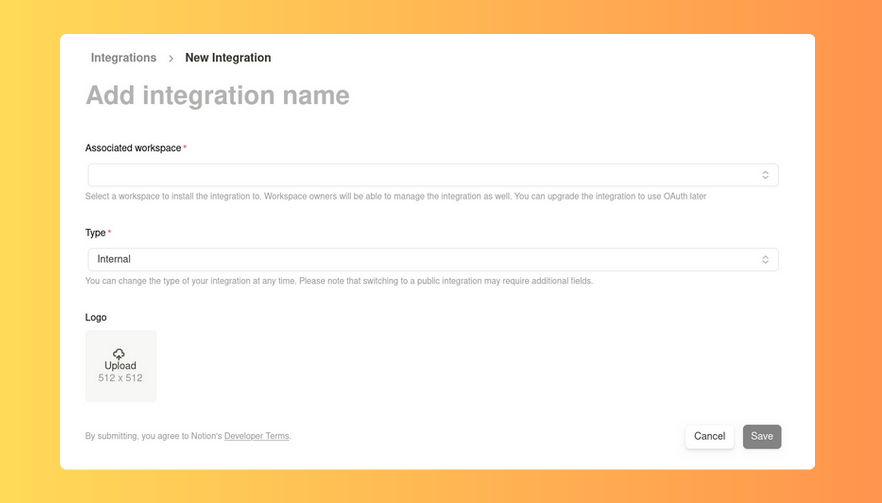
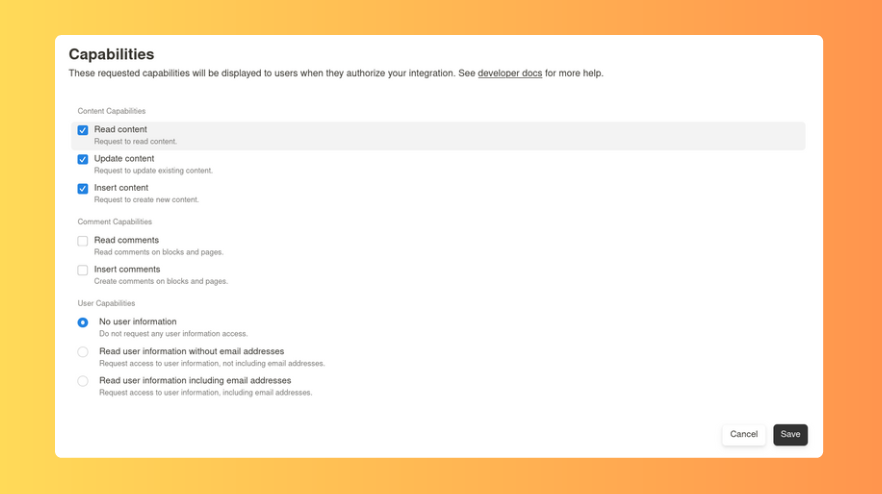
更新整合的功能以包括更新和插入權限。
將密鑰加入你的.env檔案中,如下所示:
NOTION_SECRET_API_KEY=<YOUR-SECRET-HERE>
設定資料庫
在 Notion 中,建立一個新資料庫或使用現有資料庫。對於本教程,這裡有一個包含三列的範例資料庫: name 、 link和dueDate 。

您可以自訂這些列以滿足您的特定要求。
尋找資料庫 ID
若要取得 Notion 資料庫 ID,請檢查資料庫的 URL。 ID 是 Notion 網域名稱和?v=查詢參數之間的字串。
將此 ID 新增到您的.env檔案中:
NOTION_DB_ID=<YOUR-DB-ID-HERE>
將整合分配給資料庫
前往您的資料庫,點擊右上角的選單按鈕,然後分配您先前建立的整合。
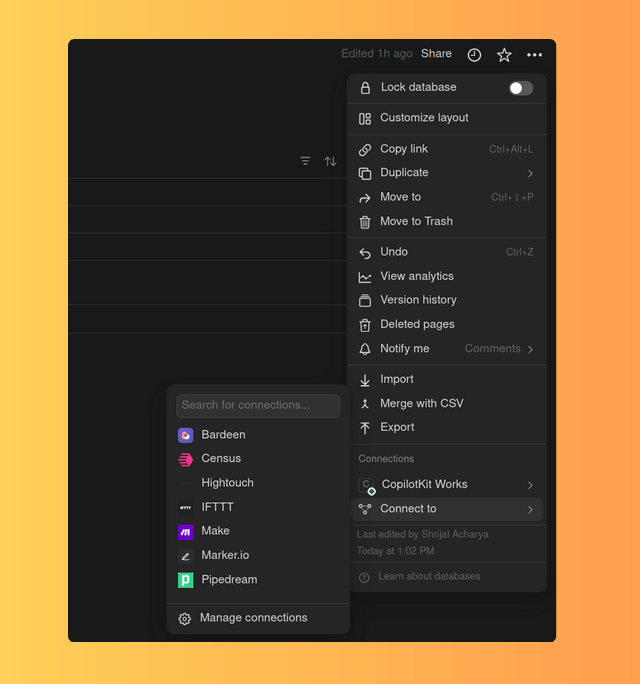
完成此設定後,您的應用程式就可以使用 Notion API 存取和管理您的 Notion 資料庫了。 ✨
設定CopilotKit 🤖
到目前為止一切順利,現在,讓我們整合CopilotKit——我們的應用程式的靈魂,可以與 Notion 資料庫互動。
定義常數
首先在lib/目錄中建立一個constants.ts文件,以集中與資料庫結構和 API 端點相關的常數:
// 👇 lib/constants.ts

export const NOTION_DB_PROPERTY_LINK = 'link'
export const NOTION_DB_PROPERTY_NAME = 'name'
export const NOTION_DB_PROPERTY_DUE_DATE = 'dueDate'

export const COPILOTKIT_API_ENDPOINT = '/api/copilotkit'
更新資料庫列名以符合您的設定。 COPILOTKIT_API_ENDPOINT常數定義CopilotKit請求的端點。
建立 API 路由
接下來,在/app/api/copilotkit目錄中建立一個route.ts檔案:
// 👇 app/api/copilotkit/route.ts

import { COPILOTKIT_API_ENDPOINT } from '@/lib/constants'
import { env } from '@/lib/env'
import {
  CopilotRuntime,
  OpenAIAdapter,
  copilotRuntimeNextJSAppRouterEndpoint,
} from '@copilotkit/runtime'
import { NextRequest } from 'next/server'
import OpenAI from 'openai'

const openai = new OpenAI({ apiKey: env.OPENAI_API_KEY })
// Here, we are using GPT-3.5-turbo OpenAI model instead of the default `gpt-4o`
const serviceAdapter = new OpenAIAdapter({ openai, model: 'gpt-3.5-turbo' })
const runtime = new CopilotRuntime()

export const POST = async (req: NextRequest) => {
  const { handleRequest } = copilotRuntimeNextJSAppRouterEndpoint({
    runtime,
    serviceAdapter,
    endpoint: COPILOTKIT_API_ENDPOINT,
  })

  return handleRequest(req)
}
該檔案設定了用於處理CopilotKit請求的POST路由。它使用 OpenAI GPT-3.5-turbo模型並定義了處理請求的執行環境。
POST函數監聽請求,使用自訂執行時間和服務適配器處理它們,然後透過CopilotKit端點發送迴響應以處理 AI 產生的回應。
新增 CopilotKit 提供者
若要將CopilotKit整合到您的應用程式中,請將您的應用程式包裝在CopilotKit提供者中。此外,還包括預先建立的 Copilot 彈出視窗以實現即時 UI 功能。
更新layout.tsx如下:
// 👇 app/layout.tsx

import { COPILOTKIT_API_ENDPOINT } from '@/lib/constants'
import { CopilotKit } from '@copilotkit/react-core'
import { CopilotPopup } from '@copilotkit/react-ui'
import '@copilotkit/react-ui/styles.css'

// ...Rest of the code

export default function RootLayout({
  children,
}: Readonly<{
  children: React.ReactNode
}>) {
  return (
    <html lang='en'>
      <body
        className={`${geistSans.variable} ${geistMono.variable} antialiased`}
      >
        <CopilotKit runtimeUrl={COPILOTKIT_API_ENDPOINT}>
          <main>{children}</main>
          <CopilotPopup instructions='You are assisting the user as best as you can. Answer the best way possible given the user notion database information.' />
        </CopilotKit>
      </body>
    </html>
  )
}
首先,我們只需匯入所需的模組和自訂樣式,以使 Copilot 彈出視窗看起來美觀。
我們使用<CopilotKit />提供者包裝我們的應用程式,並將runtimeUrl傳遞給我們的COPILOTKIT_API_ENDPOINT常數,即/api/copilotkit端點。
現在,您應該已經在應用程式的右下角看到一個小的聊天彈出視窗。開箱後它應該已經看起來很不錯了。
這就是我們在應用程式中設定CopilotKit所需的全部內容。 🥂現在,剩下的就是提供我們的應用程式的上下文,以便它可以讀取我們的資料並即時指導我們。
致力於實施
現在,所有先前的工作都已完成,是時候實現應用程式的核心功能了。
我們將首先定義資料類型,然後逐步建立從 Notion 資料庫取得和操作資料的功能。
定義類型
在types/目錄中建立一個檔案types/notion.ts來定義我們的 Notion 資料庫資料的結構:
// 👇 types/notion.ts

import {
  NOTION_DB_PROPERTY_DUE_DATE,
  NOTION_DB_PROPERTY_LINK,
  NOTION_DB_PROPERTY_NAME,
} from '@/lib/constants'

export type TResponse = {
  success: boolean
  error: Error | null
}

export type TRow = {
  id: string
  properties: {
    [NOTION_DB_PROPERTY_NAME]: {
      id: string
      title: { text: { content: string } }[]
    }
    [NOTION_DB_PROPERTY_LINK]: { id: string; url: string }
    [NOTION_DB_PROPERTY_DUE_DATE]: {
      id: string
      type: 'date'
      date?: { start: string; end: string }
    }
  }
}

export type TRowDetails = {
  id: string
  [NOTION_DB_PROPERTY_NAME]: string
  [NOTION_DB_PROPERTY_LINK]: string
  [NOTION_DB_PROPERTY_DUE_DATE]: {
    start: string
    end: string
  }
}
首先,我們有TResponse類型,我們將在伺服器操作中使用它來定義函數的回傳類型。然後我們有TRow和TRowDetails類型,它們基本上保存了概念資料庫每行資料的類型定義。
TRow類型被定義為符合從 notion API 傳回的資料。 TRowDetails類型是我自訂的類型,它僅用於保存我計劃在 UI 的每一行中顯示的資料。
💡根據您的 Notion 資料庫結構調整這些類型中的屬性。
從 Notion 取得資料
建立lib/actions.ts來定義與 Notion 資料庫互動的伺服器端操作:
// 👇 lib/actions.ts

'use server'

import { env } from '@/lib/env'
import { TResponse } from '@/types/notion'
import { Client } from '@notionhq/client'
import { QueryDatabaseResponse } from '@notionhq/client/build/src/api-endpoints'

const notion = new Client({
  auth: env.NOTION_SECRET_API_KEY,
})

export const fetchNotionDB = async (): Promise<
  QueryDatabaseResponse | TResponse
> => {
  try {
    const dbQuery = await notion.databases.query({
      database_id: env.NOTION_DB_ID,
    })

    return dbQuery
  } catch (error) {
    return {
      success: false,
      error: error as Error,
    } as TResponse
  }
}
fetchNotionDB函數被標記為伺服器操作( 'use server' ),以確保它僅在伺服器上執行,無論在哪裡呼叫它。
首先,我們透過傳遞資料庫 id 來建立 notion 客戶端的實例。然後在fetchNotionDB函數中,我們使用 notion API 查詢我們的概念資料庫並回傳回應。
顯示資料
現在,讓我們更新app/page.tsx檔案來取得並呈現 Notion 資料庫資料:
// 👇 app/page.tsx

import { NotionTable } from '@/components/notion-table'
import { fetchNotionDB } from '@/lib/actions'
import {
  NOTION_DB_PROPERTY_DUE_DATE,
  NOTION_DB_PROPERTY_LINK,
  NOTION_DB_PROPERTY_NAME,
} from '@/lib/constants'
import { isErrorResponse } from '@/lib/utils'
import { TRow } from '@/types/notion'

export default async function Home() {
  const response = await fetchNotionDB()

  if (isErrorResponse(response)) {
    return (
      <div className='mt-10 text-center text-rose-500'>
        Failed to fetch data. Please try again later.
      </div>
    )
  }

  const dbRows = response.results.map(row => ({
    id: row.id,
    // @ts-expect-error properties field definitely exists in each row.
    properties: row.properties || {},
  })) as TRow[]

  const formattedDBRows = dbRows.map(({ id, properties }) => {
    const name =
      properties?.[NOTION_DB_PROPERTY_NAME]?.title?.[0]?.text?.content || ''
    const link = properties?.[NOTION_DB_PROPERTY_LINK]?.url || ''
    const dueDate = properties?.[NOTION_DB_PROPERTY_DUE_DATE]?.date || {
      start: '',
      end: '',
    }

    return {
      id,
      [NOTION_DB_PROPERTY_NAME]: name,
      [NOTION_DB_PROPERTY_LINK]: link,
      [NOTION_DB_PROPERTY_DUE_DATE]: dueDate,
    }
  })

  return (
    <div className='mt-8 flex justify-center'>
      <div className='w-full max-w-4xl'>
        <NotionTable initialTableData={formattedDBRows} />
      </div>
    </div>
  )
}
在這裡,我們首先使用fetchNotionDB函數來取得使用者的 Notion 資料庫資訊。然後,我們檢查函數的傳回資料的類型以確保它是QueryDatabaseResponse類型。如果不是,我們只需顯示錯誤訊息並返回。
💡 屬性分配頂部的註解是為了抑製表示某一行可能是另一種類型且可能沒有屬性欄位的錯誤。但是,查詢資料庫總是會為每一行傳回一個屬性欄位。
接下來,我們取得 Notion 資料庫的所有行並將它們轉換為TRow[] 。由於它包含一些與我們不是特別相關的資料,我們將其格式化為formattedDBRows變數作為TRowDetails[] 。
最後,我們將取得的資料傳遞給<NotionTable />元件,該元件負責在 UI 中顯示表格。
錯誤處理實用程式
請注意,我們尚未實作isErrorResponse函數。新增一個實用函數來決定響應是否錯誤。更新lib/utils.ts如下:
// 👇 lib/utils.ts

import { TResponse } from '@/types/notion'
import { QueryDatabaseResponse } from '@notionhq/client/build/src/api-endpoints'

// ...Rest of the code

export function isErrorResponse(
  data: QueryDatabaseResponse | TResponse,
): data is TResponse {
  if (
    typeof data === 'object' &&
    data !== null &&
    'success' in data &&
    typeof (data as TResponse).success === 'boolean'
  ) {
    return (data as TResponse).success === false
  }
  return false
}
此函數檢查資料是否為TResponse類型,以及success欄位是否設定為false 。如果是,我們回傳False ,否則我們回傳True 。
新增和配置 UI 元件
現在,我們需要做的就是實作<NotionTable />元件。首先,在執行此操作之前,讓我們先加入一些將要使用的shadcn/ui元件。
安裝所需的 UI 元件:
npx shadcn@latest add sonner table
透過將其提供者新增至app/layout.tsx來啟用Sonner toast 通知:
// 👇 app/layout.tsx

import { Toaster } from '@/components/ui/sonner'

// ...Rest of the code

export default function RootLayout({
  children,
}: Readonly<{
  children: React.ReactNode
}>) {
  return (
    <html lang='en'>
      <body
        className={`${geistSans.variable} ${geistMono.variable} antialiased`}
      >
        {/* ...Rest of the code */}
          <main>{children}</main>
          <Toaster />
        {/* ...Rest of the code */}
      </body>
    </html>
  )
}
渲染 Notion 資料庫
建立NotionTable元件來呈現所取得的資料。該元件還將承擔大部分 AI 工作。
新增檔案components/notion-table.tsx內容如下:
// 👇 components/notion-table.tsx

'use client'

import {
  Table,
  TableBody,
  TableCaption,
  TableCell,
  TableHead,
  TableHeader,
  TableRow,
} from '@/components/ui/table'
import { updateNotionDBRowLink, updateNotionDBRowTitle } from '@/lib/actions'
import { TRowDetails } from '@/types/notion'
import { useCopilotAction, useCopilotReadable } from '@copilotkit/react-core'
import Link from 'next/link'
import { useState } from 'react'
import { toast } from 'sonner'

interface NotionTableProps {
  initialTableData: TRowDetails[]
}

export const NotionTable = ({ initialTableData }: NotionTableProps) => {
  const [tableData, setTableData] = useState<TRowDetails[]>(initialTableData)

  return (
    <Table className='rounded-sm shadow-sm'>
      <TableCaption className='py-4'>Notion Database</TableCaption>
      <TableHeader className='bg-zinc-100'>
        <TableRow>
          <TableHead>Name</TableHead>
          <TableHead>Link</TableHead>
          <TableHead className='text-right'>Due Date</TableHead>
        </TableRow>
      </TableHeader>
      {initialTableData.length === 0 ? (
        <p className='text-center text-zinc-500'>No data found.</p>
      ) : (
        <TableBody>
          {tableData.map((dbRow, i) => (
            <TableRow key={`${dbRow.name}-${dbRow.id}-${i}`}>
              <TableCell className='font-medium'>
                {dbRow.name ? (
                  <span>{dbRow.name}</span>
                ) : (
                  <span className='text-zinc-500'>Unnamed</span>
                )}
              </TableCell>
              <TableCell>
                {dbRow.link ? (
                  <Link
                    href={dbRow.link}
                    aria-label={`Link for ${dbRow.name || 'Unnamed'}`}
                    target='_blank'
                    className='underline underline-offset-4'
                  >
                    {dbRow.link}
                  </Link>
                ) : (
                  <span className='text-zinc-500'>No Link</span>
                )}
              </TableCell>
              <TableCell className='text-right'>
                {dbRow.dueDate.start ? (
                  <span>{dbRow.dueDate.start}</span>
                ) : (
                  <span className='text-zinc-500'>No Due Date</span>
                )}
                {dbRow.dueDate.end ? ` - ${dbRow.dueDate.end}` : null}
              </TableCell>
            </TableRow>
          ))}
        </TableBody>
      )}
    </Table>
  )
}
為了使 AI 能夠理解我們的應用程式並與之交互,我們將利用CopilotKit中的一些鉤子。
具體來說,我們將使用useCopilotReadable和useCopilotAction掛鉤為 AI 提供上下文和在我們的應用程式內執行操作的能力。
- 使用
useCopilotReadable提供讀取存取權限
在notion-table.tsx中,新增useCopilotReadable鉤子以使 AI 了解應用程式的狀態:
  // ...Rest of the code

  useCopilotReadable({
    description:
      'All the rows in our notion database which holds the information for all the meetings I need to attend.',
    value: tableData,
  })

  // ...Rest of the code
透過新增此功能, CopilotKit可以即時了解tableData狀態,從而允許 AI 回答有關 Notion 資料庫的查詢。
- 使用
useCopilotAction啟用寫入存取
接下來我們實作AI修改資料的能力。在同一檔案中的useCopilotReadable下方新增以下鉤子,以允許更新行詳細資訊:
// 👇 components/notion-table.tsx

// ...Rest of the code

  useCopilotAction({
    name: 'updateRowName',
    description:
      'Update the title of the row (index starts from 0) in the notion database.',
    parameters: [
      {
        name: 'index',
        description: 'Index of the row to update.',
        required: true,
      },
      {
        name: 'newTitle',
        description: 'New title for the row.',
        required: true,
      },
    ],
    handler: async ({ index, newTitle }) => {
      const parsedIndex = parseInt(index, 10)
      if (isNaN(parsedIndex)) throw new Error('Invalid index')

      const { success } = await updateNotionDBRowTitle({
        tableRowId: tableData[parsedIndex].id,
        tableRowNewTitle: newTitle,
      })

      if (!success) return toast.error('Could not update the notion DB')

      toast.success('Successfully updated the notion DB')
      setTableData(prevData => {
        const updatedTableData = [...prevData]
        if (parsedIndex >= 0 && parsedIndex < updatedTableData.length) {
          updatedTableData[parsedIndex].name = newTitle
        }
        return updatedTableData
      })
    },
  })

  useCopilotAction({
    name: 'updateRowLink',
    description:
      'Update the link of the row (index starts from 0) in the notion database.',
    parameters: [
      {
        name: 'index',
        description: 'Index of the row to update.',
        required: true,
      },
      {
        name: 'newLink',
        description: 'New link to the row.',
        required: true,
      },
    ],
    handler: async ({ index, newLink }) => {
      const parsedIndex = parseInt(index, 10)
      if (isNaN(parsedIndex)) throw new Error('Invalid index')

      const { success } = await updateNotionDBRowLink({
        tableRowId: tableData[parsedIndex].id,
        tableRowNewLink: newLink,
      })

      if (!success) return toast.error('Could not update the notion DB')

      toast.success('Successfully updated the notion DB')
      setTableData(prevData => {
        const updatedTableData = [...prevData]
        if (parsedIndex >= 0 && parsedIndex < updatedTableData.length) {
          updatedTableData[parsedIndex].link = newLink
        }
        return updatedTableData
      })
    },
  })

// ...Rest of the code
每個useCopilotAction鉤子包括:
-
name:動作的辨識符。 -
description:對該操作的清晰解釋。 -
parameters:操作所需的輸入。 -
handler:執行操作的函數,修改資料庫並相應地更新 UI。
實作資料庫更新功能
我們還沒有寫updateNotionDBRowTitle和updateNotionDBRowLink函數。在lib/actions.ts檔案中,定義與 Notion API 互動的輔助函數:
// 👇 lib/actions.ts

'use server'

import {
  NOTION_DB_PROPERTY_LINK,
  NOTION_DB_PROPERTY_NAME,
} from '@/lib/constants'

// ...Rest of the code

export const updateNotionDBRowTitle = async ({
  tableRowId,
  tableRowNewTitle,
}: {
  tableRowId: string
  tableRowNewTitle: string
}): Promise<TResponse> => {
  try {
    await notion.pages.update({
      page_id: tableRowId,
      properties: {
        [NOTION_DB_PROPERTY_NAME]: {
          title: [{ text: { content: tableRowNewTitle } }],
        },
      },
    })
    return { success: true, error: null } as TResponse
  } catch (error) {
    return { success: false, error: error as Error } as TResponse
  }
}

export const updateNotionDBRowLink = async ({
  tableRowId,
  tableRowNewLink,
}: {
  tableRowId: string
  tableRowNewLink: string
}): Promise<TResponse> => {
  try {
    await notion.pages.update({
      page_id: tableRowId,
      properties: {
        [NOTION_DB_PROPERTY_LINK]: {
          url: tableRowNewLink,
        },
      },
    })
    return { success: true, error: null } as TResponse
  } catch (error) {
    return { success: false, error: error as Error } as TResponse
  }
}
這兩個函數都使用Notion API來更新資料庫中某一行(或「頁面」)的特定字段,並傳回成功或錯誤回應。
這就是我們今天的應用程式中要實現的全部內容。您也可以使用刪除資料庫中某一行的功能。請隨意探索概念 API 文件並自行實作。 😎
{% 嵌入 https://youtu.be/\_Wx3raG4Fjc %}
結論
哇!現在,我們擁有一個功能齊全的 AI 自動化應用程式,可以從 Notion 資料庫中獲取用戶的資料,回答用戶對資料的查詢,甚至在需要時更改資料。 🫨
如果你在編寫程式碼時感到困惑,可以在此處取得本文的完整記錄原始碼:[Github Repo](https://github.com/Studio1HQ/copilotkit-with-notion-api)
)
{% cta https://git.new/copilotkit %} 為 CopilotKit 儲存庫加註 ⭐{% endcta %}
請關注 CopilotKit 以獲取更多類似內容。
{% 嵌入 https://dev.to/copilotkit %}
在下面的評論部分分享您的想法! 👇
非常感謝您的閱讀! 🎉 🫡

原文出處:https://dev.to/copilotkit/work-smarter-in-notion-add-a-copilot-with-copilotkit-50be
1) --- 會變成分隔線(上一行必須是空白)
2) # 會變成一級標題
3) ## 會變成二級標題
4) ### 會變成三級標題
5) **粗體文字**會顯示粗體文字
6) ```當第一行與最後一行會顯示程式碼
7) 請搜尋 Markdown 語法,了解各種格式