🔧 阿川の電商水電行

長話短說
在這個易於理解的教程中,我們將採用一個簡單的旅行計劃應用程式,並使用CopilotKit透過 AI 對其進行增強。
讀完本文後,您將會了解:
-
什麼是代理副駕駛以及如何使用它來將人工智慧加入到您的應用程式中。
-
如何讓副駕駛即時更新應用狀態並渲染變化。
-
如何使用
useCoAgentStateRender進行人機互動工作流程。
💁 喜歡透過影片學習?看看這個影片教學。
以下是我們將要建立的應用程式的預覽:👇
{% youtube GXc6gfS-sRA %}
💁 透過造訪此連結與旅行計畫示範互動。
查看儲存庫
在本次演示中,我們將從一個包含基本功能應用程式的分支開始,無需 AI 支持,我們將使用 CopilotKit 對其進行增強。 🚀
{% cta https://git.new/devtoarticle1 %} 查看 CopilotKit ⭐️ {% endcta %}
看起始分支
我們將從coagents-travel-tutorial-start分支開始,其中包含我們的旅行應用程式的起始程式碼:
git clone -b coagents-travel-tutorial-start https://github.com/CopilotKit/CopilotKit.git
cd CopilotKit教程程式碼位於examples/coagents-travel目錄中,其中包括兩個不同的目錄:
-
ui/:它包含一個 Next.js 應用程式,我們將在其中整合 LangGraph 代理。 -
agent/:它擁有一個基於 Python 的 LangGraph 代理程式。
導航至examples/coagents-travel目錄:
cd examples/coagents-travel安裝依賴項
讓我們設定 Next.js 應用程式。確保您的系統上安裝了pnpm ,因為我們的入門程式碼使用它作為套件管理器:
npm install -g pnpm@latest-10現在,轉到ui目錄並安裝專案所需的所有依賴項:
cd ui
pnpm install
檢索 API 金鑰
在ui目錄中建立一個.env檔案並使用必要的環境變數填充它:
# 👇 ui/.env

OPENAI_API_KEY=<your_openai_api_key>
NEXT_PUBLIC_CPK_PUBLIC_API_KEY=<your_public_copilotkit_api_key>
如果您需要 CopilotKit API 金鑰,可以在此處取得。 🔑
啟動專案
現在,我們已經安裝了所有依賴項,啟動開發伺服器:
pnpm run dev如果一切設定正確,請造訪http://localhost:3000以查看旅行應用程式的運作情況。 😻
現在,我們將研究 LangGraph 代理並了解它是如何運作的。
LangGraph代理
在我們深入整合 LangGraph 代理之前,讓我們花點時間了解它的工作原理。
在本教程中,我們不會從頭開始建立 LangGraph 代理程式。相反,我們將使用位於agent目錄中的預建版本。
💁 對建立 LangGraph 代理的詳細逐步指南感興趣嗎?查看LangGraph 快速入門指南。
在加入到我們的應用程式之前,讓我們先了解 LangGraph 代理程式以了解其內部工作原理。
安裝 LangGraph Studio
💡 LangGraph Studio 是用於視覺化和除錯 LangGraph 工作流程的優秀工具。雖然使用 CopilotKit 不是必需的,但強烈建議您了解 LangGraph 的運作方式。
安裝LangGraph Studio請參考LangChain Studio安裝指南。
檢索 API 金鑰
在agent目錄中建立一個.env檔案並使用以下環境變數填充它:
# 👇 agent/.env

OPENAI_API_KEY=<your_openai_api_key>
GOOGLE_MAPS_API_KEY=<your_google_maps_api_key>
需要 Google 地圖 API 金鑰嗎?請按照本指南獲取一個。 🔑
視覺化 LangGraph 代理
安裝 LangGraph Studio 後,開啟工作室中的examples/coagents-travel/agent目錄以載入和視覺化 LangGraph 代理程式。
💡提示:設定所有內容可能需要一點時間,但是一旦安裝完畢並且您導航到
agent資料夾,視覺化效果將如下所示:
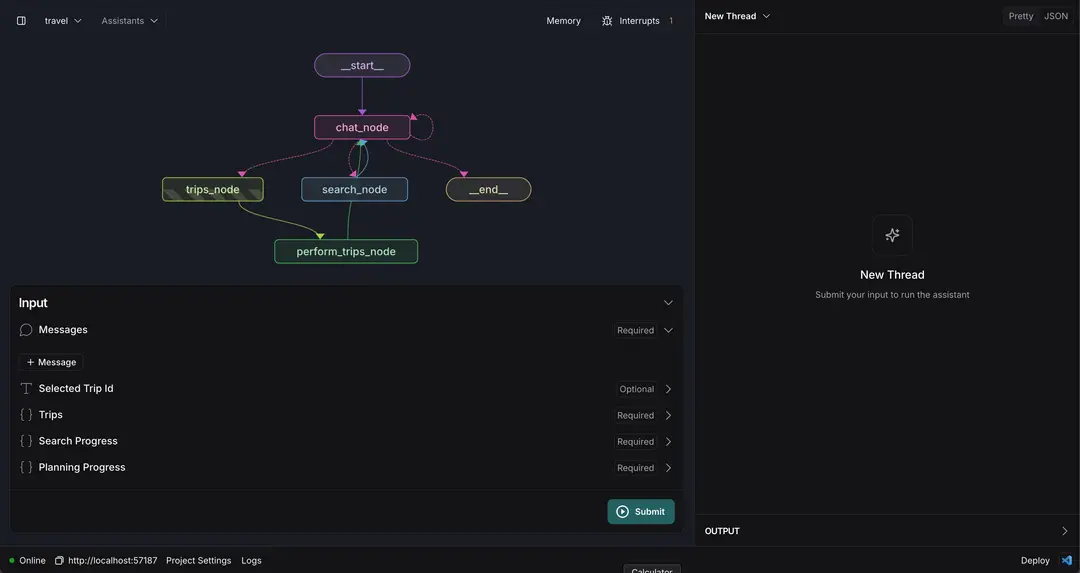
測試 LangGraph 代理
要測試 LangGraph 代理,只需將訊息新增至messages狀態變數並點擊「提交」即可。
代理將處理輸入、在聊天中做出回應,並透過連接的節點遵循定義的工作流程。
在此範例中,代理程式觸發search_node來執行搜尋。一旦它檢索到回應,它就會使用trips_node根據其發現加入新行程來更新狀態。 🎯
了解斷點
我們來談談代理副駕駛中的一個關鍵概念:人在環。
想像一下,您的代理人渴望提供幫助,但有時有點太渴望了。斷點就像一個友善的暫停按鈕,讓使用者在代理失控(或犯錯)之前介入並批准代理的決策。 LangGraph 透過斷點讓這件事變得簡單。
它的工作原理如下:
-
點選
trips_node並啟用interrupt_after選項。 -
嘗試讓客服人員建立新行程。這一次,它會停止行動並要求您的批准。
看?即使人工智慧也能學習良好的禮儀。 🙃

讓 LangGraph Studio 保持執行
您的代理商需要一個家,而目前,LangGraph Studio 就是它的住處。讓工作室在本地運作;您將在應用程式的左下角看到其 URL。

稍後我們將使用此 URL 將 CopilotKit 設定連接到 LangGraph 代理程式。
到目前為止,我們已經完成了出色的工作,現在讓我們將 LangGraph 代理程式作為代理副駕駛整合到我們的旅行應用程式中,從而使所有這些工作發揮作用。 🤖
設定 CopilotKit
現在到了有趣的部分 - 讓我們加入 CopilotKit 將所有內容整合在一起。由於我們同時執行了應用程式和代理,因此距離將 CopilotKit 整合到我們的應用程式中僅一步之遙。
對於本教程,我們將安裝以下依賴項:
-
@copilotkit/react-core:CopilotKit 的核心庫,其中包含 CopilotKit 提供者和有用的鉤子。 -
@copilotkit/react-ui:CopilotKit 的 UI 庫,其中包含 CopilotKit UI 元件,例如側邊欄、聊天彈出視窗、文字區域等。
安裝依賴項
首先,導航到ui目錄(如果您尚未到達該目錄):
cd ../ui然後,安裝 CopilotKit 軟體套件:
pnpm add @copilotkit/react-core @copilotkit/react-ui 在 React 應用程式中安裝 CopilotKit 只需要這兩個套件。 @copilotkit/react-core包含核心 CopilotKit 功能, @copilotkit/react-ui包含一些預先建置的 UI 元件供我們直接插入。
加入副駕駛套件
設定 CopilotKit 有兩種方法:
-
Copilot Cloud :速度快,超級容易上手,並且完全託管。
-
自託管:更多控制,但也帶來額外的複雜性。
在本教程中,我們將採用雲端路線(因為現在為什麼要擔心額外的複雜性?),但如果您好奇的話,可以隨意自行託管。如果您喜歡的話,請查看自架指南。
設定 Copilot 雲
以下是開始使用 Copilot Cloud 的方法:
- 建立一個帳戶
前往Copilot Cloud並註冊。只需要大約一分鐘。
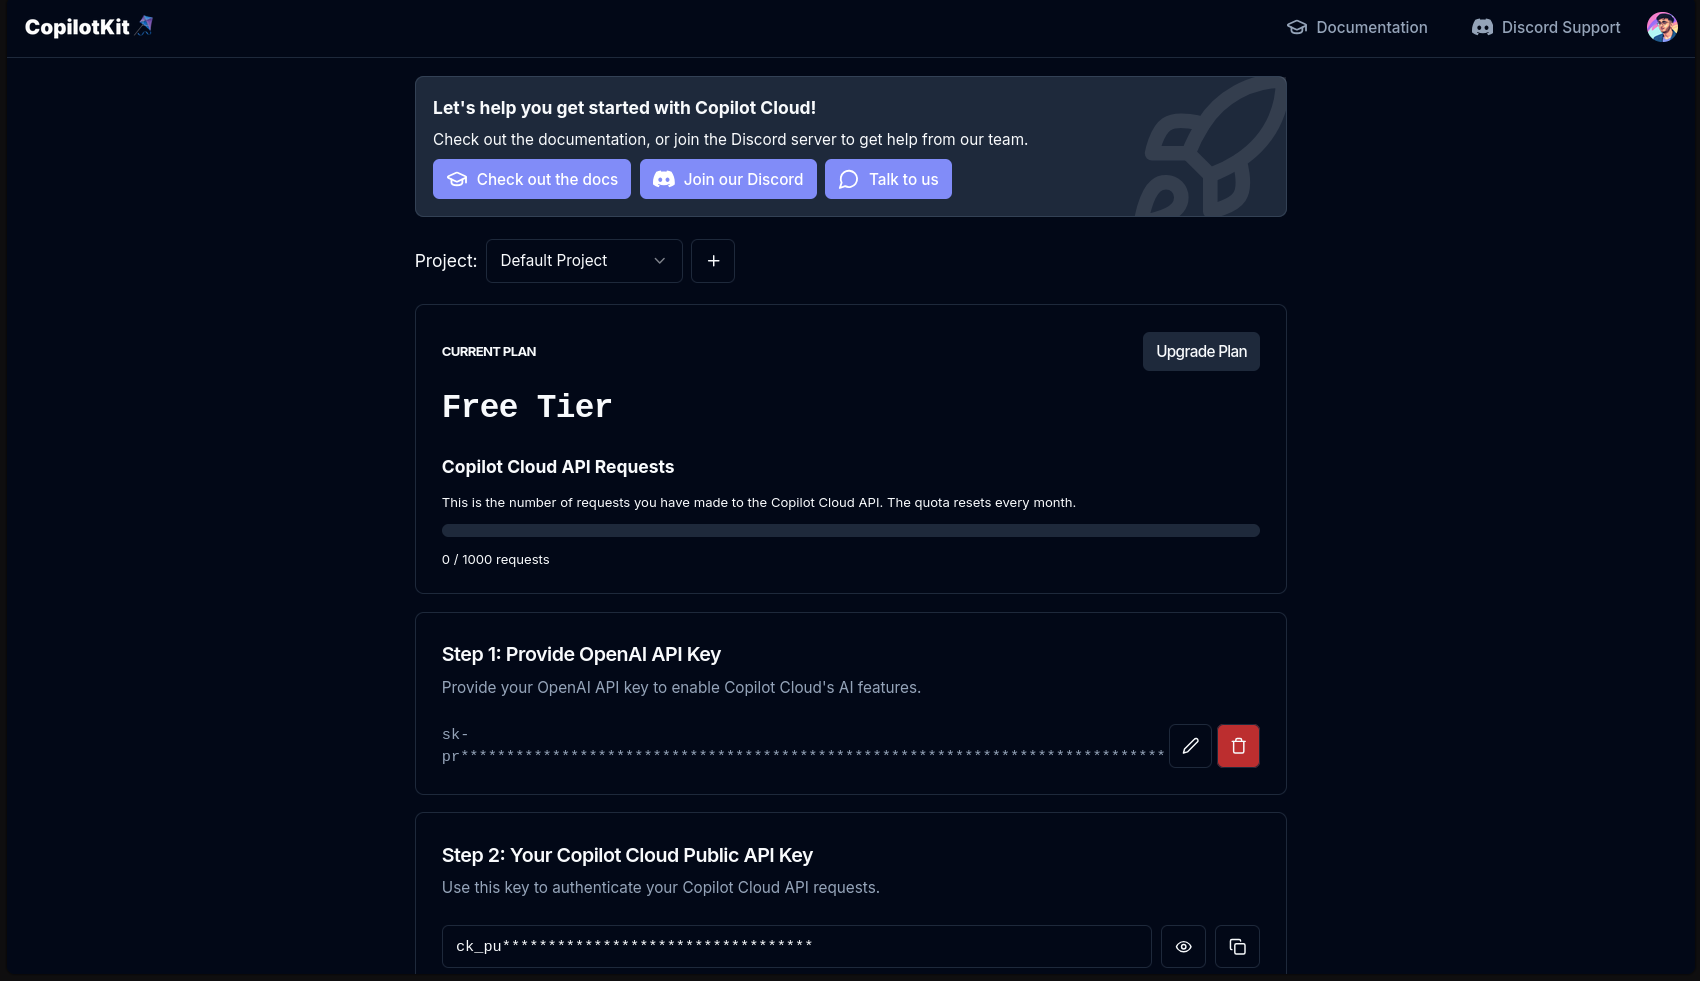
- 取得您的 API 金鑰
登入後,請依照螢幕上顯示的步驟取得您的Copilot Cloud 公用 API 金鑰。您還需要 OpenAI API 金鑰。
設定您的 OpenAI API 金鑰,點擊複選標記,就像這樣,您將獲得您的公鑰。
- 將 API 金鑰新增至您的
.env
使用您的 Copilot Cloud API 金鑰更新ui目錄中的.env檔:
# 👇 ui/.env

# Rest of the env variables...
NEXT_PUBLIC_CPK_PUBLIC_API_KEY=<your_copilotkit_public_key>- 配置 CopilotKit 提供者
現在,要將CopilotKit整合到您的應用程式中,請將您的應用程式包裝在CopilotKit提供者中。
透過使用提供者包裝我們的應用程式,我們確保將從@copilotkit/react-ui元件加入的其他 UI 元件可以與 CopilotKit SDK 互動。
使用以下程式碼行編輯ui/app/page.tsx :
// 👇 ui/app/page.tsx

"use client";

// Rest of the imports...
import { CopilotKit } from "@copilotkit/react-core";

// Rest of the code...

export default function Home() {
  return (
    <CopilotKit
      publicApiKey={process.env.NEXT_PUBLIC_CPK_PUBLIC_API_KEY}
    >
      <TooltipProvider>
        <TripsProvider>
          <main className="h-screen w-screen">
            <MapCanvas />
          </main>
        </TripsProvider>
      </TooltipProvider>
    </CopilotKit>
  );
}- CopilotKit UI 元件
CopilotKit 附帶了幾個即用型元件,例如<CopilotPopup /> 、 <CopilotSidebar /> 。只需放置這些元件,它們就會看起來非常棒。
如果您不想使用內建元件,沒問題! CopilotKit 也透過useCopilotChat支援無頭模式,因此如果您有創意,您可以進行完整的DIY 。 😉
在本教學中,我們將使用<CopilotSidebar />元件來顯示聊天側邊欄。但是,該方法與任何其他預先建置的 UI 元件保持相同。
編輯ui/app/page.tsx檔案以包含<ChatSidebar />元件,並確保匯入 CSS 樣式。
// 👇 ui/app/page.tsx
"use client";
// Rest of the imports...
import { TasksList } from "@/components/TasksList";
import { TasksProvider } from "@/lib/hooks/use-tasks";
import { CopilotKit } from "@copilotkit/react-core";
import { CopilotSidebar } from "@copilotkit/react-ui";
import "@copilotkit/react-ui/styles.css";
// Rest of the code...
export default function Home() {
return (
<CopilotKit
publicApiKey={process.env.NEXT_PUBLIC_CPK_PUBLIC_API_KEY}
>
<CopilotSidebar
defaultOpen={true}
clickOutsideToClose={false}
labels={{
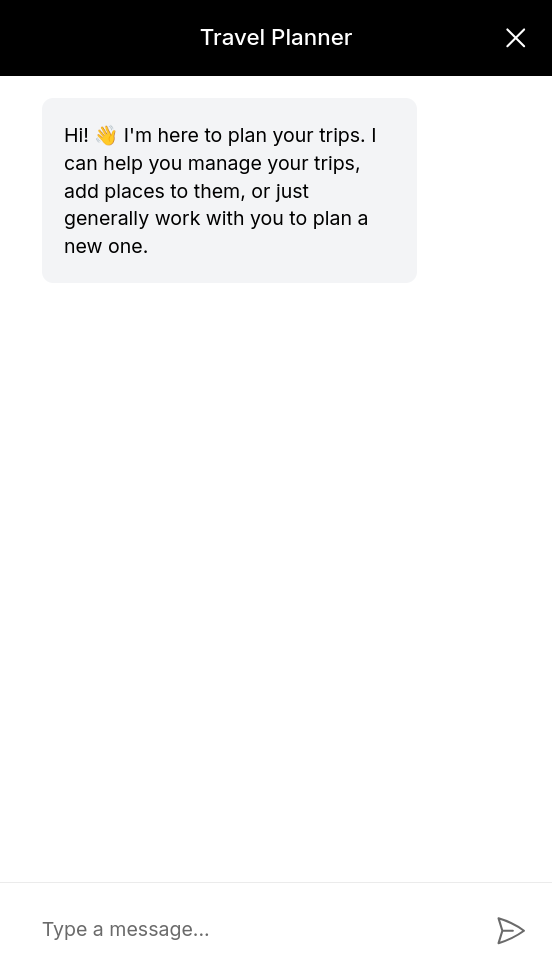
title: "Travel Planner",
initial: "Hi! 👋 I'm here to plan your trips. I can help you manage your trips, add places to them, or just generally work with you to plan a new one.",
}}
/>
<TooltipProvider>
<TripsProvider>
<main className="h-screen w-screen">
<MapCanvas />
</main>
</TripsProvider>
</TooltipProvider>
</CopilotKit>
);
}首先,我們匯入所需的模組和自訂樣式,使側邊欄看起來開箱即用。然後,放入<CopilotSidebar />元件。
在<CopilotSidebar />元件中,您可以傳遞 labels 屬性來變更 AI 的標題和初始聊天訊息。
現在,返回您的應用程式。向右看,瞧!只需幾行程式碼,就有一個閃亮的新聊天側邊欄即可使用。 😻
但缺少了一些東西,那就是副駕駛獲得決策技能的能力。我們將在asset目錄中的 LangGraph 的幫助下加入該功能。
讓你的副駕駛變得代理
我們有一個在 LangGraph Studio 中執行的 LangGraph 代理,以及一個非代理副駕駛,該副駕駛功能正常,但…不夠聰明。讓我們賦予副駕駛一些真正的決策能力吧! 😎
快速了解 React 狀態
讓我們快速回顧一下應用程式的狀態是如何運作的。開啟lib/hooks/use-trips.tsx檔。
您會在這裡找到TripsProvider ,它定義了很多有用的東西。節目明星? state物件,由AgentState類型構成。
可以使用useTrips鉤子在整個應用程式中存取此狀態,該鉤子提供TripCard 、 TripContent和TripSelect等元件。
如果您以前使用過 React 應用程式,那麼這應該感覺很熟悉 - 透過上下文或庫管理狀態是非常標準的東西。
將代理與狀態合併
現在是重要的部分:將 LangGraph 代理連接到其狀態。為了實現這一點,我們將設定一個遠端端點並使用useCoAgent掛鉤來實現奇蹟。 🌟
- 設定隧道
還記得之前的 LangGraph Studio 端點嗎?你現在就需要它!如果您正在使用 Copilot Cloud,那麼您已準備就緒。
如果您選擇了自架路線,請按照此處概述的步驟操作
為了連接本地執行的 LangGraph 代理程式和 Copilot Cloud,我們將使用 CopilotKit CLI。取得 LangGraph Studio 端點的連接埠號碼。
💁 LangGraph Studio 連接埠:您可以在 Studio 介面的左下角找到它。

現在,啟動終端機並執行以下命令:
# Replace <port_number> placeholder with the actual port number
npx @copilotkit/cli tunnel <port_number>
繁榮!您已經建立了一條隧道。 🎉 這是它會向您展示的內容:
✔ Tunnel created successfully!
Tunnel Information:
Local: localhost:54209
Public URL: https://light-pandas-argue.loca.lt
Press Ctrl+C to stop the tunnel
保存該公用 URL。 🔖 這將成為我們本地執行的 LangGraph 代理程式和 CopilotKit Cloud 之間的網關。
💁 現在,對於下一步,我們需要LangSmith API Key 。請按照本指南獲取一個。
- 將隧道連接到 Copilot Cloud
前往Copilot Cloud ,捲動到遠端端點部分,然後點擊+ Add New按鈕。
-
選擇
LangGraph平台。 -
新增公共 URL。 (從 CopilotKit CLI 產生的)並新增您的 LangSmith API 金鑰。
-
按一下“建立”。
🎉 完成!您的代理程式的端點現在已列出,並且 CopilotKit 確切地知道在呼叫代理程式時將請求發送到哪裡。
- 鎖定代理
由於我們這裡只有一個代理,因此我們要確保鎖定<CopilotKit />提供者以鎖定對該特定代理的所有請求。若要新增代理,只需修改 props 以包含agent的名稱即可。
💁 對處理多個代理商感到好奇嗎?查看多代理概念指南。
// 👇 ui/app/page.tsx

// Rest of the code...
<CopilotKit
  // Rest of the code...
  agent="travel"
>
    {/* Rest of the code... */}
</CopilotKit>我們將代理的名稱提供為travel因為我們已經在agents/langgraph.json檔案中定義了它。
就像這樣,副駕駛現在真正具有代理性了。它不僅可以進行對話,還可以做出決定。很酷,對吧? 🤯
連線代理和狀態
此時,我們希望將 LangGraph 代理的狀態與我們應用程式的狀態連接起來。這將使我們能夠加入即時動態互動!
LangGraph 代理商會追蹤自己的狀態,就像您已經在 LangGraph 工作室的左下角看到的那樣。
🤔現在有什麼想法嗎?
我們希望在這些州之間實現雙向連接。為此,我們有來自 CopilotKit 的友善鉤子useCoAgent來幫助我們實現這一目標。
使用以下程式碼行編輯ui/lib/hooks/use-trips.tsx檔案以新增useCoAgent掛鉤。
// 👇 ui/lib/hooks/use-trips.tsx

// Rest of the imports...
import { AgentState, defaultTrips} from "@/lib/trips";
import { useCoAgent } from "@copilotkit/react-core";

export const TripsProvider = ({ children }: { children: ReactNode }) => {
  const { state, setState } = useCoAgent<AgentState>({
    name: "travel",
    initialState: {
      trips: defaultTrips,
      selected_trip_id: defaultTrips[0].id,
    },
  });

  // Rest of the code...
是的,你沒看錯。這就是同步雙向狀態所需的全部操作。 😯
現在,讓我們逐行分解程式碼:
💡
useCoAgent鉤子是通用的,這表示您可以指定反映 LangGraph 代理程式狀態的類型。
在此範例中,我們使用AgentState來保持一致。您可以將其類型轉換為any ,但這通常不是一個好的做法。所以大多時候避免這樣做。
name參數將所有內容與agent/langgraph.json中圖表的名稱連結起來。確保正確命名,因為它可以確保代理程式和我們的應用程式始終位於同一頁上。
對於initialState ,我們使用@/lib/types.ts中的defaultTrips (儘管不是必需的)。
我們加入了一些初始行程,這樣我們就可以立即測試它的工作情況。
這是初始狀態(即defaultTrips )的排列方式:
// 👇 ui/lib/types.ts

export const defaultTrips: Trip[] = [
  {
    id: "1",
    name: "Business Trip to NYC",
    center_latitude: 40.7484,
    center_longitude: -73.9857,
    places: [
      {
        id: "1",
        name: "Central Park",
        address: "New York, NY 10024",
        description: "A famous park in New York City",
        latitude: 40.785091,
        longitude: -73.968285,
        rating: 4.7,
      },
      {
        id: "3",
        name: "Times Square",
        address: "Times Square, New York, NY 10036",
        description: "A famous square in New York City",
        latitude: 40.755499,
        longitude: -73.985701,
        rating: 4.6,
      },
    ],
    zoom_level: 14,
  },
  // Rest of the trips...
];
是時候測試一下了!
啟動您的應用程式並向副駕駛詢問有關您的行程的資訊。
How many trips do I have?了解代理如何從應用程式的狀態中提取資料?魔法,不是嗎? 😻
狀態在應用程式和代理程式之間共享,因此請嘗試手動刪除/編輯行程,再次詢問問題,它應該做出相應的答案:
What trips do I have now?經紀人知道是怎麼回事。更好的是,您可以直接向代理分配任務:
Add some hotels to my Paris trip瞧!狀態會更新,您的 UI 會反映變更。
應用程式的核心功能現在已經完成。我們只需要透過加入串流文字和其他功能來改善用戶體驗,為用戶提供即時回應。
在 UI 中傳輸回應
既然我們可以與代理互動、檢索和更新資料,為什麼不透過加入文字流功能來提升使用者體驗呢?
這就像在代理商工作時觀看即時進度,類似於您看到ChatGPT等許多其他流行 AI 的回應方式。
在此步驟中,我們將在 LangGraph 代理程式中實作copilotkit_emit_state SDK 函數,以便代理程式在工作時發出進度。 🔥
安裝 CopilotKit SDK
首先,讓我們安裝CopilotKit SDK 。由於我們在這裡使用基於 Python 的代理(並使用詩歌對其進行管理),因此我們將安裝 Python SDK。
💁 不知道如何安裝詩歌?您可以在此處找到安裝指南。
poetry add copilotkit==0.1.31a4由於我們將編輯search_node ,因此我們將直接跳到search.py 檔案。
手動發出代理的狀態
使用 CoAgents,當節點變更時(即,遍歷邊時),將發出代理程式的狀態。但是如果我們想在操作過程中顯示進度怎麼辦?好訊息!我們可以使用copilotkit_emit_state手動發出狀態。
讓我們為search_node新增自訂配置,以便我們可以發出中間狀態。
開啟agent/travel/search.py並新增以下程式碼行:
# 👇 agent/travel/search.py

# Rest of the imports...
from copilotkit.langchain import copilotkit_emit_state, copilotkit_customize_config

async def search_node(state: AgentState, config: RunnableConfig):
    """
    The search node is responsible for searching the for places.
    """
    ai_message = cast(AIMessage, state["messages"][-1])

    config = copilotkit_customize_config(
        config,
        emit_intermediate_state=[{
            "state_key": "search_progress",
            "tool": "search_for_places",
            "tool_argument": "search_progress",
        }],
    )

    # Rest of the code...
發出中間狀態
現在,讓我們使用copilotkit_emit_state在搜尋過程中手動發出狀態。您將看到我們發送的每個查詢的更新。
讓我們再次編輯agent/travel/search.py 以在搜尋開始時和結果出現時發出狀態。
使用以下程式碼行編輯agent/travel/search.py :
# 👇 agent/travel/search.py

# Rest of the code...
async def search_node(state: AgentState, config: RunnableConfig):
    """
    The search node is responsible for searching the for places.
    """
    ai_message = cast(AIMessage, state["messages"][-1])

    config = copilotkit_customize_config(
        config,
        emit_intermediate_state=[{
            "state_key": "search_progress",
            "tool": "search_for_places",
            "tool_argument": "search_progress",
        }],
    )

    # ^ Previous code

    state["search_progress"] = state.get("search_progress", [])
    queries = ai_message.tool_calls[0]["args"]["queries"]

    for query in queries:
        state["search_progress"].append({
            "query": query,
            "results": [],
            "done": False
        })

    await copilotkit_emit_state(config, state)

    # Rest of the code...
更新並發布進度
現在是時候即時顯示結果了。搜尋完成後,我們將更新進度。
最後,使用以下程式碼行更新agent/travel/search.py :
# 👇 agent/travel/search.py

# Rest of the code...
async def search_node(state: AgentState, config: RunnableConfig):
    """
    The search node is responsible for searching the for places.
    """
    ai_message = cast(AIMessage, state["messages"][-1])

    config = copilotkit_customize_config(
        config,
        emit_intermediate_state=[{
            "state_key": "search_progress",
            "tool": "search_for_places",
            "tool_argument": "search_progress",
        }],
    )

    state["search_progress"] = state.get("search_progress", [])
    queries = ai_message.tool_calls[0]["args"]["queries"]

    for query in queries:
        state["search_progress"].append({
            "query": query,
            "results": [],
            "done": False
        })

    await copilotkit_emit_state(config, state)

    # ^ Previous code

    places = []
    for i, query in enumerate(queries):
        response = gmaps.places(query)
        for result in response.get("results", []):
            place = {
                "id": result.get("place_id", f"{result.get('name', '')}-{i}"),
                "name": result.get("name", ""),
                "address": result.get("formatted_address", ""),
                "latitude": result.get("geometry", {}).get("location", {}).get("lat", 0),
                "longitude": result.get("geometry", {}).get("location", {}).get("lng", 0),
                "rating": result.get("rating", 0),
            }
            places.append(place)
        state["search_progress"][i]["done"] = True
        await copilotkit_emit_state(config, state)

    state["search_progress"] = []
    await copilotkit_emit_state(config, state)

    # Rest of the code...
在 UI 中渲染進度
為了在 UI 中顯示進度,我們將使用useCoAgentStateRender掛鉤。該鉤子將有條件地呈現search_progress狀態。
我們需要做的就是告訴 CopilotKit 透過useCoAgentStateRender鉤子有條件地渲染search_progress狀態鍵。
現在讓我們修改ui/lib/hooks/use-trips.tsx以顯示搜尋進度:
// 👇 ui/lib/hooks/use-trips.tsx

// Rest of the imports...
import { useCoAgent, useCoAgentStateRender } from "@copilotkit/react-core";
import { SearchProgress } from "@/components/SearchProgress";

export const TripsProvider = ({ children }: { children: ReactNode }) => {
  // Rest of the code...

  useCoAgentStateRender<AgentState>({
    name: "travel",
    render: ({ state }) => {
      if (state.search_progress) {
        return <SearchProgress progress={state.search_progress} />
      }
      return null;
    },
  });

  // Rest of the code...
}
<SearchProgress />元件已為您設定完成。如果您好奇,請隨意查看ui/components/SearchProgress.tsx中的實作。 🙌
💁獎勵:
search_progress狀態鍵已在ui/lib/types.ts中的AgentState類型中預先定義,因此無需擔心從頭開始建立它!
現在,試試看!向代理商詢問問題,您將看到即時更新的進度。 🤩
透過在循環中加入人類來加入控制
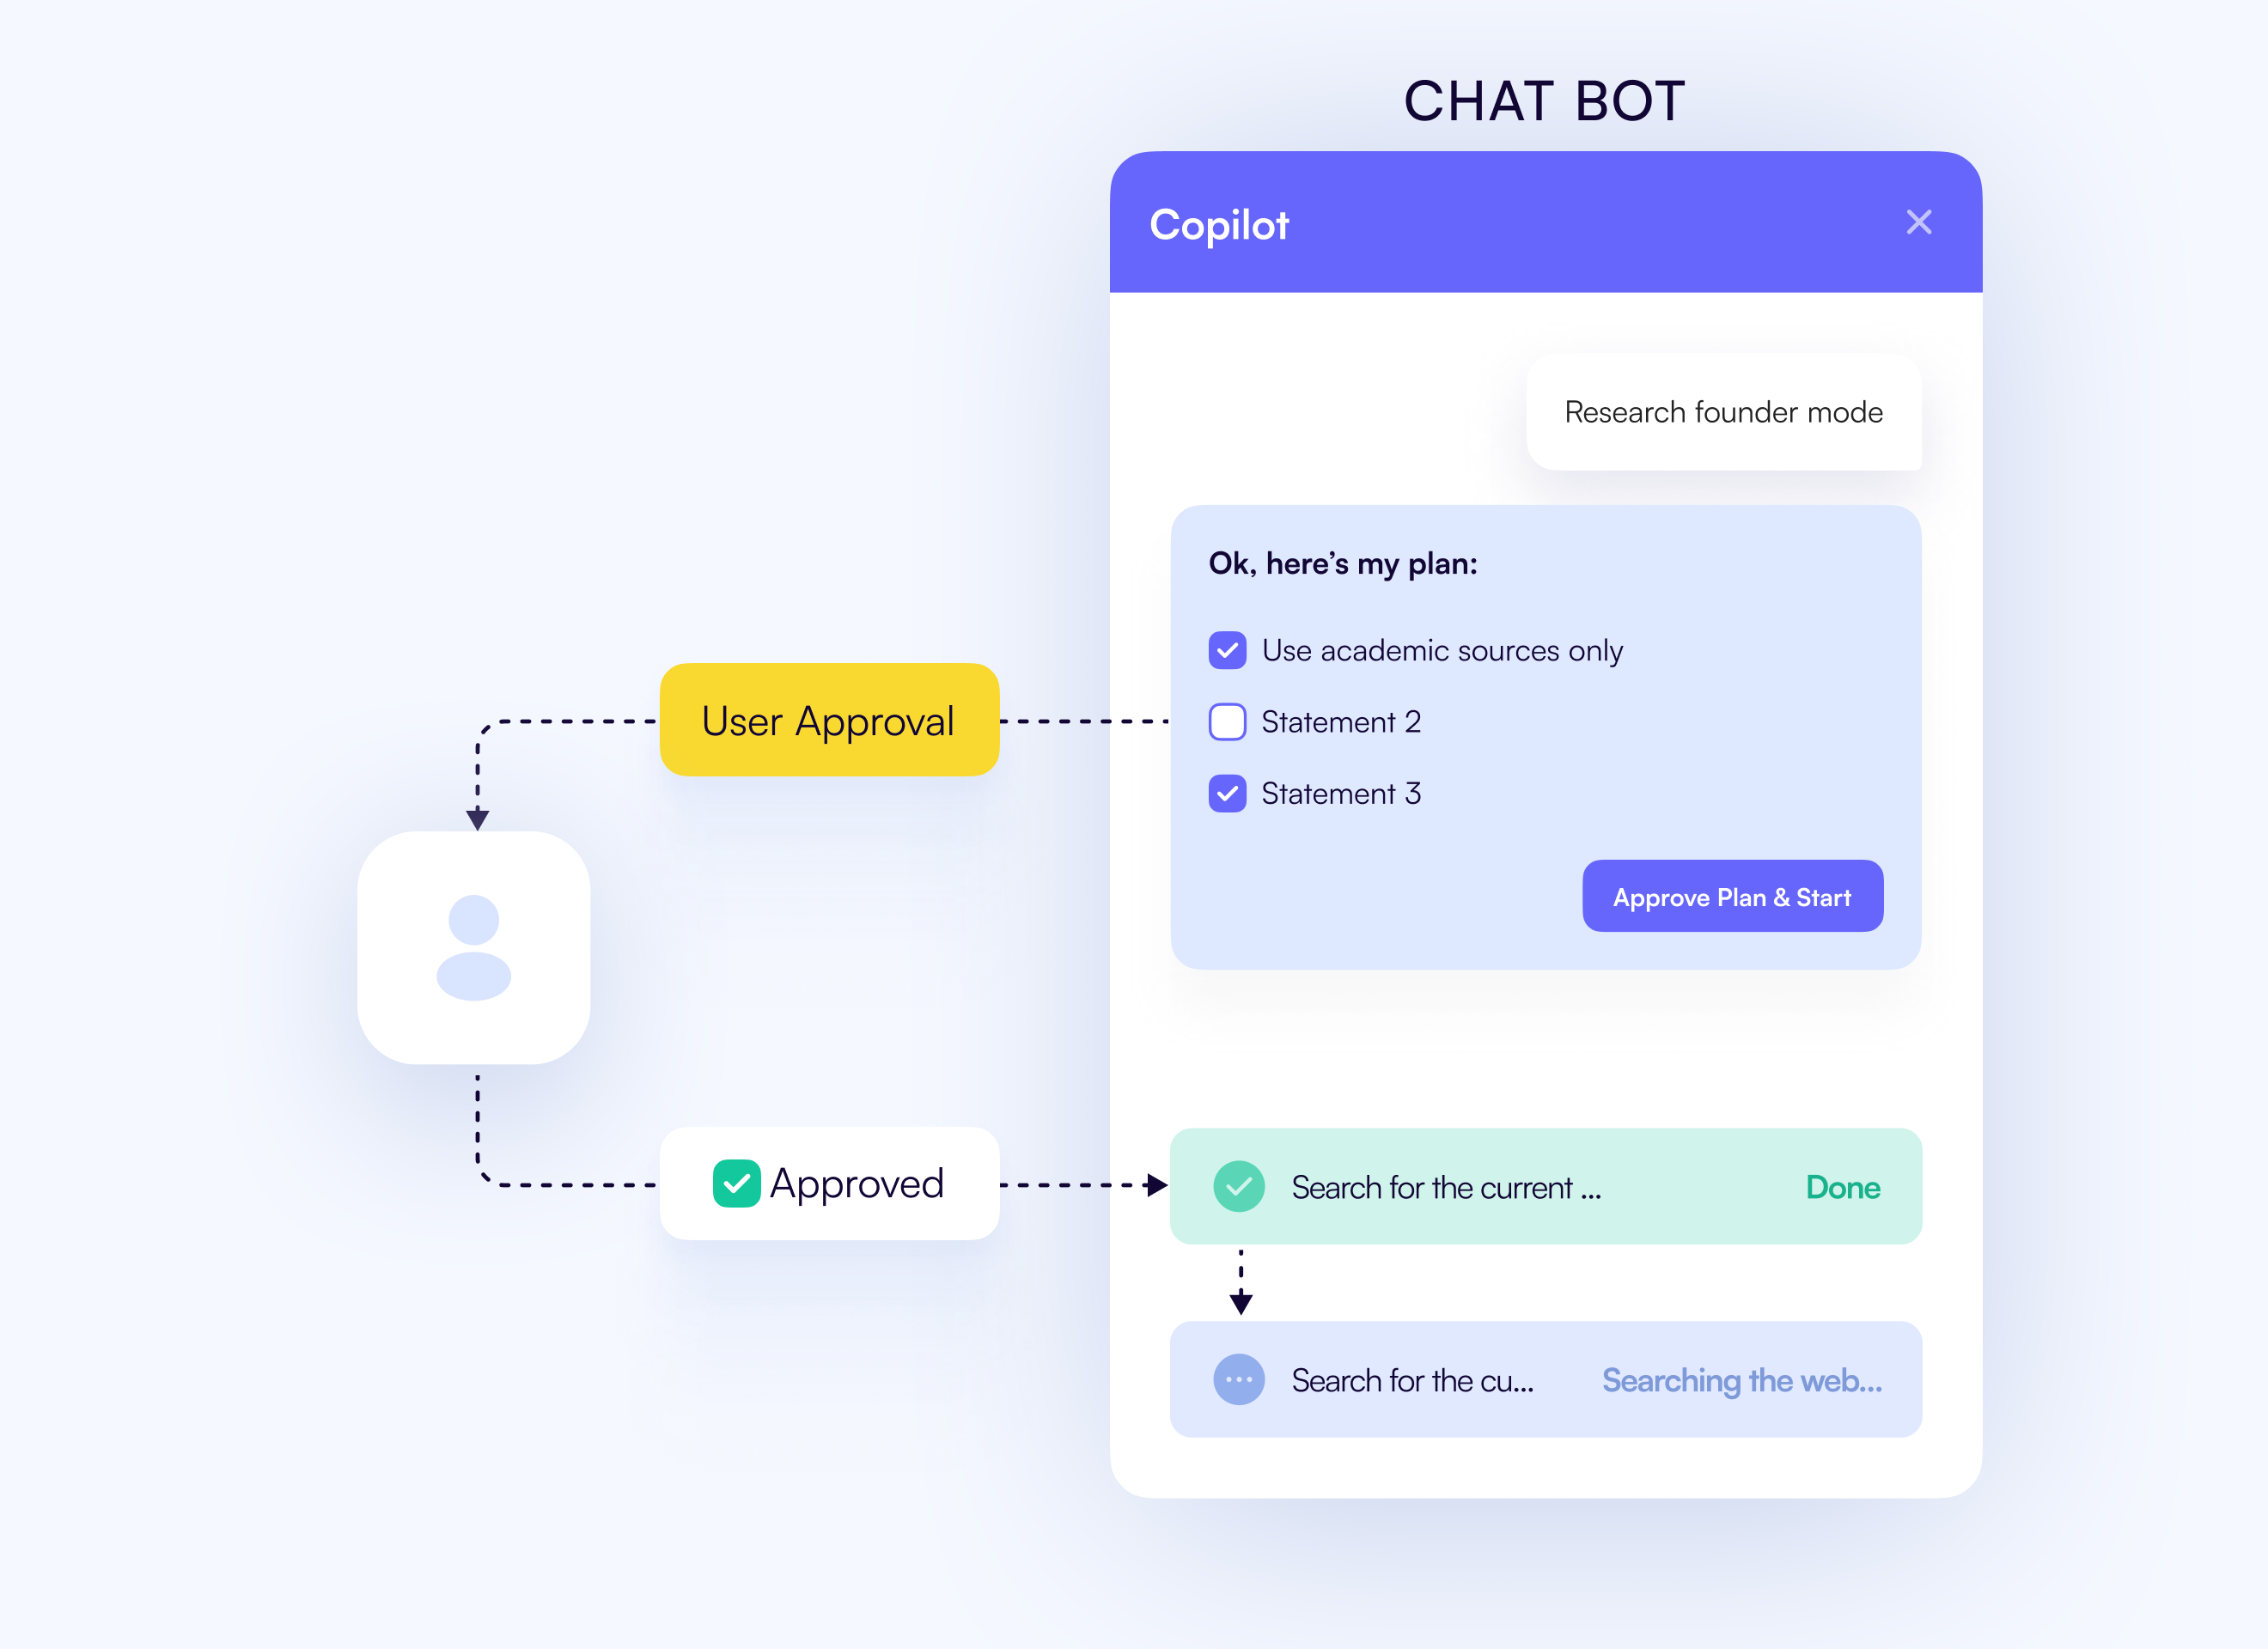
好吧,是時候施展一些現實世界的魔法了。如果代理人即將做出您不同意的決定怎麼辦?
人在循環 (HITL)允許您批准、拒絕或修改代理程式想要執行的操作。
在此步驟中,我們將在代理流程中設定一個“斷點”,強制其暫停並等待您的批准,然後再繼續。
💁 對斷點感到好奇嗎?您可以 在這裡了解更多。
一旦到達斷點,我們會將其發送到前端,用戶將在前端批准或拒絕該操作。然後代理將根據用戶的決定繼續。
總而言之,這個過程將如下所示:
請參閱下面的資訊圖,了解整個流程的工作原理:👇
- 為人機互動加入斷點
透過我們的 LangGraph,加入人機互動功能非常簡單。 trips_node充當perform_trips_node的中介,它允許我們透過設定斷點來暫停trips_node處的執行。
在agent/travel/agent.py檔案中,我們只需要告訴代理程式在哪裡暫停。我們在compile函數中這樣做:
# 👇 agent/travel/agent.py

# Rest of the code...

graph = graph_builder.compile(
    checkpointer=MemorySaver(),
    # Pause right here and wait for the user!
    interrupt_after=["trips_node"],
)
現在,只要這樣做,代理就會問:“我應該繼續嗎?”而不是盲目地繼續工作。
- 處理用戶的決定
當用戶點擊暫停按鈕時,我們需要檢查他們想要做什麼。他們批准了這項行動嗎?或者他們點擊“取消”並重新開始?
在perform_trips_node中,我們將取得工具訊息並檢查使用者的決定:
# 👇 agent/travel/trips.py

# Rest of the code...

async def perform_trips_node(state: AgentState, config: RunnableConfig):
    """Execute trip operations"""
    ai_message = cast(AIMessage, state["messages"][-2])
    tool_message = cast(ToolMessage, state["messages"][-1])

    # Rest of the code...
現在,這裡的條件將檢查用戶的決定並採取相應的行動。
如果用戶說“取消”,我們會停止一切並簡單地返回自訂訊息。否則,對於任何其他響應,它將繼續工作。
# 👇 agent/travel/trips.py

# Rest of the code...
async def perform_trips_node(state: AgentState, config: RunnableConfig):
    """Execute trip operations"""
    ai_message = cast(AIMessage, state["messages"][-2])
    tool_message = cast(ToolMessage, state["messages"][-1])

    if tool_message.content == "CANCEL":
      return {
        "messages": AIMessage(content="Cancelled operation of trip."),
      }

    # handle the edge case where the AI message is not an AIMessage or does not have tool calls, should never happen.
    if not isinstance(ai_message, AIMessage) or not ai_message.tool_calls:
        return state

# Rest of the code...- 渲染決策 UI
現在,是時候更新前端以呈現工具呼叫並捕獲用戶的決定,並將其傳遞回代理。為此,我們將為每個帶有renderAndWait選項的工具呼叫使用useCopilotAction掛鉤。
使用以下程式碼行編輯ui/lib/hooks/use-trips.tsx :
// 👇 ui/lib/hooks/use-trips.tsx

// Rest of the imports...
import { AddTrips, EditTrips, DeleteTrips } from "@/components/humanInTheLoop";
import { useCoAgent, useCoAgentStateRender, useCopilotAction } from "@copilotkit/react-core";

// Rest of the code...

export const TripsProvider = ({ children }: { children: ReactNode }) => {
  // Rest of the code...

  useCoAgentStateRender<AgentState>({
    name: "travel",
    render: ({ state }) => {
      return <SearchProgress progress={state.search_progress} />
    },
  });

  useCopilotAction({
    name: "add_trips",
    description: "Add some trips",
    parameters: [
      {
        name: "trips",
        type: "object[]",
        description: "The trips to add",
        required: true,
      },
    ],
    renderAndWait: AddTrips,
  });

  useCopilotAction({
    name: "update_trips",
    description: "Update some trips",
    parameters: [
      {
        name: "trips",
        type: "object[]",
        description: "The trips to update",
        required: true,
      },
    ],
    renderAndWait: EditTrips,
  });

  useCopilotAction({
    name: "delete_trips",
    description: "Delete some trips",
    parameters: [
      {
        name: "trip_ids",
        type: "string[]",
        description: "The ids of the trips to delete",
        required: true,
      },
    ],
    renderAndWait: (props) => DeleteTrips({ ...props, trips: state.trips }),
  });

  // Rest of the code...
透過此設置,前端已準備好呈現工具呼叫並捕獲用戶的決定。然而,有一件重要的事情我們還沒有涉及:我們如何處理用戶的輸入並將其發送回代理?
- 可選:了解
humanInTheLoop元件
讓我們快速了解如何在前端處理這個問題。我們將使用DeleteTrips元件作為範例,但相同的邏輯也適用於AddTrips和EditTrips 。
// 👇 ui/lib/components/humanInTheLoop/DeleteTrips.tsx

import { Trip } from "@/lib/types";
import { PlaceCard } from "@/components/PlaceCard";
import { X, Trash } from "lucide-react";
import { ActionButtons } from "./ActionButtons";
import { RenderFunctionStatus } from "@copilotkit/react-core";

export type DeleteTripsProps = {
  args: any;
  status: RenderFunctionStatus;
  handler: any;
  trips: Trip[];
};

export const DeleteTrips = ({ args, status, handler, trips }: DeleteTripsProps) => {
  const tripsToDelete = trips.filter((trip: Trip) => args?.trip_ids?.includes(trip.id));

  return (
    <div className="space-y-4 w-full bg-secondary p-6 rounded-lg">
    <h1 className="text-sm">The following trips will be deleted:</h1>
      {status !== "complete" && tripsToDelete?.map((trip: Trip) => (
        <div key={trip.id} className="flex flex-col gap-4">
          <>
            <hr className="my-2" />
            <div className="flex flex-col gap-4">
            <h2 className="text-lg font-bold">{trip.name}</h2>
            {trip.places?.map((place) => (
              <PlaceCard key={place.id} place={place} />
            ))}
            </div>
          </>
        </div>
      ))}
      { status !== "complete" && (

        <ActionButtons
          status={status}
          handler={handler}
          approve={<><Trash className="w-4 h-4 mr-2" /> Delete</>}
          reject={<><X className="w-4 h-4 mr-2" /> Cancel</>}
        />
      )}
    </div>
  );
};這裡的關鍵部分是ActionButtons元件,它允許用戶批准或拒絕操作。這就是我們捕獲用戶決定的方式:
// 👇 ui/lib/components/humanInTheLoop/ActionButtons.tsx

import { RenderFunctionStatus } from "@copilotkit/react-core";
import { Button } from "../ui/button";

export type ActionButtonsProps = {
    status: RenderFunctionStatus;
    handler: any;
    approve: React.ReactNode;
    reject: React.ReactNode;
}

export const ActionButtons = ({ status, handler, approve, reject }: ActionButtonsProps) => (
  <div className="flex gap-4 justify-between">
    <Button
      className="w-full"
      variant="outline"
      disabled={status === "complete" || status === "inProgress"}
      onClick={() => handler?.("CANCEL")}
    >
      {reject}
    </Button>
    <Button
      className="w-full"
      disabled={status === "complete" || status === "inProgress"}
      onClick={() => handler?.("SEND")}
    >
      {approve}
    </Button>
  </div>
);當使用者按一下「取消」時,此處的按鈕handler?.("SEND") handler?.("CANCEL")這會將使用者的決定(「取消」或「傳送」)傳回代理。
這裡重要的一點是onClick處理程序將使用者的決定傳回代理。
💡 如果您希望允許使用者在將工具呼叫參數傳回代理之前對其進行編輯,您可以透過修改
onClick處理程序並調整代理處理工具呼叫的方式來實現此目的。
就這樣。 😮💨 我們已經成功加入了人機互動功能。現在,它可以提示使用者批准或拒絕新增、編輯或刪除行程等操作,並將這些決定發送回客服人員。
結論⚡
我們在本教程中介紹了很多內容。 😴 希望您了解如何使用 CopilotKit 將代理副駕駛加入到您的應用程式中,並了解如何即時執行狀態變更並實現人機互動概念。
完整原始碼:原始碼
💁 也可以參考該專案的原始文件。
非常感謝您的閱讀! 🎉🫡
在下面的評論部分分享您的想法! 👇

原文出處:https://dev.to/copilotkit/build-an-ai-travel-planner-with-copilotkit-langgraph-google-maps-api-32fm
1) --- 會變成分隔線(上一行必須是空白)
2) # 會變成一級標題
3) ## 會變成二級標題
4) ### 會變成三級標題
5) **粗體文字**會顯示粗體文字
6) ```當第一行與最後一行會顯示程式碼
7) 請搜尋 Markdown 語法,了解各種格式