🔧 阿川の電商水電行

如今,如果不使用 Next.js 或 Nuxt.js,現代大型專案是無法想像的。
但是,儘管如此,如果任務是快速建立這樣的結構,那麼這裡描述的方法非常適合此目的。
今天,我們將建立一個位於伺服器上的包含 5 個元件的小型登陸頁面應用程式。
讓我們開始吧!
📦應用程式結構
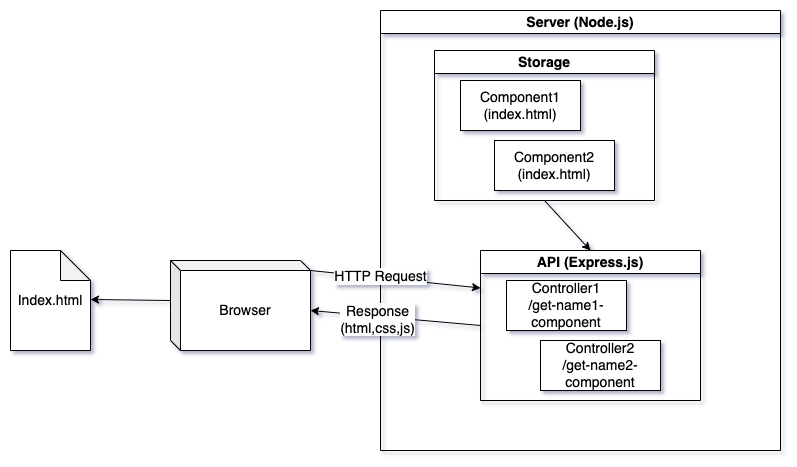
我們的應用程式將具有與現代 SSR 應用程式一樣的結構(當然沒有 BFF 等),但渲染將發生在客戶端,並透過瀏覽器顯示。
我們的結構中沒有資料庫的概念,因為資料將位於 html 檔案中。但是如果我們在登陸頁面上進行註冊,我們會有一個適合現代資料庫的.json文件,但這個例子應該在 10 分鐘內完成,所以擴展功能是沒有意義的。
另外,為了將客戶端連接到伺服器,我們將連接一個模組,例如 HMPL:
{% cta https://github.com/hmpl-language/hmpl %} 🌱 查看 HMPL ★{% endcta %}
👀 從哪裡開始建立應用程式?
首先,讓我們建立兩個檔案global.css和global.js 。它們將包括那些不依賴來自伺服器的樣式和腳本。
全域.css
* {
  margin: 0;
  padding: 0;
  box-sizing: border-box;
  font-family: Roboto, sans-serif;
}

body {
  line-height: 1.6;
  color: #333;
}

.container {
  width: 100%;
  max-width: 1200px;
  margin: 0 auto;
  padding: 0 20px;
}

.section {
  padding: 80px 0;
  text-align: center;
}

.section h2 {
  font-size: 36px;
  margin-bottom: 30px;
}
global.js
console.log("Global scripts loaded");因此,有可能不連接 global.js,但一般來說,如果我們在 js 上有共同點,那麼作為一個例子就很好了。配置常數、實用函數等。
現在,我們將建立index.html ,其中我們將連接登陸頁面所需的所有模組。
<!DOCTYPE html>
<html lang="en">
  <head>
    <meta charset="UTF-8" />
    <meta name="viewport" content="width=device-width, initial-scale=1.0" />
    <title>My Landing Page</title>
    <link rel="stylesheet" href="global.css" />
  </head>
  <body>
    <script src="https://unpkg.com/json5/dist/index.min.js"></script>
    <script src="https://unpkg.com/dompurify/dist/purify.min.js"></script>
    <script src="https://unpkg.com/hmpl-js/dist/hmpl.min.js"></script>
    <script src="global.js"></script>
  </body>
</html>
該網站本身目前看起來是空的,所以讓我們建立我們的元件!
⚙️ 伺服器配置
對於伺服器,我們當然會採用 Node.js 平台。您可以採取任何行動,這對網站來說並不是必需的。該框架將是 Express.js。
應用程式.js
const express = require("express");
const path = require("path");
const bodyParser = require("body-parser");
const cors = require("cors");

const PORT = 8000;
const app = express();

const getRoutes = require("./routes/get");

app.use(express.json());
app.use(bodyParser.urlencoded({ extended: false }));
app.use(cors({ origin: true, credentials: true }));

app.use(express.static(path.join(__dirname, "src")));

app.get("/", (_, res) => {
  res.sendFile(path.join(__dirname, "src/index.html"));
});

app.use("/api", getRoutes);

app.listen(PORT, () => {
  console.log(`Server is running on http://localhost:${PORT}`);
});
路線/get.js
const express = require("express");
const expressRouter = express.Router();
const path = require("path");

const components = {
  title: "CTA",
  header: "Header",
  features: "Features",
  promo: "Promo",
  cta: "CTA",
  footer: "Footer",
};

Object.entries(components).forEach(([name, folder]) => {
  expressRouter.get(`/get-${name}-component`, (_, res) => {
    res.type("text/html");
    res.sendFile(path.join(__dirname, `../components/${folder}/index.html`));
  });
});

module.exports = expressRouter;
在描述了幾個 js 檔案之後,我們現在可以在components資料夾中建立我們的應用程式元件。
路由可以任意命名,但為了方便起見,我將其命名為/api/get-${name}-component
⌨️ 編寫第一個元件
讓我們從橫幅開始,因為這是我們登陸頁面上的第一個內容區塊。我們將直接從 URL http://localhost:8000/api/get-features-component伺服器路由執行此操作。
元件/功能/index.html
<div id="features-component">
<section id="features" class="section features">
<div class="container">
<h2>Our Amazing Features</h2>
<div class="features-grid">
<div class="feature-card">
<h3>Fast</h3>
<p>Lightning fast performance that saves you time.</p>
</div>
<div class="feature-card">
<h3>Simple</h3>
<p>Easy to use interface with no learning curve.</p>
</div>
<div class="feature-card">
<h3>Reliable</h3>
<p>99.9% uptime guaranteed for your business.</p>
</div>
</div>
</div>
</section>
<style>
.features {
background: #f9f9f9;
padding: 80px 0;
text-align: center;
}
.features h2 {
font-size: 36px;
margin-bottom: 30px;
}
.features-grid {
display: grid;
grid-template-columns: repeat(3, 1fr);
gap: 30px;
margin-top: 50px;
}
.feature-card {
background: white;
padding: 30px;
border-radius: 8px;
box-shadow: 0 5px 15px rgba(0, 0, 0, 0.1);
opacity: 0;
transform: translateY(20px);
transition: all 0.6s ease;
}
.feature-card h3 {
margin-bottom: 15px;
font-size: 22px;
}
@media (max-width: 768px) {
.features-grid {
grid-template-columns: 1fr;
}
}
</style>
<script>
const animateFeatures = function () {
const elements = document.querySelectorAll(
"#features-component .feature-card"
);
elements.forEach((element) => {
const elementPosition = element.getBoundingClientRect().top;
const screenPosition = window.innerHeight / 1.3;
if (elementPosition < screenPosition) {
element.style.opacity = "1";
element.style.transform = "translateY(0)";
}
});
};
window.addEventListener("load", animateFeatures);
window.addEventListener("scroll", animateFeatures);
</script>
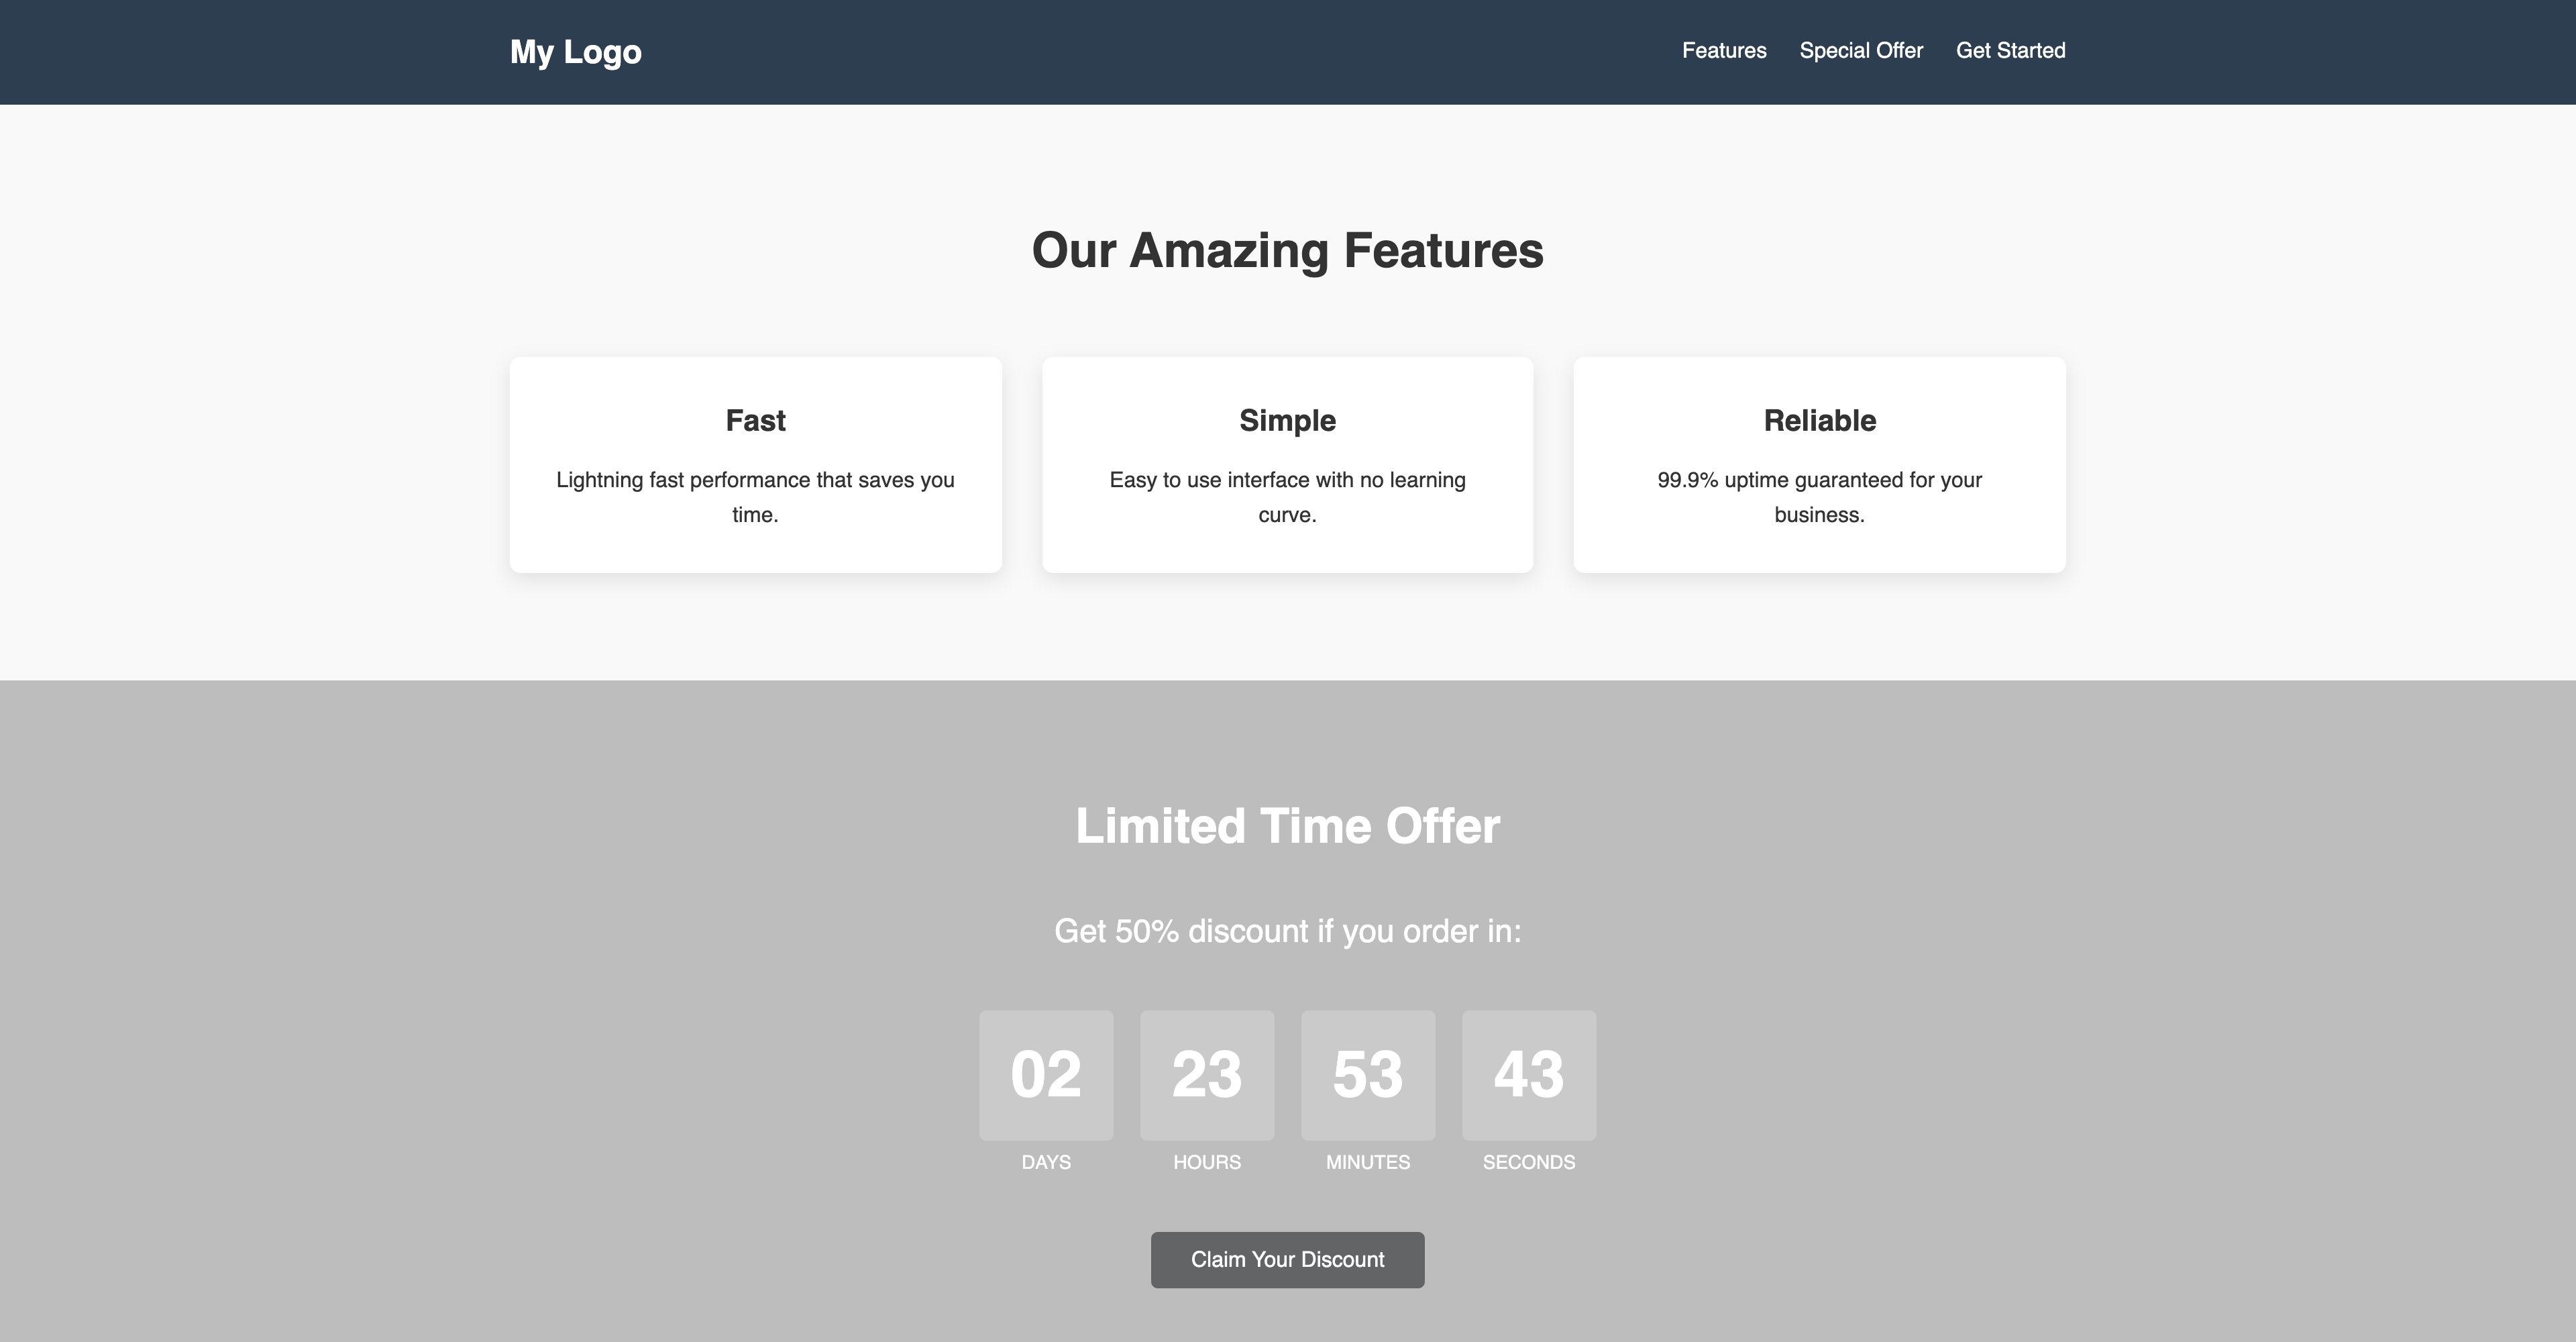
</div>現在,讓我們看看它會是什麼樣子:
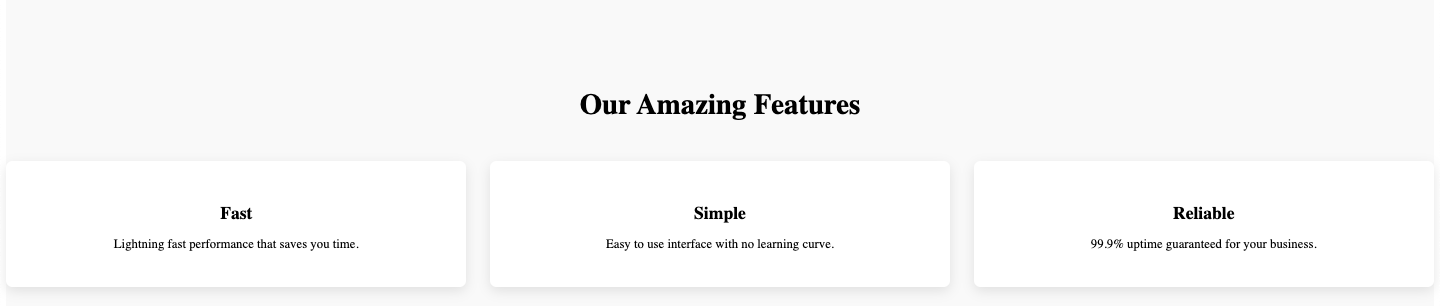
是的,伺服器上的元件看起來不會很好,因為我們編寫的樣式僅適用於它。但是,當我們將所有這些東西部署到我們的生產網站時,所有字體和其他東西都會連接起來,網站看起來會很好。
✅ 讓我們把剩下的寫完
一切正常,現在我們可以完成所有元件的編寫並使用 HMPL 將它們連接到我們的index.html 。我們也將完成以下元件的編寫:
-
標題:
http://localhost:8000/api/get-header-component -
促銷:
http://localhost:8000/api/get-promo-component -
行動呼籲:
http://localhost:8000/api/get-cta-component -
頁尾:
http://localhost:8000/api/get-footer-component
您可以在本網站的儲存庫中找到它們的完整列表,我不會只是在這裡複製和貼上程式碼,因為文章會很長。儲存庫的連結如下。
🔗 將所有內容連接到我們的網站
讓我們將伺服器請求的元件新增到我們的 html 並附加產生的 html。
<!DOCTYPE html>
<html lang="en">
  <head>
    <meta charset="UTF-8" />
    <meta name="viewport" content="width=device-width, initial-scale=1.0" />
    <title>My Landing Page</title>
    <link rel="stylesheet" href="global.css" />
  </head>
  <body>
    <script src="https://unpkg.com/json5/dist/index.min.js"></script>
    <script src="https://unpkg.com/dompurify/dist/purify.min.js"></script>
    <script src="https://unpkg.com/hmpl-js/dist/hmpl.min.js"></script>
    <script src="global.js"></script>
    <script>
      const body = document.querySelector("body");
      const template = `
        <main>
            <!-- Header Component -->
            {{#request src="http://localhost:8000/api/get-header-component"}}{{/request}}
            <!-- Features Component -->
            {{#request src="http://localhost:8000/api/get-features-component"}}{{/request}}
            <!-- Promo Component -->
            {{#request src="http://localhost:8000/api/get-promo-component"}}{{/request}}
            <!-- CTA Component -->
            {{#request src="http://localhost:8000/api/get-cta-component"}}{{/request}}
            <!-- Footer Component -->
            {{#request src="http://localhost:8000/api/get-footer-component"}}{{/request}}
        </main>
      `;
      const { response } = hmpl.compile(template)();
      body.append(response);
    </script>
  </body>
</html>值得注意的是,您可以為我們的元件新增載入器,或透過interval屬性為促銷新增間隔請求。
🖥️ 結果
現在,讓我們看看我們花了 10 分鐘(多一點)的時間完成了什麼:
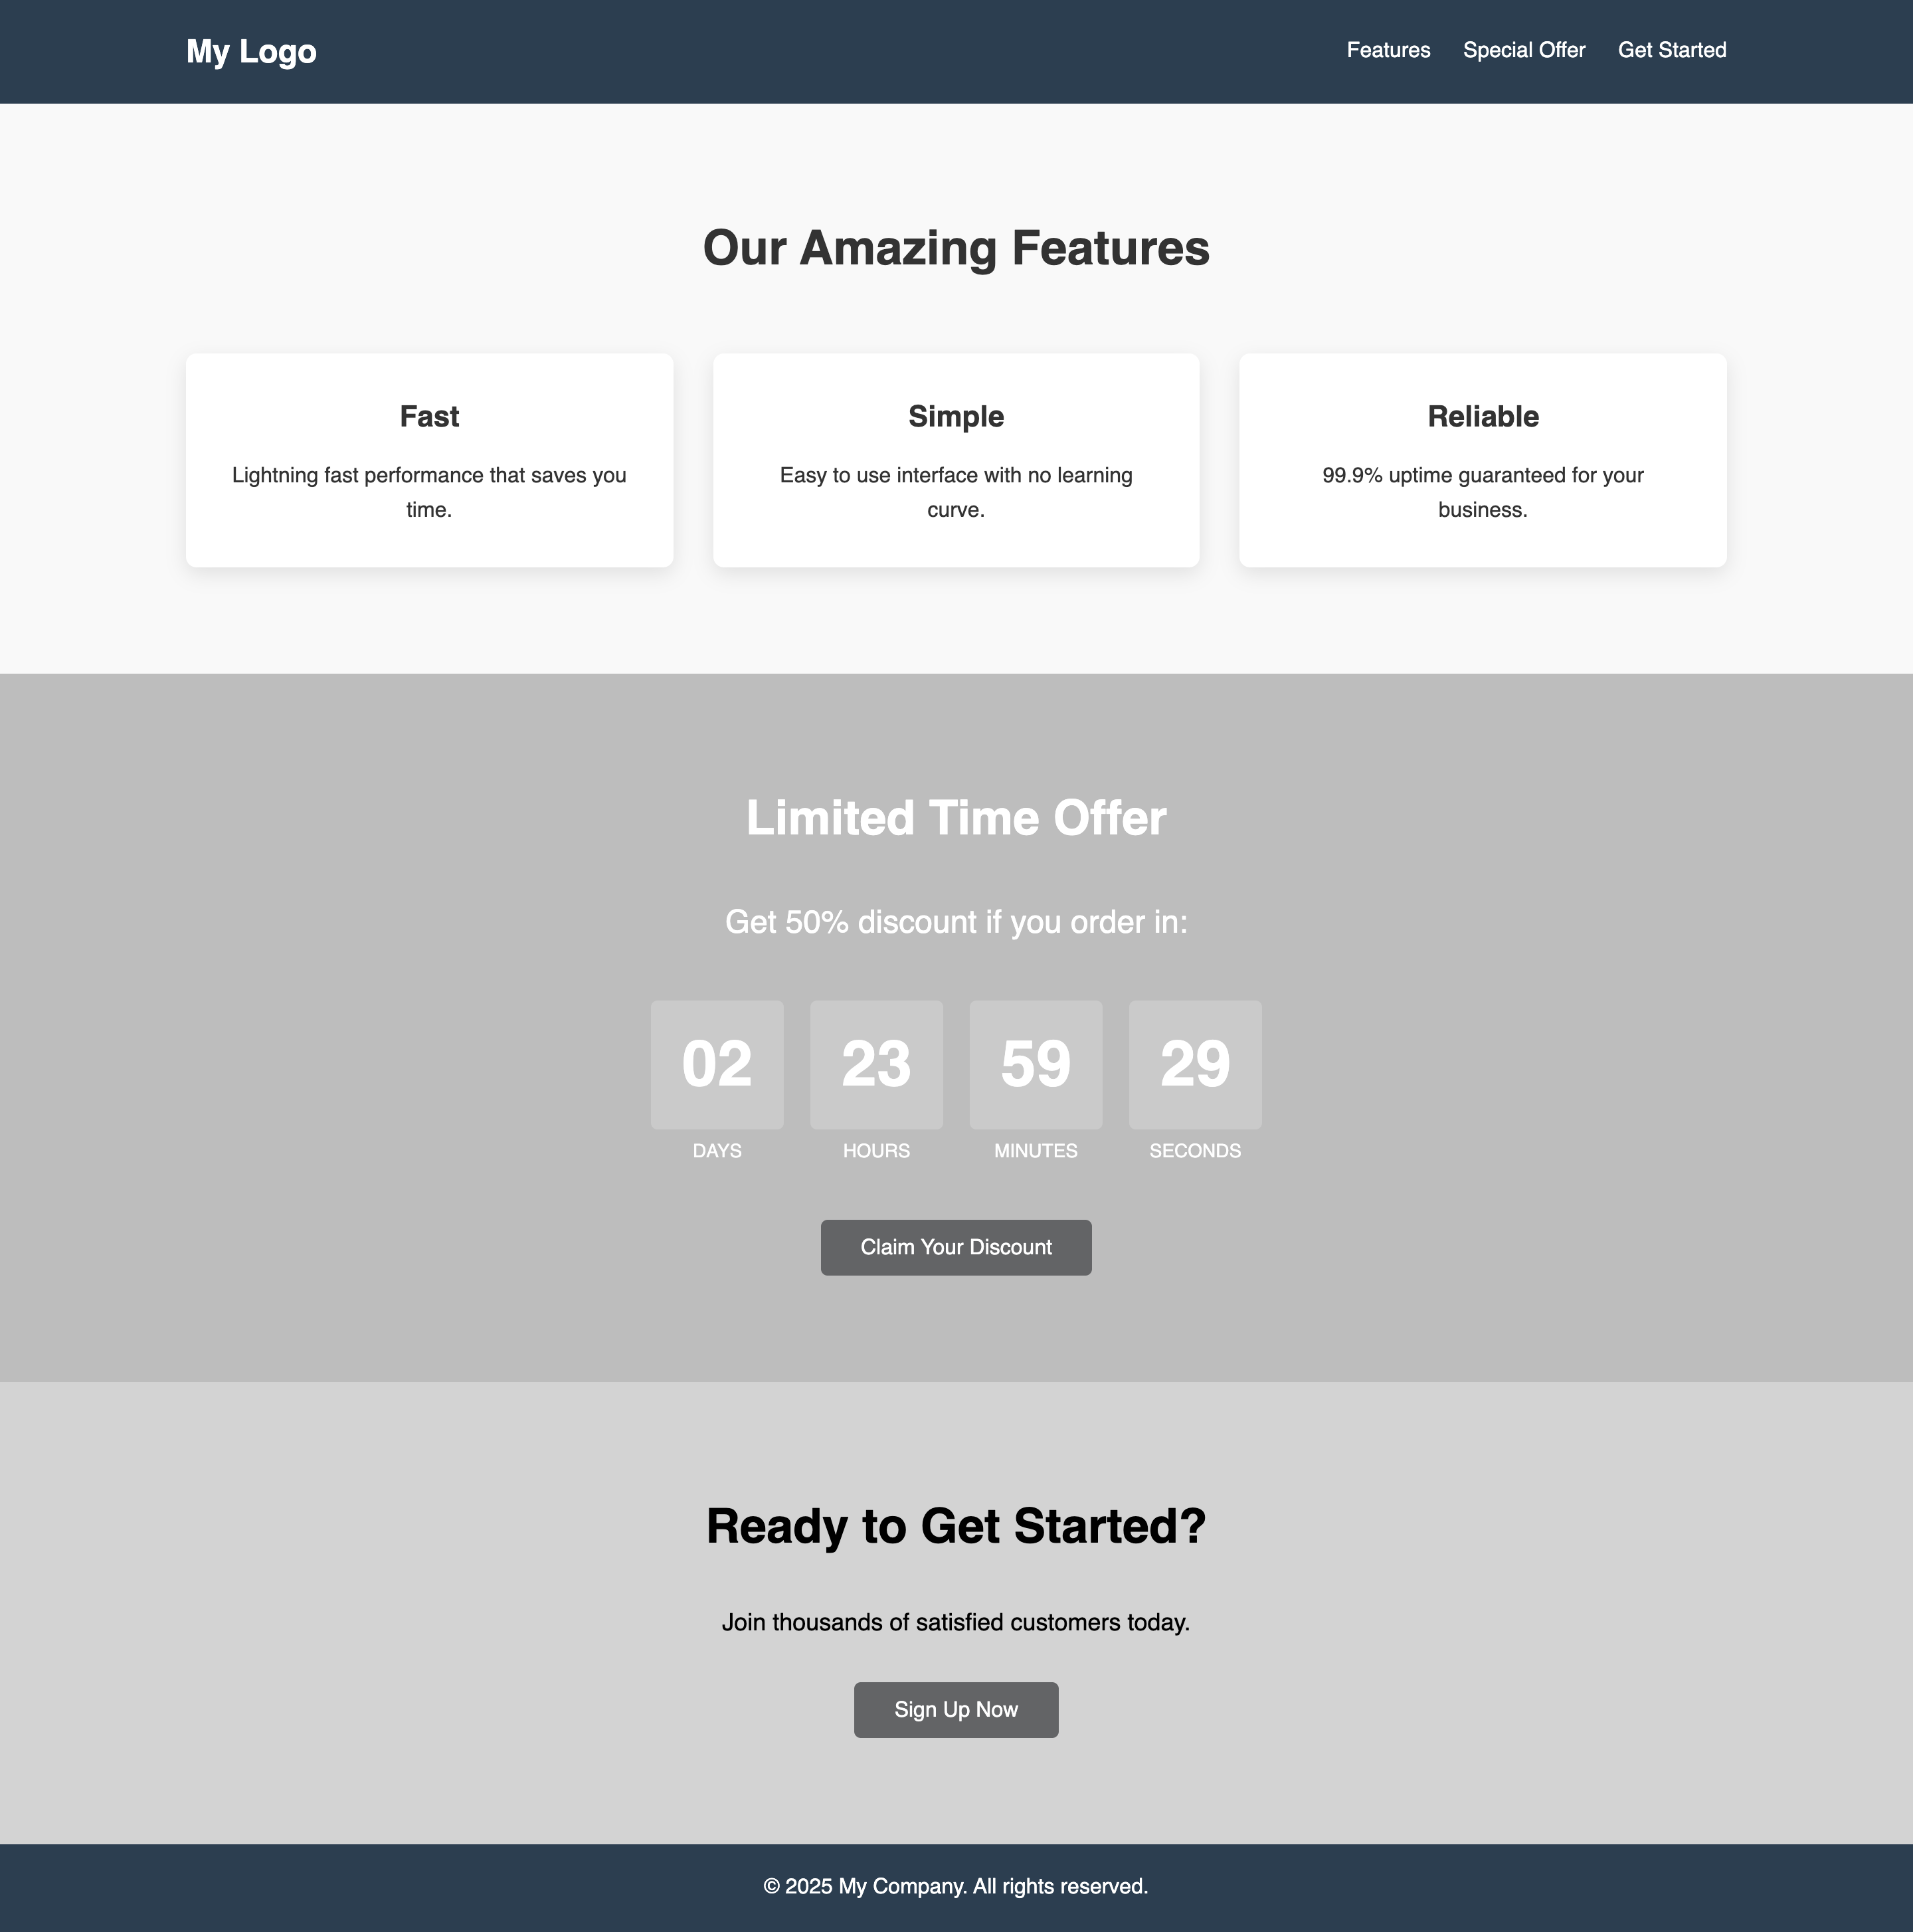
對我來說,它看起來非常漂亮,因為沒有特別關注風格等。
🖋️ 結論
在本文中,我們僅在客戶端使用 SSR 方法在 10 分鐘內建立了一個雖小但非常酷且功能強大的應用程式。使用 Next.js 可以實現相同的效果,但事實上我們必須連接框架並完全依賴它的結構,而在這裡我們連接一個模組就可以得到相同的東西(無需索引機器人)。
此外,如果您能用自己的明星來支持這個專案,那就太好了!謝謝❤️!
{% cta https://github.com/hmpl-language/hmpl %} 💎 星標 HMPL ★{% endcta %}
🗄️ 程式碼庫連結
您可以在此處找到完整程式碼: https://github.com/hmpl-language/examples/tree/main/landing
非常感謝大家閱讀這篇文章!

原文出處:https://dev.to/hmpljs/client-side-ssr-build-a-component-based-landing-page-in-10-minutes-2784
1) --- 會變成分隔線(上一行必須是空白)
2) # 會變成一級標題
3) ## 會變成二級標題
4) ### 會變成三級標題
5) **粗體文字**會顯示粗體文字
6) ```當第一行與最後一行會顯示程式碼
7) 請搜尋 Markdown 語法,了解各種格式