🔧 阿川の電商水電行

在本指南中,您將學習如何將 Mastra AI 代理與 AG-UI 協定整合。此外,我們還將介紹如何將 AG-UI + Mastra AI 代理與 CopilotKit 集成,以便與代理聊天並在前端串流其回應。
在我們開始之前,我們將介紹以下內容:
-
什麼是AG-UI協議?
-
將 Mastra AI 代理與 AG-UI 協定集成
-
使用 CopilotKit 將前端整合到 AG-UI + Mastra AI 代理
以下是我們將要建立的內容的預覽:
{% 嵌入https://youtu.be/vJxyBgWH9lA %}
什麼是AG-UI協議?
CopilotKit 開發的代理用戶互動協議 (AG-UI) 是一種開源、輕量級、基於事件的協議,可促進前端和 AI 代理之間的豐富即時互動。
AG-UI 協定支援事件驅動的通訊、狀態管理、工具使用和串流 AI 代理回應。
{% cta https://github.com/ag-ui-protocol/ag-ui %} 星級 AG-UI ⭐️ {% endcta %}
為了在前端和 AI 代理之間發送訊息,AG-UI 使用以下事件:
-
生命週期事件:這些事件標示代理任務執行的開始或結束。生命週期事件包括
RUN_STARTED和RUN_FINISHED事件。 -
簡訊事件:這些事件處理流代理對前端的回應。簡訊事件包括
TEXT_MESSAGE_START、TEXT_MESSAGE_CONTENT和TEXT_MESSAGE_END事件。 -
工具呼叫事件:這些事件管理代理程式的工具執行。工具呼叫事件包括
TOOL_CALL_START、TOOL_CALL_ARGS和TOOL_CALL_END事件。 -
狀態管理事件:這些事件使前端和 AI 代理程式狀態保持同步。狀態管理事件包括
STATE_SNAPSHOT和STATE_DELTA事件。
您可以在 AG-UI文件上了解有關 AG-UI協定及其架構的更多資訊。

現在我們已經了解了 AG-UI 協定是什麼,讓我們看看如何將它與 Mastra AI 代理框架整合。
讓我們開始吧!
先決條件
要完全理解本教程,您需要對 React 或 Next.js 有基本的了解。
我們還將利用以下內容:
-
TypeScript - 一種基於 JavaScript 的強型別程式語言,可為您提供任何規模的更好工具。
-
Mastra - 一個開源 TypeScript 代理框架,旨在為您提供建立 AI 應用程式和功能所需的原語。
-
OpenAI API 金鑰- 一個 API 金鑰,使我們能夠使用 GPT 模型執行各種任務;對於本教程,請確保您可以存取 GPT-4 模型。
-
CopilotKit - 一個開源副駕駛框架,用於建立自訂 AI 聊天機器人、應用程式內 AI 代理程式和文字區域。
將 Mastra AI 代理與 AG-UI 協定集成
首先,複製由基於 Node 的後端(代理)和 Next.js 前端(前端)組成的Open AG UI Mastra Demo 儲存庫。
接下來,導航到後端目錄:
cd agent然後使用 Pnpm 安裝依賴項:
pnpm install之後,使用OpenAI API Key API 金鑰建立一個.env檔:
OPENAI_API_KEY=<<your-OpenAI-key-here>>然後使用以下命令執行代理:
pnpx ts-node src/ag-ui-mastra.ts要測試 AG-UI + Mastra AI 集成,請在https://reqbin.com/curl上執行下面的 curl 命令。
curl -X POST "http://localhost:8000/mastra-agent" \
  -H "Content-Type: application/json" \
  -d '{
    "thread_id": "test_thread_123",
    "run_id": "test_run_456",
    "messages": [
      {
        "id": "msg_1",
        "role": "user",
        "content": "Analyze AAPL stock with a $10000 investment from 2023-01-01"
      }
    ],
    "tools": [],
    "context": [],
    "forwarded_props": {},
    "state": {}
  }'
現在讓我們看看如何將 AG-UI 協定與 Mastra AI 代理框架整合。
步驟 1:定義並設定 Mastra AI 代理程式工作流程
在將 AG-UI 協定與 Mastra AI 代理程式整合之前,請先定義並設定 Mastra AI 代理程式工作流程,如src/mastra/workflows/stock-analysis-workflow.ts檔案中所示
/**
 * MAIN WORKFLOW: Stock Analysis Workflow
 *
 * This is the main workflow orchestrator that ties together all the steps
 * to provide a complete stock analysis from user query to insights.
 */
const stockAnalysisWorkflow = createWorkflow({
  id: "stock-analysis-workflow",
  // Define workflow input schema - what the workflow expects to receive
  inputSchema: z.object({
    messages: z.any(), // Chat conversation messages
    availableCash: z.number().describe("The available cash of the user"),
    toolLogs: z
      .array(
        z.object({
          message: z.string().describe("The message to display to the user"),
          status: z.string().describe("The status of the message"),
        })
      )
      .describe("The tool logs of the workflow"),
    emitEvent: z.function().input(z.any()).output(z.any()), // Function to emit UI state updates
    investmentPortfolio: z
      .array(
        z.object({
          ticker: z.string(),
          amount: z.number(),
        })
      )
      .describe("The investment portfolio of the user"),
  }),
  // Define workflow output schema - what the completed workflow will return
  outputSchema: z.object({
    skip: z.boolean().describe("Whether to skip this step"),
    investmentPortfolio: z
      .array(
        z.object({
          ticker: z.string(),
          amount: z.number(),
        })
      )
      .describe("The investment portfolio of the user"),
    textMessage: z.string().describe("The text message to display to the user"),
    toolLogs: z
      .array(
        z.object({
          message: z.string().describe("The message to display to the user"),
          status: z.string().describe("The status of the message"),
        })
      )
      .describe("The tool logs of the workflow"),
    availableCash: z.number().describe("Available cash after investments"),
    // Time series performance data
    result: z.array(
      z.object({
        date: z.string().describe("The date"),
        portfolioValue: z.number().describe("Portfolio value at the time"),
        benchmarkValue: z.number().describe("Benchmark value at the time"),
      })
    ),
    // Individual ticker performance
    totalReturns: z.array(
      z.object({
        ticker: z.string().describe("The ticker value"),
        rets: z.number().describe("The total returns from the ticker"),
        retsNum: z
          .number()
          .describe("The total returns from the ticker in number"),
      })
    ),
    // Portfolio allocation breakdown
    allocations: z.array(
      z.object({
        ticker: z.string().describe("The ticker data"),
        percentOfAllocation: z
          .number()
          .describe("Percentage of allocation this ticker has"),
        value: z.number().describe("Current value of ticker in the portfolio"),
        returnPercent: z
          .number()
          .describe("Percentage of return from this ticker"),
      })
    ),
    // Generated market insights
    bullInsights: z.array(
      z.object({
        title: z.string().describe("The title of the insight"),
        description: z.string().describe("The description of the insight"),
        emoji: z.string().describe("The emoji of the insight"),
      })
    ),
    bearInsights: z.array(
      z.object({
        title: z.string().describe("The title of the insight"),
        description: z.string().describe("The description of the insight"),
        emoji: z.string().describe("The emoji of the insight"),
      })
    ),
  }),
})
  // Chain the workflow steps in sequence:
  .then(fetchInformationFromUserQuery) // Step 1: Extract investment parameters from user query
  .then(gatherStockInformation) // Step 2: Fetch historical stock data from Yahoo Finance
  .then(calculateInvestmentReturns) // Step 3: Calculate portfolio performance and returns
  .then(gatherInsights); // Step 4: Generate market insights using LLM

// Workflow setup and initialization
stockAnalysisWorkflow.commit(); // Finalize the workflow definition
stockAnalysisWorkflow.createRun(); // Create a new workflow run instance

// Export the workflow for use in other modules
export { stockAnalysisWorkflow };
步驟 2: 使用 Mastra 實例註冊您的 Mastra AI 代理程式工作流程
定義並設定 Mastra AI 代理程式工作流程後,使用主 Mastra 實例中的workflows註冊該工作流程,如src/mastra/index.ts檔案所示。
// Import necessary dependencies for Mastra framework configuration
import { Mastra } from "@mastra/core/mastra"; // Core Mastra framework class for orchestrating agents and workflows
import { PinoLogger } from "@mastra/loggers"; // Structured logging library for debugging and monitoring
import { LibSQLStore } from "@mastra/libsql"; // Database storage provider for telemetry, evaluations, and persistence
import { stockAnalysisAgent } from "./agents/stock-analysis-agent"; // The intelligent stock analysis agent
import { stockAnalysisWorkflow } from "./workflows/stock-analysis-workflow"; // The complete stock analysis workflow

/**
 * Mastra Framework Configuration
 *
 * This file serves as the central configuration and initialization point for the entire
 * stock analysis system. It brings together all the components:
 *
 * 1. Agents - Intelligent conversational interfaces that understand user queries
 * 2. Workflows - Multi-step business processes that execute complex analysis
 * 3. Storage - Database layer for persistence and telemetry data
 * 4. Logging - Structured logging for debugging and monitoring
 *
 * The Mastra instance acts as the main orchestrator that coordinates all these
 * components and provides a unified interface for the application.
 */
export const mastra = new Mastra({
  // Step 1: Register all available workflows
  // Workflows are multi-step processes that can be executed by agents or triggered directly
  workflows: { stockAnalysisWorkflow }, // Register the stock analysis workflow for investment calculations

  // Step 2: Register all available agents
  // Agents are intelligent interfaces that can understand natural language and execute workflows
  agents: { stockAnalysisAgent }, // Register the stock analysis agent for handling user conversations

  // Step 3: Configure data storage
  // Storage handles persistence of telemetry data, evaluation results, and system state
  storage: new LibSQLStore({
    // Use in-memory storage for development/testing (data is lost when process stops)
    // For production: change to "file:../mastra.db" to persist data to disk
    // stores telemetry, evals, ... into memory storage, if it needs to persist, change to file:../mastra.db
    url: ":memory:", // In-memory database - fast but non-persistent
  }),

  // Step 4: Configure structured logging
  // Logger captures system events, errors, and debugging information
  logger: new PinoLogger({
    name: "Mastra", // Logger name for identifying log source
    level: "info", // Log level - captures info, warn, and error messages (filters out debug/trace)
  }),
});
步驟 3:使用 Express 建立端點
將 Mastra AI 代理程式工作流程註冊到 Mastra 實例後,使用 Express 建立一個用於處理前端請求和回應的端點。然後導入 Mastra 實例,如src/ag-ui-mastra.ts檔案中所示。
// =============================================================================
// IMPORTS AND DEPENDENCIES SECTION
// =============================================================================

// Load environment variables from .env file
// This must be imported first to ensure environment variables are available
import "dotenv/config";

// Import Express.js framework and type definitions
// Express provides the HTTP server and middleware functionality
import express, { Request, Response } from "express";

// Import AG-UI core types and schemas for input validation and event types
// These provide the protocol definitions for Agent Gateway UI communication
import {
  RunAgentInputSchema, // Schema for validating incoming agent requests
  RunAgentInput, // TypeScript interface for agent input data
  EventType, // Enumeration of all possible event types
  Message, // Interface for chat message structure
} from "@ag-ui/core";

// Import event encoder for Server-Sent Events (SSE) formatting
// This handles the encoding of events for real-time streaming
import { EventEncoder } from "@ag-ui/encoder";

// Import UUID generator for creating unique message IDs
// Used to track individual messages and tool calls
import { v4 as uuidv4 } from "uuid";

// Import the configured Mastra instance containing our stock analysis agent
// This is the main AI workflow engine that processes user requests
import { mastra } from "./mastra";

// =============================================================================
// EXPRESS APPLICATION SETUP
// =============================================================================

// Create Express application instance
const app = express();

// Enable JSON body parsing middleware for incoming requests
// This allows the server to parse JSON payloads from HTTP requests
app.use(express.json());

// =============================================================================
// MAIN AGENT ENDPOINT IMPLEMENTATION
// =============================================================================

// Define the main mastra-agent (Agent Workflow Protocol) endpoint
// This endpoint handles streaming communication with AG-UI agents
app.post("/mastra-agent", async (req: Request, res: Response) => {

  //...

});

// =============================================================================
// SERVER INITIALIZATION SECTION
// =============================================================================

// START EXPRESS SERVER
// Configure and start the HTTP server on port 8000
app.listen(8000, () => {
  console.log("Server running on http://localhost:8000");
  console.log("AG-UI endpoint available at http://localhost:8000/mastra-agent");
});
步驟 4:設定輸入驗證、設定伺服器傳送事件並初始化 AG-UI 協定事件編碼器
在您的 Express 伺服器端點內,設定輸入驗證,設定伺服器傳送事件回應標頭並初始化 AG-UI 協定事件編碼器實例以格式化用於 SSE 傳輸的事件,如下所示。
app.post("/mastra-agent", async (req: Request, res: Response) => {
  try {
    // STEP 1: Parse and Validate Input
    // Parse the incoming request body using the RunAgentInputSchema to ensure
    // it contains all required fields (threadId, runId, messages, etc.)
    const input: RunAgentInput = RunAgentInputSchema.parse(req.body);

    // STEP 2: Setup Server-Sent Events (SSE) Response Headers
    // Configure HTTP headers to enable real-time streaming communication
    res.setHeader("Content-Type", "text/event-stream"); // Enable SSE format
    res.setHeader("Cache-Control", "no-cache"); // Prevent browser caching
    res.setHeader("Connection", "keep-alive"); // Keep connection open for streaming

    // STEP 3: Initialize Event Encoder
    // Create encoder instance to format events for SSE transmission
    const encoder = new EventEncoder();

    // ...

    // STEP 13: Close SSE Connection
    // End the response stream to complete the HTTP request
    res.end();
  } catch (error) {
    // =============================================================================
    // ERROR HANDLING SECTION
    // =============================================================================
   }
});
步驟 5:設定 AG-UI 協定生命週期事件
在您的 Express 伺服器端點中,設定 AG-Ui 協定生命週期事件以標記代理任務執行的開始或結束,如下所示。
app.post("/mastra-agent", async (req: Request, res: Response) => {
  try {
    // ...

    // STEP 3: Initialize Event Encoder
    // Create encoder instance to format events for SSE transmission
    const encoder = new EventEncoder();

    // STEP 4: Send Run Started Event
    // Notify the client that the agent run has begun processing
    const runStarted = {
      type: EventType.RUN_STARTED,
      threadId: input.threadId,
      runId: input.runId,
    };
    res.write(encoder.encode(runStarted));

    // ...

    // STEP 12: Finalize Agent Run
    // Send final event to indicate the entire agent run is complete
    const runFinished = {
      type: EventType.RUN_FINISHED,
      threadId: input.threadId, // Reference the conversation thread
      runId: input.runId, // Reference this specific run
    };
    res.write(encoder.encode(runFinished));

    // STEP 13: Close SSE Connection
    // End the response stream to complete the HTTP request
    res.end();
  } catch (error) {
    // =============================================================================
    // ERROR HANDLING SECTION
    // =============================================================================
   }
});
步驟 6:在工作流程步驟中設定 AG-UI 協定狀態管理事件
在您的 Mastra AI 代理程式工作流程檔案中,在工作流程步驟中設定 AG-UI 協定狀態管理STATE_DELTA事件,該事件發出 UI 狀態更新以顯示處理狀態,如下所示。
import { EventType } from "@ag-ui/core"; // Event types for UI state updates

/**
 * STEP 1: Extract Investment Parameters from User Query
 *
 * This step uses an LLM to parse the user's natural language query and extract
 * structured investment parameters like tickers, amounts, dates, etc.
 */
const fetchInformationFromUserQuery = createStep({
  id: "fetch-information-from-user-query",
  description: "Fetches information from user query",
  // Define input schema - what data this step expects to receive

  ...

  // Define output schema - what data this step will produce

  ...

  execute: async ({ inputData }) => {
    try {
      // Step 1.1: Initialize data and prepare the analysis prompt
      let data = inputData;
      await new Promise((resolve) => setTimeout(resolve, 0)); // Small delay for async processing

      // Step 1.2: Inject portfolio context into the stock analyst prompt
      data.messages[0].content = STOCK_ANALYST_PROMPT.replace(
        "{{PORTFOLIO_DATA_CONTEXT}}",
        JSON.stringify(inputData.investmentPortfolio)
      );

      // Step 1.3: Emit UI state update to show processing status
      if (inputData?.emitEvent && typeof inputData.emitEvent === "function") {
        inputData.emitEvent({
          type: EventType.STATE_DELTA,
          delta: [
            {
              op: "add",
              path: "/toolLogs/-",
              value: {
                message: "Fetching information from user query",
                status: "processing",
              },
            },
          ],
        });
        inputData.toolLogs.push({
          message: "Fetching information from user query",
          status: "processing",
        });
        await new Promise((resolve) => setTimeout(resolve, 0));
      }

      // ...

       return {
          skip: true, // Skip further analysis steps
          availableCash: inputData.availableCash,
          emitEvent: inputData.emitEvent,
          textMessage: response.choices[0].message.content,
        };
      } else {
        // Step 1.7: Parse extracted investment parameters from tool call
        let toolResult;

        // ...

        // Step 1.9: Update UI status to completed
        if (inputData?.emitEvent && typeof inputData.emitEvent === "function") {
          let index = inputData.toolLogs.length - 1;
          inputData.emitEvent({
            type: EventType.STATE_DELTA,
            delta: [
              {
                op: "replace",
                path: `/toolLogs/${index}/status`,
                value: "completed",
              },
            ],
          });
          await new Promise((resolve) => setTimeout(resolve, 0));
        }

        // Step 1.10: Return extracted parameters for next step
        return {
          ...toolResult,
          skip: false, // Continue with analysis
          availableCash: inputData.availableCash,
          investmentPortfolio: inputData.investmentPortfolio,
          emitEvent: inputData.emitEvent,
          textMessage: "",
          toolLogs: inputData.toolLogs,
        };
      }
    } catch (error) {
      console.log(error);
      throw error;
    }
  },
});
然後在 Express 端點中,使用STATE_SNAPSHOT AG-UI 協定狀態管理事件初始化您的代理程式狀態,如下所示。
app.post("/mastra-agent", async (req: Request, res: Response) => {
  try {
    // ...

    // STEP 3: Initialize Event Encoder
    // Create encoder instance to format events for SSE transmission
    const encoder = new EventEncoder();

    // ...

    // STEP 5: Initialize Agent State
    // Send initial state snapshot with default values for financial data
    // This provides the UI with the current state of the investment portfolio
    const stateSnapshot = {
      type: EventType.STATE_SNAPSHOT,
      snapshot: {
        availableCash: input.state?.availableCash || 100000, // Default $100k if not provided
        investmentSummary: input.state?.investmentSummary || {}, // Empty summary object
        investmentPortfolio: input.state?.investmentPortfolio || [], // Empty portfolio array
        toolLogs: [], // Initialize empty tool logs array
      },
    };
    res.write(encoder.encode(stateSnapshot));
    await new Promise((resolve) => setTimeout(resolve, 0)); // Allow event loop to process

    // ...

    // STEP 13: Close SSE Connection
    // End the response stream to complete the HTTP request
    res.end();
  } catch (error) {
    // =============================================================================
    // ERROR HANDLING SECTION
    // =============================================================================
   }
});
步驟 7:使用 AG-UI 協定整合並初始化 Mastra AI 代理程式工作流程
在您的 Express 伺服器端點中,將 Mastra 實例的 Mastra AI 代理程式工作流程與 AG-UI 協定集成,如下所示。
app.post("/mastra-agent", async (req: Request, res: Response) => {
  try {
    // ...

    // STEP 3: Initialize Event Encoder
    // Create encoder instance to format events for SSE transmission
    const encoder = new EventEncoder();

    // ...

    // STEP 6: Get Stock Analysis Workflow
    // Retrieve the pre-configured stock analysis workflow from Mastra
    const stockAnalysis = mastra.getWorkflow("stockAnalysisWorkflow");

    // STEP 7: Define Event Emission Helper
    // Create a helper function to emit events to the SSE stream
    function emitEvent(data: any) {
      res.write(encoder.encode(data));
    }

    // STEP 8: Create and Start Workflow Execution
    // Initialize a new workflow run instance and start processing
    const workflow = await stockAnalysis.createRunAsync();
    const result = await workflow.start({
      inputData: {
        messages: input.messages, // User messages from the conversation
        availableCash: input.state?.availableCash || 1000000, // Available investment funds
        emitEvent: emitEvent, // Event emission callback
        investmentPortfolio: input.state?.investmentPortfolio || [], // Current portfolio
        toolLogs: [], // Initialize tool logs
      },
    });

    // STEP 9: Reset Tool Logs State
    // Clear any previous tool logs to start fresh for this run
    emitEvent({
      type: EventType.STATE_DELTA,
      delta: [{ op: "replace", path: "/toolLogs", value: [] }],
    });
    await new Promise((resolve) => setTimeout(resolve, 0)); // Allow processing

    // ...

    // STEP 13: Close SSE Connection
    // End the response stream to complete the HTTP request
    res.end();
  } catch (error) {
    // =============================================================================
    // ERROR HANDLING SECTION
    // =============================================================================
   }
});
步驟 8:設定 AG-UI 協定工具事件以處理人機互動斷點
在您的 Express 伺服器端點中,定義 AG-UI 協定工具呼叫事件,代理可以使用它來觸發前端操作,方法是使用工具名稱呼叫前端操作以請求使用者回饋,如下所示。
app.post("/mastra-agent", async (req: Request, res: Response) => {
  try {
    // ...

    // STEP 3: Initialize Event Encoder
    // Create encoder instance to format events for SSE transmission
    const encoder = new EventEncoder();

    // ...

    // STEP 11: Process Workflow Results
    // Check if the workflow executed successfully and produced chart data
    if (result?.status === "success" && result?.result?.result?.length > 0) {
      // STEP 11A: Handle Chart/Table Rendering Response
      // The workflow has produced data suitable for rendering charts and tables

      // STEP 11A.1: Start Tool Call for Chart Rendering
      // Notify the client that a tool call is beginning
      const toolcallStart = {
        type: EventType.TOOL_CALL_START,
        toolCallId: uuidv4(), // Unique identifier for this tool call
        toolCallName: "render_standard_charts_and_table", // Name of the tool being called
      };
      emitEvent(toolcallStart);
      await new Promise((resolve) => setTimeout(resolve, 0)); // Allow processing

      // STEP 11A.2: Send Tool Call Arguments
      // Transmit the chart/table data as arguments to the rendering tool
      const toolcallArgs = {
        type: EventType.TOOL_CALL_ARGS,
        toolCallId: toolcallStart.toolCallId, // Reference the tool call
        delta: JSON.stringify(result.result), // Serialize the result data
      };
      emitEvent(toolcallArgs);
      await new Promise((resolve) => setTimeout(resolve, 0)); // Allow processing

      // STEP 11A.3: End Tool Call
      // Signal that the tool call has completed
      const toolcallEnd = {
        type: EventType.TOOL_CALL_END,
        toolCallId: toolcallStart.toolCallId, // Reference the tool call
      };
      emitEvent(toolcallEnd);
      await new Promise((resolve) => setTimeout(resolve, 0)); // Allow processing
    } else {

      // ...

    }

    // ...

    // STEP 13: Close SSE Connection
    // End the response stream to complete the HTTP request
    res.end();
  } catch (error) {
    // =============================================================================
    // ERROR HANDLING SECTION
    // =============================================================================
   }
});
步驟9:設定AG-UI協定簡訊事件
配置 AG-UI 協定工具事件後,定義 AG-UI 協定文字訊息事件以處理對前端的流代理回應,如下所示。
app.post("/mastra-agent", async (req: Request, res: Response) => {
  try {
    // ...

    // STEP 3: Initialize Event Encoder
    // Create encoder instance to format events for SSE transmission
    const encoder = new EventEncoder();

    // ...

    // STEP 11: Process Workflow Results
    // Check if the workflow executed successfully and produced chart data
    if (result?.status === "success" && result?.result?.result?.length > 0) {

      // ...

    } else {
      // STEP 11B: Handle Text Response
      // The workflow produced a text message instead of chart data

      // STEP 11B.1: Start Text Message Stream
      // Begin streaming a text response to the client
      const textMessageStart = {
        type: EventType.TEXT_MESSAGE_START,
        messageId, // Use the generated message ID
        role: "assistant", // Indicate this is an assistant response
      };
      res.write(encoder.encode(textMessageStart));
      await new Promise((resolve) => setTimeout(resolve, 0)); // Allow processing

      // STEP 11B.2: Extract Response Content
      // Get the text message from the workflow result, with fallback to empty string
      const response =
        result?.status === "success" ? result.result.textMessage : "";

      // STEP 11B.3: Stream Response in Chunks
      // Break the response into smaller chunks for smooth streaming experience
      const chunkSize = 100; // Number of characters per chunk
      for (let i = 0; i < response.length; i += chunkSize) {
        const chunk = response.slice(i, i + chunkSize); // Extract chunk

        // Send the chunk to the client
        const textMessageContent = {
          type: EventType.TEXT_MESSAGE_CONTENT,
          messageId, // Reference the message
          delta: chunk, // The text chunk
        };
        res.write(encoder.encode(textMessageContent));

        // Add small delay between chunks for smooth streaming effect
        await new Promise((resolve) => setTimeout(resolve, 50));
      }

      // STEP 11B.4: End Text Message Stream
      // Signal that the text message is complete
      const textMessageEnd = {
        type: EventType.TEXT_MESSAGE_END,
        messageId, // Reference the message
      };
      res.write(encoder.encode(textMessageEnd));
    }

    // ...

    // STEP 13: Close SSE Connection
    // End the response stream to complete the HTTP request
    res.end();
  } catch (error) {
    // =============================================================================
    // ERROR HANDLING SECTION
    // =============================================================================
   }
});
恭喜!您已將 Mastra AI 代理與 AG-UI 協定整合。現在讓我們看看如何為 AG-UI + Mastra AI 代理程式加入前端。
使用 CopilotKit 將前端整合到 AG-UI + Mastra AI 代理
在本節中,您將學習如何使用 CopilotKit 在 AG-UI + Mastra AI 代理程式和前端之間建立連線。
讓我們開始吧。
首先,導航到前端目錄:
cd frontend接下來建立一個帶有OpenAI API Key API 金鑰的.env檔:
OPENAI_API_KEY=<<your-OpenAI-key-here>>然後安裝相依性:
pnpm install之後,啟動開發伺服器:
pnpm run dev導航至http://localhost:3000 ,您應該會看到 AG-UI + Mastra AI 代理前端已啟動並正在執行。

現在讓我們看看如何使用 CopilotKit 為 AG-UI + Mastra AI 代理程式建立前端 UI。
步驟1:建立HttpAgent實例
在建立HttpAgent實例之前,首先我們來了解什麼是HttpAgent。
HttpAgent 是 AG-UI 函式庫的一個用戶端,它可以將您的前端應用程式與任何與 AG-UI 相容的 AI 代理程式的伺服器連接起來。
若要建立 HttpAgent 實例,請在 API 路由中定義它,如src/app/api/copilotkit/route.ts檔案中所示。
// Import the HttpAgent for making HTTP requests to the backend
import { HttpAgent } from "@ag-ui/client";

// Import CopilotKit runtime components for setting up the API endpoint
import {
  CopilotRuntime,
  OpenAIAdapter,
  copilotRuntimeNextJSAppRouterEndpoint,
} from "@copilotkit/runtime";

// Import NextRequest type for handling Next.js API requests
import { NextRequest } from "next/server";

// Create a new HttpAgent instance that connects to the LangGraph research backend running locally
const mastraAgent = new HttpAgent({
  url: process.env.NEXT_PUBLIC_MASTRA_URL || "http://localhost:8000/mastra-agent",
});

// Initialize the CopilotKit runtime with our research agent
const runtime = new CopilotRuntime({
  agents: {
    mastraAgent : mastraAgent, // Register the research agent with the runtime
  },
});

/**
 * Define the POST handler for the API endpoint
 * This function handles incoming POST requests to the /api/copilotkit endpoint
 */
export const POST = async (req: NextRequest) => {
  // Configure the CopilotKit endpoint for the Next.js app router
  const { handleRequest } = copilotRuntimeNextJSAppRouterEndpoint({
    runtime, // Use the runtime with our research agent
    serviceAdapter: new OpenAIAdapter(), // Use the experimental adapter
    endpoint: "/api/copilotkit", // Define the API endpoint path
  });

  // Process the incoming request with the CopilotKit handler
  return handleRequest(req);
};
第 2 步:設定 CopilotKit 提供程序
要設定 CopilotKit 提供程序, CopilotKit元件必須包裝應用程式中支援 Copilot 的部分。
對於大多數用例,將 CopilotKit 提供者包裝在整個應用程式中是合適的,例如,在您的layout.tsx中,如下面的src/app/layout.tsx檔案中所示。
// Next.js imports for metadata and font handling
import type { Metadata } from "next";
import { Geist, Geist_Mono } from "next/font/google";
// Global styles for the application
import "./globals.css";
// CopilotKit UI styles for AI components
import "@copilotkit/react-ui/styles.css";
// CopilotKit core component for AI functionality
import { CopilotKit } from "@copilotkit/react-core";

// Configure Geist Sans font with CSS variables for consistent typography
const geistSans = Geist({
  variable: "--font-geist-sans",
  subsets: ["latin"],
});

// Configure Geist Mono font for code and monospace text
const geistMono = Geist_Mono({
  variable: "--font-geist-mono",
  subsets: ["latin"],
});

// Metadata configuration for SEO and page information
export const metadata: Metadata = {
  title: "AI Stock Portfolio",
  description: "AI Stock Portfolio",
};

// Root layout component that wraps all pages in the application
export default function RootLayout({
  children,
}: Readonly<{
  children: React.ReactNode;
}>) {
  return (
    <html lang="en">
      <body
        className={`${geistSans.variable} ${geistMono.variable} antialiased`}>
        {/* CopilotKit wrapper that enables AI functionality throughout the app */}
        {/* runtimeUrl points to the API endpoint for AI backend communication */}
        {/* agent specifies which AI agent to use (stockAgent for stock analysis) */}
        <CopilotKit runtimeUrl="/api/copilotkit" agent="stockAgent">
          {children}
        </CopilotKit>
      </body>
    </html>
  );
}
步驟 3:設定 Copilot 聊天元件
CopilotKit 隨附許多內建聊天元件,包括CopilotPopup 、 CopilotSidebar和CopilotChat 。
若要設定 Copilot 聊天元件,請依照src/app/components/prompt-panel.tsx檔案中所示進行定義。
// Client-side component directive for Next.js
"use client";
import type React from "react";
// CopilotKit chat component for AI interactions
import { CopilotChat } from "@copilotkit/react-ui";
// Props interface for the PromptPanel component
interface PromptPanelProps {
// Amount of available cash for investment, displayed in the panel
availableCash: number;
}
// Main component for the AI chat interface panel
export function PromptPanel({ availableCash }: PromptPanelProps) {
// Utility function to format numbers as USD currency
// Removes decimal places for cleaner display of large amounts
const formatCurrency = (amount: number) => {
return new Intl.NumberFormat("en-US", {
style: "currency",
currency: "USD",
minimumFractionDigits: 0,
maximumFractionDigits: 0,
}).format(amount);
};
return (
// Main container with full height and white background
<div className="h-full flex flex-col bg-white">
{/* Header section with title, description, and cash display */}
<div className="p-4 border-b border-[#D8D8E5] bg-[#FAFCFA]">
{/* Title section with icon and branding */}
<div className="flex items-center gap-2 mb-2">
<span className="text-xl">🪁</span>
<div>
<h1 className="text-lg font-semibold text-[#030507] font-['Roobert']">
Portfolio Chat
</h1>
{/* Pro badge indicator */}
<div className="inline-block px-2 py-0.5 bg-[#BEC9FF] text-[#030507] text-xs font-semibold uppercase rounded">
PRO
</div>
</div>
</div>
{/* Description of the AI agent's capabilities */}
<p className="text-xs text-[#575758]">
Interact with the LangGraph-powered AI agent for portfolio
visualization and analysis
</p>
{/* Available Cash Display section */}
<div className="mt-3 p-2 bg-[#86ECE4]/10 rounded-lg">
<div className="text-xs text-[#575758] font-medium">
Available Cash
</div>
<div className="text-sm font-semibold text-[#030507] font-['Roobert']">
{formatCurrency(availableCash)}
</div>
</div>
</div>
{/* CopilotKit chat interface with custom styling and initial message */}
{/* Takes up majority of the panel height for conversation */}
<CopilotChat
className="h-[78vh] p-2"
labels={{
// Initial welcome message explaining the AI agent's capabilities and limitations
initial: `I am a LangGraph AI agent designed to analyze investment opportunities and track stock performance over time. How can I help you with your investment query? For example, you can ask me to analyze a stock like "Invest in Apple with 10k dollars since Jan 2023". \n\nNote: The AI agent has access to stock data from the past 4 years only`,
}}
/>
</div>
);
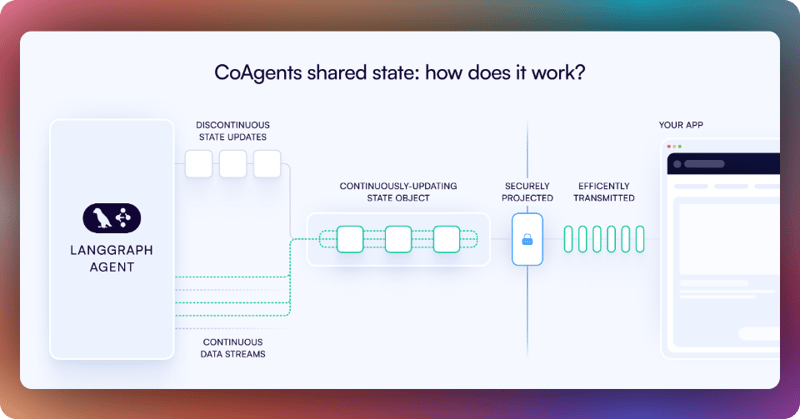
}步驟 4:使用 CopilotKit 鉤子將 AG-UI + Mastra AI 代理程式狀態與前端同步
在 CopilotKit 中,CoAgent 維護一個共享狀態,無縫連接前端 UI 與代理程式的執行。此共享狀態系統允許您:
-
顯示代理程式的當前進度和中間結果
-
透過 UI 互動更新代理程式的狀態
-
對整個應用程式的狀態變化做出即時反應
您可以在CopilotKit 文件中了解有關 CoAgents 共享狀態的更多資訊。
若要將您的 AG-UI + Mastra AI 代理程式狀態與前端同步,請使用CopilotKit useCoAgent 鉤子與您的前端共用 AG-UI + Mastra AI 代理程式狀態,如src/app/page.tsx檔案所示。
"use client";

import {
  useCoAgent,
} from "@copilotkit/react-core";

// ...

export interface SandBoxPortfolioState {
  performanceData: Array<{
    date: string;
    portfolio: number;
    spy: number;
  }>;
}
export interface InvestmentPortfolio {
  ticker: string;
  amount: number;
}

export default function OpenStocksCanvas() {

  // ...

  const [totalCash, setTotalCash] = useState(1000000);

  const { state, setState } = useCoAgent({
    name: "stockAgent",
    initialState: {
      available_cash: totalCash,
      investment_summary: {} as any,
      investment_portfolio: [] as InvestmentPortfolio[],
    },
  });

    // ...

  return (
    <div className="h-screen bg-[#FAFCFA] flex overflow-hidden">
       {/* ... */}
    </div>
  );
}
然後在聊天 UI 中呈現 AG-UI + Mastra AI 代理程式的狀態,這有助於以更符合上下文的方式告知使用者代理程式的狀態。
若要在聊天 UI 中呈現 AG-UI + Mastra AI 代理程式的狀態,您可以使用useCoAgentStateRender鉤子,如src/app/page.tsx檔案所示。
"use client";

import {
  useCoAgentStateRender,
} from "@copilotkit/react-core";

import { ToolLogs } from "./components/tool-logs";

// ...

export default function OpenStocksCanvas() {

  // ...

  useCoAgentStateRender({
    name: "stockAgent",
    render: ({ state }) => <ToolLogs logs={state.tool_logs} />,
  });

  // ...

  return (
    <div className="h-screen bg-[#FAFCFA] flex overflow-hidden">
      {/* ... */}
    </div>
  );
}
如果您在聊天中執行查詢,您應該會看到 AG-UI + Mastra AI 代理程式的狀態任務執行在聊天 UI 中呈現,如下所示。

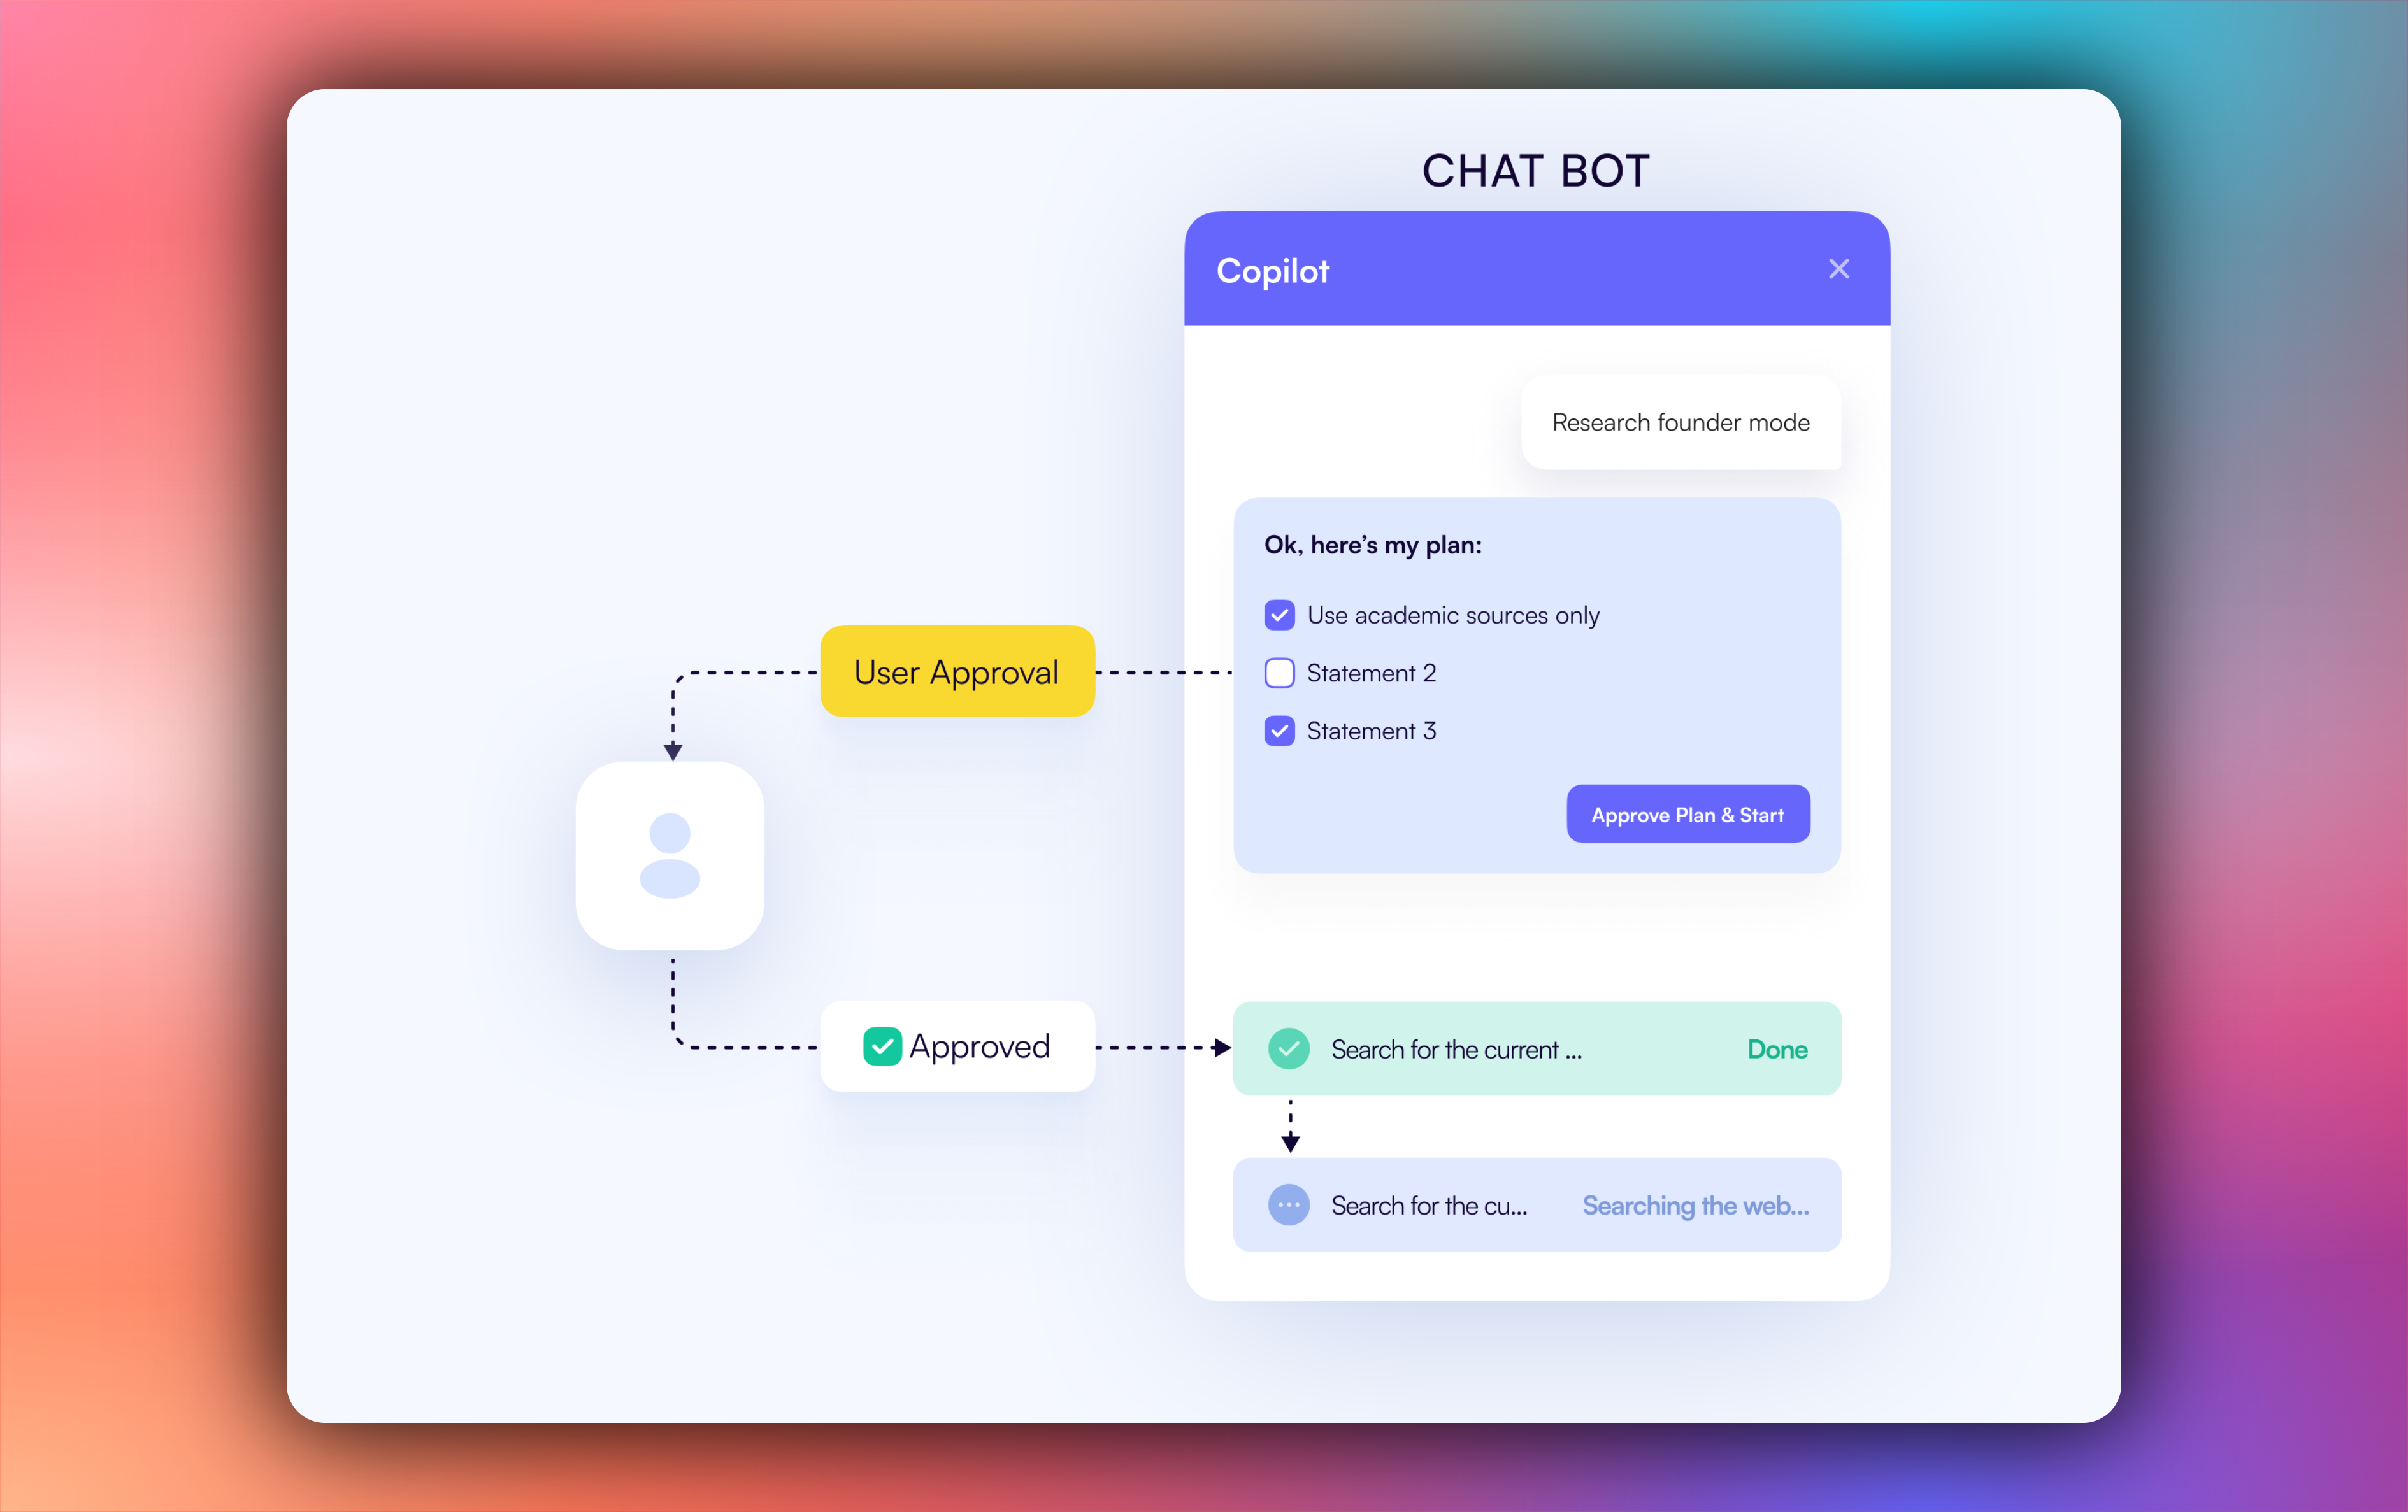
步驟 5:在前端實現人機互動(HITL)
人機在環 (HITL) 允許代理在執行過程中請求人工輸入或批准,從而提高 AI 系統可靠性和可信度。在建立需要處理複雜決策或需要人工判斷的操作的 AI 應用程式時,這種模式至關重要。
您可以在CopilotKit 文件中了解有關 Human in the Loop 的更多資訊。
要在前端實現人機互動 (HITL),您需要使用 CopilotKit useCopilotKitAction鉤子和renderAndWaitForResponse方法,該方法允許從渲染函數非同步傳回值,如src/app/page.tsx檔案所示。
"use client";

import {
  useCopilotAction,
} from "@copilotkit/react-core";

// ...

export default function OpenStocksCanvas() {

  // ...

  useCopilotAction({
    name: "render_standard_charts_and_table",
    description:
      "This is an action to render a standard chart and table. The chart can be a bar chart or a line chart. The table can be a table of data.",
    renderAndWaitForResponse: ({ args, respond, status }) => {
      useEffect(() => {
        console.log(args, "argsargsargsargsargsaaa");
      }, [args]);
      return (
        <>
          {args?.investment_summary?.percent_allocation_per_stock &&
            args?.investment_summary?.percent_return_per_stock &&
            args?.investment_summary?.performanceData && (
              <>
                <div className="flex flex-col gap-4">
                  <LineChartComponent
                    data={args?.investment_summary?.performanceData}
                    size="small"
                  />
                  <BarChartComponent
                    data={Object.entries(
                      args?.investment_summary?.percent_return_per_stock
                    ).map(([ticker, return1]) => ({
                      ticker,
                      return: return1 as number,
                    }))}
                    size="small"
                  />
                  <AllocationTableComponent
                    allocations={Object.entries(
                      args?.investment_summary?.percent_allocation_per_stock
                    ).map(([ticker, allocation]) => ({
                      ticker,
                      allocation: allocation as number,
                      currentValue:
                        args?.investment_summary.final_prices[ticker] *
                        args?.investment_summary.holdings[ticker],
                      totalReturn:
                        args?.investment_summary.percent_return_per_stock[
                          ticker
                        ],
                    }))}
                    size="small"
                  />
                </div>

                <button
                  hidden={status == "complete"}
                  className="mt-4 rounded-full px-6 py-2 bg-green-50 text-green-700 border border-green-200 shadow-sm hover:bg-green-100 transition-colors font-semibold text-sm"
                  onClick={() => {
                    debugger;
                    if (respond) {
                      setTotalCash(args?.investment_summary?.cash);
                      setCurrentState({
                        ...currentState,
                        returnsData: Object.entries(
                          args?.investment_summary?.percent_return_per_stock
                        ).map(([ticker, return1]) => ({
                          ticker,
                          return: return1 as number,
                        })),
                        allocations: Object.entries(
                          args?.investment_summary?.percent_allocation_per_stock
                        ).map(([ticker, allocation]) => ({
                          ticker,
                          allocation: allocation as number,
                          currentValue:
                            args?.investment_summary?.final_prices[ticker] *
                            args?.investment_summary?.holdings[ticker],
                          totalReturn:
                            args?.investment_summary?.percent_return_per_stock[
                              ticker
                            ],
                        })),
                        performanceData:
                          args?.investment_summary?.performanceData,
                        bullInsights: args?.insights?.bullInsights || [],
                        bearInsights: args?.insights?.bearInsights || [],
                        currentPortfolioValue:
                          args?.investment_summary?.total_value,
                        totalReturns: (
                          Object.values(
                            args?.investment_summary?.returns
                          ) as number[]
                        ).reduce((acc, val) => acc + val, 0),
                      });
                      setInvestedAmount(
                        (
                          Object.values(
                            args?.investment_summary?.total_invested_per_stock
                          ) as number[]
                        ).reduce((acc, val) => acc + val, 0)
                      );
                      setState({
                        ...state,
                        available_cash: totalCash,
                      });
                      respond(
                        "Data rendered successfully. Provide summary of the investments by not making any tool calls"
                      );
                    }
                  }}>
                  Accept
                </button>
                <button
                  hidden={status == "complete"}
                  className="rounded-full px-6 py-2 bg-red-50 text-red-700 border border-red-200 shadow-sm hover:bg-red-100 transition-colors font-semibold text-sm ml-2"
                  onClick={() => {
                    debugger;
                    if (respond) {
                      respond(
                        "Data rendering rejected. Just give a summary of the rejected investments by not making any tool calls"
                      );
                    }
                  }}>
                  Reject
                </button>
              </>
            )}
        </>
      );
    },
  });

  // ...

  return (
    <div className="h-screen bg-[#FAFCFA] flex overflow-hidden">
      {/* ... */}
    </div>
  );
}
當代理程式透過工具/操作名稱觸發前端操作,以在執行過程中請求手動輸入或回饋時,系統會提示最終使用者進行選擇(該選項會呈現在聊天介面中)。然後,用戶可以透過按下聊天介面中的按鈕進行選擇,如下所示。

步驟 6:在前端串流 AG-UI + Mastra AI 代理程式回應
若要在前端串流 AG-UI + Mastra AI 代理程式回應或結果,請將代理程式的狀態欄位值傳遞給前端元件,如src/app/page.tsx檔案所示。
"use client";

import { useEffect, useState } from "react";
import { PromptPanel } from "./components/prompt-panel";
import { GenerativeCanvas } from "./components/generative-canvas";
import { ComponentTree } from "./components/component-tree";
import { CashPanel } from "./components/cash-panel";

// ...

export default function OpenStocksCanvas() {
  const [currentState, setCurrentState] = useState<PortfolioState>({
    id: "",
    trigger: "",
    performanceData: [],
    allocations: [],
    returnsData: [],
    bullInsights: [],
    bearInsights: [],
    currentPortfolioValue: 0,
    totalReturns: 0,
  });
  const [sandBoxPortfolio, setSandBoxPortfolio] = useState<
    SandBoxPortfolioState[]
  >([]);
  const [selectedStock, setSelectedStock] = useState<string | null>(null);

  return (
    <div className="h-screen bg-[#FAFCFA] flex overflow-hidden">
      {/* Left Panel - Prompt Input */}
      <div className="w-85 border-r border-[#D8D8E5] bg-white flex-shrink-0">
        <PromptPanel availableCash={totalCash} />
      </div>

      {/* Center Panel - Generative Canvas */}
      <div className="flex-1 relative min-w-0">
        {/* Top Bar with Cash Info */}
        <div className="absolute top-0 left-0 right-0 bg-white border-b border-[#D8D8E5] p-4 z-10">
          <CashPanel
            totalCash={totalCash}
            investedAmount={investedAmount}
            currentPortfolioValue={
              totalCash + investedAmount + currentState.totalReturns || 0
            }
            onTotalCashChange={setTotalCash}
            onStateCashChange={setState}
          />
        </div>

        <div className="pt-20 h-full">
          <GenerativeCanvas
            setSelectedStock={setSelectedStock}
            portfolioState={currentState}
            sandBoxPortfolio={sandBoxPortfolio}
            setSandBoxPortfolio={setSandBoxPortfolio}
          />
        </div>
      </div>

      {/* Right Panel - Component Tree (Optional) */}
      {showComponentTree && (
        <div className="w-64 border-l border-[#D8D8E5] bg-white flex-shrink-0">
          <ComponentTree portfolioState={currentState} />
        </div>
      )}
    </div>
  );
}
如果您查詢您的代理並批准其回饋請求,您應該在 UI 中看到代理程式的回應或結果流,如下所示。
{% 嵌入https://youtu.be/vJxyBgWH9lA %}
結論
在本指南中,我們介紹了將 Mastra AI 代理與 AG-UI 協定集成,然後使用 CopilotKit 向代理程式加入前端的步驟。
雖然我們已經探索了一些功能,但我們僅僅觸及了 CopilotKit 無數用例的表面,從建置互動式 AI 聊天機器人到建置代理解決方案——本質上,CopilotKit 可讓您在幾分鐘內為您的產品加入大量有用的 AI 功能。
希望本指南能幫助您更輕鬆地將 AI 代理整合到現有應用程式中。
在Twitter上關注 CopilotKit 並打招呼,如果您想建立一些很酷的東西,請加入Discord社群。
原文出處:https://dev.to/copilotkit/build-a-fullstack-stock-portfolio-agent-with-mastra-and-ag-ui-1ci2
1) --- 會變成分隔線(上一行必須是空白)
2) # 會變成一級標題
3) ## 會變成二級標題
4) ### 會變成三級標題
5) **粗體文字**會顯示粗體文字
6) ```當第一行與最後一行會顯示程式碼
7) 請搜尋 Markdown 語法,了解各種格式