

您的部落格理應知道有人在閱讀。 Lambda 函數會統計瀏覽量,DynamoDB 會記錄這些資料,而且所有這些都包含在免費套餐內。
最後更新日期:2026年4月20日
大多數分析工具都需要一個帳戶、一個腳本標籤和一個獨立的控制面板,而這些控制面板必須位於您的基礎架構之外。如果您已經在使用 AWS,則可以建立位於您自己的帳戶中、並將資料儲存在您可控制的表中的瀏覽計數器。整個過程大約需要一個小時,而且它使用的所有三項服務都符合AWS 免費套餐的條件。
本教學將引導您完成計數器的建置。您只需在部落格中新增<script>標籤,每當有人閱讀文章時,您擁有的 DynamoDB 表中的數量就會增加。
在這個過程中,你將把 Lambda、DynamoDB 和 API 閘道連接起來,建構出遠超「Hello World」的程式。最終,你將在部落格上發布可執行的軟體,並獲得使用驅動生產應用程式的相同服務的實踐經驗。
如果您之前已經設定過 AWS 帳戶並將某些內容部署到雲端,那麼這是一個不錯的下一個專案。如果您還沒有這樣做, 可以先註冊免費的 AWS 帳戶,然後再回來繼續。
你正在建構的東西
以下是申請流程:

-
訪客在瀏覽器中載入您的部落格文章。
-
您頁面上的一個小腳本會向 API 閘道傳送請求。
-
API 閘道呼叫 Lambda 函數
-
Lambda 函數會檢查 DynamoDB,查看該訪客今天是否已被統計在內。
-
如果是新用戶,則計數器加一。
-
API 閘道向客戶端傳回 204 回應。
兩個用於計算和儲存的無伺服器服務,一個前端 API 層,大約 100 行 TypeScript 程式碼。
此計數器會透過 IP 位址進行去重(已進行雜湊處理,因此您不會儲存原始 IP 位址),並利用 DynamoDB 的 TTL 功能自動清理舊記錄。您只需使用一個<script>標籤將其加入到部落格中,它就會自動追蹤每個頁面。
先決條件
-
您需要一個AWS 帳戶。如果您還沒有帳戶,可以參考「建立 AWS 帳戶指南」來完成註冊。您需要綁定一張信用卡,但本專案不會超出免費套餐的限制。
-
Node.js 24 或更高版本
-
AWS CLI 已安裝並設定。如果您是第一次使用,請按照AWS CLI 快速入門指南進行操作。
-
AWS CDK 已在您的帳戶中啟動:
npx cdk bootstrap aws://YOUR_ACCOUNT_ID/us-east-1如果您之前沒用過 CDK,它是一個 AWS 基礎架構即程式碼 (IaC) 工具。您可以使用 TypeScript 編寫程式碼來描述您的 AWS 資源,CDK 會將其轉換為 CloudFormation 並進行部署。引導指令會建立一個暫存儲存桶,CDK 需要使用該儲存桶來上傳您的程式碼。如果您需要更多訊息,可以參考CDK 入門指南。
專案設定
建立新目錄並初始化專案:
mkdir blog-post-view-counter && cd blog-post-view-counter
npm init -y
npm install aws-cdk-lib constructs @aws-sdk/client-dynamodb @aws-sdk/lib-dynamodb
npm install -D aws-cdk tsx typescript @types/node在專案根目錄下建立一個cdk.json檔案。該文件告訴 CDK 如何執行你的應用程式:
{
  "app": "npx tsx cdk/app.ts"
}以及一個tsconfig.json :
{
  "compilerOptions": {
    "target": "ES2022",
    "module": "NodeNext",
    "moduleResolution": "NodeNext",
    "lib": ["ES2022"],
    "outDir": "dist",
    "rootDir": ".",
    "strict": true,
    "types": ["node"],
    "esModuleInterop": true,
    "skipLibCheck": true,
    "declaration": true
  },
  "include": ["lambda/**/*", "cdk/**/*"]
}
您的專案結構將如下所示:
blog-post-view-counter/
├── cdk/
│   ├── app.ts          # CDK entry point
│   └── stack.ts        # Infrastructure definition
├── lambda/
│   └── index.ts        # Lambda function code
├── cdk.json
├── package.json
└── tsconfig.json
步驟 1:DynamoDB 表
DynamoDB 是一個鍵值資料庫。你提供一個鍵,它就能回傳對應的資料。無需管理伺服器,也無需配置連接字串。
我們的表使用複合鍵( pk + sk )儲存兩種類型的記錄:
計數器記錄每頁瀏覽量:
| pk | sk | 瀏覽量 |
|---|---|---|
| /blog/my-first-post | counter | 42 |
| /about | counter | 17 |
去重記錄可以防止同一個人被重複計數:
| pk | sk | ttl |
|---|---|---|
| /blog/my-first-post#a1b2c3d4... | dedup | 1745208000 |
去重鍵將頁面路徑與訪客 IP 位址的雜湊值結合。 ttl 欄位是一個ttl時間戳,表示未來 24 小時。 DynamoDB 會自動刪除過期記錄,因此同一訪客會在隔天再次被計入。
把它想像成一個文件櫃。每個抽屜都標有頁碼路徑。裡面有一個統計瀏覽量的counter夾,以及臨時訪客登記表,這些登記表會在24小時後銷毀。
步驟 2:Lambda 函數
建立lambda/index.ts 。這是每次有人造訪你的部落格時都會執行的程式碼:
import { createHash } from 'node:crypto';
import { DynamoDBClient } from '@aws-sdk/client-dynamodb';
import { DynamoDBDocumentClient, GetCommand, PutCommand, UpdateCommand } from '@aws-sdk/lib-dynamodb';

// DynamoDB document client — lets us read/write JS objects instead of raw DynamoDB types
const client = DynamoDBDocumentClient.from(new DynamoDBClient({}));
const TABLE_NAME = process.env.TABLE_NAME!;
const DEDUP_HOURS = 24;

// These come from environment variables set in the CDK stack
const ALLOWED_ORIGIN = process.env.ALLOWED_ORIGIN || '*';
const ALLOWED_HOSTNAME = ALLOWED_ORIGIN !== '*' ? new URL(ALLOWED_ORIGIN).hostname : null;

// CORS headers — browsers require these when your blog (yourdomain.com)
// makes a fetch() to a different domain (your API Gateway URL)
const CORS_HEADERS = {
  'Access-Control-Allow-Origin': ALLOWED_ORIGIN,
  'Access-Control-Allow-Methods': 'GET,OPTIONS',
  'Access-Control-Allow-Headers': 'Content-Type',
};

// Only allow typical blog URL paths — letters, numbers, hyphens, slashes, dots
const VALID_PATH = /^\/[\w\-./]{0,199}$/;

// Hash an IP so we never store raw addresses in DynamoDB (GDPR-friendly)
function hashIp(ip: string): string {
  return createHash('sha256').update(ip).digest('hex').slice(0, 16);
}

export const handler = async (event: any) => {
  // Handle CORS preflight — browsers send this before the real request
  if (event.httpMethod === 'OPTIONS') {
    return { statusCode: 204, headers: CORS_HEADERS, body: '' };
  }

  const page = event.queryStringParameters?.page || '/';

  // Reject paths that don't look like blog URLs
  if (!VALID_PATH.test(page)) {
    return { statusCode: 400, headers: CORS_HEADERS, body: '' };
  }

  // If a Referer header exists, make sure it's from your site
  if (ALLOWED_HOSTNAME) {
    const referer = event.headers?.referer || event.headers?.Referer || '';
    if (referer && !referer.includes(ALLOWED_HOSTNAME)) {
      return { statusCode: 403, headers: CORS_HEADERS, body: '' };
    }
  }

  // Combine page path + hashed IP to create a unique dedup key
  const ip = event.requestContext?.identity?.sourceIp || 'unknown';
  const dedupKey = `${page}#${hashIp(ip)}`;
  const now = Math.floor(Date.now() / 1000);
  const ttl = now + DEDUP_HOURS * 3600; // DynamoDB TTL auto-deletes after 24h

  // Check if this visitor was already counted for this page today
  let isNewView = true;
  try {
    const existing = await client.send(new GetCommand({
      TableName: TABLE_NAME,
      Key: { pk: dedupKey, sk: 'dedup' },
    }));
    if (existing.Item) isNewView = false;
  } catch {
    // If lookup fails, count it as a new view
  }

  if (isNewView) {
    // Write a dedup record so this IP won't be counted again for 24h
    await client.send(new PutCommand({
      TableName: TABLE_NAME,
      Item: { pk: dedupKey, sk: 'dedup', ttl },
    }));

    // Increment the page's view counter (ADD creates the item if it doesn't exist)
    await client.send(new UpdateCommand({
      TableName: TABLE_NAME,
      Key: { pk: page, sk: 'counter' },
      UpdateExpression: 'ADD #v :inc',
      ExpressionAttributeNames: { '#v': 'views' },
      ExpressionAttributeValues: { ':inc': 1 },
    }));
  }

  // 204 No Content — the browser doesn't need a response body
  return { statusCode: 204, headers: CORS_HEADERS, body: '' };
};
程式碼註解涵蓋了細節,但這裡簡單概括一下流程:該函數驗證傳入的頁面路徑,檢查 Referer 標頭,然後使用 SHA-256 雜湊演算法對訪客的 IP 位址進行雜湊處理,以確保資料庫中不會儲存原始位址。它會在 DynamoDB 中尋找雜湊後的 IP 位址,以確認該訪客是否已計入今天的訪客量。如果沒有,它會寫入一筆去重記錄(DynamoDB 會在 24 小時後透過 TTL 自動刪除該記錄),並原子性地遞增頁面的瀏覽計數器。瀏覽器會收到 204 No Content 回應,表示「已接收,無內容可顯示」。
步驟三:基礎設施
建立cdk/stack.ts 。該文件定義了所有三個 AWS 資源:
import * as cdk from 'aws-cdk-lib';
import * as dynamodb from 'aws-cdk-lib/aws-dynamodb';
import * as apigateway from 'aws-cdk-lib/aws-apigateway';
import { NodejsFunction } from 'aws-cdk-lib/aws-lambda-nodejs';
import { Runtime } from 'aws-cdk-lib/aws-lambda';
import * as path from 'path';
import { fileURLToPath } from 'url';
import { Construct } from 'constructs';

const __dirname = path.dirname(fileURLToPath(import.meta.url));

export class ViewCounterStack extends cdk.Stack {
  constructor(scope: Construct, id: string) {
    super(scope, id);

    // Read your blog's domain from the deploy command:
    //   npx cdk deploy -c blogOrigin=https://yourdomain.com
    const blogOrigin = this.node.tryGetContext('blogOrigin');
    if (!blogOrigin) {
      throw new Error('Missing required context: -c blogOrigin=https://yourdomain.com');
    }

    // DynamoDB table — stores page view counts and IP dedup records
    const table = new dynamodb.Table(this, 'ViewCounterTable', {
      partitionKey: { name: 'pk', type: dynamodb.AttributeType.STRING },
      sortKey: { name: 'sk', type: dynamodb.AttributeType.STRING },
      billingMode: dynamodb.BillingMode.PROVISIONED,
      readCapacity: 25,  // 25 RCU is within the always-free tier
      writeCapacity: 25, // 25 WCU is within the always-free tier
      timeToLiveAttribute: 'ttl', // Auto-delete dedup records after 24h
      removalPolicy: cdk.RemovalPolicy.DESTROY, // Clean up on `cdk destroy`
    });

    // Lambda function — NodejsFunction bundles TypeScript with esbuild automatically
    const fn = new NodejsFunction(this, 'CounterFunction', {
      runtime: Runtime.NODEJS_24_X,
      entry: path.join(__dirname, '../lambda/index.ts'),
      handler: 'handler',
      environment: {
        TABLE_NAME: table.tableName,
        ALLOWED_ORIGIN: blogOrigin, // Passed to Lambda for CORS and Referer checks
      },
      timeout: cdk.Duration.seconds(10),
      memorySize: 128,
    });

    // Give the Lambda read/write access to the DynamoDB table
    table.grantReadWriteData(fn);

    // API Gateway — public HTTPS endpoint that triggers the Lambda
    const api = new apigateway.RestApi(this, 'CounterApi', {
      restApiName: 'blog-post-view-counter',
      deployOptions: {
        throttlingRateLimit: 10,   // Max 10 requests/second sustained
        throttlingBurstLimit: 20,  // Allow short bursts up to 20/second
      },
    });

    const integration = new apigateway.LambdaIntegration(fn);

    // CORS — only allow requests from your blog domain
    const corsOptions: apigateway.CorsOptions = {
      allowOrigins: [blogOrigin],
      allowMethods: ['GET', 'OPTIONS'],
    };

    // GET /counter?page=/some-path — record a page view
    const counter = api.root.addResource('counter');
    counter.addMethod('GET', integration);
    counter.addCorsPreflight(corsOptions);

    // Print the tracking URL after deploy
    new cdk.CfnOutput(this, 'CounterUrl', {
      value: `${api.url}counter`,
      description: 'Tracking endpoint',
    });
  }
}
需要注意以下幾點:
-
NodejsFunction而不是Function。你寫的是 TypeScript 程式碼,但 Lambda 執行的是 JavaScript。常規的lambda.Function構造會直接部署你的.ts文件,Lambda 無法處理它們。 NodejsFunctionNodejsFunction在部署時使用 esbuild 將你的 TypeScript 編譯成 JavaScript。你寫的是 TypeScript,Lambda 得到的是 JavaScript,無需單獨的建置步驟。 -
已預置容量為 25/25。 DynamoDB的永久免費層級提供 25 個讀取容量單位和 25 個寫入容量單位,完全免費。這意味著每秒 25 次讀取和 25 次寫入,遠遠超過個人部落格的需求。我們刻意使用預置模式而非按需模式,就是為了確保不超過這部分免費額度。
-
removalPolicy: DESTROY。預設情況下,CDK 會保護您的 DynamoDB 表免於意外刪除。由於這是一個學習專案,我們將其設定為 DESTROY,以便cdk destroy清理所有資料。對於生產環境的表,您應該保留預設設定。 -
限流。 API閘道的請求速率設定為每秒 10 個,峰值可達每秒 20 個。這限制了 Lambda 和 DynamoDB 的流量上限,從而在有人發現您的端點並試圖對其發動猛攻時,可以降低您的帳單費用。
現在在cdk/app.ts建立 CDK 入口點:
#!/usr/bin/env node
import * as cdk from 'aws-cdk-lib';
import { ViewCounterStack } from './stack.js';

const app = new cdk.App();
new ViewCounterStack(app, 'BlogPostViewCounterSampleForAws');
步驟 4:部署
一條命令:
npx cdk deploy -c blogOrigin=https://yourdomain.com將yourdomain.com替換為您的實際部落格網域。 CDK 將顯示即將建立的資源摘要並要求您確認。輸入y 。
大約一分鐘後,你會看到類似這樣的輸出:
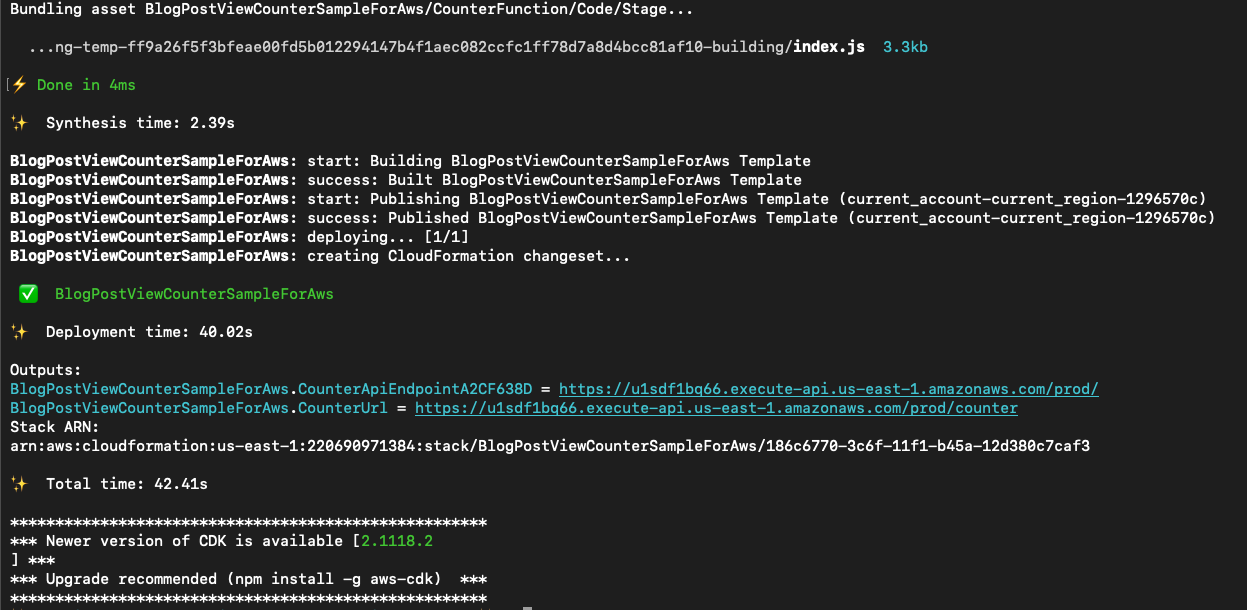
請特別注意包含CounterUrl端點的 Outputs 部分。
Outputs:
BlogPostViewCounterSampleForAws.CounterUrl = https://abc123.execute-api.us-east-1.amazonaws.com/prod/counter
這就是你的追蹤端點。保存這個網址。
第五步:將其加入到你的博客
將此腳本標籤新增至您網站的基礎佈局。在 Astro 中,它是您的佈局元件。在 Hugo 中,它是baseof.html 。在純 HTML 中,將其放在結束標籤</body>之前。
<script>
  fetch(`https://YOUR_COUNTER_URL?page=${encodeURIComponent(window.location.pathname)}`);
</script>將YOUR_COUNTER_URL替換為部署輸出中的 URL。
以下是它在 Astro 部落格佈局中的顯示效果,以及真實的端點 URL:
<BaseLayout {title} {description} {image} type="article" {pubDate}>
<script type="application/ld+json" set:html={JSON.stringify(schemaData)} slot="head" />
<script>
fetch(`https://u1sdf1bq66.execute-api.us-east-1.amazonaws.com/prod/counter?page=${encodeURIComponent(window.location.pathname)}`);
</script>
<a href="/blog" class="back-link">← all posts</a>
<article>
<header class="post-header">
<h1 class="post-header__title">{title}</h1>
<p class="post-header__meta">
<time datetime={pubDate.toISOString()}>{formattedDate}</time>
{formattedUpdated && (
<span> · updated {formattedUpdated}</span>
)}
</p>
</header>
<div class="post-body">
<slot />
</div>
</article>
</BaseLayout>現在,每次頁面載入都會向您的 API 發送請求,該window.location.pathname會統計瀏覽量並傳回 204。 window.location.pathname 部分錶示它會自動傳送目前頁面的路徑,因此您無需為每個貼文進行任何設定。
第六步:查看瀏覽量
打開DynamoDB 控制台,找到你的表,然後點擊「瀏覽表項」。如果表項很多,請篩選出sk等於counter項。這樣你就能看到每個頁面路徑及其瀏覽次數。

您也可以透過命令列介面執行此命令:
aws dynamodb scan \
  --table-name YOUR_TABLE_NAME \
  --filter-expression "sk = :sk" \
  --expression-attribute-values '{":sk": {"S": "counter"}}'
這件東西多少錢?
本專案使用了符合AWS 免費套餐資格的服務。根據您的使用情況和帳戶狀態,可能會產生費用。以下是費用明細:
-
DynamoDB以 25 WCU/25 RCU 的額度配置,屬於永久免費層級。無論帳戶使用年限長短,均不收取任何費用。
-
Lambda每月提供100萬次免費請求。大多數個人部落格的流量都不會超過這個限制。
-
API 閘道是唯一需要直接付費的服務:在美國東部第一區,每百萬次 REST API 請求收費 3.50 美元。每月瀏覽量為 10,000 次的部落格大約需要花費 0.035 美元,如果您是新客戶,這筆費用將從您的免費套餐額度中扣除。
我建議在新沙盒帳戶中設定 5 美元的帳單提醒,這作為最佳實踐。
你剛剛學到的
如果你跟著步驟操作,現在你已經掌握了以下方面的實務經驗:
-
DynamoDB :複合鍵、用於自動清理的 TTL、帶有
UpdateExpression原子計數器 -
Lambda :處理 HTTP 事件、環境變數、與 AWS 開發工具包搭配使用
-
API 閘道:REST 端點、CORS 設定、限流
-
CDK :使用 TypeScript 定義基礎架構,只需一則指令即可部署
你的部落格上正在執行一些你從零開始搭建的東西。
清理
如果你想把一切都拆掉:
npx cdk destroy -c blogOrigin=https://yourdomain.com這將刪除 Lambda 函數、DynamoDB 表和 API 閘道端點。所有瀏覽量資料都將遺失,因此請確保您已完成所有操作。
接下來該嘗試什麼呢?
-
新增帳單提醒,以便在您的 AWS 費用超過 5 美元時收到電子郵件通知。
-
建立一個小型儀表板,從 DynamoDB 讀取資料並顯示瀏覽量。
-
透過在計數器記錄中新增日期欄位來追蹤一段時間內的瀏覽量
這個專案的原始碼在 GitHub 上,如果你想 fork 並進行修改,可以去那裡看看。請在評論區告訴我你這週在做什麼!
原文出處:https://dev.to/aws/build-your-own-blog-post-view-counter-on-aws-free-tier-306f
1) --- 會變成分隔線(上一行必須是空白)
2) # 會變成一級標題
3) ## 會變成二級標題
4) ### 會變成三級標題
5) **粗體文字**會顯示粗體文字
6) ```當第一行與最後一行會顯示程式碼
7) 請搜尋 Markdown 語法,了解各種格式