過去幾天對於人工智慧來說是令人興奮的。 然而,作為開發人員,我們中的許多人還不了解人工智慧的易用性。 今天,我們將介紹您可以使用人工智慧輕鬆建立的精彩專案。無需成為人工智慧專家,每個工具都附帶教學或程式碼演練。 讓我們跳進去吧!  --- 1. [CopilotKit](https://github.com/CopilotKit/CopilotKit) - 在數小時內為您的產品提供 AI Copilot。 ------------------------------------------------------------------------------------ [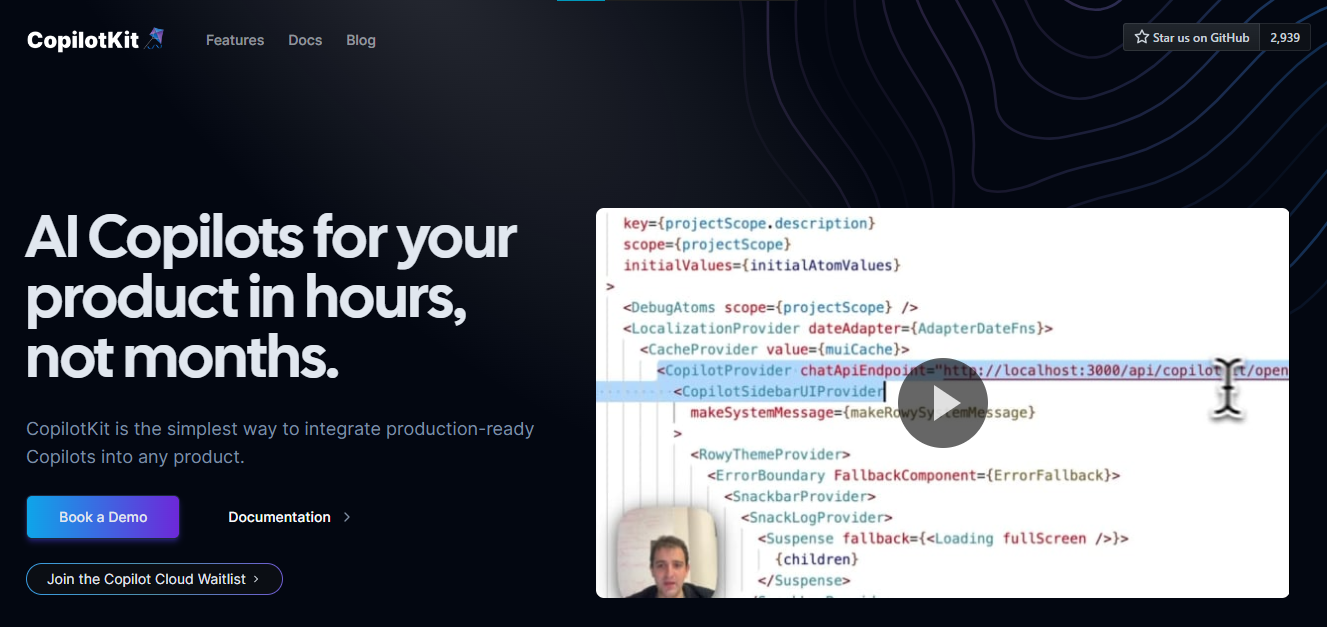](https://github.com/CopilotKit/CopilotKit) 將 AI 功能整合到 React 中是很困難的,這就是 Copilot 的用武之地。一個簡單快速的解決方案,可將可投入生產的 Copilot 整合到任何產品中! 您可以使用兩個 React 元件將關鍵 AI 功能整合到 React 應用程式中。它們還提供內建(完全可自訂)Copilot 原生 UX 元件,例如`<CopilotKit />` 、 `<CopilotPopup />` 、 `<CopilotSidebar />` 、 `<CopilotTextarea />` 。 開始使用以下 npm 指令。 ``` npm i @copilotkit/react-core @copilotkit/react-ui ``` Copilot Portal 是 CopilotKit 提供的元件之一,CopilotKit 是一個應用程式內人工智慧聊天機器人,可查看目前應用狀態並在應用程式內採取操作。它透過插件與應用程式前端和後端以及第三方服務進行通訊。 這就是整合聊天機器人的方法。 `CopilotKit`必須包裝與 CopilotKit 互動的所有元件。建議您也開始使用`CopilotSidebar` (您可以稍後切換到不同的 UI 提供者)。 ``` "use client"; import { CopilotKit } from "@copilotkit/react-core"; import { CopilotSidebar } from "@copilotkit/react-ui"; import "@copilotkit/react-ui/styles.css"; export default function RootLayout({children}) { return ( <CopilotKit url="/path_to_copilotkit_endpoint/see_below"> <CopilotSidebar> {children} </CopilotSidebar> </CopilotKit> ); } ``` 您可以使用此[快速入門指南](https://docs.copilotkit.ai/getting-started/quickstart-backend)設定 Copilot 後端端點。 之後,您可以讓 Copilot 採取行動。您可以閱讀如何提供[外部上下文](https://docs.copilotkit.ai/getting-started/quickstart-chatbot#provide-context)。您可以使用`useMakeCopilotReadable`和`useMakeCopilotDocumentReadable`反應掛鉤來執行此操作。 ``` "use client"; import { useMakeCopilotActionable } from '@copilotkit/react-core'; // Let the copilot take action on behalf of the user. useMakeCopilotActionable( { name: "setEmployeesAsSelected", // no spaces allowed in the function name description: "Set the given employees as 'selected'", argumentAnnotations: [ { name: "employeeIds", type: "array", items: { type: "string" } description: "The IDs of employees to set as selected", required: true } ], implementation: async (employeeIds) => setEmployeesAsSelected(employeeIds), }, [] ); ``` 您可以閱讀[文件](https://docs.copilotkit.ai/getting-started/quickstart-textarea)並查看[演示影片](https://github.com/CopilotKit/CopilotKit?tab=readme-ov-file#demo)。 您可以輕鬆整合 Vercel AI SDK、OpenAI API、Langchain 和其他 LLM 供應商。您可以按照本[指南](https://docs.copilotkit.ai/getting-started/quickstart-chatbot)將聊天機器人整合到您的應用程式中。 基本想法是非常快速地建立人工智慧聊天機器人,而無需在製作任何基於法學碩士的應用程式時費力。 用例是巨大的,作為開發人員,我們絕對應該在下一個專案中嘗試使用 CopilotKit。 CopilotKit 在 GitHub 上擁有超過 5800 顆星,發布了 200 多個版本,這意味著它們不斷改進。  {% cta https://go.copilotkit.ai/Anmol %} Star CopilotKit ⭐️ {% endcta %} --- ### 🎯 使用 CopilotKit 建立的熱門應用程式。 我們可以使用 CopilotKit 建立許多創新應用程式,所以讓我們探索一些脫穎而出的應用程式! ### ✅ [人工智慧驅動的部落格平台](https://dev.to/copilotkit/how-to-build-an-ai-powered-blogging-platform-nextjs-langchain-supabase-1hdp)。  您可以閱讀本文,使用`Next.js` 、 `Langchain` 、 `Supabase`和`CopilotKit`來建立這個令人驚嘆的應用程式。 LangChain&Tavily用作網路搜尋人工智慧代理,Supabase用於儲存和檢索部落格平台文章資料,CopilotKit用於將人工智慧整合到應用程式中。 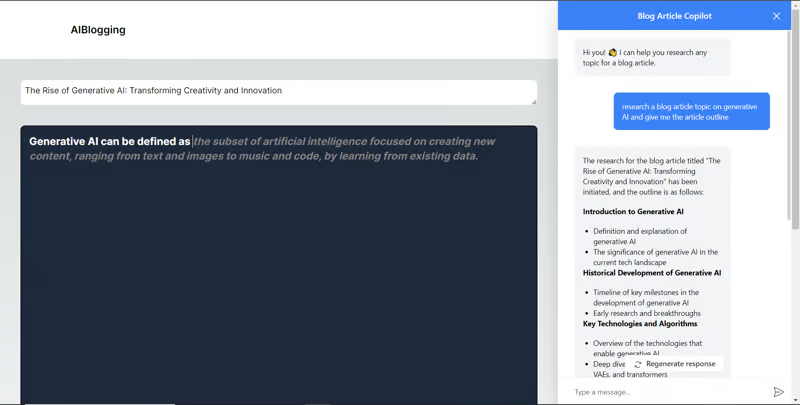 您可以檢查[GitHub 儲存庫](https://github.com/TheGreatBonnie/aipoweredblog)。 ### ✅ [V0.dev 複製](https://dev.to/copilotkit/i-created-a-v0-clone-with-nextjs-gpt4-copilotkit-3cmb)。 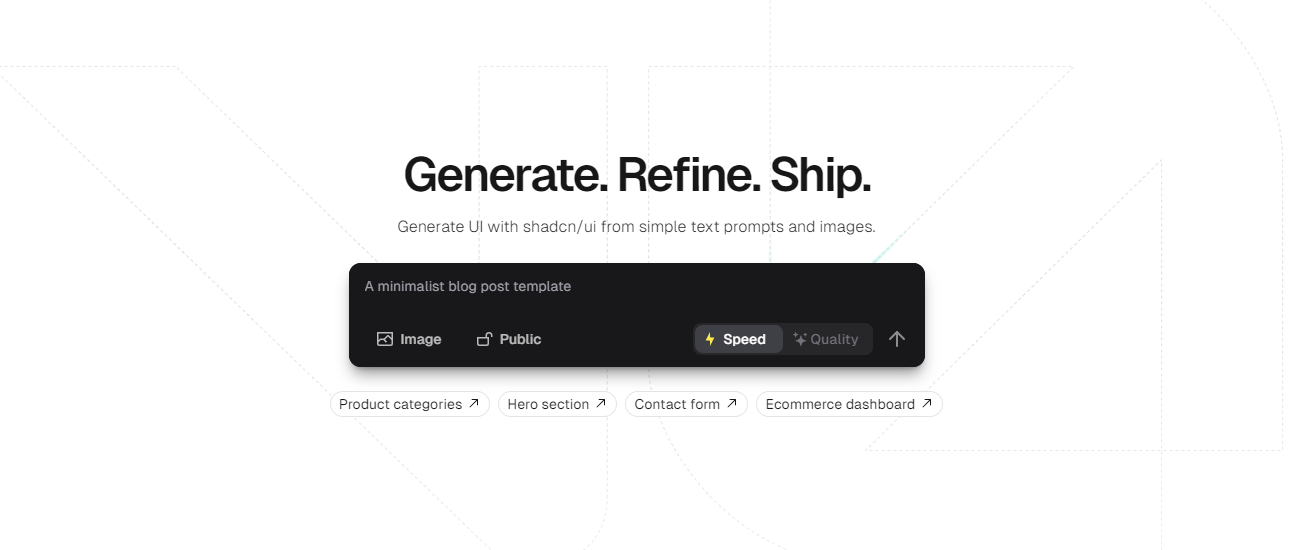 如果您不熟悉,Vercel 的 V0 是一款人工智慧驅動的工具,可讓您根據提示產生 UI,以及許多其他有用的功能。 shadcn 元件現在可以在文件本身的 v0 中進行編輯(如其網站所示)。  您可以使用`Next.js` 、 `GPT4`和`CopilotKit`建立 V0 的克隆。這個詳細的教程名列前 7 名,總的來說,這是一個值得加入到您的作品集中的偉大專案。 簽名頁的產生輸出如下所示。 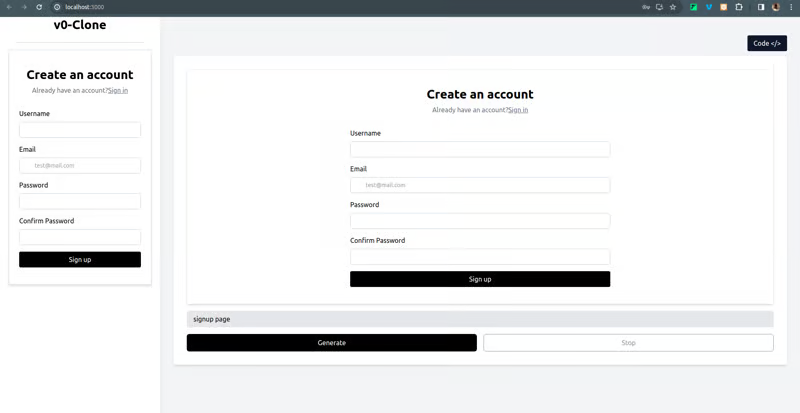 您可以透過點擊右上角的按鈕輕鬆在`React Code`和`UI`之間切換。這麼酷的概念! 您可以檢查[GitHub 儲存庫](https://github.com/Tabintel/v0-copilot-next)。 ### ✅ [人工智慧行銷經理](https://dev.to/copilotkit/build-an-ai-powered-campaign-manager-nextjs-openai-copilotkit-59ii)。  您可以使用`Next.js` 、 `OpenAI` 、 `Radix UI` (用於實現可存取性)、 `Recharts` (用於建立互動式圖表)以及`CopilotKit`來建立這個出色的專案來閱讀本文。 您可以觀看 David 的示範! {% 嵌入 https://youtu.be/gCJpH6Tnj5g %} 如果你想用更少的錢學到更多,這是我最喜歡的一個。 我喜歡它的 UI(一般教學不是這樣),這正是它成為你的編碼清單上的一個乾淨專案的原因:) 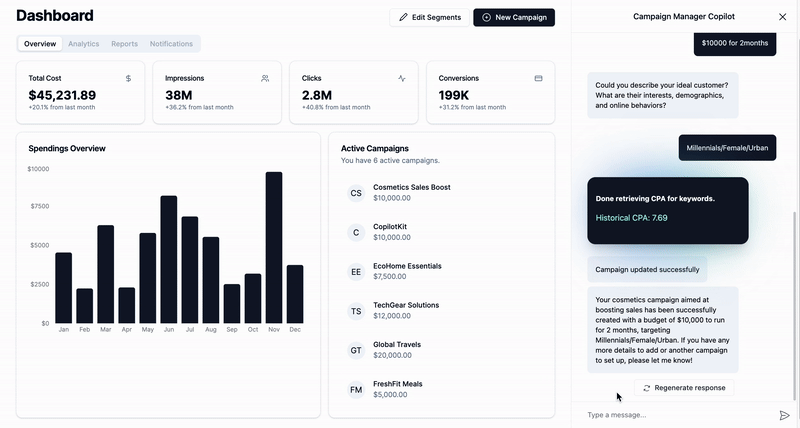 您可以查看該應用程式的[現場演示](https://campaign-manager-demo.vercel.app/)。 您可以檢查[GitHub 儲存庫](https://github.com/CopilotKit/campaign-manager-demo)。 ### ✅ [附有人工智慧副駕駛的電子表格應用程式](https://dev.to/copilotkit/build-an-ai-powered-spreadsheet-app-nextjs-langchain-copilotkit-109d)。  您可以閱讀本文,使用`Next.js` 、 `GPT-4` 、 `LangChain`和`CopilotKit`來建立這個很棒的工具。 為了使工作更輕鬆,它使用[React Spreadsheet](https://github.com/iddan/react-spreadsheet)套件為 React 和[Tavily AI](https://tavily.com/)建立簡單的可自訂電子表格作為搜尋引擎,使 AI 代理能夠進行研究並存取即時知識 你可以觀看這個演示! {% 嵌入 https://www.youtube.com/watch?v=kGQ9xl5mSoQ %} 您也可以查看[現場演示](https://spreadsheet-demo-tau.vercel.app/)。我可以肯定地說,這是一個獨特的案例,你可以得到很多啟發。 您可以檢查[GitHub 儲存庫](https://github.com/CopilotKit/spreadsheet-demo)。 ### ✅[與您的履歷聊天](https://dev.to/copilotkit/how-to-build-the-with-nextjs-openai-1mhb)。  您可以閱讀本文,使用`Next.js` 、 `OpenAI`和`CopilotKit`來建立這個很棒的用例。 您不僅可以使用 ChatGPT 產生履歷,還可以將其匯出為 PDF,甚至可以透過與其對話來進一步改進它。多酷啊,對吧:) 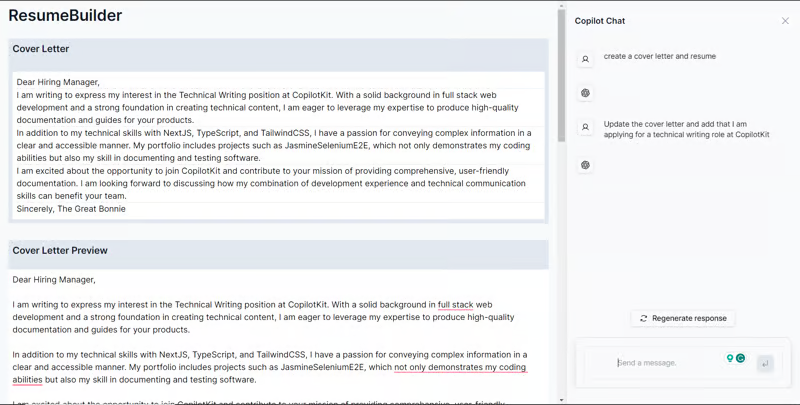 您可以檢查[GitHub 儲存庫](https://github.com/TheGreatBonnie/AIPoweredResumeBuilder)。 ### ✅ [文字到 Powerpoint 應用程式](https://dev.to/copilotkit/how-to-build-ai-powered-powerpoint-app-nextjs-openai-copilotkit-ji2)。  您可以閱讀本文,使用`Next.js` 、 `OpenAI`和`CopilotKit`建立 Text to Powerpoint 應用程式。 這是一個簡單但非常強大的概念,本文也清楚地說明如何在任何幻燈中加入背景圖像。 您可以檢查[GitHub 儲存庫](https://github.com/TheGreatBonnie/aipoweredpresentation)。 ### ✅ [StudyPal:您的人工智慧驅動的個人化學習伴侶](https://dev.to/rajesh-adk-137/studypal-your-ai-powered-personalized-learning-companion-59d)。  您可以從精選清單中選擇您想要的主題,為個人化的學習旅程奠定基礎。 您需要提供有關您的教育背景的詳細訊息,以便 StudyPal 能夠根據他們當前的知識水平定製材料和練習。 `Additional Details`部分可讓學生指定重點領域,確保內容與其學習目標一致。 您可以閱讀本文,使用`React` 、 `Node`和`CopilotKit`來建立這個很棒的用例。 您可以觀看該應用程式的[演示](https://github-production-user-asset-6210df.s3.amazonaws.com/89499267/328419789-a06b11c6-ffbc-44b6-96b0-648d2a38cd7c.mp4?X-Amz-Algorithm=AWS4-HMAC-SHA256&X-Amz-Credential=AKIAVCODYLSA53PQK4ZA%2F20240512%2Fus-east-1%2Fs3%2Faws4_request&X-Amz-Date=20240512T083208Z&X-Amz-Expires=300&X-Amz-Signature=f6fe016e65e167e94b8322b70743a7fb02fed91f2c87c5af7459e1fa022faac2&X-Amz-SignedHeaders=host&actor_id=74038190&key_id=0&repo_id=793889064)。 您可以檢查[GitHub 儲存庫](https://github.com/rajesh-adk-137/StudyPal)。 --- 2.什麼是郎鏈? -------- 其餘專案將與 langchain 和 AI 相關(有些使用 python)。最好稍微了解一下這一點。 LangChain 是用於開發由大型語言模型(LLM)支援的應用程式的框架。   總體而言,LangChain 簡化了 LLM 申請生命週期的每個階段。您可以閱讀[官方文件](https://python.langchain.com/docs/get_started/introduction/)以了解更多內容。 如果您想了解有關 langchain 的更多訊息,我建議您觀看 freeCodeCamp 的[本教程](https://www.youtube.com/watch?v=HSZ_uaif57o)。 {% 嵌入 https://www.youtube.com/watch?v=HSZ\_uaif57o %} --- ### 🎯 使用 Langchain/AI/Python 建立的熱門應用程式。 我們可以使用 langchain 建立很多很多高級應用程式,所以讓我們探索一些脫穎而出的應用程式! ### ✅ [Mac 上的語音助理](https://github.com/chidiwilliams/GPT-Automator)- 您的語音控制 Mac 助理。 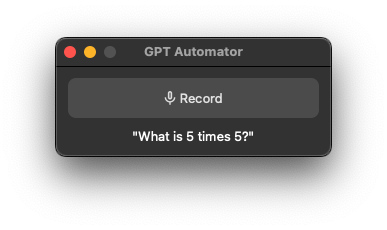 您的語音控制 Mac 助理。 GPT Automator 可讓您使用語音在 Mac 上執行任務。例如,打開應用程式、尋找餐廳、綜合資訊。太棒了:D 它是在倫敦黑客馬拉松期間建構的。 它有兩個主要部分: A。語音命令:它使用本地執行的 Whisper(Buzz 的一個分支)來產生命令。 b.命令到行動:您向配備了我們編寫的自訂工具的 LangChain 代理程式發出命令。這些工具包括使用 AppleScript 控制電腦的作業系統以及使用 JavaScript 控制活動瀏覽器。最後,就像任何優秀的人工智慧一樣,我們讓代理商使用 AppleScript 說出最終結果「{Result}」(如果您以前沒有使用過,請嘗試在 Mac 終端機中輸入「Hello World!」)。 我們製作了一個自訂工具,讓法學碩士使用 AppleScript 控制電腦。提示符是文件字串: ``` @tool def computer_applescript_action(apple_script): """ Use this when you want to execute a command on the computer. The command should be in AppleScript. Here are some examples of good AppleScript commands: Command: Create a new page in Notion AppleScript: tell application "Notion" activate delay 0.5 tell application "System Events" to keystroke "n" using {{command down}} end tell ... Write the AppleScript for the Command: Command: """ p = subprocess.Popen(['osascript', '-'], stdin=subprocess.PIPE, stdout=subprocess.PIPE, stderr=subprocess.PIPE) stdout, stderr = p.communicate(applescript.encode('utf-8')) if p.returncode != 0: raise Exception(stderr) decoded_text = stdout.decode("utf-8") return decoded_text ``` 如果您想知道它是如何運作的,GPT Automator 使用 OpenAI 的 Whisper 將您的音訊輸入轉換為文字。然後,它使用LangChain Agent 選擇一組操作,包括使用OpenAI 的GPT-3(“text-davinci-003”)從提示符號產生AppleScript(用於桌面自動化)和JavaScript(用於瀏覽器自動化)命令,然後執行產生的腳本。 請記住,這不適用於生產用途。該專案執行從自然語言產生的程式碼,可能容易受到提示注入和類似的攻擊。這項工作是作為概念驗證而進行的。 您可以閱讀[安裝指南](https://github.com/chidiwilliams/GPT-Automator?tab=readme-ov-file#instructions)。 讓我們看看一些提示及其作用: ⚡ 求計算結果。 > 提示:“2 + 2 是什麼?” 它將編寫 AppleScript 開啟計算器並輸入 5 \* 5。 ⚡ 尋找附近的餐廳。 > 提示:“查找我附近的餐廳” 它將打開 Chrome,谷歌搜尋附近的餐廳,解析頁面,然後返回最上面的結果。有時它很厚顏無恥,反而會打開谷歌地圖結果並說「最好的餐廳是谷歌地圖頁面頂部的餐廳」。其他時候,它會打開 Google 上的頂部連結 - 並卡在 Google 可存取性頁面上... 以下是執行時列印到終端的內容: ``` Command: Find a great restaurant near Manchester. > Entering new AgentExecutor chain... I need to search for a restaurant near Manchester. Action: chrome_open_url Action Input: https://www.google.com/search?q=restaurant+near+Manchester Observation: Thought: I need to read the page Action: chrome_read_the_page Action Input: Observation: Accessibility links Skip to main content ... # Shortned for brevity Dishoom Manchester 4.7 (3.3K) · £££ · Indian 32 Bridge St · Near John Rylands Library Closes soon ⋅ 11 pm Stylish eatery for modern Indian fare San Carlo 4.2 (2.8K) · £££ · Italian 42 King St W · Near John Rylands Library Closes soon ⋅ 11 pm Posh, sceney Italian restaurant Turtle Bay Manchester Northern Quarter 4.7 Thought: I now know the final answer Final Answer: The 15 best restaurants in Manchester include El Gato Negro, Albert's Schloss, The Refuge, Hawksmoor, On The Hush, Dishoom, Banyan, Zouk Tea Room & Grill, Edison Bar, MyLahore Manchester, Turtle Bay Manchester Northern Quarter, San Carlo, The Black Friar, Mana, and Tast Cuina Catalana. ``` 我不能保證這些餐廳值得,請自行承擔風險。哈哈! ⚡ 如果您要求 GPT Automator 擦除您的計算機,它會的。 是的,如果您要求的話,它會擦除您的電腦! 我內心的自我尖叫著要這麼做:) 您可以在這裡查看完整的演示! {% 嵌入 https://www.loom.com/share/7bfa82c604f3412fbbb04191ce2ae12f %} 您可以在[Chidi 的部落格](https://chidiwilliams.com/posts/gpt-automator)上閱讀更多內容。 它更像是一個業餘專案,因此他們在 GitHub 上有大約 200 個 star,但它非常酷。 您可以檢查[GitHub 儲存庫](https://github.com/chidiwilliams/GPT-Automator)。 ✅ [Instrukt](https://github.com/blob42/Instrukt) - 終端中整合人工智慧。 ------------------------------------------------------------- 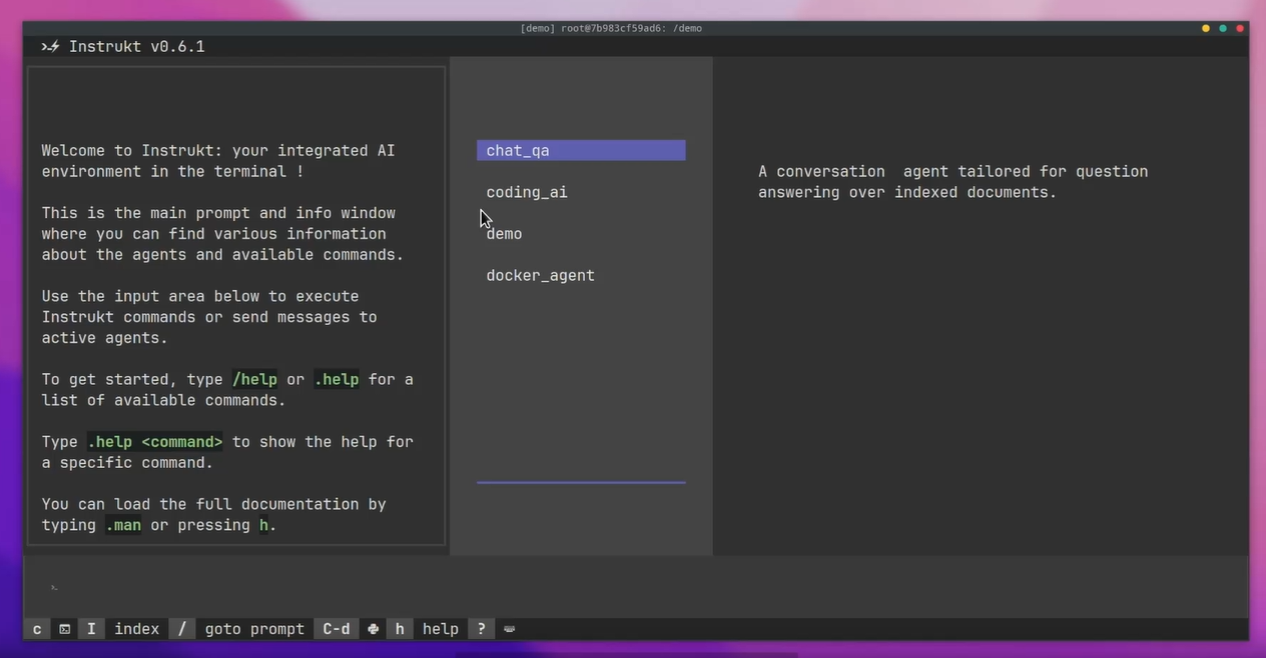 Instrukt是一個基於終端的AI整合環境。它提供了一個平台,用戶可以: - 建立並指導模組化人工智慧代理。 - 產生問答的文件索引。 - 建立工具並將其附加到任何代理程式。 用自然語言指導它們,並且為了安全起見,在安全容器(目前使用 Docker 實作)中執行它們,以在其專用的沙盒空間中執行任務。 使用`Langchain` 、 `Textual`和`Chroma`建構。 開始使用以下命令。 ``` pip install instrukt[all] ``` 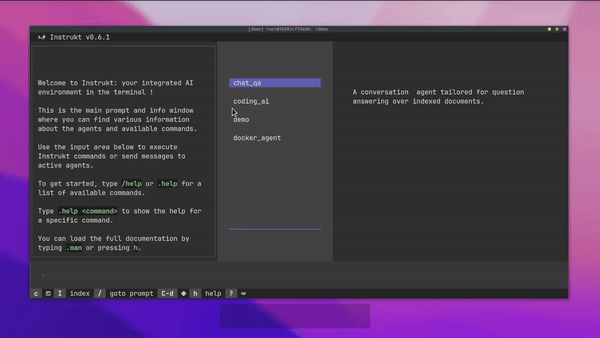 有許多令人興奮的功能,例如: - 基於終端的介面,讓強力鍵盤使用者無需離開鍵盤即可指示 AI 代理。 - 對您的資料建立索引並讓代理程式檢索它以進行問答。您可以使用簡單的 UI 建立和組織索引。 - 索引建立將自動偵測程式語言並相應地優化拆分/分塊策略。 - 在安全的 Docker 容器內執行代理程式以確保安全和隱私。 - 整合的 REPL-Prompt 可實現與代理程式的快速交互,以及用於開發和測試的快速回饋循環。 - 您可以使用自訂命令自動執行重複任務。它還具有內建的提示/聊天歷史記錄。 您可以閱讀有關所有[功能的](https://github.com/blob42/Instrukt?tab=readme-ov-file#features)資訊。 您可以閱讀[安裝指南](https://blob42.github.io/Instrukt/install.html)。 您還可以使用內建的 IPython 控制台來除錯和內省代理,這是一個簡潔的小功能。 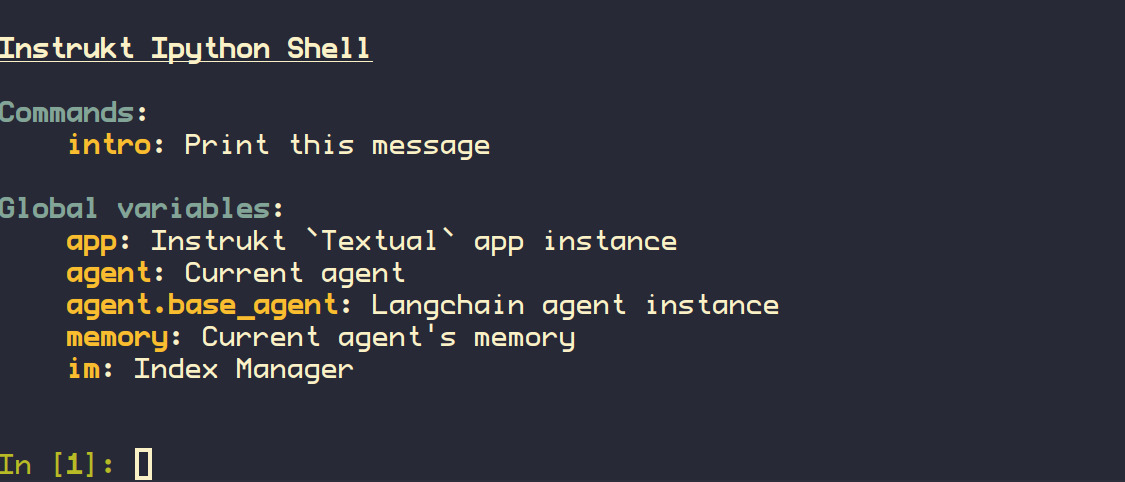 Instrukt 已獲得 AGPL 許可證,這意味著任何人都可以將其用於任何目的。 可以肯定地說,Instrukt 是您觸手可及的終端人工智慧指揮官。 這是一個新專案,因此他們在 GitHub 上有大約 200 多顆星,但用例非常好。 您可以檢查[GitHub 儲存庫](https://github.com/blob42/Instrukt)。 ✅ [ChatFiles](https://github.com/guangzhengli/ChatFiles) - 上傳您的檔案並與其對話。 ----------------------------------------------------------------------- 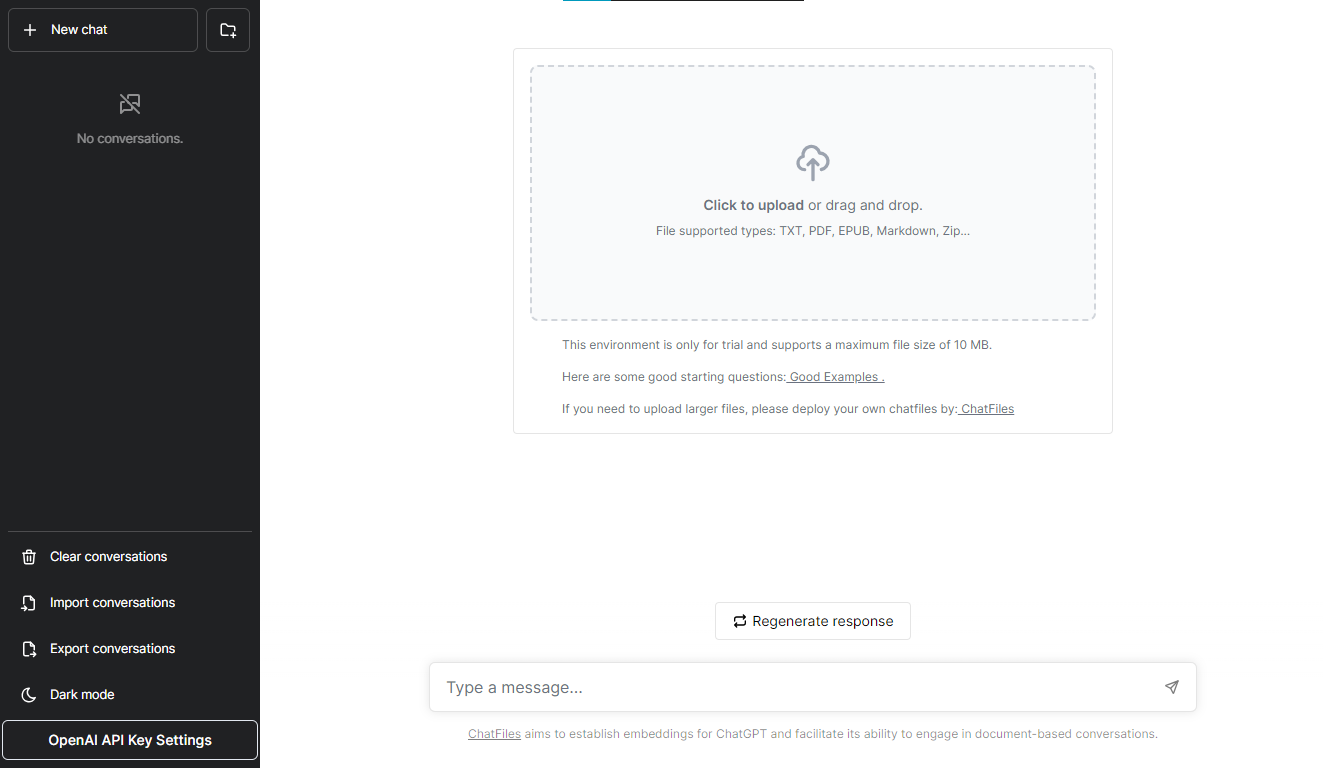 文件聊天機器人 — 多個文件,由 GPT / Embedding 提供支援。你可以上傳任何文件並與之對話,考慮到他們使用了另一個著名的開源專案,UI 非常好。 它在底層使用 Langchain 和[Chatbot-ui](https://github.com/mckaywrigley/chatbot-ui) 。使用 Nextjs、TypeScript、Tailwind 和 Supabase(向量 DB)建構。 如果您想了解該方法和技術架構,那麼就在這裡!  此環境僅用於試用,支援最大檔案大小為 10 MB,這是一個缺點,如果您想要更大的大小,則可以[在本機安裝](https://github.com/guangzhengli/ChatFiles?tab=readme-ov-file#how-to-run-locally)。 他們提供了您可以使用的[入門問題](https://github.com/guangzhengli/ChatFiles/blob/main/doc/Example.md)。您可以查看[現場演示](https://chatfile.vectorhub.org/)。 他們在 GitHub 上有 3k star,並且發布了`v0.3`版本。 您可以檢查[GitHub 儲存庫](https://github.com/guangzhengli/ChatFiles)。 ✅ [具有多代理協作的終極人工智慧自動化 - LangGraph + GPT 研究人員](https://blog.langchain.dev/how-to-build-the-ultimate-ai-automation-with-multi-agent-collaboration/)。 ------------------------------------------------------------------------------------------------------------------------------------------------- LangGraph 是一個使用 LLM 建立有狀態、多參與者應用程式的函式庫。此範例使用 Langgraph 自動化對任何給定主題的深入研究過程。 簡而言之,這個範例展示了人工智慧代理團隊如何協同工作,對給定主題進行從規劃到發布的研究。此範例還將利用領先的自主研究代理[GPT Researcher](https://github.com/assafelovic/gpt-researcher) ,我已在過去的一篇文章中介紹過該代理。 研究團隊由七名法學碩士代理人: ⚡ `Chief Editor` - 監督研究過程並管理團隊。這是使用 LangGraph 協調其他代理程式的「主」代理程式。該代理充當主要的 LangGraph 介面。 ⚡ `GPT Researcher` - 專門的自主代理,對給定主題進行深入研究。 ⚡ `Editor` - 負責規劃研究大綱和結構。 ⚡ `Reviewer` - 根據一組標準驗證研究結果的正確性。 ⚡ `Reviser` - 根據審查者的回饋修改研究結果。 ⚡ `Writer` - 負責編譯和撰寫最終報告。 ⚡ `Publisher` - 負責以各種格式發布最終報告。 自動化過程基於以下階段(架構),文章中清楚地顯示了這一點。 - 策劃階段。 - 資料收集和分析。 - 審查和修訂。 - 寫作並提交。 - 出版品. 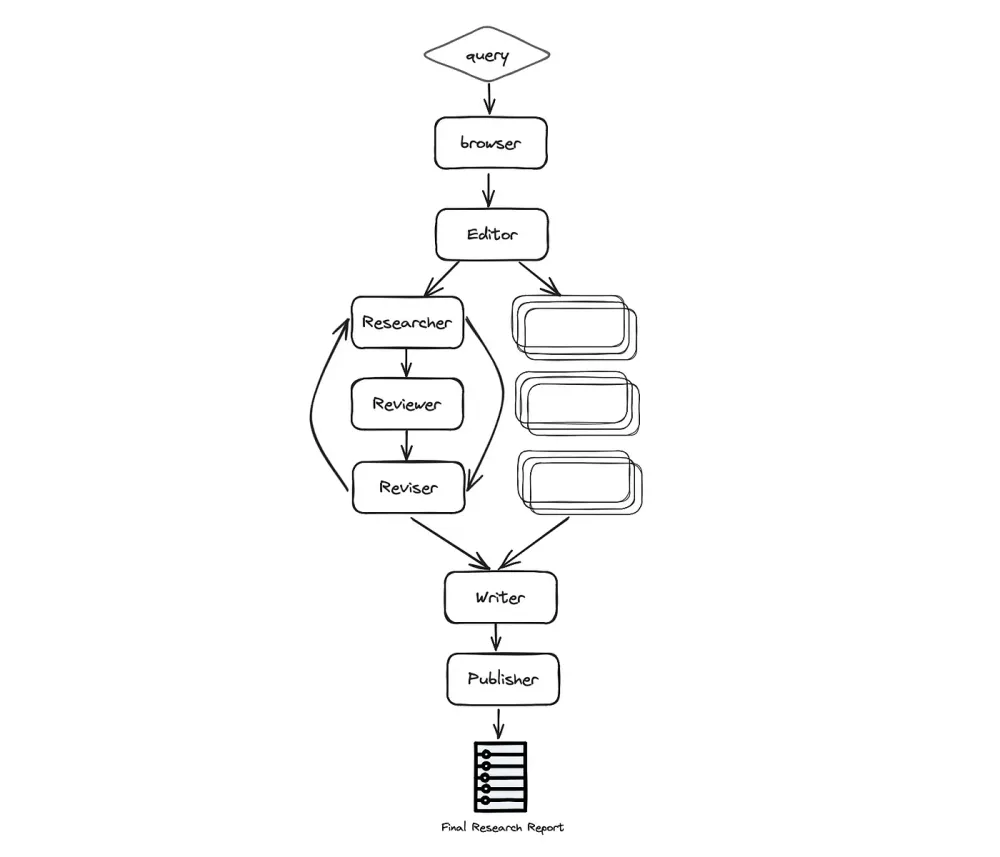 您可以閱讀有關正在發生的事情的[詳細步驟文件](https://github.com/assafelovic/gpt-researcher/tree/master/multi_agents?ref=blog.langchain.dev#steps)。 助手的最終運作將產生 Markdown、PDF 和 Docx 等格式的最終研究報告。 您可以閱讀這篇文章,其中介紹[如何透過多代理協作來建立終極人工智慧自動化](https://blog.langchain.dev/how-to-build-the-ultimate-ai-automation-with-multi-agent-collaboration/),其中 Wix 研發主管 Assaf Elovic 介紹如何使用 LangGraph 與專業代理團隊建立自主研究助理。它具有易於理解的程式碼範例,並清楚地說明正在發生的事情。開發者必讀! 最好的部分是,如果您想更改研究查詢並自訂報告,只需編輯主目錄中的`task.json`檔案。真的很棒:) 它由 GPT 研究人員負責,擁有 10k 顆星,但自從上次提交是在幾天前以來,它經常更新。 您可以檢查[GitHub 儲存庫](https://github.com/assafelovic/gpt-researcher/tree/master/multi_agents)。 ✅[僚機AI](https://github.com/e-johnstonn/wingmanAI) 。 --------------------------------------------------- 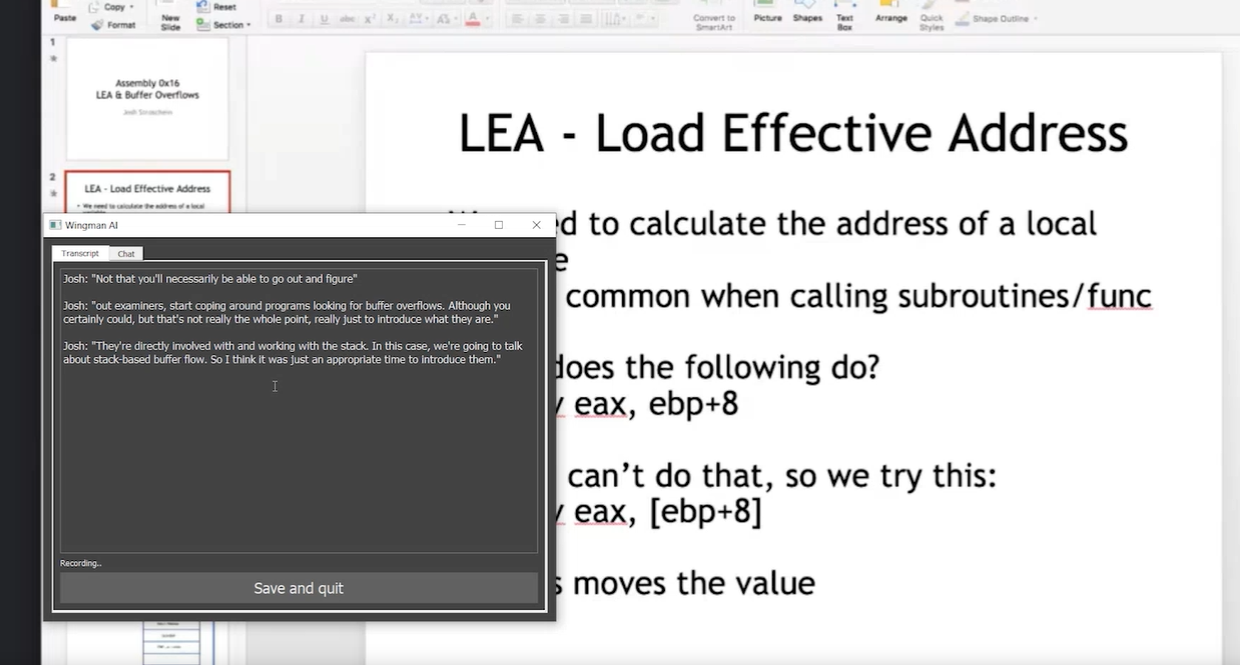 WingmanAI 是一款功能強大的工具,可與系統和麥克風音訊的即時轉錄進行互動。 它使用 ChatGPT,讓您與文字記錄即時交互,作為機器人的廣泛記憶體基礎,提供獨特的通訊平台。 當您載入指定人員的文字記錄時,機器人甚至可以回答有關過去對話的問題。 所有精彩功能的詳細介紹: ⚡ 它可以轉錄系統輸出和麥克風輸入音頻,讓您以易於閱讀的格式查看即時轉錄。 ⚡ 機器人以令牌有效的方式維護對話記錄,因為只有當前的文字區塊會傳遞給機器人。 ⚡ 您可以與 ChatGPT 支援的機器人聊天,機器人會即時讀取您的文字記錄。 ⚡ 您可以繼續附加到已儲存的記錄中,隨著時間的推移建立一個龐大的資料庫供機器人從中提取。 ⚡ 它允許您保存成績單以供將來使用。您可以稍後隨時加載它們,並且對機器人進行的任何查詢都將與保存的轉錄本的向量資料庫交叉引用,從而為機器人提供更豐富的上下文。 您可以閱讀[安裝說明](https://github.com/e-johnstonn/wingmanAI?tab=readme-ov-file#installation)。 您只需將 OpenAI API 金鑰放入`keys.env`檔案中並執行`main.py` 。 唯一的缺點是該應用程式目前僅與 Windows 相容。 Windows 用戶現在更高興了:) 您可以觀看[完整的示範影片](https://github.com/e-johnstonn/wingmanAI?tab=readme-ov-file#demo)。由於限制,下面所附的 gif 很短(86 秒中只有 30 秒)。  我對這個概念感到非常驚訝,因為我從來沒有想過它可以以這種方式實現。當開發人員用非常簡單的概念創造出一些很酷的東西時,感覺真的很棒:) 它在 GitHub 上有 420 多顆星,並且不再維護。但你可以用它來建造更好的東西。 您可以檢查[GitHub 儲存庫](https://github.com/e-johnstonn/wingmanAI)。 ✅[考試](https://github.com/codeacme17/examor)。 -------------------------------------------- 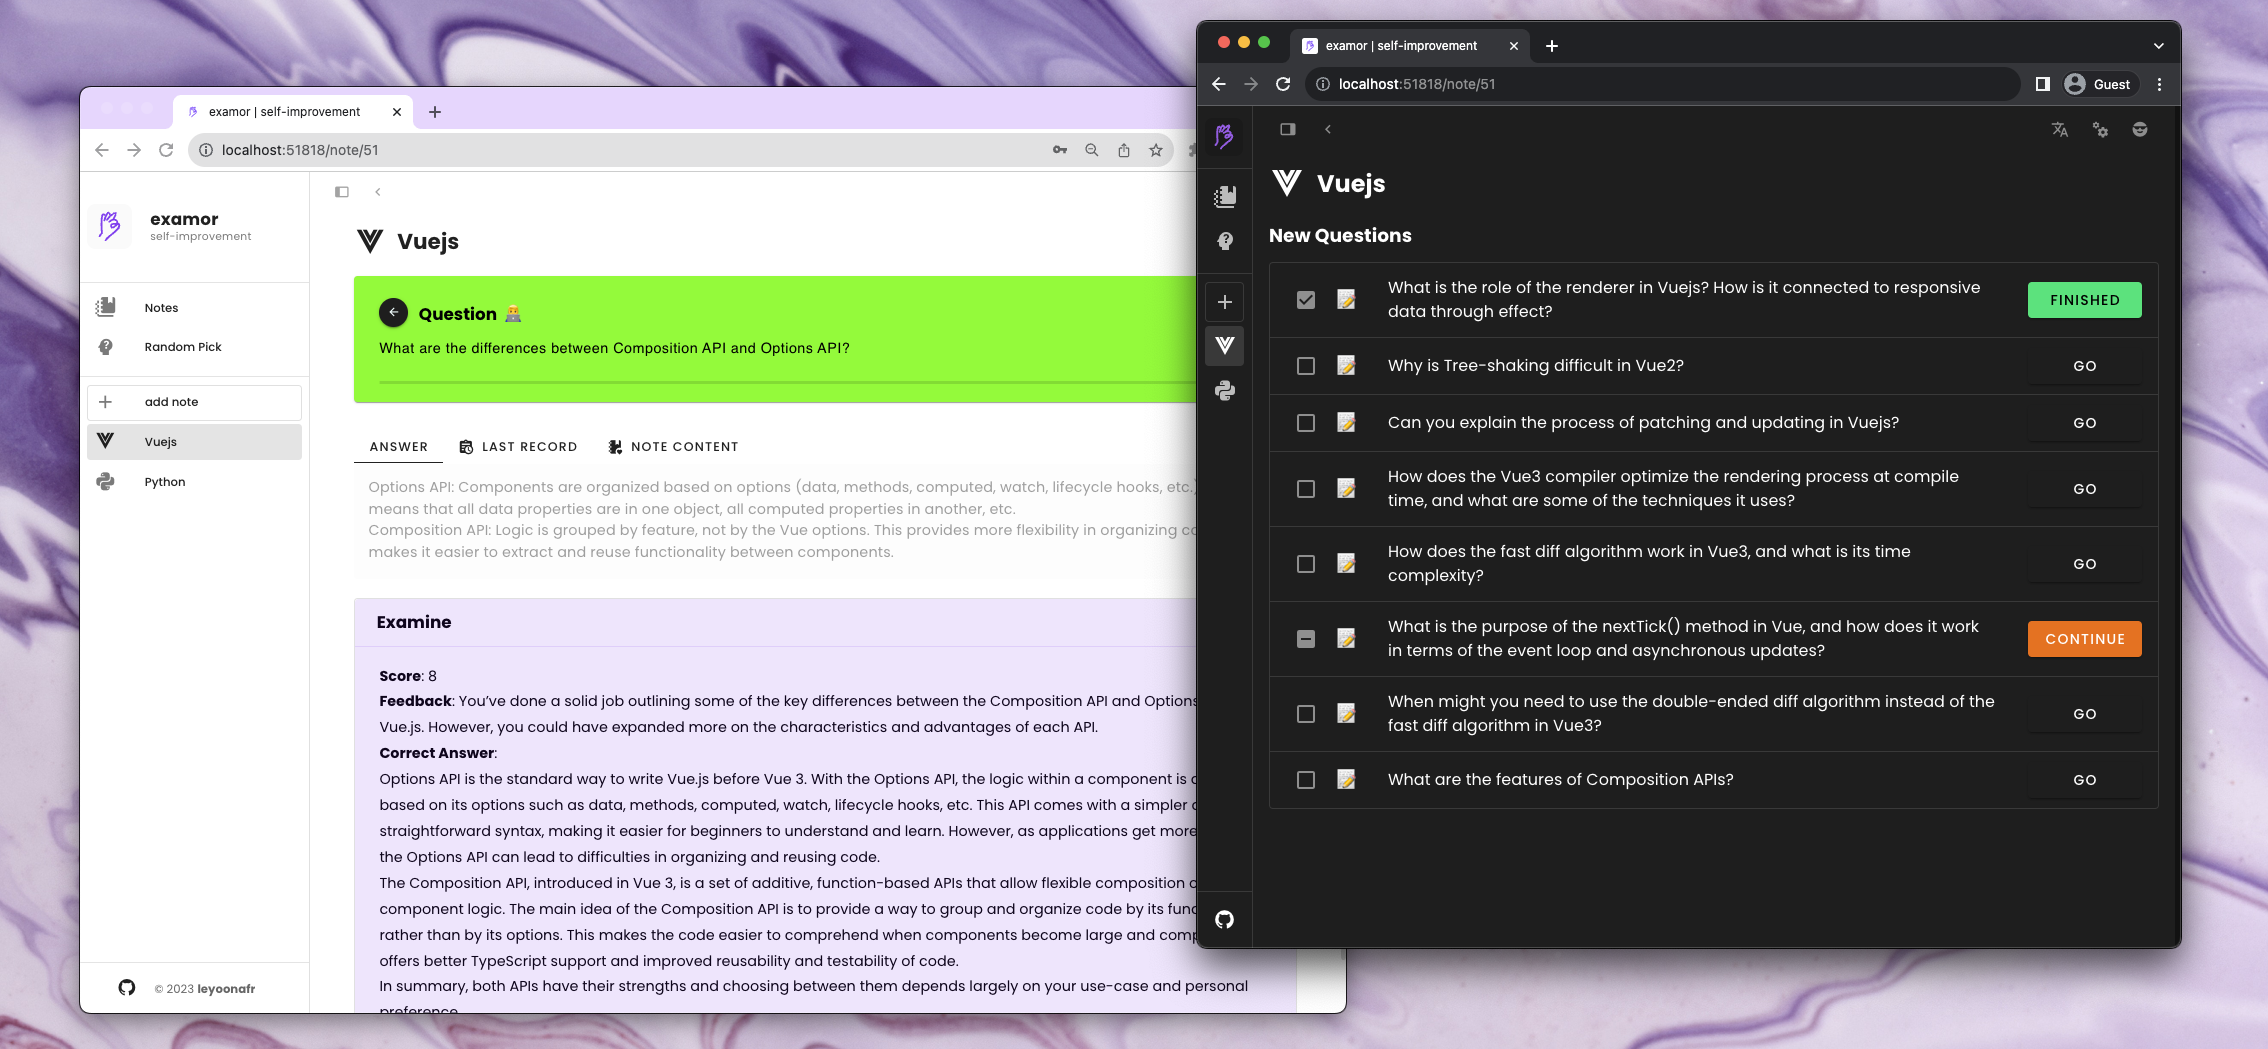 一款允許您根據知識筆記參加考試的應用程式。它可以讓您專注於您所學和所寫的內容🧠。 它不斷提示您提出問題以複習筆記內容,這對於學生、學者、受訪者和終身學習者非常有用。 專案管理員正在使用 next.js 重構專案,這對於使用`next.js`開發人員來說非常好。 讓我們來詳細分析一下一些很棒的功能: ⚡ 建立筆記時可以上傳相關文件。該應用程式根據這些文件的內容產生一組問題。這些問題將在未來呈現給大家。建立筆記時,您作為使用者還可以選擇要產生的問題類型。  ⚡ 收到每日問題後,您可以提供答案。 GPT 將評分、驗證並提供正確答案。透過評估答案和連結文件的正確性來確定分數(0 ~ 10 分)。這個分數會影響隨後的艾賓浩斯評審過程。將會在未來的發布版本中進行最佳化。 ⚡ 角色可以為問題產生和評估提供更多可能性。您可以在設定頁面上設定角色。有關各種角色的更多訊息,建議參閱詳細的[角色手冊指南](https://github.com/codeacme17/examor/blob/main/docs/en-role.md)。 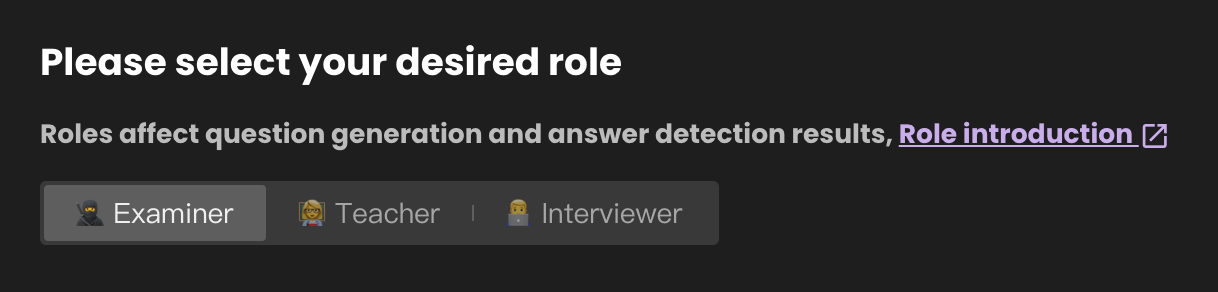 ⚡ 練習問題時,可以用不同的方法作答。下圖顯示了單選題的範例。  ⚡ 它有一個包含多個[模組](https://github.com/codeacme17/examor?tab=readme-ov-file#-modules)的列表,例如`Examine` 、 `Note` 、 `Notes Management`和`Random Question`使用這些模組您可以在筆記中導入問題,刪除或加入新文件到上傳的筆記中,等等。 我喜歡整個概念,這會引起任何曾經面臨過修改筆記問題的人的注意。 您可以閱讀包含如何正確使用它的詳細指南的[文件](https://github.com/codeacme17/examor/blob/main/README.md)。 它在 GitHub 上有 1k star,目前版本為`v0.4.2` 。 您可以檢查[GitHub 儲存庫](https://github.com/codeacme17/examor)。 ✅[語音GPT](https://github.com/hahahumble/speechgpt) 。 --------------------------------------------------- 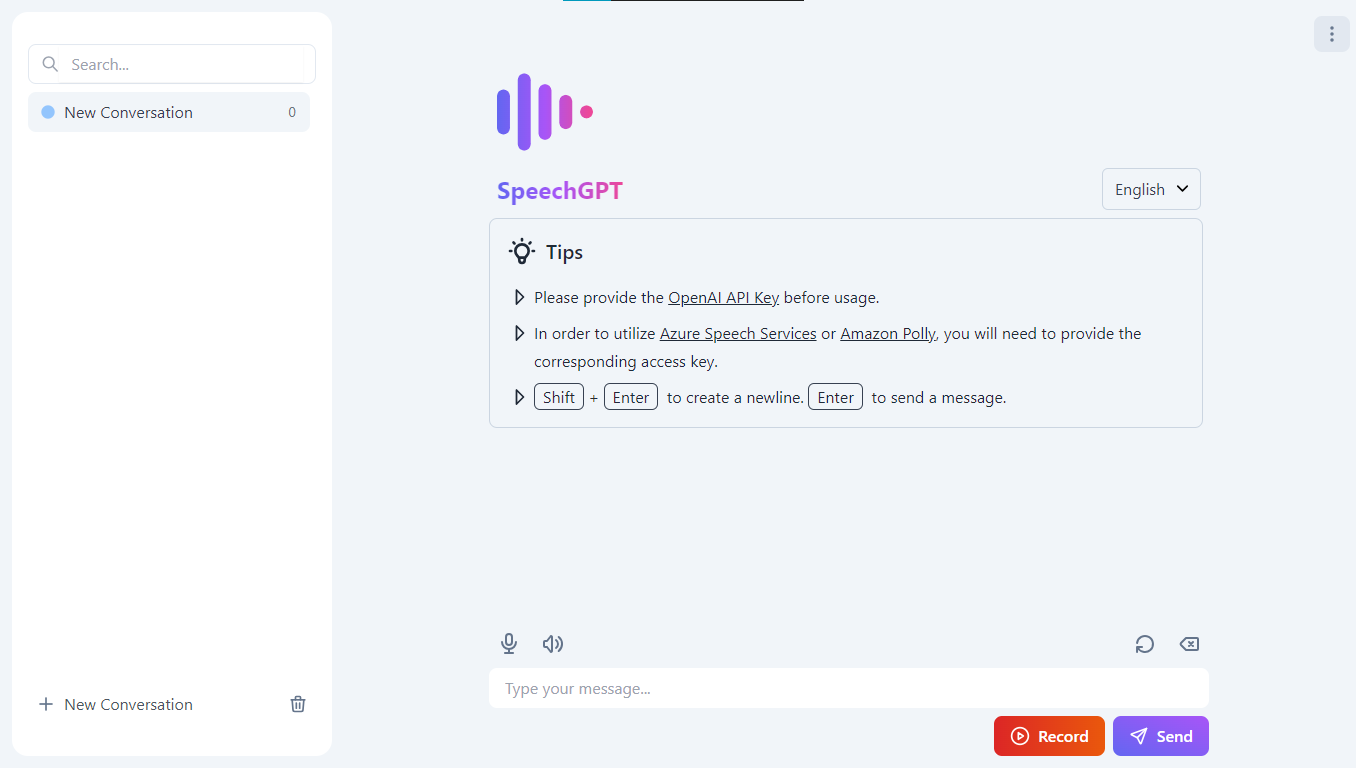 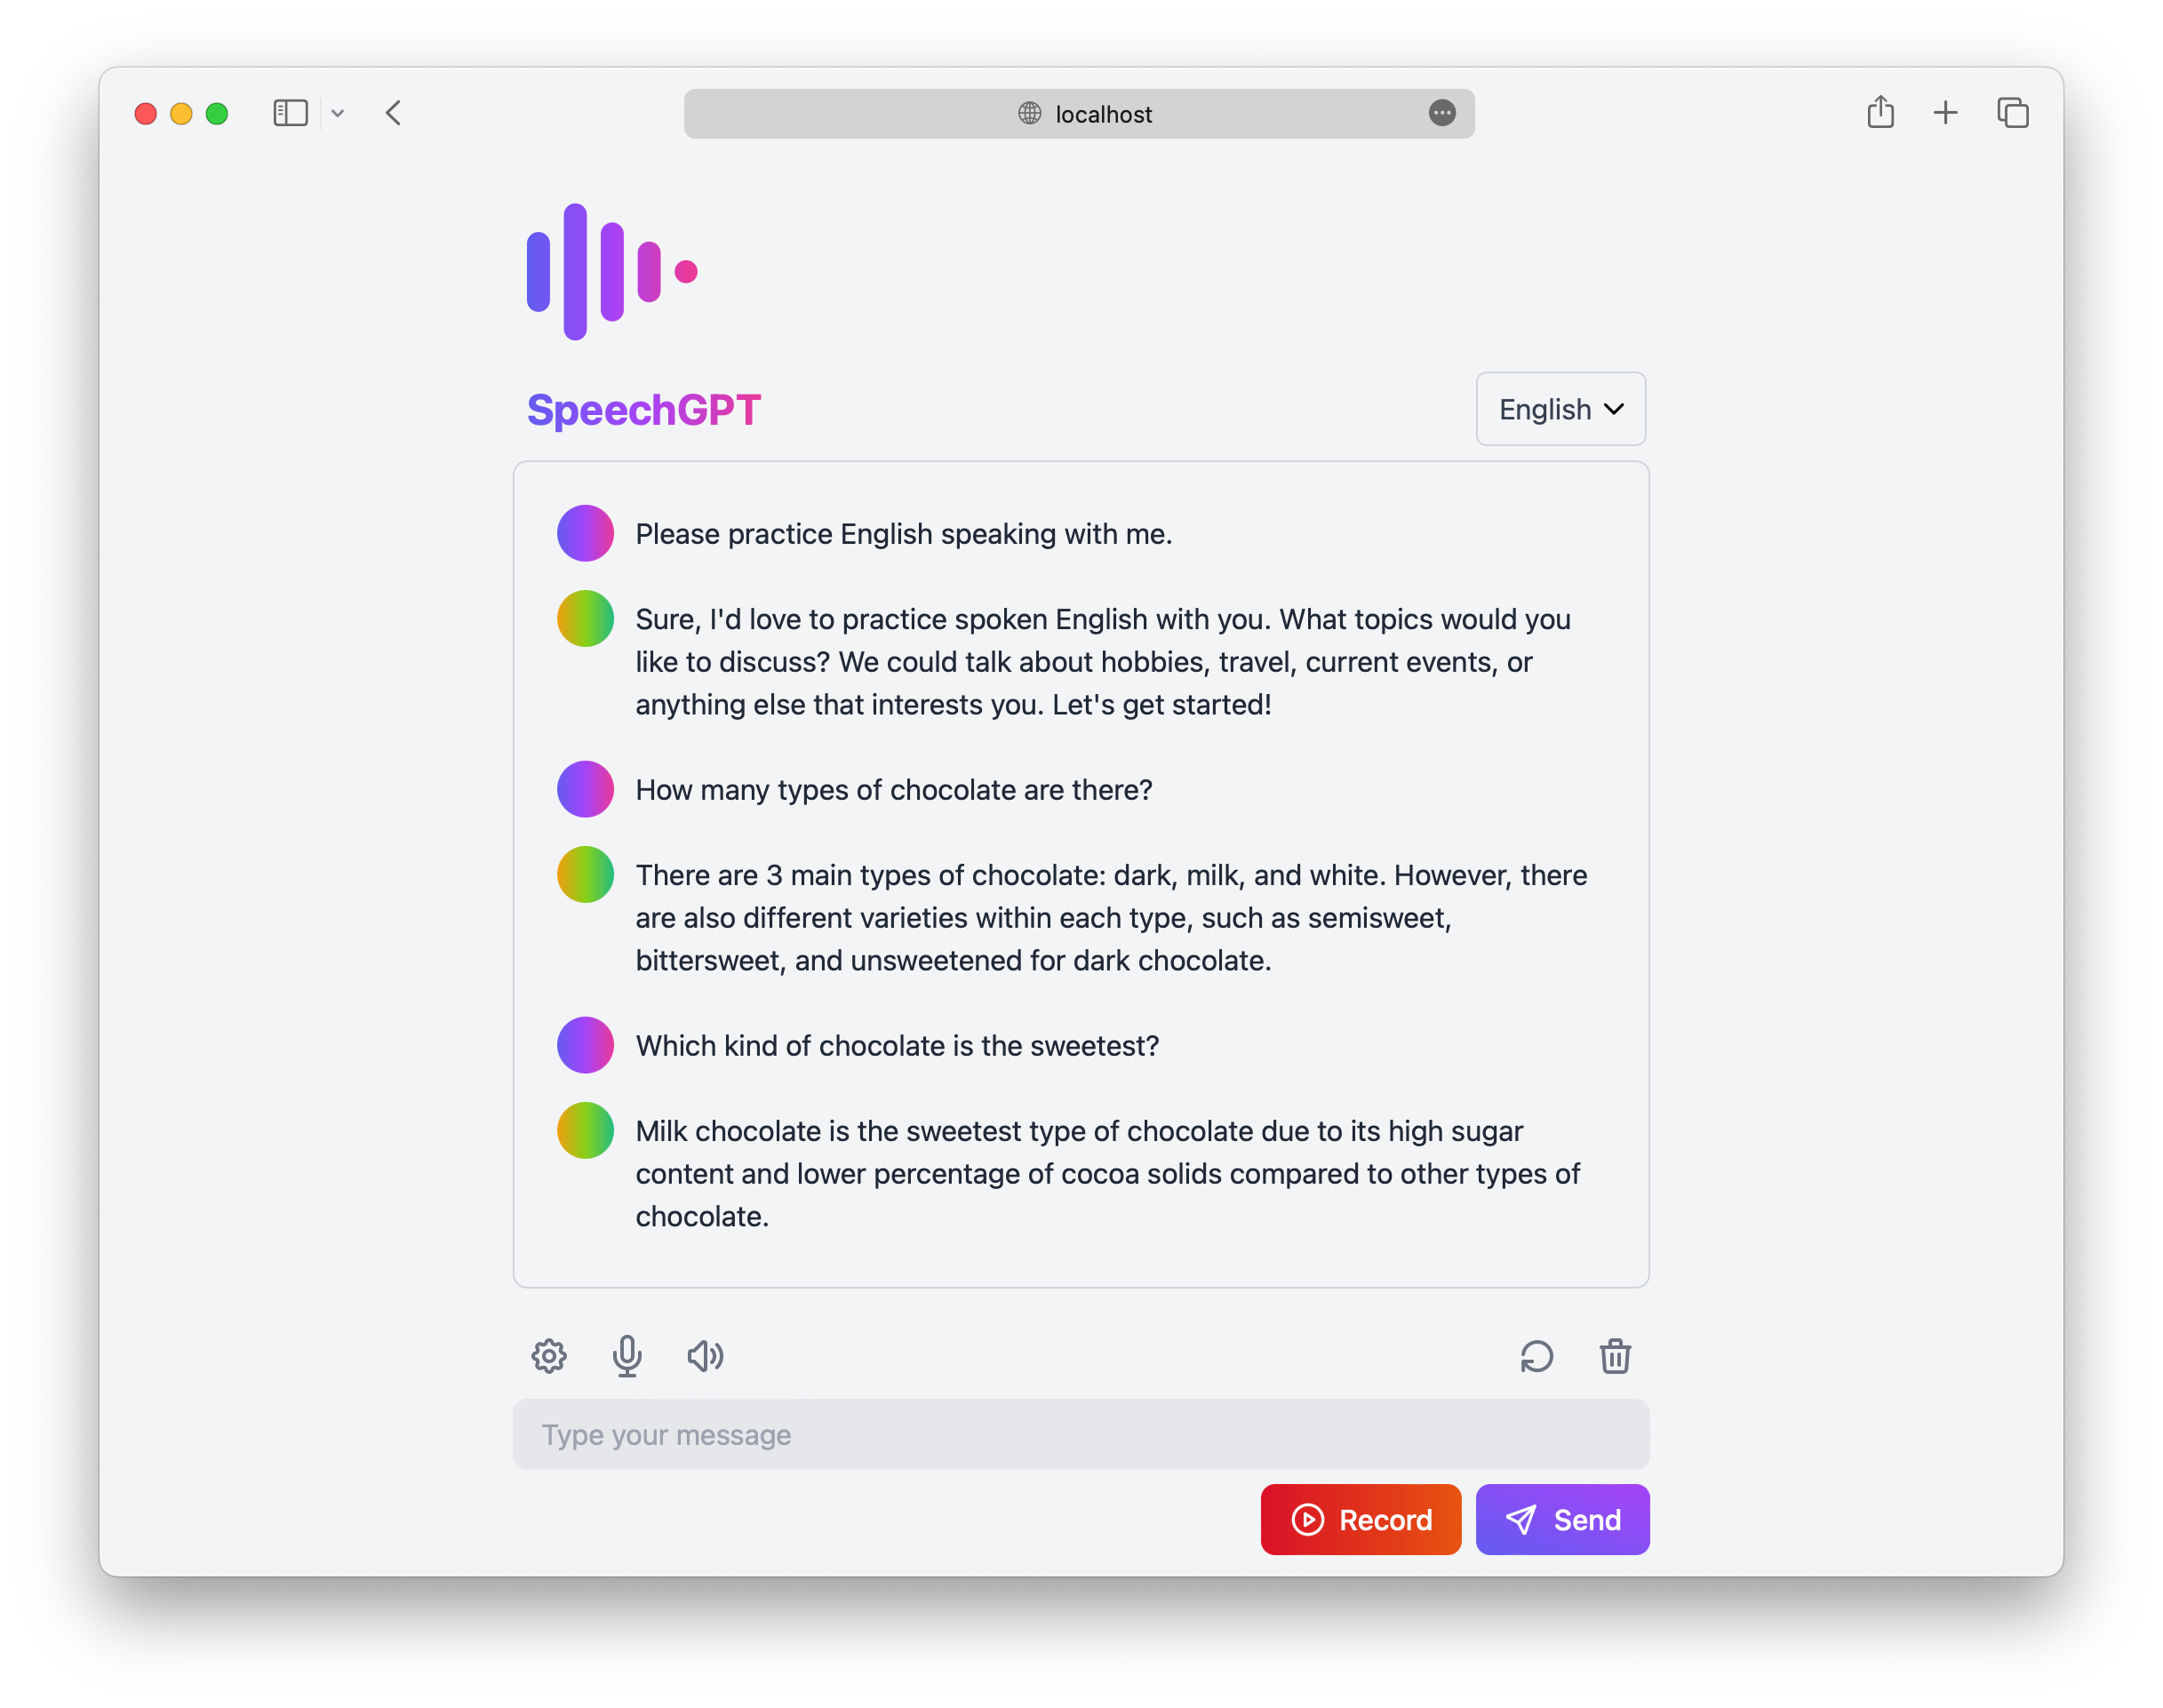 SpeechGPT 是一個 Web 應用程式,可讓您與 ChatGPT 進行對話。 您可以利用此應用程式來提高您的語言技能,或只是透過 ChatGPT 享受聊天的樂趣。 大多數人會說這有什麼獨特之處,但事實確實如此。 讓我們來打破一些很棒的功能: ⚡ 所有資料儲存在本地,隱私性更強。 ⚡ 根據文件,它支援 100 多種語言,但我在現場演示中只能看到對三種語言的支援。 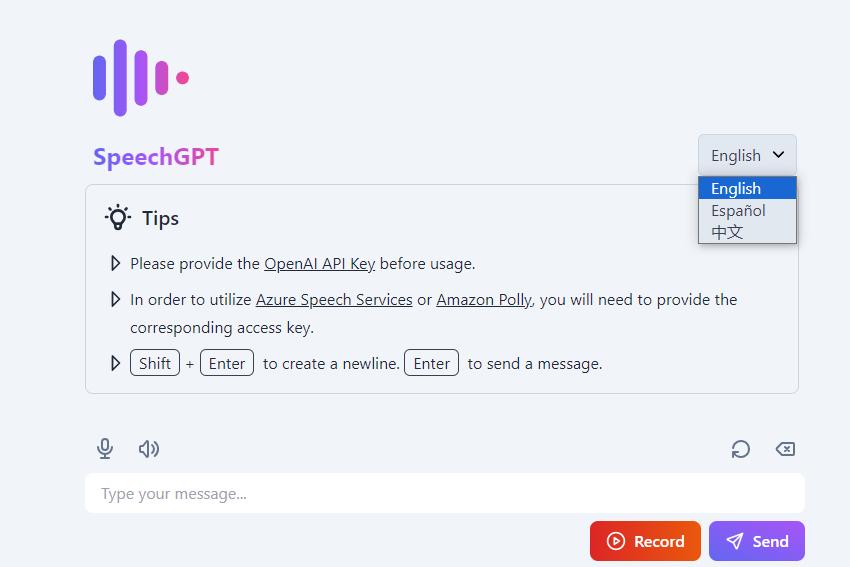 ⚡ 包含內建語音辨識以及與 Azure 語音服務的整合。  ⚡ 包含內建語音合成,以及與 Amazon Polly 和 Azure 語音服務的整合。 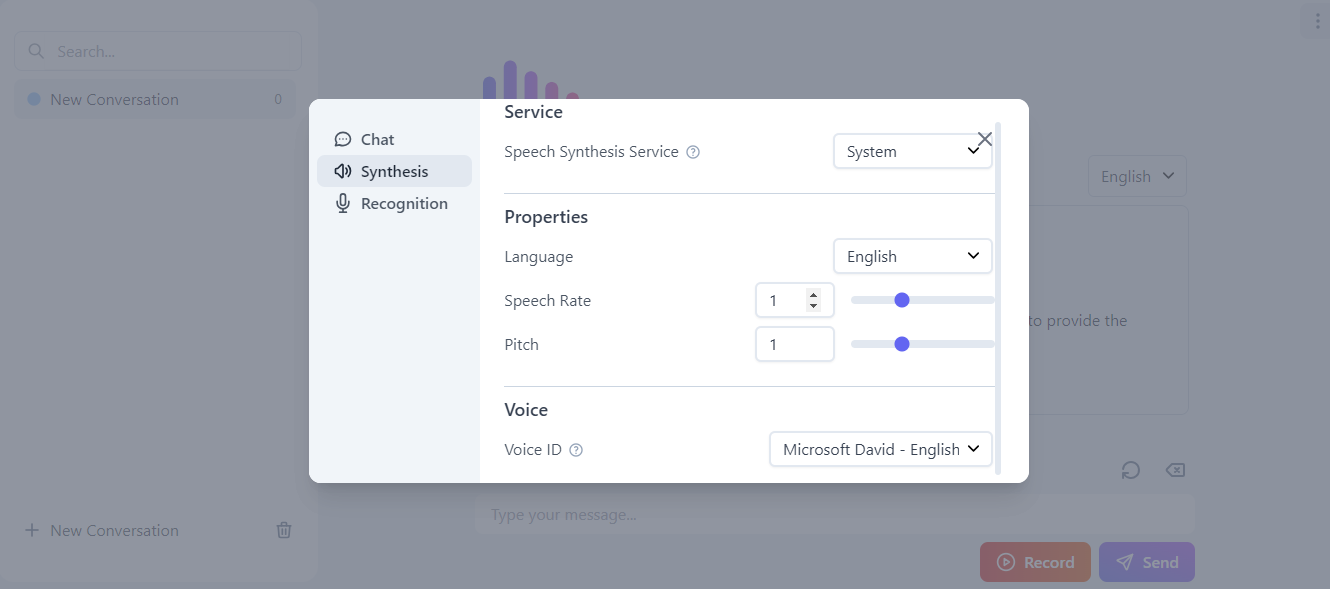 請按照[文件中的教學](https://github.com/hahahumble/speechgpt?tab=readme-ov-file#-tutorial)了解如何使用它。 您可以在[speechgpt.app](https://speechgpt.app/)上觀看現場演示。這是一個完美的例子,說明了一些額外的功能如何將您的應用程式提升到一個新的水平! SpeechGPT 在 GitHub 上有 2700 顆星,目前版本為`v0.5.1` 。 您可以檢查[GitHub 儲存庫](https://github.com/hahahumble/speechgpt)。 ✅ [myGPTReader](https://github.com/madawei2699/myGPTReader) - 閱讀並與 AI 機器人聊天。 ----------------------------------------------------------------------------  myGPTReader 是 Slack 上的機器人,可以閱讀和總結任何網頁、文件(包括電子書),甚至來自 YouTube 的影片。它可以透過語音與您交流。 一些有價值的功能是: ⚡ 使用 myGPTReader 透過對話快速閱讀和理解任何網頁內容,甚至是影片(目前僅支援帶有字幕的 YouTube 影片)。 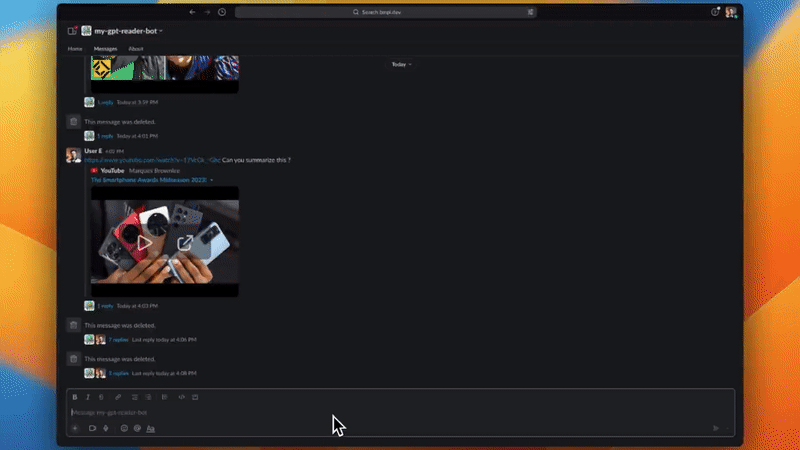 ⚡ 使用 myGPTReader 快速閱讀任何文件的內容,支援電子書、PDF、DOCX、TXT 和 Markdown。  ⚡ 透過與 myGPTReader 語音對話來練習外語,它可以成為您的私人導師,支援中文、英語、德語和日語。 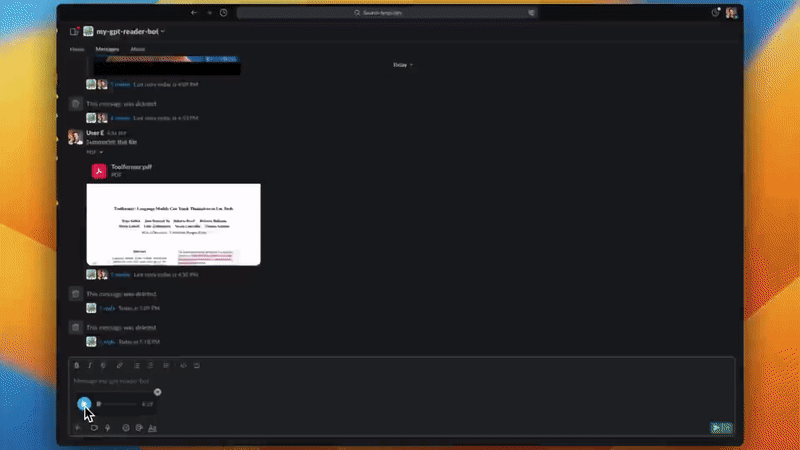 ⚡ 內建大量提示模板,使用它們可以更好地與chatGPT對話。  ⚡ myGPTReader 每天發送最新熱點新聞,並自動產生摘要,讓您快速了解今日熱點。 您可以造訪[官方網站](https://www.myreader.io/)。 您可以加入擁有超過 5000 名會員的儲存庫上的 Slack 頻道,免費體驗所有這些功能。 它們在 GitHub 上有 4.4k 顆星,並且像此列表中的其他專案一樣使用 Python 建置。 您可以檢查[GitHub 儲存庫](https://github.com/madawei2699/myGPTReader)。 ✅ [RepoChat](https://github.com/pnkvalavala/repochat) - 支援 GitHub 儲存庫互動的聊天機器人助理。 -------------------------------------------------------------------------------- 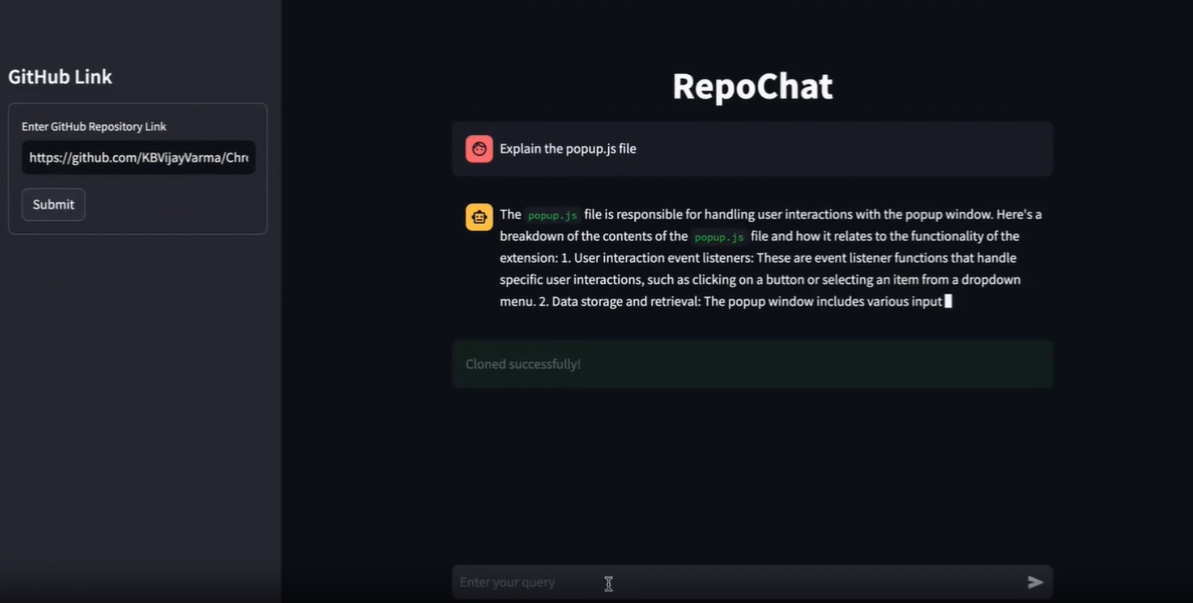 Repochat 是一個互動式聊天機器人專案,旨在使用大型語言模型 (LLM) 參與有關 GitHub 儲存庫的對話。 它允許用戶進行有意義的討論、提出問題並從 GitHub 儲存庫檢索相關資訊。本自述文件提供了在本機電腦上設定和使用 Repochat 的逐步說明。 他們建立了兩個具有不同功能的分支,這對我來說有點新鮮。 ⚡ Repochat 的主要分支被設計為完全在本機上執行。此版本的 Repochat 不依賴外部 API 呼叫,並且可以更好地控制您的資料和處理。如果您正在尋找獨立的解決方案,那麼主分支就是您的最佳選擇。 ⚡ Repochat 的雲端分支主要依賴對外部服務的 API 呼叫來進行模型推理和儲存。它非常適合那些喜歡基於雲端的解決方案並且不想設定本地環境的人。 您可以閱讀[安裝說明](https://github.com/pnkvalavala/repochat?tab=readme-ov-file#installation)。 Repochat 讓您與聊天機器人進行對話。您可以提出問題或提供輸入,聊天機器人將從向量資料庫中檢索相關文件。 然後,它將您的輸入以及檢索到的文件傳送到語言模型以產生回應。 預設情況下,我已將模型設為`codellama-7b-instruct` ,但您可以根據計算機的速度更改它,甚至可以嘗試 13b 量化模型進行回應。 聊天機器人在對話過程中保留記憶以提供上下文相關的回應。 您可以查看[即時網站](https://repochat.streamlit.app/),您可以使用 API 金鑰進行檢查。 你可以觀看這個演示! 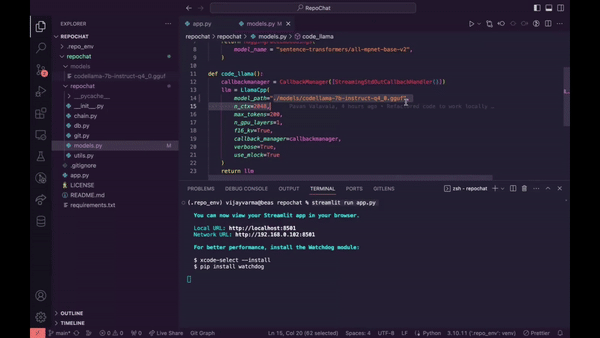 如果您想查看的話,我找到了另一種[選擇](https://github.com/peterw/Chat-with-Github-Repo)。 Repochat 擁有 200 多顆星,並部署在 Streamlit 上。 您可以檢查[GitHub 儲存庫](https://github.com/pnkvalavala/repochat)。 ✅ [NextChat - ChatGPT Next Web](https://github.com/ChatGPTNextWeb/ChatGPT-Next-Web) 。 ------------------------------------------------------------------------------------- 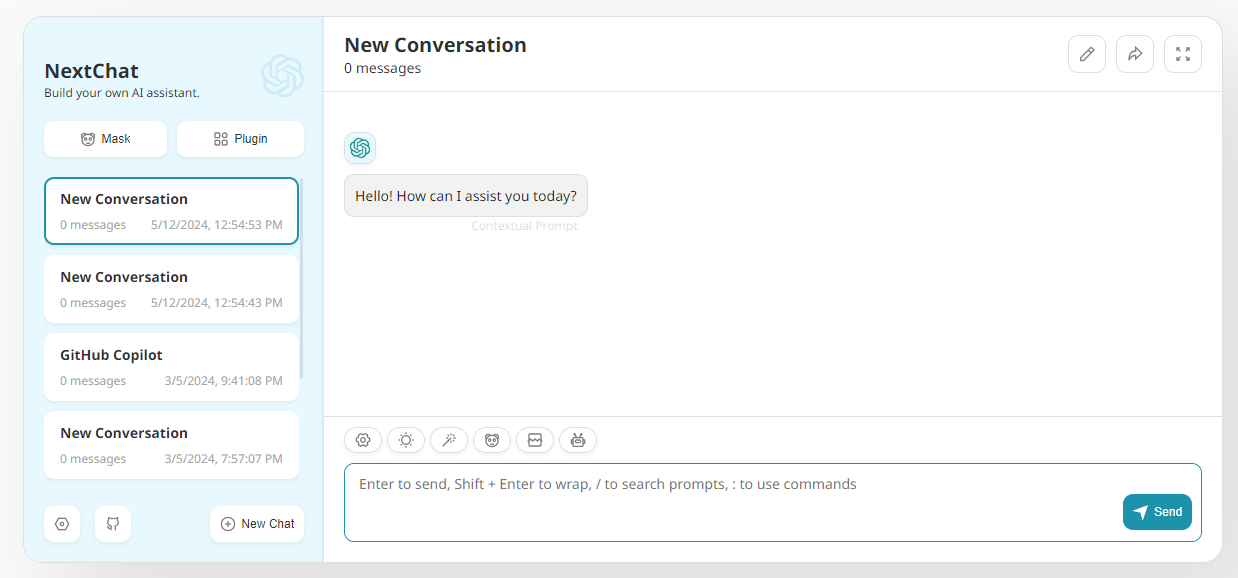 這不是一個典型的副專案,因為程式碼庫足夠大,但值得一看作為靈感。 您只需一鍵即可獲得精心設計的跨平台 ChatGPT Web UI,支援 GPT3、GPT4 和 Gemini Pro(Web / PWA / Linux / Win / MacOS)。 一些很棒的功能是: ⚡ 隱私 首先,所有資料都儲存在瀏覽器本地。 ⚡ 首屏載入速度快(~100kb),支援串流響應。 ⚡ 自動壓縮聊天歷史記錄以支援長時間對話,同時儲存您的代幣。 ⚡ Linux/Windows/MacOS 上的緊湊型用戶端 (~5MB)。 ⚡ 您只需在 Vercel 上一鍵點擊即可在 1 分鐘內免費部署。 ⚡ 與自行部署的法學碩士完全相容。 ⚡ Markdown 支援:LaTex、mermaid、程式碼高亮等。 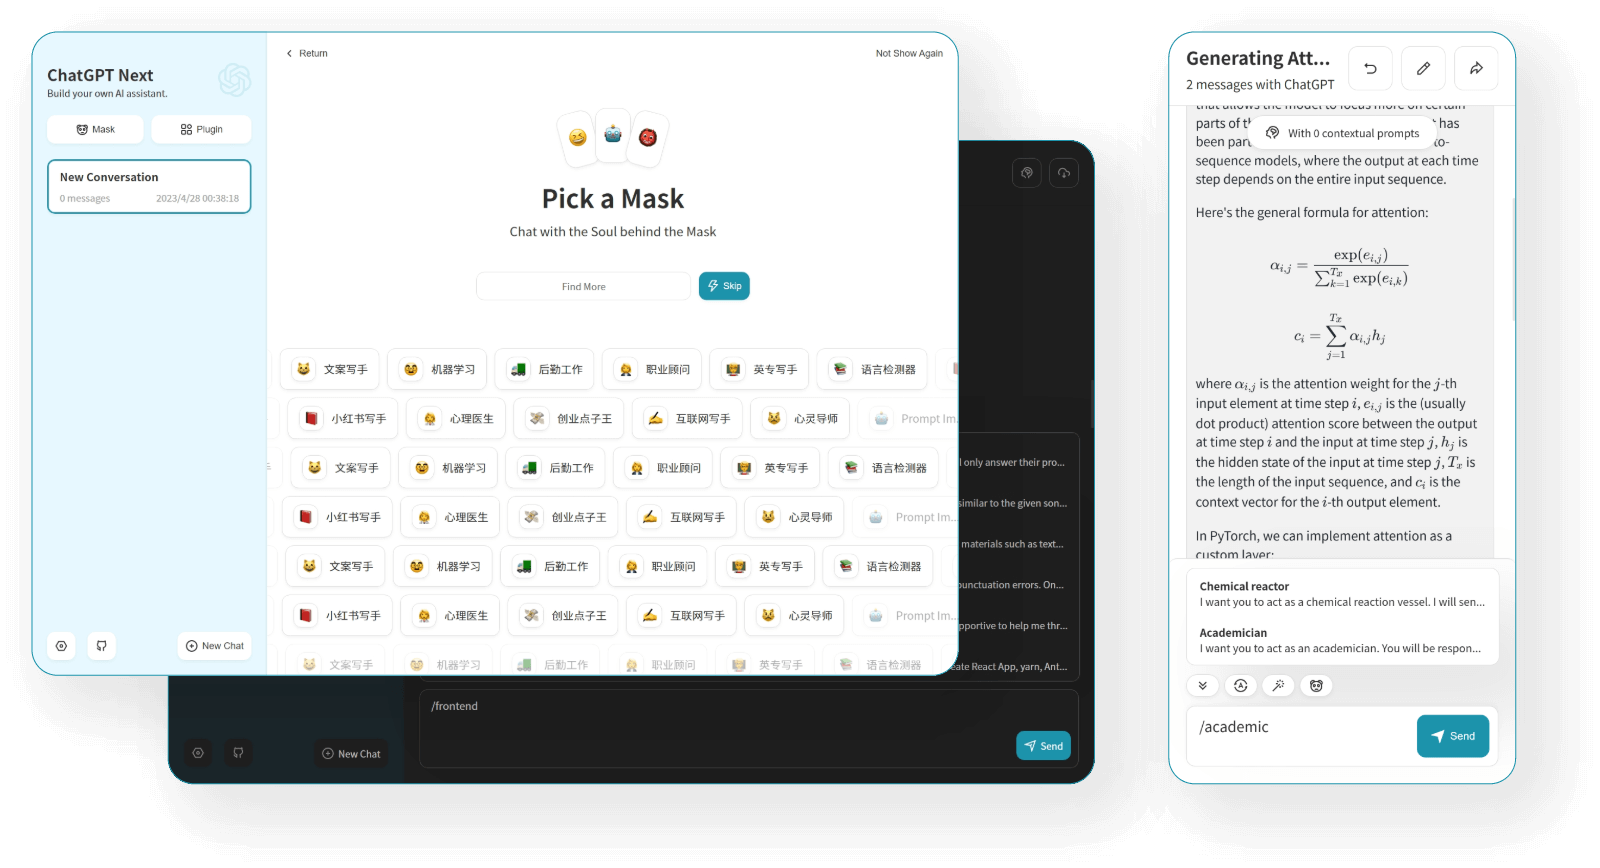 您可以查看 NextChat 的[現場演示](https://app.nextchat.dev/)和[文件,](https://github.com/ChatGPTNextWeb/ChatGPT-Next-Web?tab=readme-ov-file#roadmap)其中包括所有環境變數(主要是 API 金鑰)的清單。 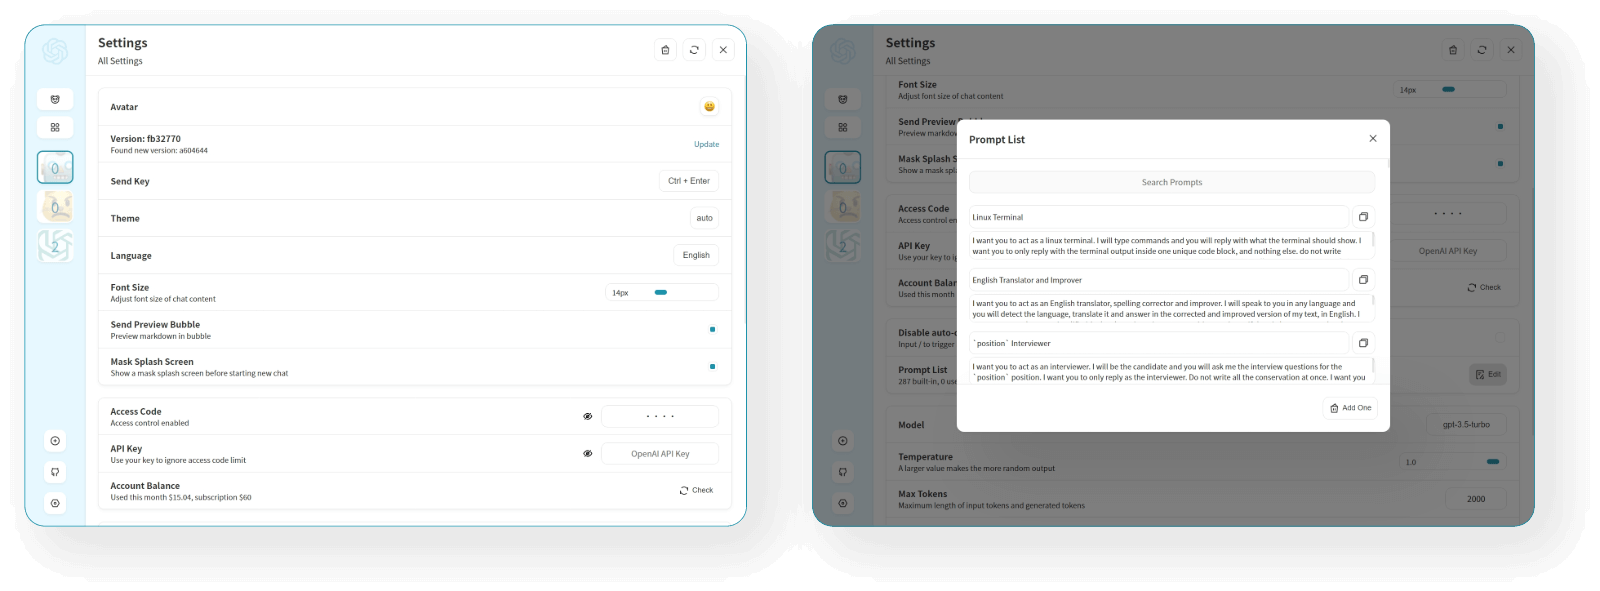 在本地處理它並不難,他們還提供了 GitHub 操作工作流程,每小時都會自動更新。 NextChat 在 GitHub 上擁有 69k+ 顆星,目前已發布`v2.2`版本。 您可以檢查[GitHub 儲存庫](https://github.com/ChatGPTNextWeb/ChatGPT-Next-Web)。 --- 如果您喜歡觀看教程來建立專案,我有一些很好的建議。 🎯 [LangChain GEN AI 教學 – 使用 OpenAI、Google Gemini Pro、LLAMA2 的 6 個端到端專案](https://www.youtube.com/watch?v=x0AnCE9SE4A)– 4 小時。 本教學涵蓋的專案: ✅ LangChain 速成課程 - 打下基礎。 ✅ 使用 Langchain 和 Astradb 與 PDF 聊天。 ✅ 使用 Llama 2 LLM 模型產生部落格。 ✅ 使用 Pinecone VectorDB 的端到端法學碩士課程。 ✅ Google Gemini 專業版示範。 ✅ 多語言發票提取器 LLM 專案。 ✅ 使用 Gemini Pro API 的對話式問答聊天機器人。 {% 嵌入 https://www.youtube.com/watch?v=x0AnCE9SE4A %} 🎯 Streamlit 的 LangChain 速成課程。 本教學涵蓋的專案: ✅ 發票資料提取器。 ✅ 針對自訂資料的基本 QA。 ✅ 總結和有用的鏈類型。 ✅ WordPress 程式碼助理。 ✅ 將語音備忘錄轉換為文字。 你可以找到[速成課程](https://learnlangchain.streamlit.app/)。側邊欄中將有一個關於實踐專案的部分! --- 這麼多很棒的專案:) 但說實話,我見過很多開發人員建立相同的應用程式,您可以獲得無限的靈感。我希望你喜歡這個。 繼續,保存它,並建造每一個,以展示誰是技術老大! 讓我知道哪個專案最讓你驚訝。 祝你有美好的一天!直到下一次。 |如果你喜歡這類東西, 請關注我以了解更多:) | [](https://twitter.com/Anmol_Codes) [](https://github.com/Anmol-Baranwal) [](https://www.linkedin.com/in/Anmol-Baranwal/) | |------------|----------| 請關注 Copilotkit 以獲取更多此類內容。 {% 嵌入 https://dev.to/copilotkit %} --- 原文出處:https://dev.to/copilotkit/20-projects-you-can-build-with-ai-today-352k
**長話短說** -------- 在本文中,您將了解如何建立由 AI 驅動的前端 UI 元件產生器,該產生器使您能夠透過實作教學產生 Next.js Tailwind CSS UI 元件。 我們將介紹如何: - 使用 Next.js、TypeScript 和 Tailwind CSS 建立 UI 元件產生器 Web 應用程式。 - 使用 CopilotKit 將 AI 功能整合到 UI 元件產生器中。 - 整合嵌入式程式碼編輯器以變更產生的程式碼。 先決條件 ---- 要完全理解本教程,您需要對 React 或 Next.js 有基本的了解。 以下是建立 AI 支援的 UI 元件產生器所需的工具: - [Ace 程式碼編輯器](https://ace.c9.io/)- 用 JvaScript 編寫的嵌入式程式碼編輯器,與本機編輯器的功能和效能相符。 - [Langchain](https://www.langchain.com/) - 提供了一個框架,使人工智慧代理能夠搜尋網路並研究任何主題。 - [OpenAI API](https://platform.openai.com/api-keys) - 提供 API 金鑰,讓您能夠使用 ChatGPT 模型執行各種任務。 - [Tavily AI](https://tavily.com/) - 一個搜尋引擎,使人工智慧代理能夠在應用程式中進行研究並存取即時知識。 - [CopilotKit](https://github.com/CopilotKit) - 一個開源副駕駛框架,用於建立自訂 AI 聊天機器人、應用程式內 AI 代理程式和文字區域。 專案設定和套件安裝 --------- 首先,透過在終端機中執行以下程式碼片段來建立 Next.js 應用程式: ``` npx create-next-app@latest aiuigenerator ``` 選擇您首選的配置設定。在本教學中,我們將使用 TypeScript 和 Next.js App Router。 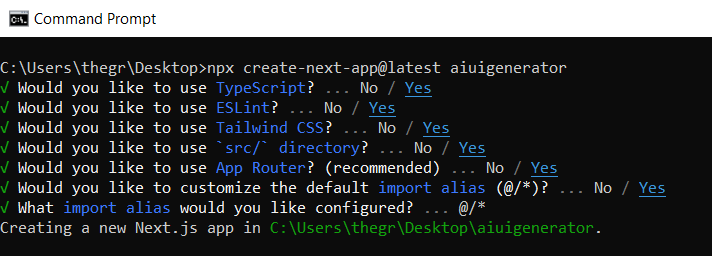 接下來,安裝 Ace 程式碼編輯器和 Langchain 軟體套件及其相依性。 ``` npm install react-ace @langchain/langgraph ``` 最後,安裝 CopilotKit 軟體套件。這些套件使我們能夠從 React 狀態檢索資料並將 AI copilot 新增至應用程式。 ``` npm install @copilotkit/react-ui @copilotkit/react-textarea @copilotkit/react-core @copilotkit/backend ``` 恭喜!您現在已準備好建立由人工智慧驅動的部落格。 **建構 UI 元件產生器前端** ----------------- 在本節中,我將引導您完成使用靜態內容建立 UI 元件產生器前端的過程,以定義生成器的使用者介面。 首先,請在程式碼編輯器中前往`/[root]/src/app`並建立一個名為`components`的資料夾。在 Components 資料夾中,建立兩個名為`Header.tsx`和`CodeTutorial.tsx`的檔案。 在`Header.tsx`檔案中,新增以下程式碼,定義一個名為`Header`的功能元件,該元件將呈現生成器的導覽列。 ``` "use client"; import Link from "next/link"; export default function Header() { return ( <> <header className="flex flex-wrap sm:justify-start sm:flex-nowrap z-50 w-full bg-gray-800 border-b border-gray-200 text-sm py-3 sm:py-0 "> <nav className="relative max-w-7xl w-full mx-auto px-4 sm:flex sm:items-center sm:justify-between sm:px-6 lg:px-8" aria-label="Global"> <div className="flex items-center justify-between"> <Link className="w-full flex-none text-xl text-white font-semibold p-6" href="/" aria-label="Brand"> AI-UI-Components-Generator </Link> </div> </nav> </header> </> ); } ``` 在`CodeTutorial.tsx`檔案中,加入以下程式碼,定義一個名為`CodeTutorial`的功能元件,該元件呈現 UI 元件產生器主頁,該首頁將顯示產生的 UI 元件、嵌入式程式碼編輯器和產生的實作教學。 ``` "use client"; import Markdown from "react-markdown"; import { useState } from "react"; import AceEditor from "react-ace"; import React from "react"; export default function CodeTutorial() { const [code, setCode] = useState<string[]>([ `<h1 class="text-red-500">Hello World</h1>`, ]); const [codeToDisplay, setCodeToDisplay] = useState<string>(code[0] || ""); const [codeTutorial, setCodeTutorial] = useState(``); function onChange(newCode: any) { setCodeToDisplay(newCode); } return ( <> <main className=" min-h-screen px-4"> <div className="w-full h-full min-h-[70vh] flex justify-between gap-x-1 "> <div className="w-2/3 min-h-[60vh] rounded-lg bg-white shadow-lg p-2 border mt-8 overflow-auto"> <div className="w-full min-h-[60vh] rounded-lg" dangerouslySetInnerHTML={{ __html: codeToDisplay }} /> </div> <AceEditor placeholder="Placeholder Text" mode="html" theme="monokai" name="blah2" className="w-[50%] min-h-[60vh] p-2 mt-8 rounded-lg" onChange={onChange} fontSize={14} lineHeight={19} showPrintMargin={true} showGutter={true} highlightActiveLine={true} value={codeToDisplay} setOptions={{ enableBasicAutocompletion: true, enableLiveAutocompletion: true, enableSnippets: false, showLineNumbers: true, tabSize: 2, }} /> </div> <div className="w-10/12 mx-auto"> <div className="mt-8"> <h1 className="text-white text-center text-xl font-semibold p-6"> Code Tutorial </h1> {codeTutorial ? ( <Markdown className="text-white">{codeTutorial}</Markdown> ) : ( <div className="text-white"> The Code Tutorial Will Appear Here </div> )} </div> </div> </main> </> ); } ``` 接下來,前往`/[root]/src/page.tsx`文件,新增以下程式碼,導入`CodeTutorial`和`Header`元件,並定義名為`Home`的功能元件。 ``` import React from "react"; import Header from "./components/Header"; import CodeTutorial from "./components/CodeTutorial"; export default function Home() { return ( <> <Header /> <CodeTutorial /> </> ); } ``` 接下來,刪除 globals.css 檔案中的 CSS 程式碼並新增以下 CSS 程式碼。 ``` @tailwind base; @tailwind components; @tailwind utilities; @tailwind base; @tailwind components; @tailwind utilities; body { height: 100vh; background-color: rgb(16, 23, 42); } pre { margin: 1rem; padding: 1rem; border-radius: 10px; background-color: black; overflow: auto; } h2, p { padding-bottom: 1rem; padding-top: 1rem; } code { margin-bottom: 2rem; } ``` 最後,在命令列上執行命令`npm run dev` ,然後導航到 http://localhost:3000/。 現在您應該在瀏覽器上查看 UI 元件產生器前端,如下所示。 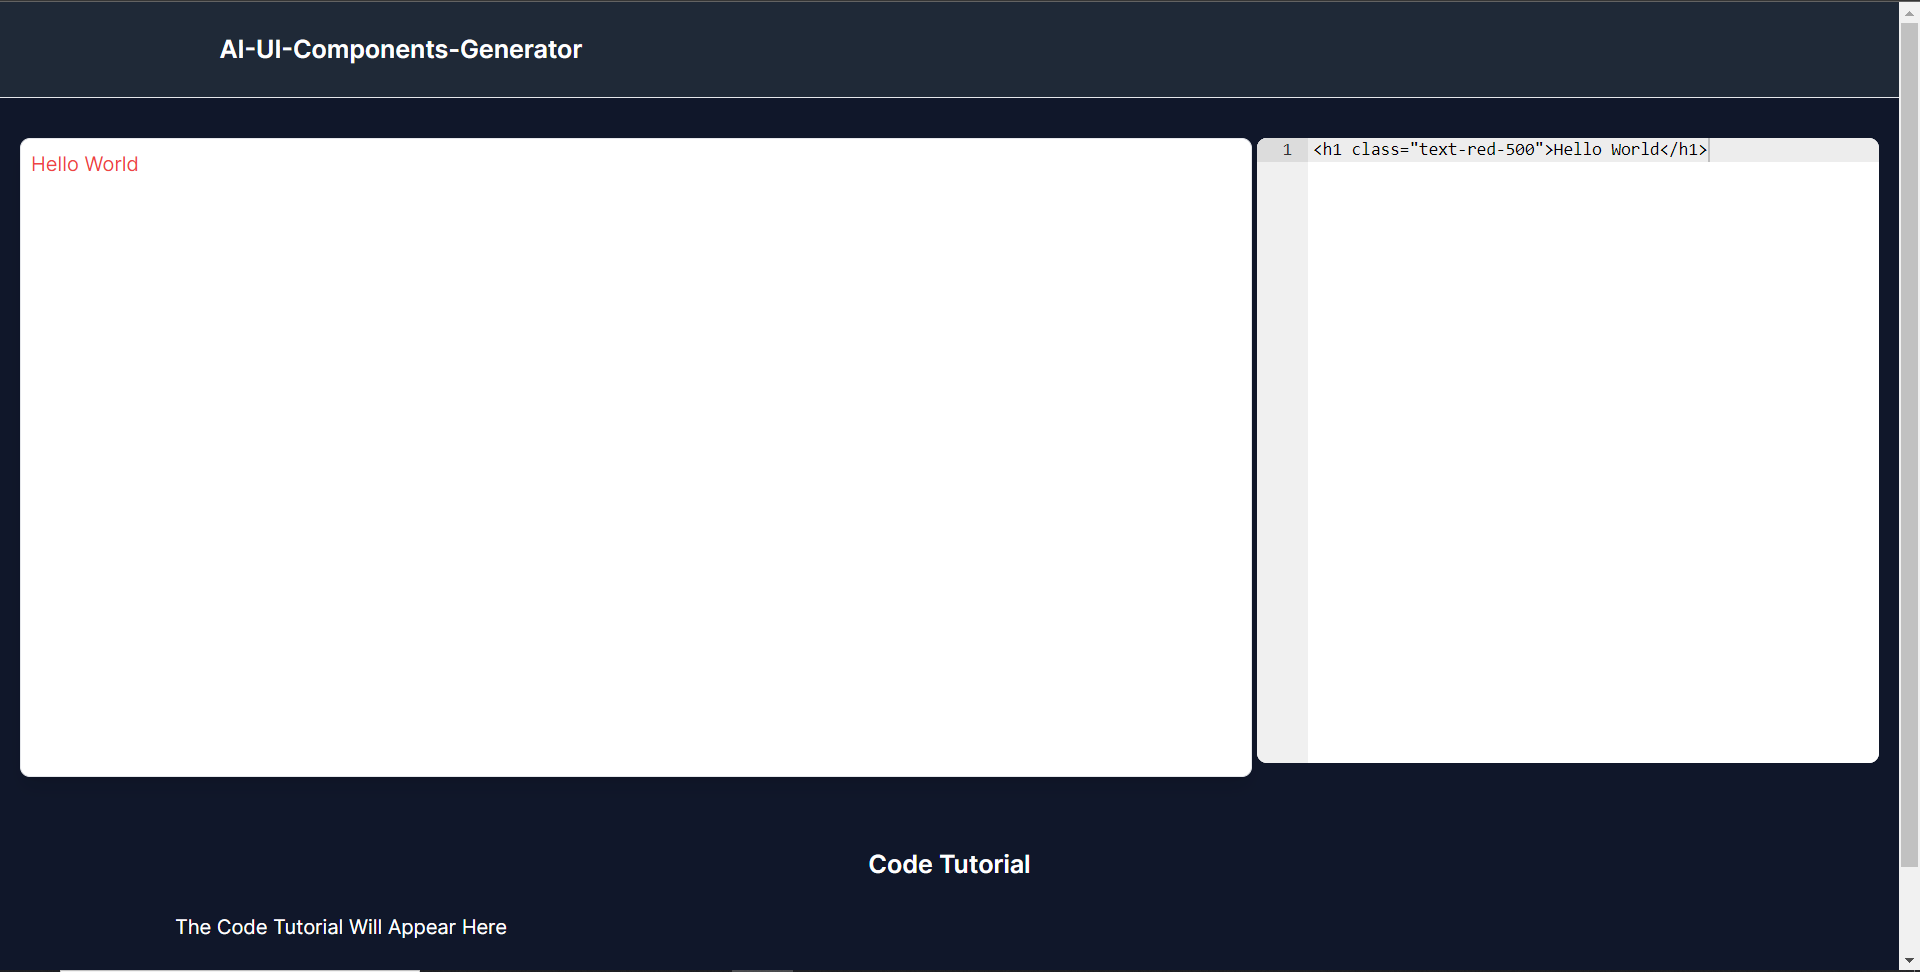 **使用 CopilotKit 將 AI 功能整合到元件產生器** --------------------------------- 在本節中,您將學習如何為 UI 元件產生器新增 AI 副駕駛以產生 UI 元件程式碼以及使用 CopilotKit 的實作教學。 CopilotKit 提供前端和[後端](https://docs.copilotkit.ai/getting-started/quickstart-backend)套件。它們使您能夠插入 React 狀態並使用 AI 代理在後端處理應用程式資料。 首先,讓我們將 CopilotKit React 元件加入到部落格前端。 ### **將 CopilotKit 新增至部落格前端** 在這裡,我將引導您完成將 UI 元件產生器與 CopilotKit 前端整合的過程,以方便產生 UI 元件程式碼和實作教學。 首先,使用下面的程式碼片段導入`/[root]/src/app/components/CodeTutorial.tsx`檔案頂部的自訂掛鉤`useMakeCopilotReadable`和`useCopilotAction` 。 ``` import { useCopilotAction, useMakeCopilotReadable, } from "@copilotkit/react-core"; ``` 在`CodeTutorial`函數內的狀態變數下方,加入以下程式碼,該程式碼使用`useMakeCopilotReadable`掛鉤來新增將作為應用程式內聊天機器人的上下文產生的程式碼。該鉤子使副駕駛可以讀取程式碼。 ``` useMakeCopilotReadable(codeToDisplay); ``` 在上面的程式碼下方,新增以下程式碼,該程式碼使用`useCopilotAction`掛鉤來設定名為`generateCodeAndImplementationTutorial`的操作,該操作將啟用 UI 元件程式碼和實作教學課程的產生。 這個操作接受兩個參數,稱為`code`和`tutorial` ,這兩個參數可以產生 UI 元件程式碼和實作教程。 該操作包含一個處理函數,該函數根據給定的提示產生 UI 元件程式碼和實作教程。 在處理函數內部, `codeToDisplay`狀態會使用新產生的程式碼進行更新,而`codeTutorial`狀態會使用新產生的教學課程進行更新,如下所示。 ``` useCopilotAction( { name: "generateCodeAndImplementationTutorial", description: "Create Code Snippet with React.js(Next.js), tailwindcss and an implementation tutorial of the code generated.", parameters: [ { name: "code", type: "string", description: "Code to be generated", required: true, }, { name: "tutorial", type: "string", description: "Markdown of step by step guide tutorial on how to use the generated code accompanied with the code. Include introduction, prerequisites and what happens at every step accompanied with code generated earlier. Don't forget to add how to render the code on browser.", required: true, }, ], handler: async ({ code, tutorial }) => { setCode((prev) => [...prev, code]); setCodeToDisplay(code); setCodeTutorial(tutorial); }, }, [codeToDisplay, codeTutorial] ); ``` 之後,請前往`/[root]/src/app/page.tsx`檔案並使用下面的程式碼匯入頂部的 CopilotKit 前端套件和樣式。 ``` import { CopilotKit } from "@copilotkit/react-core"; import { CopilotSidebar } from "@copilotkit/react-ui"; import "@copilotkit/react-ui/styles.css"; ``` 然後使用`CopilotKit`包裝`CopilotSidebar`和`CodeTutorial`元件,如下所示。 `CopilotKit`元件指定 CopilotKit 後端端點 ( `/api/copilotkit/` ) 的 URL,而`CopilotSidebar`呈現應用程式內聊天機器人,您可以提示產生 UI 元件程式碼和實作教學。 ``` export default function Home() { return ( <> <Header /> <CopilotKit url="/api/copilotkit"> <CopilotSidebar instructions="Help the user generate code. Ask the user if to generate its tutorial." defaultOpen={true} labels={{ title: "Code & Tutorial Generator", initial: "Hi! 👋 I can help you generate code and its tutorial.", }}> <CodeTutorial /> </CopilotSidebar> </CopilotKit> </> ); } ``` 之後,執行開發伺服器並導航到 http://localhost:3000。您應該會看到應用程式內聊天機器人已整合到 UI 元件產生器中。 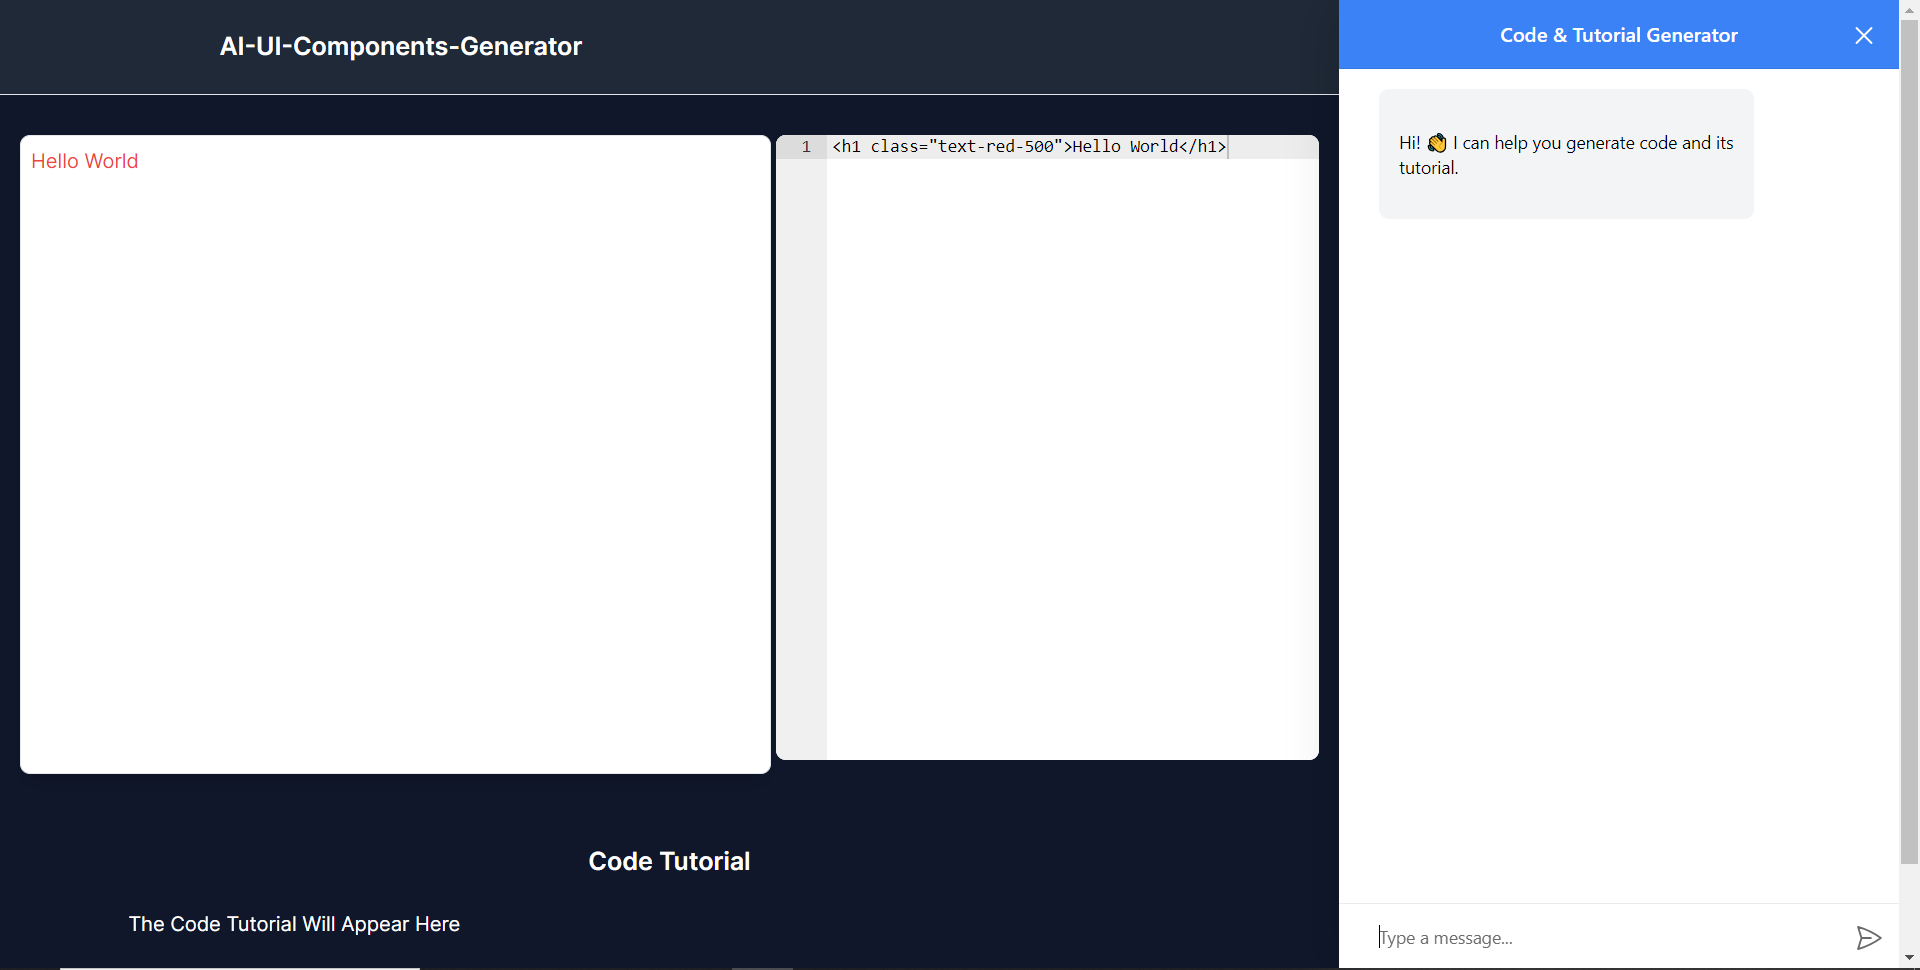 ### **將 CopilotKit 後端加入博客** 在這裡,我將引導您完成將 UI 元件產生器與 CopilotKit 後端整合的過程,該後端處理來自前端的請求,並提供函數呼叫和各種 LLM 後端(例如 GPT)。 此外,我們將整合一個名為 Tavily 的人工智慧代理,它可以研究網路上的任何主題。 首先,在根目錄中建立一個名為`.env.local`的檔案。然後在保存`ChatGPT`和`Tavily` Search API 金鑰的檔案中加入下面的環境變數。 ``` OPENAI_API_KEY="Your ChatGPT API key" TAVILY_API_KEY="Your Tavily Search API key" ``` 若要取得 ChatGPT API 金鑰,請導覽至 https://platform.openai.com/api-keys。 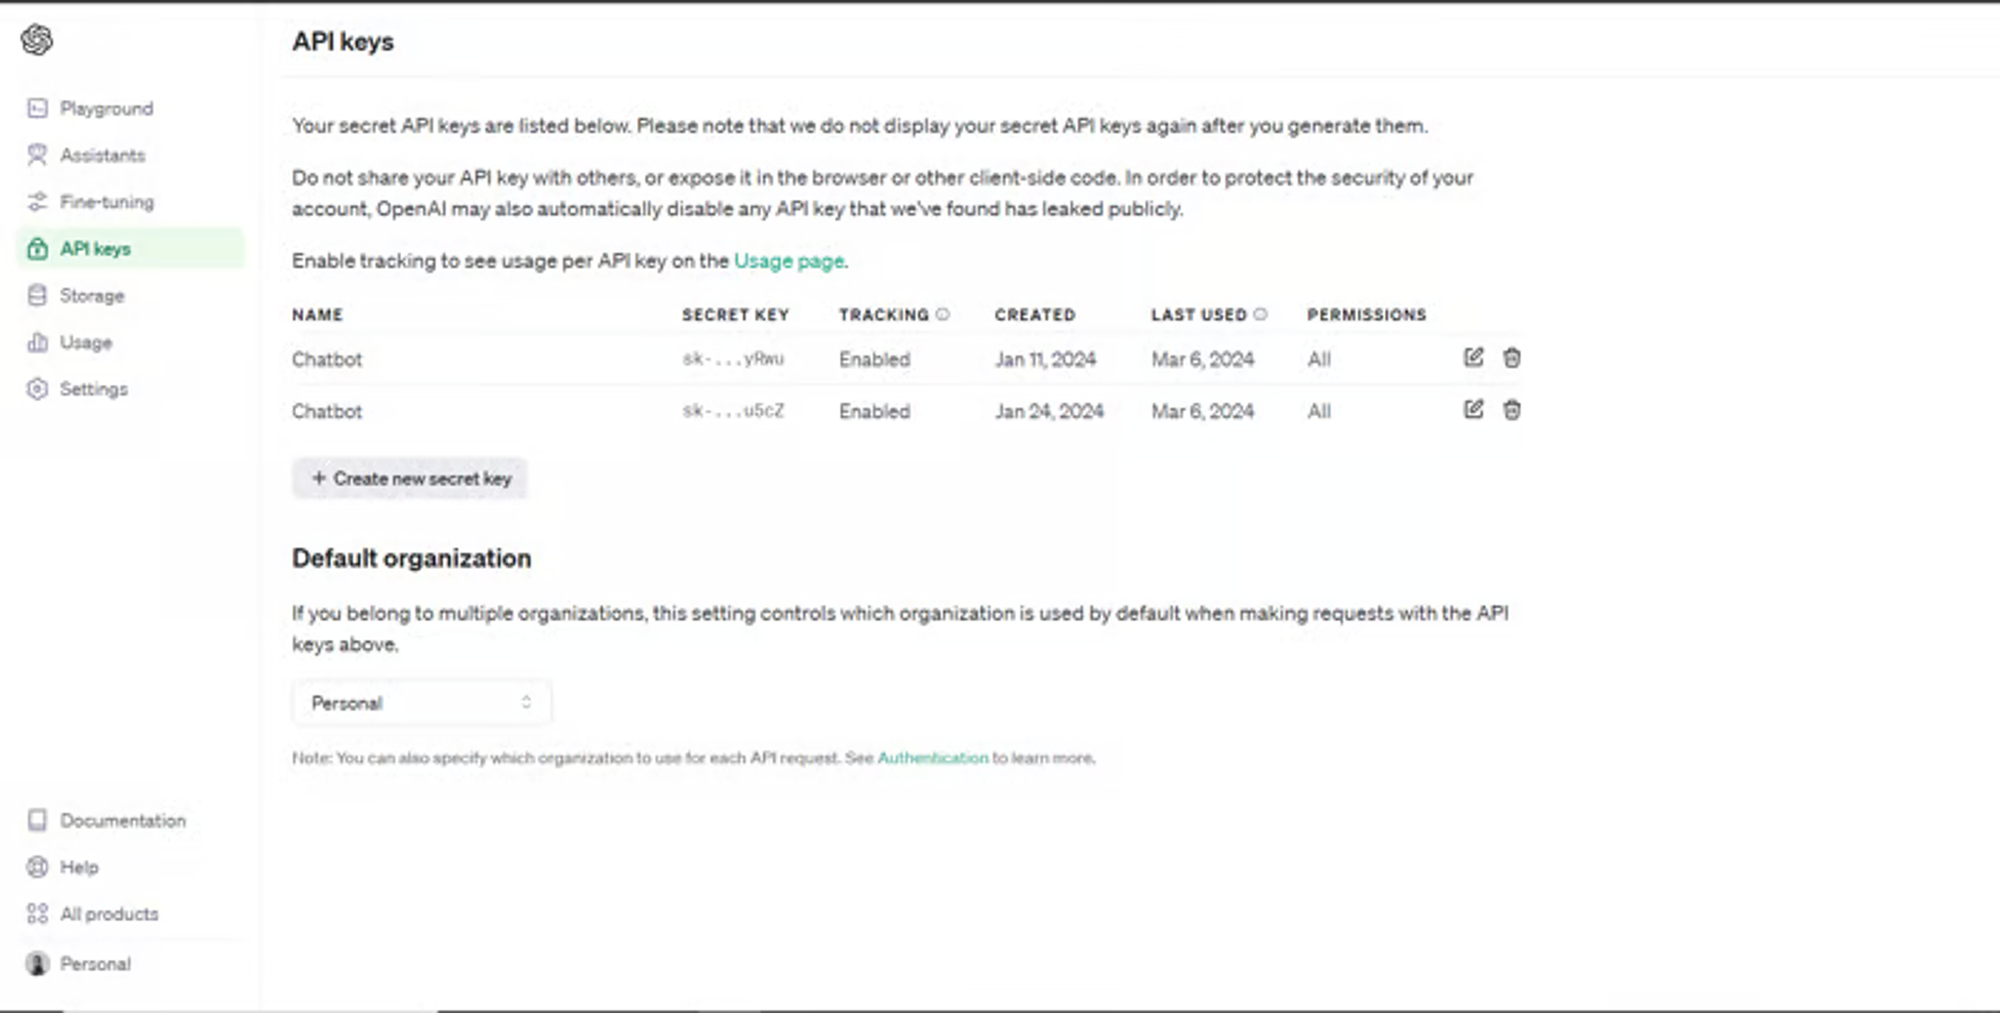 若要取得 Tavilly Search API 金鑰,請導覽至 https://app.tavily.com/home 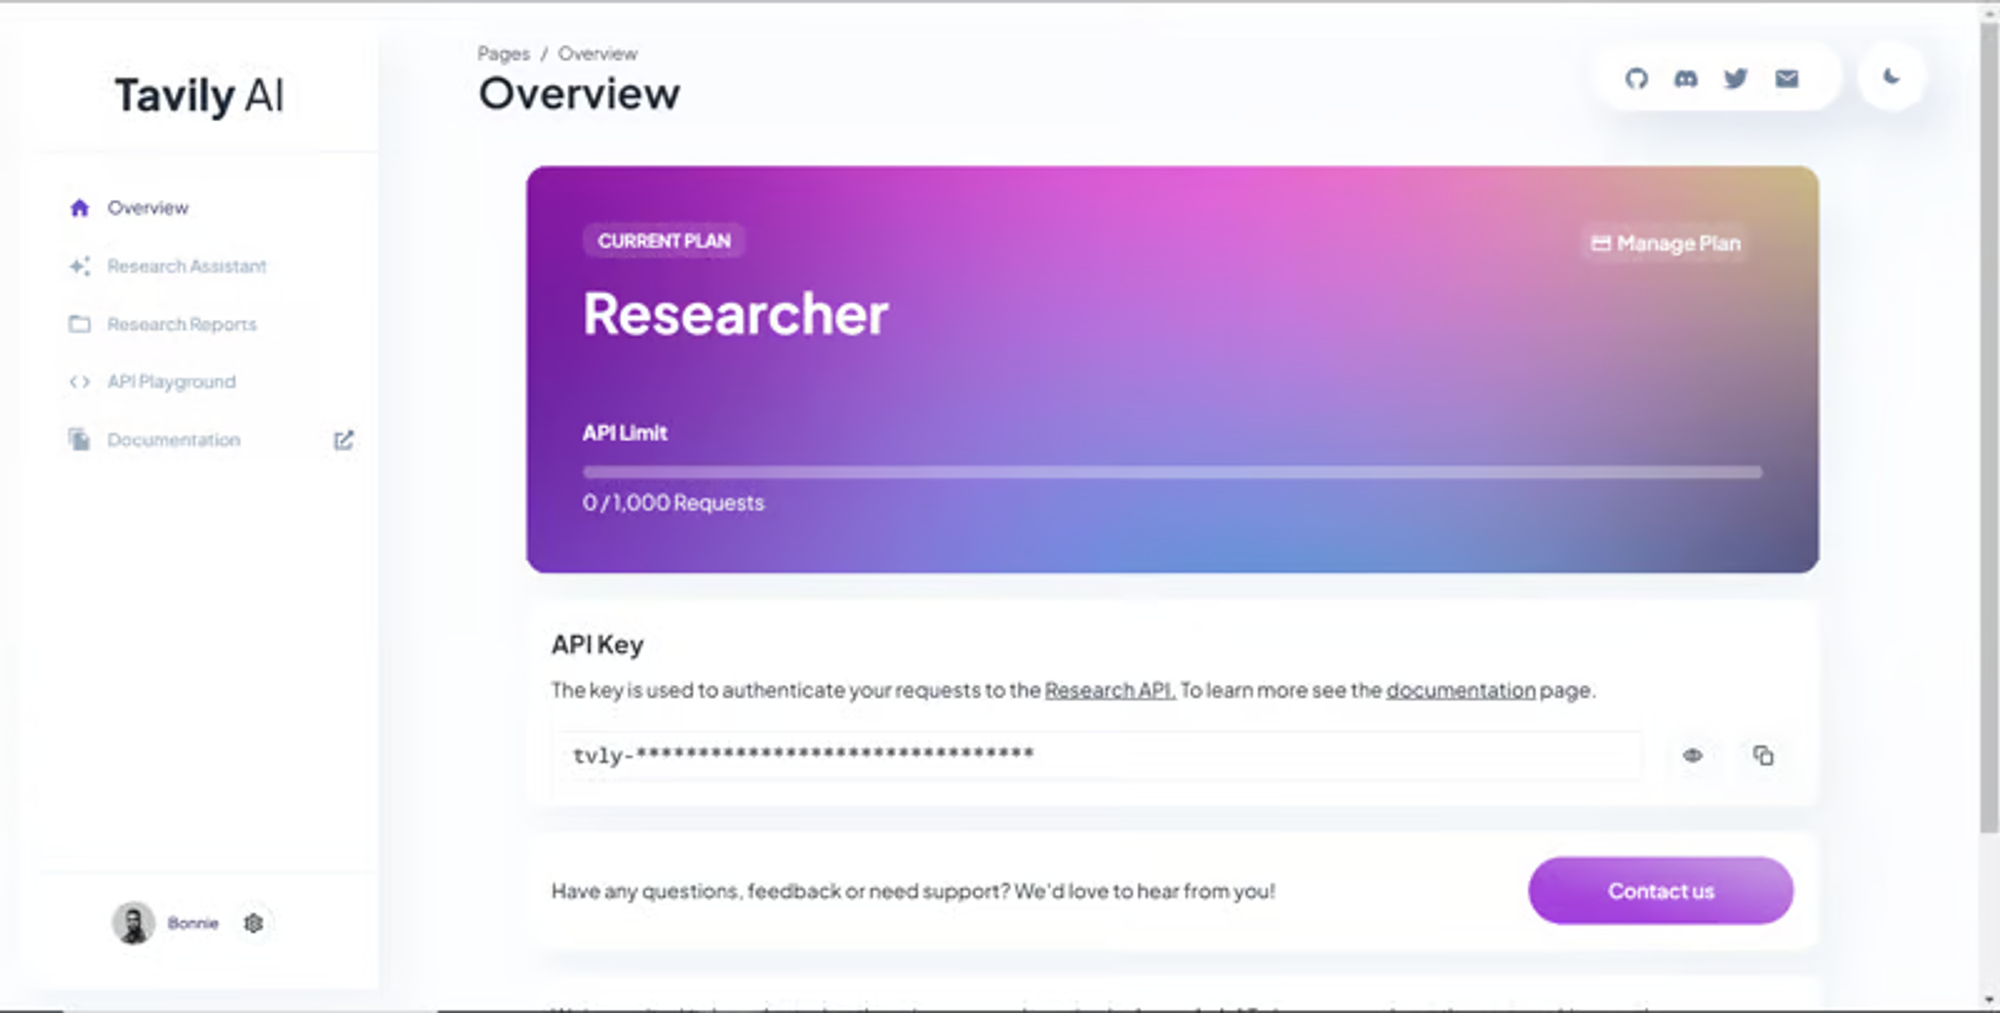 之後,轉到`/[root]/src/app`並建立一個名為`api`的資料夾。在`api`資料夾中,建立一個名為`copilotkit`的資料夾。 在`copilotkit`資料夾中,建立一個名為`research.ts`的檔案。然後導航到[該 Research.ts gist 文件](https://gist.github.com/TheGreatBonnie/58dc21ebbeeb8cbb08df665db762738c),複製程式碼,並將其新增至**`research.ts`**檔案中 接下來,在`/[root]/src/app/api/copilotkit`資料夾中建立一個名為`route.ts`的檔案。該文件將包含設定後端功能來處理 POST 請求的程式碼。它有條件地包括對給定主題進行研究的“研究”操作。 現在在文件頂部導入以下模組。 ``` import { CopilotBackend, OpenAIAdapter } from "@copilotkit/backend"; // For backend functionality with CopilotKit. import { researchWithLangGraph } from "./research"; // Import a custom function for conducting research. import { AnnotatedFunction } from "@copilotkit/shared"; // For annotating functions with metadata. ``` 在上面的程式碼下面,定義一個執行時間環境變數和一個名為`researchAction`的函數,該函數使用下面的程式碼研究某個主題。 ``` // Define a runtime environment variable, indicating the environment where the code is expected to run. export const runtime = "edge"; // Define an annotated function for research. This object includes metadata and an implementation for the function. const researchAction: AnnotatedFunction<any> = { name: "research", // Function name. description: "Call this function to conduct research on a certain topic. Respect other notes about when to call this function", // Function description. argumentAnnotations: [ // Annotations for arguments that the function accepts. { name: "topic", // Argument name. type: "string", // Argument type. description: "The topic to research. 5 characters or longer.", // Argument description. required: true, // Indicates that the argument is required. }, ], implementation: async (topic) => { // The actual function implementation. console.log("Researching topic: ", topic); // Log the research topic. return await researchWithLangGraph(topic); // Call the research function and return its result. }, }; ``` 然後在上面的程式碼下加入下面的程式碼來定義處理POST請求的非同步函數。 ``` // Define an asynchronous function that handles POST requests. export async function POST(req: Request): Promise<Response> { const actions: AnnotatedFunction<any>[] = []; // Initialize an array to hold actions. // Check if a specific environment variable is set, indicating access to certain functionality. if (process.env.TAVILY_API_KEY) { actions.push(researchAction); // Add the research action to the actions array if the condition is true. } // Instantiate CopilotBackend with the actions defined above. const copilotKit = new CopilotBackend({ actions: actions, }); // Use the CopilotBackend instance to generate a response for the incoming request using an OpenAIAdapter. return copilotKit.response(req, new OpenAIAdapter()); } ``` 如何產生 UI 元件 ---------- 現在轉到您之前整合的應用程式內聊天機器人,並給它一個提示,例如「產生聯絡表單」。 生成完成後,您應該會看到生成的聯絡表單元件及其實作教程,如下所示。您也可以使用嵌入式程式碼編輯器修改產生的程式碼。  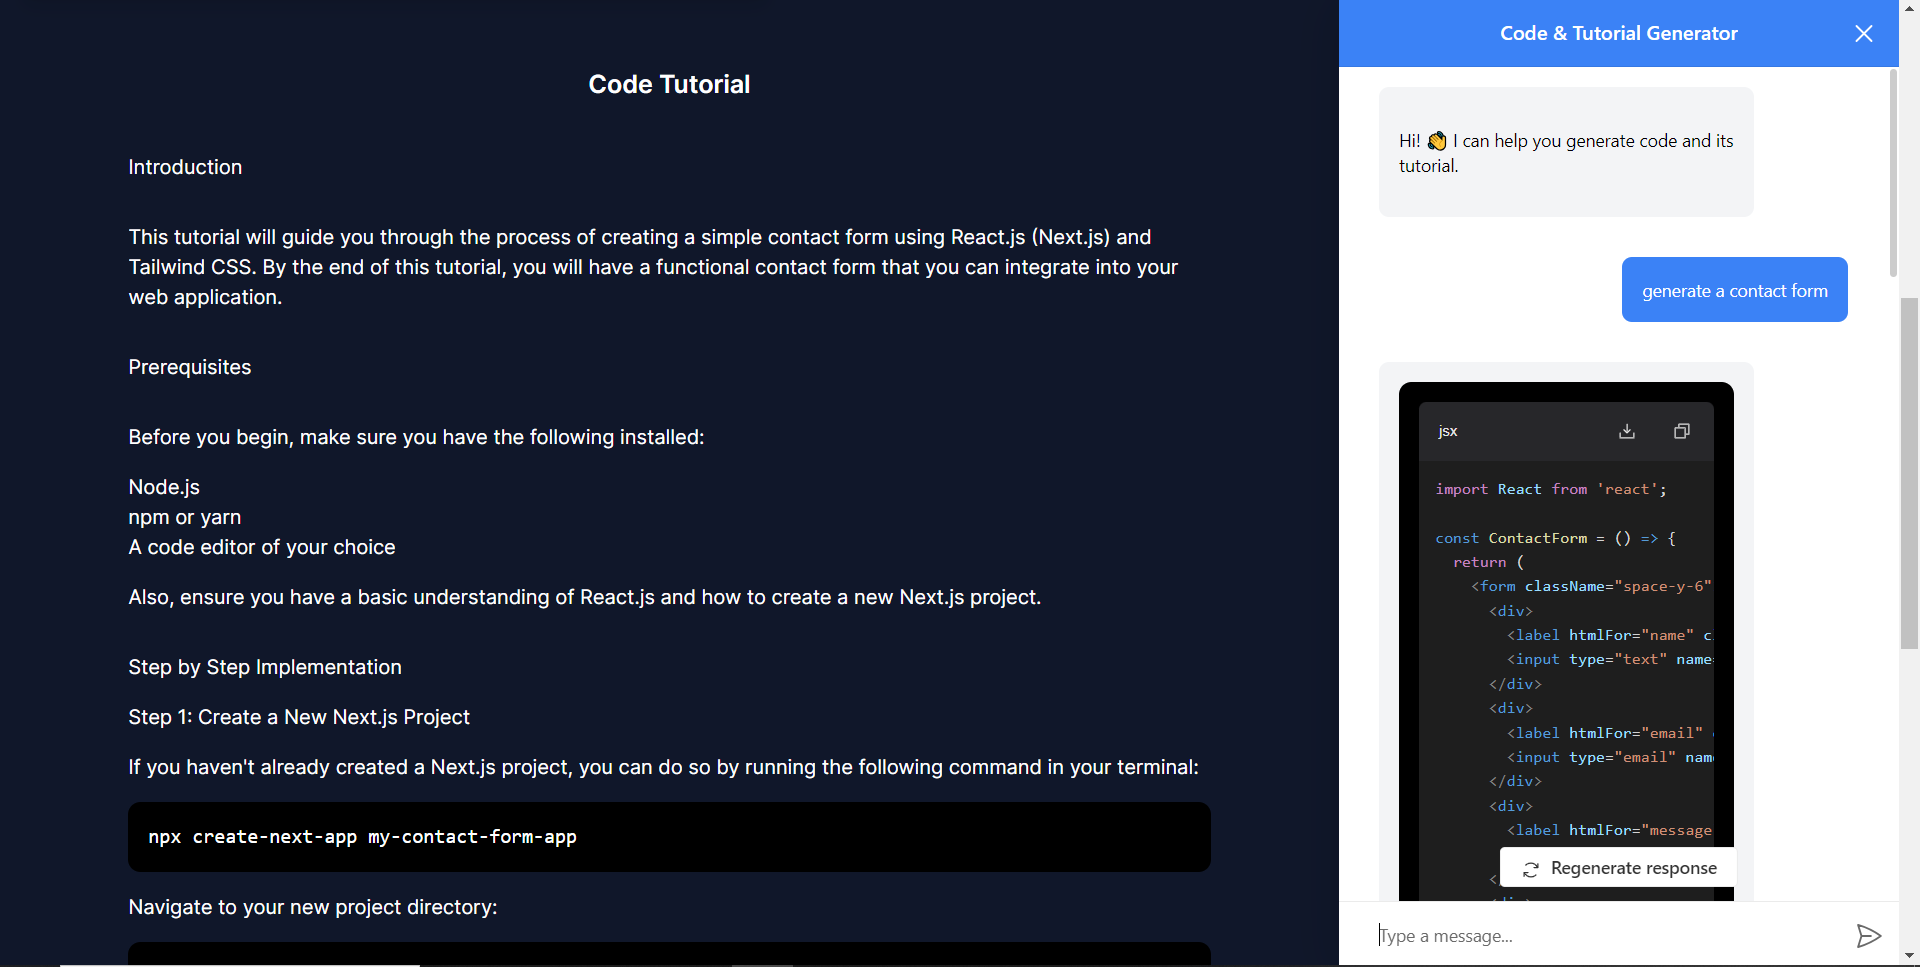 恭喜!您已完成本教學的專案。 結論 -- [CopilotKit](https://copilotkit.ai/)是一款令人難以置信的工具,可讓您在幾分鐘內將 AI Copilot 加入到您的產品中。無論您是對人工智慧聊天機器人和助理感興趣,還是對複雜任務的自動化感興趣,CopilotKit 都能讓您輕鬆實現。 如果您需要建立 AI 產品或將 AI 工具整合到您的軟體應用程式中,您應該考慮 CopilotKit。 您可以在 GitHub 上找到本教學的源程式碼: <https://github.com/TheGreatBonnie/AIPoweredUIComponentsGenerator> --- 原文出處:https://dev.to/tcms/ai-powered-frontend-ui-components-generator-nextjs-gpt4-langchain-copilotkit-1hac
**長話短說** -------- 在本文中,您將了解如何建立由 AI 驅動的前端 UI 元件產生器,該產生器使您能夠透過實作教學產生 Next.js Tailwind CSS UI 元件。 我們將介紹如何: - 使用 Next.js、TypeScript 和 Tailwind CSS 建立 UI 元件產生器 Web 應用程式。 - 使用 CopilotKit 將 AI 功能整合到 UI 元件產生器中。 - 整合嵌入式程式碼編輯器以變更產生的程式碼。 先決條件 ---- 要完全理解本教程,您需要對 React 或 Next.js 有基本的了解。 以下是建立 AI 支援的 UI 元件產生器所需的工具: - [Ace 程式碼編輯器](https://ace.c9.io/)- 用 JvaScript 編寫的嵌入式程式碼編輯器,與本機編輯器的功能和效能相符。 - [Langchain](https://www.langchain.com/) - 提供了一個框架,使人工智慧代理能夠搜尋網路並研究任何主題。 - [OpenAI API](https://platform.openai.com/api-keys) - 提供 API 金鑰,讓您能夠使用 ChatGPT 模型執行各種任務。 - [Tavily AI](https://tavily.com/) - 一個搜尋引擎,使人工智慧代理能夠在應用程式中進行研究並存取即時知識。 - [CopilotKit](https://github.com/CopilotKit) - 一個開源副駕駛框架,用於建立自訂 AI 聊天機器人、應用程式內 AI 代理程式和文字區域。 專案設定和套件安裝 --------- 首先,透過在終端機中執行以下程式碼片段來建立 Next.js 應用程式: ``` npx create-next-app@latest aiuigenerator ``` 選擇您首選的配置設定。在本教學中,我們將使用 TypeScript 和 Next.js App Router。  接下來,安裝 Ace 程式碼編輯器和 Langchain 軟體套件及其相依性。 ``` npm install react-ace @langchain/langgraph ``` 最後,安裝 CopilotKit 軟體套件。這些套件使我們能夠從 React 狀態檢索資料並將 AI copilot 新增至應用程式。 ``` npm install @copilotkit/react-ui @copilotkit/react-textarea @copilotkit/react-core @copilotkit/backend ``` 恭喜!您現在已準備好建立由人工智慧驅動的部落格。 **建構 UI 元件產生器前端** ----------------- 在本節中,我將引導您完成使用靜態內容建立 UI 元件產生器前端的過程,以定義生成器的使用者介面。 首先,請在程式碼編輯器中前往`/[root]/src/app`並建立一個名為`components`的資料夾。在 Components 資料夾中,建立兩個名為`Header.tsx`和`CodeTutorial.tsx`的檔案。 在`Header.tsx`檔案中,新增以下程式碼,定義一個名為`Header`的功能元件,該元件將呈現生成器的導覽列。 ``` "use client"; import Link from "next/link"; export default function Header() { return ( <> <header className="flex flex-wrap sm:justify-start sm:flex-nowrap z-50 w-full bg-gray-800 border-b border-gray-200 text-sm py-3 sm:py-0 "> <nav className="relative max-w-7xl w-full mx-auto px-4 sm:flex sm:items-center sm:justify-between sm:px-6 lg:px-8" aria-label="Global"> <div className="flex items-center justify-between"> <Link className="w-full flex-none text-xl text-white font-semibold p-6" href="/" aria-label="Brand"> AI-UI-Components-Generator </Link> </div> </nav> </header> </> ); } ``` 在`CodeTutorial.tsx`檔案中,加入以下程式碼,定義一個名為`CodeTutorial`的功能元件,該元件呈現 UI 元件產生器主頁,該首頁將顯示產生的 UI 元件、嵌入式程式碼編輯器和產生的實作教學。 ``` "use client"; import Markdown from "react-markdown"; import { useState } from "react"; import AceEditor from "react-ace"; import React from "react"; export default function CodeTutorial() { const [code, setCode] = useState<string[]>([ `<h1 class="text-red-500">Hello World</h1>`, ]); const [codeToDisplay, setCodeToDisplay] = useState<string>(code[0] || ""); const [codeTutorial, setCodeTutorial] = useState(``); function onChange(newCode: any) { setCodeToDisplay(newCode); } return ( <> <main className=" min-h-screen px-4"> <div className="w-full h-full min-h-[70vh] flex justify-between gap-x-1 "> <div className="w-2/3 min-h-[60vh] rounded-lg bg-white shadow-lg p-2 border mt-8 overflow-auto"> <div className="w-full min-h-[60vh] rounded-lg" dangerouslySetInnerHTML={{ __html: codeToDisplay }} /> </div> <AceEditor placeholder="Placeholder Text" mode="html" theme="monokai" name="blah2" className="w-[50%] min-h-[60vh] p-2 mt-8 rounded-lg" onChange={onChange} fontSize={14} lineHeight={19} showPrintMargin={true} showGutter={true} highlightActiveLine={true} value={codeToDisplay} setOptions={{ enableBasicAutocompletion: true, enableLiveAutocompletion: true, enableSnippets: false, showLineNumbers: true, tabSize: 2, }} /> </div> <div className="w-10/12 mx-auto"> <div className="mt-8"> <h1 className="text-white text-center text-xl font-semibold p-6"> Code Tutorial </h1> {codeTutorial ? ( <Markdown className="text-white">{codeTutorial}</Markdown> ) : ( <div className="text-white"> The Code Tutorial Will Appear Here </div> )} </div> </div> </main> </> ); } ``` 接下來,前往`/[root]/src/page.tsx`文件,新增以下程式碼,導入`CodeTutorial`和`Header`元件,並定義名為`Home`的功能元件。 ``` import React from "react"; import Header from "./components/Header"; import CodeTutorial from "./components/CodeTutorial"; export default function Home() { return ( <> <Header /> <CodeTutorial /> </> ); } ``` 接下來,刪除 globals.css 檔案中的 CSS 程式碼並新增以下 CSS 程式碼。 ``` @tailwind base; @tailwind components; @tailwind utilities; @tailwind base; @tailwind components; @tailwind utilities; body { height: 100vh; background-color: rgb(16, 23, 42); } pre { margin: 1rem; padding: 1rem; border-radius: 10px; background-color: black; overflow: auto; } h2, p { padding-bottom: 1rem; padding-top: 1rem; } code { margin-bottom: 2rem; } ``` 最後,在命令列上執行命令`npm run dev` ,然後導航到 http://localhost:3000/。 現在您應該在瀏覽器上查看 UI 元件產生器前端,如下所示。  **使用 CopilotKit 將 AI 功能整合到元件產生器** --------------------------------- 在本節中,您將學習如何為 UI 元件產生器新增 AI 副駕駛以產生 UI 元件程式碼以及使用 CopilotKit 的實作教學。 CopilotKit 提供前端和[後端](https://docs.copilotkit.ai/getting-started/quickstart-backend)套件。它們使您能夠插入 React 狀態並使用 AI 代理在後端處理應用程式資料。 首先,我們將 CopilotKit React 元件加入到部落格前端。 ### **將 CopilotKit 新增至部落格前端** 在這裡,我將引導您完成將 UI 元件產生器與 CopilotKit 前端整合的過程,以方便產生 UI 元件程式碼和實作教學。 首先,使用下面的程式碼片段導入`/[root]/src/app/components/CodeTutorial.tsx`檔案頂部的自訂掛鉤`useMakeCopilotReadable`和`useCopilotAction` 。 ``` import { useCopilotAction, useMakeCopilotReadable, } from "@copilotkit/react-core"; ``` 在`CodeTutorial`函數內的狀態變數下方,加入以下程式碼,該程式碼使用`useMakeCopilotReadable`掛鉤來新增將作為應用程式內聊天機器人的上下文產生的程式碼。該鉤子使副駕駛可以讀取程式碼。 ``` useMakeCopilotReadable(codeToDisplay); ``` 在上面的程式碼下方,新增以下程式碼,該程式碼使用`useCopilotAction`掛鉤來設定名為`generateCodeAndImplementationTutorial`的操作,該操作將啟用 UI 元件程式碼和實作教學課程的產生。 這個操作接受兩個參數,稱為`code`和`tutorial` ,這兩個參數可以產生 UI 元件程式碼和實作教程。 該操作包含一個處理函數,該函數根據給定的提示產生 UI 元件程式碼和實作教程。 在處理函數內部, `codeToDisplay`狀態會使用新產生的程式碼進行更新,而`codeTutorial`狀態會使用新產生的教學課程進行更新,如下所示。 ``` useCopilotAction( { name: "generateCodeAndImplementationTutorial", description: "Create Code Snippet with React.js(Next.js), tailwindcss and an implementation tutorial of the code generated.", parameters: [ { name: "code", type: "string", description: "Code to be generated", required: true, }, { name: "tutorial", type: "string", description: "Markdown of step by step guide tutorial on how to use the generated code accompanied with the code. Include introduction, prerequisites and what happens at every step accompanied with code generated earlier. Don't forget to add how to render the code on browser.", required: true, }, ], handler: async ({ code, tutorial }) => { setCode((prev) => [...prev, code]); setCodeToDisplay(code); setCodeTutorial(tutorial); }, }, [codeToDisplay, codeTutorial] ); ``` 之後,請前往`/[root]/src/app/page.tsx`檔案並使用下面的程式碼匯入頂部的 CopilotKit 前端套件和樣式。 ``` import { CopilotKit } from "@copilotkit/react-core"; import { CopilotSidebar } from "@copilotkit/react-ui"; import "@copilotkit/react-ui/styles.css"; ``` 然後使用`CopilotKit`包裝`CopilotSidebar`和`CodeTutorial`元件,如下所示。 `CopilotKit`元件指定 CopilotKit 後端端點 ( `/api/copilotkit/` ) 的 URL,而`CopilotSidebar`呈現應用程式內聊天機器人,您可以提示產生 UI 元件程式碼和實作教學。 ``` export default function Home() { return ( <> <Header /> <CopilotKit url="/api/copilotkit"> <CopilotSidebar instructions="Help the user generate code. Ask the user if to generate its tutorial." defaultOpen={true} labels={{ title: "Code & Tutorial Generator", initial: "Hi! 👋 I can help you generate code and its tutorial.", }}> <CodeTutorial /> </CopilotSidebar> </CopilotKit> </> ); } ``` 之後,執行開發伺服器並導航到 http://localhost:3000。您應該會看到應用程式內聊天機器人已整合到 UI 元件產生器中。  ### **將 CopilotKit 後端加入博客** 在這裡,我將引導您完成將 UI 元件產生器與 CopilotKit 後端整合的過程,該後端處理來自前端的請求,並提供函數呼叫和各種 LLM 後端(例如 GPT)。 此外,我們將整合一個名為 Tavily 的人工智慧代理,它可以研究網路上的任何主題。 首先,在根目錄中建立一個名為`.env.local`的檔案。然後在保存`ChatGPT`和`Tavily` Search API 金鑰的檔案中加入下面的環境變數。 ``` OPENAI_API_KEY="Your ChatGPT API key" TAVILY_API_KEY="Your Tavily Search API key" ``` 若要取得 ChatGPT API 金鑰,請導覽至 https://platform.openai.com/api-keys。  若要取得 Tavilly Search API 金鑰,請導覽至 https://app.tavily.com/home  之後,轉到`/[root]/src/app`並建立一個名為`api`的資料夾。在`api`資料夾中,建立一個名為`copilotkit`的資料夾。 在`copilotkit`資料夾中,建立一個名為`research.ts`的檔案。然後導航到[該 Research.ts gist 文件](https://gist.github.com/TheGreatBonnie/58dc21ebbeeb8cbb08df665db762738c),複製程式碼,並將其新增至**`research.ts`**檔案中 接下來,在`/[root]/src/app/api/copilotkit`資料夾中建立一個名為`route.ts`的檔案。該文件將包含設定後端功能來處理 POST 請求的程式碼。它有條件地包括對給定主題進行研究的“研究”操作。 現在在文件頂部導入以下模組。 ``` import { CopilotBackend, OpenAIAdapter } from "@copilotkit/backend"; // For backend functionality with CopilotKit. import { researchWithLangGraph } from "./research"; // Import a custom function for conducting research. import { AnnotatedFunction } from "@copilotkit/shared"; // For annotating functions with metadata. ``` 在上面的程式碼下面,定義一個執行時間環境變數和一個名為`researchAction`的函數,該函數使用下面的程式碼研究某個主題。 ``` // Define a runtime environment variable, indicating the environment where the code is expected to run. export const runtime = "edge"; // Define an annotated function for research. This object includes metadata and an implementation for the function. const researchAction: AnnotatedFunction<any> = { name: "research", // Function name. description: "Call this function to conduct research on a certain topic. Respect other notes about when to call this function", // Function description. argumentAnnotations: [ // Annotations for arguments that the function accepts. { name: "topic", // Argument name. type: "string", // Argument type. description: "The topic to research. 5 characters or longer.", // Argument description. required: true, // Indicates that the argument is required. }, ], implementation: async (topic) => { // The actual function implementation. console.log("Researching topic: ", topic); // Log the research topic. return await researchWithLangGraph(topic); // Call the research function and return its result. }, }; ``` 然後在上面的程式碼下加入下面的程式碼來定義處理POST請求的非同步函數。 ``` // Define an asynchronous function that handles POST requests. export async function POST(req: Request): Promise<Response> { const actions: AnnotatedFunction<any>[] = []; // Initialize an array to hold actions. // Check if a specific environment variable is set, indicating access to certain functionality. if (process.env.TAVILY_API_KEY) { actions.push(researchAction); // Add the research action to the actions array if the condition is true. } // Instantiate CopilotBackend with the actions defined above. const copilotKit = new CopilotBackend({ actions: actions, }); // Use the CopilotBackend instance to generate a response for the incoming request using an OpenAIAdapter. return copilotKit.response(req, new OpenAIAdapter()); } ``` 如何產生 UI 元件 ---------- 現在轉到您之前整合的應用程式內聊天機器人,並給它一個提示,例如「產生聯絡表單」。 生成完成後,您應該會看到生成的聯絡表單元件及其實作教程,如下所示。您也可以使用嵌入式程式碼編輯器修改產生的程式碼。   恭喜!您已完成本教學的專案。 結論 -- [CopilotKit](https://copilotkit.ai/)是一款令人難以置信的工具,可讓您在幾分鐘內將 AI Copilot 加入到您的產品中。無論您是對人工智慧聊天機器人和助理感興趣,還是對複雜任務的自動化感興趣,CopilotKit 都能讓您輕鬆實現。 如果您需要建立 AI 產品或將 AI 工具整合到您的軟體應用程式中,您應該考慮 CopilotKit。 您可以在 GitHub 上找到本教學的源程式碼: <https://github.com/TheGreatBonnie/AIPoweredUIComponentsGenerator> --- 原文出處:https://dev.to/the_greatbonnie/ai-powered-frontend-ui-components-generator-nextjs-gpt4-langchain-copilotkit-1hac
今天,我們將介紹 30 個或更多可以使用 AI 建置的專案。 所有專案都是開源的,因此您可以做出貢獻以使其變得更好。 有些專案可能擁有龐大的程式碼庫,但您可以從中獲得靈感並建立一個很酷的副專案。 相信我,如果這個清單沒有讓你感到驚訝,那麼沒有什麼會讓你感到驚訝:) 讓我們開始吧!  --- 1. [CopilotKit](https://go.copilotkit.ai/Anmol) - 在數小時內為您的產品提供 AI Copilot。 -------------------------------------------------------------------------- [](https://github.com/CopilotKit/CopilotKit) 將 AI 功能整合到 React 中是很困難的,這就是 Copilot 的用武之地。一個簡單快速的解決方案,可將可投入生產的 Copilot 整合到任何產品中! 您可以使用兩個 React 元件將關鍵 AI 功能整合到 React 應用程式中。它們還提供內建(完全可自訂)Copilot 原生 UX 元件,例如`<CopilotKit />` 、 `<CopilotPopup />` 、 `<CopilotSidebar />` 、 `<CopilotTextarea />` 。 開始使用以下 npm 指令。 ``` npm i @copilotkit/react-core @copilotkit/react-ui ``` Copilot Portal 是 CopilotKit 提供的元件之一,CopilotKit 是一個應用程式內人工智慧聊天機器人,可查看目前應用狀態並在應用程式內採取操作。它透過插件與應用程式前端和後端以及第三方服務進行通訊。 這就是整合聊天機器人的方法。 `CopilotKit`必須包裝與 CopilotKit 互動的所有元件。建議您也開始使用`CopilotSidebar` (您可以稍後切換到不同的 UI 提供者)。 ``` "use client"; import { CopilotKit } from "@copilotkit/react-core"; import { CopilotSidebar } from "@copilotkit/react-ui"; import "@copilotkit/react-ui/styles.css"; export default function RootLayout({children}) { return ( <CopilotKit url="/path_to_copilotkit_endpoint/see_below"> <CopilotSidebar> {children} </CopilotSidebar> </CopilotKit> ); } ``` 您可以使用此[快速入門指南](https://docs.copilotkit.ai/getting-started/quickstart-backend)設定 Copilot 後端端點。 之後,您可以讓 Copilot 採取行動。您可以閱讀如何提供[外部上下文](https://docs.copilotkit.ai/getting-started/quickstart-chatbot#provide-context)。您可以使用`useMakeCopilotReadable`和`useMakeCopilotDocumentReadable`反應掛鉤來執行此操作。 ``` "use client"; import { useMakeCopilotActionable } from '@copilotkit/react-core'; // Let the copilot take action on behalf of the user. useMakeCopilotActionable( { name: "setEmployeesAsSelected", // no spaces allowed in the function name description: "Set the given employees as 'selected'", argumentAnnotations: [ { name: "employeeIds", type: "array", items: { type: "string" } description: "The IDs of employees to set as selected", required: true } ], implementation: async (employeeIds) => setEmployeesAsSelected(employeeIds), }, [] ); ``` 您可以閱讀[文件](https://docs.copilotkit.ai/getting-started/quickstart-textarea)並查看[演示影片](https://github.com/CopilotKit/CopilotKit?tab=readme-ov-file#demo)。 您可以輕鬆整合 Vercel AI SDK、OpenAI API、Langchain 和其他 LLM 供應商。您可以按照本[指南](https://docs.copilotkit.ai/getting-started/quickstart-chatbot)將聊天機器人整合到您的應用程式中。 基本概念是在幾分鐘內建立可用於基於 LLM 的應用程式的 AI 聊天機器人。 用例是巨大的,作為開發人員,我們絕對應該在下一個專案中嘗試使用 CopilotKit。 CopilotKit 在 GitHub 上擁有超過 5700 顆星,發布了 200 多個版本,這意味著它們不斷改進。 https://go.copilotkit.ai/Anmol Star CopilotKit ⭐️ --- 2. [AgentGPT](https://github.com/reworkd/AgentGPT) - 組裝、配置和部署自主 AI 代理程式。 ------------------------------------------------------------------------ 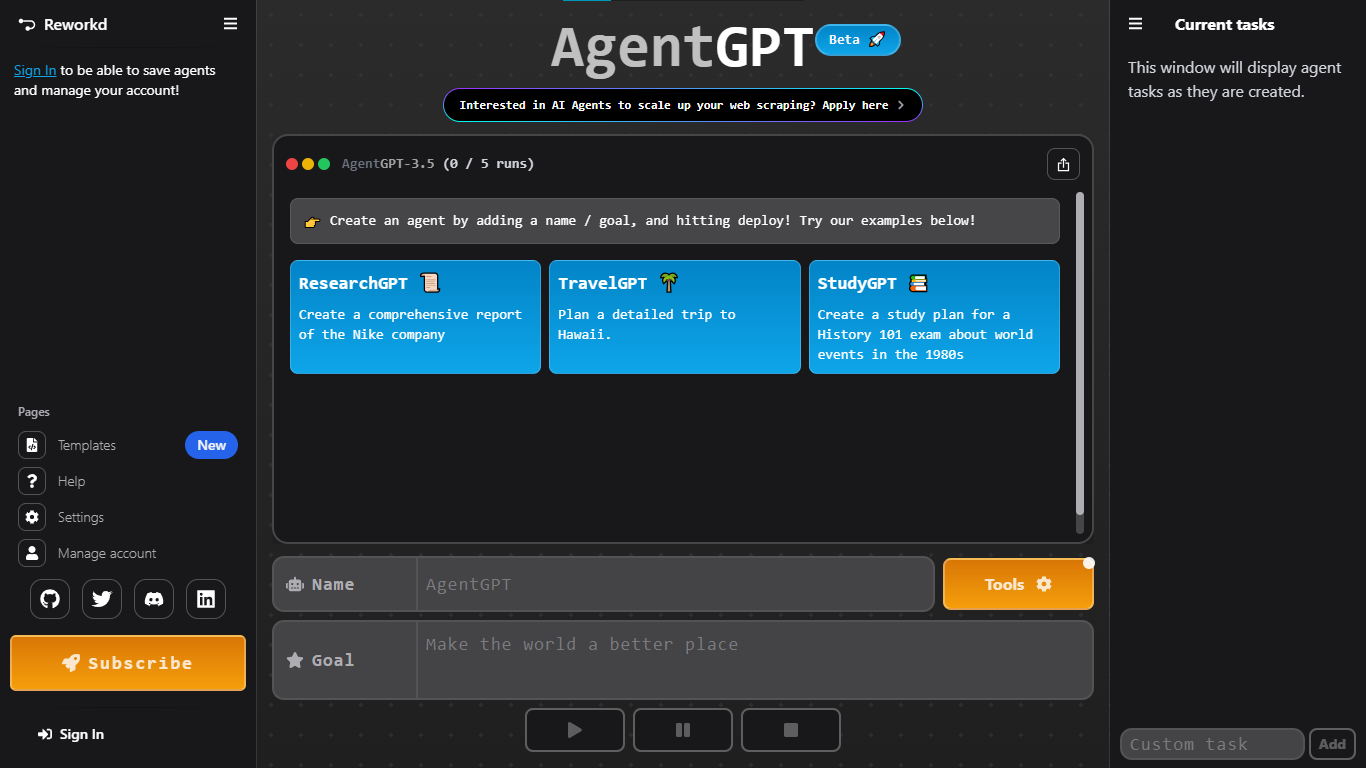 AgentGPT 可讓您設定和部署自主 AI 代理程式。 它將嘗試透過思考要完成的任務、執行任務並從結果中學習來實現目標:) 它是使用以下方式建構的: - 引導:create-t3-app + FastAPI-模板。 - 框架:Nextjs 13 + Typescript + FastAPI - 驗證:Next-Auth.js - ORM:Prisma 和 SQLModel。 - 資料庫:Planetscale。 - 樣式:TailwindCSS + HeadlessUI。 - 架構驗證:Zod + Pydantic。 - 法學碩士工具:Langchain。 開始使用本[指南](https://github.com/reworkd/AgentGPT?tab=readme-ov-file#getting-started-rocket)在本地安裝它。 您可以查看該應用程式的[演示](https://github.com/reworkd/AgentGPT?tab=readme-ov-file#-demo)並查看[即時網站](https://agentgpt.reworkd.ai/)。  他們在 GitHub 上擁有 29k+ 顆星,並且正在發布`v1`版本。 https://github.com/reworkd/AgentGPT 明星 AgentGPT ⭐️ --- 3.[私人 GPT](https://github.com/zylon-ai/private-gpt) - 無需網路即可詢問有關您文件的問題。 ------------------------------------------------------------------------ 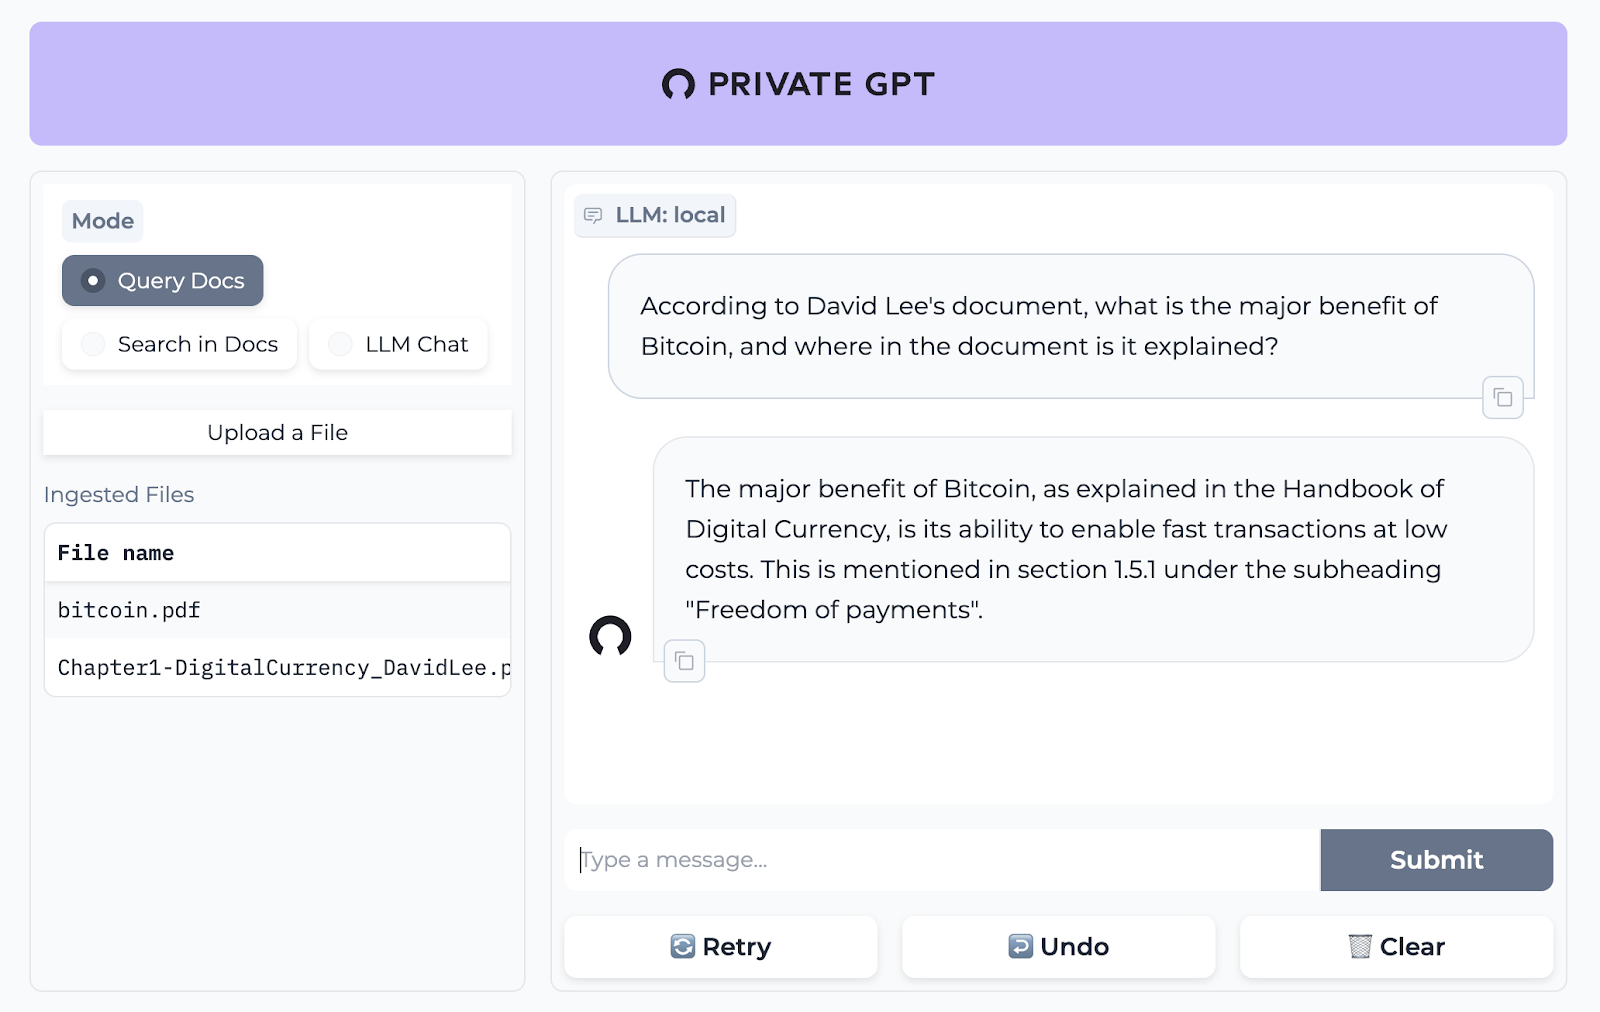 PrivateGPT 是一個可立即投入生產的 AI 專案,即使在沒有網路連線的情況下,您也可以使用大型語言模型 (LLM) 的功能來詢問有關文件的問題。 100% 私有意味著任何時候都沒有資料離開您的執行環境。 API 分為兩個邏輯區塊: A。高級 API,抽象化了 RAG(檢索增強生成)管道實現的所有複雜性: - 文件攝取:內部管理文件解析、分割、元資料擷取、嵌入產生和儲存。 - 使用所攝取文件中的上下文進行聊天和完成:抽像上下文檢索、提示工程和回應產生。 b.低階 API,允許高階用戶實現複雜的管道: - 嵌入生成:基於一段文字。 - 上下文區塊檢索:給定查詢,從攝取的文件中傳回最相關的文字區塊。 您可以閱讀[安裝指南](https://docs.privategpt.dev/installation/getting-started/installation)來開始。 您可以閱讀[文件](https://docs.privategpt.dev/overview/welcome/introduction)以及所涉及的[詳細架構](https://github.com/zylon-ai/private-gpt?tab=readme-ov-file#-architecture)。 PrivateGPT 現在正在發展成為產生 AI 模型和原語的網關,包括補全、文件攝取、RAG 管道和其他低階建置塊。 他們在 GitHub 上擁有超過 51,000 顆星,並且發展迅速。 https://github.com/zylon-ai/private-gpt 明星私人 GPT ⭐️ --- 4. [Instrukt](https://github.com/blob42/Instrukt) - 終端機中整合人工智慧。 ---------------------------------------------------------------  Instrukt是一個基於終端的AI整合環境。它提供了一個平台,用戶可以: - 建立並指導模組化人工智慧代理。 - 產生問答的文件索引。 - 建立工具並將其附加到任何代理程式。 用自然語言指導它們,並且為了安全起見,在安全容器(目前使用 Docker 實作)中執行它們,以在其專用的沙盒空間中執行任務。 使用`Langchain` 、 `Textual`和`Chroma`建構。 開始使用以下命令。 ``` pip install instrukt[all] ```  有許多令人興奮的功能,例如: - 基於終端的介面,讓強力鍵盤使用者無需離開鍵盤即可指示 AI 代理。 - 對您的資料建立索引並讓代理程式檢索它以進行問答。您可以使用簡單的 UI 建立和組織索引。 - 索引建立將自動偵測程式語言並相應地優化拆分/分塊策略。 - 在安全的 Docker 容器內執行代理程式以確保安全和隱私。 - 整合的 REPL-Prompt 可實現與代理程式的快速交互,以及用於開發和測試的快速回饋循環。 - 您可以使用自訂命令自動執行重複任務。它還具有內建的提示/聊天歷史記錄。 您可以閱讀有關所有[功能的](https://github.com/blob42/Instrukt?tab=readme-ov-file#features)資訊。 您可以閱讀[安裝指南](https://blob42.github.io/Instrukt/install.html)。 您還可以使用內建的 IPython 控制台來除錯和內省代理,這是一個簡潔的小功能。  Instrukt 已獲得 AGPL 許可證,這意味著任何人都可以將其用於任何目的。 可以肯定地說,Instrukt 是您觸手可及的終端人工智慧指揮官。 這是一個新專案,因此他們在 GitHub 上有大約 200 多顆星,但用例非常好。 https://github.com/blob42/Instrukt 舊指令 ⭐️ --- 5. [Mac 上的語音助理](https://github.com/chidiwilliams/GPT-Automator)- 您的語音控制 Mac 助理。 -------------------------------------------------------------------------------  您的語音控制 Mac 助理。 GPT Automator 可讓您使用語音在 Mac 上執行任務。例如,打開應用程式、尋找餐廳、綜合資訊。太棒了:D 它是在倫敦黑客馬拉松期間建構的。 它有兩個主要部分: A。語音命令:它使用本地執行的 Whisper(Buzz 的一個分支)來產生命令。 b.命令到行動:您向配備了我們編寫的自訂工具的 LangChain 代理程式發出命令。這些工具包括使用 AppleScript 控制電腦的作業系統以及使用 JavaScript 控制活動瀏覽器。最後,就像任何優秀的人工智慧一樣,我們讓代理商使用 AppleScript 說出最終結果「{Result}」(如果您以前沒有使用過,請嘗試在 Mac 終端機中輸入「Hello World!」)。 我們製作了一個自訂工具,讓法學碩士使用 AppleScript 控制電腦。提示符是文件字串: ``` @tool def computer_applescript_action(apple_script): """ Use this when you want to execute a command on the computer. The command should be in AppleScript. Here are some examples of good AppleScript commands: Command: Create a new page in Notion AppleScript: tell application "Notion" activate delay 0.5 tell application "System Events" to keystroke "n" using {{command down}} end tell ... Write the AppleScript for the Command: Command: """ p = subprocess.Popen(['osascript', '-'], stdin=subprocess.PIPE, stdout=subprocess.PIPE, stderr=subprocess.PIPE) stdout, stderr = p.communicate(applescript.encode('utf-8')) if p.returncode != 0: raise Exception(stderr) decoded_text = stdout.decode("utf-8") return decoded_text ``` 如果您想知道它是如何運作的,GPT Automator 使用 OpenAI 的 Whisper 將您的音訊輸入轉換為文字。然後,它使用LangChain Agent 選擇一組操作,包括使用OpenAI 的GPT-3(“text-davinci-003”)從提示符號產生AppleScript(用於桌面自動化)和JavaScript(用於瀏覽器自動化)命令,然後執行產生的腳本。 請記住,這不適用於生產用途。該專案執行從自然語言產生的程式碼,可能容易受到提示注入和類似的攻擊。這項工作是作為概念驗證而進行的。 您可以閱讀[安裝指南](https://github.com/chidiwilliams/GPT-Automator?tab=readme-ov-file#instructions)。 讓我們看看一些提示及其作用: ✅ 求計算結果。 > 提示:“2 + 2 是什麼?” 它將編寫 AppleScript 開啟計算器並輸入 5 \* 5。 ✅ 尋找附近的餐廳。 > 提示:“查找我附近的餐廳” 它將打開 Chrome,谷歌搜尋附近的餐廳,解析頁面,然後返回最上面的結果。有時它很厚顏無恥,反而會打開谷歌地圖結果並說「最好的餐廳是谷歌地圖頁面頂部的餐廳」。其他時候,它會打開 Google 上的頂部連結 - 並卡在 Google 可存取性頁面上... 以下是執行時列印到終端的內容: ``` Command: Find a great restaurant near Manchester. > Entering new AgentExecutor chain... I need to search for a restaurant near Manchester. Action: chrome_open_url Action Input: https://www.google.com/search?q=restaurant+near+Manchester Observation: Thought: I need to read the page Action: chrome_read_the_page Action Input: Observation: Accessibility links Skip to main content ... # Shortned for brevity Dishoom Manchester 4.7 (3.3K) · £££ · Indian 32 Bridge St · Near John Rylands Library Closes soon ⋅ 11 pm Stylish eatery for modern Indian fare San Carlo 4.2 (2.8K) · £££ · Italian 42 King St W · Near John Rylands Library Closes soon ⋅ 11 pm Posh, sceney Italian restaurant Turtle Bay Manchester Northern Quarter 4.7 Thought: I now know the final answer Final Answer: The 15 best restaurants in Manchester include El Gato Negro, Albert's Schloss, The Refuge, Hawksmoor, On The Hush, Dishoom, Banyan, Zouk Tea Room & Grill, Edison Bar, MyLahore Manchester, Turtle Bay Manchester Northern Quarter, San Carlo, The Black Friar, Mana, and Tast Cuina Catalana. ``` 我不能保證這些餐廳值得,請自行承擔風險。哈哈! ✅ 如果您要求 GPT Automator 擦除您的計算機,它會的。 是的,如果您要求的話,它會擦除您的電腦! 我內心的自我尖叫著要這麼做:) 您可以在這裡查看完整的演示! https://www.loom.com/share/7bfa82c604f3412fbbb04191ce2ae12f 您可以在[Chidi 的部落格](https://chidiwilliams.com/posts/gpt-automator)上閱讀更多內容。 它更像是一個業餘專案,因此他們在 GitHub 上有大約 200 個 star,但它非常酷。 https://github.com/chidiwilliams/GPT-Automator 明星 GPT Automator ⭐️ --- 6. [Flowise](https://github.com/FlowiseAI/Flowise) - 拖放 UI 來建立您的客製化 LLM 流程。 ---------------------------------------------------------------------------  Flowise 是一款開源 UI 視覺化工具,用於建立客製化的 LLM 編排流程和 AI 代理程式。 開始使用以下 npm 指令。 ``` npm install -g flowise npx flowise start OR npx flowise start --FLOWISE_USERNAME=user --FLOWISE_PASSWORD=1234 ``` 這就是整合 API 的方式。 ``` import requests url = "/api/v1/prediction/:id" def query(payload): response = requests.post( url, json = payload ) return response.json() output = query({ question: "hello!" )} ```  您可以閱讀[文件](https://docs.flowiseai.com/)。  雲端主機不可用,因此您必須使用這些[說明](https://github.com/FlowiseAI/Flowise?tab=readme-ov-file#-self-host)自行託管。 讓我們探討一些用例: - 假設您有一個網站(可以是商店、電子商務網站或部落格),並且您希望廢棄該網站的所有相關連結,並讓法學碩士回答您網站上的任何問題。您可以按照此[逐步教學](https://docs.flowiseai.com/use-cases/web-scrape-qna)來了解如何實現相同的目標。 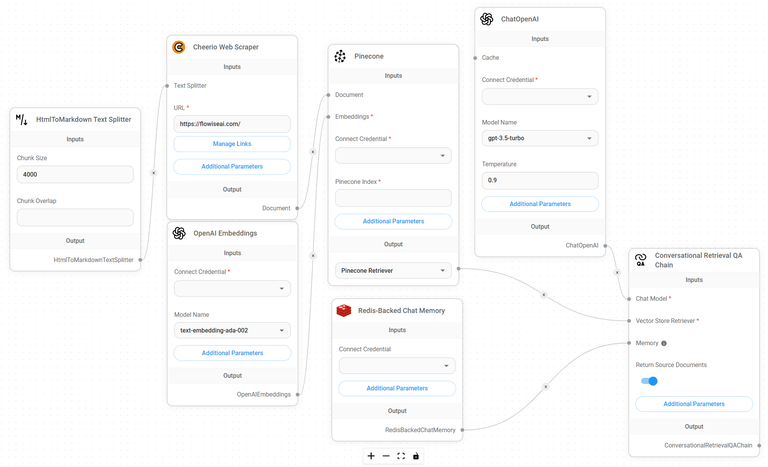 - 您還可以建立一個自訂工具,該工具將能夠呼叫 Webhook 端點並將必要的參數傳遞到 Webhook 主體中。請依照本[指南](https://docs.flowiseai.com/use-cases/webhook-tool)使用 Make.com 建立 Webhook 工作流程。 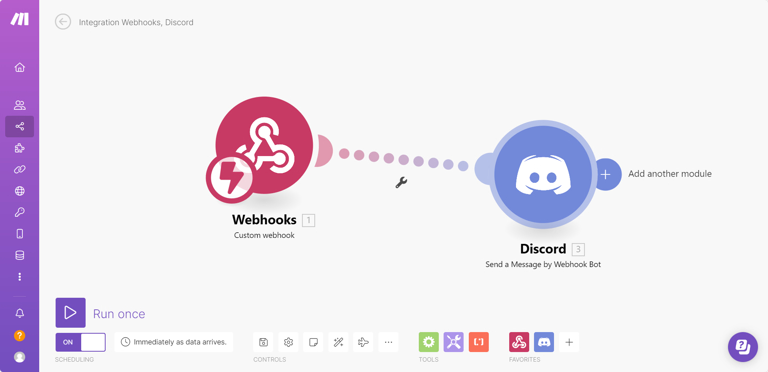 還有許多其他用例,例如建立 SQL QnA 或與 API 互動。 FlowiseAI 在 GitHub 上擁有超過 27,500 個 Star,並擁有超過 10,000 個分叉,因此具有良好的整體比率。 https://github.com/FlowiseAI/Flowise 明星 Flowise ⭐️ --- 7. [Twitter Agent](https://github.com/ahmedbesbes/media-agent) - 從社群媒體抓取資料並使用 Langchain 與其聊天。 --------------------------------------------------------------------------------------------- 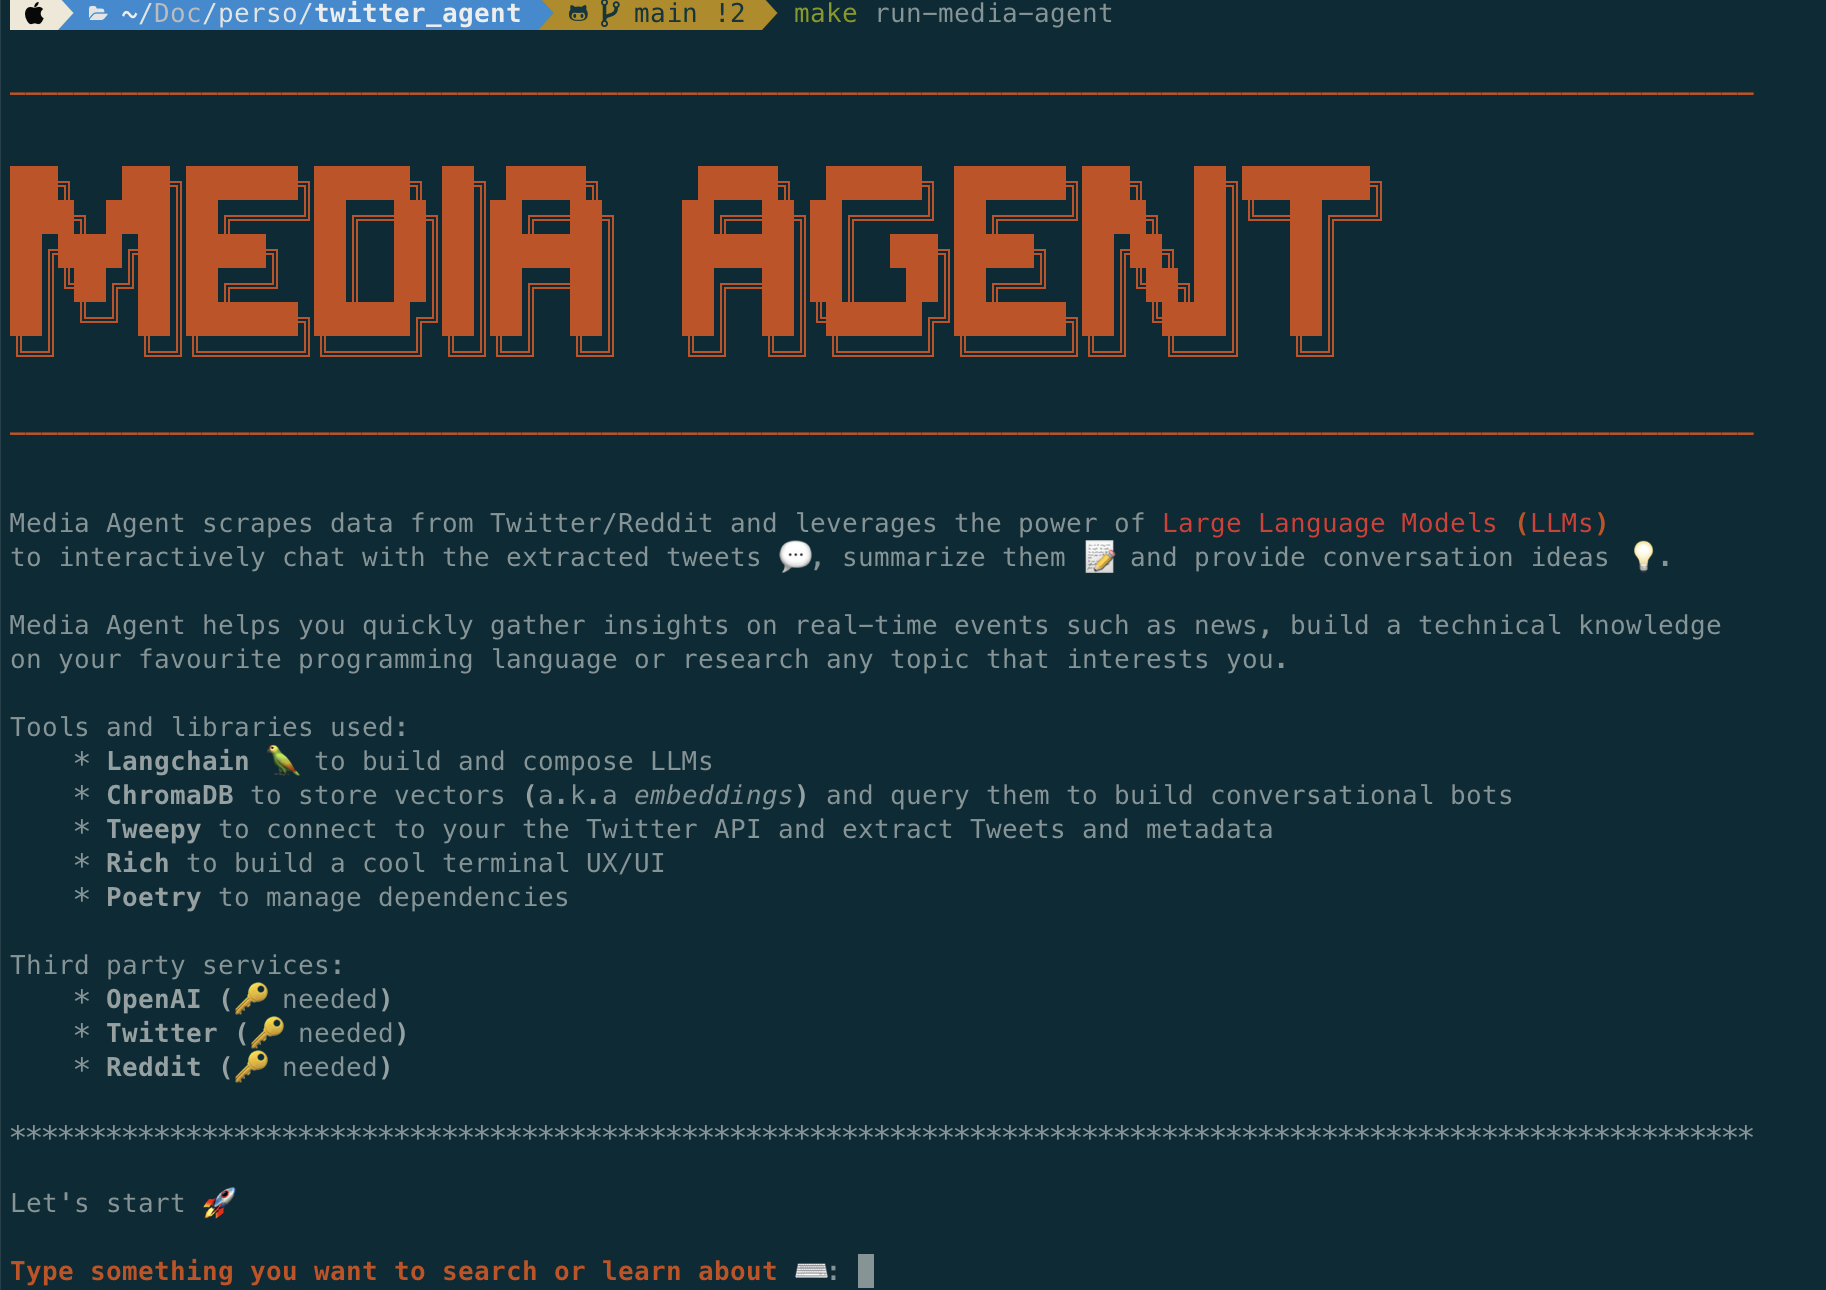 Media Agent 抓取 Twitter 和 Reddit 提交的內容,對其進行總結,並在互動式終端中與它們聊天。這麼酷的概念! 您可以閱讀[說明](https://github.com/ahmedbesbes/media-agent?tab=readme-ov-file#run-the-app-locally)以在本地安裝它。 它是使用以下方式建構的: - Langchain 🦜 用於建構和撰寫法學碩士。 - ChromaDB 用於儲存向量(也稱為嵌入)並查詢它們以建立對話機器人。 - Tweepy 連接到您的 Twitter API 並提取推文和元資料。 - Praw 連接到 Reddit API。 - Rich 建造了一個很酷的終端 UX/UI。 - 管理依賴關係的詩。 一些很棒的功能: - 代表您從使用者帳戶清單或關鍵字清單中抓取推文/提交內容。 - 使用 OpenAI 嵌入推文/提交內容。 - 建立推文/提交內容的摘要並提供需要回答的潛在問題。 - 在推文之上打開聊天會話。 - 儲存對話及其元資料。 - 豐富的終端使用者介面和日誌記錄功能。 您可以觀看演示! https://www.loom.com/share/f4954e7d34ef4b7b8491e2bf910e8521 它在 GitHub 上有近 100 顆星,並且不再維護。您可以用它來建造更好的東西。 https://github.com/ahmedbesbes/media-agent 明星 Twitter 代理商 ⭐️ --- 8. [GPT 遷移](https://github.com/joshpxyne/gpt-migrate)- 輕鬆將程式碼庫從一種框架或語言遷移到另一種框架或語言。 ----------------------------------------------------------------------------------  如果您曾經面臨將程式碼庫遷移到新框架或語言的痛苦,那麼這個專案適合您。 我想我們都同意我們在某個時候需要這個。您也可以使用工作流程來完成此操作,據我所知,Stripe 曾經將其整個 JS 程式碼庫轉換為 TS。 遷移是一個成本高、乏味且重要的問題。 不要盲目相信當前版本,請負責任地使用它。另請注意,成本可能會迅速增加,因為 GPT-Migrate 旨在編寫(並可能重寫)整個程式碼庫。 您可以使用 Poetry[安裝](https://github.com/joshpxyne/gpt-migrate?tab=readme-ov-file#-installation-using-poetry)它並了解[它的工作原理](https://github.com/joshpxyne/gpt-migrate?tab=readme-ov-file#-how-it-works)。 > 請注意。 GPT-Migrate 目前處於開發 alpha 階段,尚未準備好投入生產使用。例如,在相對簡單的基準測試中,它在約 50% 的時間內順利通過 Python 或 JavaScript 等「簡單」語言,並且在沒有人工幫助的情況下無法通過 C++ 或 Rust 等更複雜的語言。 您可以在這裡觀看演示! 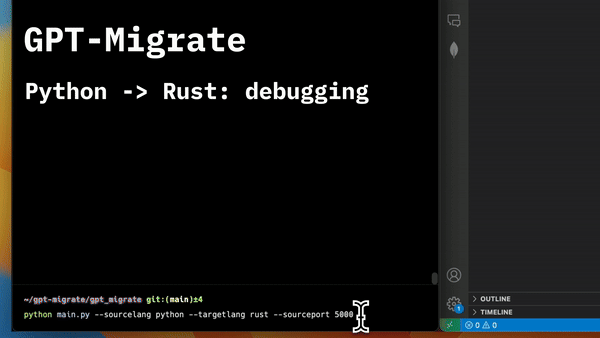 他們在 GitHub 上有 6500+ 顆星,最後一次提交是 6 個月前,所以我認為它不再被維護了! https://github.com/joshpxyne/gpt-migrate 明星 GPT 遷移 ⭐️ --- 9. [Plandex](https://github.com/plandex-ai/plandex) - 用於使用法學碩士建置複雜的真實世界軟體的人工智慧編碼引擎。 -----------------------------------------------------------------------------------  Plandex 使用長時間執行的代理程式來完成跨多個檔案且需要多個步驟的任務。它將大任務分解為更小的子任務,然後實現每個子任務,一直持續到完成工作為止。 它可以幫助您處理積壓的工作,使用不熟悉的技術,擺脫困境,並花更少的時間在無聊的事情上。 您可以在這裡查看演示! https://vimeo.com/926634577 變更會累積在受保護的沙箱中,以便您可以在自動將它們套用到專案文件之前查看它們。內建版本控制可讓您輕鬆返回並嘗試不同的方法。分支允許您嘗試多種方法並比較結果。 您可以在終端機中有效地管理上下文。輕鬆將檔案或整個目錄新增至上下文中,並在工作時自動更新它們,以便模型始終具有專案的最新狀態。 Plandex 依賴 OpenAI API,並且需要`OPENAI_API_KEY`環境變數。 Plandex 支援 Mac、Linux、FreeBSD 和 Windows。它從沒有依賴關係的單一二進位檔案執行。 您甚至可以嘗試不同的模型和模型設置,然後比較結果。 您可以閱讀[安裝說明](https://github.com/plandex-ai/plandex?tab=readme-ov-file#install)。 Plandex Cloud 是使用 Plandex 最簡單、最可靠的方式。當您使用 plandex new 建立第一個計劃時,系統會提示您開始匿名試用(無需電子郵件)。試用帳戶僅限 10 個計劃,每個計劃有 10 個 AI 模型回复。 Plandex Cloud 帳戶目前是免費的,這是一件好事。 Plandex 在 GitHub 上擁有 8k+ 顆星,並使用 Go 建造。 https://github.com/plandex-ai/plandex 明星PLandex ⭐️ --- 10. [SQL Translator](https://github.com/whoiskatrin/sql-translator) - 使用人工智慧將自然語言查詢轉換為 SQL 程式碼的工具。 --------------------------------------------------------------------------------------------------  我試圖建立一個類似的專案,發現它已經存在。 該工具旨在讓任何人都可以輕鬆地將 SQL(結構化查詢語言)命令轉換為自然語言,反之亦然。 SQL 是一種用於管理和操作關聯式資料庫中的資料的程式語言,雖然它是一個強大的工具,但它也可能非常複雜且難以理解。 另一方面,自然語言是我們在日常生活中說和寫的語言,對於不熟悉技術術語的人來說,它通常是首選的溝通方式。 透過 SQL 和自然語言翻譯器,您無需成為 SQL 專家即可了解資料庫中發生的情況或編寫 SQL 查詢。您只需用自然語言輸入查詢即可取得對應的 SQL 程式碼,反之亦然。 其中一些功能是: - 深色模式。 - 小寫/大寫切換。 - 複製到剪貼簿。 - SQL 語法高亮。 - 模式意識(測試版)。 - 查詢歷史記錄。 你可以閱讀 [安裝說明](https://github.com/whoiskatrin/sql-translator?tab=readme-ov-file#%EF%B8%8F-installation),它非常簡單,因為它使用 Nextjs。 此查詢適合您。哈哈!  SQL Translator 在 GitHub 上有 4k star,是使用 TypeScript 建構的。 https://github.com/whoiskatrin/sql-translator 明星 SQL 翻譯機 ⭐️ --- 11. [WingmanAI](https://github.com/e-johnstonn/wingmanAI) - 音訊即時轉錄,與 ChatGPT 整合。 --------------------------------------------------------------------------------  WingmanAI 是一款功能強大的工具,可與系統和麥克風音訊的即時轉錄進行互動。該工具由 ChatGPT 提供支援,可讓您與腳本即時交互,作為機器人的廣泛記憶體基礎,提供獨特的通訊平台。 當您載入指定人員的記錄時,機器人可以回答有關過去對話的問題。 您可以閱讀[安裝說明](https://github.com/e-johnstonn/wingmanAI?tab=readme-ov-file#installation)。 您可以在這裡觀看演示!  一些簡潔的功能是: - WingmanAI 可以轉錄系統輸出和麥克風輸入音頻,讓您以易於閱讀的格式查看即時轉錄。 - 您可以與 ChatGPT 支援的機器人聊天,該機器人會即時讀取您的文字記錄。 - 機器人以令牌有效的方式維護對話記錄,因為只有當前的文字區塊會傳遞給機器人。 - WingmanAI 讓您可以保存成績單以供將來使用。您可以稍後隨時加載它們,並且對機器人進行的任何查詢都將與保存的轉錄本的向量資料庫交叉引用,從而為機器人提供更豐富的上下文。 - 您可以繼續附加到已儲存的記錄中,隨著時間的推移建立一個龐大的資料庫供機器人從中提取。 它在 GitHub 上有 420 個星,並且不再維護。 https://github.com/e-johnstonn/wingmanAI 明星 WingmanAI ⭐️ --- 12. [Lively](https://github.com/rocksdanister/lively) - 允許使用者設定動畫桌面桌布和螢幕保護程式。 -----------------------------------------------------------------------------  這只是為了好玩,我們可以使用程式碼學到很多關於它是如何完成的。 你可以看看這個[影片](https://www.pexels.com/video/blue-texture-abstract-leaves-7710243/),看看它看起來有多瘋狂。  他們提供[三種類型的壁紙,](https://github.com/rocksdanister/lively?tab=readme-ov-file#types-of-wallpapers)包括影片/GIF、網頁和應用程式/遊戲。 它基於 C# 和 live 支援的一些很酷的功能建置: 1. Lively 可以透過終端機的[命令列參數](https://github.com/rocksdanister/lively/wiki/Command-Line-Controls)進行控制。您可以將其與其他語言(例如 Python 或腳本軟體 AutoHotKey)整合。 2. 一組強大的[API](https://github.com/rocksdanister/lively/wiki/API) ,供開發人員建立互動式壁紙。取得硬體讀數、音訊圖表、音樂資訊等。 3. 當電腦上執行全螢幕應用程式/遊戲時(~0% CPU、GPU 使用率),桌布播放會暫停。 4. 您還可以利用[機器學習推理](https://github.com/rocksdanister/lively/wiki/Machine-Learning)來建立動態壁紙。您可以預測任何 2D 影像與相機的距離並產生類似 3D 的視差效果。酷:D 我見過很多人使用它,其中許多人甚至不知道它是開源的。 您可以使用[安裝程式](https://github.com/rocksdanister/lively/releases/download/v2.0.7.4/lively_setup_x86_full_v2074.exe)或透過[Microsoft Store](https://www.microsoft.com/store/productId/9NTM2QC6QWS7?ocid=pdpshare)下載它。 它是 2023 年 Microsoft Store 的獲勝者。 它在 GitHub 上擁有 13k+ Stars,有 60 個版本。 https://github.com/rocksdanister/lively 明星活潑 ⭐️ --- 13. [RestGPT](https://github.com/Yifan-Song793/RestGPT) - 基於 LM 的自主代理透過 RESTful API 控制應用程式。 -------------------------------------------------------------------------------------------  這項工作旨在建立一個基於大型語言模型的自主代理 RestGPT,以控制現實世界的應用程式,例如電影資料庫和音樂播放器。為了實現這一目標,我們將法學碩士與 RESTful API 連接起來,並解決規劃、API 呼叫和回應解析的實際挑戰。為了全面評估 RestGPT 的效能,我們提出了 RestBench,這是一個高品質的基準測試,由兩個真實場景和具有黃金解決方案路徑的人工註釋指示組成。 RestGPT採用迭代式從粗到精的線上規劃框架,並使用執行器呼叫RESTful API。以下是 RestGPT 的概述。 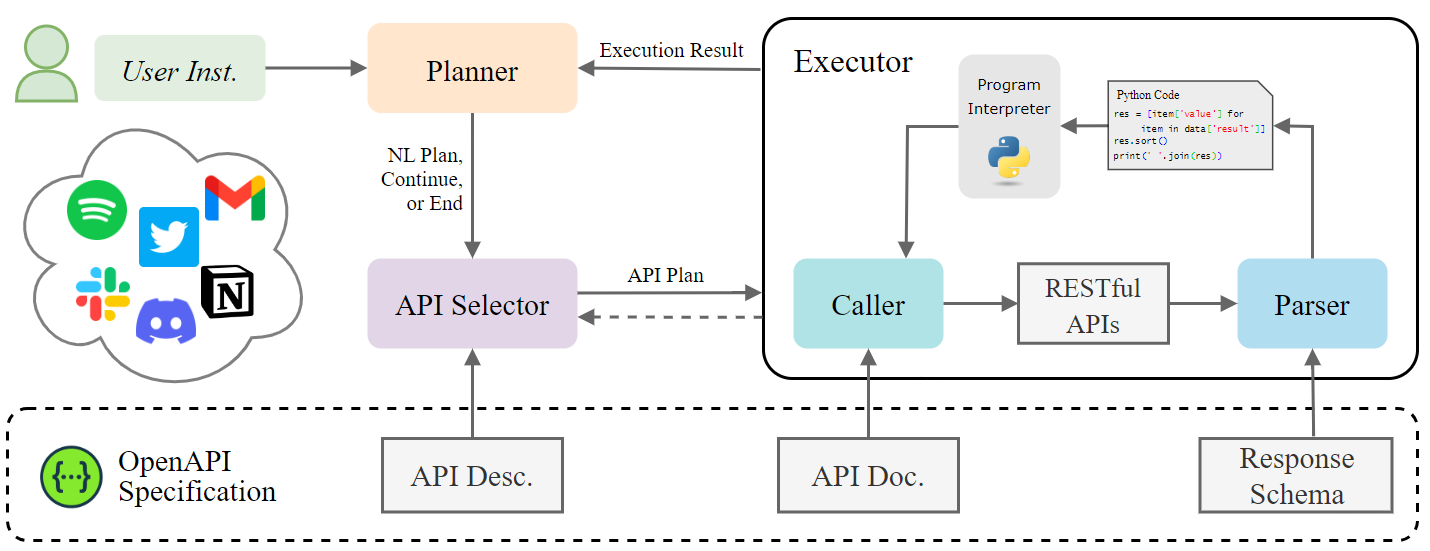 您可以閱讀[文件](https://github.com/Yifan-Song793/RestGPT?tab=readme-ov-file#data)以使用 RestBench 評估 RestGPT 的效能。 使用 TMDB 電影資料庫搜尋 Sofia Coppola 執導的電影數量的範例。  您可以閱讀康乃爾大學發表的程式碼研究論文: [RestGPT - Connecting Large Language Models with Real-World RESTful APIs](https://arxiv.org/abs/2306.06624) 。 他們在 GitHub 上有 1.2k Stars,雖然不是很大,但涵蓋了一個很好的用例。 https://github.com/Yifan-Song793/RestGPT 明星 RestGPT ⭐️ --- 14. [ChatFiles](https://github.com/guangzhengli/ChatFiles) - 上傳您的檔案並與其對話。 -------------------------------------------------------------------------  文件聊天機器人 — 多個文件,由 GPT / Embedding 提供支援。你可以上傳任何文件並與之對話,考慮到他們使用了另一個著名的開源專案,UI 非常好。 它在底層使用 Langchain 和[Chatbot-ui](https://github.com/mckaywrigley/chatbot-ui) 。使用 Nextjs、TypeScript、Tailwind 和 Supabase(向量 DB)建構。 如果您想了解該方法和技術架構,那麼就在這裡!  此環境僅用於試用,支援最大檔案大小為 10 MB,這是一個缺點,如果您想要更大的大小,則可以[在本機安裝](https://github.com/guangzhengli/ChatFiles?tab=readme-ov-file#how-to-run-locally)。 他們提供了您可以使用的[入門問題](https://github.com/guangzhengli/ChatFiles/blob/main/doc/Example.md)。您可以查看[現場演示](https://chatfile.vectorhub.org/)。 他們在 GitHub 上有 3k star,並且發布了`v0.3`版本。 https://github.com/guangzhengli/ChatFiles 明星 ChatFiles ⭐️ --- 15. [MindsDB](https://github.com/mindsdb/mindsdb) - 從企業資料客製化人工智慧的平台。 --------------------------------------------------------------------  MindsDB 是一個利用企業資料客製化人工智慧的平台。 透過 MindsDB,您可以利用資料庫、向量儲存或應用程式中的資料即時部署、服務和微調模型,以建立人工智慧驅動的應用程式 - 使用開發人員已知的通用工具。 借助 MindsDB 及其與資料來源和 AI/ML 框架的近[200 個集成](https://docs.mindsdb.com/integrations/data-overview),任何開發人員都可以使用其企業資料更快、更安全地自訂符合其目的的 AI。 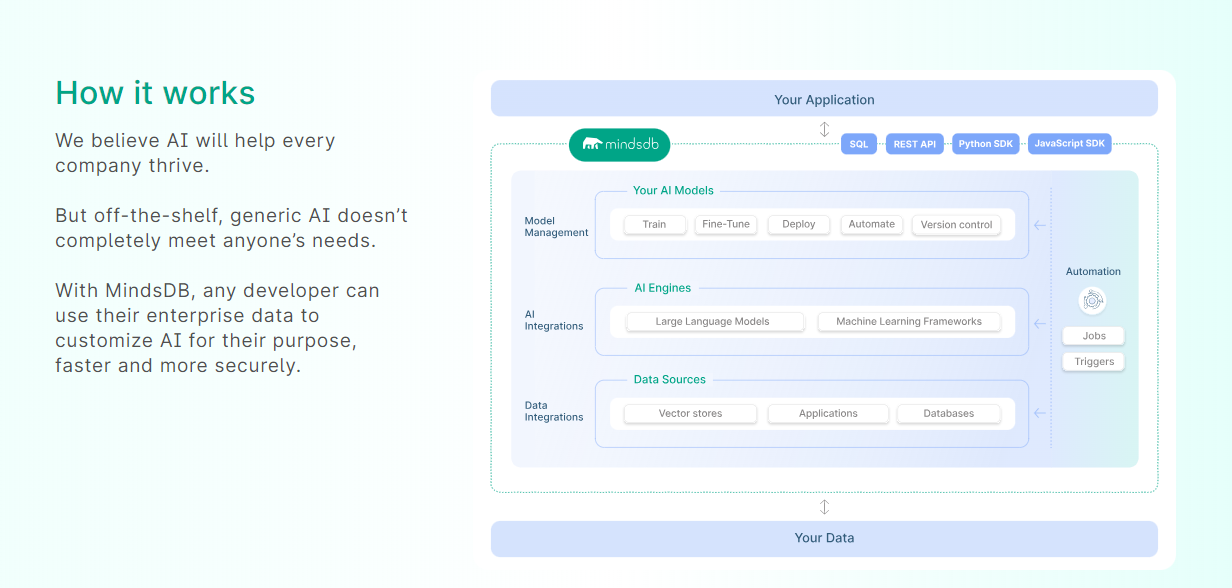 您可以閱讀[文件](https://docs.mindsdb.com/)和[快速入門指南](https://docs.mindsdb.com/quickstart-tutorial)來開始使用。 目前,他們總共支援[3 個使用 Mongo-QL、Python 和 JavaScript 的 SDK](https://docs.mindsdb.com/sdks/overview) 。 MindsDB 有多種應用程式,例如與眾多資料來源和 AI 框架集成,因此您可以輕鬆地將資料和 AI 結合在一起以建立和自動化自訂工作流程。 其他常見用例包括微調模型、聊天機器人、警報系統、內容生成、自然語言處理、分類、回歸和預測。閱讀有關[用例的](https://docs.mindsdb.com/use-cases/)更多訊息,每個用例都有一個包含一些資訊的架構圖。 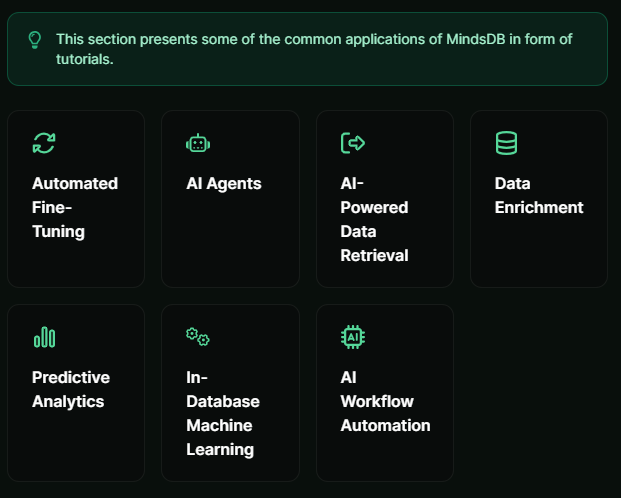 例如,MindsDB 的聊天機器人架構圖。您可以閱讀提供的所有[解決方案](https://github.com/mindsdb/mindsdb?tab=readme-ov-file#-get-started)及其 SQL 查詢範例。 ``` // SQL Query Example for Chatbot CREATE CHATBOT slack_bot USING database='slack',agent='customer_support'; ```  只是為了告訴您總體的可能性,您可以查看[如何使用 AI + IoT 感測器資料預測氣溫](https://mindsdb.com/blog/how-to-forecast-air-temperatures-with-ai-iot-sensor-data)。令人興奮的權利:)  他們在 GitHub 上擁有超過 21k 個 star,並且在`v24.4.3.0`上有超過 200 個版本。順便說一句,這是我第一次在任何版本中看到 4 個部分,因為我一直遵循語義版本。 https://github.com/mindsdb/mindsdb 明星 MindsDB ⭐️ --- 16. [Quivr](https://github.com/QuivrHQ/quivr) - 你的 GenAI 第二腦。 ------------------------------------------------------------- 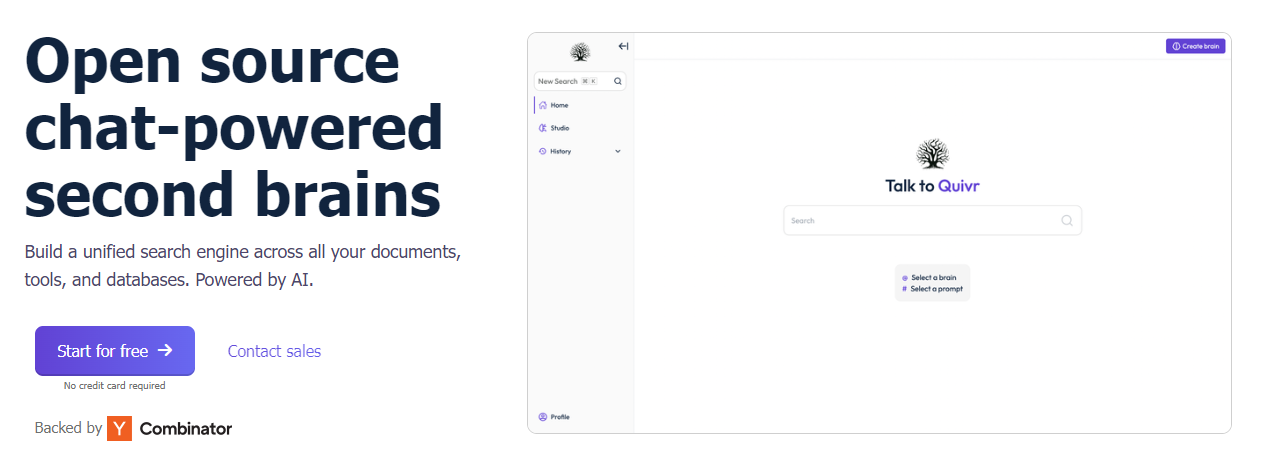 Quivr,您的第二個大腦,利用 GenerativeAI 的力量成為您的私人助理!可以將其視為黑曜石,但增強了人工智慧功能。  您可以閱讀[安裝指南](https://github.com/QuivrHQ/quivr?tab=readme-ov-file#getting-started-)。 您可以閱讀[文件](https://docs.quivr.app/home/intro)並觀看[示範影片](https://github.com/QuivrHQ/quivr?tab=readme-ov-file#demo-highlights-)。 他們可以提供更好的免費套餐,但這足以在您端進行測試。 它在 GitHub 上擁有超過 30k 顆星,發布了 220 多個版本,這意味著它們正在不斷改進。 https://github.com/QuivrHQ/quivr 明星 Quivr ⭐️ --- 17.[動畫繪畫](https://github.com/facebookresearch/AnimatedDrawings)- 一種將兒童人物繪畫動畫化的方法。 ---------------------------------------------------------------------------------  我的意思是哇!這麼酷的概念。我不知道你怎麼想,但我真的很興奮。 這是 Facebook 的一個開源專案,主要用於研究目的,包含論文《 [A Method for Animating Children's Drawings of the Human Figure》](https://dl.acm.org/doi/10.1145/3592788)中描述的演算法的實作。 該專案已在 macOS Ventura 13.2.1 和 Ubuntu 18.04 上進行了測試。如果您在其他作業系統上安裝,則可能會遇到問題。 他們強烈建議在安裝 Animated Drawings 之前啟動 Python 虛擬環境。 閱讀有關[安裝說明](https://github.com/facebookresearch/AnimatedDrawings?tab=readme-ov-file#installation)以及如何快速入門的更多資訊。 您可以按照這個完整的指南來為[您的繪圖製作動畫](https://github.com/facebookresearch/AnimatedDrawings?tab=readme-ov-file#animating-your-own-drawing),包括如何在場景中加入多個角色、加入背景圖像以及更多令人興奮的事情。 他們在 GitHub 上擁有超過 10k 顆星,並且僅用於具有 MIT 許可的研究目的。 https://github.com/facebookresearch/AnimatedDrawings 明星動畫繪圖 ⭐️ --- 18.[背景移除器](https://github.com/nadermx/backgroundremover)- 讓您可以透過簡單的 CLI 使用 AI 從影像和影片中移除背景。 ------------------------------------------------------------------------------------------ 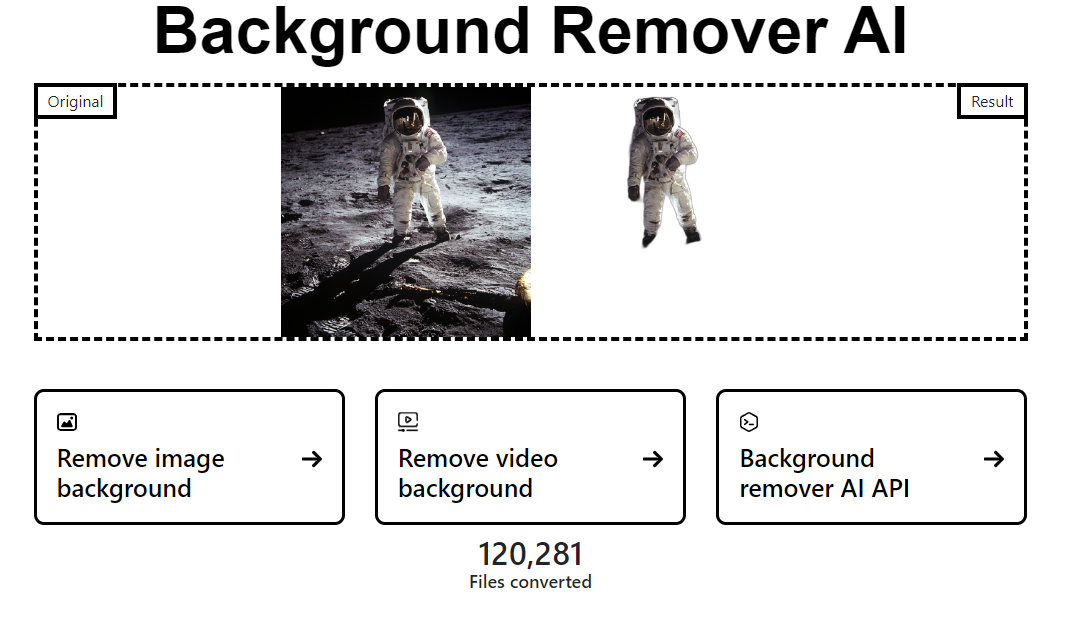 這是一個使用 AI 從圖像和影片中刪除背景的命令列工具。 首先從 pypi 安裝 backgroundremover。 ``` pip install --upgrade pip pip install backgroundremover ``` 也可以在不透過 pip 安裝的情況下執行它,只需克隆 git 以在本地啟動虛擬環境安裝要求並執行。 您可以使用的一些命令: - 從本機檔案圖像中刪除背景 ``` backgroundremover -i "/path/to/image.jpeg" -o "output.png" ``` - 從本地影片中刪除背景並將其覆蓋在圖像上 ``` backgroundremover -i "/path/to/video.mp4" -toi "/path/to/videtobeoverlayed.mp4" -o "output.mov" ``` 您可以檢查可透過 CLI 使用的所有[命令](https://github.com/nadermx/backgroundremover?tab=readme-ov-file#usage-as-a-cli)。 您甚至可以將它用作圖書館。 ``` from backgroundremover.bg import remove def remove_bg(src_img_path, out_img_path): model_choices = ["u2net", "u2net_human_seg", "u2netp"] f = open(src_img_path, "rb") data = f.read() img = remove(data, model_name=model_choices[0], alpha_matting=True, alpha_matting_foreground_threshold=240, alpha_matting_background_threshold=10, alpha_matting_erode_structure_size=10, alpha_matting_base_size=1000) f.close() f = open(out_img_path, "wb") f.write(img) f.close() ``` 您可以閱讀[安裝說明](https://github.com/nadermx/backgroundremover?tab=readme-ov-file#installation)並觀看[現場演示](https://www.backgroundremoverai.com/)。 > 輸入與輸出。  他們在 GitHub 上有 6k star,我們絕對可以用它來學習一些重要的概念。 https://github.com/nadermx/backgroundremover 明星背景去除器 ⭐️ --- 19. [Lobe Chat](https://github.com/lobehub/lobe-chat) - 現代設計的法學碩士/人工智慧聊天框架。 --------------------------------------------------------------------------- 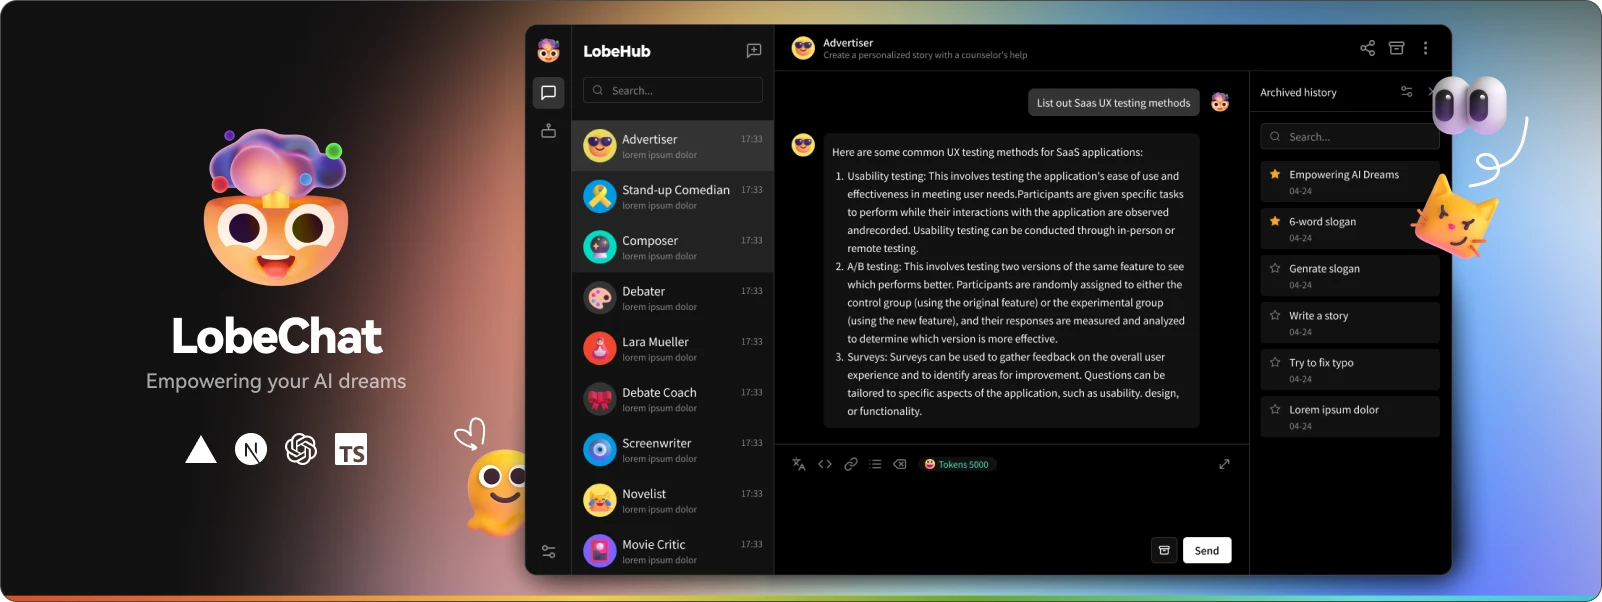 一個開源、現代設計的 ChatGPT/LLM UI/框架。 支援語音合成、多模式和可擴展(函數呼叫)插件系統。您可以一鍵部署您的私有 OpenAI。  讓我們來看看 LobeChat 的一些令人興奮的功能: ✅ 多模式服務提供者支援。  他們將我們的支援擴展到多個模型服務提供者,而不是局限於單一服務提供者,為用戶提供更多樣化和豐富的對話選擇。 尋找他們支援的[10 多個模型服務提供者](https://lobehub.com/docs/usage/features/multi-ai-providers)的完整清單。 ✅ 市場助理。  在LobeChat的[助手市場](https://lobehub.com/assistants)中,創作者可以發現一個充滿活力和創新的社區,匯集了許多精心設計的助手。這些助手不僅在工作場景中發揮著至關重要的作用,而且在學習過程中也提供了極大的便利。在這裡,每個人都可以貢獻自己的智慧,分享自己開發的助手。  那裡有很多很棒的應用程式。哇! ✅ 模型視覺辨識。  LobeChat現在支援OpenAI的gpt-4-vision、Google Gemini Pro Vision、Zhipu GLM-4 Vision等具有視覺辨識能力的大型語言模型,使LobeChat具備多模態互動能力。用戶可以輕鬆地將圖片上傳或拖放到聊天框中,助理將能夠辨識圖片內容並據此進行智慧對話,打造更聰明、更多樣化的聊天場景。 ✅ 文字到圖像生成。  LobeChat 支援最新的文字到圖像生成技術,現在允許使用者在與助手對話時直接使用文字到圖像工具。透過利用 DALL-E 3、MidJourney 和 Pollinations 等 AI 工具的功能,助手現在可以將您的想法轉化為圖像。 ✅ 本地大語言模型 (LLM) 支援。  借助 Ollama AI 強大的基礎設施和社區的協作努力,現在您可以在 LobeChat 中與本地 LLM(大型語言模型)進行對話! 透過執行以下 Docker 指令,您可以在 LobeChat 中體驗與本機 LLM 的對話。 ``` docker run -d -p 3210:3210 -e OLLAMA_PROXY_URL=http://host.docker.internal:11434/v1 lobehub/lobe-chat ``` ✅ 漸進式網頁應用程式 (PWA)。  他們採用了漸進式 Web 應用程式 PWA 技術,這是一種現代 Web 技術,可將 Web 應用程式提升到接近本機應用程式的體驗。透過 PWA,LobeChat 可以在桌面和行動裝置上提供高度優化的使用者體驗,同時保持輕量級和高效能的功能。 ✅ 自訂主題。  LobeChat在介面設計上非常注重個人化的使用者體驗,因此引入了靈活多樣的主題模式,包括白天的淺色模式和夜間的深色模式。 除了主題模式切換之外,我們還提供了一系列顏色自訂選項,讓使用者可以根據自己的喜好調整應用程式的主題顏色。 了解所有[功能和用例](https://lobehub.com/docs/usage/start)。 您可以自行託管或使用 docker 部署它。 lobe chat 的[生態系統](https://github.com/lobehub/lobe-chat/tree/main?tab=readme-ov-file#-ecosystem)提供了 4 個軟體包: `lobehub/ui` 、 `lobehub/icons` 、 `lobehub/tts`和`lobehub/lint` 。 他們還提供[插件市場](https://lobehub.com/plugins),您可以在其中找到許多有用的插件,這些插件可用於引入新的函數呼叫,甚至是呈現訊息結果的新方法。如果你想開發自己的插件,請參考 wiki 中的[📘插件開髮指南](https://lobehub.com/docs/usage/plugins/development)。  您可以閱讀[文件](https://lobehub.com/docs/usage/start)。 您可以查看[現場演示](https://chat-preview.lobehub.com/chat)。它太酷了!  他們在 GitHub 上擁有超過 28k 顆星,發布了 500 多個版本。 https://github.com/lobehub/lobe-chat 星瓣聊天 ⭐️ --- 20.[微代理](https://github.com/aymenfurter/microagents)- 能夠自我編輯提示的代理。 ------------------------------------------------------------------ 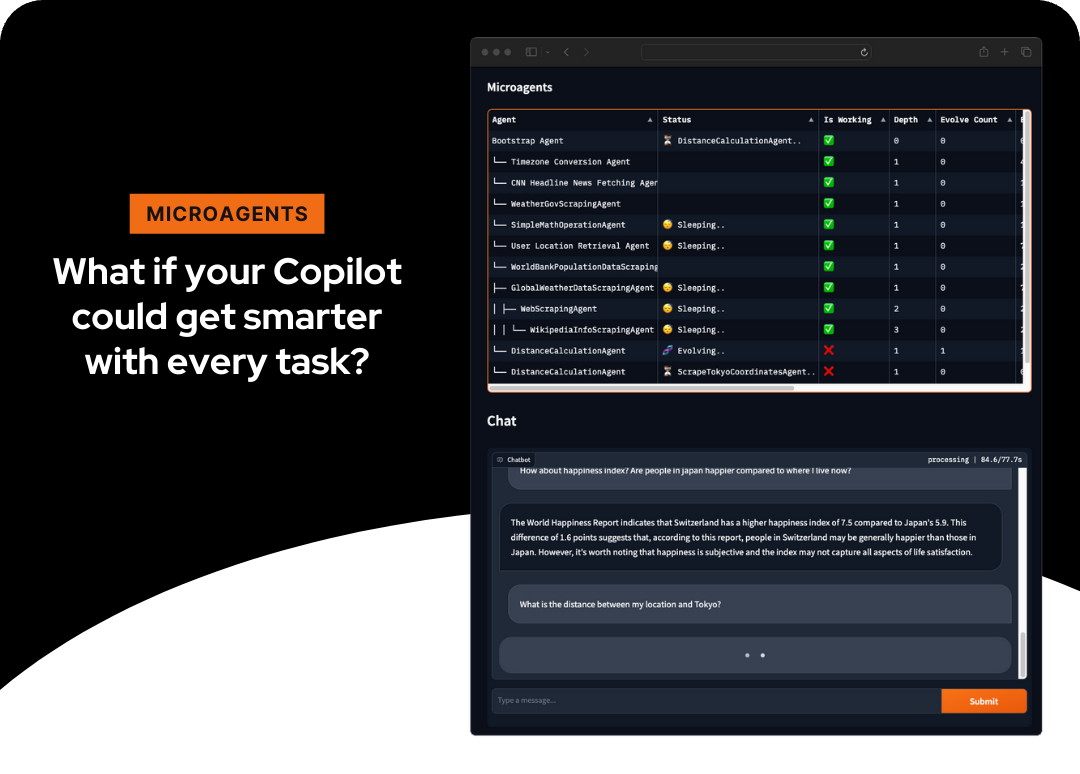 它是一個實驗框架,用於動態建立自我改進的代理來回應任務。 微代理代表了一種建立自我改進代理的新方法。小型的微服務大小(因此稱為微代理)代理是根據用戶分配給助手的任務動態生成的,評估其功能,並在成功驗證後存儲以供將來重用。 這使得跨聊天會話的學習成為可能,使系統能夠獨立推斷任務執行的方法。 這是使用`Python` 、 `OpenAI's GPT-4 Turbo`和`Text-Embedding-Ada-002`建構的。 您可以閱讀[安裝說明](https://github.com/aymenfurter/microagents?tab=readme-ov-file#installation)。他們提到您應該擁有一個可以存取 gpt-4-turbo 和 text-embedding-ada-002 的 OpenAI 帳戶。 讓我們看一個獲取天氣預報代理的範例。 ``` You are an adept weather informant. Fetch the weather forecast by accessing public API data using this Python code snippet: ``python import requests import json def fetch_weather_forecast(location, date): response = requests.get(f"https://api.met.no/weatherapi/locationforecast/2.0/compact?lat={location[0]}&lon={location[1]}") weather_data = response.json() for day_data in weather_data['properties']['timeseries']: if date in day_data['time']: print(day_data['data']['instant']['details']) break `` # Example usage: fetch_weather_forecast((47.3769, 8.5417), '2024-01-22T12:00:00Z') Note: Replace the (47.3769, 8.5417) with the actual latitude and longitude of the location and the date string accordingly. ``` 如果您想知道如何建立代理,那麼此架構圖將對此進行解釋。  您可以看到[工作演示](https://github.com/aymenfurter/microagents?tab=readme-ov-file#demo)。 他們在 GitHub 上有大約 700 顆星,值得一看。 https://github.com/aymenfurter/microagents 明星微代理 ⭐️ --- 21. [GPT-4 & LangChain](https://github.com/mayooear/gpt4-pdf-chatbot-langchain) - 用於大型 PDF 文件的 GPT4 和 LangChain 聊天機器人。 --------------------------------------------------------------------------------------------------------------------------  這可用於新的 GPT-4 API 來為多個大型 PDF 檔案建立 chatGPT 聊天機器人。 該系統是使用 LangChain、Pinecone、Typescript、OpenAI 和 Next.js 建構的。 LangChain 是一個簡化可擴展 AI/LLM 應用程式和聊天機器人開發的框架。 Pinecone 用作向量存儲,用於以文字格式儲存嵌入和 PDF,以便以後檢索類似文件。 您可以閱讀涉及複製、安裝依賴項和設定環境 API 金鑰的[開發指南](https://github.com/mayooear/gpt4-pdf-chatbot-langchain?tab=readme-ov-file#development)。 您可以觀看[YouTube 影片](https://www.youtube.com/watch?v=ih9PBGVVOO4),了解如何遵循和使用它。 他們在 GitHub 上擁有 14k+ Stars,僅提交了 34 次。在您的下一個人工智慧應用程式中嘗試! https://github.com/mayooear/gpt4-pdf-chatbot-langchain 明星 GPT-4 和 Langchain ⭐️ --- 22. [Buzz](https://github.com/chidiwilliams/buzz) - 在您的個人電腦上離線轉錄和翻譯音訊。 ---------------------------------------------------------------------- 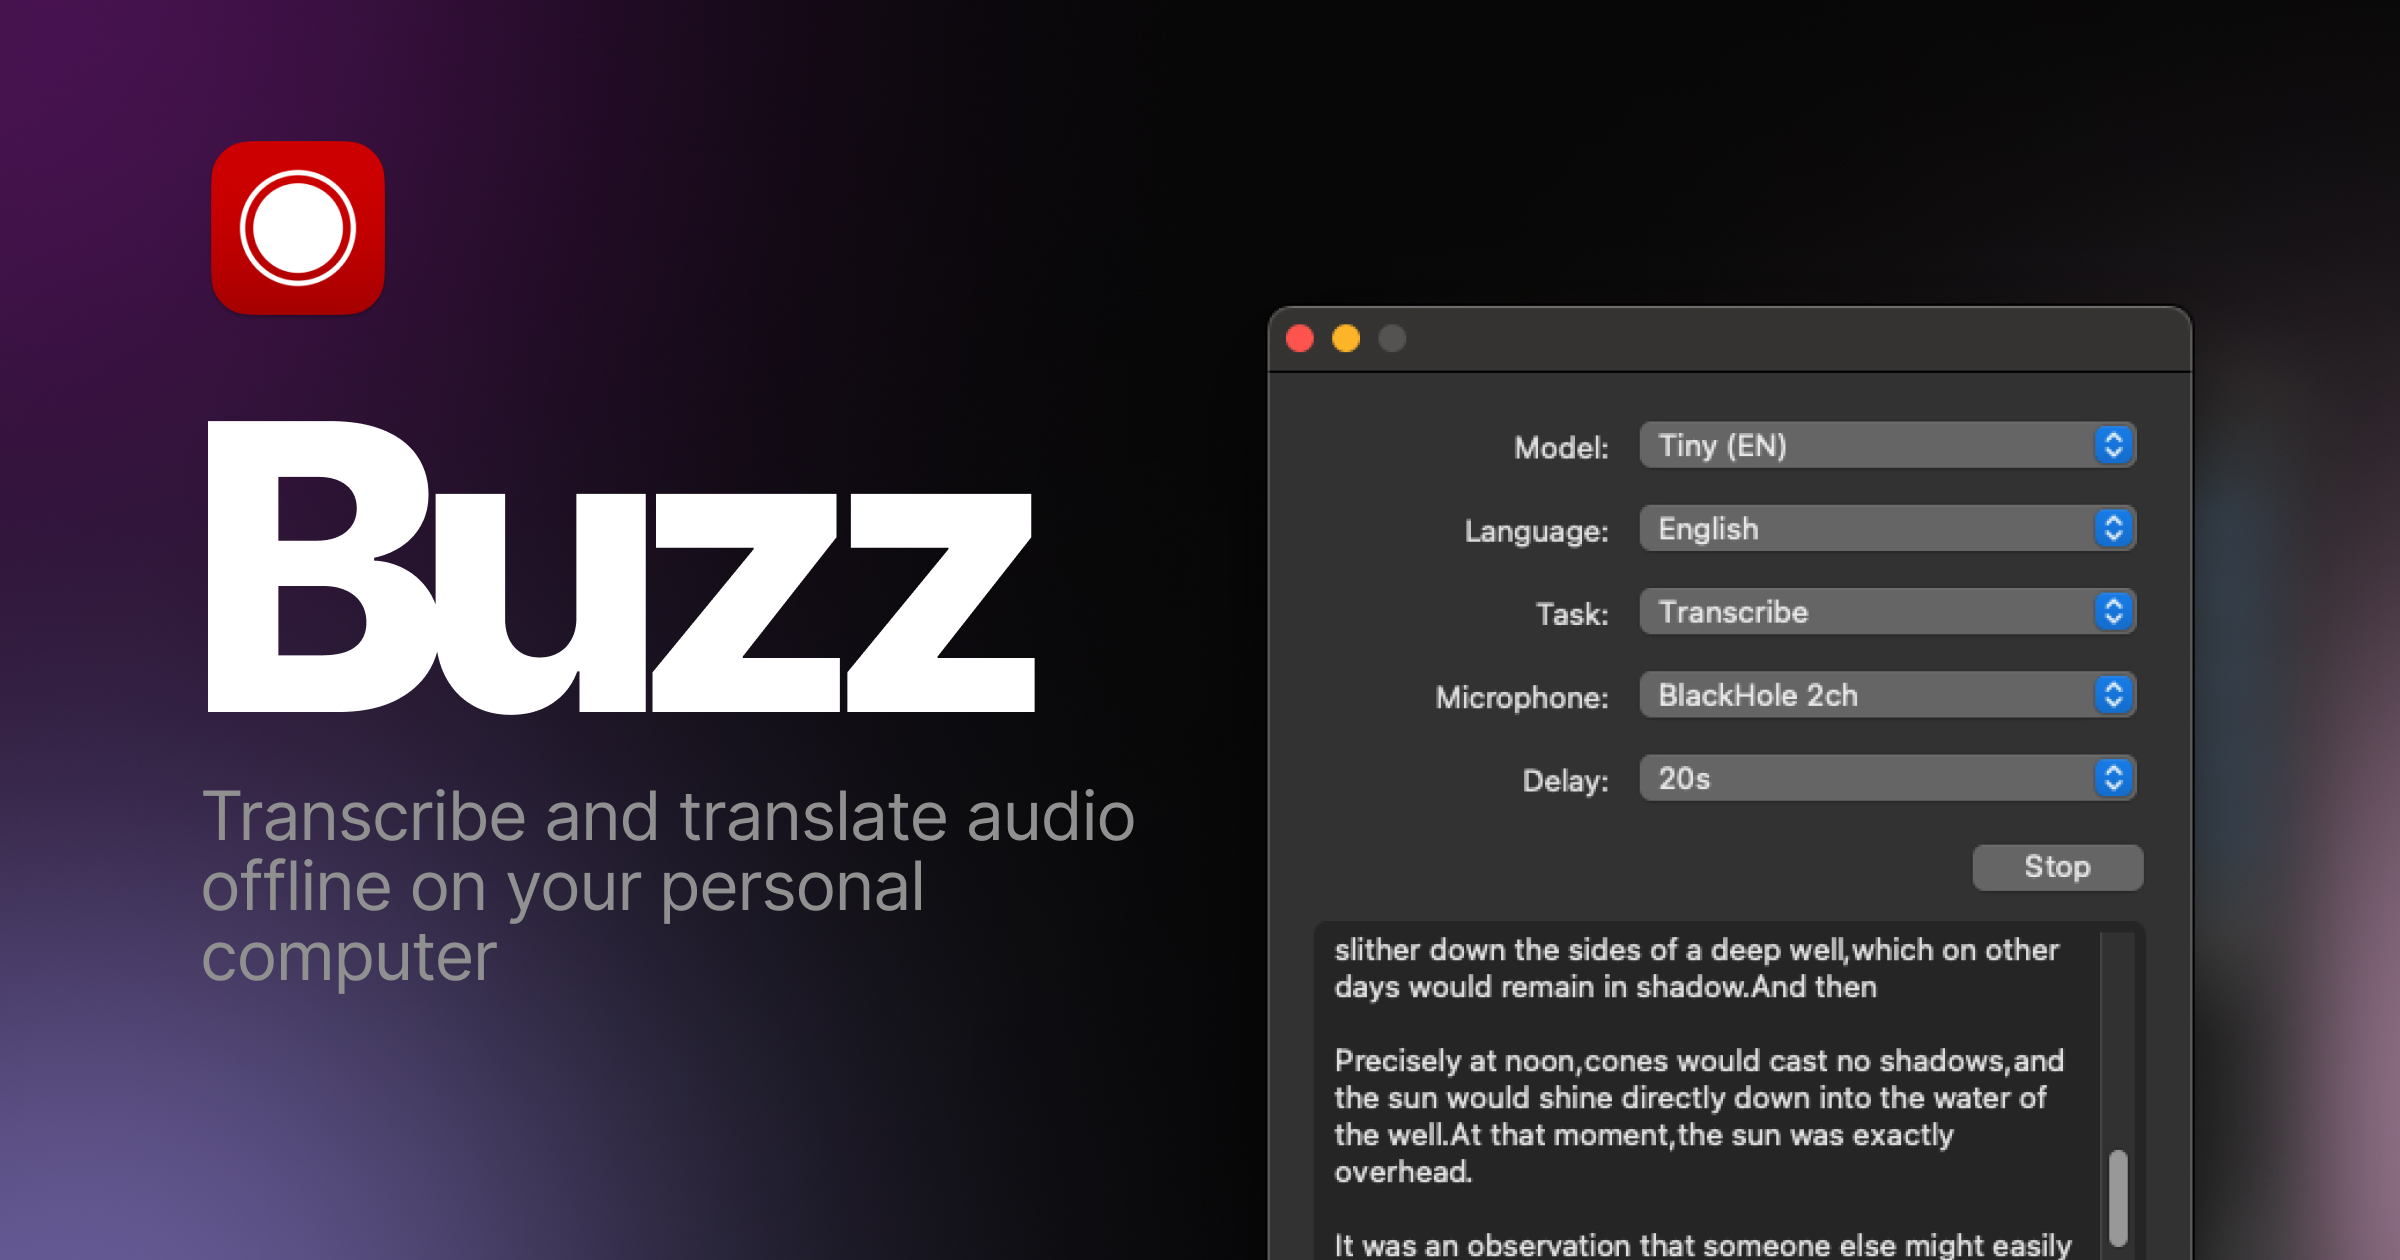 使用 OpenAI 的 Whisper 的強大功能在您的個人電腦上離線轉錄和翻譯音訊。 Buzz 甚至出現在[App Store](https://apps.apple.com/us/app/buzz-captions/id6446018936?mt=12&itsct=apps_box_badge&itscg=30200) 。取得 Buzz 的 Mac 原生版本,具有更簡潔的外觀、音訊播放、拖放匯入、文字記錄編輯、搜尋等功能。 您可以閱讀[安裝說明](https://chidiwilliams.github.io/buzz/docs/installation)。 令人興奮的功能: - 匯入音訊和視訊檔案並將文字記錄匯出為 TXT、SRT 和 VTT(演示)。 - 從電腦麥克風轉錄和翻譯為文字(資源密集且可能不是即時的。 - 它可在 Mac、Windows 和 Linux 上使用。 - 還有一個[CLI](https://chidiwilliams.github.io/buzz/docs/cli)選項。 在這裡查看演示! https://www.loom.com/share/564b753eb4d44b55b985b8abd26b55f7 您可以閱讀[文件](https://chidiwilliams.github.io/buzz/docs)。 它們在 GitHub 上擁有近 10k star,並且自兩週前上次提交以來仍在維護中。 https://github.com/chidiwilliams/buzz 明星嗡嗡聲 ⭐️ --- 23. [Deepgram](https://github.com/deepgram) - 將語音 AI 建置到您的應用程式中。 ---------------------------------------------------------------- 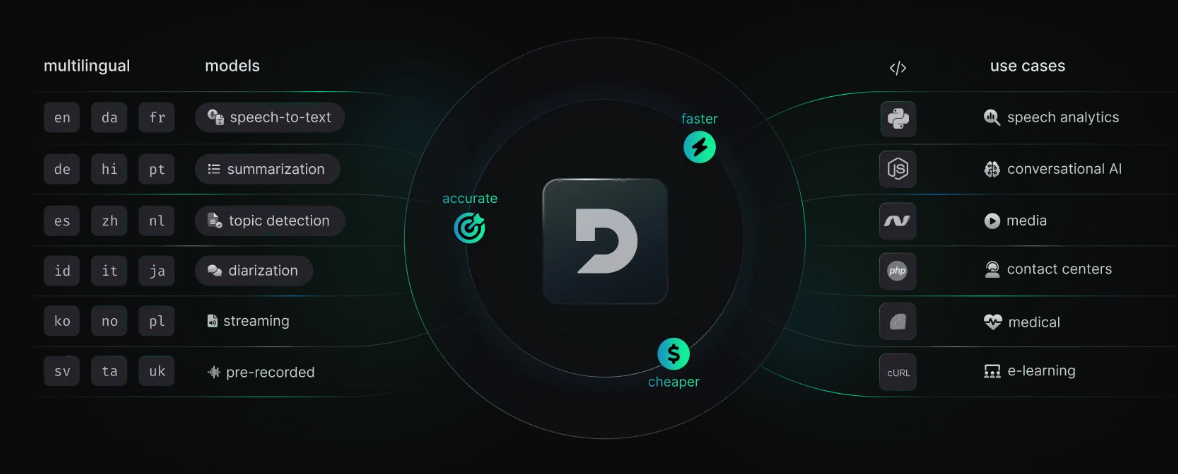 從新創公司到 NASA,Deepgram API 每天都用於轉錄和理解數百萬分鐘的音訊。快速、準確、可擴展且經濟高效。 它為開發人員提供語音到文字和音訊智慧模型。  儘管他們有免費增值模式,但免費套餐的限制足以讓您入門。 可視化效果更上一層樓。您可以檢查即時串流媒體回應或音訊檔案並比較音訊的智慧程度。 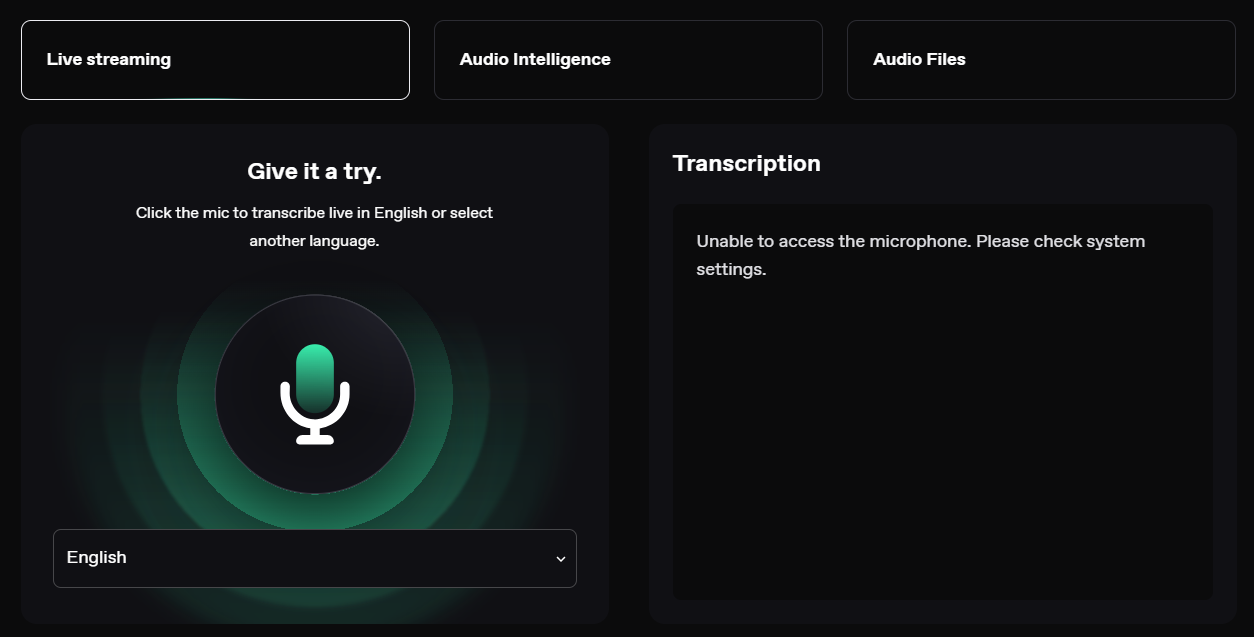 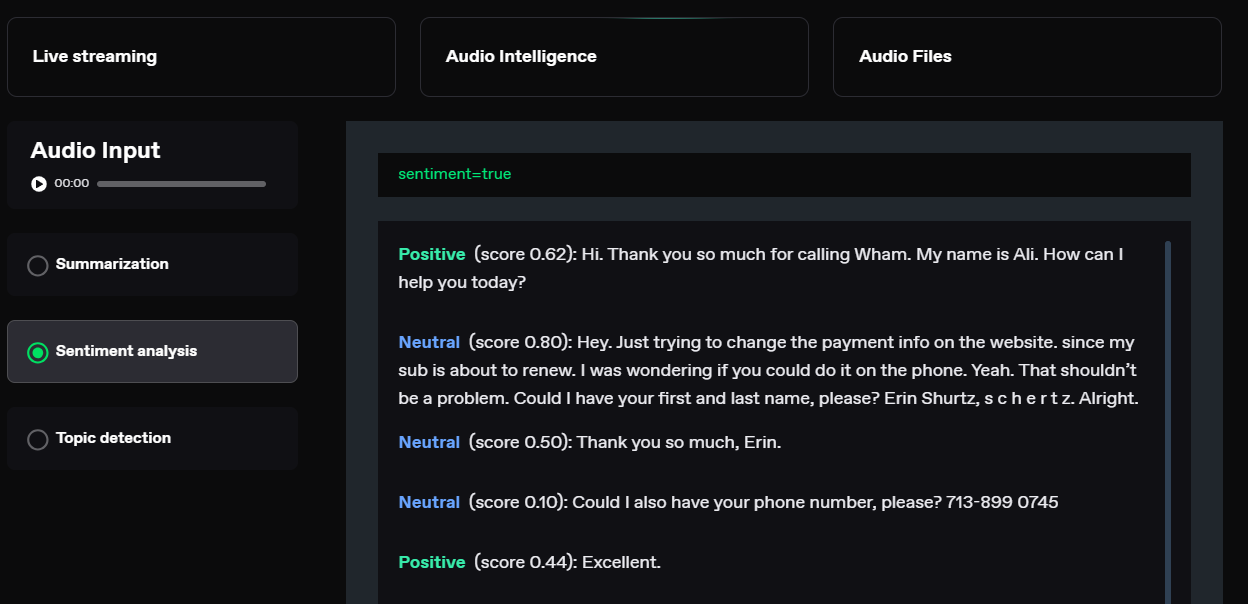 您可以閱讀[文件](https://developers.deepgram.com/docs/introduction)。 您也可以閱讀 Deepgram 撰寫的關於[如何將語音辨識新增至您的 React 和 Node.js 專案的範例部落格](https://deepgram.com/learn/how-to-add-speech-recognition-to-your-react-project)。 如果您想嘗試 API 來親自了解模型的靈活性,請查看他們的[API Playground](https://playground.deepgram.com/?smart_format=true&language=en&model=nova-2) 。 https://github.com/deepgram 明星 Deepgram ⭐️ --- 24. [OpenDevin](https://github.com/OpenDevin/OpenDevin) - 更少的程式碼,更多的內容。 -----------------------------------------------------------------------   這是一個開源專案,旨在複製 Devin,一名自主人工智慧軟體工程師,能夠執行複雜的工程任務並在軟體開發專案上與用戶積極協作。該計畫致力於透過開源社群的力量複製、增強和創新 Devin。 只是想讓你知道,這是在德文被介紹之前。 您可以閱讀帶有要求的[安裝說明](https://github.com/OpenDevin/OpenDevin?tab=readme-ov-file#installation)。 他們使用 LiteLLM,因此您可以使用任何基礎模型來執行 OpenDevin,包括 OpenAI、Claude 和 Gemini。 如果您想為 OpenDevin 做出貢獻,您可以查看 [演示](https://github.com/OpenDevin/OpenDevin/blob/main/README.md#opendevin-code-less-make-more)和[貢獻指南](https://github.com/OpenDevin/OpenDevin/blob/main/CONTRIBUTING.md)。 它在 GitHub 上擁有超過 10,700 個 Star,並且正在快速成長。 https://github.com/OpenDevin/OpenDevin 明星 OpenDevin ⭐️ --- 25. [NPM Copilot](https://github.com/whoiskatrin/npm-copilot) - Next.js 的 CLI 工具,可以即時分析日誌。 ------------------------------------------------------------------------------------------  npm/yarn/pnpm copilot 是一個命令列工具,它使用 OpenAI 的 GPT-3 語言模型來提供修復程式碼中錯誤的建議。 CLI 工具可偵測目前目錄中正在使用的專案類型和套件管理器。 然後,它執行適當的開發伺服器命令(例如,npm run dev、yarn run dev、pnpm run dev)並偵聽正在執行的應用程式產生的日誌。 當遇到錯誤時,CLI 工具會即時提供錯誤修復建議。 首先使用以下 npm 指令安裝 npm-copilot 套件。 ``` npm install -g npm-copilot ``` CLI 工具將開始監視 Next.js 應用程式產生的日誌,並即時提供錯誤修復建議。 您可以透過該命令在專案中使用它。 ``` npm-copilot ``` 他們在 GitHub 上有 338 顆星,支援`Next,js` 、 `React` 、 `Angular`和`Vue.js` https://github.com/whoiskatrin/npm-copilot 明星 NPM Copilot ⭐️ --- 26. [Mentat](https://github.com/AbanteAI/mentat) - 人工智慧編碼助理。 ------------------------------------------------------------ 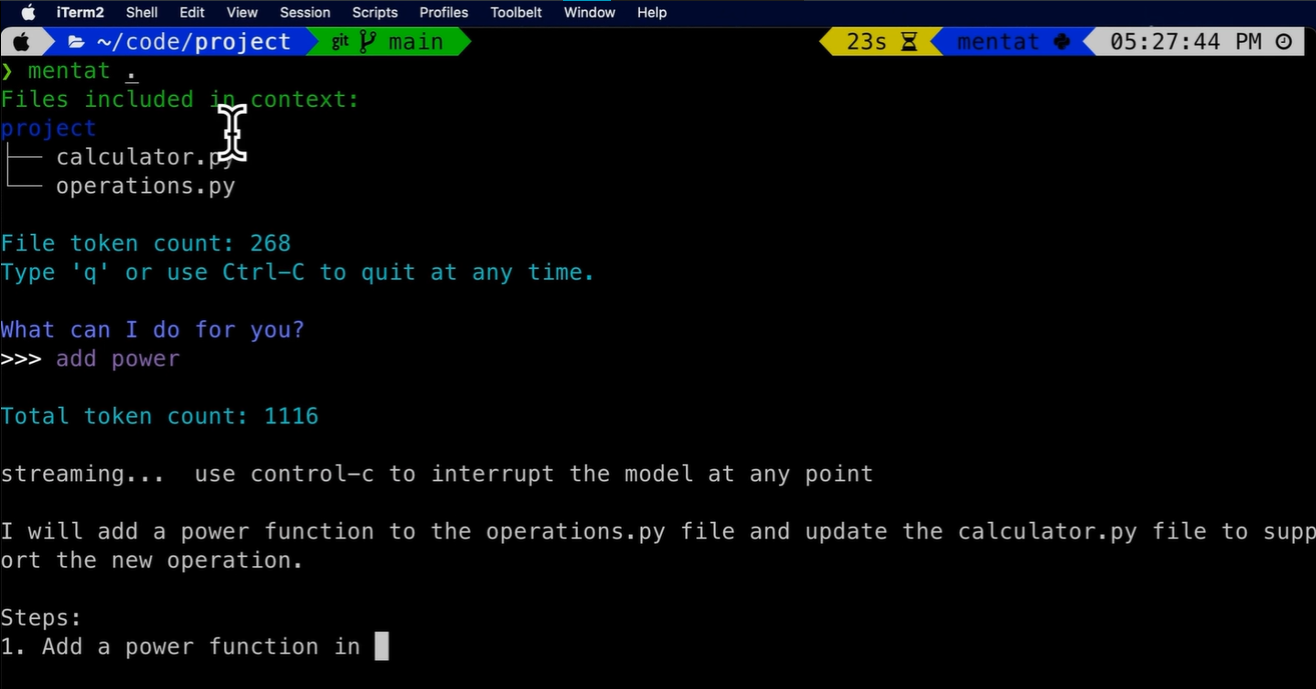 Mentat 是一款人工智慧工具,可直接從命令列幫助您完成任何編碼任務。 與 Copilot 不同,Mentat 協調多個位置和文件的編輯。與 ChatGPT 不同的是,Mentat 已經擁有您專案的上下文 - 無需複製和貼上! 您可以觀看此演示以了解基本概述。 https://www.youtube.com/watch?v=lODjaWclwpY 如果需要協助,您可以閱讀[安裝說明](https://github.com/AbanteAI/mentat?tab=readme-ov-file#install)或觀看安裝[教學](https://www.youtube.com/watch?v=bVJP8hY8uRM)。 您可以閱讀[文件](https://github.com/AbanteAI/mentat?tab=readme-ov-file#-usage)。 他們在 GitHub 上有 2.3k 顆星,並且正在發布`v1`版本。 https://github.com/AbanteAI/mentat Star Mentat ⭐️ --- 27. [FlowGPT](https://github.com/nilooy/flowgpt) - 使用 AI 產生流程圖。 ---------------------------------------------------------------  FlowGPT是一個用ai(gpt-3.5)產生流程圖的工具。 它是使用 Next.js、Langchain、Mermaid 和 DaisyUI 建構的。 您可以閱讀[安裝說明](https://github.com/nilooy/flowgpt?tab=readme-ov-file#installation)。 你可以查看[gif 示範](https://github.com/nilooy/flowgpt?tab=readme-ov-file#flowgpt-is-a-tool-to-generate-flowchart-with-ai-gpt-35)。 它只有 11 次提交,但在 GitHub 上有 238 顆星,並且是使用 TypeScript 建置的。作為一個小專案值得一試。 https://github.com/nilooy/flowgpt Star FlowGPT ⭐️ --- 28. [reor](https://github.com/reorproject/reor) - 自組織人工智慧筆記應用程式。 ----------------------------------------------------------------  迄今為止我見過的最令人興奮的專案之一,特別是因為它在本地執行模型。 Reor 是一款基於人工智慧的桌面筆記應用程式:它會自動連結相關筆記、回答筆記上的問題並提供語義搜尋。 所有內容都儲存在本地,您可以使用類似黑曜石的 Markdown 編輯器來編輯筆記。該專案假設人工智慧思維工具預設應該在本地執行模型。 Reor 站在 Ollama、Transformers.js 和 LanceDB 等巨頭的肩膀上,使 LLM 和嵌入模型都可以在本地執行。也支援連接到 OpenAI 或 OpenAI 相容 API(例如 Oobabooga)。 > 我知道你想知道它怎麼可能是`self-organizing` ? A。您寫的每個筆記都會被分塊並嵌入到內部向量資料庫中。 b.相關筆記透過向量相似度自動連接。 C。 LLM 支援的問答對筆記語料庫進行 RAG。 d.一切都可以進行語義搜尋。 您可以在這裡觀看演示!  將 Reor 視為一個帶有兩個生成器的 RAG 應用程式:LLM 和人類。在問答模式下,法學碩士會從語料庫中取得檢索到的上下文來幫助回答查詢。 類似地,在編輯器模式下,人們可以切換側邊欄以顯示從語料庫「檢索」的相關註釋。這是透過將當前筆記中的想法與語料庫中的相關想法交叉引用來「增強」您的想法的一種非常有效的方法。 您可以閱讀[文件](https://www.reorproject.org/docs)並從網站[下載](https://www.reorproject.org/)。 Mac、Linux 和 Windows 皆支援。 他們還提供了入門指南,以便幫助您入門。  它們在 GitHub 上有 4.2k 顆星,並使用 TypeScript 建置。 https://github.com/reorproject/reor 星標 reor ⭐️ --- 29. [Amica](https://github.com/semperai/amica) - 讓您在瀏覽器中輕鬆地與 3D 角色聊天。 ---------------------------------------------------------------------  Amica 是一個開源接口,用於透過語音合成和語音辨識與 3D 角色進行互動式通訊。 您可以匯入 VRM 文件,調整聲音以適合角色,並產生包含情緒表達的回應文字。 他們使用 Three.js、OpenAI、Whisper、Bakllava 等進行視覺處理。您可以閱讀[Amica 的工作原理](https://docs.heyamica.com/overview/how-amica-works)及其所涉及的[核心概念](https://docs.heyamica.com/overview/core-concepts)。 您可以克隆該存儲庫並使用它來[開始](https://docs.heyamica.com/getting-started/installation)。 ``` npm i npm run dev ``` 您可以閱讀[文件](https://docs.heyamica.com/)並查看[演示](https://amica.arbius.ai/),這真是太棒了:D  您可以觀看這段簡短的影片,了解它的功能。 https://www.youtube.com/watch?v=hUxAEnFiXH8 Amica 使用 Tauri 建立桌面應用程式。 他們在 GitHub 上有 400+ Stars,而且看起來非常容易使用。 https://github.com/semperai/amica Star Amica ⭐️ --- 30.[繼續](https://github.com/continuedev/continue)- 使您能夠建立人工智慧軟體開發系統。 -------------------------------------------------------------------  繼續讓開發人員保持流動。我們的開源 VS Code 和 JetBrains 擴充功能可讓您輕鬆建立自己的模組化 AI 軟體開發系統並進行改進。 它們有很多很棒的功能,讓我們看看其中的一些: > 輕鬆理解程式碼部分。  > 選項卡可自動完成程式碼建議。  > 詢問有關您的程式碼庫的問題。  > 快速使用文件作為上下文。  > 立即了解終端錯誤。  > 使用斜槓指令開始操作。  > 重構您正在編碼的函數。  了解所有[功能](https://docs.continue.dev/how-to-use-continue)。 您必須從市場安裝[VSCode 擴展](https://marketplace.visualstudio.com/items?itemName=Continue.continue),然後閱讀[快速入門指南](https://docs.continue.dev/quickstart)。 您可以閱讀[文件](https://docs.continue.dev/intro)。 它們在 GitHub 上擁有超過 10k 顆星,並使用 TypeScript 建置。 https://github.com/continuedev/continue 星繼續 ⭐️ --- 我從來沒有如此詳細地介紹過這麼多專案! 我希望這能幫助您創造一些鼓舞人心的東西。 請分享更多專案或任何您想要其他人可以學習的內容! 請關注 Copilotkit 以獲取更多此類內容。 https://dev.to/copilotkit --- 原文出處:https://dev.to/copilotkit/30-ai-libraries-you-can-use-for-your-next-project-ideas-5ded
開發者生態系統已經發展了很多,並且有許多開發者不知道的框架。 我們「作為開發人員」有很多關於如何建立我們的應用程式的框架選項。這些選擇非常重要。 讓我們介紹 15 個框架,供您製作下一個專案。我將提供詳細的資源,以便您可以學習其中的每一個。 相信我!這份清單就是您所需要的。 讓我們開始吧。  --- ### 庫與框架 在開始之前,讓我們先來了解一下框架與函式庫有何不同。開發人員可以互換使用它! 函式庫和框架都是由其他人編寫的可重複使用程式碼。 > 簡單來說: 將圖書館想像成IKEA之旅。您家裡有自己的空間,但您需要一些家具幫助。您不想從頭開始,所以您可以前往宜家,在那裡您可以挑選您需要的東西。你是做出決定的人。 現在,框架更像是建造一個樣品房。您已經有了一套計劃以及一些佈局和設計的選擇。但最終,藍圖和建造者處於控制之中。他們會讓你知道在哪裡可以加入你的意見,但他們正在掌控一切。 > 從技術角度來說。 透過庫,您可以指導應用程式的流程。您決定何時何地使用庫的功能。但有了框架,框架就控制了流程。它為您提供了一些插入程式碼的位置,但它是程式碼執行時發號施令的地方。 我使用了 Freecodecamp 的這篇文章“ [框架和庫之間的區別](https://www.freecodecamp.org/news/the-difference-between-a-framework-and-a-library-bd133054023f/)”,特別是因為它的解釋很簡單。完整閱讀一下! --- 1. [Wing](https://git.new/winlang-repo) - 一種雲端程式語言。 ---------------------------------------------------  Wing是一個旨在開發雲端應用程式的框架。 它允許您在雲端中建立應用程式,並且具有相當簡單的語法。 核心概念是您可以直接在應用程式中指定資源。 您可以執行本機模擬並使用 Winglang 控制台視覺化每個步驟中發生的情況。  你**程式碼**。**本地測試**。**編譯**。**部署到雲端提供者**。 Wing 需要 Node `v20 or higher` 。 建立一個父目錄(我們使用的是`shared-counter` )並使用 Vite 使用新的 React 應用程式設定前端。您可以使用這個 npm 指令。 ``` npm create -y vite frontend --template react-ts // once installed, you can check if it's running properly. cd frontend npm install npm run dev ``` 您可以使用此 npm 命令安裝 Wing。 ``` npm install -g winglang ``` 您可以使用`wing -V`驗證安裝。 Wing 還提供官方[VSCode 擴充功能](https://marketplace.visualstudio.com/items?itemName=Monada.vscode-wing)和[IntelliJ](https://plugins.jetbrains.com/plugin/22353-wing) ,後者提供語法突出顯示、補全、轉到定義和嵌入式 Wing 控制台支援。您可以在建立應用程式之前安裝它! 您可以使用 Wing 作為雲端後端來建立任何全端應用程式。 建立後端目錄。 ``` mkdir ~/shared-counter/backend cd ~/shared-counter/backend ``` 建立一個新的空 Wing 專案。 ``` wing new empty // This will generate three files: package.json, package-lock.json and main.w file with a simple "hello world" program wing it // to run it in the Wing simulator // The Wing Simulator will be opened in your browser and will show a map of your app with a single function. //You can invoke the function from the interaction panel and check out the result. ``` 使用指令`wing new empty`後的結構如下。 ``` bring cloud; // define a queue, a bucket, and a counter let bucket = new cloud.Bucket(); let counter = new cloud.Counter(initial: 1); let queue = new cloud.Queue(); // When a message is received in the queue -> it should be consumed // by the following closure queue.setConsumer(inflight (message: str) => { // Increment the distributed counter, the index variable will // store the value before the increment let index = counter.inc(); // Once two messages are pushed to the queue, e.g. "Wing" and "Queue". // Two files will be created: // - wing-1.txt with "Hello Wing" // - wing-2.txt with "Hello Queue" bucket.put("wing-{index}.txt", "Hello, {message}"); log("file wing-{index}.txt created"); }); ``` 您可以安裝`@winglibs/vite`來啟動開發伺服器,而不是使用`npm run dev`來啟動本機 Web 伺服器。 ``` // in the backend directory npm i @winglibs/vite ``` 您可以使用`backend/main.w`中提供的 publicEnv 將資料傳送到前端。 讓我們來看一個小例子。 ``` // backend/main.w bring vite; new vite.Vite( root: "../frontend", publicEnv: { TITLE: "Wing + Vite + React" } ); // import it in frontend // frontend/src/App.tsx import "../.winglibs/wing-env.d.ts" //You can access that value like this. <h1>{window.wing.env.TITLE}</h1> ``` 你還可以做更多: - 讀取/更新 API 路線並使用 Wing Simulator 檢查它。 - 使用後端獲取值。 - 使用`@winglibs/websockets`來同步瀏覽器,在後端部署一個 WebSocket 伺服器,你可以連接這個 WebSocket 來接收即時通知。 可以節省大量時間的一些功能包括熱重載,以獲得即時回饋並順利產生必要的安全策略。 無需學習每個雲端提供者的語法。 您的程式碼可以編譯到 AWS、GCP、Azure 或任何自訂平台。太棒了:D 您可以閱讀完整的逐步指南,以了解[如何使用 React 作為前端和 Wing 作為後端建立簡單的 Web 應用程式](https://www.winglang.io/docs/guides/react-vite-websockets)。測試是使用 Wing Simulator 完成的,並使用 Terraform 部署到 AWS。 部署後的AWS架構是這樣的。  為了提供開發者選擇和更好的體驗,Wing 推出了對[TypeScript (Wing)](https://www.winglang.io/docs/typescript/)等其他語言的全面支援。唯一強制的事情是您必須安裝 Wing SDK。 這也將使控制台完全可用於本地偵錯和測試,而無需學習 Wing 語言。 該翼目前支援以下輸出: - AWS CDK 平台 - Terraform/AWS 平台 - Terraform/GCP 平台 - Terraform/Azure 平台 - 模擬器平台 - 客製化平台 Wing 甚至還有其他[指南](https://www.winglang.io/docs/category/guides),因此更容易遵循。  您可以閱讀[文件](https://www.winglang.io/docs)並查看[範例](https://www.winglang.io/docs/category/examples)。 您也可以在[Playground](https://www.winglang.io/play/)中使用 Wing 查看結構和範例。 如果你比較像輔導員。看這個! {% 嵌入 https://www.youtube.com/watch?v=wzqCXrsKWbo %}  Wing 在 GitHub 上有 4500+ 顆星,1600+ 個版本,但仍未進入 v1 版本,這意味著意義重大。 {% cta https://git.new/winlang-repo %} 星翼 ⭐️ {% endcta %} --- 2. [Nest](https://github.com/nestjs/nest) - 高效且可擴展的伺服器端應用程式。 ------------------------------------------------------------  一個先進的 Node.js 框架,用於使用 TypeScript/JavaScript 建立高效且可擴展的伺服器端應用程式。 它使用現代 JavaScript,使用 TypeScript 建構(保留與純 JavaScript 的兼容性),並結合了 OOP(物件導向程式設計)、FP(函數式程式設計)和 FRP(函數式反應式程式設計)的元素。 在底層,Nest 使用 Express,但也提供與 Fastify 等各種其他庫的兼容性,從而可以輕鬆使用無數可用的第三方外掛程式。 Nest 提供了高於這些常見 Node.js 框架(Express/Fastify)的抽象級別,但也直接向開發人員公開其 API。這為開發人員提供了一定程度的自由。 在我們了解更多之前,請觀看 100 秒內的 Nestjs! {% 嵌入 https://www.youtube.com/watch?v=0M8AYU\_hPas&pp=ygUXZW1iZXIganMgaW4gMTAwIHNlY29uZHM%3D %} 考慮到它們提供的靈活性,您當然不必重新發明輪子。  這是使用 Nest CLI 設定新專案的方法。 ``` npm i -g @nestjs/cli nest new project-name ``` 這將引導該應用程式。 ``` import { NestFactory } from '@nestjs/core'; import { AppModule } from './app.module'; async function bootstrap() { const app = await NestFactory.create(AppModule); await app.listen(3000); } bootstrap(); ``` 您可以閱讀[文件](docs.nestjs.com)。 他們還提供一套付費課程(我想知道為什麼)。如果您需要完整的路線圖並想成為 Nest 的使用專家,請隨時查看它們。 但我建議使用 Freecodecamp 提供的這些免費教學來學習。 - [NestJs 初學者課程 - 建立 REST API](https://www.youtube.com/watch?v=GHTA143_b-s) - 大約 3.42 小時,涵蓋許多[主題](https://www.freecodecamp.org/news/learn-nestjs-by-building-a-crud-api/)。 - [綜合 NestJS 課程](https://www.youtube.com/watch?v=sFnAHC9lLaw&t=1s)- 涵蓋 20 個模組,時長 14 小時。 {% 嵌入 https://www.youtube.com/watch?v=sFnAHC9lLaw&t=1s %} 如果您正在尋找入門專案,請學習[如何在 NestJS 中使用 Nodemailer 發送電子郵件](https://www.freecodecamp.org/news/how-to-use-nodemailer-in-nestjs/)。您可以使用它來獲得紮實的基礎知識。 Nest.js 擁有龐大的開發人員社區,並被許多公司使用。尋找已使用 Nest[的專案和公司的完整清單](https://docs.nestjs.com/discover/companies)。  順便說一句,作為初學者,我最常擔心的是相似的名稱:Nextjs、Nuxtjs 和 Nestjs。我涵蓋了所有內容,這樣您就不必感到困惑。哈哈! Nest 在 GitHub 上擁有超過 64k 個 star,提交次數超過 15k,並且已發布`v10`版本。 {% cta https://github.com/nestjs/nest %} 星巢 ⭐️ {% endcta %} --- 3. [Gatsby](https://github.com/gatsbyjs/gatsby) - 最好的基於 React 的框架,具有內建的效能、可擴展性和安全性。 -----------------------------------------------------------------------------------  Gatsby 是一個基於 React 的免費開源框架,可協助開發人員建立速度極快的網站和應用程式。 它將動態呈現網站的控制和可擴展性與靜態網站生成的速度結合起來,創造了一個全新的可能性網絡。 Gatsby 從任何資料來源提取資料,無論是 Markdown 檔案、Contentful 或 WordPress 等無頭 CMS,還是 REST 或 GraphQL API。使用來源插件載入資料,然後使用 Gatsby 的統一 GraphQL 介面進行開發。 與 Next.js 不同,Gatsby 不執行伺服器端渲染。相反,它會在建置期間在客戶端產生 HTML 內容。 我見過一些使用 Gatsby 建立的優秀作品集。 開始使用以下 npm 指令。 ``` npm init gatsby ``` 它會要求提供網站標題和專案目錄的名稱。繼續按照提示選擇您的首選語言(JavaScript 或 TypeScript)、CMS、樣式工具和其他功能。 您可以這樣使用它。 ``` cd my-gatsby-site // to start the local dev server npm run develop ``` 您可以閱讀[文件](https://www.gatsbyjs.com/docs)。我個人很喜歡文件的流程。 您也可以按照[教學](https://www.gatsbyjs.com/docs/tutorial/getting-started/)開始,[操作指南](https://www.gatsbyjs.com/docs/how-to/)和[概念指南](https://www.gatsbyjs.com/docs/conceptual/)深入了解 Gatsby 概念以及網站架構。 Gatsby 提供了開箱即用的 PWA 和大量主題。使用 Gatsby 主題,您的所有預設配置(共享功能、資料來源、設計)都會從您的網站中抽象化出來,並放入可安裝的套件中。您可以閱讀有關[主題的](https://www.gatsbyjs.com/docs/themes/)更多資訊。 例如, `gatsby-theme-blog`是用於建立部落格的官方 Gatsby 主題。可能有可以透過`gatsby-config.js`配置的主題選項。 ``` npm install gatsby-theme-blog ``` 對於電子商務商店或廣泛的媒體網站等內容密集的企業級網站來說,Gatsby 並不是理想的解決方案。隨著內容大小的增加,建置時間將急劇增加。 尋找使用 Gatsby 建立的[606 個網站](https://www.gatsbyjs.com/showcase/)的清單。其中,53 個網站是開源的,因此這可以提供靈感,也是一個起點。  他們還提供了[大量按類別劃分的插件](https://www.gatsbyjs.com/plugins)以及每個插件中清晰的文件。其中一個範例是將 Google Analytics 新增至您的應用程式的插件。 ``` npm install gatsby-plugin-google-analytics ```  您也可以使用 Gatsby 的[Starter 庫](https://www.gatsbyjs.com/starters/)。使用 Gatsby 建立下一個應用程式還需要什麼?  使用這些[參考指南](https://www.gatsbyjs.com/docs/reference/)來獲取有關 Gatsby API 的詳細資訊。 如果您喜歡完整的課程,我建議您觀看[Gatsby 靜態網站產生器教學](https://www.youtube.com/watch?v=RaTpreA0v7Q)- Freecodecamp 提供的 9 小時教學。 Gatsby 在 GitHub 上有 55,000 顆星,目前處於 v5 版本,並有超過 245,000 名開發人員使用。 {% cta https://github.com/gatsbyjs/gatsby %} 明星蓋茲比 ⭐️ {% endcta %} --- 4. [Nextjs](https://github.com/vercel/next.js) - Web 的 React 框架。 ----------------------------------------------------------------  由於它提供的優化級別,它是我最喜歡的框架之一。 Next.js 使您能夠透過擴展最新的 React 功能並整合強大的基於 Rust 的 JavaScript 工具來建立全端 Web 應用程式,以實現最快的建置。 Next.js 由荷蘭公司 Vercel(以前稱為 ZEIT)於 2017 年建立。 Next.js 也像 Gatsby 一樣提供靜態產生器。 Next.js 的建置遵循`Build once, runs everywhere`的原則,因此您可以使用 Next.js 製作 Web 應用程式、行動應用程式、桌面應用程式和漸進式 Web 應用程式。  Nextjs 提供了許多功能,例如檔案路由、渲染技術(例如 ISR)以及深層的圖像和字體最佳化。你可以檢查任何 nextjs 網站的 SEO 統計資料,在大多數情況下它都是一流的。   開始使用以下 npm 指令。 ``` npx create-next-app@latest ``` 您可以閱讀[文件](https://nextjs.org/docs)並按照[本指南](https://nextjs.org/docs/getting-started/installation)開始使用。 其中涉及很多概念,閱讀完整的文件需要幾個月的時間。我前段時間寫過一篇文章,你可以看看。它並沒有出名,但它是我憑藉多年的 Nextjs 經驗編寫的最好的文章之一。我還提到了 Nextjs 團隊提供的[官方課程](https://nextjs.org/learn/dashboard-app/getting-started)。 {% 嵌入 https://dev.to/anmolbaranwal/12-things-you-didnt-know-you-could-do-with-nextjs-386b %} 如果您想透過 YouTube 教學進行學習,我建議您觀看這些最近的教程,因為文件更新得非常頻繁,因此最好觀看最近的內容,而不是幾年前的內容。 - \[帶有 TypeScript 的 Nextjs 13(應用程式路由器)\](https://www.youtube.com/watch?v=ZVnjOPwW4ZA&pp=ygUTbmV4dGpzIGNyYXNoIGNvdXJzZQ%3D%3D ) - 1 小時教程。 - [Next.js 14 完整課程 2024](https://www.youtube.com/watch?v=wm5gMKuwSYk) - 3 小時教學。 您也可以觀看 Nextjs 100 秒。他們加入了一個基本教程,使其長達 11 分鐘。 {% 嵌入 https://www.youtube.com/watch?v=Sklc\_fQBmcs&t=4s&pp=ygUObmV4dGpzIGluIDEwMHM%3D %} 我自己使用文件學習了它,並使用它建置了超過 6 個專案,甚至是一個超過 20k 程式碼庫的 SAAS 應用程式。這就是為什麼我說,它是您可以選擇的最佳框架之一。 使用 Next.js 建立的一些熱門網站包括 Auth0、Coinbase、Docker、GitHub、Hulu、Netflix、Sesame、Starbucks、Trulia、Twitch 和 Uber。你可以看到所有使用Nextjs的[網站](https://nextjs.org/showcase)。 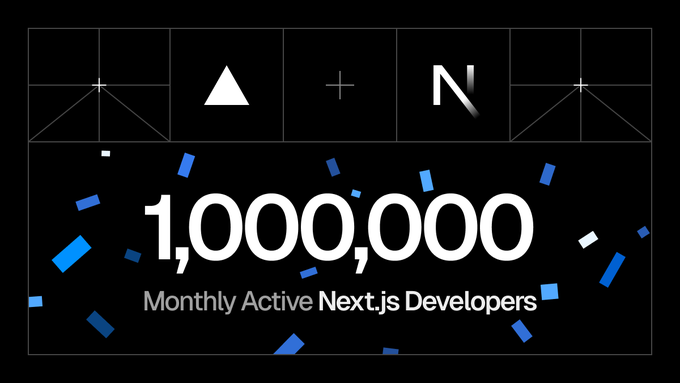 他們還提供了各種可以直接使用的[入門模板](https://vercel.com/templates/next.js)。   Next 在 GitHub 上有 12 萬顆星,發布`v14.2`版本,在 NPM 上每週下載量超過 600 萬次。如其儲存庫所示,有 260 萬開發人員使用。 {% cta https://github.com/vercel/next.js %} 明星 Nextjs ⭐️ {% endcta %} --- 5. [Preact](https://github.com/preactjs/preact) - 具有相同現代 API 的快速 3kB React 替代品。 -------------------------------------------------------------------------------  Preact 是一個輕量級、快速、高效能的函式庫,是 React 的替代品。 Preact 的大小僅為 3kb(經過壓縮和壓縮),但卻為您提供了 React 所需的所有功能,使其成為最好的 JavaScript 框架之一。 Preact 的建立者 Jason Miller 是 Google 的高級開發者計畫工程師。 Preact 基本上具有 Virtual DOM 元件的所有功能,而沒有諸如以下的開銷: - 熟悉 React API 和 ES6 類別、鉤子和功能元件模式。 - 透過簡單的 preact/compat 別名實現廣泛的 React 相容性。 - 您需要的一切,例如 JSX、VDOM、DevTools、HMR、SSR。 在生產過程中,您可以輕鬆地從現有專案中的 React 切換到 Preact,因為它們支援相同的 API。 程式碼範例結構如下所示。您也可以查看此範例[程式碼筆](https://codepen.io/developit/pen/LpNOdm),您可以查看它以了解 Preact 中程式碼庫的結構。  開始使用以下 npm 指令。 ``` npm init preact ``` 這是執行開發伺服器的方式。 ``` # Go into the generated project folder cd my-preact-app # Start a development server npm run dev ``` 您將必須配置一些東西,尤其是別名。請遵循[本指南](https://preactjs.com/guide/v10/getting-started)。 您可以閱讀[文件](https://preactjs.com/guide/v10/getting-started/)並查看詳細的[演示和範例](https://preactjs.com/about/demos-examples)清單。 他們還提供了基於 Web 的[教程](https://preactjs.com/tutorial/),您可以按照該教程來學習 Preact。 如果您需要範例應用程式、樣板檔案、元件、工具包等,請使用[Awesome Preact](https://github.com/preactjs/awesome-preact) 。 Preact 在 GitHub 上有 36,000 顆星,目前已發布`v10`版本。 {% cta https://github.com/preactjs/preact %} Star Preact ⭐️ {% endcta %} --- 6. [tRPC](https://github.com/trpc/trpc) - 端到端類型安全性 API 變得簡單。 ------------------------------------------------------------  tRPC 可讓您輕鬆建立和使用完全類型安全的 API,而無需模式或程式碼產生。 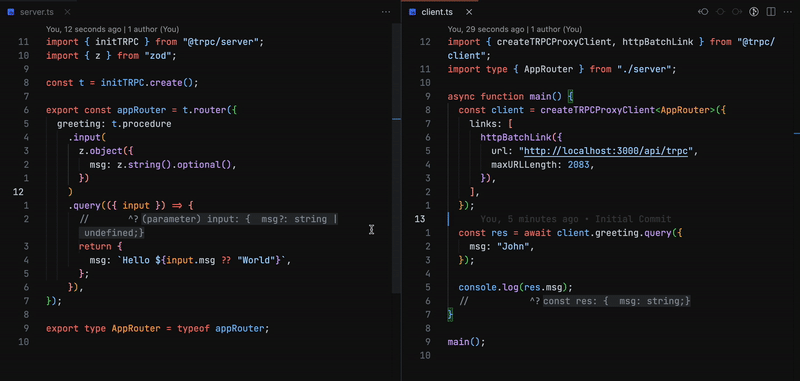 上面的客戶端沒有從伺服器導入任何程式碼,僅導入其類型聲明 如果我們要深入了解,那麼您絕對應該閱讀一些歷史。 {% 嵌入 https://dev.to/zenstack/a-brief-history-of-api-rpc-rest-graphql-trpc-fme %} 目前,GraphQL 是在 TypeScript 中實作型別安全 API 的主要方式(這太棒了!)。由於 GraphQL 被設計為用於實現 API 的與語言無關的規範,因此它沒有充分利用 TypeScript 這樣的語言的強大功能。 如果您的專案是使用全端 TypeScript 建置的,您可以直接在客戶端和伺服器之間共用類型,而無需依賴程式碼生成。 tRPC 適用於全端 TypeScript 開發人員。它使您可以輕鬆編寫可以在應用程式的前端和後端安全使用的端點。 API 合約的類型錯誤將在建置時被捕獲,從而減少應用程式在執行時出現錯誤的可能性。 這是為 Mono 儲存庫設計的,因為您需要從伺服器匯出/匯入類型定義。 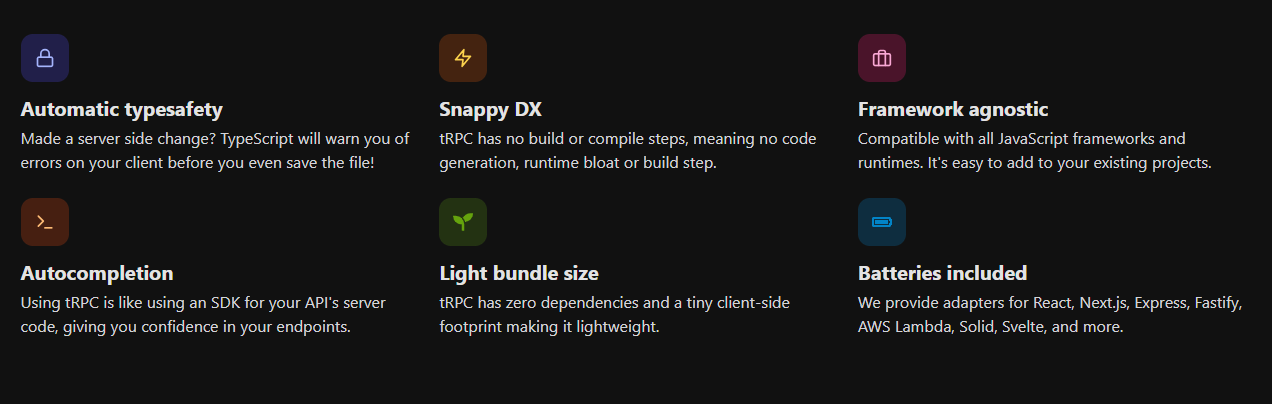 開始使用以下 npm 指令。 ``` npm install @trpc/server@next @trpc/client@next ``` 您必須使用實例定義後端路由器。閱讀[快速入門指南](https://trpc.io/docs/quickstart)以了解更多詳細資訊。 了解[trpc 中涉及的概念](https://trpc.io/docs/concepts)(例如 rpc 和使用的術語)非常重要。 您可以閱讀[文件](https://trpc.io/docs)。 如果您已經在一個混合語言的團隊中工作,或者擁有您無法控制的第三方消費者,那麼您應該建立一個與語言無關的 GraphQL-API。 如果您想測試一下,我建議使用此[模板](https://github.com/new?template_name=examples-minimal&template_owner=trpc),其中包含一個最小的範例。 您還可以觀看這個[45 分鐘的 YouTube 教學](https://www.youtube.com/watch?v=UfUbBWIFdJs&pp=ygUMd2hhdCBpcyB0cnBj)來了解有關 trpc 的更多資訊。 {% 嵌入 https://www.youtube.com/watch?v=UfUbBWIFdJs&pp=ygUMd2hhdCBpcyB0cnBj %} 它們在 GitHub 上擁有超過 32,000 顆星,目前處於`v11` beta 版本,並被 51,000 名開發人員使用。 {% cta https://github.com/trpc/trpc %} 啟動 tRPC ⭐️ {% endcta %} --- [7.Nuxtjs](https://github.com/nuxt/nuxt) - 直覺的 Vue 框架。 ------------------------------------------------------  Nuxt 是一個基於 Vue.js 生態系統的漸進式開源框架,用於建立高效能 Web 應用程式,尤其是伺服器端渲染應用程式。 但請記住,Nuxt 並不是 Vue.js 的替代品,因為它無法單獨運作。而且它也不能被視為像 Express 這樣成熟的後端框架。 100 秒觀看 Nuxtjs,掌握整體概念。 {% 嵌入 https://www.youtube.com/watch?v=dCxSsr5xuL8 %} Nuxt 是建立這三種 Web 應用程式的最佳 JavaScript 框架之一 - 預先渲染靜態頁面、單頁 Web 應用程式 (SPA)、伺服器端渲染 Web 應用程式 (SSR) 甚至通用應用程式。 開發人員特別喜歡 Nuxt,因為它有豐富的函式庫和模組。 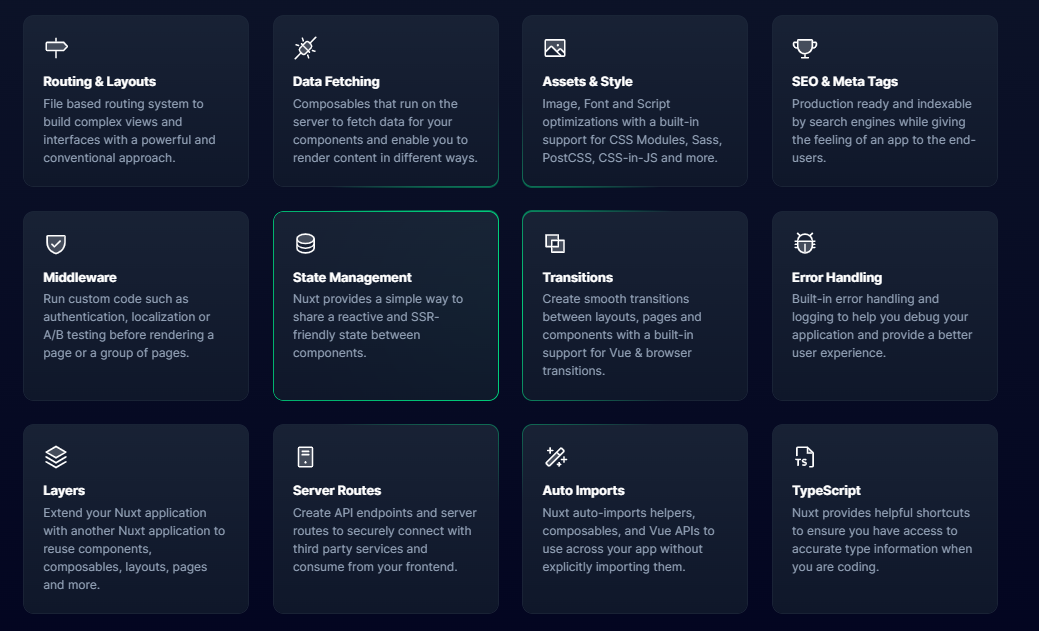 開始使用以下 npm 指令。 ``` npx nuxi@latest init <my-project> ``` 您可以閱讀[文件](https://nuxt.com/docs/getting-started/introduction)並檢查[codesandbox範例](https://codesandbox.io/s/github/nuxt/starter/tree/v3/)。 您可以按照本[指南](https://nuxt.com/docs/guide/concepts/auto-imports)了解更多關鍵概念。 有許多整合選項,因此您可以更輕鬆地繼續使用您喜歡的工具和服務。  您可以查看[免費課程清單](https://nuxt.com/video-courses)來了解 Nuxt 生態系統。 如果您想要推薦的課程,請學習[Nuxt 3 — 初學者課程](https://www.youtube.com/watch?v=fTPCKnZZ2dk)— Freecodecamp 提供的 3 小時教學。 使用 Nuxt 建立的一些流行網站包括 Aircall、Amplitude、Backmarket、Bitpay、Bootstrap Vue、Fox News、Gitlab、Icons8、Instrument、MyScript、Nespresso、Note.com、Ozon.ru、Roland Garros、System76、Todoist、加油,Wappalyzer 。尋找不同類別下[展示網站的完整清單](https://nuxt.com/showcase)。 如果您想快速測試和建置,那麼我建議您查看[入門模板](https://nuxt.com/templates)。 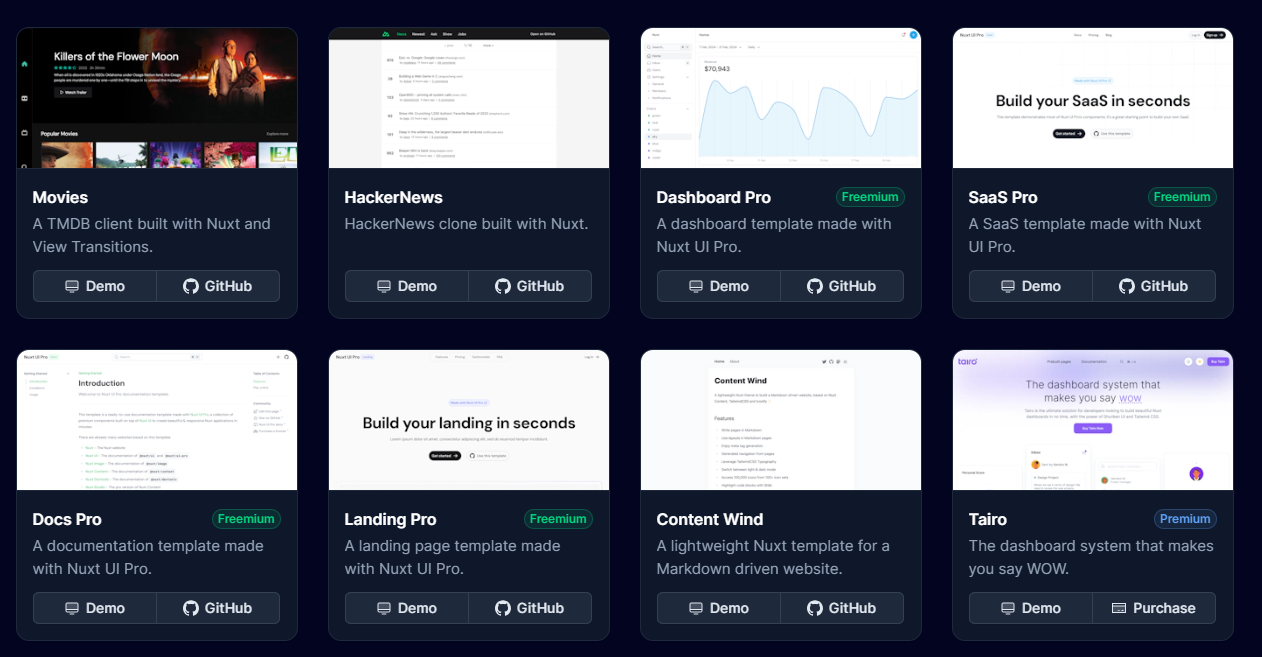 Nuxt 在 GitHub 上擁有超過 51,000 顆星,並被超過 318,000 名開發者使用。 {% cta https://github.com/nuxt/nuxt %} Star Nuxt ⭐️ {% endcta %} --- 8. [Ember.js](https://github.com/emberjs/ember.js) - 用於建立雄心勃勃的 Web 應用程式的 JavaScript 框架。 ---------------------------------------------------------------------------------------  Ember.js 是一個 JavaScript 框架,用於為企業建立可擴展的單頁 Web 應用程式。與其他框架不同,模型-視圖-視圖模型 (MVVW) 架構是 Ember 的基礎。 Ember.js 最初是一個 SproutCore 2.0 框架,由其建立者 Yehuda Katz 更名為 Ember.js,Yehuda Katz 是一位出色的開發人員,被譽為 jQuery 的主要建立者之一。 他們還提供命令列介面工具。 Ember CLI 是建立、建置、測試和提供構成 Ember 應用程式或外掛程式的檔案的官方方式。 ``` npm install -g ember-cli ``` 儘管與 React、Vue 和 Svelte 相比,Ember.js 是一個較舊的前端 JavaScript 框架,但它仍然具有強大的功能,並且在 Microsoft、LinkedIn、Netflix 和 Twitch 等大公司中擁有龐大的用戶群。查看[完整清單](https://emberjs.com/ember-users/)。  借助強大的預設設置,您可能永遠不需要在應用程式中配置任何內容,但如果您需要的話,選項就在那裡! 這意味著 Ember.js 遵循「CoC – 約定優於配置」方法,這可確保在大多數情況下不需要任何配置,以便您可以直接跳到編碼和建立 Web 應用程式。 它們還支援類似於 AngularJS 的 2 路資料綁定。 當我們深入研究時,了解 ember.js 是如何誕生的、其建立背後的先驅者以及製作開源軟體時做出的改變生活的決定非常重要。看這個! {% 嵌入 https://www.youtube.com/watch?v=Cvz-9ccflKQ %} 安裝 Ember CLI 後。 ``` npm install -g ember-cli ``` 您可以建立一個新應用程式,如圖所示。 ``` ember new ember-quickstart --lang en cd ember-quickstart npm start ``` 您可以閱讀[詳細的快速入門文件](https://guides.emberjs.com/release/getting-started/quick-start/)和[官方指南](https://guides.emberjs.com/release/)。 要學習 ember.js,您可以按照他們的官方團隊建立的[逐步教程](https://guides.emberjs.com/release/tutorial/part-1/)進行操作。您可以在[Ember API 文件](https://api.emberjs.com/ember/release)上閱讀有關 API 的更多資訊。 有數以千計的 JavaScript 庫可以在 Ember 中很好地工作。當 npm 套件提供一些 Ember 特定的功能時,他們稱之為`addon` 。外掛程式提供了一種編寫可重複使用程式碼、共用元件和樣式、擴充建置工具等的方法,所有這些都只需最少的配置。尋找[插件的完整清單](https://emberobserver.com/)。  如果您正在尋找更多文章來學習 Ember.js,我推薦這些: - [Ember JS Essentials:Startech 提供的安裝及其功能的初學者指南](https://www.startechup.com/blog/ember-js/)。 - Toptal [建立您的第一個 Ember.js 應用程式的指南](https://www.toptal.com/javascript/a-step-by-step-guide-to-building-your-first-ember-js-app)。 這足以理解結構並決定 Ember 何時適合您的專案。 他們在 GitHub 上有 22k+ 顆星,而`v5.8`版本有 500 多個版本。 {% cta https://github.com/emberjs/ember.js %} 明星 Ember.js ⭐️ {% endcta %} --- 9. [Backbone.js](https://github.com/jashkenas/backbone) - 為您的 JS 應用程式提供一些帶有模型、視圖、集合和事件的 Backbone。 -------------------------------------------------------------------------------------------------  Backbone.js 是一個基於 JavaScript 的框架,透過 RESTful JSON 介面連接到 API。 Jeremy Ashkenas 因建立一些最好的 JavaScript 框架(例如 CoffeeScript 和 Underscore.js)而聞名,他於 2010 年 10 月推出了 Backbone.js。 它旨在建立單頁 Web 應用程式並維護不同 Web 應用程式元件(例如眾多客戶端和伺服器)之間的同步。 Backbone.js 以小而輕而聞名,因為它只需要 jQuery 和一個 JavaScript 函式庫 Underscore.js 即可使用整個函式庫。 Backbone.js 透過提供具有鍵值綁定和自訂事件的模型、具有豐富的可枚舉函數API 的集合、具有聲明性事件處理的視圖,為JavaScript 密集型應用程式提供結構,並透過RESTful JSON 接口將其全部連接到您現有的應用程式。 這是一個簡單的主幹視圖。 ``` var AppView = Backbone.View.extend({ // el - stands for element. Every view has an element associated with HTML // content will be rendered. el: '#container', // It's the first function called when this view is instantiated. initialize: function(){ this.render(); }, // $el - it's a cached jQuery object (el), in which you can use jQuery functions // to push content. Like the Hello World in this case. render: function(){ this.$el.html("Hello World"); } }); ``` 您可以閱讀[文件](https://backbonejs.org/)。 Backbone.js 被許多值得信賴的公司使用,例如 Walmart、Pinterest、SoundCloud 等。 您可以參考他們的[wiki](https://github.com/jashkenas/backbone/wiki/Tutorials%2C-blog-posts-and-example-sites) ,其中記錄了教程、部落格文章和範例網站。 您可以參考幾篇很棒的文章來了解更多: - [BackboneJS:入門](https://auth0.com/blog/backbonejs-getting-started/)- 推薦。 - [適合絕對初學者的 Backbone.js](https://adrianmejia.com/backbone-dot-js-for-absolute-beginners-getting-started/) - [BackboneJS 教學](https://www.tutorialspoint.com/backbonejs/index.htm)- 教學點。 根據儲存庫統計,它們在 GitHub 上擁有超過 28,000 顆星,並被超過 66,000 名開發人員使用。 {% cta https://github.com/jashkenas/backbone %} 明星 Backbone.js ⭐️ {% endcta %} --- 10. [Svelte](https://github.com/sveltejs/svelte) - 控制論增強的網路應用程式。 ----------------------------------------------------------------  Svelte 是一種建立 Web 應用程式的新方法。 它是由 Rich Harris(著名前端開發人員)建立的。 Svelte 於 2016 年首次推出,人氣暴漲。 許多開發人員認為 Svelte 是一個真正改變遊戲規則的革命性想法,它從根本上改變了我們編碼 Web 應用程式的方式。 與 React 或 Vue.js 等其他 JavaScript 框架不同,Svelte 沒有虛擬 DOM。相反,您可以使用簡單的 HTML、CSS 和 JavaScript 程式碼來建立無樣板的元件。 然後,Svelte Compiler 在建置期間將此程式碼編譯成小型的無框架的普通 JavaScript 模組,並在狀態變更時精確地更新 DOM。 因此,與 React 或 Vue.js 等其他傳統框架不同,Svelte 不需要很高的瀏覽器處理能力。 Svelte 依靠反應式程式來徹底更新 DOM。因此,與幾乎任何其他框架相比,它可以實現最快的渲染,並且在大多數效能基準測試中名列前茅。 開始使用以下 npm 指令。 ``` npm create svelte@latest my-app ``` 您可以這樣使用它。 ``` cd my-app npm install npm run dev -- --open ``` 您可以閱讀[文件](https://svelte.dev/docs/introduction)。該團隊還提供了[官方的 VSCode 擴展](https://marketplace.visualstudio.com/items?itemName=svelte.svelte-vscode),它也可以與各種其他編輯器和工具整合。  他們還提供了[詳細的基於網路的教程](https://svelte.dev/tutorial/basics)來學習 Svelte。 您可以查看所有[範例](https://svelte.dev/examples/nested-components)來了解關鍵概念和結構,包括 DOM 事件、生命週期、運動、過渡和處理 SVG。 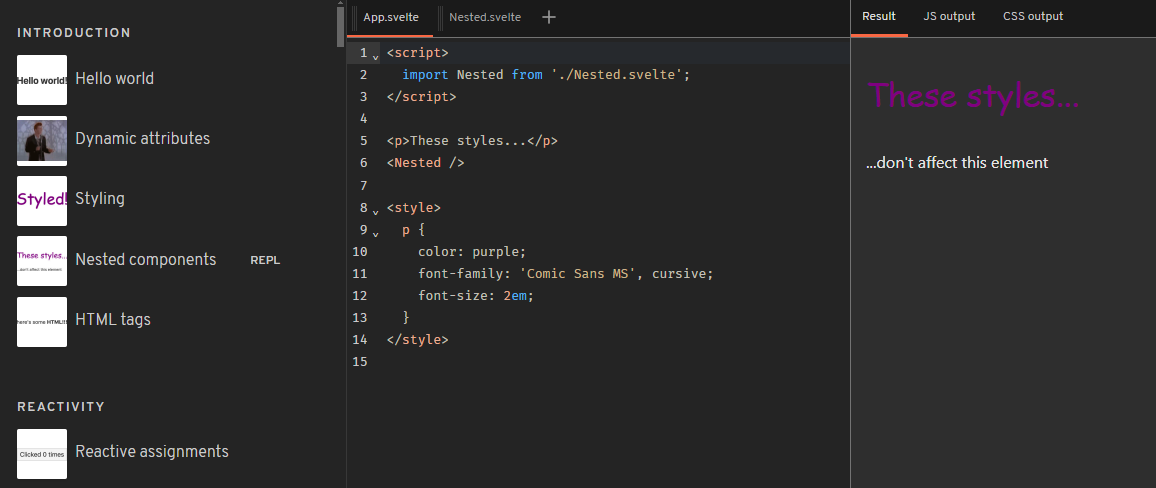 您可以觀看這些教學來了解有關 Svelte 的所有知識。 - [Learn Svelte – 初學者完整課程](https://www.youtube.com/watch?v=UGBJHYpHPvA)– Freecodecamp 的 23 小時教學。 - [Sveltekit & Tailwind](https://www.youtube.com/watch?v=vb7CgDcA_6U&t=2s) - Freecodecamp 的 2 小時教學。 非常感謝老師們免費提供如此詳細的教學! Svelte 在 GitHub 上擁有超過 76k 顆星,目前處於`v4.2`版本,有 282k 開發人員使用。 {% cta https://github.com/sveltejs/svelte %} Star Svelte ⭐️ {% endcta %} --- 11. [Remix](https://github.com/remix-run/remix) - 建立更好的網站。 ----------------------------------------------------------  Remix 是一個全端Web 框架,可讓您專注於使用者介面並透過Web 基礎知識進行工作,以提供快速、流暢且有彈性的使用者體驗,可部署到任何Node.js 伺服器,甚至非Node. js 環境像 Cloudflare Workers 這樣的邊緣。 Remix 建構在 React Router 之上,有四個特點: - 一個編譯器 - 伺服器端 HTTP 處理程序 - 一個伺服器框架 - 一個瀏覽器框架 您可以觀看此內容以了解有關 Remix by Fireship 的更多資訊。 {% 嵌入 https://www.youtube.com/watch?v=r4B69HAOXnA&pp=ygUUcmVtaXggaW4gMTAwIHNlY29uZHM%3D %} 透過嵌套路由,Remix 可以消除幾乎所有載入狀態,如圖所示。  開始使用以下 npm 指令。 ``` npx create-remix@latest ``` 您可以這樣使用它。 ``` mkdir my-remix-app cd my-remix-app npm init -y # install runtime dependencies npm i @remix-run/node @remix-run/react @remix-run/serve isbot@4 react react-dom # install dev dependencies npm i -D @remix-run/dev vite ``` 如果您想包含您的伺服器,請閱讀此[快速入門指南](https://remix.run/docs/en/main/start/quickstart),並了解更多有關如何透過 Remix Vite 插件提供 Vite 配置的訊息,因為 Remix 使用 Vite。 您可以閱讀[文件](https://remix.run/docs/en/main)。他們根據你想做的事情來分發它,順便說一句,我很喜歡。  尋找使用 Remix 建立的[網站的完整清單](https://remix.run/showcase)。  您還應該查看社區製作的[Remix 資源](https://remix.run/resources?category=all)。其中一些是有幫助的,可以改善整個生態系統。  如果您是第一次接觸 Remix,我建議您閱讀官方團隊建立的[Remix 教學 -30min](https://remix.run/docs/en/main/start/tutorial) 。 他們在 GitHub 上擁有超過 27k 個 star,並且發布了`v2.8`版本。 {% cta https://github.com/remix-run/remix %} 明星混音 ⭐️ {% endcta %} --- 12. [AdonisJS](https://github.com/adonisjs/core) - TypeScript 優先的 Web 框架,用於建立 Web 應用程式和 API 伺服器。 ------------------------------------------------------------------------------------------------ 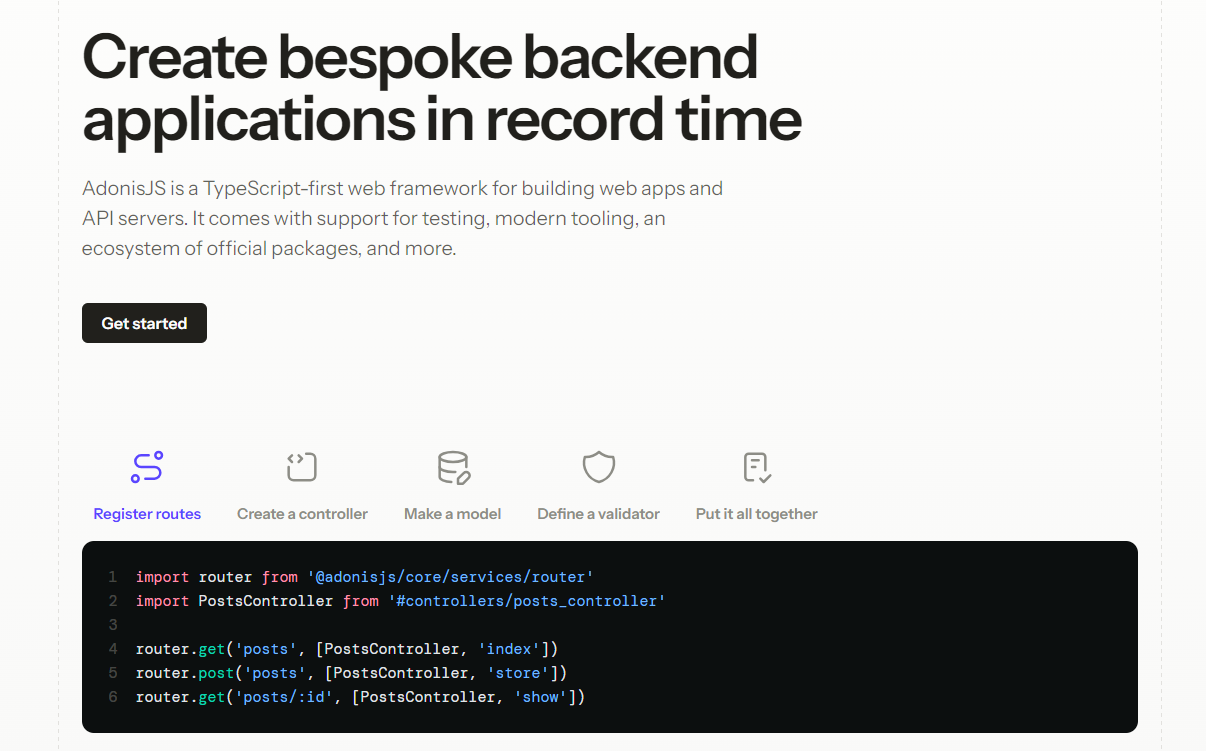 AdonisJS 是一個功能齊全的 Node.js 後端框架。該框架是從頭開始建立的,非常重視開發人員的人體工學和易用性。 AdonisJS 專注於後端,讓您選擇您選擇的前端堆疊,這意味著前端不可知。 它是 Node.js 社群中最稀有的框架之一,附帶一套第一方包,可幫助您建立和發布產品,而無需浪費數百小時組裝不同的 npm 包。 在基礎層面上,AdonisJS 為您的應用程式提供架構,配置無縫的 TypeScript 開發環境,為您的後端程式碼配置 HMR,並提供大量維護良好且記錄廣泛的軟體包。 他們強調了一點測試,這是非常好的。  開始使用以下 npm 指令。 ``` npm init adonisjs@latest hello-world ``` AdonisJS 採用經典的 MVC 設計模式。首先,使用函數式 JavaScript API 定義路由,將控制器綁定到它們,並編寫邏輯來處理控制器內的 HTTP 請求。 ``` import router from '@adonisjs/core/services/router' import PostsController from '#controllers/posts_controller' router.get('posts', [PostsController, 'index']) ``` 控制器可以使用模型從資料庫中獲取資料並呈現視圖(也稱為模板)作為回應。 ``` import { HttpContext } from '@adonisjs/core/http' import Post from '#models/post' export default class PostsController { async index({ view }: HttpContext) { const posts = await Post.all() return view.render('pages/posts/list', { posts }) } } ``` 如果您正在建立 API 伺服器,則可以用 JSON 回應取代視圖層。但是,處理和回應 HTTP 請求的流程保持不變。 您可以閱讀[文件](https://docs.adonisjs.com/guides/introduction)。 您也可以參考[入門套件](https://docs.adonisjs.com/guides/installation#starter-kits)。 他們還提供了[VSCode 擴展,](https://marketplace.visualstudio.com/items?itemName=jripouteau.adonis-vscode-extension)如果您開始使用 Adonisjs,則應該使用該擴展。 您必須查看[Awesome Adonisjs](https://github.com/adonisjs-community/awesome-adonisjs) ,它提供了一系列很棒的書籤、軟體包、教程、影片、課程、擁有使用此內容的網站的公司以及來自 AdonisJS 生態系統的其他很酷的資源。 大多數時候,開始接觸一些非常新的東西是很困難的,因此團隊提供了[10 多個課程](https://adonismastery.com/)來了解 Adonisjs 生態系統。   他們在 GitHub 上擁有超過 15k 個 star,並且發布了`v6.8`版本。 {% cta https://github.com/adonisjs/core %} 明星 AdonisJS ⭐️ {% endcta %} --- 13. [Astro](https://github.com/withastro/astro) - 內容驅動網站的網頁框架。 --------------------------------------------------------------  Astro 是一個開源、伺服器優先的 Web 框架,它結合了靜態網站產生 (SSG) 和伺服器端渲染 (SSR) 的優點,可建立快速、SEO 友善的網站。 Astro 專門為部落格和電子商務等內容豐富的網站提供支持,並擁有良好的開發生態系統。 開始使用以下 npm 指令。 ``` npm create astro@latest ``` 您可以閱讀使用 Astro 建立的[文件](https://docs.astro.build/en/getting-started/)和[展示的網站](https://astro.build/showcase/)。其中一些真的很棒並且視覺上令人驚嘆! Astro 支援 React、Preact、Svelte、Vue、Solid、Lit、HTMX、Web 元件等。閱讀所有[記錄的功能](https://docs.astro.build/en/concepts/why-astro/#features)。 您可以按照本教學[使用 Astro 建立您的第一個部落格](https://docs.astro.build/en/tutorial/0-introduction/)。或使用主題來快速啟動您的下一個專案。其中一些是免費的,而另一些則是付費的!  您可以看到如圖所示的加載性能,甚至我對此感到驚訝。 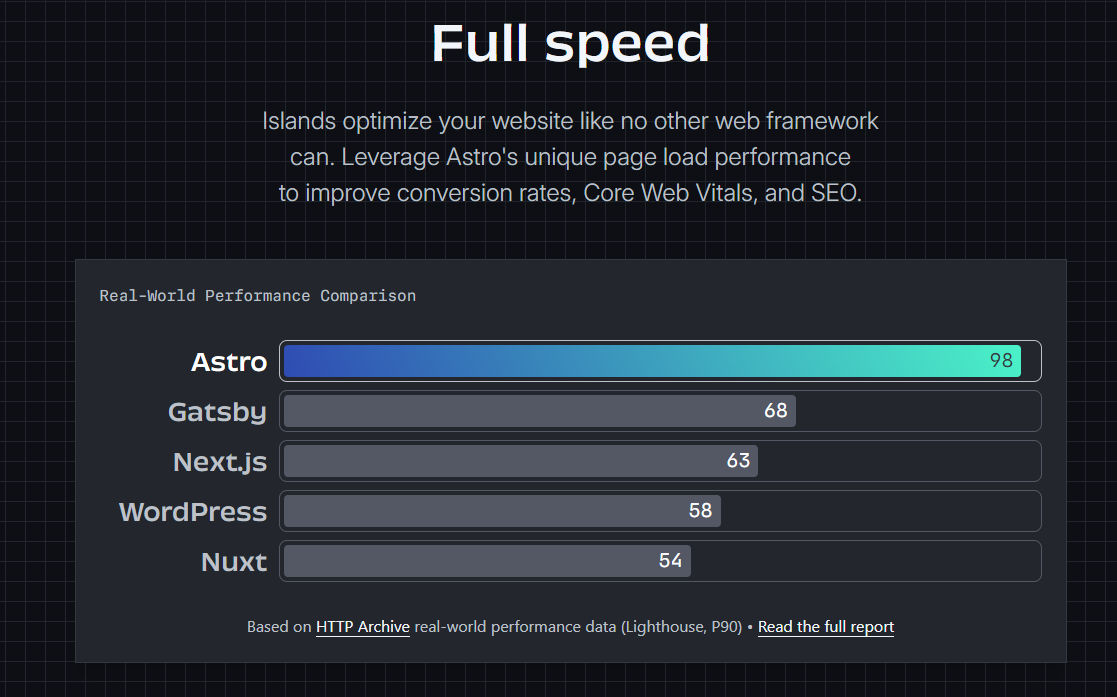 性能至關重要,尤其是在您從事商業活動時,因為高效的演算法將節省更多資金並減少麻煩。 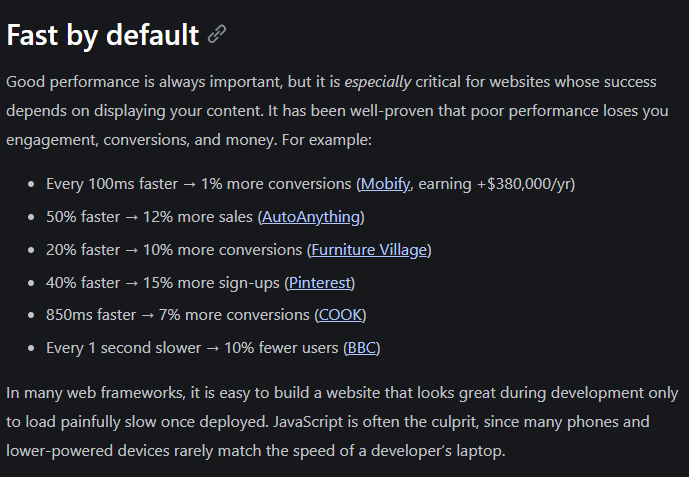 無論是在可存取性、圖標還是使用不同的庫方面,[整合選項](https://astro.build/integrations/)都是巨大的。  您可以觀看 Freecodecamp 提供的一小時[Astro Web 框架速成課程](https://www.youtube.com/watch?v=e-hTm5VmofI)。 {% 嵌入 https://www.youtube.com/watch?v=e-hTm5VmofI %} Astro 在 GitHub 上擁有超過 42k 顆星,處於`v4.6` (1800 多個版本),並由超過 112k 開發人員使用。 {% cta https://github.com/withastro/astro %} Star Astro ⭐️ {% endcta %} --- 14. [Fresh](https://github.com/denoland/fresh) - 下一代網路框架。 ---------------------------------------------------------  Fresh 是下一代 Web 框架,專為速度、可靠性和簡單性而建置。 一些突出的特點: - 島上的客戶水合作用可達到最大程度的互動。 - 零執行時開銷意味著預設不會將 JS 傳送到客戶端。 - 無需配置。 - 開箱即用的 TypeScript 支援。 該框架使用 Preact 和 JSX 進行渲染和模板化,處理伺服器和客戶端上的任務。 此外,Fresh 消除了建造步驟的需要。您編寫的程式碼直接在伺服器端和客戶端執行。 TypeScript 或 JSX 到純 JavaScript 的轉換是在需要時動態發生的。這有助於實現極其快速的迭代周期和快速部署。 從這個開始吧。 ``` deno run -A -r https://fresh.deno.dev ``` Fresh 採用的最重要的架構決策是其對[島嶼架構模式](https://www.patterns.dev/vanilla/islands-architecture)的使用。 這意味著 Fresh 應用程式預設將純 HTML 發送到客戶端。然後,伺服器渲染頁面的某些部分可以透過互動式小工具(島嶼)獨立重新水化。 客戶端只負責渲染頁面中互動性足以保證額外工作的部分。任何純靜態內容都沒有相關的客戶端 JavaScript,因此非常輕量級。 您可以閱讀[文件](https://fresh.deno.dev/docs/introduction)。 您可以找到所有使用此建立的[網站](https://fresh.deno.dev/showcase),例如[Max Schmidt](https://mooxl.dev/)的投資組合網站。  他們在 GitHub 上擁有超過 11k 個 star,並且發布了`v1.6`版本。 {% cta https://github.com/denoland/fresh %} 明星新鮮 ⭐️ {% endcta %} --- 15. [Vue.js](https://github.com/vuejs/core) - 用於在網路上建立 UI 的漸進式 JavaScript 框架。 -----------------------------------------------------------------------------  Vue.js 是一個漸進式框架,因為它能夠透過雙整合模式促進高階單頁 Web 應用程式的設計。閱讀[使用 Vue 的所有方法](https://vuejs.org/guide/extras/ways-of-using-vue.html),包括從嵌入 Web 元件到獨立腳本,甚至使用伺服器端渲染或靜態網站生成來建立複雜的應用程式。 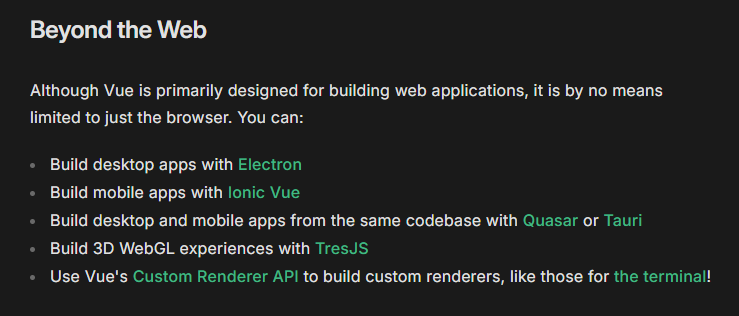 使用 MVVM(模型-視圖-視圖模型)架構,Vue.js 讓事情變得簡單、靈活且適合初學者。 Vue.js 於 2014 年由 Google 的開發人員 Evan You 首次推出,他從 AngularJS 中汲取靈感,提供了一種簡單、輕量級且高效的替代方案。 Vue.js 借用了 ReactJS 和 AngularJS 的一些功能,並對其進行了增強,以提供更流暢、更用戶友好的體驗。例如,Vue.js 將 AngularJS 的 2 路資料綁定與 React 的高效虛擬 DOM 結合。 與 React 不同,Vue 有一個內建的 MVC,可以快速輕鬆地進行設定。此外,Vue.js 的壓縮版本只有 18-20 kb,比其臃腫笨重的競爭對手(如 React 或 AngularJS)輕得多。 Vue.js 還包含一個方便的內建 CSS 過渡和動畫元件。 100 秒觀看 Vue.js 了解更多! {% 嵌入 https://www.youtube.com/watch?v=nhBVL41-\_Cw&pp=ygUXZW1iZXIganMgaW4gMTAwIHNlY29uZHM%3D %} 開始使用以下 npm 指令。 ``` npm create vue@latest ``` 該命令將安裝並執行 create-vue,官方的 Vue 專案腳手架工具。您將收到有關多個可選功能的提示,例如 TypeScript 和測試支援。 這是啟動開發伺服器的方法。 ``` cd <your-project-name> npm install npm run dev ``` 一個簡單的應用程式。 ``` import { createApp } from 'vue' createApp({ data() { return { count: 0 } } }).mount('#app') <div id="app"> <button @click="count++"> Count is: {{ count }} </button> </div> ``` 上面的例子展示了Vue的兩個核心特性: 1. **聲明式渲染**:Vue 使用模板語法擴充了標準 HTML,該模板語法基於 JavaScript 狀態以聲明方式描述 HTML 輸出。 2. **反應性**:Vue 會自動追蹤 JavaScript 狀態變化,並在變化發生時有效地更新 DOM。 您也可以使用 CDN 來使用它,CDN 將使用全域建置。閱讀[快速入門指南](https://vuejs.org/guide/quick-start)以了解更多資訊。 您可以閱讀[文件](https://vuejs.org/guide/introduction)並查看不同主題的[程式碼編輯器範例](https://vuejs.org/examples/#hello-world),甚至可以了解如何建立 Markdown 編輯器。 要體驗 Vue.js,您也可以直接在他們的[現場 Playground](https://play.vuejs.org/#eNp9kVFLwzAQx7/KeS9TmBuiT6MOVAbqg4oKvuSltLeuM01CcpmF0u/utaXVhzEISe7/vyS/yzV459ziEAlXmITMl47XylDtrGfIaZtGzdAoA5CnnJ5fDHsATxy9GSOAKhQrmD2S1ha+rNf52Wyw2m6RSUaynB6QgKlyOmWSCCDZXa2bprsF2jZZStSrpXGR4XBZ2Zz0rULxFYqVLKfTOEcOmTXbsljsgzVSRw+lMLOVKzX5V8elNUHhasRVmArnz3OvsY80H/VsR9n3EX0f6k5T+OYpkD+Qwsnj1BfEg735eKFa9pMp5FFL9gnznYLVsWMc0u6jyQX7X15P+1R1PSlN8Rk2NZMJY1EdaP/Jfb5CaebDidL/cK8XN2NzsP0F+HSp8w==)中嘗試。 我非常喜歡的一篇關於 Vue 的文章是 Michael 在 DEV 上發表的。必讀! {% 嵌入 https://dev.to/michaelthiessen/25-vue-tips-you-need-to-know-2h70 %} 如果您剛開始,您可以按照他們的團隊建立的[官方教程](https://vuejs.org/tutorial/#step-1)進行操作。  與 Astro 類似,他們也有[課程部分](https://www.vuemastery.com/courses/)和[Vue School](https://vueschool.io/) ,您可以在其中找到各種主題。  Vue.js 為許多知名網站提供支持,包括 Font Awesome、Upwork 和 Namecheap 等。 Freecodecamp 有一個[針對初學者的 3 小時 Vue](https://www.youtube.com/watch?v=4deVCNJq3qc)教程,但我不推薦它,因為它是 2019 年的,而且我們知道這些框架中的概念變化有多快。 他們在 GitHub 上擁有超過 44k 個 star,並且發布了`v3.4`版本。它是有史以來最受開發人員喜愛的框架之一。 {% cta https://github.com/vuejs/core %} Star Vuejs ⭐️ {% endcta %} --- 還有很多其他框架,您可以查看其中一些: [Aurelia.js](https://github.com/aurelia/framework) 、 [Mithril.js](https://github.com/MithrilJS/mithril.js) 、 [Stimulus.js](https://github.com/hotwired/stimulus) 、 [Meteor.js](https://github.com/meteor/meteor) 、 [Angular.js](https://github.com/angular/angular) 、 [React.js](https://github.com/facebook/react) 、 [Knockout.js](https://github.com/knockout/knockout)和[Alpine.js](https://github.com/alpinejs/alpine) 。 是的,我知道,我同時感到 😵 和興奮。哈哈! 我有一些影片推薦,可以讓本文更加深入。 {% 嵌入 https://www.youtube.com/watch?v=cuHDQhDhvPE&pp=ygUXZW1iZXIganMgaW4gMTAwIHNlY29uZHM%3D %} {% 嵌入 https://www.youtube.com/watch?v=WJRf7dh5Zws&pp=ygURZW1iZXIganMgdHV0b3JpYWw%3D %} --- 我特意製作了這一系列教程,以幫助您在一個地方找到所有內容。我希望你喜歡這個! 雖然我是 Next.js 的忠實粉絲,但探索 Wing 等其他出色的框架可能非常適合您的下一個專案。 讓我們知道您計劃使用哪些框架,或者您認為其他人是否應該了解其他內容。 祝你有美好的一天!直到下一次。 我建立技術內容是為了幫助其他人每天成長 1%,這樣您就可以在 Twitter 和 LinkedIn 上關注我以獲得每日見解。 |如果你喜歡這類東西, 請關注我以了解更多:) | [](https://twitter.com/Anmol_Codes) [](https://github.com/Anmol-Baranwal) [](https://www.linkedin.com/in/Anmol-Baranwal/) | |------------|----------| 關注Winglang以獲取更多此類內容。 {% 嵌入 https://dev.to/winglang %} --- 原文出處:https://dev.to/winglang/15-javascript-frameworks-for-your-next-project-1o7n
介紹 == 對於初學者來說,尋找專案想法並實施它們一直是一個困難的過程。每天,我都會遇到成百上千的人在 Reddit、Facebook、Twitter 等頁面以及 Devto 和 Medium 等技術部落格上詢問他們可以使用備受好評和誇張的程式語言做什麼。為此,我想開一個話題。僅包含專案想法的線程。我建立一篇評論文章只是為了激勵那些想要學習新語言並測試其能力的人。我會在文章下面的評論中加入新的想法。透過這種方式,我的目標是盡可能避免初學者可以用這樣或那樣的程式做什麼的問題。 首先我要跟大家提幾個想法: 1. 盡可能嘗試使用心智圖技術。將主題標題寫為關鍵字,並使用您記下的筆記中的標籤將正確的專案放在正確的標題下。 2. 移植 - 將另一種語言給出的專案想法整合到您的新語言中 3. 老派 - 重寫您的第一個專案,同時透過命令列以最簡單的形式學習另一種語言(不使用人工智慧) 4. 程式碼共享 - 出於非商業目的,請毫不猶豫地共享您的程式碼。一邊喝咖啡,一邊看著你的錯誤被無情地批評。 5. 鳥在手,勝鳥在林。一個行之有效的專案比行不通的瘋狂想法要好。這樣做直到你成功為止。 > PS:此清單包含 53 個想法。不是50。句號:) 從初級到高級的專案想法 ----------- 1. 網路爬蟲#scraper 2. 文件加密器#filetool 3. URL 縮短器 #urltool 4. CLI 聊天應用程式#chat 5. REST完整 API #api 6. 影像辨識 #ml #dl 7. 股市分析#stock #market 8. Markdown 到 HTML 轉換器 #converter 9. PDF 產生器 #generator 10. 社群媒體分析#analytics 11. 視訊串流伺服器#server 12. 區塊鏈實作#blockchain 13. 內容管理系統 (CMS) #website #cms 14. 電子郵件客戶端#email 15. 任務管理系統#task 16. 線上市集#ecommerce 17. 即時聊天應用程式#chat 18. URL監控工具#url 19. 代理伺服器#proxy 20. 網路爬蟲#crawler 21. 部落格平台#blog 22. 密碼管理器#password 23. 任務調度#task 24. 圖片庫#gallery 25. Markdown 編輯器#markdown 26. 費用追蹤#finance 27. 預算追蹤器#finance 28. URL 驗證器 #url 29. 食譜共享平台#recipe 30. 文字轉語音轉換器#tts 31. 論壇或討論區#forum #discussion 32. 聊天機器人人工智慧#ai #chat 33. 日誌分析器#log #analytics 34. 天氣應用#app #weather #api 35. 程式碼審查工具#code 36. 音樂串流服務#stream #service #music 37. Markdown 部落格產生器 #markdown #blog #generator 38. 拍賣平台#platform #auction 39. URL 縮短器 #url 40. TODO 應用 #todo #task 41. 抽認卡應用程式#flashcard 42. 新聞聚合器 #news #api #rss 43. 社群媒體調度程式#social #schedule 44. 資料視覺化(圖表等)#data 45. URL 過濾代理伺服器 #url #proxy 46. URL 解析器#url 47. 密碼強度檢查器#password #cybersecurity 48. RSS 提要閱讀器 #rss #reader 49. 測驗應用程式#quiz #app 50. 視訊會議工具#video 51. 員工管理系統#business 52. Encrpyt - 解密工具#filetool 53. 程式碼片段管理器#snippet #code --- 原文出處:https://dev.to/gokayburuc/53-project-ideas-for-beginner-to-advanced-2j5
我見過數百種人工智慧工具,其中許多正在改變世界。 作為開發人員,總是有很多事情需要學習,因此專注於節省時間來處理重要的事情非常重要。 我將介紹 21 個供開發人員使用的工具,它們可以讓您的生活更輕鬆,特別是在開發人員體驗方面。 相信我,這份清單會讓你大吃一驚! 我們開始做吧。 --- 1. [Taipy](https://github.com/Avaiga/taipy) - 將資料和人工智慧演算法整合到生產就緒的 Web 應用程式中。 ----------------------------------------------------------------------------  Taipy 是一個開源 Python 庫,可用於輕鬆的端到端應用程式開發,具有假設分析、智慧管道執行、內建調度和部署工具。 我相信你們大多數人都不明白 Taipy 用於為基於 Python 的應用程式建立 GUI 介面並改進資料流管理。 關鍵是性能,而 Taipy 是最佳選擇。 雖然 Streamlit 是一種流行的工具,但在處理大型資料集時,其效能可能會顯著下降,這使得它在生產級使用上不切實際。 另一方面,Taipy 在不犧牲性能的情況下提供了簡單性和易用性。透過嘗試 Taipy,您將親身體驗其用戶友好的介面和高效的資料處理。 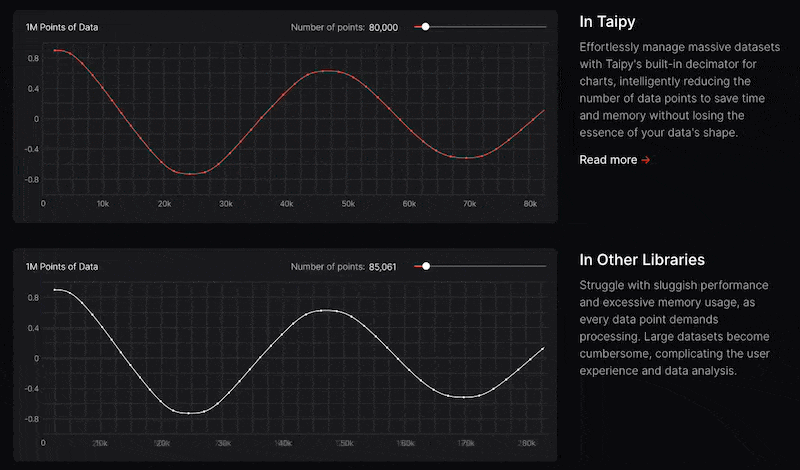 Taipy 有許多整合選項,可以輕鬆地與領先的資料平台連接。  開始使用以下命令。 ``` pip install taipy ``` 我們來談談最新的[Taipy v3.1 版本](https://docs.taipy.io/en/latest/relnotes/)。 最新版本使得在 Taipy 的多功能零件物件中可視化任何 HTML 或 Python 物件成為可能。 這意味著[Folium](https://python-visualization.github.io/folium/latest/) 、 [Bokeh](https://bokeh.org/) 、 [Vega-Altair](https://altair-viz.github.io/)和[Matplotlib](https://matplotlib.org/)等程式庫現在可用於視覺化。 這也帶來了對[Plotly python](https://plotly.com/python/)的原生支持,使繪製圖表變得更加容易。 他們還使用分散式運算提高了效能,但最好的部分是 Taipy,它的所有依賴項現在都與 Python 3.12 完全相容,因此您可以在使用 Taipy 進行專案的同時使用最新的工具和程式庫。 您可以閱讀[文件](https://docs.taipy.io/en/latest/)。  另一個有用的事情是,Taipy 團隊提供了一個名為[Taipy Studio](https://docs.taipy.io/en/latest/manuals/studio/)的 VSCode 擴充功能來加速 Taipy 應用程式的建置。  您也可以使用 Taipy 雲端部署應用程式。 如果您想閱讀部落格來了解程式碼庫結構,您可以閱讀 HuggingFace[的使用 Taipy 在 Python 中為您的 LLM 建立 Web 介面](https://huggingface.co/blog/Alex1337/create-a-web-interface-for-your-llm-in-python)。 嘗試新技術通常很困難,但 Taipy 提供了[10 多個演示教程,](https://docs.taipy.io/en/release-3.1/gallery/)其中包含程式碼和適當的文件供您遵循。  例如,一些演示範例和專案想法: - [即時污染儀表板](https://docs.taipy.io/en/release-3.0/knowledge_base/demos/pollution_sensors/) 使用工廠周圍的感測器測量空氣品質的用例,展示 Taipy 儀表板流資料的能力。檢查[GitHub 儲存庫](https://github.com/Avaiga/demo-realtime-pollution)。 - [詐欺辨識](https://docs.taipy.io/en/release-3.0/knowledge_base/demos/fraud_detection/) Taipy 應用程式可分析信用卡交易以偵測詐欺行為。檢查[GitHub 儲存庫](https://github.com/Avaiga/demo-fraud-detection)。 - [新冠儀表板](https://docs.taipy.io/en/release-3.0/knowledge_base/demos/covid_dashboard/) 這使用 2020 年的 Covid 資料集。還有一個預測頁面來預測傷亡人數。檢查[GitHub 儲存庫](https://github.com/Avaiga/demo-covid-dashboard)。 - [建立 LLM 聊天機器人](https://docs.taipy.io/en/release-3.0/knowledge_base/demos/chatbot/) 該演示展示了 Taipy 使最終用戶能夠使用 LLM 執行推理的能力。在這裡,我們使用 GPT-3 建立一個聊天機器人,並將對話顯示在互動式聊天介面中。您可以輕鬆更改程式碼以使用任何其他 API 或模型。檢查[GitHub 儲存庫](https://github.com/Avaiga/demo-chatbot)。 - [即時人臉辨識](https://docs.taipy.io/en/release-3.0/knowledge_base/demos/face_recognition/) 該演示將人臉辨識無縫整合到我們的平台中,使用網路攝影機提供使用者友好的即時人臉偵測體驗。檢查[GitHub 儲存庫](https://github.com/Avaiga/demo-face-recognition)。 這些用例非常驚人,所以一定要檢查一下。 Taipy 在 GitHub 上有 8.2k+ Stars,並且處於`v3.1`版本,因此它們正在不斷改進。 {% cta https://github.com/Avaiga/taipy %} Star Taipy ⭐️ {% endcta %} --- 2. [DevToys](https://github.com/DevToys-app/DevToys) - 開發者的瑞士軍刀。 ----------------------------------------------------------------  DevToys 協助完成日常開發任務,例如格式化 JSON、比較文字和測試 RegExp。 這樣,就無需使用不可信的網站來處理您的資料執行簡單的任務。透過智慧型偵測,DevToys 可以偵測用於複製到 Windows 剪貼簿的資料的最佳工具。 緊湊的覆蓋範圍讓您可以保持應用程式較小並位於其他視窗之上。最好的部分是可以同時使用應用程式的多個實例。 我可以肯定地說,開發人員甚至不知道這個很棒的專案。 最後是一款專為 Windows 生態系統設計的軟體。哈哈!  他們提供的一些工具是: > 轉換器 - JSON <> YAML - 時間戳 - 數基數 - 規劃任務解析器  > 編碼器/解碼器 - 超文本標記語言 - 網址 - Base64 文字與圖片 - 壓縮包 - 智威湯遜解碼器  > 格式化程式 - JSON - SQL - XML  > 發電機 - 哈希(MD5、SHA1、SHA256、SHA512) - UUID 1 和 4 - 洛雷姆·伊普蘇姆 - 校驗和  > 文字 - 逃脫/逃脫 - 檢驗員和箱子轉換器 - 正規表示式測試器 - 文字比較 - XML驗證器 - 降價預覽   > 形象的 - 色盲模擬器 - 顏色選擇器和對比度 - PNG / JPEG 壓縮器 - 影像轉換器  我不了解你,但我不會錯過這個! 您可以閱讀[如何執行 DevToys](https://github.com/DevToys-app/DevToys?tab=readme-ov-file#how-to-run-devtoys) 。 關於許可證的註解。 DevToys 使用的授權允許將應用程式作為試用軟體或共享軟體重新分發而無需進行任何更改。然而,作者 Etienne BAUDOUX 和 BenjaminT 不希望你這樣做。如果您認為自己有充分的理由這樣做,請先與我們聯絡討論。 他們在 GitHub 上有 23k Stars,並且使用 C#。 {% cta https://github.com/DevToys-app/DevToys %} 明星 DevToys ⭐️ {% endcta %} --- 3. [Pieces](https://github.com/pieces-app) - 您的工作流程副駕駛。 -------------------------------------------------------  Pieces 是一款支援人工智慧的生產力工具,旨在透過智慧程式碼片段管理、情境化副駕駛互動和主動呈現有用材料來幫助開發人員管理混亂的工作流程。 它最大限度地減少了上下文切換、簡化了工作流程並提升了整體開發體驗,同時透過完全離線的 AI 方法維護了工作的隱私和安全性。太棒了:D 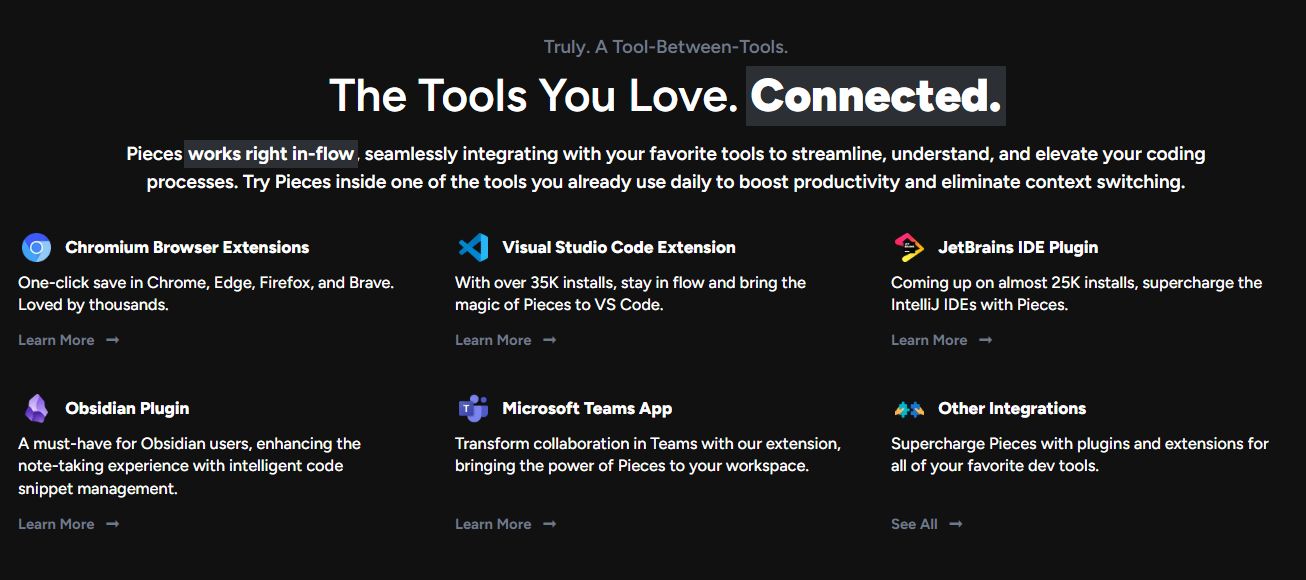 它與您最喜歡的工具無縫集成,以簡化、理解和提升您的編碼流程。 它具有比表面上看到的更令人興奮的功能。 - 它可以透過閃電般快速的搜尋體驗找到您需要的材料,讓您根據您的喜好透過自然語言、程式碼、標籤和其他語義進行查詢。可以放心地說“您的個人離線谷歌”。 - Pieces 使用 OCR 和 Edge-ML 升級螢幕截圖,以提取程式碼並修復無效字元。因此,您可以獲得極其準確的程式碼提取和深度元資料豐富。 您可以查看 Pieces 可用[功能的完整清單](https://pieces.app/features)。 您可以閱讀[文件](https://docs.pieces.app/)並存取[網站](https://pieces.app/)。 他們為 Pieces OS 用戶端提供了一系列 SDK 選項,包括[TypeScript](https://github.com/pieces-app/pieces-os-client-sdk-for-typescript) 、 [Kotlin](https://github.com/pieces-app/pieces-os-client-sdk-for-kotlin) 、 [Python](https://github.com/pieces-app/pieces-os-client-sdk-for-python)和[Dart](https://github.com/pieces-app/pieces-os-client-sdk-for-dart) 。 就開源流行度而言,他們仍然是新的,但他們的社群是迄今為止我見過的最好的社群之一。加入他們,成為 Pieces 的一部分! {% cta https://github.com/pieces-app/ %} 星星碎片 ⭐️ {% endcta %} --- 4. [Infisical-](https://github.com/Infisical/infisical)秘密管理平台。 --------------------------------------------------------------  Infisical 是一個開源秘密管理平台,團隊可以用它來集中 API 金鑰、資料庫憑證和設定等秘密。 他們讓每個人(而不僅僅是安全團隊)都可以更輕鬆地進行秘密管理,這意味著從頭開始重新設計整個開發人員體驗。 就我個人而言,我不介意使用 .env 文件,因為我並不特別謹慎。不過,您可以閱讀[立即停止使用 .env 檔案!](https://dev.to/gregorygaines/stop-using-env-files-now-kp0)由格雷戈里來理解。 他們提供了四種 SDK,分別用於<a href="">Node.js</a> 、 <a href="">Python</a> 、 <a href="">Java</a>和<a href="">.Net</a> 。您可以自行託管或使用他們的雲端。 開始使用以下 npm 指令。 ``` npm install @infisical/sdk ``` 這是使用入門 (Node.js SDK) 的方法。 ``` import { InfisicalClient, LogLevel } from "@infisical/sdk"; const client = new InfisicalClient({ clientId: "YOUR_CLIENT_ID", clientSecret: "YOUR_CLIENT_SECRET", logLevel: LogLevel.Error }); const secrets = await client.listSecrets({ environment: "dev", projectId: "PROJECT_ID", path: "/foo/bar/", includeImports: false }); ```  Infisical 還提供了一組工具來自動防止 git 歷史記錄的秘密洩露。可以使用預提交掛鉤或透過與 GitHub 等平台直接整合在 Infisical CLI 層級上設定此功能。 您可以閱讀[文件](https://infisical.com/docs/documentation/getting-started/introduction)並檢查如何[安裝 CLI](https://infisical.com/docs/cli/overview) ,這是使用它的最佳方式。 Infisical 還可用於將機密注入 Kubernetes 叢集和自動部署,以便應用程式使用最新的機密。有很多整合選項可用。  在使用整個原始程式碼之前一定要檢查他們的[許可證](https://github.com/Infisical/infisical/blob/main/LICENSE),因為他們有一些受 MIT Expat 保護的企業級程式碼,但不用擔心,大部分程式碼都是免費使用的。 他們在 GitHub 上擁有超過 11k 顆星星,並且發布了超過 125 個版本,因此他們正在不斷發展。另外,Infiscial CLI 的安裝次數超過 540 萬次,因此非常值得信賴。 {% cta https://github.com/Infisical/infisical %} 明星 Infisical ⭐️ {% endcta %} --- 5. [Mintlify](https://github.com/mintlify/writer) - 在建置時出現的文件。 --------------------------------------------------------------  Mintlify 是一款由人工智慧驅動的文件編寫器,您只需 1 秒鐘即可編寫程式碼文件 :D 幾個月前我發現了 Mintlify,從那時起我就一直是它的粉絲。我見過很多公司使用它,甚至我使用我的商務電子郵件產生了完整的文件,結果證明這是非常簡單和體面的。如果您需要詳細的文件,Mintlify 就是解決方案。 主要用例是根據我們將在此處討論的程式碼產生文件。當您編寫程式碼時,它會自動記錄程式碼,以便其他人更容易跟上。 您可以安裝[VSCode 擴充功能](https://marketplace.visualstudio.com/items?itemName=mintlify.document)或將其安裝在[IntelliJ](https://plugins.jetbrains.com/plugin/18606-mintlify-doc-writer)上。 您只需突出顯示程式碼或將遊標放在要記錄的行上。然後點選「編寫文件」按鈕(或按 ⌘ + 。) 您可以閱讀[文件](https://github.com/mintlify/writer?tab=readme-ov-file#%EF%B8%8F-mintlify-writer)和[安全指南](https://writer.mintlify.com/security)。 如果您更喜歡教程,那麼您可以觀看[Mintlify 的工作原理](https://www.loom.com/embed/3dbfcd7e0e1b47519d957746e05bf0f4)。它支援 10 多種程式語言,並支援許多文件字串格式,例如 JSDoc、reST、NumPy 等。 順便說一句,他們的網站連結是[writer.mintlify.com](https://writer.mintlify.com/) ;回購協議中目前的似乎是錯誤的。 Mintlify 是一個方便的工具,用於記錄程式碼,這是每個開發人員都應該做的事情。它使其他人更容易有效地理解您的程式碼。 它在 GitHub 上有大約 2.5k 顆星,基於 TypeScript 建置,受到許多開發人員的喜愛。 {% cta https://github.com/mintlify/writer %} Star Mintlify ⭐️ {% endcta %} --- 6. [Replexica](https://github.com/replexica/replexica) - 用於 React 的 AI 支援的 i18n 工具包。 ------------------------------------------------------------------------------------  在地化方面的困難是真實存在的,因此人工智慧的幫助絕對是一個很酷的概念。 Replexica 是 React 的 i18n 工具包,可快速發布多語言應用程式。它不需要將文字提取到 JSON 檔案中,並使用 AI 支援的 API 進行內容處理。 它有以下兩個部分: 1. Replexica Compiler - React 的開源編譯器插件。 2. Replexica API - 雲端中的 i18n API,使用 LLM 執行翻譯。 (基於使用情況,它有免費套餐) 支援的一些 i18n 格式包括: 1. 無 JSON 的 Replexica 編譯器格式。 2. Markdown 內容的 .md 檔案。 3. 基於舊版 JSON 和 YAML 的格式。 當他們達到 500 星時,他們也在 DEV 上發布了官方公告。我是第一批讀者之一(少於 3 個反應)。 它們涵蓋了很多內容,因此您應該閱讀 Max 的[《We Got 500 Stars What Next》](https://dev.to/maxprilutskiy/we-got-500-github-stars-whats-next-2njc) 。 為了給出 Replexica 背後的總體思路,這是基本 Next.js 應用程式所需的唯一更改,以使其支援多語言。 開始使用以下 npm 指令。 ``` // install pnpm add replexica @replexica/react @replexica/compiler // login to Replexica API. pnpm replexica auth --login ``` 您可以這樣使用它。 ``` // next.config.mjs // Import Replexica Compiler import replexica from '@replexica/compiler'; /** @type {import('next').NextConfig} */ const nextConfig = {}; // Define Replexica configuration /** @type {import('@replexica/compiler').ReplexicaConfig} */ const replexicaConfig = { locale: { source: 'en', targets: ['es'], }, }; // Wrap Next.js config with Replexica Compiler export default replexica.next( replexicaConfig, nextConfig, ); ``` 您可以閱讀如何[開始使用](https://github.com/replexica/replexica/blob/main/getting-started.md)以及清楚記錄的有關[幕後使用內容的](https://github.com/replexica/replexica?tab=readme-ov-file#whats-under-the-hood)內容。 Replexica 編譯器支援 Next.js App Router,Replexica API 支援英文🇺🇸和西班牙文🇪🇸。他們計劃接下來發布 Next.js Pages Router + 法語🇫🇷語言支援! 他們在 GitHub 上擁有 740 多個 Star,並且基於 TypeScript 建置。您應該密切關注該專案以獲得進一步進展! {% cta https://github.com/replexica/replexica %} Star Replexica ⭐️ {% endcta %} --- 7. [Flowise](https://github.com/FlowiseAI/Flowise) - 拖放 UI 來建立您的客製化 LLM 流程。 ---------------------------------------------------------------------------  Flowise 是一款開源 UI 視覺化工具,用於建立客製化的 LLM 編排流程和 AI 代理程式。 開始使用以下 npm 指令。 ``` npm install -g flowise npx flowise start OR npx flowise start --FLOWISE_USERNAME=user --FLOWISE_PASSWORD=1234 ``` 這就是整合 API 的方式。 ``` import requests url = "/api/v1/prediction/:id" def query(payload): response = requests.post( url, json = payload ) return response.json() output = query({ question: "hello!" )} ```  您可以閱讀[文件](https://docs.flowiseai.com/)。  雲端主機不可用,因此您必須使用這些[說明](https://github.com/FlowiseAI/Flowise?tab=readme-ov-file#-self-host)自行託管。 讓我們探討一些用例: - 假設您有一個網站(可以是商店、電子商務網站或部落格),並且您希望廢棄該網站的所有相關連結,並讓法學碩士回答您網站上的任何問題。您可以按照此[逐步教學](https://docs.flowiseai.com/use-cases/web-scrape-qna)來了解如何實現相同的目標。  - 您還可以建立一個自訂工具,該工具將能夠呼叫 Webhook 端點並將必要的參數傳遞到 Webhook 主體中。請依照本[指南](https://docs.flowiseai.com/use-cases/webhook-tool)使用 Make.com 建立 Webhook 工作流程。  還有許多其他用例,例如建立 SQL QnA 或與 API 互動。 FlowiseAI 在 GitHub 上擁有超過 27,500 個 Star,並擁有超過 10,000 個分叉,因此具有良好的整體比率。 {% cta https://github.com/FlowiseAI/Flowise %} 明星 Flowise ⭐️ {% endcta %} --- 8. [Hexo](https://github.com/hexojs/hexo) - 一個快速、簡單且功能強大的部落格框架。 ---------------------------------------------------------------  大多數開發人員更喜歡自己的博客,如果您也是如此。 Hexo 可能是你不知道的工具。 Hexo 支援許多功能,例如超快的生成速度,支援 GitHub Flavored Markdown 和大多數 Octopress 插件,提供對 GitHub Pages、Heroku 等的一命令部署,以及可實現無限擴展性的強大 API 和數百個主題和插件。 這意味著您可以用 Markdown(或其他標記語言)編寫帖子,Hexo 在幾秒鐘內生成具有漂亮主題的靜態檔案。 開始使用以下 npm 指令。 ``` npm install hexo-cli -g ``` 您可以這樣使用它。 ``` // Setup your blog hexo init blog // Start the server hexo server // Create a new post hexo new "Hello Hexo" ``` 您可以閱讀[文件](https://hexo.io/docs/),查看 Hexo 提供的所有[400 多個外掛程式](https://hexo.io/plugins/)和[主題集](https://hexo.io/themes/)。據我所知,這些外掛程式支援廣泛的用例,例如 Hexo 的 Ansible 部署器外掛程式。 您可以查看有關在[Hexo 上編寫和組織內容的](https://www.youtube.com/watch?v=AIqBubK6ZLc&t=6s)YouTube 教學。 Hexo 在 GitHub 上擁有超過 38,000 顆星,並被 GitHub 上超過 125,000 名開發者使用。它們位於`v7`版本中,解壓縮後大小為`629 kB` 。 {% cta https://github.com/hexojs/hexo %} Star Hexo ⭐️ {% endcta %} --- 9.[螢幕截圖到程式碼](https://github.com/abi/screenshot-to-code)- 放入螢幕截圖並將其轉換為乾淨的程式碼。 --------------------------------------------------------------------------- 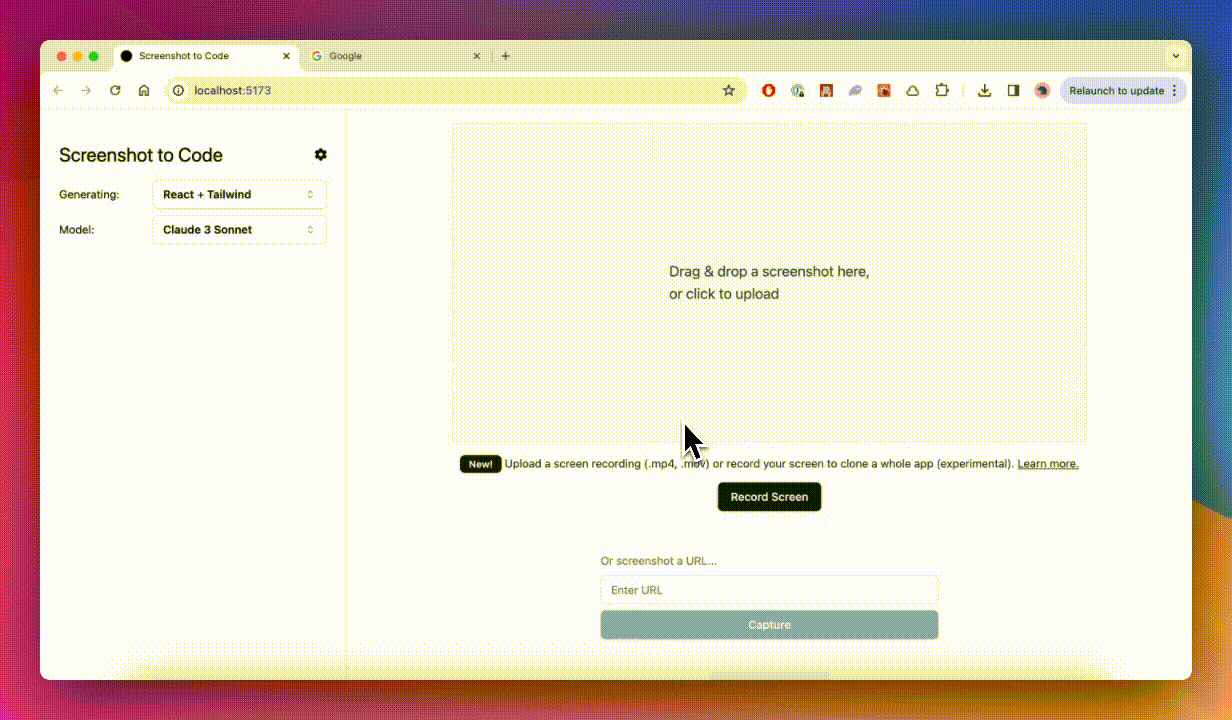 這個開源專案廣泛流行,但許多開發人員仍然不了解它。它可以幫助您以 10 倍的速度建立使用者介面。 這是一個簡單的工具,可以使用 AI 將螢幕截圖、模型和 Figma 設計轉換為乾淨、實用的程式碼。 該應用程式有一個 React/Vite 前端和一個 FastAPI 後端。如果您想使用 Claude Sonnet 或獲得實驗視訊支持,您將需要一個能夠存取 GPT-4 Vision API 的 OpenAI API 金鑰或一個 Anthropic 金鑰。您可以閱讀[指南](https://github.com/abi/screenshot-to-code?tab=readme-ov-file#-getting-started)來開始。 您可以在託管版本上[即時試用](https://screenshottocode.com/),並觀看 wiki 上提供的[一系列演示影片](https://github.com/abi/screenshot-to-code/wiki/Screen-Recording-to-Code)。 他們在 GitHub 上擁有超過 47k 顆星星,並支援許多技術堆疊,例如 React 和 Vue,以及不錯的 AI 模型,例如 GPT-4 Vision、Claude 3 Sonnet 和 DALL-E 3。 {% cta https://github.com/abi/screenshot-to-code %} 將螢幕截圖轉為程式碼 ⭐️ {% endcta %} --- 10. [Appsmith](https://github.com/appsmithorg/appsmith) - 建立管理面板、內部工具和儀表板的平台。 -----------------------------------------------------------------------------  管理面板和儀表板是任何軟體創意(在大多數情況下)的一些常見部分,我嘗試從頭開始建立它,這會帶來很多痛苦和不必要的辛苦工作。 您可能已經看到組織建立了內部應用程式,例如儀表板、資料庫 GUI、管理面板、批准應用程式、客戶支援儀表板等,以幫助其團隊執行日常操作。正如我所說,Appsmith 是一個開源工具,可以實現這些內部應用程式的快速開發。 首先,請觀看這個[YouTube 影片](https://www.youtube.com/watch?v=NnaJdA1A11s),該影片在 100 秒內解釋了 Appsmith。 {% 嵌入 https://www.youtube.com/watch?v=NnaJdA1A11s %} 他們提供拖放小部件來建立 UI。 您可以使用 45 多個可自訂的小工具在幾分鐘內建立漂亮的響應式 UI,而無需編寫一行 HTML/CSS。尋找[小部件的完整清單](https://www.appsmith.com/widgets)。  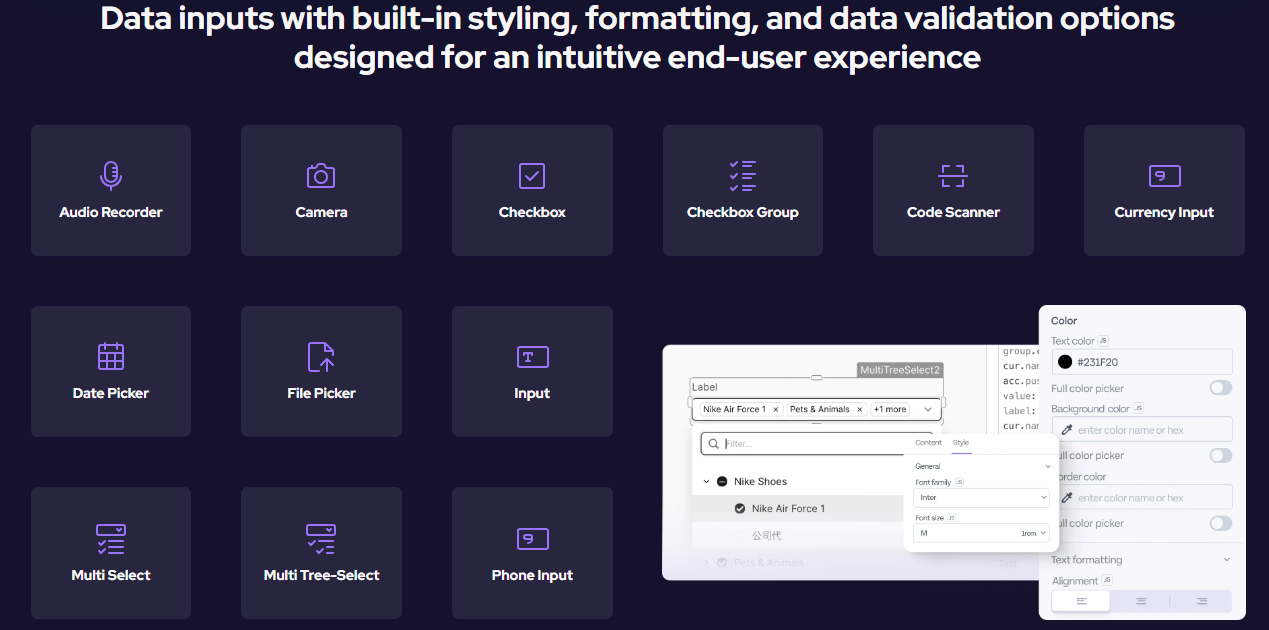 Appsmith 幾乎可以在 GUI 上的小部件屬性、事件偵聽器、查詢和其他設定內的任何位置編寫 JavaScript 程式碼。 Appsmith 支援在`{{ }}`內編寫單行程式碼,並將括號之間編寫的任何內容解釋為 JavaScript 表達式。 ``` /*Filter the data array received from a query*/ {{ QueryName.data.filter((row) => row.id > 5 ) }} or {{ storeValue("userID", 42); console.log(appsmith.store.userID); showAlert("userID saved"); }} ``` 您需要使用立即呼叫函數表達式(IIFE)來編寫多行。 例如,無效程式碼和有效程式碼。 ``` // invalid code /*Call a query to fetch the results and filter the data*/ {{ const array = QueryName.data; const filterArray = array.filter((row) => row.id > 5); return filterArray; }} /* Check the selected option and return the value*/ {{ if (Dropdown.selectedOptionValue === "1") { return "Option 1"; } else { return "Option 2"; } }} // valid code /* Call a query and then manipulate its result */ {{ (function() { const array = QueryName.data; const filterArray = array.filter((row) => row.id > 5); return filterArray; })() }} /* Verify the selected option and return the value*/ {{ (function() { if (Dropdown.selectedOptionValue === "1") { return "Option 1"; } else { return "Option 2"; } })() }} ``` 您可以透過幾個簡單的步驟建立從簡單的 CRUD 應用程式到複雜的多步驟工作流程的任何內容: 1. 與資料庫或 API 整合。 Appsmith 支援最受歡迎的資料庫和 REST API。 2. 使用內建小工具建立您的應用程式佈局。 3. 在編輯器中的任何位置使用查詢和 JavaScript 來表達您的業務邏輯。 4. Appsmith 支援使用 Git 進行版本控制,以使用分支來協作建立應用程式來追蹤和回滾變更。部署應用程式並分享:)  您可以閱讀[文件](https://docs.appsmith.com/)和[操作指南](https://docs.appsmith.com/connect-data/how-to-guides),例如如何將其連接到本機資料來源或\[如何與第三方工具整合\](與第三方工具整合)。 您可以自行託管或使用雲端。他們還提供[20 多個模板](https://www.appsmith.com/templates),以便您可以快速入門。一些有用的是: - [維修訂單管理](https://www.appsmith.com/template/Maintenance-Order-Management) - [加密即時追蹤器](https://www.appsmith.com/template/crypto-live-tracker) - [內容管理系統](https://www.appsmith.com/template/content-management-system) - [WhatsApp 信使](https://www.appsmith.com/template/whatsapp-messenger) Appsmith 在 GitHub 上擁有超過 31,000 顆星,發布了 200 多個版本。 {% cta https://github.com/appsmithorg/appsmith %} Star Appsmith ⭐️ {% endcta %} --- 11. [BlockNote](https://github.com/TypeCellOS/BlockNote) - 基於區塊(Notion 樣式)且可擴充的富文本編輯器。 -------------------------------------------------------------------------------------- 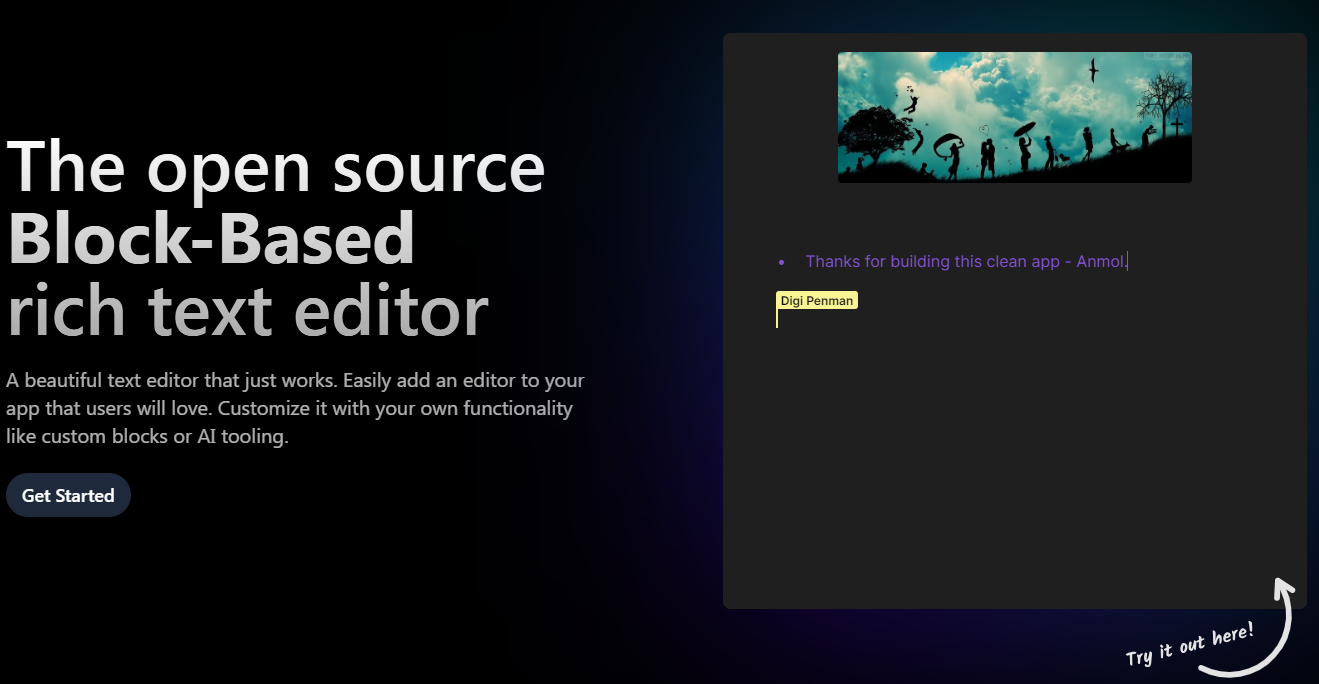 人們常說,除非您正在學習新東西,否則不要重新發明輪子。 Blocknote 是開源的 Block 為基礎的 React 富文本編輯器。您可以輕鬆地將現代文字編輯體驗加入到您的應用程式中。 Blocknote 建構在 Prosemirror 和 Tiptap 之上。 它們有很多功能,如下所示。 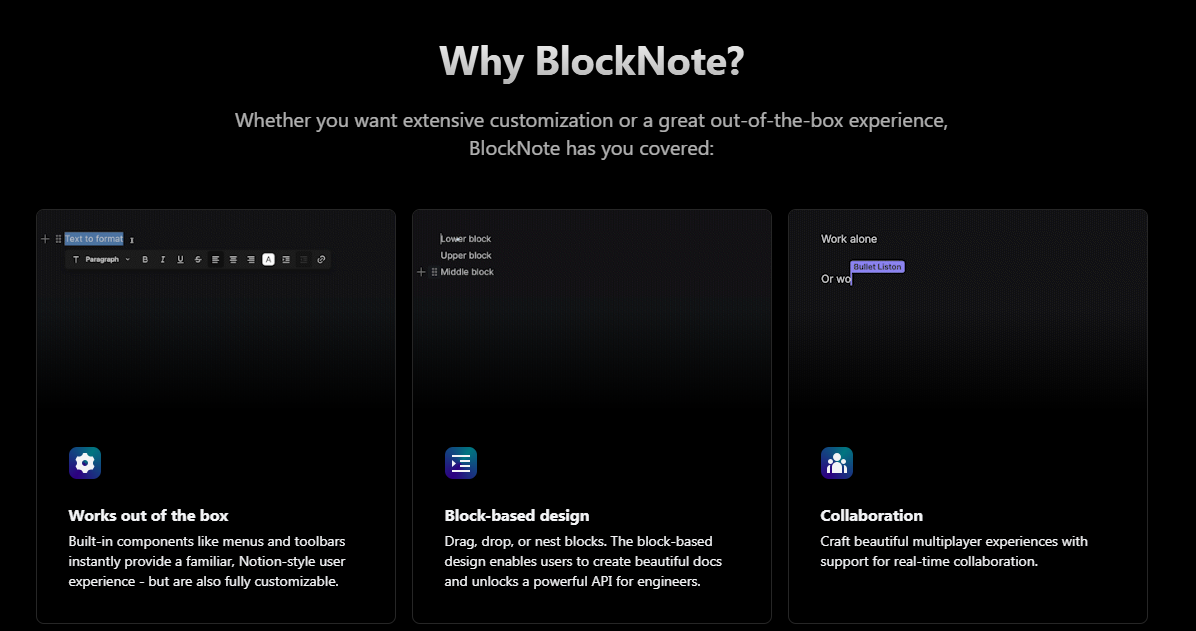 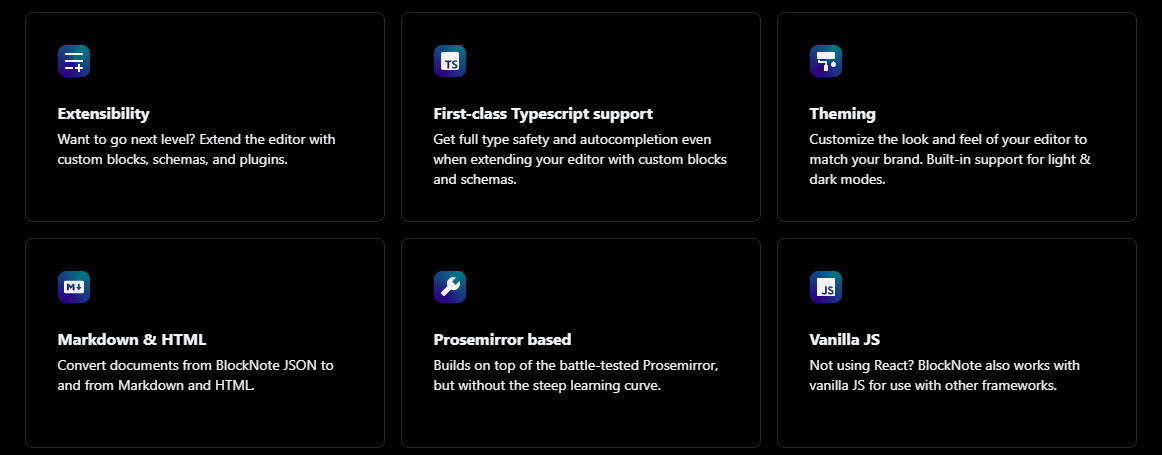 您可以輕鬆自訂內建 UI 元件,或建立自訂區塊、內聯內容和樣式。如果您想更進一步,您可以使用額外的 Prosemirror 或 TipTap 外掛程式來擴充核心編輯器。 其他庫雖然功能強大,但通常具有相當陡峭的學習曲線,並且要求您自訂編輯器的每個細節。這可能需要數月的專門工作。 相反,BlockNote 只需最少的設定即可提供出色的體驗,包括現成的動畫 UI。 開始使用以下 npm 指令。 ``` npm install @blocknote/core @blocknote/react ``` 您可以這樣使用它。透過`useCreateBlockNote`鉤子,我們可以建立一個新的編輯器實例,然後使用`theBlockNoteView`元件來渲染它。 `@blocknote/react/style.css`也被匯入來新增編輯器的預設樣式和 BlockNote 匯出的 Inter 字體(可選)。 ``` import "@blocknote/core/fonts/inter.css"; import { BlockNoteView, useCreateBlockNote } from "@blocknote/react"; import "@blocknote/react/style.css"; export default function App() { // Creates a new editor instance. const editor = useCreateBlockNote(); // Renders the editor instance using a React component. return <BlockNoteView editor={editor} />; } ``` 您可以閱讀可用的[文件](https://www.blocknotejs.org/docs)和[ui 元件](https://www.blocknotejs.org/docs/ui-components)。 您應該嘗試一下,特別是因為它包含廣泛的功能,例如「斜線」選單、流暢的動畫以及建立即時協作應用程式的潛力。  斜線選單  即時協作  格式選單 他們還提供了[20 多個範例](https://www.blocknotejs.org/examples)以及預覽和程式碼,您可以使用它們來快速跟進。  Blocknote 在 GitHub 上擁有超過 5,000 顆星,並有超過 1,500 名開發者在使用。 {% cta https://github.com/TypeCellOS/BlockNote %} 星 BlockNote ⭐️ {% endcta %} --- 12. [CopilotKit](https://github.com/CopilotKit/CopilotKit) - 在數小時內為您的產品提供 AI Copilot。 -------------------------------------------------------------------------------------  將 AI 功能整合到 React 中是很困難的,這就是 Copilot 的用武之地。一個簡單快速的解決方案,可將可投入生產的 Copilot 整合到任何產品中! 您可以使用兩個 React 元件將關鍵 AI 功能整合到 React 應用程式中。它們還提供內建(完全可自訂)Copilot 原生 UX 元件,例如`<CopilotKit />` 、 `<CopilotPopup />` 、 `<CopilotSidebar />` 、 `<CopilotTextarea />` 。 開始使用以下 npm 指令。 ``` npm i @copilotkit/react-core @copilotkit/react-ui ``` Copilot Portal 是 CopilotKit 提供的元件之一,CopilotKit 是一個應用程式內人工智慧聊天機器人,可查看目前應用狀態並在應用程式內採取操作。它透過插件與應用程式前端和後端以及第三方服務進行通訊。 這就是整合聊天機器人的方法。 `CopilotKit`必須包裝與 CopilotKit 互動的所有元件。建議您也開始使用`CopilotSidebar` (您可以稍後切換到不同的 UI 提供者)。 ``` "use client"; import { CopilotKit } from "@copilotkit/react-core"; import { CopilotSidebar } from "@copilotkit/react-ui"; import "@copilotkit/react-ui/styles.css"; export default function RootLayout({children}) { return ( <CopilotKit url="/path_to_copilotkit_endpoint/see_below"> <CopilotSidebar> {children} </CopilotSidebar> </CopilotKit> ); } ``` 您可以使用此[快速入門指南](https://docs.copilotkit.ai/getting-started/quickstart-backend)設定 Copilot 後端端點。 之後,您可以讓 Copilot 採取行動。您可以閱讀如何提供[外部上下文](https://docs.copilotkit.ai/getting-started/quickstart-chatbot#provide-context)。您可以使用`useMakeCopilotReadable`和`useMakeCopilotDocumentReadable`反應掛鉤來執行此操作。 ``` "use client"; import { useMakeCopilotActionable } from '@copilotkit/react-core'; // Let the copilot take action on behalf of the user. useMakeCopilotActionable( { name: "setEmployeesAsSelected", // no spaces allowed in the function name description: "Set the given employees as 'selected'", argumentAnnotations: [ { name: "employeeIds", type: "array", items: { type: "string" } description: "The IDs of employees to set as selected", required: true } ], implementation: async (employeeIds) => setEmployeesAsSelected(employeeIds), }, [] ); ``` 您可以閱讀[文件](https://docs.copilotkit.ai/getting-started/quickstart-textarea)並查看[演示影片](https://github.com/CopilotKit/CopilotKit?tab=readme-ov-file#demo)。 您可以輕鬆整合 Vercel AI SDK、OpenAI API、Langchain 和其他 LLM 供應商。您可以按照本[指南](https://docs.copilotkit.ai/getting-started/quickstart-chatbot)將聊天機器人整合到您的應用程式中。 基本概念是在幾分鐘內建立可用於基於 LLM 的應用程式的 AI 聊天機器人。 用例是巨大的,作為開發人員,我們絕對應該在下一個專案中嘗試使用 CopilotKit。 CopilotKit 在 GitHub 上擁有超過 4,200 個星星,發布了 200 多個版本,這意味著它們正在不斷改進。 {% cta https://github.com/CopilotKit/CopilotKit %} Star CopilotKit ⭐️ {% endcta %} --- 13.[自動完成](https://github.com/withfig/autocomplete)- IDE 風格的自動完成功能適用於您現有的終端和 shell。 ----------------------------------------------------------------------------------  [Fig](https://fig.io/?ref=github_autocomplete)讓命令列對個人來說更容易,對團隊來說更具協作性。 他們最受歡迎的產品是自動完成。當您鍵入時,Fig 會在現有終端機中彈出子命令、選項和上下文相關的參數。 最好的部分是您也可以將 Fig 的自動完成功能用於您自己的工具。以下是建立私人完成的方法: ``` import { ai } from "@fig/autocomplete-generators" ... generators: [ ai({ // the prompt prompt: "Generate a git commit message", // Send any relevant local context. message: async ({ executeShellCommand }) => { return executeShellCommand("git diff") }, //Turn each newline into a suggestion (can specify instead a `postProcess1 function if more flexibility is required) splitOn: "\n", }) ] ``` 您可以閱讀[Fig.io/docs](https://fig.io/docs/getting-started)了解如何開始。 他們在 GitHub 上有 24k+ Stars,這對於經常使用 shell 或終端機的開發人員來說非常有用。 {% cta https://github.com/withfig/autocomplete %} 星狀自動完成 ⭐️ {% endcta %} --- 14. [Tooljet](https://github.com/ToolJet/ToolJet) - 用於建立業務應用程式的低程式碼平台。 ----------------------------------------------------------------------  我們都建立前端,但它通常非常複雜並且涉及很多因素。這樣可以省去很多麻煩。 ToolJet 是一個開源低程式碼框架,可以用最少的工程工作來建置和部署內部工具。 ToolJet 的拖放式前端建構器可讓您在幾分鐘內建立複雜的響應式前端。 您可以整合各種資料來源,包括PostgreSQL、MongoDB、Elasticsearch等資料庫;具有 OpenAPI 規範和 OAuth2 支援的 API 端點; SaaS 工具,例如 Stripe、Slack、Google Sheets、Airtable 和 Notion;以及 S3、GCS 和 Minio 等物件儲存服務來取得和寫入資料。一切 :) 這就是 Tooljet 的工作原理。  您可以在 ToolJet 中開發多步驟工作流程以自動化業務流程。除了建置和自動化工作流程之外,ToolJet 還可以在您的應用程式中輕鬆整合這些工作流程。  您可以閱讀此[快速入門指南](https://docs.tooljet.com/docs/getting-started/quickstart-guide),該指南向您展示如何使用 ToolJet 在幾分鐘內建立員工目錄應用程式。該應用程式將讓您透過漂亮的用戶介面追蹤和更新員工資訊。 查看可用[功能列表](https://github.com/ToolJet/ToolJet?tab=readme-ov-file#all-features),包括 45 多個內建響應式元件、50 多個資料來源等等。 您可以閱讀[文件](https://docs.tooljet.com/docs/)並查看[操作指南](https://docs.tooljet.com/docs/how-to/use-url-params-on-load)。 它們在 GitHub 上有 26k+ Stars,並且基於 JavaScript 建置。他們也獲得了 GitHub 的資助,從而建立了巨大的信任。 {% cta https://github.com/ToolJet/ToolJet %} Star ToolJet ⭐️ {% endcta %} --- 15. [Apitable](https://github.com/apitable/apitable) - 用於建立協作應用程式的 API 導向的低程式碼平台。 ---------------------------------------------------------------------------------  APITable 是一個面向 API 的低程式碼平台,用於建立協作應用程式,並表示它比所有其他 Airtable 開源替代品都要好。 有很多很酷的功能,例如: - 即時協作。  - 您可以產生自動表單。  - 無限的跨錶連結。 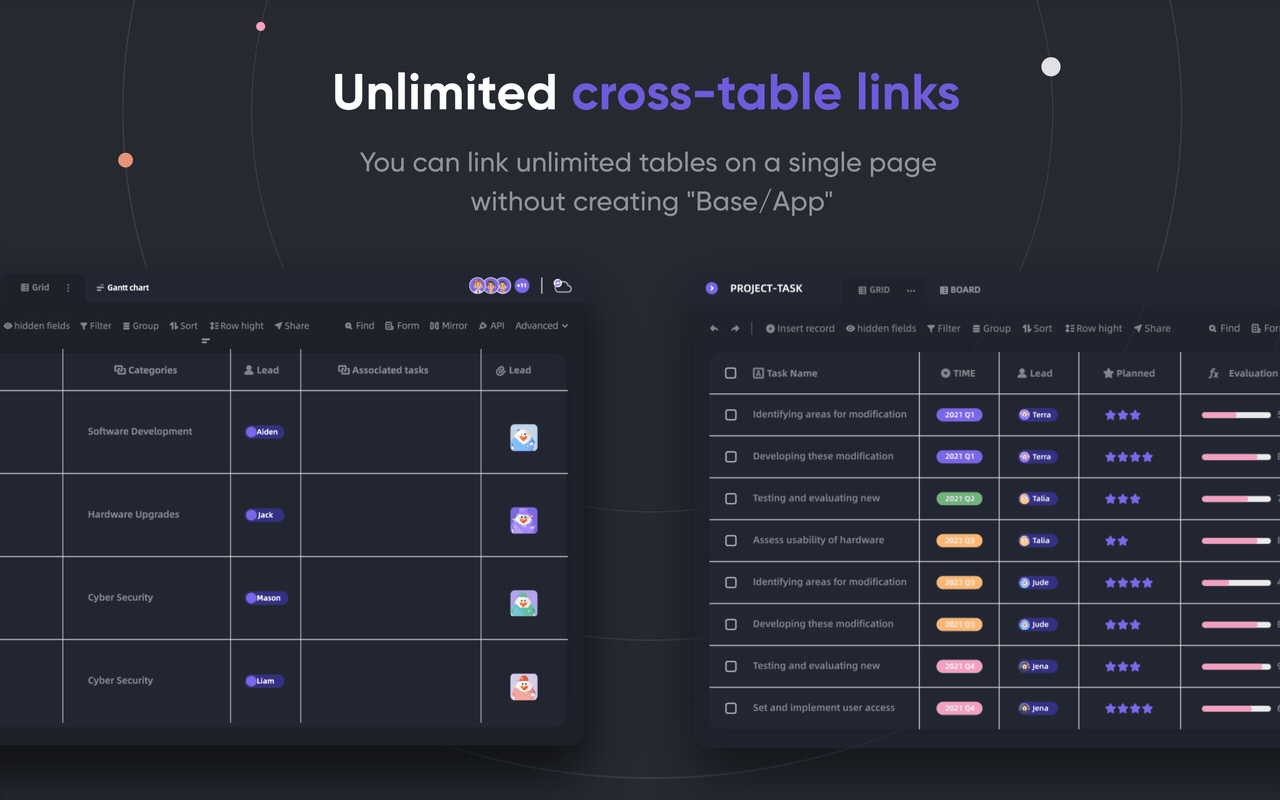 - API 第一個面板。 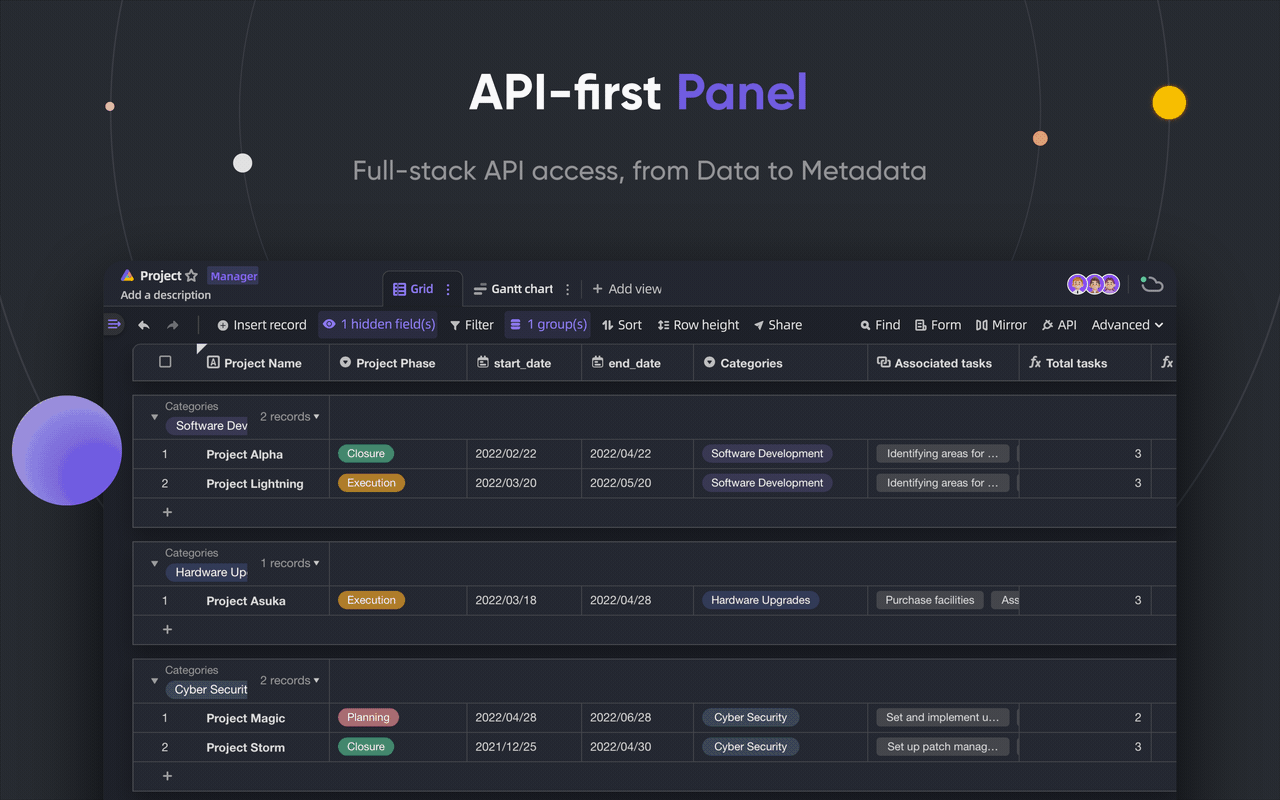 - 強大的行/列功能。 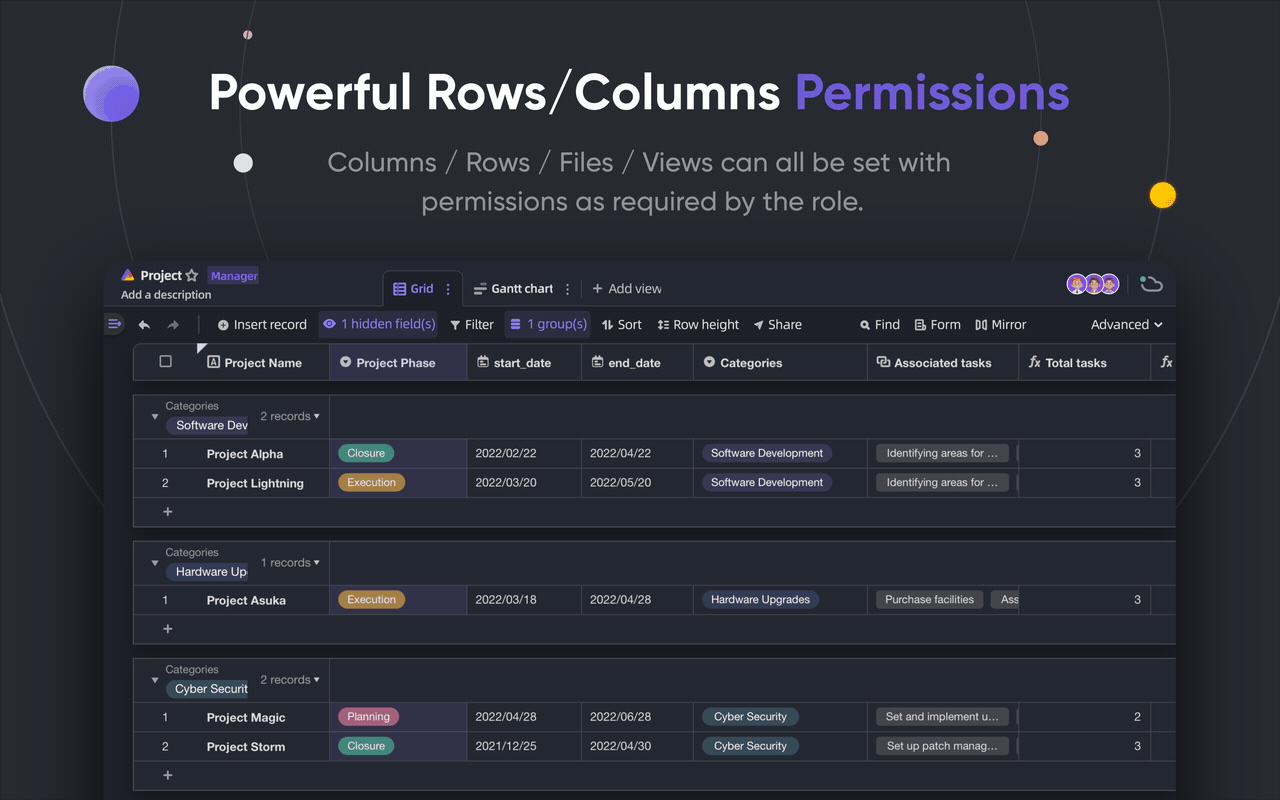 您可以閱讀完整的[功能清單](https://github.com/apitable/apitable?tab=readme-ov-file#-features)。 您可以嘗試[apitable](https://aitable.ai/)並在 apitable 的[live Gitpod demo](https://gitpod.io/#https://github.com/apitable/apitable)中查看該專案的演示。 您也可以閱讀[安裝指南](https://github.com/apitable/apitable?tab=readme-ov-file#installation),在本機或雲端運算環境中安裝 APITable。 {% cta https://github.com/apitable/apitable %} Star Apitable ⭐️ {% endcta %} --- 16. [n8n](https://github.com/n8n-io/n8n) - 工作流程自動化工具。 -----------------------------------------------------  n8n 是一個可擴展的工作流程自動化工具。透過公平程式碼分發模型,n8n 將始終擁有可見的原始程式碼,可用於自託管,並允許您加入自訂函數、邏輯和應用程式。 每個開發人員都想使用的工具。自動化是生產力和簡單性的關鍵。  n8n 基於節點的方法使其具有高度通用性,使您能夠將任何事物連接到任何事物。 有[400 多個集成選項](https://n8n.io/integrations),這幾乎是瘋狂的! 您可以看到所有[安裝](https://docs.n8n.io/choose-n8n/)選項,包括 Docker、npm 和自架。 開始使用以下命令。 ``` npx n8n ``` 此命令將下載啟動 n8n 所需的所有內容。然後,您可以透過開啟`http://localhost:5678`來存取 n8n 並開始建置工作流程。 在 YouTube 上觀看此[快速入門影片](https://www.youtube.com/watch?v=1MwSoB0gnM4)! {% 嵌入 https://www.youtube.com/watch?v=1MwSoB0gnM4 %} 您可以閱讀[文件](https://docs.n8n.io/)並閱讀本[指南](https://docs.n8n.io/try-it-out/),以便根據您的需求快速開始。 他們還提供初學者和中級[課程,](https://docs.n8n.io/courses/)以便輕鬆學習。 他們在 GitHub 上有 39k+ Stars,並提供兩個包供整體使用。 {% cta https://github.com/n8n-io/n8n %} 明星 n8n ⭐️ {% endcta %} --- 17. [DOMPurify](https://github.com/cure53/DOMPurify) - 一個僅限 DOM、超快、超級容忍 XSS 的 HTML 清理程式。 ----------------------------------------------------------------------------------------  DOMPurify 是一款僅限 DOM、超快、超級容忍 XSS 的 HTML、MathML 和 SVG 清理工具。作為開發人員,我們的應用程式需要它來確保它們足夠安全。 DOMPurify 可以淨化 HTML 並防止 XSS 攻擊。 您可以向 DOMPurify 提供一個充滿髒 HTML 的字串,它將傳回一個包含乾淨 HTML 的字串(除非另有配置)。 DOMPurify 將刪除所有包含危險 HTML 的內容,從而防止 XSS 攻擊和其他惡意行為。這也太快了。 他們使用瀏覽器提供的技術並將其轉變為 XSS 過濾器。您的瀏覽器速度越快,DOMPurify 的速度就越快。 DOMPurify 使用 JavaScript 編寫,適用於所有現代瀏覽器(Safari (10+)、Opera (15+)、Edge、Firefox 和 Chrome - 以及幾乎所有使用 Blink、Gecko 或 WebKit 的其他瀏覽器)。它不會在 MSIE 或其他舊版瀏覽器上中斷。它根本什麼都不做。 開始使用以下 npm 指令。 ``` npm install dompurify npm install jsdom // or use the unminified development version <script type="text/javascript" src="src/purify.js"></script> ``` 您可以這樣使用它。 ``` const createDOMPurify = require('dompurify'); const { JSDOM } = require('jsdom'); const window = new JSDOM('').window; const DOMPurify = createDOMPurify(window); const clean = DOMPurify.sanitize('<b>hello there</b>'); ``` 如果您遇到問題,請參閱[文件](https://github.com/cure53/DOMPurify?tab=readme-ov-file#how-do-i-use-it)。他們已經記錄了使用腳本或在伺服器端執行它。 您可以看到一些 [純化樣品](https://github.com/cure53/DOMPurify?tab=readme-ov-file#some-purification-samples-please)並觀看[現場演示](https://cure53.de/purify)。 使用起來也非常簡單。 DOMPurify 於 2014 年 2 月啟動,同時版本已達 v3.1.0。 其中涉及到很多概念,我渴望探索它們。如果您有任何與此相關的令人興奮的事情,請告訴我。 我發現的另一個有用的替代方案是[validator.js](https://github.com/validatorjs/validator.js) 。 他們在 GitHub 上擁有超過 12,000 顆星,被超過 30 萬開發者使用,每週下載量超過 5,475,000 次,這使得他們非常可信。 {% cta https://github.com/cure53/DOMPurify %} 明星 DOMPurify ⭐️ {% endcta %} --- 18. [OpenDevin](https://github.com/OpenDevin/OpenDevin) - 更少的程式碼,更多的內容。 -----------------------------------------------------------------------   這是一個開源專案,旨在複製 Devin,一名自主人工智慧軟體工程師,能夠執行複雜的工程任務並在軟體開發專案上與用戶積極協作。該計畫致力於透過開源社群的力量複製、增強和創新 Devin。 只是想讓你知道,這是在德文被介紹之前。 您可以閱讀帶有要求的[安裝說明](https://github.com/OpenDevin/OpenDevin?tab=readme-ov-file#installation)。 他們使用 LiteLLM,因此您可以使用任何基礎模型來執行 OpenDevin,包括 OpenAI、Claude 和 Gemini。 如果您想為 OpenDevin 做出貢獻,您可以查看 [演示](https://github.com/OpenDevin/OpenDevin/blob/main/README.md#opendevin-code-less-make-more)和[貢獻指南](https://github.com/OpenDevin/OpenDevin/blob/main/CONTRIBUTING.md)。 它在 GitHub 上擁有超過 10,700 個 Star,並且正在快速成長。 {% cta https://github.com/OpenDevin/OpenDevin %} 明星 OpenDevin ⭐️ {% endcta %} --- 19. [Amplification-](https://github.com/amplication/amplication)後端開發平台。 -----------------------------------------------------------------------  我想我們都同意,如果我們要達到標準,設定後端並從頭開始是很困難的。 我知道 Appwrite 和 Supabase 在功能方面要好得多,但每種情況都是獨特的,這可能會點擊而不是那些。  Amplication 旨在徹底改變可擴展且安全的 Node.js 應用程式的建立。 他們消除了重複的編碼任務,並提供可立即投入生產的基礎設施程式碼,這些程式碼根據您的規範精心定制,並遵循行業最佳實踐。 其用戶友好的介面促進了 API、資料模型、資料庫、身份驗證和授權的無縫整合。 Amplication 建立在靈活的、基於插件的架構之上,允許輕鬆定製程式碼並提供大量整合選項。   您可以閱讀[文件](https://docs.amplication.com/)並查看可用的[社群插件](https://docs.amplication.com/plugins-list/)清單。 他們還提供了[逐步教程](https://docs.amplication.com/tutorials/#step-by-step-tutorials),以幫助您使用 Angular 或 React 建立應用程式。 Amplification 在 GitHub 上擁有超過 13k 顆星,發布了 170 多個版本,因此它們不斷發展。 {% cta https://github.com/amplication/amplication %} 星狀放大 ⭐️ {% endcta %} --- 20. [Embla 旋轉木馬](https://github.com/davidjerleke/embla-carousel)-。 ------------------------------------------------------------------  我們都在應用程式中使用輪播,有時會切換到網格佈局,因為輪播並不總是好看,但這會改變您對輪播的看法。 我之所以了解 Embla Carousel,是因為 Shadcn/ui 在他們的 UI 系統中使用了它。 Embla Carousel 是一個簡單的輪播庫,具有出色的流暢運動和出色的滑動精度。它與庫無關、無依賴性且 100% 開源。 如果您不確定,我建議您查看[基本的實例](https://www.embla-carousel.com/examples/predefined/)。     我最喜歡的是視差,它可以提供非常酷且平滑的過渡。 它們支援 CDN、react、Vue、Svelte 和 Solid。 開始使用以下 npm 指令 (react)。 ``` npm install embla-carousel-react --save ``` 您可以這樣使用它。 Embla Carousel 提供了方便的 useEmblaCarousel 鉤子,用於與 React 無縫整合。最小的設定需要一個溢出包裝器和一個滾動容器。 `useEmblaCarousel`掛鉤將 Embla Carousel 選項作為第一個參數。您還需要使用 useEffect 存取 API ``` import React, { useEffect } from 'react' import useEmblaCarousel from 'embla-carousel-react' export function EmblaCarousel() { const [emblaRef, emblaApi] = useEmblaCarousel({ loop: false }) useEffect(() => { if (emblaApi) { console.log(emblaApi.slideNodes()) // Access API } }, [emblaApi]) return ( <div className="embla" ref={emblaRef}> <div className="embla__container"> <div className="embla__slide">Slide 1</div> <div className="embla__slide">Slide 2</div> <div className="embla__slide">Slide 3</div> </div> </div> ) } ``` 他們還提供了一組插件,您可以加入它們以實現自動播放等額外功能。 ``` npm install embla-carousel-autoplay --save ``` ``` import React, { useEffect } from 'react' import useEmblaCarousel from 'embla-carousel-react' import Autoplay from 'embla-carousel-autoplay' export function EmblaCarousel() { const [emblaRef] = useEmblaCarousel({ loop: false }, [Autoplay()]) return ( <div className="embla" ref={emblaRef}> <div className="embla__container"> <div className="embla__slide">Slide 1</div> <div className="embla__slide">Slide 2</div> <div className="embla__slide">Slide 3</div> </div> </div> ) } ``` 尋找[插件的完整列表](https://www.embla-carousel.com/plugins/),包括自動滾動和滾輪手勢。 您可以閱讀有關如何實現不同部分(例如斷點或上一個/下一個按鈕)的[文件](https://www.embla-carousel.com/get-started/)和[指南](https://www.embla-carousel.com/guides/)。 最讓我驚訝的部分是,您可以使用他們的[生成器](https://www.embla-carousel.com/examples/generator/)使用您自己的一組選項來產生自訂輪播。 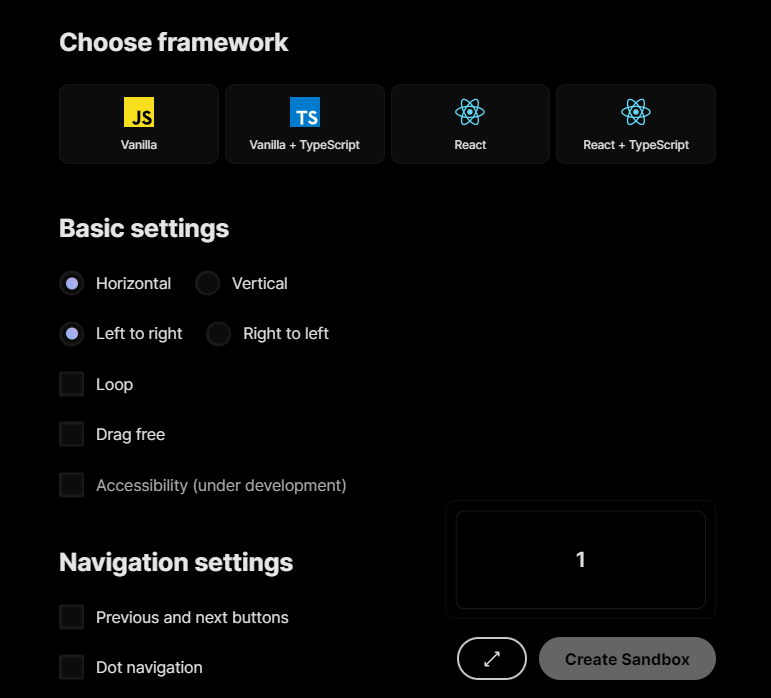  它們在 GitHub 上擁有 4.9K 顆星,並被超過 26000 名開發人員使用。如果我必須使用一個,我肯定會使用這個。 {% cta repo %} 明星名稱 ⭐️ {% endcta %} --- [21.Documenso](https://github.com/documenso/documenso) - 開源 DocuSign 替代方案。 --------------------------------------------------------------------------  如果您從事自由職業並需要簽署協議,這是最佳選擇。我們不應該浪費時間,而應該專注於重要的事情。 以數位方式簽署文件應該既快速又簡單,並且應該成為全球簽署的每個文件的最佳實踐。 如今,這在技術上相當簡單,但它也為每個簽名引入了一個新方:簽名工具提供者。 此專案的技術堆疊包括 TypeScript、Next.js、Prisma、Tailwind CSS、shadcn/ui、NextAuth.js、react-email、tRPC、@documenso/pdf-sign、React-PDF、PDF-Lib、Stripe 和韋爾塞爾。   免費套餐可讓您每月簽署 10 份文件,這已經足夠了。 您可以閱讀本文以了解如何[設定專案](https://github.com/documenso/documenso?tab=readme-ov-file#developer-setup)。 您可以閱讀[文件](https://github.com/documenso/documenso?tab=readme-ov-file#developer-quickstart)。 我知道這不是一個非常廣泛的用例,但您仍然可以從程式碼中學習,因此這始終是一個優點。 他們在 GitHub 上擁有超過 5800 顆星,並且發布了`v1.5`版本。 不是很流行但非常有用。 {% cta https://github.com/documenso/documenso %} 明星 documenso ⭐️ {% endcta %} --- 哇! 這花了我很長很長的時間來寫。我希望你喜歡它。 我知道人工智慧工具有時太多了,但我們應該使用它們來讓我們的工作更輕鬆。我的意思是,這就是我們所做的正確的事情,讓生活變得更輕鬆。 我嘗試涵蓋廣泛的工具。 不管怎樣,請讓我們知道您的想法以及您計劃在您的工作流程中使用這些工具嗎? 祝你有美好的一天!直到下一次。 我建立了很多技術內容,因此如果您能在 Twitter 上關注我來支持我,我將不勝感激。 |如果你喜歡這類東西, 請關注我以了解更多:) | [](https://twitter.com/Anmol_Codes) [](https://github.com/Anmol-Baranwal) [](https://www.linkedin.com/in/Anmol-Baranwal/) | |------------|----------| 關注 Taipy 以了解更多此類內容。 {% 嵌入 https://dev.to/taipy %} --- 原文出處:https://dev.to/taipy/21-tools-to-take-your-dev-skills-to-the-moon-53mf
Visual Studio Code 是目前市場上非常受歡迎且使用者友好的程式碼編輯器。如果您專注於使用 JavaScript 框架進行前端開發,這些擴充功能可以大大提高工作效率並節省您的時間。 在眾多類似的文章中,這篇文章有何不同?嗯,這是基於我個人的開發經驗。同事經常詢問我使用的擴充程序,本文分享了他們的見解。如果您正在尋找久經考驗的擴充功能來增強您的編碼體驗,那麼您可以在這裡找到它們。 文字格式和可讀性 -------- ### [Prettier — 程式碼格式化程序](https://marketplace.visualstudio.com/items?itemName=esbenp.prettier-vscode) 此擴充功能會自動格式化您的程式碼,使其看起來整潔且一致。這就像有一個私人助理來整理你的程式碼,可以節省你大量的時間和精力。可以根據我們專案的需求進行配置。 ### [色彩高光](https://marketplace.visualstudio.com/items?itemName=naumovs.color-highlight) 這個擴充功能是一個被低估且有用的工具,專門用於 UI 開發。它在程式碼編輯器中突出顯示顏色,使您可以輕鬆地使用顏色程式碼並確保精美的視覺呈現。在下面的螢幕截圖中,顏色`#43feee`被突出顯示,減少了出錯的機會。  ### [凹入彩虹](https://marketplace.visualstudio.com/items?itemName=oderwat.indent-rainbow) 它透過使用縮排顏色視覺化縮排等級來提高程式碼的可讀性。此擴展為每個縮排層級加入了微妙的顏色變化,使嵌套程式碼結構更易於一目了然地解析。  ### [改變大小寫](https://marketplace.visualstudio.com/items?itemName=wmaurer.change-case) 它提供了在camelCase、CONSTANT\_CASE或snake\_case之間進行轉換的直覺快捷方式,使大小寫轉換無縫且輕鬆。  ### [程式碼拼字檢查器](https://marketplace.visualstudio.com/items?itemName=streetsidesoftware.code-spell-checker) 它有助於發現程式碼中的拼字錯誤和拼字錯誤,確保程式碼更清晰、更具可讀性。它是維護程式碼品質和避免意外錯誤的有用工具。  --- 程式碼品質和改進 -------- ### [ESLint](https://marketplace.visualstudio.com/items?itemName=dbaeumer.vscode-eslint) ESLint 是確保 JavaScript 程式碼品質的寶貴工具。它會掃描您的程式碼中的錯誤、樣式不一致和常見錯誤,這有助於您維護更乾淨、更可靠的程式碼。您可以透過在設定檔中建立一組自訂[規則](https://eslint.org/docs/latest/rules/)來為您的專案配置 ESLint。 例如,如果您的專案禁止嵌套三元表達式,ESLint 將在您的編輯器中標記它們。同樣,如果沒有定義像 DDMMYYYY 這樣的變數,ESLint 會突出顯示它。您甚至可以指定每種類型問題的嚴重性級別,從而確定優先順序並相應地解決它們。這種積極主動的程式碼品質方法有助於防止錯誤並保持整個專案的一致性。 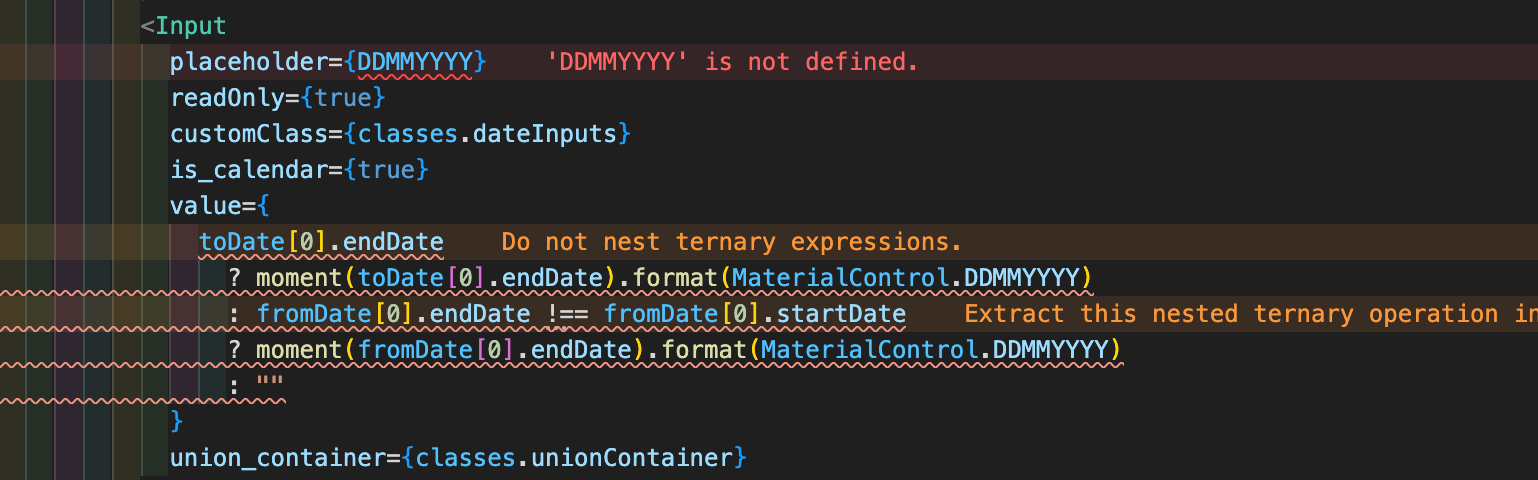 ### [誤差鏡頭](https://marketplace.visualstudio.com/items?itemName=usernamehw.errorlens) 它是一個 VS Code 擴展,可增強程式碼編輯器中的錯誤突出顯示。它提供常見錯誤和警告的即時回饋,使開發人員能夠在編寫程式碼時快速解決問題。  ### [JS重構助手](https://marketplace.visualstudio.com/items?itemName=p42ai.refactor) 對於使用 JavaScript、TypeScript、React 和 Vue.js 的開發人員來說,這是一個不可或缺的工具。它提供了超過 120 個程式碼操作,可以有效地編輯、現代化和重構程式碼,使程式碼維護和最佳化變得更加容易。  ### [聲納林特](https://marketplace.visualstudio.com/items?itemName=SonarSource.sonarlint-vscode) 它提供了比簡單的 linting 更全面的程式碼分析。 SonarLint 不僅可以偵測編碼問題,還可以更深入地了解程式碼品質、安全漏洞和潛在的效能瓶頸。 它利用基於行業最佳實踐的規則集,並可以與 SonarQube 或 SonarCloud 整合以進行集中程式碼品質管理。對於較大的專案,強烈建議這樣做。  --- 開發工具和實用程式 --------- ### [控制台忍者](https://marketplace.visualstudio.com/items?itemName=WallabyJs.console-ninja) 它透過直接在程式碼旁邊顯示 console.log 輸出和執行時錯誤來改進 JS 開發工作流程。此擴充功能提供了對偵錯資訊的便捷存取,增強了程式碼理解和問題解決。  ### [Turbo 控制台日誌](https://marketplace.visualstudio.com/items?itemName=ChakrounAnas.turbo-console-log) 它加速了寫入有意義的日誌訊息的過程。此擴充功能可自動插入 console.log 語句,從而在偵錯和故障排除任務期間節省時間和精力。這是我的清單中最常用的擴充功能之一,經常被問到。 1. 選擇或懸停作為除錯主題的變數(手動選擇將始終接管懸停選擇) 2. 按`ctrl + alt + L` (Windows) 或`ctrl + option + L` (Mac) 日誌訊息將插入到與所選變數相關的下一行。 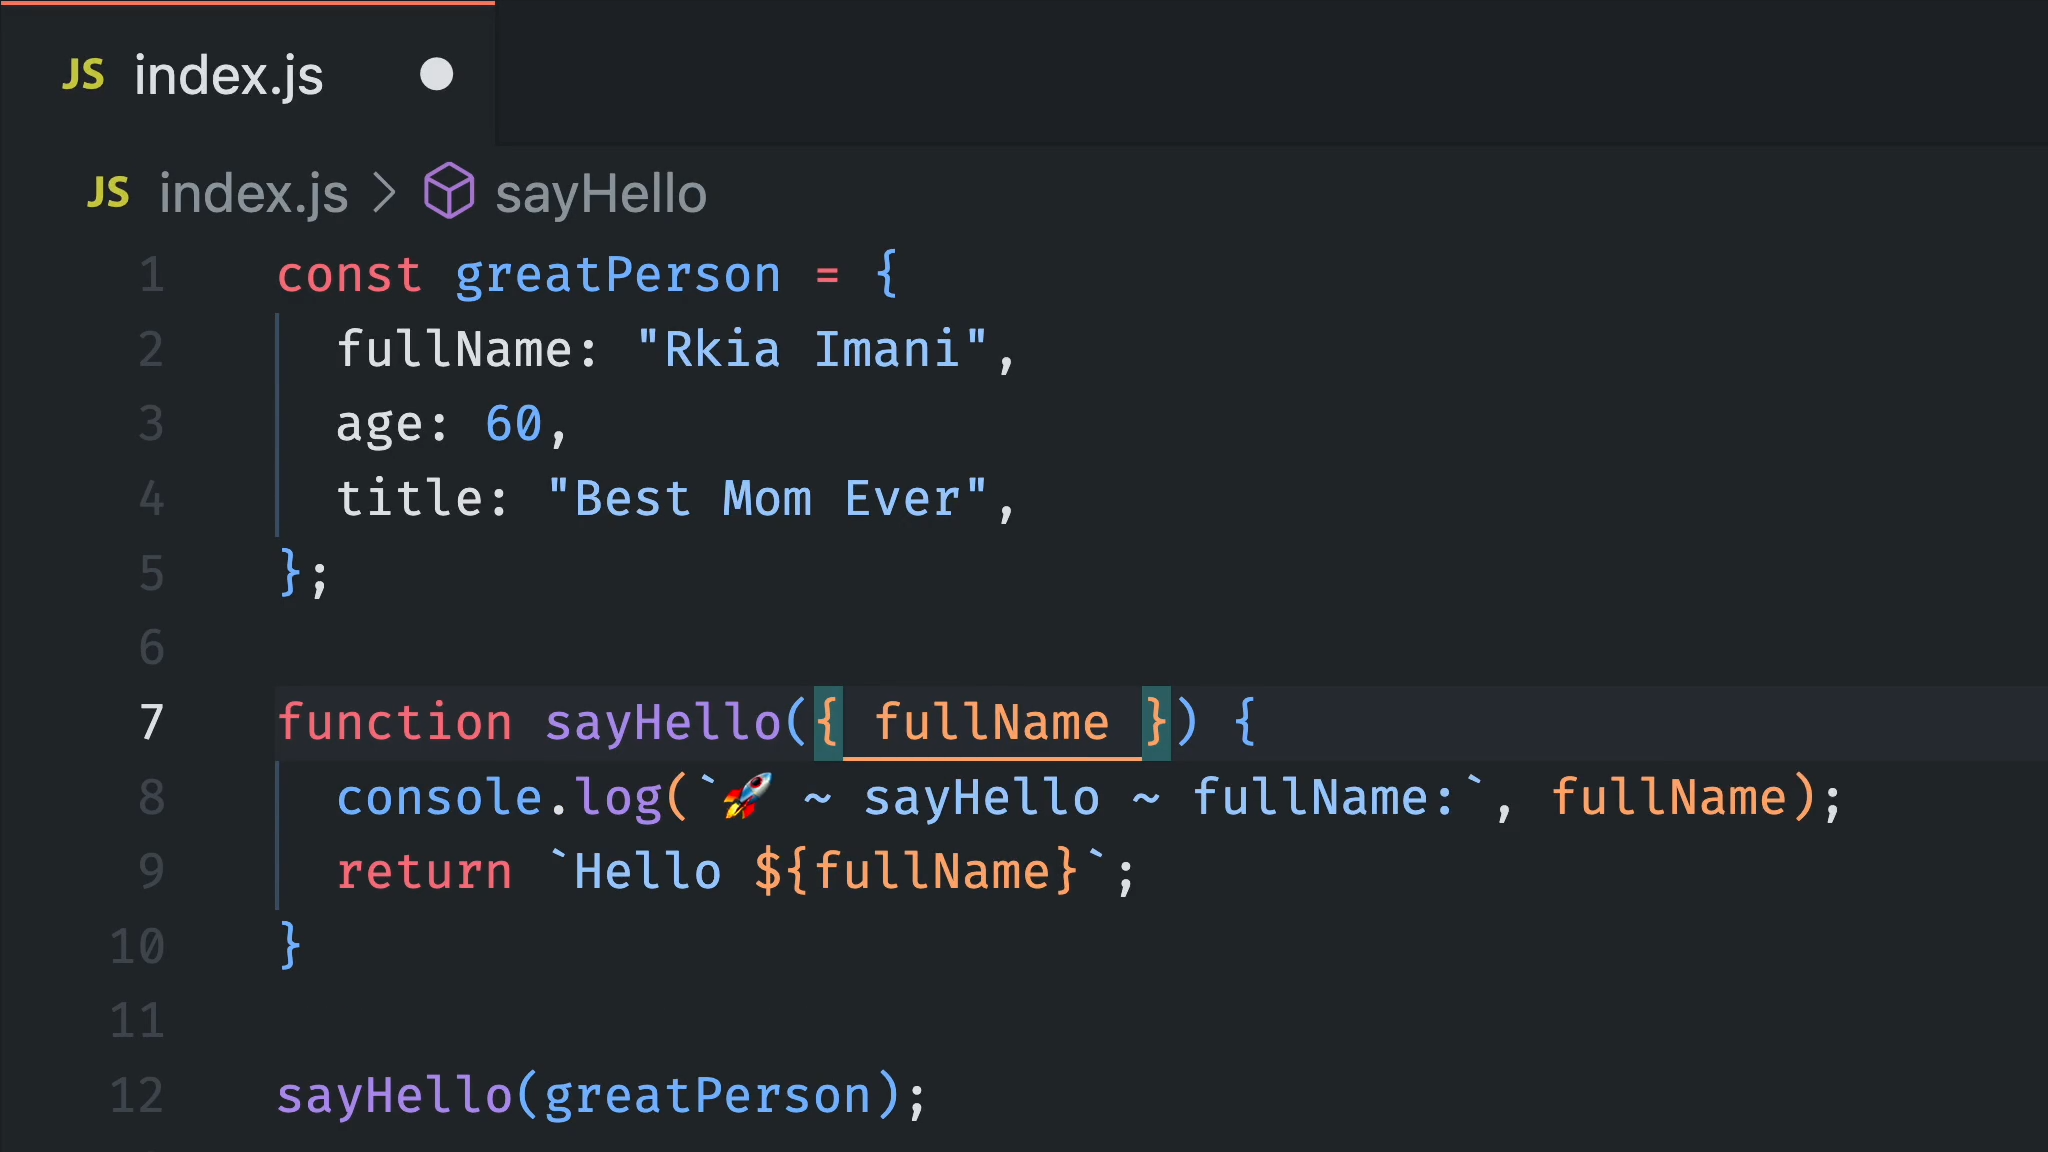 ### [吉特透鏡](https://marketplace.visualstudio.com/items?itemName=eamodio.gitlens) 對於依賴 Git 進行版本控制的開發人員來說,它是必備的擴充。透過 GitLens,您可以輕鬆地視覺化程式碼作者身份、瀏覽 Git 儲存庫,並獲得有關專案歷史和演變的寶貴見解。  GitLens 的主要功能之一是它能夠直接與程式碼內聯顯示詳細註釋或「指責」訊息。這使您可以查看誰最後修改了每行程式碼以及進行更改的時間。透過提供這種程度的程式碼作者可見性,GitLens 可以幫助您了解每行程式碼背後的上下文,並與您的團隊更有效地協作。  ### [Mintlify 文件編寫器](https://marketplace.visualstudio.com/items?itemName=mintlify.document) 它是一款基於 AI 的 VS Code 文件工具。它為使用各種程式語言編寫文件提供智慧建議和自動完成功能。 透過支援 Markdown 格式並與 VS Code 無縫集成,它可以幫助開發人員輕鬆建立專業文件。  ### [進口成本](https://marketplace.visualstudio.com/items?itemName=wix.vscode-import-cost) 此擴充功能將在編輯器中內嵌顯示導入包的大小。此擴充功能利用 webpack 來偵測導入的大小。 它透過辨識專案中使用的重型庫來幫助提高性能。  --- 特定語言的工具 ------- ### [自動關閉標籤](https://marketplace.visualstudio.com/items?itemName=formulahendry.auto-close-tag) 當您在開始標記的右括號中鍵入內容時,它會自動新增 HTML/XML 結束標記。這種節省時間的功能減少了手動工作量並簡化了編碼,從而實現更快、更有效率的開發。  ### [自動重命名標籤](https://marketplace.visualstudio.com/items?itemName=formulahendry.auto-rename-tag) 當我們重新命名一個標籤時,它會自動重新命名已配對的 HTML/XML 標籤。這個小但有用的功能可以節省時間,使編碼更有效率和愉快。  ### [CSS轉換器](https://marketplace.visualstudio.com/items?itemName=Lakkannawalikar.css-converter) 它將 HTML CSS 轉換為 JS CSS 以用於樣式化元件,反之亦然。 1. 選擇要轉換的 CSS 文本 2. 輸入`Shift + Command + V` (mac)、 `Shift + Ctrl + V` (windows/linux)  --- 測試和測試覆蓋率 -------- ### [是](https://marketplace.visualstudio.com/items?itemName=Orta.vscode-jest) 它可以幫助開發人員直接在編輯器中執行和除錯 Jest 測試。憑藉內嵌測試結果和直覺的導航,它簡化了 JavaScript 專案的測試工作流程。  ### [覆蓋範圍](https://marketplace.visualstudio.com/items?itemName=ryanluker.vscode-coverage-gutters) 它有助於直接在程式碼編輯器中顯示 lcov 或 xml 報告產生的測試覆蓋率資料,並提供對程式碼覆蓋率的深入了解,幫助您評估測試套件的有效性。無需切換到另一個窗口,從而節省了時間。  --- 獎金 -- ### [瓦卡時間](https://marketplace.visualstudio.com/items?itemName=WakaTime.vscode-wakatime) 它會自動追蹤您跨不同程式語言的編碼時間,提供寶貴的見解來優化您的生產力。  ### 自動儲存 VS 程式碼設定 我發現一個有用的省時技巧是將“自動儲存 VS 程式碼”設定配置為 onFocusChange。這意味著每當我切換到不同的檔案或應用程式時,我的更改都會自動儲存。這樣就無需手動儲存檔案並避免遺失任何修改的風險。此外,對於行動或網頁應用程式,此設定允許我在切換到瀏覽器或模擬器時立即看到更新的更改,從而加快開發過程。  --- 最後的話 ---- 上述這些工具透過自動化任務和簡化工作流程顯著改善了開發體驗。它們透過在程式碼編輯器中提供程式碼格式化、錯誤偵測和版本控制整合等功能,為開發人員節省了大量的時間和精力。 --- 原文出處:https://dev.to/saloniagrawal/boost-productivity-quality-essential-vs-code-extensions-18oj
**嘿,編碼員!** 我想分享一些我發現的最酷的網站,它們確實可以節省您的時間並幫助提高您的編碼技能。 每一款都有獨特且免費的東西。 那麼就讓我們從👇開始吧 ## 1. [HTMLrev.com💎](htmlrev.com)  這個網站真的很棒,他們在每個類別(如登陸頁面、部落格、作品集、電子商務和儀表板)上收集了**1000 多個免費HTML 模板**,其中包含大量使用HTML、CSS、 TailwindCSS 和JavaScript 等 必須結帳一次🤓。 ## 2. [uiverse.io✨](uiverse.io)  UIverse 擁有超過 **3000 多個免費 CSS 和 Tailwind 元素**,您可以在專案中使用,例如按鈕、表單、載入器等。 其他開發者也貢獻了它們,因此品質非常好 ⭐。他們甚至有程式碼片段可供複製。 這麼大的圖書館竟然免費! ## 3.[exercism.io💪](exercism.io)  這對於**練習特定的編碼挑戰**非常有用。他們有超過 3500 個簡短的練習,分成不同的語言。 對解決方案進行編碼後,您可以提交它以獲得自動回饋並與導師配對。 這是學習新技能和更好地進行除錯的有趣😅方式。 ## 4. [quickref.me💭](quickref.me)  需要**您剛接觸的語言**的語法快速參考嗎?這個☝網站非常完美。 他們的備忘錄涵蓋了從 Python 和 JavaScript 到 Vim 和 Markdown 的所有內容。 當您遇到困難時,您可以隨時搜尋它們。真的很方便! ## 5. [resume.io📝](resume.io) 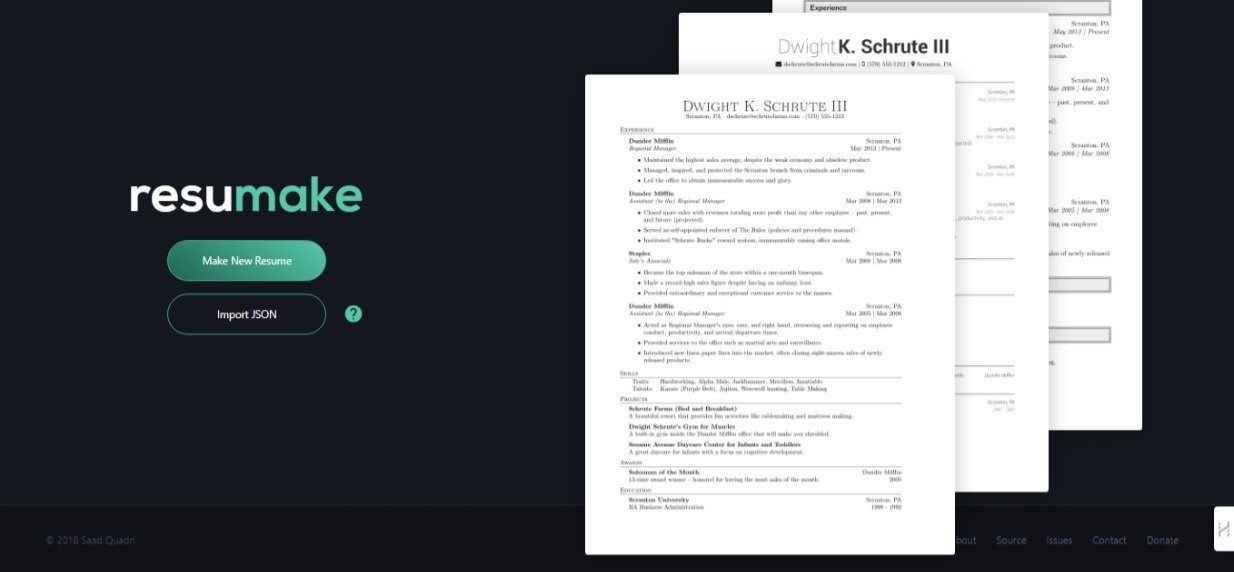 當您準備好建立您的編碼作品集時,**此網站可協助您建立專業的履歷**。😎 他們為開發人員、設計師等提供精美的客製化模板。您只需輸入您的訊息,它就會產生高品質的 PDF。 非常適合申請實習或工作! ## 很快再見👋 **感謝您閱讀這篇部落格🙏**,我希望這能為您提供一些新的地方來了解程式設計師朋友! _如果您發現任何其他有用的網站,請發表評論📩。_ 並且不要忘記加上“💖🦄🔥” https://github.com/taqui-786 關注Github✅ ## 快樂編碼😊 --- 原文出處:https://dev.to/random_ti/5-killer-websites-for-coders-a7
世界上充滿了有前景的人工智慧工具,如 Sora、ChatGPT 以及更多即將推出的工具。 我收集了一些你必須使用的令人興奮的人工智慧工具。 該清單包括 Devin AI 的開源替代品、Notion、5 秒內的語音克隆、電子郵件自動化軟體以及您從未聽說過的工具。好奇心超載! 別忘了給他們加星號🌟 讓我們涵蓋這一切! --- 1. [Taipy](https://github.com/Avaiga/taipy) - 將資料和人工智慧演算法整合到生產就緒的 Web 應用程式中。 ----------------------------------------------------------------------------  Taipy 是一個開源 Python 庫,可用於輕鬆的端到端應用程式開發,具有假設分析、智慧管道執行、內建調度和部署工具。 我相信你們大多數人都不明白 Taipy 用於為基於 Python 的應用程式建立 GUI 介面並改進資料流管理。 因此,您可以繪製資料集的圖表,並使用類似 GUI 的滑桿來提供使用其他實用功能來處理資料的選項。 雖然 Streamlit 是一種流行的工具,但在處理大型資料集時,其效能可能會顯著下降,這使得它在生產級使用上不切實際。 另一方面,Taipy 在不犧牲性能的情況下提供了簡單性和易用性。透過嘗試 Taipy,您將親身體驗其用戶友好的介面和高效的資料處理。 在底層,Taipy 利用各種函式庫來簡化開發並增強功能。  開始使用以下命令。 ``` pip install taipy ``` 我們來談談最新的[Taipy v3.1 版本](https://docs.taipy.io/en/latest/relnotes/)。 最新版本使得在 Taipy 的多功能零件物件中可視化任何 HTML 或 Python 物件成為可能。 這意味著[Folium](https://python-visualization.github.io/folium/latest/) 、 [Bokeh](https://bokeh.org/) 、 [Vega-Altair](https://altair-viz.github.io/)和[Matplotlib](https://matplotlib.org/)等程式庫現在可用於視覺化。 這也帶來了對[Plotly python](https://plotly.com/python/)的原生支持,使繪製圖表變得更加容易。  他們還使用分散式運算提高了效能,但最好的部分是 Taipy,它的所有依賴項現在都與 Python 3.12 完全相容,因此您可以在使用 Taipy 進行專案的同時使用最新的工具和程式庫。 您可以閱讀[文件](https://docs.taipy.io/en/latest/)。 例如,您可以看到[聊天演示](https://docs.taipy.io/en/release-3.1/gallery/llm/5_chatbot/),它使用 OpenAI 的 GPT-4 API 來產生對您的訊息的回應。您可以輕鬆更改程式碼以使用任何其他 API 或模型。  另一個有用的事情是,Taipy 團隊提供了一個名為[Taipy Studio](https://docs.taipy.io/en/latest/manuals/studio/)的 VSCode 擴充功能來加速 Taipy 應用程式的建置。  您也可以使用 Taipy 雲端部署應用程式。 如果您想閱讀部落格來了解程式碼庫結構,您可以閱讀 HuggingFace[的使用 Taipy 在 Python 中為您的 LLM 建立 Web 介面](https://huggingface.co/blog/Alex1337/create-a-web-interface-for-your-llm-in-python)。 嘗試新技術通常很困難,但 Taipy 提供了[10 多個演示教程,](https://docs.taipy.io/en/release-3.1/gallery/)其中包含程式碼和適當的文件供您遵循。 例如,一些現場演示範例和專案想法: - [新冠儀表板](https://covid-dashboard.taipy.cloud/Country) - [推文生成](https://tweet-generation.taipy.cloud/) - [資料視覺化](https://production-planning.taipy.cloud/Data-Visualization) - [即時人臉辨識](https://face-recognition.taipy.cloud/) - [國際象棋大師](https://github.com/KorieDrakeChaney/taipy-chess) Taipy 在 GitHub 上有 7k+ Stars,並且處於`v3`版本,因此它們正在不斷改進。 https://github.com/Avaiga/taipy Star Taipy ⭐️ --- 2. [PR Agent](https://github.com/Codium-ai/pr-agent) - 自動拉取請求分析、回饋、建議的工具。 -------------------------------------------------------------------------  這是一個開源工具,可幫助有效地審查和處理拉取請求。它有許多獨特的選項,並提供跨各種 git 提供者的廣泛的拉取請求功能。 每天有數百萬個開源專案和數百個 Pull 請求,因此有一個可以幫助您的朋友是非常好的事情。 我是開源維護者,所以我知道有時會變得多麼困難,特別是每天都要審查這麼多的 Pull 請求。 無論如何,這就是公關代理商的幕後工作方式。  您必須使用`@CodiumAI-Agent /review`對拉取請求發表評論,代理商將透過對 PR 的審查進行回應。有很多可用的選項,例如`describe`和`improve` 。 他們也提供了 [PR-Agent 工具](https://pr-agent-docs.codium.ai/tools/),每個頁面都有一個專門的頁面來解釋如何使用它。 您可以閱讀[文件](https://pr-agent-docs.codium.ai/installation/)並查看[範例結果](https://github.com/Codium-ai/pr-agent?tab=readme-ov-file#example-results)。 最好的部分是您甚至可以將其作為[GitHub Action](https://pr-agent-docs.codium.ai/installation/github/#run-as-a-github-action)執行。他們還提供了一個專業版本,有更多的選擇,但免費套餐足以開始使用。 如果您正在尋找好的文章,我推薦[使用 CodiumAI PR-Agent 自動進行拉取請求審查和](https://rnemet.dev/posts/ai/codium-pragent/)[CodiumAI PR-Agent 讓開發人員的生活更輕鬆的 5 個原因](https://medium.com/@mengineer/5-reasons-why-codiumai-pr-agent-is-making-developers-lives-easier-e040be0f6a36)。這些提供了有關 PR Agent 的大量概述。 它們在 GitHub 上有大約 3800 個 Star,被 300 多名開發人員使用,並且是使用 Python 建構的。雖然它們可能不是非常受歡迎,但它們的用例非常好。 https://github.com/Codium-ai/pr-agent 明星公關代理人 ⭐️ --- 3. [Mintlify](https://github.com/mintlify/writer) - 在建置時出現的文件。 --------------------------------------------------------------  Mintlify 是一款由人工智慧驅動的文件編寫器,您只需 1 秒鐘即可編寫程式碼文件 :D 幾個月前我發現了 Mintlify,從那時起我就一直是它的粉絲。我見過很多公司使用它,甚至我使用我的商務電子郵件產生了完整的文件,結果證明這是非常簡單和體面的。如果您需要詳細的文件,Mintlify 就是解決方案。 另一個用例是根據我們將在這裡討論的程式碼產生文件。 您可以安裝[VSCode 擴充功能](https://marketplace.visualstudio.com/items?itemName=mintlify.document)或將其安裝在[IntelliJ](https://plugins.jetbrains.com/plugin/18606-mintlify-doc-writer)上。 您只需突出顯示程式碼或將遊標放在要記錄的行上。然後點選「編寫文件」按鈕(或按 ⌘ + 。) 您可以閱讀[文件](https://github.com/mintlify/writer?tab=readme-ov-file#%EF%B8%8F-mintlify-writer)和[安全指南](https://writer.mintlify.com/security)。 如果您更喜歡教程,那麼您可以觀看[Mintlify 的工作原理](https://www.loom.com/embed/3dbfcd7e0e1b47519d957746e05bf0f4)。它支援 10 多種程式語言,並支援許多文件字串格式,例如 JSDoc、reST、NumPy 等。 順便說一句,他們的網站連結是[writer.mintlify.com](https://writer.mintlify.com/) ;回購協議中目前的似乎是錯誤的。 它在 GitHub 上有大約 2.4k 顆星,受到許多開發人員的喜愛,並且是使用 TypeScript 建構的。 https://github.com/mintlify/writer Star Mintlify ⭐️ --- 4.[螢幕截圖到程式碼](https://github.com/abi/screenshot-to-code)- 放入螢幕截圖並將其轉換為乾淨的程式碼。 ---------------------------------------------------------------------------  這是一個非常受歡迎的開源專案,但我可以肯定地說,很多開發人員仍然沒有意識到這一點。使用此功能,您可以將使用者介面的建置速度提高 10 倍。 這是一個簡單的工具,可以使用 AI 將螢幕截圖、模型和 Figma 設計轉換為乾淨、實用的程式碼。 該應用程式有一個 React/Vite 前端和一個 FastAPI 後端。如果您想使用 Claude Sonnet 或實驗性視訊支持,您將需要一個能夠存取 GPT-4 Vision API 的 OpenAI API 金鑰或一個 Anthropic 金鑰。您可以閱讀[指南](https://github.com/abi/screenshot-to-code?tab=readme-ov-file#-getting-started)來開始。 您可以在託管版本上[即時試用](https://screenshottocode.com/),並觀看 wiki 上提供的[一系列演示影片](https://github.com/abi/screenshot-to-code/wiki/Screen-Recording-to-Code)。 他們在 GitHub 上擁有超過 47k 顆星星,並支援許多技術堆疊,例如 React 和 Vue,以及不錯的 AI 模型,例如 GPT-4 Vision、Claude 3 Sonnet 和 DALL-E 3。 https://github.com/abi/screenshot-to-code 將螢幕截圖轉為程式碼 ⭐️ --- 5. [FaceSwap](https://github.com/deepfakes/faceswap) - 適合所有人的 Deepfakes 軟體。 ---------------------------------------------------------------------------  我總是對 Deepfakes 著迷,因為這就是某些人工智慧的工作原理,尤其是使用影片的人工智慧。 相信我!我們中的許多人甚至不使用它來建立影片,我們只是修改程式碼來看看它的作用,不道德的使用並不能代表它的建立原因、我們現在如何使用它,或者我們對它的未來的看法。 您應該觀看此影片以了解電腦如何辨識臉!觀看[此影片](https://www.youtube.com/watch?v=aircAruvnKk)以了解神經網路的基本功能。 https://www.youtube.com/watch?v=R9OHn5ZF4Uo 您可以閱讀[INSTALL.md](https://github.com/deepfakes/faceswap/blob/master/INSTALL.md)以取得詳細的安裝指南。根據文件,您需要具有 CUDA 支援的現代 GPU 才能獲得最佳效能。許多 AMD GPU 透過 DirectML (Windows) 和 ROCm (Linux) 支援。 您可以閱讀<a href="">文件</a>、觀看[演示影片](https://www.dailymotion.com/video/x810mot)並存取他們的[部落格](https://faceswap.dev/blog/)以觀看具有其他用例的會議影片。 我最喜歡的事實是,他們有一個非常簡單的部分,介紹任何人如何為該專案做出貢獻,包括對生成模型感興趣的人、開發人員、非開發高級用戶、最終用戶,當然還有討厭者:) 他們在 GitHub 上有 48k+ Stars,這使得他們足夠可信。 https://github.com/deepfakes/faceswap 明星 FaceSwap ⭐️ --- 6. [Amica](https://github.com/semperai/amica) - 讓您可以在瀏覽器中輕鬆地與 3D 角色聊天。 ----------------------------------------------------------------------  Amica 是一個開源接口,用於透過語音合成和語音辨識與 3D 角色進行互動式通訊。 您可以匯入 VRM 文件,調整聲音以適合角色,並產生包含情緒表達的回應文字。 他們使用 Three.js、OpenAI、Whisper、Bakllava 等進行視覺處理。您可以閱讀[Amica 的工作原理](https://docs.heyamica.com/overview/how-amica-works)及其所涉及的[核心概念](https://docs.heyamica.com/overview/core-concepts)。 您可以克隆該存儲庫並使用它來[開始](https://docs.heyamica.com/getting-started/installation)。 ``` npm i npm run dev ``` 您可以閱讀[文件](https://docs.heyamica.com/)並查看[演示](https://amica.arbius.ai/),這真是太棒了:D  您可以觀看這段簡短的影片,了解它的功能。 https://www.youtube.com/watch?v=hUxAEnFiXH8 Amica 使用 Tauri 建立桌面應用程式。 他們在 GitHub 上有 400+ Stars,而且看起來非常容易使用。 https://github.com/semperai/amica Star Amica ⭐️ --- 7. [Bark](https://github.com/suno-ai/bark) - 文字提示的生成音訊模型。 ---------------------------------------------------------  Bark 是 Suno 建立的基於轉換器的文本到音訊模型。 Bark 可以產生高度逼真的多語言語音以及其他音訊 - 包括音樂、背景噪音和簡單的音效。 該模型還可以產生非語言交流,如笑、嘆息和哭泣。哇! 它擁有 MIT 許可證,這意味著它現在可用於商業用途。 Bark 支援超過 100 種語言的揚聲器預設。您可以[在此處](https://suno-ai.notion.site/8b8e8749ed514b0cbf3f699013548683?v=bc67cff786b04b50b3ceb756fd05f68c)查看支援的語音預設庫。 根據文件,Bark 嘗試匹配給定預設的語氣、音高、情緒和韻律,但目前不支援自訂語音複製。該模型還嘗試保留音樂、環境噪音等。這超出了任何人的需要。 您可以這樣使用它。如果您想將其與 Transformers 庫一起使用,請閱讀[本文](https://github.com/suno-ai/bark?tab=readme-ov-file#-transformers-usage)。 ``` from bark import SAMPLE_RATE, generate_audio, preload_models from scipy.io.wavfile import write as write_wav from IPython.display import Audio # download and load all models preload_models() # generate audio from text text_prompt = """ Hello, my name is Suno. And, uh — and I like pizza. [laughs] But I also have other interests such as playing tic tac toe. """ audio_array = generate_audio(text_prompt) # save audio to disk write_wav("bark_generation.wav", SAMPLE_RATE, audio_array) # play text in notebook Audio(audio_array, rate=SAMPLE_RATE) ``` Bark 開箱即用支援各種語言,並自動根據輸入文字確定語言。當提示使用程式碼轉換文字時,Bark 將嘗試使用相應語言的本地口音。 您可以在[Google Colab](https://colab.research.google.com/drive/1eJfA2XUa-mXwdMy7DoYKVYHI1iTd9Vkt?usp=sharing) & [Replicate](https://replicate.com/suno-ai/bark)閱讀<a href="">文件</a>並查看演示。 您也可以在筆記本部分閱讀有關語音一致性增強和其他形式的[範例](https://github.com/suno-ai/bark/tree/main/notebooks)。  它們支援多種語言,如英語、印地語、德語、法語等。 他們在 GitHub 上擁有 30k+ Stars,並且經營超過 300,000 人的社區,這使他們成為值得選擇的選擇。 https://github.com/suno-ai/bark 星樹 ⭐️ --- 8. [GPTDiscord](https://github.com/Kav-K/GPTDiscord) - Discord 的一體化 GPT 介面。 --------------------------------------------------------------------------- 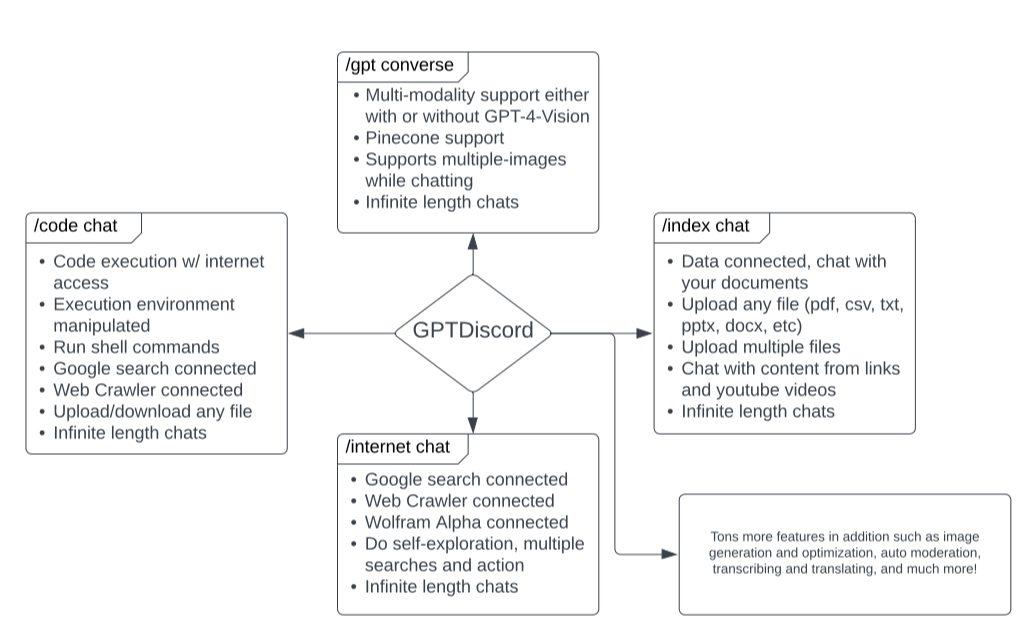 我是 Discord 上多個社群的成員,具有出色用例的機器人可以改善整體最終用戶體驗。 這個機器人的功能與 ChatGPT 網路相當,甚至在某些事情上做得更好! 它們支援一切,從多模態圖像理解、程式碼解釋、高級資料分析、文件問答、與 Wolfram Alpha 的網路連接聊天和 Google 存取、AI 審核、使用 DALL-E 生成圖像等等! 您可以閱讀 GPTDiscord 的所有高效[功能](https://github.com/Kav-K/GPTDiscord?tab=readme-ov-file#features)。 您可以閱讀[安裝指南](https://github.com/Kav-K/GPTDiscord/blob/main/detailed_guides/INSTALLATION.md)。 您可以查看[螢幕截圖](https://github.com/Kav-K/GPTDiscord?tab=readme-ov-file#screenshots)並查看不同目的的[詳細指南](https://github.com/Kav-K/GPTDiscord/tree/main/detailed_guides)清單。 他們在 GitHub 上有大約 1.8k+ Stars,而且肯定在進步。 https://github.com/Kav-K/GPTDiscord 星 GPTDiscord ⭐️ --- 9. [Upscayl](https://github.com/upscayl/upscayl) - 開源 AI 影像擴大機。 ---------------------------------------------------------------  適用於 Linux、MacOS 和 Windows 的免費開源 AI Image Upscaler 採用 Linux 優先概念建構。 它可能與全端無關,但它對於升級圖像很有用。 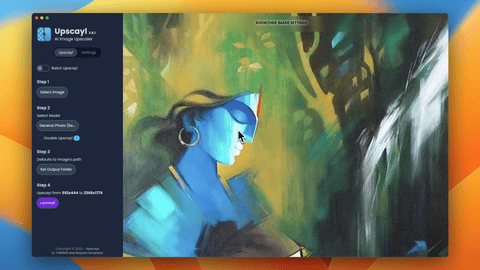  透過最先進的人工智慧,Upscayl 可以幫助您將低解析度影像變成高解析度。清脆又鋒利! 您可以閱讀[安裝指南](https://github.com/upscayl/upscayl?tab=readme-ov-file#-installation),並查看 Upscayl 之前/之後的[比較](https://github.com/upscayl/upscayl/blob/main/COMPARISONS.MD)。 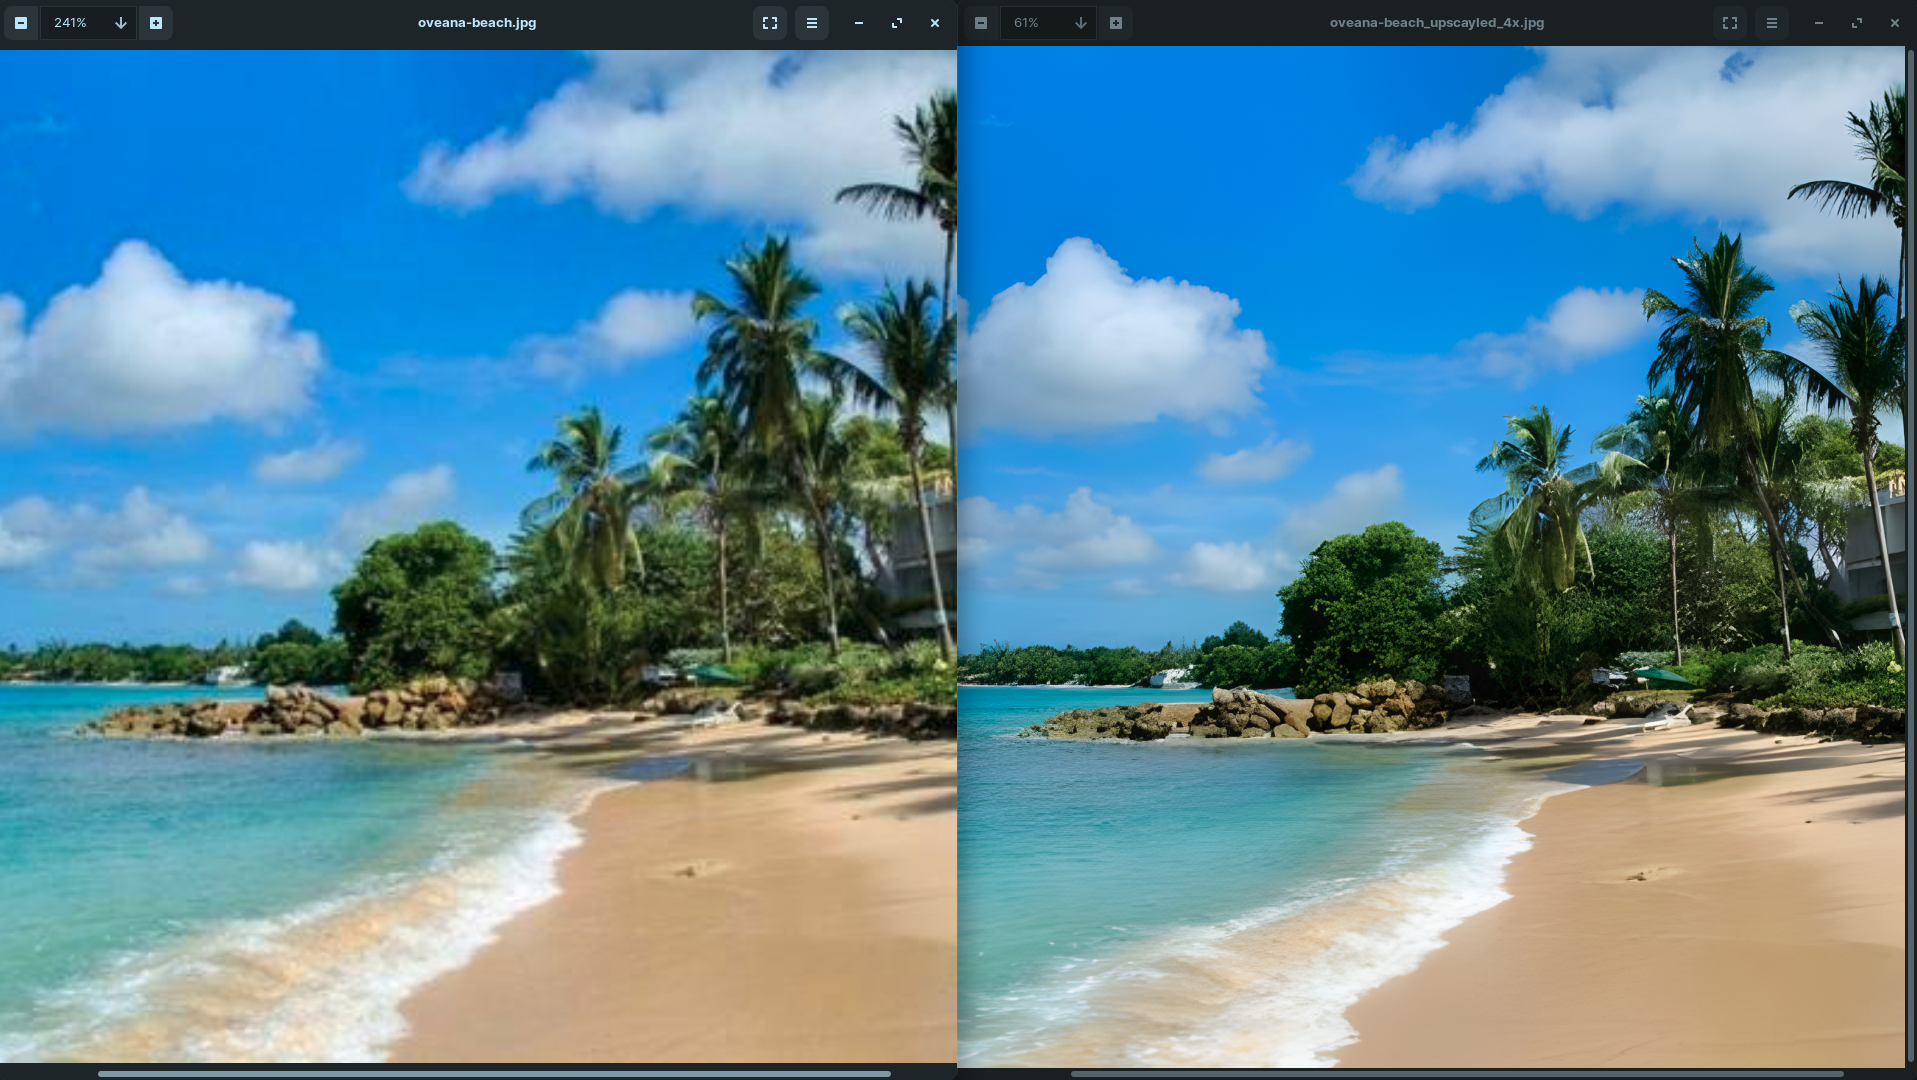 它在 GitHub 上有 23k+ Stars,並且基於 TypeScript 建置。 https://github.com/upscayl/upscayl 明星 Upscayl ⭐️ --- 10. [AppFlowy](https://github.com/AppFlowy-IO/AppFlowy) - Notion 的開源替代品。 ------------------------------------------------------------------------  AppFlowy 是一個由人工智慧驅動的安全工作空間,類似於您在不失去資料控制的情況下實現更多目標的概念。  他們還提供行動應用程式,這是一個優點。 您可以閱讀[文件](https://docs.appflowy.io/docs)並了解[安裝方法](https://docs.appflowy.io/docs/appflowy/install-appflowy/installation-methods)。 他們還支援[使用 Supabase 自託管 AppFlowy](https://docs.appflowy.io/docs/guides/appflowy) 。對於喜歡 Supabase 功能或使用 Supabase 作為其基礎設施的用戶來說,這是理想的選擇。 您還應該檢查[此內容](https://docs.appflowy.io/docs/appflowy/product/data-storage)以了解有關資料儲存、Markdown、捷徑、主題、涉及的人工智慧和插件的更多資訊。 AppFlowy 在 GitHub 上擁有超過 47,000 顆星,發布了 64 個以上版本。 https://github.com/AppFlowy-IO/AppFlowy 明星 AppFlowy ⭐️ --- 11. [Leon](https://github.com/leon-ai/leon) - 您的開源個人助理。 -------------------------------------------------------  Leon 是一個開源個人助理,可以駐留在您的伺服器上。 當你要求他做事時,他就會做事。 你可以跟他說話,他也可以跟你說話。你也可以給他發短信,他也可以傳簡訊給你。如果您願意,Leon 可以透過離線方式與您溝通,以保護您的隱私。這是萊昂目前可以做的[技能](https://github.com/leon-ai/leon/tree/develop/skills)清單。 你應該讀一下[萊昂背後的故事](https://blog.getleon.ai/the-story-behind-leon/)。您還可以觀看此演示以了解有關 Leon 的更多資訊。 https://www.youtube.com/watch?v=p7GRGiicO1c  這是Leon的高層架構模式。  這是開始使用 npm 指令的方法。 ``` # install leon global cli npm install --global @leon-ai/cli # install leon leon create birth ``` 您可以閱讀[文件](https://docs.getleon.ai/)。 它在 GitHub 上擁有超過 14k 顆星,並且還在不斷增長。 https://github.com/leon-ai/leon 明星萊昂 ⭐️ --- 12. [n8n](https://github.com/n8n-io/n8n) - 工作流程自動化工具。 -----------------------------------------------------  n8n 是一個可擴展的工作流程自動化工具。透過公平程式碼分發模型,n8n 將始終擁有可見的原始程式碼,可用於自託管,並允許您加入自訂函數、邏輯和應用程式。  n8n 基於節點的方法使其具有高度通用性,使您能夠將任何事物連接到任何事物。 有[400 多個集成選項](https://n8n.io/integrations),這幾乎是瘋狂的! 您可以看到所有[安裝](https://docs.n8n.io/choose-n8n/)選項,包括 Docker、npm 和自架。 開始使用以下命令。 ``` npx n8n ``` 此命令將下載啟動 n8n 所需的所有內容。然後,您可以透過開啟`http://localhost:5678`來存取 n8n 並開始建置工作流程。 在 YouTube 上觀看此[快速入門影片](https://www.youtube.com/watch?v=1MwSoB0gnM4)! https://www.youtube.com/watch?v=1MwSoB0gnM4 您可以閱讀[文件](https://docs.n8n.io/)並閱讀本[指南](https://docs.n8n.io/try-it-out/),以便根據您的需求快速開始。 他們還提供初學者和中級[課程,](https://docs.n8n.io/courses/)以便輕鬆學習。 他們在 GitHub 上有 39k+ Stars,並提供兩個包供整體使用。 https://github.com/n8n-io/n8n 明星 n8n ⭐️ --- 13. [Quivr](https://github.com/QuivrHQ/quivr) - 你的 GenAI 第二腦。 -------------------------------------------------------------  Quivr,您的第二個大腦,利用 GenerativeAI 的力量成為您的私人助理!可以將其視為黑曜石,但增強了人工智慧功能。  您可以閱讀[安裝指南](https://github.com/QuivrHQ/quivr?tab=readme-ov-file#getting-started-)。 您可以閱讀[文件](https://docs.quivr.app/home/intro)並觀看[示範影片](https://github.com/QuivrHQ/quivr?tab=readme-ov-file#demo-highlights-)。 他們可以提供更好的免費套餐,但這足以在您端進行測試。 它在 GitHub 上擁有超過 30k 顆星,發布了 220 多個版本,這意味著它們正在不斷改進。 https://github.com/QuivrHQ/quivr Star Quivr ⭐️ --- 14. [meilisearch](https://github.com/meilisearch/meilisearch) - 適合您的應用程式、網站和工作流程的搜尋 API。 ----------------------------------------------------------------------------------------  Meilisearch 可協助您快速打造令人愉悅的搜尋體驗,提供開箱即用的功能來加快您的工作流程。 您一定看過可以使用`Ctrl + k`搜尋文件的軟體網站,例如 GitHub 或 Appwrite。那麼,meilisearch 可以幫助您實現相同的功能。 與 Algolia、Typesense 和 Elasticsearch 相比,這是唯一基於 Rust 建構的。您可以閱讀有關可用替代選項的[比較](https://www.meilisearch.com/docs/learn/what_is_meilisearch/comparison_to_alternatives):) Meilisearch 不應該是您的主要資料儲存。它是一個搜尋引擎,而不是一個資料庫。 Meilisearch 應僅包含您希望使用者搜尋的資料。如果您必須加入與搜尋無關的資料,請務必使這些字段不可搜尋,以提高相關性並縮短響應時間。 無論您是在開發網站還是應用程式,Meilisearch 都能提供直覺的即輸入即搜尋體驗,回應時間低於 50 毫秒。 他們提供[SDK 和庫,](https://www.meilisearch.com/docs/learn/what_is_meilisearch/sdks?utm_campaign=oss&utm_source=github&utm_medium=meilisearch&utm_content=sdks-link)用於 Meilsearch 和您喜歡的語言或框架之間的無縫整合。相信我,選擇的數量是瘋狂的。 他們還提供了一個[抓取工具](https://github.com/meilisearch/docs-scraper)來自動讀取文件內容並將其儲存到Meilisearch。 他們展示了許多[有用的功能](https://www.meilisearch.com/docs/learn/what_is_meilisearch/overview#features),例如即使查詢包含拼寫錯誤和拼寫錯誤(他們將其稱為`typo tolerance` ,您也可以獲得相關匹配。 有很多可用的選項,但讓我們看看如何使用 React 來做到這一點。 開始使用以下命令。 ``` yarn add react-instantsearch @meilisearch/instant-meilisearch # or npm install react-instantsearch @meilisearch/instant-meilisearch # or pnpm add react-instantsearch @meilisearch/instant-meilisearch ``` 您可以這樣使用它。 ``` import React from 'react'; import { InstantSearch, SearchBox, Hits, Highlight } from 'react-instantsearch'; import { instantMeiliSearch } from '@meilisearch/instant-meilisearch'; const { searchClient } = instantMeiliSearch( 'https://ms-adf78ae33284-106.lon.meilisearch.io', 'a63da4928426f12639e19d62886f621130f3fa9ff3c7534c5d179f0f51c4f303' ); const App = () => ( <InstantSearch indexName="steam-video-games" searchClient={searchClient} > <SearchBox /> <Hits hitComponent={Hit} /> </InstantSearch> ); const Hit = ({ hit }) => <Highlight attribute="name" hit={hit} />; export default App ``` 您可以查看此[codesandbox](https://codesandbox.io/p/sandbox/eager-dust-f98w2w)以取得詳細的範例以開始使用。 正如我所說,他們在幕後提供了很多東西。例如,您可以使用這些。 ``` npm install @meilisearch/autocomplete-client npm install @meilisearch/instant-meilisearch npm install meilisearch-docsearch ``` `meilisearch docsearch`的靈感來自 Algolia 搜尋文件元件。另外,非常詳細的文件以及每個 sdk 的範例和選項使它們成為人們的最愛。 您可以閱讀[文件](https://www.meilisearch.com/docs)並觀看[現場演示](https://where2watch.meilisearch.com/?utm_campaign=oss&utm_source=github&utm_medium=meilisearch&utm_content=demo-link)。  他們在 GitHub 上有超過 42k 顆星,並且`v1.7`版本有 180 多個版本。 https://github.com/meilisearch/meilisearch 星 meilisearch ⭐️ --- 15.[收件匣清除](https://github.com/elie222/inbox-zero)- 幾分鐘內清理您的收件匣。 ---------------------------------------------------------------  收件匣歸零是一款開源電子郵件應用程式,其目標是透過 AI 協助幫助您快速實現收件匣歸零。 它們得到了谷歌的批准,因此這是關注隱私的一個很好的部分。  它們使用 Postgres 作為資料庫,並基於 TypeScript 建置。 它們有一些瘋狂的功能,例如: > 您的電子郵件人工智慧助理 1. 人工智慧代理將讓您根據您提供的規則自動回覆、轉發或存檔電子郵件。 2. 他們的人工智慧計畫可以幫助你點擊接受或拒絕。一旦您確信人工智慧可以獨立工作,就可以開啟完全自動化。 3. 您可以用簡單的英語進行指導。就像與助手交談或向 ChatGPT 發送提示一樣簡單。 > 您可以自動封鎖冷電子郵件 您可以告訴「收件匣零」什麼對您來說構成冷郵件。它將根據您的指示阻止它們。 > 分析 了解收件匣是處理它的第一步。了解您的收件匣裡裝滿了什麼。它們還為您提供了立即採取行動的方法。 您可以閱讀核心[功能](https://github.com/elie222/inbox-zero?tab=readme-ov-file#key-features)並觀看[演示影片](https://github.com/elie222/inbox-zero?tab=readme-ov-file#demo-video)。您還可以查看他們的[看板](https://github.com/users/elie222/projects/1/views/1)以了解計劃內容。 他們在 GitHub 上擁有超過 1,500 個 Star,並且絕對值得更多。 https://github.com/elie222/inbox-zero 星收件匣零 ⭐️ --- 16. [Lively](https://github.com/rocksdanister/lively) - 允許使用者設定動畫桌面桌布和螢幕保護程式。 -----------------------------------------------------------------------------  這只是為了好玩,我們可以使用程式碼學到很多關於它是如何完成的。 你可以看看這個[影片](https://www.pexels.com/video/blue-texture-abstract-leaves-7710243/),看看它看起來有多瘋狂。  他們提供[三種類型的壁紙,](https://github.com/rocksdanister/lively?tab=readme-ov-file#types-of-wallpapers)包括影片/GIF、網頁和應用程式/遊戲。 它基於 C# 和 live 支援的一些很酷的功能建置: 1. Lively 可以透過終端機的[命令列參數](https://github.com/rocksdanister/lively/wiki/Command-Line-Controls)進行控制。您可以將其與其他語言(例如 Python 或腳本軟體 AutoHotKey)整合。 2. 一組強大的[API](https://github.com/rocksdanister/lively/wiki/API) ,供開發人員建立互動式壁紙。取得硬體讀數、音訊圖表、音樂資訊等。 3. 當電腦上執行全螢幕應用程式/遊戲時(~0% CPU、GPU 使用率),桌布播放會暫停。 4. 您還可以利用[機器學習推理](https://github.com/rocksdanister/lively/wiki/Machine-Learning)來建立動態壁紙。您可以預測任何 2D 影像與相機的距離並產生類似 3D 的視差效果。酷:D 我見過很多人使用它,其中許多人甚至不知道它是開源的。 您可以使用[安裝程式](https://github.com/rocksdanister/lively/releases/download/v2.0.7.4/lively_setup_x86_full_v2074.exe)或透過[Microsoft Store](https://www.microsoft.com/store/productId/9NTM2QC6QWS7?ocid=pdpshare)下載它。 它是 2023 年 Microsoft Store 的獲勝者。 它在 GitHub 上擁有 13k+ Stars,有 60 個版本。 https://github.com/rocksdanister/lively 明星活潑 ⭐️ --- 17. [Netron](https://github.com/lutzroeder/netron) - 神經網路、深度學習和機器學習模型的視覺化工具。 ----------------------------------------------------------------------------  Netron 是神經網路、深度學習和機器學習模型的檢視器。 Netron 支援 ONNX、TensorFlow Lite、Core ML、Keras、Caffe、Darknet、MXNet、PaddlePaddle、ncnn、MNN 和 TensorFlow.js。 Netron 對 PyTorch、TorchScript、TensorFlow、OpenVINO、RKNN、MediaPipe、ML.NET 和 scikit-learn 提供實驗性支援。 您可以閱讀有關[安裝說明](https://github.com/lutzroeder/netron?tab=readme-ov-file#install)。 您可以存取該[網站](https://netron.app/)並打開這些[範例模型文件](https://github.com/lutzroeder/netron?tab=readme-ov-file#models)以使用它來打開。例如,您可以看到這個[演示](https://netron.app/?url=https://github.com/onnx/models/raw/main/validated/vision/classification/squeezenet/model/squeezenet1.0-3.onnx)。  他們在 GitHub 上有 25k+ Stars,並且是基於 JavaScript 建構的。它們在`v7.5`上只有三個版本,考慮到我只使用了語義版本,這對我來說似乎很困惑。我們都同意這個用例非常出色。 https://github.com/lutzroeder/netron 明星 Netron ⭐️ --- 18. [Cursor](https://github.com/getcursor/cursor) - 以 VSCode 為基礎的人工智慧程式碼編輯器。 ----------------------------------------------------------------------------  Cursor 是一款專為與 AI 結對程式設計而設計的程式碼編輯器。遊標適用於 Windows、Mac 和 Linux。 Cursor 不僅僅是 Visual Studio Code (VSC) 擴充功能。這是它自己的應用程式。但別擔心!這是VSC前叉。這意味著它擁有 VSC 所擁有的一切,但在此基礎上也建立了更多人工智慧功能。 https://github.com/anysphere/primpt 他們之前開源了[基於 Codemirror 的編輯器](https://github.com/getcursor/old)。 基於 VSCodium 的 Cursor 版本不是開源的,只有它們的[提示庫](https://github.com/anysphere/priompt)是開源的。 選項數量龐大,您可以查看[功能列表](https://docs.cursor.sh/features/chat),例如選擇用於聊天的 AI 模型、程式碼庫索引和自動終端偵錯。聽起來很酷,對吧:D 您應該檢查的一些功能是: - 允許您透過編輯程式碼庫的「偽程式碼」版本來進行編碼。 - 一旦錯誤出現在您的終端機中,就會自動修復錯誤。 - 要求 AI 更改程式碼區塊,查看編輯的內聯差異。 您也可以閱讀他們官方網站的[變更日誌](https://changelog.cursor.sh/?)。 您可以閱讀有關如何從[VSCode 遷移到 Cursor 的](https://docs.cursor.sh/get-started/moving-from-vsc-to-cursor)資訊。 他們也有定價模型,但免費套餐足以讓您進行測試! 他們在 GitHub 上擁有超過 19k+ 的 Star,並將繼續成長。正如我所說,這不是開源的,但將來可能會改變。 https://github.com/getcursor/cursor 星形遊標 ⭐️ --- 19. [VSCode 除錯視覺化工具](https://github.com/hediet/vscode-debug-visualizer)- VS Code 的擴展,可在偵錯期間可視化資料。 -------------------------------------------------------------------------------------------------  這個專案相當令人印象深刻。它不僅有助於高效除錯,還有助於透過視覺化學習基本概念,從長遠來看,這是無價的。 這是一個 VS Code 擴展,用於在偵錯時可視化資料結構。與 VS Code 的監視視圖類似,但具有豐富的監視值視覺化效果。 他們支援許多語言,如 Dart/Flutter、JS/TS、Go、Python、C#、Java、C++、Ruby、Rust 和 Swift,儘管它很基礎,所以這是一個優點。 其他語言和除錯器也可能有效。對於有基本支援的語言,只能視覺化 JSON 字串。您需要實作邏輯來為您的資料結建置立此 JSON。完全支援的語言提供資料提取器,可將一些眾所周知的資料結構轉換為 JSON。 安裝擴充功能後,您可以使用命令`Debug Visualizer: New View`開啟新的視覺化工具視圖。 您可以[在 market 上](https://marketplace.visualstudio.com/items?itemName=hediet.debug-visualizer)查看所有可用的[演示](https://github.com/hediet/vscode-debug-visualizer/blob/master/extension/README.md#selected-demos)並查看擴展。 您還可以查看他們的[視覺化遊樂場](https://hediet.github.io/visualization/?darkTheme=1),其中包含眾多選項。 他們在 GitHub 上擁有超過 7800 顆星,而且還在不斷增長。 https://github.com/hediet/vscode-debug-visualizer 明星 VSCode 除錯視覺化工具 ⭐️ --- 20. [OpenDevin](https://github.com/OpenDevin/OpenDevin) - 更少的程式碼,更多的內容。 -----------------------------------------------------------------------   這是一個開源專案,旨在複製 Devin,一名自主人工智慧軟體工程師,能夠執行複雜的工程任務並在軟體開發專案上與用戶積極協作。該計畫致力於透過開源社群的力量複製、增強和創新 Devin。 只是想讓你知道,這是在德文被介紹之前。 您可以閱讀帶有要求的[安裝說明](https://github.com/OpenDevin/OpenDevin?tab=readme-ov-file#installation)。 他們使用 LiteLLM,因此您可以使用任何基礎模型來執行 OpenDevin,包括 OpenAI、Claude 和 Gemini。 如果您想為 OpenDevin 做出貢獻,您可以查看 [演示](https://github.com/OpenDevin/OpenDevin/blob/main/README.md#opendevin-code-less-make-more)和[貢獻指南](https://github.com/OpenDevin/OpenDevin/blob/main/CONTRIBUTING.md)。 它在 GitHub 上擁有超過 10,700 個 Star,並且正在快速成長。 https://github.com/OpenDevin/OpenDevin 明星 OpenDevin ⭐️ --- 21.[即時語音克隆](https://github.com/CorentinJ/Real-Time-Voice-Cloning)-5秒克隆語音,即時產生任意語音。 ----------------------------------------------------------------------------------  該專案是透過即時工作的聲碼器實現從說話者驗證到多說話者文字到語音合成 (SV2TTS) 的遷移學習。 SV2TTS是一個分為三個階段的深度學習架構。 在第一階段,人們從幾秒鐘的音訊中建立聲音的數位表示。 在第二和第三階段,該表示被用作參考來產生給定任意文字的語音。 您可以閱讀[如何設定](https://github.com/CorentinJ/Real-Time-Voice-Cloning?tab=readme-ov-file#setup)專案,其中包括安裝要求、下載預訓練模型、測試配置、下載資料集和啟動工具箱。 觀看下面所示的影片示範! https://www.youtube.com/watch?v=-O\_hYhToKoA 我一直喜歡開源專案的最好的部分是,他們甚至非常清楚地提到了替代方案,並且像往常一樣,他們推薦了一些[專案](https://github.com/CorentinJ/Real-Time-Voice-Cloning?tab=readme-ov-file#heads-up),這些專案將為您克隆的聲音提供更好的保真度及其表現力。 他們在 GitHub 上擁有 50k+ Stars,並且僅基於 Python 建置。到目前為止使用起來還是非常可信的。 https://github.com/CorentinJ/Real-Time-Voice-Cloning Star 即時語音克隆 ⭐️ --- 請在評論中告訴我您在此列表中發現了哪些有用的人工智慧工具:D 人工智慧正在改變世界,最好讓人工智慧成為你的朋友,而不是簡單地忽略它。 使用這些工具來提高工作效率並抓住機會創造非凡的東西。 祝你有美好的一天!直到下一次。 在 GitHub 和[Twitter](https://twitter.com/Anmol_Codes)上關注我。 https://github.com/Anmol-Baranwal 關注 Taipy 以了解更多此類內容。 https://dev.to/taipy --- 原文出處:https://dev.to/taipy/21-ai-tools-that-are-changing-the-world-1o54
這個週末我開始開發我的第一個 npm 包。我不敢相信我編寫程式碼已經有多久了,我從來沒有費心去建立自己的 npm 包,但我們來了。我使用 Gridsome 和 markdown 建立了我的最新網站,您可以[在此處](https://www.danvega.me/blog/hello-gridsome)閱讀所有相關內容。在 Markdown 文件中,我想要一個簡單的方法來插入 Twitter 狀態並嵌入推文。 我將在以後的部落格文章中告訴您有關 Gridsome 插件的更多訊息,但現在,我想向您展示如何建立您的第一個 npm 包。我在做這件事的過程中學到了一些東西,我想與你們分享。 先決條件 ---- 我假設你至少知道什麼是 Node 和 npm,並且之前寫過 JavaScript。如果您對其中任何一個都不了解,並希望我寫一些有關這些入門的內容,請告訴我。 在我們深入並開始編寫一些程式碼之前,您需要一些東西。 - [Visual Studio Code](https://code.visualstudio.com/)或您最喜歡的編輯器 - [節點和 NPM](https://nodejs.org/en/) - [NPM帳戶](https://www.npmjs.com/) 建立你的 npm 包 ---------- 您要做的第一件事是建立一個新資料夾來保存您的 npm 套件。對於此範例,我將建立一個名為**wrap-with-poo**的新目錄。是的,你沒看錯。 進入該資料夾並輸入以下內容: ``` npm init ``` 這會問你一堆問題,然後建立一個 package.json。如果您還不知道某些問題的答案,請不要擔心,您可以稍後再回來回答。 ``` This utility will walk you through creating a package.json file. It only covers the most common items and tries to guess sensible defaults. See `npm help json` for definitive documentation on these fields and exactly what they do. Use `npm install <pkg>` afterward to install a package and save it as a dependency in the package.json file. Press ^C at any time to quit. package name: (wrap-with-poop) version: (0.1.0) 0.1.0 description: This package will take any string you give it and wrap it with the poop emjoi entry point: (index.js) test command: git repository: keywords: node,npm author: Dan Vega license: (ISC) MIT About to write to /Users/vega/dev/npm/wrap-with-poop/package.json: { "name": "wrap-with-poop", "version": "0.1.0", "description": "This package will take any string you give it and wrap it with the poop emjoi", "main": "index.js", "scripts": { "test": "echo \"Error: no test specified\" && exit 1" }, "keywords": [ "node", "npm" ], "author": "Dan Vega", "license": "MIT" } Is this OK? (yes) yes ``` 寫你的插件 ----- 接下來在 Visual Studio Code 中開啟專案並建立 index.js。您建立此文件的原因是您在 package.json 中說過這是您的入口點。在你的index.js中加入以下程式碼: ``` module.exports = (str) => { return `💩${str}💩`; } ``` module.exports 物件允許我們組織一些相關的程式碼,然後將其公開為模組。這意味著當我們完成後,我們可以將此模組匯入到另一個應用程式中。在本例中,我們指派一個箭頭函數,這表示我們公開一個函數,該函數接受一個名為 str 的參數,並傳回用 poo 表情符號包裹的字串。這就是您需要對這個專案做的全部事情。這是一個非常簡單的包,但它將有助於完成一些事情。 npm 本機開發 -------- 現在您已經準備好了我們的包,您需要在另一個專案中測試它。在現實世界中,您應該針對它編寫一些單元測試,但我想將其保存到另一篇文章和截圖中。 接下來,建立一個名為「wrap-with-poo-testing」的新目錄(在套件外部)。您將再次需要執行 npm init 但這次您可以加入 -y 參數來跳過所有問題,這次它們不太重要。 ``` npm init -y Wrote to /Users/vega/dev/npm/wrap-with-poo/package.json: { "name": "wrap-with-poop", "version": "0.1.0", "description": "", "main": "index.js", "scripts": { "test": "echo \"Error: no test specified\" && exit 1" }, "keywords": [], "author": "", "license": "ISC" } ``` ### NPM安裝 在此專案中建立一個名為 app.js 的新檔案。這是您將使用新的wrap-with-poo 套件的地方。通常,您可以透過執行以下命令來安裝所需的 npm 軟體包。 ``` npm install wrap-with-poo ``` 問題是你還沒有發布你的新插件,所以它不在 npm 中。您需要一種在開發時在本地引用該套件的方法。您可以使用套件的絕對路徑來執行 npm install。 ``` npm install /Users/vega/dev/npm/wrap-with-poo ``` 這會將您的 package.json 更新為如下所示 ``` { "name": "npm", "version": "0.1.0", "description": "", "main": "index.js", "scripts": { "test": "echo \"Error: no test specified\" && exit 1" }, "keywords": [], "author": "", "license": "ISC", "dependencies": { "wrap-with-poo": "file:../wrap-with-poo" } } ``` 如果您需要測試套件中的[安裝前/安裝後掛鉤,](https://docs.npmjs.com/misc/scripts)那麼您將需要使用此方法。如果您不關心本地開發 NPM 專案的最佳方法是使用[npm link](https://docs.npmjs.com/cli/link.html) 。 ### NPM連結 npm link 是一個允許您在專案和依賴項之間建立符號連結的過程。首先,您需要進入目錄wrapper-with-poo並執行以下命令。 ``` npm link ``` 這將獲取您的套件並在 npm 全域資料夾中建立符號連結。 **/Users/vega/.nvm/versions/node/v10.15.0/lib/node\_modules/wrap-with-poo -> /Users/vega/dev/npm/wrap-with-poo** 這意味著您的專案只需一個簡單的步驟即可在任何專案中使用。您需要做的下一件事是進入專案 wrap-with-poo-testing 並執行以下命令。 ``` npm link wrap-with-poo ``` 這將輸出以下內容: \_\_/Users/vega/dev/npm/wrap-with-poo-testing/node\_modules/wrap-with-poo -> /Users/vega/.nvm/versions/node/v10.15.0/lib /node\_modules/wra p-with-poo -> /Users/vega/dev/npm/wrap-with-poo\_\_ 這就是全部內容,無需安裝依賴項。您已準備好開始編寫一些程式碼來使用新插件。打開 app.js 並新增以下程式碼。 ``` const poo = require('wrap-with-poo'); const boring = 'This is a boring string'; const fun = poo(boring); console.log(fun); ``` 並從集成終端執行以下命令 ``` node app.js ``` 你會得到以下輸出 ``` 💩This is a boring string💩 ``` 發布原始碼 ----- 現在我們知道我們的專案正在發揮作用,是時候將其公開供所有人使用了。如果您還沒有這樣做,我會將您的專案加入到 Github 或您喜歡的任何原始程式碼託管位置。 ``` git init git add . git commit -m "Initial commit" git remote add origin https://github.com/cfaddict/wrap-with-poo.git git push -u origin master ``` 現在它位於 Github 上,返回並在 package.json 中加入一個條目,以便每個人都知道在哪裡可以使用主頁鍵找到原始程式碼。 ``` { "name": "wrap-with-poo", "version": "0.1.0", "description": "This package will wrap any string you give it with the poop emoji", "main": "index.js", "scripts": { "test": "echo \"Error: no test specified\" && exit 1" }, "keywords": [ "node", "npm", "poop" ], "author": "Dan Vega", "license": "MIT", "homepage": "https://github.com/cfaddict/wrap-with-poo" } ``` 發布 NPM 包 -------- 現在是時候將我們的專案發佈到 npm 以便任何人都可以使用它了。如果這是您第一次發布包,請在wrap-with-poo 目錄中開啟終端,然後鍵入以下命令。 ``` npm adduser ``` 這將要求您提供 npm 帳戶訊息,例如使用者名稱、密碼和電子郵件。 ``` vega wrap-with-poo (master) $ npm adduser Username: therealdanvega Password: Email: (this IS public) [email protected] Logged in as therealdanvega on https://registry.npmjs.org/. ``` 現在您已準備好發布,但您需要記住一些事情。首先,每個 npm 套件必須有一個唯一的名稱。我會前往[npm](https://www.npmjs.com/)并快速搜尋你的包。我已經發布了套件wrapper-with-poo,所以你的套件需要一個新的唯一名稱。 接下來您需要知道的是您的版本號碼很重要。我從 0.0.1 開始,然後從那裡開始工作。發布特定版本後,您將無法再次發布相同版本。將許多功能建置到一個版本中然後發布是一個好主意。如果你跑 ``` npm version ``` 它會告訴您目前的版本是什麼。 ``` { 'wrap-with-poo': '0.1.0', npm: '6.7.0', ares: '1.15.0', cldr: '33.1', http_parser: '2.8.0', icu: '62.1', modules: '64', napi: '3', nghttp2: '1.34.0', node: '10.15.0', openssl: '1.1.0j', tz: '2018e', unicode: '11.0', uv: '1.23.2', v8: '6.8.275.32-node.45', zlib: '1.2.11' } ``` 如果一切看起來都不錯,您可以透過執行來發布您的新專案 ``` npm publish ``` 這可能需要幾秒鐘,但如果一切順利,你的包包現在應該[在 npm 上](https://www.npmjs.com/settings/therealdanvega/packages)。 恭喜你發布了你的第一個 npm 包!!! 現在您可以進入任何已有 package.json 的專案並輸入以下內容 ``` npm install wrap-with-poo ``` 就像我們在上面的測試範例中所做的那樣使用它。 文件 -- 我知道有些人說你應該從一開始就建立文件,但我並不總是確定我的程式碼最終會是什麼樣子,所以我通常會等待。在專案的根目錄中建立 README.md 並加入有關專案的一些資訊。 - 你的 npm 包是做什麼的? - 你為什麼創造它。 - 你如何安裝它? - 有任何配置選項嗎? 結論 -- 正如我在本文開頭所說,我不敢相信我這個週末發布了我的第一個 npm 包。直到現在我才真正需要這樣做,但我真的很高興知道它是多麼容易。如果這是您的第一個 npm 軟體包,請在您的軟體包上線後給我留下一些評論或推文! 快樂編碼! 和 *本文首先發佈在我的部落格:https://www.danvega.dev/blog 如果您覺得這篇文章有趣,請考慮[訂閱我的電子報](https://www.danvega.dev/signup/)或在[Twitter](http://twitter.com/therealdanvega)上關注我。* --- 原文出處:https://dev.to/therealdanvega/creating-your-first-npm-package-2ehf
今天,我們將學習如何使用 Wing 作為後端建立全端應用程式。  我們將使用 React 和 Vite 作為前端。 我知道還有其他框架,如 Vue、Angular 和 Next,但 React 仍然是最常見的,並且迄今為止有大量值得信賴的新創公司使用它。 如果您不知道, [React](https://github.com/facebook/react)是 Facebook 建立的開源程式庫,用於建立 Web 和本機使用者介面。正如您從儲存庫中看到的,它被超過 2040 萬開發人員使用。所以,這是值得的。 讓我們看看如何使用 Wing 作為後端。  --- [Wing](https://git.new/wing-repo) - 一種雲端程式語言。 ---------------------------------------------  Winglang 是一種專為雲端(又稱「面向雲端」)設計的新型開源程式語言。它允許您在雲端中建立應用程式,並且具有相當簡單的語法。 Wing 程式可以使用功能齊全的模擬器在本地執行(是的,不需要網路),也可以部署到任何雲端供應商。  Wing 需要 Node `v20 or higher` 。 建立一個父目錄(我們使用的`shared-counter` )並使用 Vite 使用新的 React 應用程式設定前端。您可以使用這個 npm 指令。 ``` npm create -y vite frontend -- --template react-ts // once installed, you can check if it's running properly. cd frontend npm install npm run dev ``` 您可以使用此 npm 命令安裝 Wing。 ``` npm install -g winglang ``` 您可以使用`wing -V`驗證安裝。 Wing 還提供官方[VSCode 擴充功能](https://marketplace.visualstudio.com/items?itemName=Monada.vscode-wing)和[IntelliJ](https://plugins.jetbrains.com/plugin/22353-wing) ,後者提供語法突出顯示、補全、轉到定義和嵌入式 Wing 控制台支援。您可以在建立應用程式之前安裝它! 建立後端目錄。 ``` mkdir ~/shared-counter/backend cd ~/shared-counter/backend ``` 建立一個新的空 Wing 專案。 ``` wing new empty // This will generate three files: package.json, package-lock.json and main.w file with a simple "hello world" program wing it // to run it in the Wing simulator // The Wing Simulator will be opened in your browser and will show a map of your app with a single function. //You can invoke the function from the interaction panel and check out the result. ``` 使用指令`wing new empty`後的結構如下。 ``` bring cloud; // define a queue, a bucket, and a counter let bucket = new cloud.Bucket(); let counter = new cloud.Counter(initial: 1); let queue = new cloud.Queue(); // When a message is received in the queue -> it should be consumed // by the following closure queue.setConsumer(inflight (message: str) => { // Increment the distributed counter, the index variable will // store the value before the increment let index = counter.inc(); // Once two messages are pushed to the queue, e.g. "Wing" and "Queue". // Two files will be created: // - wing-1.txt with "Hello Wing" // - wing-2.txt with "Hello Queue" bucket.put("wing-{index}.txt", "Hello, {message}"); log("file wing-{index}.txt created"); }); ``` 您可以安裝`@winglibs/vite`來啟動開發伺服器,而不是使用`npm run dev`來啟動本機 Web 伺服器。 ``` // in the backend directory npm i @winglibs/vite ``` 您可以使用`backend/main.w`中提供的 publicEnv 將資料傳送到前端。 讓我們來看一個小例子。 ``` // backend/main.w bring vite; new vite.Vite( root: "../frontend", publicEnv: { TITLE: "Wing + Vite + React" } ); // import it in frontend // frontend/src/App.tsx import "../.winglibs/wing-env.d.ts" //You can access that value like this. <h1>{window.wing.env.TITLE}</h1> ``` 你還可以做更多: - 讀取/更新 API 路線並使用 Wing Simulator 檢查它。 - 使用後端獲取值。 - 使用`@winglibs/websockets`同步瀏覽器,它在後端部署一個 WebSocket 伺服器,您可以連接此 WebSocket 來接收即時通知。 您可以閱讀完整的逐步指南,以了解[如何使用 React 作為前端和 Wing 作為後端建立簡單的 Web 應用程式](https://www.winglang.io/docs/guides/react-vite-websockets)。測試是使用 Wing Simulator 完成的,並使用 Terraform 部署到 AWS。 部署後的AWS架構是這樣的。  為了提供開發者選擇和更好的體驗,Wing 推出了對[TypeScript (Wing)](https://www.winglang.io/docs/typescript/)等其他語言的全面支援。唯一強制性的事情是您必須安裝 Wing SDK。 這也將使控制台完全可用於本地偵錯和測試,而無需學習 Wing 語言。 Wing 甚至還有其他[指南](https://www.winglang.io/docs/category/guides),因此更容易遵循。  您可以閱讀[文件](https://www.winglang.io/docs)並查看[範例](https://www.winglang.io/docs/category/examples)。 您也可以在[Playground](https://www.winglang.io/play/?code=LwAvACAAVABoAGkAcwAgAGkAcwAgAHQAaABlACAAaQBtAHAAbwByAHQAIABzAHQAYQB0AGUAbQBlAG4AdAAgAGkAbgAgAFcAaQBuAGcALgAKAC8ALwAgAEgAZQByAGUAIAB3AGUAIABiAHIAaQBuAGcAIAB0AGgAZQAgAFcAaQBuAGcAIABzAHQAYQBuAGQAYQByAGQAIABsAGkAYgByAGEAcgB5ACAAdABoAGEAdAAgAAoALwAvACAAYwBvAG4AdABhAGkAbgBzACAAYQBiAHMAdAByAGEAYwB0AGkAbwBuAHMAIABvAGYAIABwAG8AcAB1AGwAYQByACAAYwBsAG8AdQBkACAAcwBlAHIAdgBpAGMAZQBzAC4ACgBiAHIAaQBuAGcAIABjAGwAbwB1AGQAOwAKAAoALwAvACAAVABoAGkAcwAgAGMAbwBkAGUAIABkAGUAZgBpAG4AZQBzACAAYQAgAGIAdQBjAGsAZQB0ACAAYQBzACAAcABhAHIAdAAgAG8AZgAgAHkAbwB1AHIAIABhAHAAcAAuAAoALwAvACAAVwBoAGUAbgAgAGMAbwBtAHAAaQBsAGkAbgBnACAAdABvACAAYQAgAHMAcABlAGMAaQBmAGkAYwAgAGMAbABvAHUAZAAgAHAAcgBvAHYAaQBkAGUAcgAKAC8ALwAgAGkAdAAgAHcAaQBsAGwAIABiAGUAIABzAHUAYgBzAHQAaQB0AHUAdABlAGQAIABiAHkAIABhAG4AIABpAG0AcABsAGUAbQBlAG4AdABhAHQAaQBvAG4AIABmAG8AcgAKAC8ALwAgAHQAaABhAHQAIABjAGwAbwB1AGQALgAgAEkALgBlACwAIABmAG8AcgAgAEEAVwBTACAAaQB0ACAAdwBpAGwAbAAgAGIAZQAgAGEAbgAgAFMAMwAgAEIAdQBjAGsAZQB0AC4ACgBsAGUAdAAgAGIAdQBjAGsAZQB0ACAAPQAgAG4AZQB3ACAAYwBsAG8AdQBkAC4AQgB1AGMAawBlAHQAKAApADsACgAKAC8ALwAgACEAIQAhACEAIQAhACEAIQAhACEAIQAhACEAIQAhACEAIQAhACEAIQAhACEAIQAhACEAIQAhACEAIQAhACEAIQAhACEAIQAhACEAIQAhACEAIQAhACEAIQAhACEAIQAhACEAIQAKAC8ALwAgAFkAbwB1ACAAYwBhAG4AIABpAG4AdABlAHIAYQBjAHQAIAB3AGkAdABoACAAdABoAGUAIABhAHAAcAAgAGkAbgAgAHQAaABlACAAYwBvAG4AcwBvAGwAZQAgAC0ALQA%2BAAoALwAvACAACgAvAC8AIABDAGwAaQBjAGsAIABvAG4AIAB0AGgAZQAgAEYAdQBuAGMAdABpAG8AbgAsACAAYQBuAGQAIAB0AGgAZQBuACAAaQBuAHYAbwBrAGUAIABpAHQAIABpAG4AIAB0AGgAZQAKAC8ALwAgAGwAbwB3AGUAcgAgAHIAaQBnAGgAdAAgAHAAYQBuAGUAbAAsACAAbwByACAAYwBsAGkAYwBrACAAbwBuACAAdABoAGUAIABCAHUAYwBrAGUAdAAKAC8ALwAgAHQAbwAgAHMAZQBlACAAaQB0AHMAIABjAG8AbgB0AGUAbgB0AHMAIABpAG4AIAB0AGgAZQAgAHAAYQBuAGUAbAAsACAAZQB0AGMALgAKAC8ALwAgACEAIQAhACEAIQAhACEAIQAhACEAIQAhACEAIQAhACEAIQAhACEAIQAhACEAIQAhACEAIQAhACEAIQAhACEAIQAhACEAIQAhACEAIQAhACEAIQAhACEAIQAhACEAIQAhACEAIQAKAAoALwAvACAAYABpAG4AZgBsAGkAZwBoAHQAcwBgACAAcgBlAHAAcgBlAHMAZQBuAHQAIABjAG8AZABlACAAdABoAGEAdAAgAHIAdQBuAHMAIABsAGEAdABlAHIALAAgAG8AbgAKAC8ALwAgAG8AdABoAGUAcgAgAG0AYQBjAGgAaQBuAGUAcwAsACAAaQBuAHQAZQByAGEAYwB0AGkAbgBnACAAdwBpAHQAaAAgAGMAYQBwAHQAdQByAGUAZAAgAGQAYQB0AGEAIABhAG4AZAAKAC8ALwAgAHIAZQBzAG8AdQByAGMAZQBzACAAZgByAG8AbQAgAHQAaABlACAAcAByAGUALQBmAGwAaQBnAGgAdAAgAHAAaABhAHMAZQAuAAoAbABlAHQAIABoAGUAbABsAG8AXwB3AG8AcgBsAGQAIAA9ACAAaQBuAGYAbABpAGcAaAB0ACAAKAApACAAPQA%2BACAAewAKACAAIABiAHUAYwBrAGUAdAAuAHAAdQB0ACgAIgBoAGUAbABsAG8ALgB0AHgAdAAiACwAIAAiAEgAZQBsAGwAbwAsACAAVwBvAHIAbABkACEAIgApADsACgB9ADsACgAKAC8ALwAgAEkAbgBmAGwAaQBnAGgAdABzACAAYwBhAG4AIABiAGUAIABkAGUAcABsAG8AeQBlAGQAIABhAHMAIABzAGUAcgB2AGUAcgBsAGUAcwBzACAAZgB1AG4AYwB0AGkAbwBuAHMACgBuAGUAdwAgAGMAbABvAHUAZAAuAEYAdQBuAGMAdABpAG8AbgAoAGgAZQBsAGwAbwBfAHcAbwByAGwAZAApADsACgAgACAAIAAgACAAIAAgACAAIAAgACAAIAAgACAAIAAgACAAIAAgACAAIAAgACAAIAAgACAAIAAgACAAIAAgACAAIAAgACAAIAAgACAACgAvAC8AIACRISAAUwB3AGkAdABjAGgAIABmAGkAbABlAHMAIABhAG4AZAAgAHMAZQBlACAAbwB0AGgAZQByACAAZQB4AGEAbQBwAGwAZQBzACAAdwBpAHQAaAAgAG0AbwByAGUACgAvAC8AIABlAHgAcABsAGUAbgBhAHQAaQBvAG4AcwAgAGEAYgBvAHYAZQAuAA%3D%3D)中使用 Wing 查看結構和範例。 如果你比較像輔導員。看這個! https://www.youtube.com/watch?v=wzqCXrsKWbo Wing 在 GitHub 上擁有超過 3500 個 Star,發布了 1500 多個版本,但仍未進入 v1 版本,這意味著意義重大。 去嘗試一下,做一些很酷的事情吧! https://git.new/wing-repo 星翼 ⭐️ --- 開發者生態系統不斷發展,許多開發者圍繞 React 建置了一些獨特的東西。 我不會介紹如何使用 React,因為這是一個非常廣泛的主題,我在最後貼了一些資源來幫助您學習 React。 但為了幫助您建立出色的 React 專案,我們介紹了 25 個開源專案,您可以使用它們來使您的工作更輕鬆。 這將有大量的資源、想法和概念。 我甚至會給你一些學習資源,以及一些產品的專案範例來學習 React。 一切都是免費的,而且只有 React。 讓我們涵蓋這一切! --- 1. [Mantine Hooks](https://www.npmjs.com/package/@mantine/hooks) - 用於狀態和 UI 管理的 React hooks。 --------------------------------------------------------------------------------------------  這可能不是專門針對 React 的,但是您可以使用這些鉤子來使您的工作更輕鬆。這些鉤子隨時可用,每個鉤子都有許多選項。 如果我必須評價的話,這將是每個人都可以使用的最有用的專案,而不是從頭開始編寫程式碼。 相信我,獲得 60 多個 Hooks 是一件大事,因為他們有一個簡單的方法讓您可以透過簡單的文件查看每個 Hooks 的演示。 開始使用以下 npm 指令。 ``` npm install @mantine/hooks ``` 這就是如何使用`useScrollIntoView`作為 mantine 掛鉤的一部分。 ``` import { useScrollIntoView } from '@mantine/hooks'; import { Button, Text, Group, Box } from '@mantine/core'; function Demo() { const { scrollIntoView, targetRef } = useScrollIntoView<HTMLDivElement>({ offset: 60, }); return ( <Group justify="center"> <Button onClick={() => scrollIntoView({ alignment: 'center', }) } > Scroll to target </Button> <Box style={{ width: '100%', height: '50vh', backgroundColor: 'var(--mantine-color-blue-light)', }} /> <Text ref={targetRef}>Hello there</Text> </Group> ); } ``` 它們幾乎擁有從本地儲存到分頁、滾動視圖、交叉點,甚至一些非常酷的實用程式(例如滴管和文字選擇)的所有功能。這實在太有幫助了!  您可以閱讀[文件](https://mantine.dev/hooks/use-click-outside/)。 如果您正在尋找更多選項,您也可以使用[替代庫](https://antonioru.github.io/beautiful-react-hooks/)。 他們在 GitHub 上擁有超過 23k star,但這不僅僅是為了 hooks,因為他們是 React 的元件庫。 隨著`v7`版本的發布,它的每週下載量已超過 38 萬次,這表明它們正在不斷改進且值得信賴。 https://github.com/mantinedev/mantine Star Mantine Hooks ⭐️ --- 2. [React Grid Layout](https://github.com/react-grid-layout/react-grid-layout) - 可拖曳且可調整大小的網格佈局,具有響應式斷點。 --------------------------------------------------------------------------------------------------------  React-Grid-Layout 是專為 React 應用程式建構的響應式網格佈局系統。 透過支援可拖曳、可調整大小和靜態小部件,它提供了使用網格的簡單解決方案。 與 Packery 或 Gridster 等類似系統不同,React-Grid-Layout 不含 jQuery,確保輕量級且高效的實作。 它與伺服器渲染應用程式的無縫整合以及序列化和恢復佈局的能力使其成為開發人員在 React 專案中使用網格佈局的寶貴工具。 開始使用以下 npm 指令。 ``` npm install react-grid-layout ``` 這就是如何使用響應式網格佈局。 ``` import { Responsive as ResponsiveGridLayout } from "react-grid-layout"; class MyResponsiveGrid extends React.Component { render() { // {lg: layout1, md: layout2, ...} const layouts = getLayoutsFromSomewhere(); return ( <ResponsiveGridLayout className="layout" layouts={layouts} breakpoints={{ lg: 1200, md: 996, sm: 768, xs: 480, xxs: 0 }} cols={{ lg: 12, md: 10, sm: 6, xs: 4, xxs: 2 }} > <div key="1">1</div> <div key="2">2</div> <div key="3">3</div> </ResponsiveGridLayout> ); } } ``` 您可以閱讀[文件](https://github.com/react-grid-layout/react-grid-layout?tab=readme-ov-file#installation)並查看[演示](https://react-grid-layout.github.io/react-grid-layout/examples/0-showcase.html)。有一系列[演示](https://github.com/react-grid-layout/react-grid-layout?tab=readme-ov-file#demos),甚至可以透過點擊“查看下一個範例”來獲得。 您也可以嘗試[codesandbox](https://codesandbox.io/p/devbox/github/gilbarbara/react-joyride-demo/tree/main/?embed=1)上的東西。 該專案在 GitHub 上有超過 19k+ 的星星,有超過 16k+ 的開發者使用,並且[npm 套件](https://www.npmjs.com/package/react-grid-layout)的每週下載量超過 600k+。 https://github.com/react-grid-layout/react-grid-layout 明星 React 網格佈局 ⭐️ --- 3. [React Spectrum](https://github.com/adobe/react-spectrum) - 提供出色使用者體驗的程式庫和工具的集合。 -----------------------------------------------------------------------------------  React Spectrum 是一個庫和工具的集合,可幫助您建立自適應、可存取且強大的使用者體驗。 它們提供了太多的東西,以至於很難在一篇文章中涵蓋所有內容。 總的來說,他們提供了這四個庫。  - [反應譜](https://react-spectrum.adobe.com/react-spectrum/index.html) - [React Stately](https://react-spectrum.adobe.com/react-stately/index.html) - 一組龐大的 React Hooks,為您的設計系統提供跨平台狀態管理。 - [反應詠嘆調](https://react-spectrum.adobe.com/react-aria/index.html) - [國際化](https://react-spectrum.adobe.com/internationalized/index.html) 我們將了解一些有關 React Aria 的內容,它是一個無樣式 React 元件和鉤子庫,可幫助您為應用程式建立可存取的、高品質的 UI 元件。 它經過了各種設備、互動方式和輔助技術的精心測試,以確保為所有用戶提供最佳體驗。 開始使用以下 npm 指令。 ``` npm i react-aria-components ``` 這就是建立自訂`select`的方法。 ``` import {Button, Label, ListBox, ListBoxItem, Popover, Select, SelectValue} from 'react-aria-components'; <Select> <Label>Favorite Animal</Label> <Button> <SelectValue /> <span aria-hidden="true">▼</span> </Button> <Popover> <ListBox> <ListBoxItem>Cat</ListBoxItem> <ListBoxItem>Dog</ListBoxItem> <ListBoxItem>Kangaroo</ListBoxItem> </ListBox> </Popover> </Select> ``` 相信我,出於學習目的,這是一座金礦。 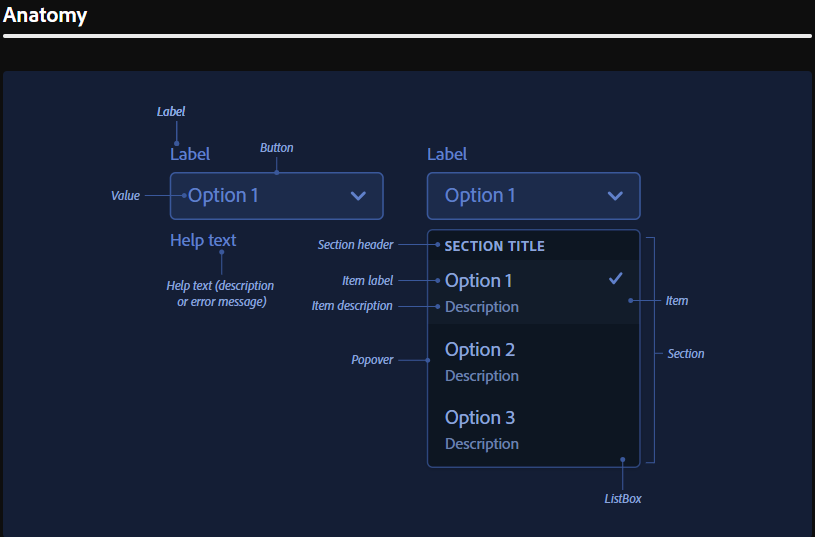 他們使用自己強大的[40 多個樣式元件](https://opensource.adobe.com/spectrum-css/),這比通常提供的要多得多。他們也有自己的一套[設計系統,](https://spectrum.adobe.com/)例如字體、UI、版面、動作等等。   您可以詳細了解[Spectrum](https://react-spectrum.adobe.com/index.html)及其[架構](https://react-spectrum.adobe.com/architecture.html)。 他們在 GitHub 上擁有超過 11,000 顆星,這表明了他們的質量,儘管他們並不廣為人知。研究它們可以為您建立圖書館提供寶貴的見解。 https://github.com/adobe/react-spectrum Star React Spectrum ⭐️ --- 4.[保留 React](https://github.com/StaticMania/keep-react) - Tailwind CSS 和 React.js 的 UI 元件庫。 -------------------------------------------------------------------------------------------  Keep React 是一個基於 Tailwind CSS 和 React.js 建立的開源元件庫。它提供了一組多功能的預先設計的 UI 元件,使開發人員能夠簡化現代、響應式且具有視覺吸引力的 Web 應用程式的建立。 開始使用以下 npm 指令。 ``` npm i keep-react ``` 這就是使用時間軸的方法。 ``` "use client"; import { Timeline } from "keep-react"; import { CalendarBlank } from "phosphor-react"; export const TimelineComponent = () => { return ( <Timeline horizontal={true}> <Timeline.Item> <Timeline.Point icon={<CalendarBlank size={16} />} /> <Timeline.Content> <Timeline.Title>Keep Library v1.0.0</Timeline.Title> <Timeline.Time>Released on December 2, 2021</Timeline.Time> <Timeline.Body> Get started with dozens of web components and interactive elements. </Timeline.Body> </Timeline.Content> </Timeline.Item> <Timeline.Item> <Timeline.Point icon={<CalendarBlank size={16} />} /> <Timeline.Content> <Timeline.Title>Keep Library v1.1.0</Timeline.Title> <Timeline.Time>Released on December 23, 2021</Timeline.Time> <Timeline.Body> Get started with dozens of web components and interactive elements. </Timeline.Body> </Timeline.Content> </Timeline.Item> <Timeline.Item> <Timeline.Point icon={<CalendarBlank size={16} />} /> <Timeline.Content> <Timeline.Title>Keep Library v1.3.0</Timeline.Title> <Timeline.Time>Released on January 5, 2022</Timeline.Time> <Timeline.Body> Get started with dozens of web components and interactive elements. </Timeline.Body> </Timeline.Content> </Timeline.Item> </Timeline> ); } ``` 輸出如下。  流暢的小動畫讓這一切都是值得的,如果你想快速建立一個 UI,沒有任何麻煩,你可以使用它。   您可以閱讀[文件](https://react.keepdesign.io/docs/getting-started/Introduction)並查看[故事書](https://react-storybook.keepdesign.io/?path=/docs/components-accordion--docs)以進行詳細的使用測驗。 該專案在 GitHub 上有超過 1000 顆星,而且它的一些元件使用起來非常方便。 https://github.com/StaticMania/keep-react Star Keep React ⭐️ --- 5. [React Content Loader](https://github.com/danilowoz/react-content-loader) - SVG 支援的元件,可輕鬆建立骨架載入。 ---------------------------------------------------------------------------------------------------  該專案為您提供了一個由 SVG 驅動的元件,可以輕鬆建立佔位符載入(如 Facebook 的卡片載入)。 在載入狀態期間使用骨架來向使用者指示內容仍在載入。 總的來說,這是一個非常方便的專案,可以增強整體使用者體驗。 開始使用以下 npm 指令。 ``` npm i react-content-loader --save ``` 您可以這樣使用它。 ``` import React from "react" import ContentLoader from "react-content-loader" const MyLoader = (props) => ( <ContentLoader speed={2} width={400} height={160} viewBox="0 0 400 160" backgroundColor="#f3f3f3" foregroundColor="#ecebeb" {...props} > <rect x="48" y="8" rx="3" ry="3" width="88" height="6" /> <rect x="48" y="26" rx="3" ry="3" width="52" height="6" /> <rect x="0" y="56" rx="3" ry="3" width="410" height="6" /> <rect x="0" y="72" rx="3" ry="3" width="380" height="6" /> <rect x="0" y="88" rx="3" ry="3" width="178" height="6" /> <circle cx="20" cy="20" r="20" /> </ContentLoader> ) export default MyLoader ```  您甚至可以拖曳單一骨架或使用為 Facebook 和 Instagram 等不同社群媒體預先定義的骨架。 您可以閱讀[文件](https://github.com/danilowoz/react-content-loader?tab=readme-ov-file#gettingstarted)並查看[演示](https://skeletonreact.com/)。 該專案在 GitHub 上擁有 13k+ Stars,並在 GitHub 上有 45k+ 開發人員使用。 https://github.com/danilowoz/react-content-loader Star React 內容載入器 ⭐️ --- 6. [React PDF](https://github.com/diegomura/react-pdf) - 使用 React 建立 PDF 檔案。 ----------------------------------------------------------------------------  該套件用於使用 React 建立 PDF。 開始使用以下 npm 指令。 ``` npm install @react-pdf/renderer --save ``` 您可以這樣使用它。 ``` import React from 'react'; import { Document, Page, Text, View, StyleSheet } from '@react-pdf/renderer'; // Create styles const styles = StyleSheet.create({ page: { flexDirection: 'row', backgroundColor: '#E4E4E4', }, section: { margin: 10, padding: 10, flexGrow: 1, }, }); // Create Document Component const MyDocument = () => ( <Document> <Page size="A4" style={styles.page}> <View style={styles.section}> <Text>Section #1</Text> </View> <View style={styles.section}> <Text>Section #2</Text> </View> </Page> </Document> ); ```   您可以閱讀[文件](https://react-pdf.org/)並查看[演示](https://react-pdf.org/repl)。 React-pdf 現在提供了一個名為`usePDF`的鉤子,可以透過 React hook API 存取所有 PDF 建立功能。如果您需要更多控製文件的呈現方式或更新頻率,這非常有用。 ``` const [instance, update] = usePDF({ document }); ``` 該專案在 GitHub 上有 13k+ Stars,有超過 270 個版本,[每週下載量超過 400k](https://www.npmjs.com/package/@react-pdf/renderer) ,這是一個好兆頭。 https://github.com/diegomura/react-pdf Star React PDF ⭐️ --- 7. [Recharts](https://github.com/recharts/recharts) - 使用 React 和 D3 建立的重新定義的圖表庫。 --------------------------------------------------------------------------------  該庫的主要目的是幫助您輕鬆地在 React 應用程式中編寫圖表。 Recharts 的主要原則是。 1. 只需使用 React 元件進行部署即可。 2. 原生 SVG 支持,輕量級,僅依賴一些 D3 子模組。 3. 聲明性元件、圖表元件純粹是表示性的。 開始使用以下 npm 指令。 ``` npm install recharts ``` 您可以這樣使用它。 ``` <LineChart width={500} height={300} data={data} accessibilityLayer> <XAxis dataKey="name"/> <YAxis/> <CartesianGrid stroke="#eee" strokeDasharray="5 5"/> <Line type="monotone" dataKey="uv" stroke="#8884d8" /> <Line type="monotone" dataKey="pv" stroke="#82ca9d" /> <Tooltip/> </LineChart> ```  您可以閱讀[文件](https://recharts.org/en-US/guide)並查看有關[Storybook](https://recharts.org/en-US/storybook)的更多資訊。 他們提供了大量的選項來自訂它,這就是開發人員喜歡它的原因。他們也提供一般常見問題的[wiki](https://github.com/recharts/recharts/wiki)頁面。 您也可以在此處的codesandbox 上嘗試。 https://codesandbox.io/embed/kec3v?view=Editor+%2B+Preview&module=%2Fsrc%2Findex.tsx 該專案在 GitHub 上有 22k+ Stars,有 200k+ 開發人員使用。 https://github.com/recharts/recharts 明星 Recharts ⭐️ --- 8. [React Joyride](https://github.com/gilbarbara/react-joyride) - 在您的應用程式中建立導遊。 -------------------------------------------------------------------------------   導覽是向新用戶展示您的應用程式或解釋新功能的絕佳方式。它改善了用戶體驗並可以創造個人化的觸感。 開始使用以下 npm 指令。 ``` npm i react-joyride ``` 您可以這樣使用它。 ``` import React, { useState } from 'react'; import Joyride from 'react-joyride'; /* * If your steps are not dynamic you can use a simple array. * Otherwise you can set it as a state inside your component. */ const steps = [ { target: '.my-first-step', content: 'This is my awesome feature!', }, { target: '.my-other-step', content: 'This another awesome feature!', }, ]; export default function App() { // If you want to delay the tour initialization you can use the `run` prop return ( <div> <Joyride steps={steps} /> ... </div> ); } ``` 它們還提供[元件列表](https://docs.react-joyride.com/custom-components)以及自訂預設用戶介面的簡單方法。 您可以閱讀[文件](https://docs.react-joyride.com/)並查看[演示](https://react-joyride.com/)。 您也可以嘗試[codesandbox](https://codesandbox.io/p/devbox/github/gilbarbara/react-joyride-demo/tree/main/?embed=1)上的東西。 他們在 GitHub 上有超過 6k 顆星,npm 套件每週下載量超過 25 萬次。 https://github.com/gilbarbara/react-joyride Star React Joyride ⭐️ --- 9. [SVGR](https://github.com/gregberge/svgr) - 將 SVG 轉換為 React 元件。 ------------------------------------------------------------------  SVGR 是一個將 SVG 轉換為 React 元件的通用工具。 它需要一個原始的 SVG 並將其轉換為隨時可用的 React 元件。 開始使用以下 npm 指令。 ``` npm install @svgr/core ``` 例如,您採用這個 SVG。 ``` <?xml version="1.0" encoding="UTF-8"?> <svg width="48px" height="1px" viewBox="0 0 48 1" version="1.1" xmlns="http://www.w3.org/2000/svg" xmlns:xlink="http://www.w3.org/1999/xlink" > <!-- Generator: Sketch 46.2 (44496) - http://www.bohemiancoding.com/sketch --> <title>Rectangle 5</title> <desc>Created with Sketch.</desc> <defs></defs> <g id="Page-1" stroke="none" stroke-width="1" fill="none" fill-rule="evenodd"> <g id="19-Separator" transform="translate(-129.000000, -156.000000)" fill="#063855" > <g id="Controls/Settings" transform="translate(80.000000, 0.000000)"> <g id="Content" transform="translate(0.000000, 64.000000)"> <g id="Group" transform="translate(24.000000, 56.000000)"> <g id="Group-2"> <rect id="Rectangle-5" x="25" y="36" width="48" height="1"></rect> </g> </g> </g> </g> </g> </g> </svg> ``` 執行SVGR後,將轉換為. ``` import * as React from 'react' const SvgComponent = (props) => ( <svg width="1em" height="1em" viewBox="0 0 48 1" {...props}> <path d="M0 0h48v1H0z" fill="currentColor" fillRule="evenodd" /> </svg> ) export default SvgComponent ``` 它使用[SVGO](https://github.com/svg/svgo)優化 SVG,並使用 Prettier 格式化程式碼。 將 HTML 轉換為 JSX 需要幾個步驟: 1. 將 SVG 轉換為 HAST (HTML AST) 2. 將 HAST 轉換為 Babel AST (JSX AST) 3. 使用 Babel 轉換 AST(重新命名屬性、更改屬性值…) 您可以在[Playground](https://react-svgr.com/playground/)閱讀[文件](https://react-svgr.com/docs/getting-started)並檢查內容。 該專案在 GitHub 上擁有 10k+ Stars,有超過 800 萬開發者使用,npm 上每週下載量超過 800k。 https://github.com/gregberge/svgr 明星 SVGR ⭐️ --- 10. [React Sortable Tree](https://github.com/frontend-collective/react-sortable-tree) - 用於巢狀資料和層次結構的拖放可排序元件。 ------------------------------------------------------------------------------------------------------------  一個 React 元件,支援對分層資料進行拖放排序。  開始使用以下 npm 指令。 ``` npm install react-sortable-tree --save ``` 您可以這樣使用它。 ``` import React, { Component } from 'react'; import SortableTree from 'react-sortable-tree'; import 'react-sortable-tree/style.css'; // This only needs to be imported once in your app export default class Tree extends Component { constructor(props) { super(props); this.state = { treeData: [ { title: 'Chicken', children: [{ title: 'Egg' }] }, { title: 'Fish', children: [{ title: 'fingerline' }] }, ], }; } render() { return ( <div style={{ height: 400 }}> <SortableTree treeData={this.state.treeData} onChange={treeData => this.setState({ treeData })} /> </div> ); } } ``` 檢查由此獲得的各種[道具選項](https://github.com/frontend-collective/react-sortable-tree?tab=readme-ov-file#props)和[主題](https://github.com/frontend-collective/react-sortable-tree?tab=readme-ov-file#featured-themes)。 您可以閱讀[文件](https://github.com/frontend-collective/react-sortable-tree?tab=readme-ov-file#getting-started)並查看[Storybook](https://frontend-collective.github.io/react-sortable-tree/?path=/story/basics--minimal-implementation) ,以獲取一些基本和高級功能的演示。 它可能不會被積極維護(仍然沒有存檔),因此您也可以使用[維護的 fork 版本](https://github.com/nosferatu500/react-sortable-tree)。 該專案在 GitHub 上擁有超過 4,500 個 Star,並被超過 5,000 名開發人員使用。 https://github.com/frontend-collective/react-sortable-tree Star React 可排序樹 ⭐️ --- 11. [React Hot Toast](https://github.com/timolins/react-hot-toast) - 冒煙的 Hot React 通知。 --------------------------------------------------------------------------------------  React Hot Toast 透過簡單的自訂選項提供了驚人的 🔥 預設體驗。它利用 Promise API 進行自動加載,確保平穩過渡。 它重量輕,不到 5kb,但仍然可以存取,同時為開發人員提供了像`useToaster()`這樣的無頭鉤子。 首先將 Toaster 加入到您的應用程式中。它將負責渲染發出的所有通知。現在您可以從任何地方觸發 toast() ! 開始使用以下 npm 指令。 ``` npm install react-hot-toast ``` 這就是它的易用性。 ``` import toast, { Toaster } from 'react-hot-toast'; const notify = () => toast('Here is your toast.'); const App = () => { return ( <div> <button onClick={notify}>Make me a toast</button> <Toaster /> </div> ); }; ``` 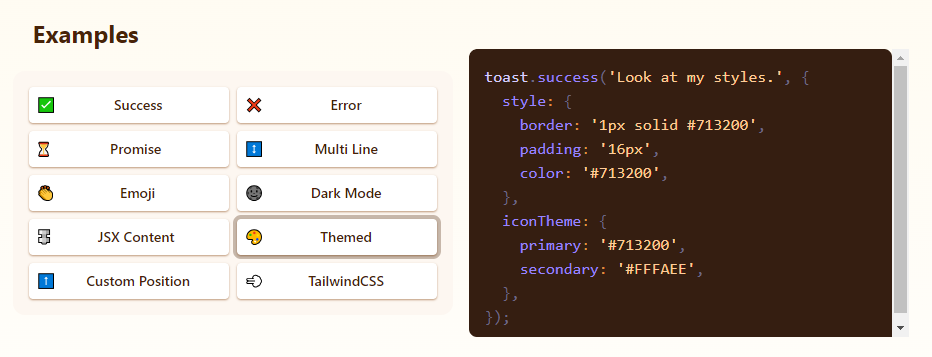  他們有很多自訂選項,但`useToaster()`掛鉤為您提供了一個無頭系統,可以為您管理通知狀態。這使得建立您的通知系統變得更加容易。 您可以閱讀[文件](https://react-hot-toast.com/docs)、[樣式指南](https://react-hot-toast.com/docs/styling)並查看[示範](https://react-hot-toast.com/)。 該專案在 GitHub 上有 8k+ Stars,有 230k+ 開發者使用。 https://github.com/timolins/react-hot-toast Star React Hot Toast ⭐️ --- 12. [Payload](https://github.com/payloadcms/payload) - 建立現代後端+管理 UI 的最佳方式。 --------------------------------------------------------------------------  Payload 是一個無頭 CMS 和應用程式框架。它旨在促進您的開發過程,但重要的是,當您的應用程式變得更加複雜時,不要妨礙您。 Payload 沒有黑魔法,完全開源,它既是一個應用程式框架,也是一個無頭 CMS。它確實是適用於 TypeScript 的 Rails,並且您會獲得一個管理面板。您可以使用此[YouTube 影片](https://www.youtube.com/watch?v=In_lFhzmbME)了解有關 Payload 的更多資訊。 https://www.youtube.com/watch?v=In\_lFhzmbME 您可以透過使用Payload來了解[其中涉及的概念](https://payloadcms.com/docs/getting-started/concepts)。 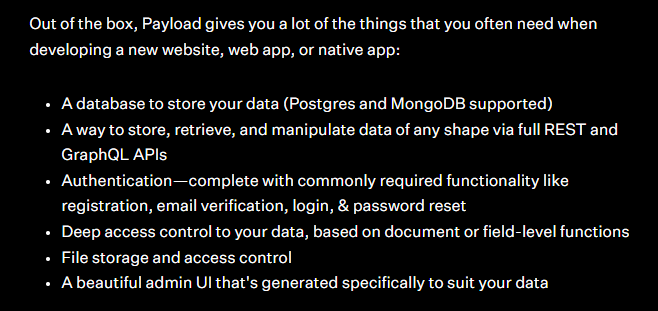 有效負載透過您選擇的資料庫適配器與您的資料庫進行互動。目前,Payload 正式支援兩種資料庫適配器: 1. MongoDB 與 Mongoose 2. Postgres 帶毛毛雨 開始使用以下命令。 ``` npx create-payload-app@latest ``` 您必須產生 Payload 金鑰並更新`server.ts`以初始化 Payload。 ``` import express from 'express' import payload from 'payload' require('dotenv').config() const app = express() const start = async () => { await payload.init({ secret: process.env.PAYLOAD_SECRET, express: app, }) app.listen(3000, async () => { console.log( "Express is now listening for incoming connections on port 3000." ) }) } start() ``` 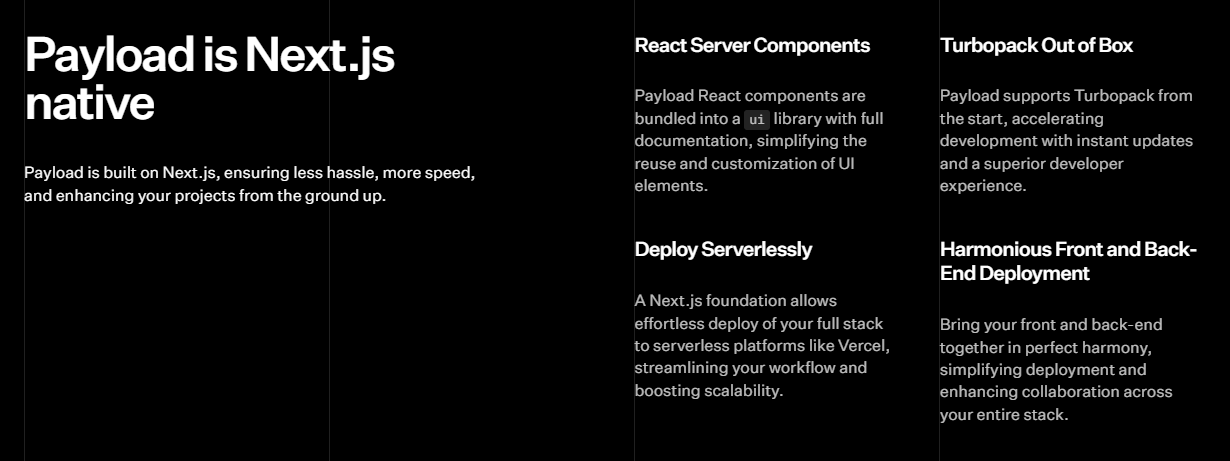 您可以閱讀[文件](https://payloadcms.com/docs/getting-started/what-is-payload)並查看[演示](https://demo.payloadcms.com/?_gl=1*9x0za3*_ga*NzEzMzkwNzIuMTcxMDE2NDk1MA..*_ga_FLQ5THRMZQ*MTcxMDE2NDk1MC4xLjEuMTcxMDE2NDk1MS4wLjAuMA..)。 他們還提供與 Payload + Stripe 無縫整合的[電子商務模板](https://github.com/payloadcms/payload/tree/main/templates/ecommerce)。此範本具有令人驚嘆的、功能齊全的前端,包括購物車、結帳流程、訂單管理等元件。 Payload 在 GitHub 上擁有 18k+ Stars,並且有超過 290 個版本,因此它們不斷改進,尤其是在資料庫支援方面。 https://github.com/payloadcms/payload 明星有效負載 ⭐️ --- 13. [React Player](https://github.com/cookpete/react-player) - 用於播放各種 URL 的 React 元件。 ------------------------------------------------------------------------------------- 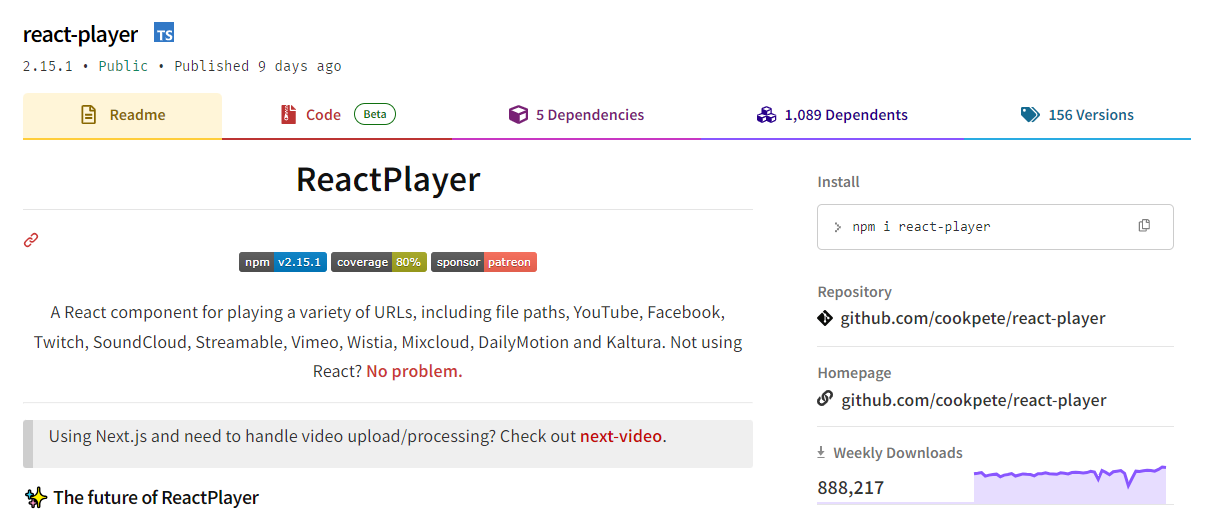 用於播放各種 URL 的 React 元件,包括檔案路徑、YouTube、Facebook、Twitch、SoundCloud、Streamable、Vimeo、Wistia、Mixcloud、DailyMotion 和 Kaltura。您可以看到[支援的媒體](https://github.com/cookpete/react-player?tab=readme-ov-file#supported-media)清單。 ReactPlayer 的維護工作由 Mux 接管,這使它們成為一個不錯的選擇。 開始使用以下 npm 指令。 ``` npm install react-player ``` 您可以這樣使用它。 ``` import React from 'react' import ReactPlayer from 'react-player' // Render a YouTube video player <ReactPlayer url='https://www.youtube.com/watch?v=LXb3EKWsInQ' /> // If you only ever use one type, use imports such as react-player/youtube to reduce your bundle size. // like this: import ReactPlayer from 'react-player/youtube' ``` 您也可以使用`react-player/lazy`為您傳入的URL 延遲載入適當的播放器。這會為您的輸出加入幾個reactPlayer 區塊,但會減少主包的大小。 ``` import React from 'react' import ReactPlayer from 'react-player/lazy' // Lazy load the YouTube player <ReactPlayer url='https://www.youtube.com/watch?v=ysz5S6PUM-U' /> ``` 您可以閱讀[文件](https://github.com/cookpete/react-player?tab=readme-ov-file#props)並查看[演示](https://cookpete.github.io/react-player/)。他們提供了大量的選項,包括加入字幕並以簡單的方式使其響應。 它們在 GitHub 上擁有超過 8000 顆星,被超過 135,000 名開發人員使用,並且 npm 軟體包[每週的下載量超過 800k](https://www.npmjs.com/package/react-player) 。 https://github.com/cookpete/react-player 明星 React 播放器 ⭐️ --- 14. [Victory](https://github.com/FormidableLabs/victory) - 用於建立互動式資料視覺化的 React 元件。 ----------------------------------------------------------------------------------  Victory 是一個可組合 React 元件的生態系統,用於建立互動式資料視覺化。 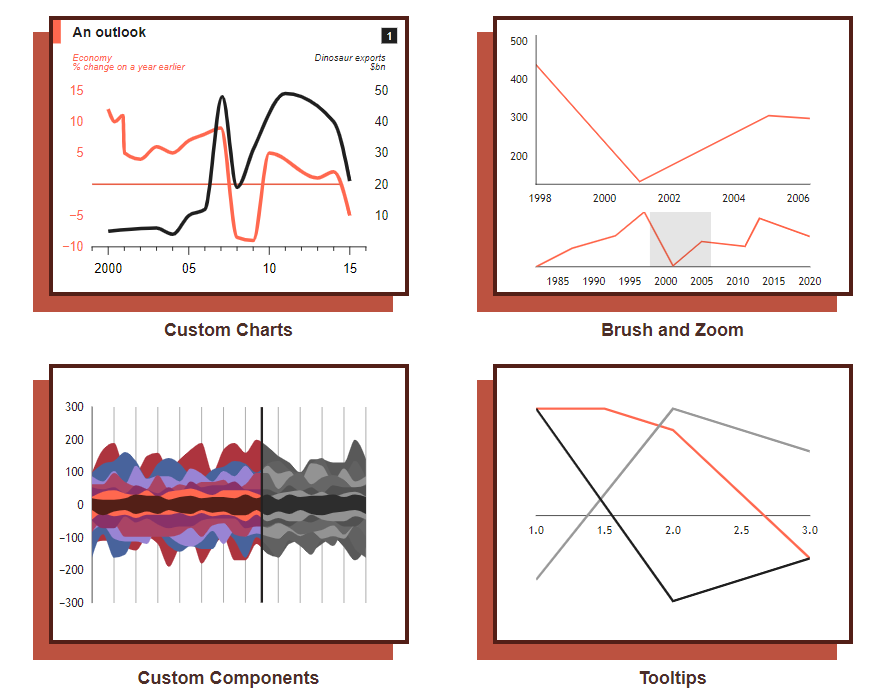 開始使用以下 npm 指令。 ``` npm i --save victory ``` 您可以這樣使用它。 ``` <VictoryChart domainPadding={{ x: 20 }} > <VictoryHistogram style={{ data: { fill: "#c43a31" } }} data={sampleHistogramDateData} bins={[ new Date(2020, 1, 1), new Date(2020, 4, 1), new Date(2020, 8, 1), new Date(2020, 11, 1) ]} /> </VictoryChart> ``` 這就是它的渲染方式。他們還提供通常有用的動畫和主題選項。  您可以閱讀[文件](https://commerce.nearform.com/open-source/victory/docs)並按照[教學](https://commerce.nearform.com/open-source/victory/docs/native)開始。他們提供大約 15 種不同的圖表選項。 它也可用於[React Native(文件)](https://commerce.nearform.com/open-source/victory/docs/native) ,所以這是一個優點。我還建議您查看他們的常見[問題解答](https://commerce.nearform.com/open-source/victory/docs/faq#frequently-asked-questions-faq),其中描述了常見問題的程式碼解決方案和解釋,例如樣式、註釋(標籤)、處理軸。 該專案在 GitHub 上擁有 10k+ Stars,並在 GitHub 上有 23k+ 開發人員使用。 https://github.com/FormidableLabs/victory 勝利之星 ⭐️ --- 15. [React Slick](https://github.com/akiran/react-slick) - React 輪播元件。 ----------------------------------------------------------------------  React Slick 是一個使用 React 建構的輪播元件。它是一個光滑的旋轉木馬的反應端口 開始使用以下 npm 指令。 ``` npm install react-slick --save ``` 這是使用自訂分頁的方法。 ``` import React, { Component } from "react"; import Slider from "react-slick"; import { baseUrl } from "./config"; function CustomPaging() { const settings = { customPaging: function(i) { return ( <a> <img src={`${baseUrl}/abstract0${i + 1}.jpg`} /> </a> ); }, dots: true, dotsClass: "slick-dots slick-thumb", infinite: true, speed: 500, slidesToShow: 1, slidesToScroll: 1 }; return ( <div className="slider-container"> <Slider {...settings}> <div> <img src={baseUrl + "/abstract01.jpg"} /> </div> <div> <img src={baseUrl + "/abstract02.jpg"} /> </div> <div> <img src={baseUrl + "/abstract03.jpg"} /> </div> <div> <img src={baseUrl + "/abstract04.jpg"} /> </div> </Slider> </div> ); } export default CustomPaging; ```  您可以閱讀有關可用的[prop 選項](https://react-slick.neostack.com/docs/api)和[方法](https://react-slick.neostack.com/docs/api#methods)的資訊。 您可以閱讀[文件](https://react-slick.neostack.com/docs/get-started)和所有帶有程式碼和輸出[的範例集](https://react-slick.neostack.com/docs/example/)。 他們在 GitHub 上有超過 11k 顆星,並且有超過 36 萬開發者在 GitHub 上使用它。 https://github.com/akiran/react-slick Star React Slick ⭐️ --- 16. [Medusa](https://github.com/medusajs/medusa) - 數位商務的建構模組。 -------------------------------------------------------------  Medusa 是一組商務模組和工具,可讓您建立豐富、可靠且高效能的商務應用程式,而無需重新發明核心商務邏輯。 這些模組可以客製化並用於建立高級電子商務商店、市場或任何需要基礎商務原語的產品。所有模組都是開源的,可以在 npm 上免費取得。 開始使用以下 npm 指令。 ``` npm install medusa-react @tanstack/[email protected] @medusajs/medusa ``` 將其包含在`app.ts`中。 只有 MedusaProvider 的子級才能從其鉤子中受益。因此,Storefront 元件及其子元件現在可以使用 Medusa React 公開的鉤子。 ``` import { MedusaProvider } from "medusa-react" import Storefront from "./Storefront" import { QueryClient } from "@tanstack/react-query" import React from "react" const queryClient = new QueryClient() const App = () => { return ( <MedusaProvider queryClientProviderProps={{ client: queryClient }} baseUrl="http://localhost:9000" > <Storefront /> </MedusaProvider> ) } export default App ``` 例如,這就是您如何使用突變來建立購物車。 ``` import { useCreateCart } from "medusa-react" const Cart = () => { const createCart = useCreateCart() const handleClick = () => { createCart.mutate({}) // create an empty cart } return ( <div> {createCart.isLoading && <div>Loading...</div>} {!createCart.data?.cart && ( <button onClick={handleClick}> Create cart </button> )} {createCart.data?.cart?.id && ( <div>Cart ID: {createCart.data?.cart.id}</div> )} </div> ) } export default Cart ``` 他們提供了一套電子商務模組(大量選項),例如折扣、價目表、禮品卡等。  它們還提供了一種簡單的管理員和客戶身份驗證方法,您可以在[文件](https://docs.medusajs.com/)中閱讀。 他們提供了[nextjs 入門模板](https://docs.medusajs.com/starters/nextjs-medusa-starter)和[Medusa React](https://docs.medusajs.com/medusa-react/overview)作為 SDK。 該專案在 GitHub 上有 22k+ Stars,有 4k+ 開發者使用。 https://github.com/medusajs/medusa 明星美杜莎 ⭐️ --- 17. [React Markdown](https://github.com/remarkjs/react-markdown) - React 的 Markdown 元件. ---------------------------------------------------------------------------------------  Markdown 至關重要,使用 React 渲染它對於各種場景都非常有用。 它提供了一個 React 元件,能夠安全地將一串 Markdown 渲染到 React 元素中。您可以透過傳遞外掛程式並指定要使用的元件而不是標準 HTML 元素來自訂 Markdown 的轉換。 開始使用以下 npm 指令。 ``` npm i react-markdown ``` 您可以這樣使用它。 ``` import React from 'react' import {createRoot} from 'react-dom/client' import Markdown from 'react-markdown' import remarkGfm from 'remark-gfm' const markdown = `Just a link: www.nasa.gov.` createRoot(document.body).render( <Markdown remarkPlugins={[remarkGfm]}>{markdown}</Markdown> ) ``` 等效的 JSX 是。 ``` <p> Just a link: <a href="http://www.nasa.gov">www.nasa.gov</a>. </p> ``` 他們還提供了一份[備忘錄](https://commonmark.org/help/)和一個十分鐘的逐步[教學](https://commonmark.org/help/tutorial/)。  您可以閱讀[文件](https://github.com/remarkjs/react-markdown?tab=readme-ov-file#install)並查看[演示](https://remarkjs.github.io/react-markdown/)。 該專案在 GitHub 上有 12k+ Stars,[每週下載量超過 2700k](https://www.npmjs.com/package/react-markdown) ,並被 200k+ 開發人員使用,證明了它的真正有用性。 https://github.com/remarkjs/react-markdown Star React Markdown ⭐️ --- 18. [React JSONSchema Form](https://github.com/rjsf-team/react-jsonschema-form) - 用於從 JSON Schema 建立 Web 表單。 ------------------------------------------------------------------------------------------------------------  `react-jsonschema-form`會自動從 JSON Schema 產生 React 表單,使其非常適合僅使用 JSON schema 為任何資料產生表單。它提供了像 uiSchema 這樣的自訂選項來自訂預設主題之外的表單外觀。 開始使用以下 npm 指令。 ``` npm install @rjsf/core @rjsf/utils @rjsf/validator-ajv8 --save ``` 您可以這樣使用它。 ``` import { RJSFSchema } from '@rjsf/utils'; import validator from '@rjsf/validator-ajv8'; const schema: RJSFSchema = { title: 'Todo', type: 'object', required: ['title'], properties: { title: { type: 'string', title: 'Title', default: 'A new task' }, done: { type: 'boolean', title: 'Done?', default: false }, }, }; const log = (type) => console.log.bind(console, type); render( <Form schema={schema} validator={validator} onChange={log('changed')} onSubmit={log('submitted')} onError={log('errors')} />, document.getElementById('app') ); ``` 他們提供[高級定制](https://rjsf-team.github.io/react-jsonschema-form/docs/advanced-customization/)選項,包括定制小部件。 您可以閱讀[文件](https://rjsf-team.github.io/react-jsonschema-form/docs/)並查看[即時遊樂場](https://rjsf-team.github.io/react-jsonschema-form/)。 它在 GitHub 上擁有超過 13k 個 Star,並被 5k+ 開發人員使用。他們在`v5`上發布了 190 多個版本,因此他們正在不斷改進。 https://github.com/rjsf-team/react-jsonschema-form Star React JSONSchema 表單 ⭐️ --- 19. [Craft.js](https://github.com/prevwong/craft.js) - 建立可擴充的拖放頁面編輯器。 ---------------------------------------------------------------------  頁面編輯器可以增強使用者體驗,但從頭開始建立頁面編輯器可能會令人望而生畏。現有庫提供具有可編輯元件的預先建置編輯器,但自訂通常需要修改庫本身。 Craft.js 透過模組化頁面編輯器元件、透過拖放功能簡化自訂以及渲染管理來解決這個問題。在 React 中設計你的編輯器,無需複雜的插件系統,專注於你的特定需求和規格。 開始使用以下 npm 指令。 ``` npm install --save @craftjs/core ``` 他們還提供了有關如何入門的[簡短教程](https://craft.js.org/docs/guides/basic-tutorial)。我不會介紹它,因為它非常簡單且詳細。 您可以閱讀[文件](https://craft.js.org/docs/overview)並查看[即時演示](https://craft.js.org/)以及另一個[即時範例](https://craft.js.org/examples/basic)。 它在 GitHub 上有大約 6k+ Stars,但考慮到它們正在改進,仍然很有用。 https://github.com/prevwong/craft.js Star Craft.js ⭐️ --- 20. [Gatsby](https://github.com/gatsbyjs/gatsby) - 最好的基於 React 的框架,具有內建的效能、可擴展性和安全性。 ------------------------------------------------------------------------------------  Gatsby 是一個基於 React 的框架,使開發人員能夠建立閃電般快速的網站和應用程式,將動態渲染的靈活性與靜態網站生成的速度融為一體。 憑藉可自訂的 UI 和對各種資料來源的支援等功能,Gatsby 提供了無與倫比的控制和可擴展性。此外,它還可以自動進行效能最佳化,使其成為靜態網站的首選。 開始使用以下 npm 指令。 ``` npm init gatsby ``` 這就是如何在 Gatsby(反應元件)中使用`Link` 。 ``` import React from "react" import { Link } from "gatsby" const Page = () => ( <div> <p> Check out my <Link to="/blog">blog</Link>! </p> <p> {/* Note that external links still use `a` tags. */} Follow me on <a href="https://twitter.com/gatsbyjs">Twitter</a>! </p> </div> ) ``` 他們提供了一組[入門模板,](https://www.gatsbyjs.com/starters/)其中包含如何使用它、涉及的依賴項以及每個模板的演示。  您可以閱讀有關 Gatsby 的一些[常見概念,](https://www.gatsbyjs.com/docs/conceptual/gatsby-concepts/)例如 React Hydration、Gatsby 建置流程等。 您可以閱讀[文件](https://www.gatsbyjs.com/docs/)並查看入門[教學課程](https://www.gatsbyjs.com/docs/tutorial/)。 Gatsby 在 GitHub 上擁有超過 55,000 顆星,並被超過 240,000 名開發者使用 https://github.com/gatsbyjs/gatsby 明星蓋茲比 ⭐️ --- 21. [Chat UI Kit React](https://github.com/chatscope/chat-ui-kit-react) - 在幾分鐘內使用 React 建立您的聊天 UI。 -------------------------------------------------------------------------------------------------- 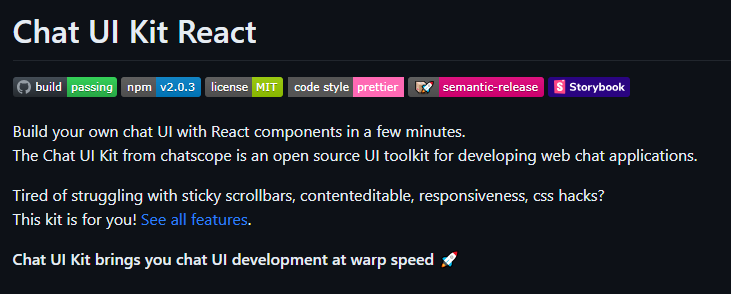 Chatscope 的聊天 UI 工具包是一個用於開發網頁聊天應用程式的開源 UI 工具包。 儘管該專案並未廣泛使用,但這些功能對於剛剛查看該專案的初學者來說還是很有用的。 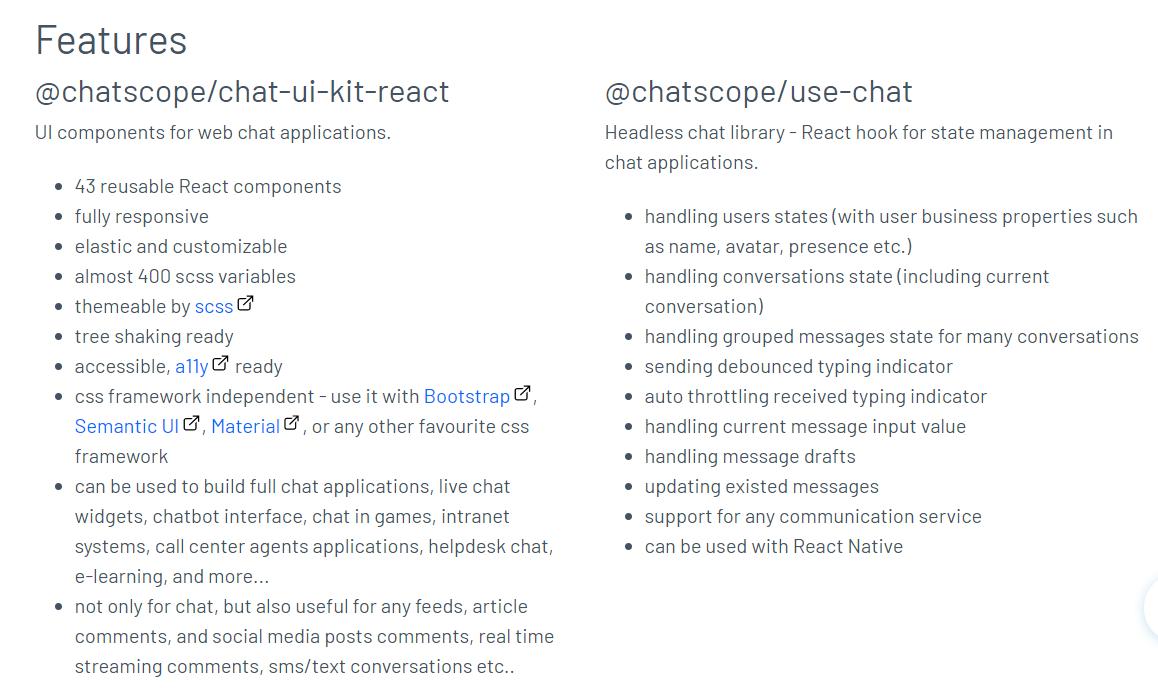 開始使用以下 npm 指令。 ``` npm install @chatscope/chat-ui-kit-react ``` 這就是建立 GUI 的方法。 ``` import styles from '@chatscope/chat-ui-kit-styles/dist/default/styles.min.css'; import { MainContainer, ChatContainer, MessageList, Message, MessageInput } from '@chatscope/chat-ui-kit-react'; <div style={{ position:"relative", height: "500px" }}> <MainContainer> <ChatContainer> <MessageList> <Message model={{ message: "Hello my friend", sentTime: "just now", sender: "Joe" }} /> </MessageList> <MessageInput placeholder="Type message here" /> </ChatContainer> </MainContainer> </div> ``` 您可以閱讀[文件](https://chatscope.io/docs/)。 故事書中有更[詳細的文件](https://chatscope.io/storybook/react/?path=/docs/documentation-introduction--docs)。 它提供了一些方便的元件,例如[`TypingIndicator`](https://chatscope.io/storybook/react/?path=/docs/components-typingindicator--docs) 、 [`Multiline Incoming`](https://chatscope.io/storybook/react/?path=/story/components-message--multiline-incoming)等等。 我知道你們中的一些人更喜歡透過部落格來了解整個結構,因此你可以閱讀使用 Chat UI Kit React 的 Rollbar 的[如何將 ChatGPT 與 React 整合](https://rollbar.com/blog/how-to-integrate-chatgpt-with-react/)。 您可以看到的一些演示: - [聊天機器人使用者介面](https://mars.chatscope.io/) - [與朋友聊天](https://chatscope.io/demo/chat-friends/)- 看看這個! 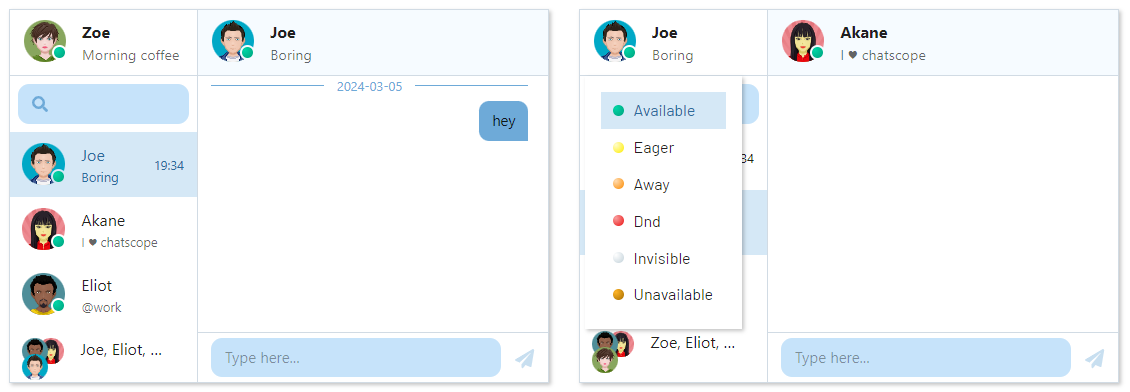 https://github.com/chatscope/chat-ui-kit-react Star Chat UI Kit React ⭐️ --- 22. [Botonic](https://github.com/hubtype/botonic) - 用於建立會話應用程式的 React 框架。 -------------------------------------------------------------------------  Botonic 是一個全端 Javascript 框架,用於建立在多個平台上執行的聊天機器人和現代對話應用程式:Web、行動和訊息應用程式(Messenger、WhatsApp、Telegram 等)。它建構在 ⚛️ React、Serverless 和 Tensorflow.js 之上。 如果您不了解對話應用程式的概念,可以在[官方部落格](https://www.hubtype.com/blog/what-are-conversational-apps)上閱讀它們。 使用 Botonic,您可以建立包含最佳文字外介面(簡單性、自然語言互動)和圖形介面(多媒體、視覺上下文、豐富互動)的會話應用程式。 這是一個強大的組合,可以提供比僅依賴文字和 NLP 的傳統聊天機器人更好的用戶體驗。 這就是 Botonic 的簡單方式。 ``` export default class extends React.Component { static async botonicInit({ input, session, params, lastRoutePath }) { await humanHandOff(session)) } render() { return ( <Text> Thanks for contacting us! One of our agents will attend you as soon as possible. </Text> ) } } ``` 它們也支援 TypeScript,所以這是一個優點。 您可以看到一些使用 Botonic 建置的[範例](https://botonic.io/examples/)及其原始程式碼。 您可以閱讀[文件](https://botonic.io/docs/welcome)以及如何[從頭開始建立會話應用程式](https://botonic.io/docs/create-convapp)。 https://github.com/hubtype/botonic Star Botonic ⭐️ --- 23. [React Flowbite](https://github.com/themesberg/flowbite-react) - 為 Flowbite 和 Tailwind CSS 建構的 React 元件. ------------------------------------------------------------------------------------------------------------  每個人對他們想要用來建立網站的使用者介面都有不同的偏好。 Flowbite React 是 UI 元件的開源集合,在 React 中建置,具有來自 Tailwind CSS 的實用程式類,您可以將其用作使用者介面和網站的起點。 開始使用以下 npm 指令。 ``` npm i flowbite-react ``` 這是一起使用表格和鍵盤元件的方法。 ``` 'use client'; import { Kbd, Table } from 'flowbite-react'; import { MdKeyboardArrowDown, MdKeyboardArrowLeft, MdKeyboardArrowRight, MdKeyboardArrowUp } from 'react-icons/md'; function Component() { return ( <Table> <Table.Head> <Table.HeadCell>Key</Table.HeadCell> <Table.HeadCell>Description</Table.HeadCell> </Table.Head> <Table.Body className="divide-y"> <Table.Row className="bg-white dark:border-gray-700 dark:bg-gray-800"> <Table.Cell className="whitespace-nowrap font-medium text-gray-900 dark:text-white"> <Kbd>Shift</Kbd> <span>or</span> <Kbd>Tab</Kbd> </Table.Cell> <Table.Cell>Navigate to interactive elements</Table.Cell> </Table.Row> <Table.Row className="bg-white dark:border-gray-700 dark:bg-gray-800"> <Table.Cell className="whitespace-nowrap font-medium text-gray-900 dark:text-white"> <Kbd>Enter</Kbd> or <Kbd>Spacebar</Kbd> </Table.Cell> <Table.Cell>Ensure elements with ARIA role="button" can be activated with both key commands.</Table.Cell> </Table.Row> <Table.Row className="bg-white dark:border-gray-700 dark:bg-gray-800"> <Table.Cell className="whitespace-nowrap font-medium text-gray-900 dark:text-white"> <span className="inline-flex gap-1"> <Kbd icon={MdKeyboardArrowUp} /> <Kbd icon={MdKeyboardArrowDown} /> </span> <span> or </span> <span className="inline-flex gap-1"> <Kbd icon={MdKeyboardArrowLeft} /> <Kbd icon={MdKeyboardArrowRight} /> </span> </Table.Cell> <Table.Cell>Choose and activate previous/next tab.</Table.Cell> </Table.Row> </Table.Body> </Table> ); } ``` 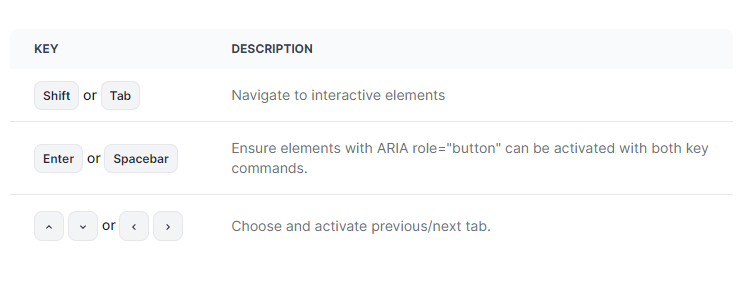 您可以閱讀[文件](https://www.flowbite-react.com/docs/getting-started/introduction)並查看[Storybook](https://storybook.flowbite-react.com/?path=/story/components-accordion--always-open)中的功能。您也可以查看[元件](https://www.flowbite-react.com/docs/components/accordion)清單。 在我看來,如果您想快速設定 UI,但又不想最終為高品質的開源專案使用預先定義的庫元件,那麼這很好。 該專案在 GitHub 上擁有超過 1,500 顆星,擁有超過 37,000 名開發者的用戶群,並受到社群的廣泛認可和信任,使其成為一個可靠的選擇。 https://github.com/themesberg/flowbite-react Star React Flowbite ⭐️ --- 24. [DND 套件](https://github.com/clauderic/dnd-kit)- 輕量級、高效能、可存取且可擴展的拖放功能。 -------------------------------------------------------------------------  這是一個強大的 React 拖放工具包,擁有可自訂的碰撞檢測、多個啟動器和自動滾動等功能。 它的設計考慮到了 React,提供了方便集成的鉤子,無需進行重大的架構更改。支援從清單到網格和虛擬化清單的各種用例,它既是動態的又是輕量級的,沒有外部相依性。 開始使用以下 npm 指令。 ``` npm install @dnd-kit/core ``` 這就是建立可拖放元件的方法。 `Example.jsx` ``` import React, {useState} from 'react'; import {DndContext} from '@dnd-kit/core'; import {Draggable} from './Draggable'; import {Droppable} from './Droppable'; function Example() { const [parent, setParent] = useState(null); const draggable = ( <Draggable id="draggable"> Go ahead, drag me. </Draggable> ); return ( <DndContext onDragEnd={handleDragEnd}> {!parent ? draggable : null} <Droppable id="droppable"> {parent === "droppable" ? draggable : 'Drop here'} </Droppable> </DndContext> ); function handleDragEnd({over}) { setParent(over ? over.id : null); } } ``` `Droppable.jsx` ``` import React from 'react'; import {useDroppable} from '@dnd-kit/core'; export function Droppable(props) { const {isOver, setNodeRef} = useDroppable({ id: props.id, }); const style = { opacity: isOver ? 1 : 0.5, }; return ( <div ref={setNodeRef} style={style}> {props.children} </div> ); } ``` `Draggable.jsx` ``` import React from 'react'; import {useDraggable} from '@dnd-kit/core'; import {CSS} from '@dnd-kit/utilities'; function Draggable(props) { const {attributes, listeners, setNodeRef, transform} = useDraggable({ id: props.id, }); const style = { // Outputs `translate3d(x, y, 0)` transform: CSS.Translate.toString(transform), }; return ( <button ref={setNodeRef} style={style} {...listeners} {...attributes}> {props.children} </button> ); } ``` 我將可拖曳元件放在可放置元件上。  您可以閱讀[文件](https://docs.dndkit.com/)以及滑鼠和指標等[感測器的選項](https://docs.dndkit.com/introduction/installation#core-library)。 它在 GitHub 上擁有 10k+ Stars,並被 GitHub 上 47k+ 開發人員使用。 https://github.com/clauderic/dnd-kit 明星免打擾套件 ⭐️
經過數月的開發和測試,我們很高興地宣布 AnalogJS 1.0 版本發布! `1.0`版本包含許多功能,可協助開發人員使用 Angular 更快地交付網站和應用程式。 此版本標誌著 Analog 的第一個主要版本,為開發人員使用 Analog 進行建置提供了更穩定的起點。我們將繼續從開發人員那裡獲得回饋,幫助我們繼續改進和創新專案。 特點⭐️ ---- Analog 是建構在 Angular 之上的元框架,由下一代開源建置工具[Vite](https://vitejs.dev)和開源伺服器引擎框架[Nitro](https://nitro.unjs.io)提供支援。以下是它的一些功能,包括: - 對 Vite 生態系統的一流支援(Vitest、Playwright、Cypress 等) - [基於檔案系統的路由](https://analogjs.org/docs/features/routing/overview) - [支援 Markdown](https://analogjs.org/docs/features/routing/content)頁面和博客 - [支援 API/伺服器路由](https://analogjs.org/docs/features/api/overview) - 具有網站地圖和 RSS 提要支援的混合[SSR](https://analogjs.org/docs/features/server/server-side-rendering) / [SSG](https://analogjs.org/docs/features/server/static-site-generation) - 支援 Angular CLI/ [Nx 工作區](https://analogjs.org/docs/integrations/nx) - 與[tRPC](https://trpc.io)整合以實現類型安全的伺服器交互 - 伺服器和部署支援 - 和更多! 貢獻和社區🤓 ------ 如果沒有核心貢獻者和合作者團隊,AnalogJS 就不會有今天的成就。 [羅賓·戈茨](https://twitter.com/goetzrobin) [馬爾科·斯塔尼米羅維奇](https://twitter.com/markostdev) [路易斯·卡斯特羅](https://twitter.com/LuisHCCDev) [週陳](https://twitter.com/nartc1410) [約書亞·莫羅尼](https://twitter.com/joshuamorony) [安德烈斯·維拉紐瓦](https://twitter.com/villanuevand) 此外,也要感謝該專案的[80 多名貢獻者](https://github.com/analogjs/analog#contributors-),無論是透過程式碼、文件、測試,還是只是嘗試該專案。 該專案已經在[GitHub](https://github.com/analogjs/analog)上擁有超過 2000 顆星,在[Discord](https://chat.analogjs.org)上擁有超過 500 名成員,在[Twitter/X](https://twitter.com/analogjs)上擁有超過 1000 名追蹤者,並被納入第一批[GitHub 加速器隊列](https://accelerator.github.com/)。 {% youtube H4U6udLcM-Q %} 如果您想嘗試 Analog,請查看這篇有關使用 Analog 和 Angular[建立部落格](https://dev.to/analogjs/how-to-build-a-blog-with-analog-and-angular-4pk2)的部落格文章。如果您想參與該專案,請查看[GitHub 儲存庫](https://github.com/analogjs/analog)。 下一步是什麼 ------ 我們將繼續使用 Analog 和 Angular 盡可能無縫地建立全端網站和應用程式,並透過與[Astro](https://astro.build) 、 [Nx](https://nx.dev) 、 [Vitest](https://analogjs.org/docs/features/testing/vitest) 、 [Storybook](https://storybook.js.org)等整合來擴展 Angular 生態系統。 我們還在 Analog 中引入了一種新的單文件元件格式,用於編寫元件和指令。 以下是`hello.analog`檔案的範例: ``` <script lang="ts"> import { signal } from '@angular/core'; const count = signal(0); function increment() { count.update(total => ++total); } </script> <template> <h2>Hello Analog</h2> Count: {{ count() }} <button (click)="increment()"> Increment </button> </template> <style> h2 { color: red; } </style> ``` 最初是使用 Angular 的元件和指令的`.ng`檔案副檔名,現已發展成為模擬 SFC,其功能包括支援[自動導入](https://github.com/analogjs/analog/discussions/901)、內聯 Markdown 模板、頁面路由等。隨著 Analog 未來的發展,我們將繼續迭代這種方法,並探索在 Angular 應用程式中啟用這種格式的選項。 我們已經收到了非常積極的回饋,甚至還收到了支援這種格式的進一步開發,包括[用於模擬 SFC 的 IDEA 插件](https://plugins.jetbrains.com/plugin/23913-analog?noRedirect=true),該插件可在 WebStorm 的 EAP 版本中使用。感謝 JetBrains 團隊的[Jan-Niklas Wortmann](https://twitter.com/niklas_wortmann)和[Piotr Tomiak](https://twitter.com/PiotrekTomiak)對此外掛程式的初步開發。您也可以在[GitHub](https://github.com/analogjs/idea-plugin)上為該插件做出貢獻。 與 Analog 合作🤝 ------------ 我們正在尋找與模擬專案合作的公司,以支持該專案的開發。感謝[Snyder Technologies](https://snyder.tech/)作為 Analog 的早期採用者和推動者,[感謝 Nx](https://nx.dev)作為贊助商加入我們,[感謝 House of Angular](https://houseofangular.io)以及該專案的許多其他支持者。 了解有關我們[合作機會](https://analogjs.org/docs/sponsoring)的更多資訊或直接聯繫贊助商\[at\]analogjs.org。 加入社群🥇 ----- - 存取[GitHub 儲存庫](https://github.com/analogjs/analog)並為其加註星標 - 加入[不和諧](https://chat.analogjs.org) - 在[推特](https://twitter.com/analogjs)上關注我們 如果您喜歡這篇文章,請點擊 :heart: 這樣其他人就會看到它。在 Twitter/X 上關注[AnalogJS](https://twitter.com/analogjs)和 \[me\] (https://twitter.com/brandontroberts),並訂閱我的[YouTube 頻道](https://youtube.com/brandonrobertsdev?sub_confirmation=1)以獲取更多內容! --- 原文出處:https://dev.to/analogjs/announcing-analogjs-10-19an
作為開發人員,**確定工具的優先順序至關重要,**因為它們對於實現您的目標至關重要。熟練是有價值的,但正確的工具可以增強這些技能,從而在您的領域中取得更大的成功。 在本文中,我將分享我每天使用的提高工作效率的工具。這些工具幫助我完成各種任務,包括文件、線框圖、開發、測試、除錯和研究。 我將這些工具分為三類:*任務管理*、*開發*和*文件*。 **讓我們事不宜遲地深入研究這些工具。** 任務管理工具:讓事情井井有條 -------------- 對於軟體開發人員來說,保持任務有序非常重要。無論您計劃的是本月、一周還是今天,都沒關係。寫下所有任務會很有幫助,這樣您就可以了解自己的表現。 我主要使用兩個工具: **Notion**和**Linear** 。 ### Notion 當您是軟體工程師時,您經常需要組織您的工作、快速做筆記,甚至即時編寫一些文件。概念對此非常有用。 Notion讓我可以輕鬆地整理我的想法、規劃我的內容並安排我的工作。日曆範本使用簡單,您可以根據自己的喜好進行更改,並且可以加入許多詳細資訊(例如標籤)來追蹤您的任務。 我使用 Notion 來規劃我的內容。  概念也有利於團隊追蹤任務。但是,我要討論的下一個工具對於管理軟體開發任務來說更加簡單。 我真的不喜歡到處移動門票或花很多時間在門票報告上。這個工具讓這些任務變得更容易,我認識的許多開發人員都喜歡每天使用它。這就是為什麼我想介紹 Linear。 ### [Linear](https://linear.app/) 我之前嘗試過使用 Trello 或 Jira 等工具,但我不太喜歡它。 Trello 太簡單,功能不多,而 Jira 功能很多,但使用起來很複雜(甚至 GitLab 的 Issue board 似乎更好)。 然後我找到了 Linear,它是為像我們這樣的開發者設計的。 Linear 可以輕鬆實現工作流程自動化並整合其他工具,而不會使事情變得複雜。而且用起來真的很好。使用線性,您可以獲得: - 根據您的 PR/MR 變更或進度自動更新票證。 - 複製分支名稱的簡單方法。 - 不傷眼的深色模式。 - 鍵盤快捷鍵可讓您在應用程式中快速移動。 - 使用起來既快速又有趣。 使用 Linear,我不會花太多時間在任務管理上,因此我可以更專注於編碼。 現在我們已經討論瞭如何管理任務,接下來我將分享我用於文件編寫的工具。 文件工具:軟體工程的支柱 ------------ 文件是軟體工程的基石,以至於人們常說,最好的開發人員花在編寫文件的時間比編寫程式碼的時間還要多。它有多種用途,從規劃和假設建立到追蹤效能、教育用戶以及詳細說明功能或錯誤。 在這裡,我將分享我用於文件編寫的工具,從文字編寫到圖形建立。 ### [Obsidian](https://obsidian.md/) 雖然 Notion 是一個很棒的工具,許多人可能想知道為什麼它不是我的文件首選,但我發現它更傾向於記筆記。儘管 Notion 的小部件增強了其功能,但我最近需要一個簡單的離線工具來組織想法並有效地將它們連結起來。 Obsidian 在這一領域表現出色,在反向連結和創意組織方面超越了 Notion。  Obsidian 提供了一套廣泛的筆記記錄和知識管理功能。它的知識圖直觀地表示了筆記之間的聯繫,有助於深入挖掘資訊。完整的 Markdown 支援允許靈活且強大的格式設定。 該應用程式的離線功能確保其無需網路連接即可使用,拼字檢查、API 支援以及將筆記發佈為網站或使用統一筆記結構模板的能力等其他功能也很突出。  我主要使用 Obsidian 來整理我的筆記。組織好後,我將它們轉移到 Notion 進行共享,因為 Obsidian 缺乏共享和同步功能。儘管如此,與 Notion 相比,Obsidian 仍然是我首選的文件工具。 然而,Notion和Obsidian只能幫助你寫文件。那麼,一些視覺效果怎麼樣呢?我們來談談[Excalidraw](https://excalidraw.com/) 。 ### [Excalidraw](https://excalidraw.com/) 向遠距工作的過渡讓我懷念使用記號筆和白板進行腦力激盪的簡單性。當語言無法表達時,視覺效果可以彌補理解複雜想法的差距。 Excalidraw 以數位方式重新建立白板體驗,這對於補充文件的快速圖表或插圖具有無價的價值。 這是我建立的圖表範例,用於闡明 React 元件生命週期。  這些工具構成了我作為軟體工程師的文件實踐的基礎。接下來,我們將探討提高編碼效率的開發工具。 開發工具 ---- 多年來,我的開發工具發生了很大變化,隨著最近人工智慧的引入和大量使用,我發現自己發現了更多可以幫助我作為軟體工程師提高工作效率的工具。但在討論人工智慧工具之前,我們先來談談程式設計和測試工具。 我是軟體工程師,使用 Django、Next.js,有時也使用 Golang 進行開發。我建立了為資料提供服務的 API 和/或使用這些資料的接口,因此編碼和測試我的工作非常重要。這就是 Jetbrains 發揮作用的地方。 ### 編碼工具 [Jetbrains](https://www.jetbrains.com/)提供了非常強大的 IDE,讓您的工作變得更輕鬆。我堅信他們為開發人員打造了最好的 IDE。我認為,無需配置即可立即開始編碼,這是一個很大的優勢。 這是我離開使用 VsCode 的原因之一(嗯,我仍然將它用於快速專案或不太複雜的專案),因為我每次都需要同步才能確保我可以開始工作。例如,當使用 Webstorm 啟動 Next.js 專案時,我只需選擇在每次儲存時執行 Eslint、prettier 的選項,還可以自動設定可以在寫入提交之前執行的 git 掛鉤。 [Webstorm](https://www.jetbrains.com/webstorm/) IDE 還有一個漂亮的 UI,用於在偵錯模式下執行專案,而且功能非常強大。我在 Pycharm 和 Goland 上也經歷過。這些 IDE 功能強大且使用起來非常簡單。 不要誤會我的意思,VsCode 已經很強大了,但是當涉及到執行基本任務時,沒有太多麻煩或配置,例如:搜尋、重構、Git 任務(獲取、拉取、推送、PR/MR 管理等)。 感謝 Jetbrains 團隊製作如此強大的工具。 ### 測試:Insomnia、Postman 起初,我使用[Postman](https://www.postman.com/)來測試API,因為它有很多功能。但我改用了[Insomnia](https://insomnia.rest/) ,因為它更容易使用並且讓一切井井有條。 Insomnia 的一個大問題是,當它讓我建立一個帳戶來繼續使用它時,它刪除了我所有保存的工作。 這讓我在一年後又回到了 Postman。 Postman 沒有太大變化,但它有一些我非常喜歡的新的、更好的功能。現在,我又回到了 Postman,因為它感覺像是我熟悉的東西,但也有新的東西。 Insomnia 使用起來很簡單,但每次打開筆記型電腦時都必須登錄,這很煩人。本來可以很棒,但這些問題讓我開始尋找別的東西。 現在,我正在考慮嘗試[Bruno](https://www.usebruno.com/) ,這是我聽說過的新工具。 Bruno 擁有您想要的所有功能,例如 Websocket 的支援。 Bruno 的優點是一次性支付僅需 19 美元,看起來很划算。我想看看它對我來說效果如何,是否像聽起來那麼好。我很高興嘗試一下,也許稍後再討論。 ### 人工智慧工具 我經常使用 ChatGPT 和[Phind.ai](https://www.phind.com/)來撰寫技術文章、除錯和集思廣益解決方案。雖然有些人可能對他們的回答持保留態度,但我發現它們是有用的指南,補充了我自己的研究。 [Phind.ai](https://www.phind.com/)對於提供進一步探索和加強研究過程的連結特別有價值。 其他 AI 工具(例如[Copilot](https://github.com/features/copilot)和[Codium.ai)](https://www.codium.ai/)與流行的編輯器和 IDE(例如 VSCode)很好地集成,從而提高您的技能和生產力。 在編碼中有效使用人工智慧需要清楚了解您的目標。在沒有紮實掌握底層技術和清晰的溝通技巧的情況下,不建議初學者開始使用人工智慧進行編碼。一旦您掌握了這些技能,人工智慧工具就可以極大地有益於您的工作。 結論 -- 這是我很久以來第一次寫一篇與程式設計無關的文章。由於生產力是軟體工程的一個重要方面,因此我希望撰寫更多有關幫助我成為更好的軟體工程師的工具或策略的文章。 如果您對本文有疑問或回饋,請在評論中分享。您的意見有助於使該資源更好地服務每個人。以下是我們在本文中所使用的資源。 目前為止就這樣了。快樂編碼!🚀 --- 原文出處:https://dev.to/koladev/tools-that-make-me-productive-as-a-software-engineer-2dge
您可以使用無數的框架和函式庫來改進您的全端應用程式。 我們將介紹令人興奮的概念,例如應用程式內通知、使用 React 製作影片、從為開發人員提供的電子郵件 API 到在瀏覽器中建立互動式音樂。 那我們就開始吧。 (不要忘記為這些庫加註星標以表示您的支持)。  https://github.com/CopilotKit/CopilotKit --- 1. [CopilotKit](https://github.com/CopilotKit/CopilotKit) - 在數小時內為您的產品提供 AI Copilot。 ------------------------------------------------------------------------------------  您可以使用兩個 React 元件將關鍵 AI 功能整合到 React 應用程式中。它們還提供內建(完全可自訂)Copilot 原生 UX 元件,例如`<CopilotKit />` 、 `<CopilotPopup />` 、 `<CopilotSidebar />` 、 `<CopilotTextarea />` 。 開始使用以下 npm 指令。 ``` npm i @copilotkit/react-core @copilotkit/react-ui @copilotkit/react-textarea ``` 這是整合 CopilotTextArea 的方法。 ``` import { CopilotTextarea } from "@copilotkit/react-textarea"; import { useState } from "react"; export function SomeReactComponent() { const [text, setText] = useState(""); return ( <> <CopilotTextarea className="px-4 py-4" value={text} onValueChange={(value: string) => setText(value)} placeholder="What are your plans for your vacation?" autosuggestionsConfig={{ textareaPurpose: "Travel notes from the user's previous vacations. Likely written in a colloquial style, but adjust as needed.", chatApiConfigs: { suggestionsApiConfig: { forwardedParams: { max_tokens: 20, stop: [".", "?", "!"], }, }, }, }} /> </> ); } ``` 您可以閱讀[文件](https://docs.copilotkit.ai/getting-started/quickstart-textarea)。 基本概念是在幾分鐘內建立可用於基於 LLM 的全端應用程式的 AI 聊天機器人。 https://github.com/CopilotKit/CopilotKit --- 2. [Storybook](https://github.com/storybookjs/storybook) - UI 開發、測試和文件變得簡單。 ---------------------------------------------------------------------------  Storybook 是一個用於獨立建立 UI 元件和頁面的前端工作坊。它有助於 UI 開發、測試和文件編制。 他們在 GitHub 上有超過 57,000 次提交、81,000 多個 star 和 1300 多個版本。 這是您為專案建立簡單元件的方法。 ``` import type { Meta, StoryObj } from '@storybook/react'; import { YourComponent } from './YourComponent'; //👇 This default export determines where your story goes in the story list const meta: Meta<typeof YourComponent> = { component: YourComponent, }; export default meta; type Story = StoryObj<typeof YourComponent>; export const FirstStory: Story = { args: { //👇 The args you need here will depend on your component }, }; ``` 您可以閱讀[文件](https://storybook.js.org/docs/get-started/setup)。 如今,UI 除錯起來很痛苦,因為它們與業務邏輯、互動狀態和應用程式上下文糾纏在一起。 Storybook 提供了一個獨立的 iframe 來渲染元件,而不會受到應用程式業務邏輯和上下文的干擾。這可以幫助您將開發重點放在元件的每個變體上,甚至是難以觸及的邊緣情況。 https://github.com/storybookjs/storybook --- 3. [Appwrite](https://github.com/appwrite/appwrite) - 您的後端減少麻煩。 ---------------------------------------------------------------   Appwrite 的開源平台可讓您將身份驗證、資料庫、函數和儲存體新增至您的產品中,並建立任何規模的任何應用程式、擁有您的資料並使用您喜歡的編碼語言和工具。 他們有很好的貢獻指南,甚至不厭其煩地詳細解釋架構。 開始使用以下 npm 指令。 ``` npm install appwrite ``` 您可以像這樣建立一個登入元件。 ``` "use client"; import { useState } from "react"; import { account, ID } from "./appwrite"; const LoginPage = () => { const [loggedInUser, setLoggedInUser] = useState(null); const [email, setEmail] = useState(""); const [password, setPassword] = useState(""); const [name, setName] = useState(""); const login = async (email, password) => { const session = await account.createEmailSession(email, password); setLoggedInUser(await account.get()); }; const register = async () => { await account.create(ID.unique(), email, password, name); login(email, password); }; const logout = async () => { await account.deleteSession("current"); setLoggedInUser(null); }; if (loggedInUser) { return ( <div> <p>Logged in as {loggedInUser.name}</p> <button type="button" onClick={logout}> Logout </button> </div> ); } return ( <div> <p>Not logged in</p> <form> <input type="email" placeholder="Email" value={email} onChange={(e) => setEmail(e.target.value)} /> <input type="password" placeholder="Password" value={password} onChange={(e) => setPassword(e.target.value)} /> <input type="text" placeholder="Name" value={name} onChange={(e) => setName(e.target.value)} /> <button type="button" onClick={() => login(email, password)}> Login </button> <button type="button" onClick={register}> Register </button> </form> </div> ); }; export default LoginPage; ``` 您可以閱讀[文件](https://appwrite.io/docs)。 Appwrite 可以非常輕鬆地建立具有開箱即用的擴充功能的可擴展後端應用程式。 https://github.com/appwrite/appwrite --- 4. [Wasp](https://github.com/wasp-lang/wasp) - 用於 React、node.js 和 prisma 的類似 Rails 的框架。 ---------------------------------------------------------------------------------------  使用 React 和 Node.js 開發全端 Web 應用程式的最快方法。這不是一個想法,而是一種建立瘋狂快速全端應用程式的不同方法。 這是將其整合到元件中的方法。 ``` import getRecipes from "@wasp/queries/getRecipes"; import { useQuery } from "@wasp/queries"; import type { User } from "@wasp/entities"; export function HomePage({ user }: { user: User }) { // Due to full-stack type safety, `recipes` will be of type `Recipe[]` here. const { data: recipes, isLoading } = useQuery(getRecipes); // Calling our query here! if (isLoading) { return <div>Loading...</div>; } return ( <div> <h1>Recipes</h1> <ul> {recipes ? recipes.map((recipe) => ( <li key={recipe.id}> <div>{recipe.title}</div> <div>{recipe.description}</div> </li> )) : 'No recipes defined yet!'} </ul> </div> ); } ``` 您可以閱讀[文件](https://wasp-lang.dev/docs)。 https://github.com/wasp-lang/wasp --- 5. [Novu](https://github.com/novuhq/novu) - 將應用程式內通知新增至您的應用程式! --------------------------------------------------------------  Novu 提供開源通知基礎架構和功能齊全的嵌入式通知中心。 這就是如何使用`React`建立 novu 元件以用於應用程式內通知。 ``` import { NovuProvider, PopoverNotificationCenter, NotificationBell, } from "@novu/notification-center"; function App() { return ( <> <NovuProvider subscriberId={process.env.REACT_APP_SUB_ID} applicationIdentifier={process.env.REACT_APP_APP_ID} > <PopoverNotificationCenter> {({ unseenCount }) => <NotificationBell unseenCount={unseenCount} />} </PopoverNotificationCenter> </NovuProvider> </> ); } export default App; ``` 您可以閱讀[文件](https://docs.novu.co/getting-started/introduction)。 https://github.com/novuhq/novu --- 6. [Remotion](https://github.com/remotion-dev/remotion) - 使用 React 以程式設計方式製作影片。 -------------------------------------------------------------------------------  使用 React 建立真正的 MP4 影片,使用伺服器端渲染和參數化擴展影片製作。 開始使用以下 npm 指令。 ``` npm init video ``` 它為您提供了一個幀號和一個空白畫布,您可以在其中使用 React 渲染任何您想要的內容。 這是一個範例 React 元件,它將當前幀渲染為文字。 ``` import { AbsoluteFill, useCurrentFrame } from "remotion"; export const MyComposition = () => { const frame = useCurrentFrame(); return ( <AbsoluteFill style={{ justifyContent: "center", alignItems: "center", fontSize: 100, backgroundColor: "white", }} > The current frame is {frame}. </AbsoluteFill> ); }; ``` 您可以閱讀[文件](https://www.remotion.dev/docs/)。 過去兩年,remotion 團隊因製作 GitHub Wrapped 而聞名。 https://github.com/remotion-dev/remotion --- [7.NocoDB](https://github.com/nocodb/nocodb) - Airtable 的替代品。 ------------------------------------------------------------- 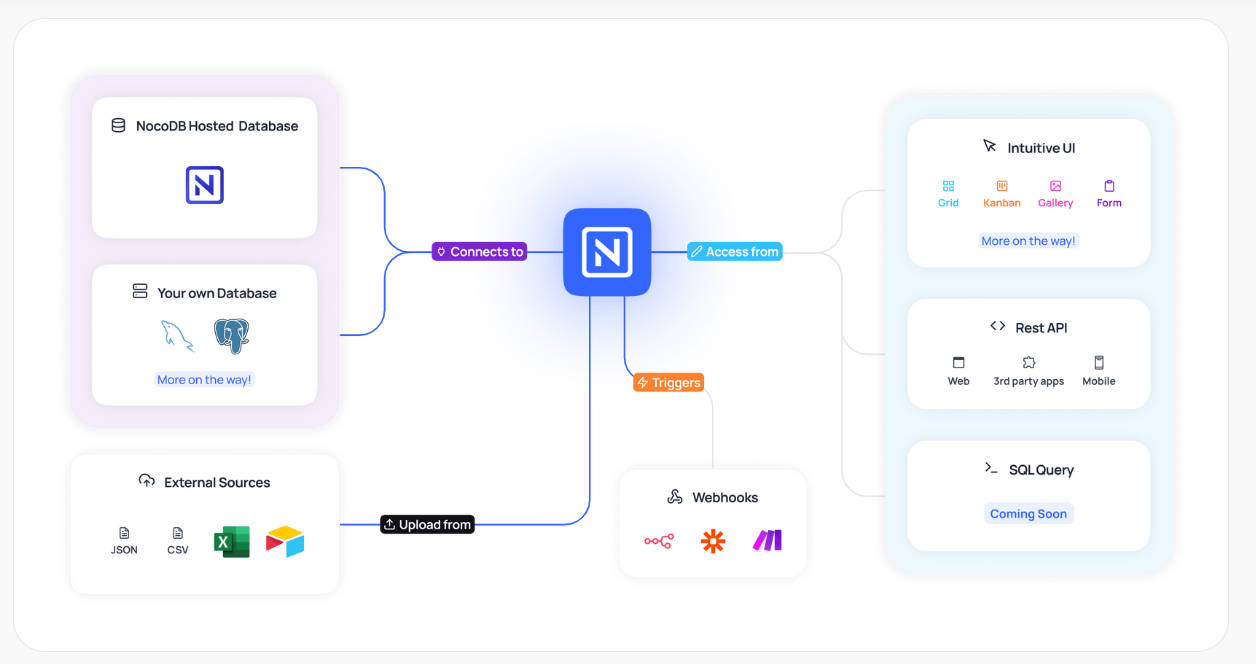 Airtable 的免費開源替代品是 NocoDB。它可以使用任何 MySQL、PostgreSQL、SQL Server、SQLite 或 MariaDB 資料庫製作智慧型電子表格。 其主要目標是讓強大的計算工具得到更廣泛的使用。 開始使用以下 npx 指令。 ``` npx create-nocodb-app ``` 您可以閱讀[文件](https://docs.nocodb.com/)。 NocoDB 的建立是為了為世界各地的數位企業提供強大的開源和無程式碼資料庫介面。 您可以非常快速地將airtable資料匯入NocoDB。 https://github.com/nocodb/nocodb --- 8.[新穎](https://github.com/steven-tey/novel)- 所見即所得編輯器,具有人工智慧自動完成功能。 -------------------------------------------------------------------  它使用`Next.js` 、 `Vercel AI SDK` 、 `Tiptap`作為文字編輯器。 開始使用以下 npm 指令。 ``` npm i novel ``` 您可以這樣使用它。有多種選項可用於改進您的應用程式。 ``` import { Editor } from "novel"; export default function App() { return <Editor />; } ``` https://github.com/steven-tey/novel --- 9. [Blitz](https://github.com/blitz-js/blitz) - 缺少 NextJS 的全端工具包。 -----------------------------------------------------------------  Blitz 繼承了 Next.js 的不足,為全球應用程式的交付和擴展提供了經過實戰考驗的函式庫和約定。 開始使用以下 npm 指令。 ``` npm install -g blitz ``` 這就是您如何使用 Blitz 建立新頁面。 ``` const NewProjectPage: BlitzPage = () => { const router = useRouter() const [createProjectMutation] = useMutation(createProject) return ( <div> <h1>Create New Project</h1> <ProjectForm submitText="Create Project" schema={CreateProject} onSubmit={async (values) => { // This is equivalent to calling the server function directly const project = await createProjectMutation(values) // Notice the 'Routes' object Blitz provides for routing router.push(Routes.ProjectsPage({ projectId: project.id })) }} /> </div> ); }; NewProjectPage.authenticate = true NewProjectPage.getLayout = (page) => <Layout>{page}</Layout> export default NewProjectPage ``` 您可以閱讀[文件](https://blitzjs.com/docs/get-started)。 它使建築物改善了數倍。  https://github.com/blitz-js/blitz --- 10. [Supabase](https://github.com/supabase/supabase) - 開源 Firebase 替代品。 -----------------------------------------------------------------------  我們大多數人都已經預料到 SUPABASE 會出現在這裡,因為它實在是太棒了。 開始使用以下 npm 指令 (Next.js)。 ``` npx create-next-app -e with-supabase ``` 這是使用 supabase 建立用戶的方法。 ``` import { createClient } from '@supabase/supabase-js' // Initialize const supabaseUrl = 'https://chat-room.supabase.co' const supabaseKey = 'public-anon-key' const supabase = createClient(supabaseUrl, supabaseKey) // Create a new user const { user, error } = await supabase.auth.signUp({ email: '[email protected]', password: 'example-password', }) ``` 您可以閱讀[文件](https://supabase.com/docs)。 您可以使用身份驗證、即時、邊緣功能、儲存等功能建立一個速度極快的應用程式。 Supabase 涵蓋了這一切! 他們還提供了一些入門套件,例如 AI 聊天機器人和 Stripe 訂閱。 https://github.com/supabase/supabase --- [11.Refine](https://github.com/refinedev/refine) - 企業開源重組工具。 ------------------------------------------------------------ 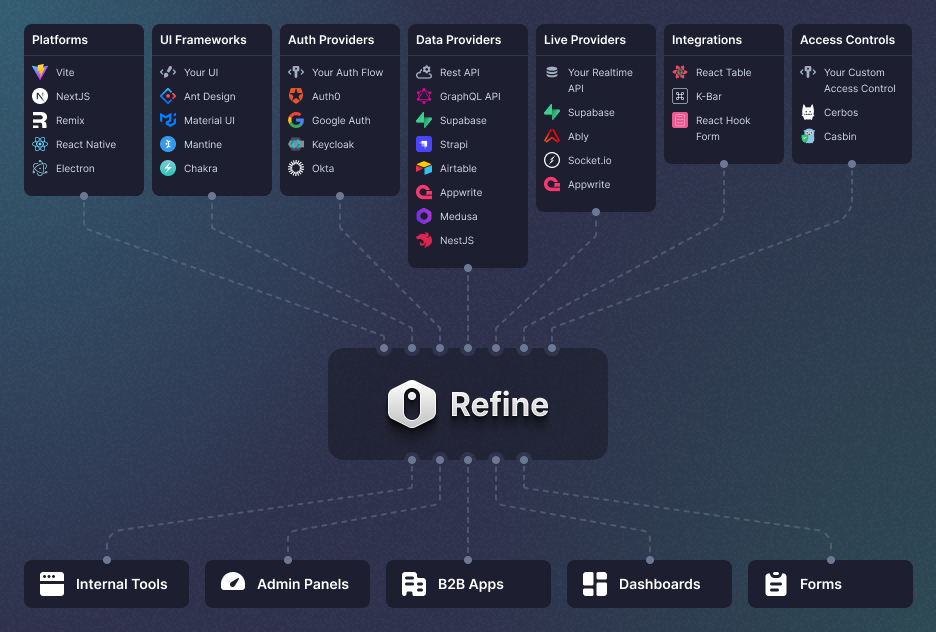 建立具有無與倫比的靈活性的管理面板、儀表板和 B2B 應用程式 您可以在一分鐘內使用單一 CLI 命令進行設定。 它具有適用於 15 多個後端服務的連接器,包括 Hasura、Appwrite 等。 開始使用以下 npm 指令。 ``` npm create refine-app@latest ``` 這就是使用 Refine 新增登入資訊的簡單方法。 ``` import { useLogin } from "@refinedev/core"; const { login } = useLogin(); ``` 您可以閱讀[文件](https://refine.dev/docs/)。 https://github.com/refinedev/refine --- 12. [Zenstack](https://github.com/zenstackhq/zenstack) - 資料庫到 API 和 UI 只需幾分鐘。 ----------------------------------------------------------------------------- 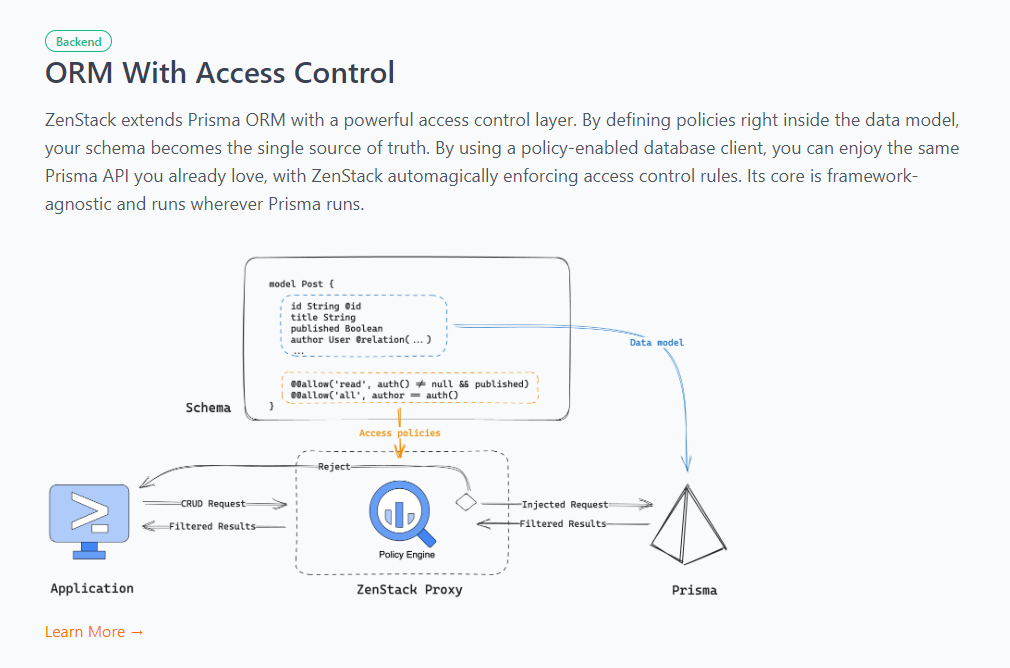 TypeScript 工具包,透過強大的存取控制層增強 Prisma ORM,並釋放其全端開發的全部功能。 開始使用以下 npx 指令。 ``` npx zenstack@latest init ``` 這是透過伺服器適配器建立 RESTful API 的方法。 ``` // pages/api/model/[...path].ts import { requestHandler } from '@zenstackhq/next'; import { enhance } from '@zenstackhq/runtime'; import { getSessionUser } from '@lib/auth'; import { prisma } from '@lib/db'; // Mount Prisma-style APIs: "/api/model/post/findMany", "/api/model/post/create", etc. // Can be configured to provide standard RESTful APIs (using JSON:API) instead. export default requestHandler({ getPrisma: (req, res) => enhance(prisma, { user: getSessionUser(req, res) }), }); ``` 您可以閱讀[文件](https://zenstack.dev/docs/welcome)。 https://github.com/zenstackhq/zenstack --- 13. [Buildship](https://github.com/rowyio/buildship) - 低程式碼視覺化後端建構器。 --------------------------------------------------------------------  對於您正在使用無程式碼應用程式建構器(FlutterFlow、Webflow、Framer、Adalo、Bubble、BravoStudio...)或前端框架(Next.js、React、Vue...)建立的應用程式,您需要一個後端來支援可擴展的 API、安全工作流程、自動化等。BuildShip 為您提供了一種完全視覺化的方式,可以在易於使用的完全託管體驗中可擴展地建立這些後端任務。 這意味著您不需要在雲端平台上爭論或部署東西、執行 DevOps 等。只需立即建置和交付 🚀 https://github.com/rowyio/buildship --- 14. [Taipy](https://github.com/Avaiga/taipy) - 將資料和人工智慧演算法整合到生產就緒的 Web 應用程式中。 -----------------------------------------------------------------------------  Taipy 是一個開源 Python 庫,用於輕鬆的端到端應用程式開發, 具有假設分析、智慧管道執行、內建調度和部署工具。 開始使用以下命令。 ``` pip install taipy ``` 這是一個典型的Python函數,也是過濾器場景中使用的唯一任務。 ``` def filter_genre(initial_dataset: pd.DataFrame, selected_genre): filtered_dataset = initial_dataset[initial_dataset['genres'].str.contains(selected_genre)] filtered_data = filtered_dataset.nlargest(7, 'Popularity %') return filtered_data ``` 您可以閱讀[文件](https://docs.taipy.io/en/latest/)。 他們還有很多可供您建立的[演示應用程式教學](https://docs.taipy.io/en/latest/knowledge_base/demos/)。 https://github.com/Avaiga/taipy --- 15. [LocalForage](https://github.com/localForage/localForage) - 改進了離線儲存。 ------------------------------------------------------------------------  LocalForage 是一個 JavaScript 函式庫,它透過使用非同步資料儲存和簡單的、類似 localStorage 的 API 來改善 Web 應用程式的離線體驗。它允許開發人員儲存多種類型的資料而不僅僅是字串。 開始使用以下 npm 指令。 ``` npm install localforage ``` 只需包含 JS 檔案並開始使用 localForage。 ``` <script src="localforage.js"></script> ``` 您可以閱讀[文件](https://localforage.github.io/localForage/#installation)。 https://github.com/localForage/localForage --- 16. [Zod](https://github.com/colinhacks/zod) - 使用靜態類型推斷的 TypeScript-first 模式驗證。 -------------------------------------------------------------------------------  Zod 的目標是透過最大限度地減少重複的類型聲明來對開發人員友好。使用 Zod,您聲明一次驗證器,Zod 將自動推斷靜態 TypeScript 類型。將更簡單的類型組合成複雜的資料結構很容易。 開始使用以下 npm 指令。 ``` npm install zod ``` 這是您在建立字串架構時自訂一些常見錯誤訊息的方法。 ``` const name = z.string({ required_error: "Name is required", invalid_type_error: "Name must be a string", }); ``` 您可以閱讀[文件](https://zod.dev/)。 它適用於 Node.js 和所有現代瀏覽器 https://github.com/colinhacks/zod --- 17.[多普勒](https://github.com/DopplerHQ)- 管理你的秘密。 -----------------------------------------------  您可以透過在具有開發、暫存和生產環境的專案中組織機密來消除機密蔓延。 開始使用以下指令 (MacOS)。 ``` $ brew install dopplerhq/cli/doppler $ doppler --version ``` 這是安裝 Doppler CLI[的 GitHub Actions 工作流程](https://github.com/DopplerHQ/cli-action)。 您可以閱讀[文件](https://docs.doppler.com/docs/start)。 ``` name: Example action on: [push] jobs: my-job: runs-on: ubuntu-latest steps: - name: Install CLI uses: dopplerhq/cli-action@v3 - name: Do something with the CLI run: doppler secrets --only-names env: DOPPLER_TOKEN: ${{ secrets.DOPPLER_TOKEN }} ``` https://github.com/DopplerHQ --- 18. [FastAPI](https://github.com/tiangolo/fastapi) - 高效能、易於學習、快速編碼、可用於生產。 -------------------------------------------------------------------------  FastAPI 是一個現代、快速(高效能)的 Web 框架,用於基於標準 Python 類型提示使用 Python 3.8+ 建立 API。 開始使用以下命令。 ``` $ pip install fastapi ``` 這是您開始使用 FastAPI 的方式。 ``` from typing import Union from fastapi import FastAPI app = FastAPI() @app.get("/") def read_root(): return {"Hello": "World"} @app.get("/items/{item_id}") def read_item(item_id: int, q: Union[str, None] = None): return {"item_id": item_id, "q": q} ``` 您的編輯器將自動完成屬性並了解它們的類型,這是使用 FastAPI 的最佳功能之一。 您可以閱讀[文件](https://fastapi.tiangolo.com/)。 https://github.com/tiangolo/fastapi --- 19. [Flowise](https://github.com/FlowiseAI/Flowise) - 拖放 UI 來建立您的客製化 LLM 流程。 ----------------------------------------------------------------------------  Flowise 是一款開源 UI 視覺化工具,用於建立客製化的 LLM 編排流程和 AI 代理程式。 開始使用以下 npm 指令。 ``` npm install -g flowise npx flowise start OR npx flowise start --FLOWISE_USERNAME=user --FLOWISE_PASSWORD=1234 ``` 這就是整合 API 的方式。 ``` import requests url = "/api/v1/prediction/:id" def query(payload): response = requests.post( url, json = payload ) return response.json() output = query({ question: "hello!" )} ``` 您可以閱讀[文件](https://docs.flowiseai.com/)。 https://github.com/FlowiseAI/Flowise --- 20. [Scrapy](https://github.com/scrapy/scrapy) - Python 的快速進階網頁爬行和抓取框架.. ------------------------------------------------------------------------  Scrapy 是一個快速的高級網路爬行和網頁抓取框架,用於爬行網站並從頁面中提取結構化資料。它可用於多種用途,從資料探勘到監控和自動化測試。 開始使用以下命令。 ``` pip install scrapy ``` 建造並執行您的網路蜘蛛。 ``` pip install scrapy cat > myspider.py <<EOF import scrapy class BlogSpider(scrapy.Spider): name = 'blogspider' start_urls = ['https://www.zyte.com/blog/'] def parse(self, response): for title in response.css('.oxy-post-title'): yield {'title': title.css('::text').get()} for next_page in response.css('a.next'): yield response.follow(next_page, self.parse) EOF scrapy runspider myspider.py ``` 您可以閱讀[文件](https://scrapy.org/doc/)。 它擁有大約 50k+ 的星星,因此對於網頁抓取來說具有巨大的可信度。 https://github.com/scrapy/scrapy --- 21. [Tone](https://github.com/Tonejs/Tone.js) - 在瀏覽器中製作互動式音樂。 -------------------------------------------------------------  開始使用以下 npm 指令。 ``` npm install tone ``` 這是您開始使用 Tone.js 的方法 ``` // To import Tone.js: import * as Tone from 'tone' //create a synth and connect it to the main output (your speakers) const synth = new Tone.Synth().toDestination(); //play a middle 'C' for the duration of an 8th note synth.triggerAttackRelease("C4", "8n"); ``` 您可以閱讀[文件](https://github.com/Tonejs/Tone.js?tab=readme-ov-file#installation)。 https://github.com/Tonejs/Tone.js --- 22. [Spacetime](https://github.com/spencermountain/spacetime) - 輕量級 javascript 時區庫。 -----------------------------------------------------------------------------------  您可以計算遠端時區的時間;支持夏令時、閏年和半球。按季度、季節、月份、週來定位時間.. 開始使用以下 npm 指令。 ``` npm install spacetime ``` 您可以這樣使用它。 ``` <script src="https://unpkg.com/spacetime"></script> <script> var d = spacetime('March 1 2012', 'America/New_York') //set the time d = d.time('4:20pm') d = d.goto('America/Los_Angeles') d.time() //'1:20pm' </script> ``` https://github.com/spencermountain/spacetime --- 23. [Mermaid](https://github.com/mermaid-js/mermaid) - 從類似 markdown 的文字產生圖表。 ----------------------------------------------------------------------------  您可以使用 Markdown with Mermaid 等文字產生流程圖或序列圖等圖表。 這就是建立圖表的方法。 ``` sequenceDiagram Alice->>John: Hello John, how are you? loop Healthcheck John->>John: Fight against hypochondria end Note right of John: Rational thoughts! John-->>Alice: Great! John->>Bob: How about you? Bob-->>John: Jolly good! ``` 它將做出如下圖。  您可以閱讀[VS Code](https://docs.mermaidchart.com/plugins/visual-studio-code)的[文件](https://mermaid.js.org/intro/getting-started.html)和外掛程式。 請參閱[即時編輯器](https://mermaid.live/edit#pako:eNpVkE1PwzAMhv9KlvM-2AZj62EIxJd24ADXXLzEbaKlcUkdUDX1v5MONomcnNevXz32UWoyKAvZ4mfCoPHRQRWhVuHeO42T7XZHNhTiFb0nMdRjYelbQETRUbpTwRM1uQ2erbaoDyqI_AbnZfjZVZYFVOBCy8J2DWlLwUQHKmAwKrwRo4gnF5Xid-gd2FEAL9hSyp12pMIpNcee2ArxEhH4LG-3D7TPoAPcnhL_4WVxcgHZkfedqIjMSI5ljbEGZ_LyxwFaSbZYo5JFLg3Eg5Iq9NkHiemjC1oWHBOOZWoM8PlQ_8Un45iiLErwbRY9gcH8PUrumuHKlWs5J2oKpasGPUWfZcvctMVsNrSnlWOb9lNN9ax1xkJk-7VZzVaL1RoWS1zdLuFmuTR6P9-sy8X1vDS3V_MFyL7vfwD_bJ1W)中的範例。 https://github.com/mermaid-js/mermaid --- 24.[公共 API](https://github.com/public-apis/public-apis) - 20 多個類別的 1400 多個 API。 -------------------------------------------------------------------------------  我們主要使用外部 API 來建立應用程式,在這裡您可以找到所有 API 的清單。網站連結在最後。 它在 GitHub 上擁有大約 279k+ 顆星。  從儲存庫取得網站連結非常困難。所以,我把它貼在這裡。 網址 - [Collective-api.vercel.app/](https://collective-api.vercel.app/) https://github.com/public-apis/public-apis --- 25. [Framer Motion](https://github.com/framer/motion) - 像魔法一樣的動畫。 -----------------------------------------------------------------  可用的最強大的動畫庫之一。 Framer 使用簡單的聲明性語法意味著您編寫的程式碼更少。更少的程式碼意味著您的程式碼庫更易於閱讀和維護。 您可以建立事件和手勢,並且使用 Framer 的社區很大,這意味著良好的支援。 開始使用以下 npm 指令。 ``` npm install framer-motion ``` 您可以這樣使用它。 ``` import { motion } from "framer-motion" <motion.div whileHover={{ scale: 1.2 }} whileTap={{ scale: 1.1 }} drag="x" dragConstraints={{ left: -100, right: 100 }} /> ``` 您可以閱讀[文件](https://www.framer.com/motion/introduction/)。 https://github.com/framer/motion --- 26.[順便說一句](https://github.com/btw-so/btw)- 在幾分鐘內建立您的個人部落格。 ----------------------------------------------------------  順便說一句,您可以註冊並使用,而無需安裝任何東西。您也可以使用開源版本自行託管。  使用順便說一句建立的[範例部落格](https://www.siddg.com/about)。 https://github.com/btw-so/btw --- 27. [Formbricks](https://github.com/formbricks/formbricks) - 開源調查平台。 --------------------------------------------------------------------  Formbricks 提供免費、開源的測量平台。透過精美的應用程式內、網站、連結和電子郵件調查收集用戶旅程中每個點的回饋。在 Formbricks 之上建置或利用預先建置的資料分析功能。 開始使用以下 npm 指令。 ``` npm install @formbricks/js ``` 這就是您開始使用 formbricks 的方法。 ``` import formbricks from "@formbricks/js"; if (typeof window !== "undefined") { formbricks.init({ environmentId: "claV2as2kKAqF28fJ8", apiHost: "https://app.formbricks.com", }); } ``` 您可以閱讀[文件](https://formbricks.com/docs/getting-started/quickstart-in-app-survey)。 https://github.com/formbricks/formbricks --- 28. [Stripe](https://github.com/stripe) - 支付基礎設施。 -------------------------------------------------  數以百萬計的各種規模的公司在線上和親自使用 Stripe 來接受付款、發送付款、自動化財務流程並最終增加收入。 開始使用以下 npm 指令 (React.js)。 ``` npm install @stripe/react-stripe-js @stripe/stripe-js ``` 這就是使用鉤子的方法。 ``` import React, {useState} from 'react'; import ReactDOM from 'react-dom'; import {loadStripe} from '@stripe/stripe-js'; import { PaymentElement, Elements, useStripe, useElements, } from '@stripe/react-stripe-js'; const CheckoutForm = () => { const stripe = useStripe(); const elements = useElements(); const [errorMessage, setErrorMessage] = useState(null); const handleSubmit = async (event) => { event.preventDefault(); if (elements == null) { return; } // Trigger form validation and wallet collection const {error: submitError} = await elements.submit(); if (submitError) { // Show error to your customer setErrorMessage(submitError.message); return; } // Create the PaymentIntent and obtain clientSecret from your server endpoint const res = await fetch('/create-intent', { method: 'POST', }); const {client_secret: clientSecret} = await res.json(); const {error} = await stripe.confirmPayment({ //`Elements` instance that was used to create the Payment Element elements, clientSecret, confirmParams: { return_url: 'https://example.com/order/123/complete', }, }); if (error) { // This point will only be reached if there is an immediate error when // confirming the payment. Show error to your customer (for example, payment // details incomplete) setErrorMessage(error.message); } else { // Your customer will be redirected to your `return_url`. For some payment // methods like iDEAL, your customer will be redirected to an intermediate // site first to authorize the payment, then redirected to the `return_url`. } }; return ( <form onSubmit={handleSubmit}> <PaymentElement /> <button type="submit" disabled={!stripe || !elements}> Pay </button> {/* Show error message to your customers */} {errorMessage && <div>{errorMessage}</div>} </form> ); }; const stripePromise = loadStripe('pk_test_6pRNASCoBOKtIshFeQd4XMUh'); const options = { mode: 'payment', amount: 1099, currency: 'usd', // Fully customizable with appearance API. appearance: { /*...*/ }, }; const App = () => ( <Elements stripe={stripePromise} options={options}> <CheckoutForm /> </Elements> ); ReactDOM.render(<App />, document.body); ``` 您可以閱讀[文件](https://github.com/stripe/react-stripe-js?tab=readme-ov-file#minimal-example)。 您幾乎可以整合任何東西。它有一個巨大的選項清單。  https://github.com/stripe --- 29. [Upscayl](https://github.com/upscayl/upscayl) - 開源 AI 影像升級器。 ----------------------------------------------------------------  適用於 Linux、MacOS 和 Windows 的免費開源 AI Image Upscaler 採用 Linux 優先概念建構。 它可能與全端無關,但它對於升級圖像很有用。  透過最先進的人工智慧,Upscayl 可以幫助您將低解析度影像變成高解析度。清脆又鋒利! https://github.com/upscayl/upscayl --- 30.[重新發送](https://github.com/resend)- 為開發人員提供的電子郵件 API。 -------------------------------------------------------  您可以使用 React 建立和傳送電子郵件。 2023 年最受炒作的產品之一。 開始使用以下 npm 指令。 ``` npm install @react-email/components -E ``` 這是將其與 next.js 專案整合的方法。 ``` import { EmailTemplate } from '@/components/email-template'; import { Resend } from 'resend'; const resend = new Resend(process.env.RESEND_API_KEY); export async function POST() { const { data, error } = await resend.emails.send({ from: '[email protected]', to: '[email protected]', subject: 'Hello world', react: EmailTemplate({ firstName: 'John' }), }); if (error) { return Response.json({ error }); } return Response.json(data); } ``` 您可以閱讀[文件](https://resend.com/docs/introduction)。 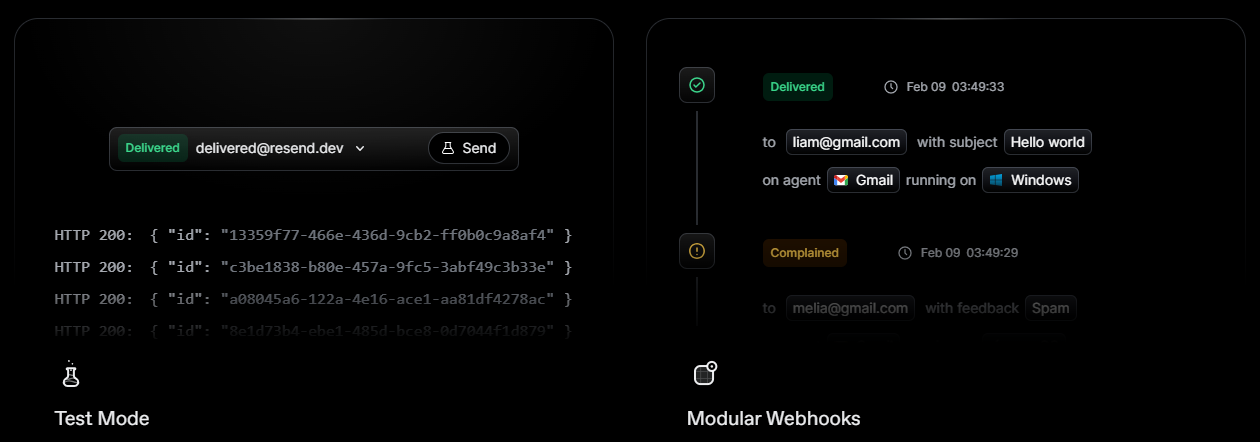 基本概念是一個簡單、優雅的介面,讓您可以在幾分鐘內開始發送電子郵件。它可以透過適用於您最喜歡的程式語言的 SDK 直接融入您的程式碼中。 https://github.com/resend --- 哇!如此長的專案清單。 我知道您有更多想法,分享它們,讓我們一起建造:D 如今建立全端應用程式並不難,但每個應用程式都可以透過有效地使用優秀的開源專案來解決任何問題來增加這一獨特因素。 例如,您可以建立一些提供通知或建立 UI 流來抓取資料的東西。 我希望其中一些內容對您的開發之旅有用。他們擁有一流的開發人員經驗;你可以依賴他們。 由於您將要建造東西,因此您可以在這裡找到一些[瘋狂的想法](https://github.com/florinpop17/app-ideas)。 祝你有美好的一天!直到下一次。 --- 原文出處:https://dev.to/copilotkit/im-building-a-full-stack-app-here-are-the-libraries-im-going-to-use-51nk
> **2019 年 9 月 25 日更新:**感謝[ラナ・kuaru](https://twitter.com/rana_kualu)的辛勤工作,本文現已提供日文版。請點擊下面的連結查看他們的工作。如果您知道本文被翻譯成其他語言,請告訴我,我會將其發佈在這裡。 [🇯🇵 閱讀日語](https://qiita.com/rana_kualu/items/7b62898d373901466f5c) > **2019 年 7 月 8 日更新:**我最近發現大約兩年前發佈在法語留言板上的[這篇非常相似的文章](https://bookmarks.ecyseo.net/?EAWvDw)。如果您有興趣學習一些 shell 命令——並且您*會說 français* ,那麼它是對我下面的文章的一個很好的補充。 直到大約一年前,我幾乎只在 macOS 和 Ubuntu 作業系統中工作。在這兩個作業系統上, `bash`是我的預設 shell。在過去的六、七年裡,我對`bash`工作原理有了大致的了解,並想為那些剛入門的人概述一些更常見/有用的命令。如果您認為您了解有關`bash`所有訊息,請無論如何看看下面的內容 - 我已經提供了一些提示和您可能忘記的標誌的提醒,這可以讓您的工作更輕鬆一些。 下面的命令或多或少以敘述風格排列,因此如果您剛開始使用`bash` ,您可以從頭到尾完成操作。事情到最後通常會變得不那麼常見並且變得更加困難。 <a name="toc"></a> 目錄 -- - [基礎](#the-basics) ``` - [First Commands, Navigating the Filesystem](#first-commands) ``` ``` - [`pwd / ls / cd`](#pwd-ls-cd) ``` ``` - [`; / && / &`](#semicolon-andand-and) ``` ``` - [Getting Help](#getting-help) ``` ``` - [`-h`](#minus-h) ``` ``` - [`man`](#man) ``` ``` - [Viewing and Editing Files](#viewing-and-editing-files) ``` ``` - [`head / tail / cat / less`](#head-tail-cat-less) ``` ``` - [`nano / nedit`](#nano-nedit) ``` ``` - [Creating and Deleting Files and Directories](#creating-and-deleting-files) ``` ``` - [`touch`](#touch) ``` ``` - [`mkdir / rm / rmdir`](#mkdir-rm-rmdir) ``` ``` - [Moving and Copying Files, Making Links, Command History](#moving-and-copying-files) ``` ``` - [`mv / cp / ln`](#mv-cp-ln) ``` ``` - [Command History](#command-history) ``` ``` - [Directory Trees, Disk Usage, and Processes](#directory-trees-disk-usage-processes) ``` ``` - [`mkdir –p / tree`](#mkdir--p-tree) ``` ``` - [`df / du / ps`](#df-du-ps) ``` ``` - [Miscellaneous](#basic-misc) ``` ``` - [`passwd / logout / exit`](#passwd-logout-exit) ``` ``` - [`clear / *`](#clear-glob) ``` - [中間的](#intermediate) ``` - [Disk, Memory, and Processor Usage](#disk-memory-processor) ``` ``` - [`ncdu`](#ncdu) ``` ``` - [`top / htop`](#top-htop) ``` ``` - [REPLs and Software Versions](#REPLs-software-versions) ``` ``` - [REPLs](#REPLs) ``` ``` - [`-version / --version / -v`](#version) ``` ``` - [Environment Variables and Aliases](#env-vars-aliases) ``` ``` - [Environment Variables](#env-vars) ``` ``` - [Aliases](#aliases) ``` ``` - [Basic `bash` Scripting](#basic-bash-scripting) ``` ``` - [`bash` Scripts](#bash-scripts) ``` ``` - [Custom Prompt and `ls`](#custom-prompt-ls) ``` ``` - [Config Files](#config-files) ``` ``` - [Config Files / `.bashrc`](#config-bashrc) ``` ``` - [Types of Shells](#types-of-shells) ``` ``` - [Finding Things](#finding-things) ``` ``` - [`whereis / which / whatis`](#whereis-which-whatis) ``` ``` - [`locate / find`](#locate-find) ``` ``` - [Downloading Things](#downloading-things) ``` ``` - [`ping / wget / curl`](#ping-wget-curl) ``` ``` - [`apt / gunzip / tar / gzip`](#apt-gunzip-tar-gzip) ``` ``` - [Redirecting Input and Output](#redirecting-io) ``` ``` - [`| / > / < / echo / printf`](#pipe-gt-lt-echo-printf) ``` ``` - [`0 / 1 / 2 / tee`](#std-tee) ``` - [先進的](#advanced) ``` - [Superuser](#superuser) ``` ``` - [`sudo / su`](#sudo-su) ``` ``` - [`!!`](#click-click) ``` ``` - [File Permissions](#file-permissions) ``` ``` - [File Permissions](#file-permissions-sub) ``` ``` - [`chmod / chown`](#chmod-chown) ``` ``` - [User and Group Management](#users-groups) ``` ``` - [Users](#users) ``` ``` - [Groups](#groups) ``` ``` - [Text Processing](#text-processing) ``` ``` - [`uniq / sort / diff / cmp`](#uniq-sort-diff-cmp) ``` ``` - [`cut / sed`](#cut-sed) ``` ``` - [Pattern Matching](#pattern-matching) ``` ``` - [`grep`](#grep) ``` ``` - [`awk`](#awk) ``` ``` - [Copying Files Over `ssh`](#ssh) ``` ``` - [`ssh / scp`](#ssh-scp) ``` ``` - [`rsync`](#rsync) ``` ``` - [Long-Running Processes](#long-running-processes) ``` ``` - [`yes / nohup / ps / kill`](#yes-nohup-ps-kill) ``` ``` - [`cron / crontab / >>`](#cron) ``` ``` - [Miscellaneous](#advanced-misc) ``` ``` - [`pushd / popd`](#pushd-popd) ``` ``` - [`xdg-open`](#xdg-open) ``` ``` - [`xargs`](#xargs) ``` - [獎勵:有趣但大多無用的東西](#bonus) ``` - [`w / write / wall / lynx`](#w-write-wall-lynx) ``` ``` - [`nautilus / date / cal / bc`](#nautilus-date-cal-bc) ``` --- <a name="the-basics"></a> 基礎 == <a name="first-commands"></a> 第一個指令,瀏覽檔案系統 ------------ 現代檔案系統具有目錄(資料夾)樹,其中目錄要么是*根目錄*(沒有父目錄),要么是*子目錄*(包含在單一其他目錄中,我們稱之為“父目錄”)。向後遍歷檔案樹(從子目錄到父目錄)將始終到達根目錄。有些檔案系統有多個根目錄(如 Windows 的磁碟機: `C:\` 、 `A:\`等),但 Unix 和類別 Unix 系統只有一個名為`\`的根目錄。 <a name="pwd-ls-cd"></a> ### `pwd / ls / cd` [\[ 返回目錄 \]](#toc) 在檔案系統中工作時,使用者始終*在*某個目錄中工作,我們稱之為當前目錄或*工作目錄*。使用`pwd`列印使用者的工作目錄: ``` [ andrew@pc01 ~ ]$ pwd /home/andrew ``` 使用`ls`列出該目錄的內容(檔案和/或子目錄等): ``` [ andrew@pc01 ~ ]$ ls Git TEST jdoc test test.file ``` > **獎金:** > > 使用`ls -a`顯示隱藏(“點”)文件 > > 使用`ls -l`顯示文件詳細訊息 > > 組合多個標誌,如`ls -l -a` > > 有時您可以連結諸如`ls -la`之類的標誌,而不是`ls -l -a` 使用`cd`更改到不同的目錄(更改目錄): ``` [ andrew@pc01 ~ ]$ cd TEST/ [ andrew@pc01 TEST ]$ pwd /home/andrew/TEST [ andrew@pc01 TEST ]$ cd A [ andrew@pc01 A ]$ pwd /home/andrew/TEST/A ``` `cd ..`是「 `cd`到父目錄」的簡寫: ``` [ andrew@pc01 A ]$ cd .. [ andrew@pc01 TEST ]$ pwd /home/andrew/TEST ``` `cd ~`或只是`cd`是「 `cd`到我的主目錄」的簡寫(通常`/home/username`或類似的東西): ``` [ andrew@pc01 TEST ]$ cd [ andrew@pc01 ~ ]$ pwd /home/andrew ``` > **獎金:** > > `cd ~user`表示「 `cd`到`user`的主目錄 > > 您可以使用`cd ../..`等跳轉多個目錄等級。 > > 使用`cd -`返回到最近的目錄 > > `.`是「此目錄」的簡寫,因此`cd .`不會做太多事情 <a name="semicolon-andand-and"></a> ### `; / && / &` [\[ 返回目錄 \]](#toc) 我們在命令列中輸入的內容稱為*命令*,它們總是執行儲存在電腦上某處的一些機器碼。有時這個機器碼是一個內建的Linux命令,有時它是一個應用程式,有時它是你自己寫的一些程式碼。有時,我們會想依序執行一個指令。為此,我們可以使用`;` (分號): ``` [ andrew@pc01 ~ ]$ ls; pwd Git TEST jdoc test test.file /home/andrew ``` 上面的分號表示我首先 ( `ls` ) 列出工作目錄的內容,然後 ( `pwd` ) 列印其位置。連結命令的另一個有用工具是`&&` 。使用`&&`時,如果左側命令失敗,則右側命令將不會執行。 `;`和`&&`都可以在同一行中多次使用: ``` # whoops! I made a typo here! [ andrew@pc01 ~ ]$ cd /Giit/Parser && pwd && ls && cd -bash: cd: /Giit/Parser: No such file or directory # the first command passes now, so the following commands are run [ andrew@pc01 ~ ]$ cd Git/Parser/ && pwd && ls && cd /home/andrew/Git/Parser README.md doc.sh pom.xml resource run.sh shell.sh source src target ``` ....但是與`;` ,即使第一個命令失敗,第二個命令也會執行: ``` # pwd and ls still run, even though the cd command failed [ andrew@pc01 ~ ]$ cd /Giit/Parser ; pwd ; ls -bash: cd: /Giit/Parser: No such file or directory /home/andrew Git TEST jdoc test test.file ``` `&`看起來與`&&`類似,但實際上實現了完全不同的功能。通常,當您執行長時間執行的命令時,命令列將等待該命令完成,然後才允許您輸入另一個命令。在命令後面加上`&`可以防止這種情況發生,並允許您在舊命令仍在執行時執行新命令: ``` [ andrew@pc01 ~ ]$ cd Git/Parser && mvn package & cd [1] 9263 ``` > **額外的好處:**當我們在命令後使用`&`來「隱藏」它時,我們說該作業(或「進程」;這些術語或多或少可以互換)是「後台的」。若要查看目前正在執行的背景作業,請使用`jobs`指令: > ````bash \[ andrew@pc01 ~ \]$ 職位 \[1\]+ 執行 cd Git/Parser/ && mvn package & ``` <a name="getting-help"></a> ## Getting Help <a name="minus-h"></a> ### `-h` [[ Back to Table of Contents ]](#toc) Type `-h` or `--help` after almost any command to bring up a help menu for that command: ``` \[ andrew@pc01 ~ \]$ du --help 用法:你\[選項\]...\[檔案\]... 或: du \[選項\]... --files0-from=F 對目錄遞歸地總結文件集的磁碟使用情況。 長期權的強制性參數對於短期權也是強制性的。 -0, --null 以 NUL 結束每個輸出行,而不是換行符 -a, --all 計算所有檔案的寫入計數,而不僅僅是目錄 ``` --apparent-size print apparent sizes, rather than disk usage; although ``` ``` the apparent size is usually smaller, it may be ``` ``` larger due to holes in ('sparse') files, internal ``` ``` fragmentation, indirect blocks, and the like ``` -B, --block-size=SIZE 在列印前按 SIZE 縮放大小;例如, ``` '-BM' prints sizes in units of 1,048,576 bytes; ``` ``` see SIZE format below ``` … ``` <a name="man"></a> ### `man` [[ Back to Table of Contents ]](#toc) Type `man` before almost any command to bring up a manual for that command (quit `man` with `q`): ``` LS(1) 使用者指令 LS(1) 姓名 ``` ls - list directory contents ``` 概要 ``` ls [OPTION]... [FILE]... ``` 描述 ``` List information about the FILEs (the current directory by default). ``` ``` Sort entries alphabetically if none of -cftuvSUX nor --sort is speci- ``` ``` fied. ``` ``` Mandatory arguments to long options are mandatory for short options ``` ``` too. ``` … ``` <a name="viewing-and-editing-files"></a> ## Viewing and Editing Files <a name="head-tail-cat-less"></a> ### `head / tail / cat / less` [[ Back to Table of Contents ]](#toc) `head` outputs the first few lines of a file. The `-n` flag specifies the number of lines to show (the default is 10): ``` 列印前三行 ===== \[ andrew@pc01 ~ \]$ 頭 -n 3 c 這 文件 有 ``` `tail` outputs the last few lines of a file. You can get the last `n` lines (like above), or you can get the end of the file beginning from the `N`-th line with `tail -n +N`: ``` 從第 4 行開始列印文件末尾 ============== \[ andrew@pc01 ~ \]$ tail -n +4 c 確切地 六 線 ``` `cat` concatenates a list of files and sends them to the standard output stream (usually the terminal). `cat` can be used with just a single file, or multiple files, and is often used to quickly view them. (**Be warned**: if you use `cat` in this way, you may be accused of a [_Useless Use of Cat_ (UUOC)](http://bit.ly/2SPHE4V), but it's not that big of a deal, so don't worry too much about it.) ``` \[ andrew@pc01 ~ \]$ 貓 a 歸檔一個 \[ andrew@pc01 ~ \]$ 貓 ab 歸檔一個 文件b ``` `less` is another tool for quickly viewing a file -- it opens up a `vim`-like read-only window. (Yes, there is a command called `more`, but `less` -- unintuitively -- offers a superset of the functionality of `more` and is recommended over it.) Learn more (or less?) about [less](http://man7.org/linux/man-pages/man1/less.1.html) and [more](http://man7.org/linux/man-pages/man1/more.1.html) at their `man` pages. <a name="nano-nedit"></a> ### `nano / nedit` [[ Back to Table of Contents ]](#toc) `nano` is a minimalistic command-line text editor. It's a great editor for beginners or people who don't want to learn a million shortcuts. It was more than sufficient for me for the first few years of my coding career (I'm only now starting to look into more powerful editors, mainly because defining your own syntax highlighting in `nano` can be a bit of a pain.) `nedit` is a small graphical editor, it opens up an X Window and allows point-and-click editing, drag-and-drop, syntax highlighting and more. I use `nedit` sometimes when I want to make small changes to a script and re-run it over and over. Other common CLI (command-line interface) / GUI (graphical user interface) editors include `emacs`, `vi`, `vim`, `gedit`, Notepad++, Atom, and lots more. Some cool ones that I've played around with (and can endorse) include Micro, Light Table, and VS Code. All modern editors offer basic conveniences like search and replace, syntax highlighting, and so on. `vi(m)` and `emacs` have more features than `nano` and `nedit`, but they have a much steeper learning curve. Try a few different editors out and find one that works for you! <a name="creating-and-deleting-files"></a> ## Creating and Deleting Files and Directories <a name="touch"></a> ### `touch` [[ Back to Table of Contents ]](#toc) `touch` was created to modify file timestamps, but it can also be used to quickly create an empty file. You can create a new file by opening it with a text editor, like `nano`: ``` \[ andrew@pc01 前 \]$ ls \[ andrew@pc01 ex \]$ 奈米 a ``` _...editing file..._ ``` \[ andrew@pc01 前 \]$ ls A ``` ...or by simply using `touch`: ``` \[ andrew@pc01 ex \]$ touch b && ls ab ``` > **Bonus**: > > Background a process with \^z (Ctrl+z) > > ```bash > [ andrew@pc01 ex ]$ nano a > ``` > > _...editing file, then hit \^z..._ > > ```bash > Use fg to return to nano > > [1]+ Stopped nano a > [ andrew@pc01 ex ]$ fg > ``` > > _...editing file again..._ --- > **Double Bonus:** > > Kill the current (foreground) process by pressing \^c (Ctrl+c) while it’s running > > Kill a background process with `kill %N` where `N` is the job index shown by the `jobs` command <a name="mkdir-rm-rmdir"></a> ### `mkdir / rm / rmdir` [[ Back to Table of Contents ]](#toc) `mkdir` is used to create new, empty directories: ``` \[ andrew@pc01 ex \]$ ls && mkdir c && ls ab ABC ``` You can remove any file with `rm` -- but be careful, this is non-recoverable! ``` \[ andrew@pc01 ex \]$ rm a && ls 西元前 ``` You can add an _"are you sure?"_ prompt with the `-i` flag: ``` \[ andrew@pc01 前 \]$ rm -ib rm:刪除常規空文件“b”? y ``` Remove an empty directory with `rmdir`. If you `ls -a` in an empty directory, you should only see a reference to the directory itself (`.`) and a reference to its parent directory (`..`): ``` \[ andrew@pc01 ex \]$ rmdir c && ls -a 。 .. ``` `rmdir` removes empty directories only: ``` \[ andrew@pc01 ex \]$ cd .. && ls 測試/ \*.txt 0.txt 1.txt a a.txt bc \[ andrew@pc01 ~ \]$ rmdir 測試/ rmdir:無法刪除“test/”:目錄不為空 ``` ...but you can remove a directory -- and all of its contents -- with `rm -rf` (`-r` = recursive, `-f` = force): ``` \[ andrew@pc01 ~ \]$ rm –rf 測試 ``` <a name="moving-and-copying-files"></a> ## Moving and Copying Files, Making Links, Command History <a name="mv-cp-ln"></a> ### `mv / cp / ln` [[ Back to Table of Contents ]](#toc) `mv` moves / renames a file. You can `mv` a file to a new directory and keep the same file name or `mv` a file to a "new file" (rename it): ``` \[ andrew@pc01 ex \]$ ls && mv ae && ls A B C D BCDE ``` `cp` copies a file: ``` \[ andrew@pc01 ex \]$ cp e e2 && ls BCDE E2 ``` `ln` creates a hard link to a file: ``` ln 的第一個參數是 TARGET,第二個參數是 NEW LINK ================================= \[ andrew@pc01 ex \]$ ln bf && ls bcde e2 f ``` `ln -s` creates a soft link to a file: ``` \[ andrew@pc01 ex \]$ ln -sbg && ls BCDE E2 FG ``` Hard links reference the same actual bytes in memory which contain a file, while soft links refer to the original file name, which itself points to those bytes. [You can read more about soft vs. hard links here.](http://bit.ly/2D0W8cN) <a name="command-history"></a> ### Command History [[ Back to Table of Contents ]](#toc) `bash` has two big features to help you complete and re-run commands, the first is _tab completion_. Simply type the first part of a command, hit the \<tab\> key, and let the terminal guess what you're trying to do: ``` \[ andrew@pc01 目錄 \]$ ls 另一個長檔名 這是一個長檔名 一個新檔名 \[ andrew@pc01 目錄 \]$ ls t ``` _...hit the TAB key after typing `ls t` and the command is completed..._ ``` \[ andrew@pc01 dir \]$ ls 這是檔名 這是長檔名 ``` You may have to hit \<TAB\> multiple times if there's an ambiguity: ``` \[ andrew@pc01 目錄 \]$ ls a \[ andrew@pc01 目錄 \]$ ls an 一個新檔名另一個長檔名 ``` `bash` keeps a short history of the commands you've typed previously and lets you search through those commands by typing \^r (Ctrl+r): ``` \[ andrew@pc01 目錄 \] ``` _...hit \^r (Ctrl+r) to search the command history..._ ``` (反向搜尋)``: ``` _...type 'anew' and the last command containing this is found..._ ``` (reverse-i-search)`anew': 觸碰新檔名 ``` <a name="directory-trees-disk-usage-processes"></a> ## Directory Trees, Disk Usage, and Processes <a name="mkdir--p-tree"></a> ### `mkdir –p / tree` [[ Back to Table of Contents ]](#toc) `mkdir`, by default, only makes a single directory. This means that if, for instance, directory `d/e` doesn't exist, then `d/e/f` can't be made with `mkdir` by itself: ``` \[ andrew@pc01 ex \]$ ls && mkdir d/e/f ABC mkdir:無法建立目錄「d/e/f」:沒有這樣的檔案或目錄 ``` But if we pass the `-p` flag to `mkdir`, it will make all directories in the path if they don't already exist: ``` \[ andrew@pc01 ex \]$ mkdir -pd/e/f && ls A B C D ``` `tree` can help you better visualise a directory's structure by printing a nicely-formatted directory tree. By default, it prints the entire tree structure (beginning with the specified directory), but you can restrict it to a certain number of levels with the `-L` flag: ``` \[ andrew@pc01 前 \]$ 樹 -L 2 。 |-- 一個 |-- b |-- c `--d ``` `--e ``` 3個目錄,2個文件 ``` You can hide empty directories in `tree`'s output with `--prune`. Note that this also removes "recursively empty" directories, or directories which aren't empty _per se_, but which contain only other empty directories, or other recursively empty directories: ``` \[ andrew@pc01 ex \]$ 樹 --prune 。 |-- 一個 `--b ``` <a name="df-du-ps"></a> ### `df / du / ps` [[ Back to Table of Contents ]](#toc) `df` is used to show how much space is taken up by files for the disks or your system (hard drives, etc.). ``` \[ andrew@pc01 前 \]$ df -h 已使用的檔案系統大小 可用 使用% 安裝於 udev 126G 0 126G 0% /dev tmpfs 26G 2.0G 24G 8% /執行 /dev/mapper/ubuntu--vg-root 1.6T 1.3T 252G 84% / … ``` In the above command, `-h` doesn't mean "help", but "human-readable". Some commands use this convention to display file / disk sizes with `K` for kilobytes, `G` for gigabytes, and so on, instead of writing out a gigantic integer number of bytes. `du` shows file space usage for a particular directory and its subdirectories. If you want to know how much space is free on a given hard drive, use `df`; if you want to know how much space a directory is taking up, use `du`: ``` \[ andrew@pc01 ex \]$ 你 4 ./d/e/f 8./d/e 12 ./天 4./c 20 . ``` `du` takes a `--max-depth=N` flag, which only shows directories `N` levels down (or fewer) from the specified directory: ``` \[ andrew@pc01 ex \]$ du -h --max-深度=1 12K./天 4.0K./c 20K。 ``` `ps` shows all of the user's currently-running processes (aka. jobs): ``` \[ andrew@pc01 前 \]$ ps PID TTY 時間 CMD 16642 分/15 00:00:00 ps 25409 點/15 00:00:00 重擊 ``` <a name="basic-misc"></a> ## Miscellaneous <a name="passwd-logout-exit"></a> ### `passwd / logout / exit` [[ Back to Table of Contents ]](#toc) Change your account password with `passwd`. It will ask for your current password for verification, then ask you to enter the new password twice, so you don't make any typos: ``` \[ andrew@pc01 目錄 \]$ 密碼 更改安德魯的密碼。 (目前)UNIX 密碼: 輸入新的 UNIX 密碼: 重新輸入新的 UNIX 密碼: passwd:密碼更新成功 ``` `logout` exits a shell you’ve logged in to (where you have a user account): ``` \[ andrew@pc01 目錄 \]$ 註銷 ────────────────────────────────────────────────── ── ────────────────────────────── 會話已停止 ``` - Press <return> to exit tab ``` ``` - Press R to restart session ``` ``` - Press S to save terminal output to file ``` ``` `exit` exits any kind of shell: ``` \[ andrew@pc01 ~ \]$ 退出 登出 ────────────────────────────────────────────────── ── ────────────────────────────── 會話已停止 ``` - Press <return> to exit tab ``` ``` - Press R to restart session ``` ``` - Press S to save terminal output to file ``` ``` <a name="clear-glob"></a> ### `clear / *` [[ Back to Table of Contents ]](#toc) Run `clear` to move the current terminal line to the top of the screen. This command just adds blank lines below the current prompt line. It's good for clearing your workspace. Use the glob (`*`, aka. Kleene Star, aka. wildcard) when looking for files. Notice the difference between the following two commands: ``` \[ andrew@pc01 ~ \]$ ls Git/Parser/source/ PArrayUtils.java PFile.java PSQLFile.java PWatchman.java PDateTimeUtils.java PFixedWidthFile.java PStringUtils.java PXSVFile.java PDelimitedFile.java PNode.java PTextFile.java Parser.java \[ andrew@pc01 ~ \]$ ls Git/Parser/source/PD\* Git/Parser/source/PDateTimeUtils.java Git/Parser/source/PDelimitedFile.java ``` The glob can be used multiple times in a command and matches zero or more characers: ``` \[ andrew@pc01 ~ \]$ ls Git/Parser/source/P *D* m\* Git/Parser/source/PDateTimeUtils.java Git/Parser/source/PDelimitedFile.java ``` <a name="intermediate"></a> # Intermediate <a name="disk-memory-processor"></a> ## Disk, Memory, and Processor Usage <a name="ncdu"></a> ### `ncdu` [[ Back to Table of Contents ]](#toc) `ncdu` (NCurses Disk Usage) provides a navigable overview of file space usage, like an improved `du`. It opens a read-only `vim`-like window (press `q` to quit): ``` \[ andrew@pc01 ~ \]$ ncdu ncdu 1.11 ~ 使用箭頭鍵導航,按 ?求助 \--- /home/安德魯 ------------------------------------------- ------------------ 148.2 MiB \[##########\] /.m2 91.5 MiB \[######\] /.sbt 79.8 MiB \[######\] /.cache 64.9 MiB \[####\] /.ivy2 40.6 MiB \[##\] /.sdkman 30.2 MiB \[##\] /.local 27.4 MiB \[#\] /.mozilla 24.4 MiB \[#\] /.nanobackups 10.2 MiB \[ \] .confout3.txt ``` 8.4 MiB [ ] /.config ``` ``` 5.9 MiB [ ] /.nbi ``` ``` 5.8 MiB [ ] /.oh-my-zsh ``` ``` 4.3 MiB [ ] /Git ``` ``` 3.7 MiB [ ] /.myshell ``` ``` 1.7 MiB [ ] /jdoc ``` ``` 1.5 MiB [ ] .confout2.txt ``` ``` 1.5 MiB [ ] /.netbeans ``` ``` 1.1 MiB [ ] /.jenv ``` 564.0 KiB \[ \] /.rstudio-desktop 磁碟使用總量:552.7 MiB 表觀大小:523.6 MiB 專案:14618 ``` <a name="top-htop"></a> ### `top / htop` [[ Back to Table of Contents ]](#toc) `top` displays all currently-running processes and their owners, memory usage, and more. `htop` is an improved, interactive `top`. (Note: you can pass the `-u username` flag to restrict the displayed processes to only those owner by `username`.) ``` \[ andrew@pc01 ~ \]$ htop 1 \[ 0.0%\] 9 \[ 0.0%\] 17 \[ 0.0%\] 25 \[ 0.0%\] 2 \[ 0.0%\] 10 \[ 0.0%\] 18 \[ 0.0%\] 26 \[ 0.0%\] 3 \[ 0.0%\] 11 \[ 0.0%\] 19 \[ 0.0%\] 27 \[ 0.0%\] 4 \[ 0.0%\] 12 \[ 0.0%\] 20 \[ 0.0%\] 28 \[ 0.0%\] 5 \[ 0.0%\] 13 \[ 0.0%\] 21 \[| 1.3%\] 29 \[ 0.0%\] 6 \[ 0.0%\] 14 \[ 0.0%\] 22 \[ 0.0%\] 30 \[| 0.6%\] 7 \[ 0.0%\] 15 \[ 0.0%\] 23 \[ 0.0%\] 31 \[ 0.0%\] 8 \[ 0.0%\] 16 \[ 0.0%\] 24 \[ 0.0%\] 32 \[ 0.0%\] Mem\[|||||||||||||||||||1.42G/252G\] 任務:188、366 個; 1 執行 交換電壓\[| 2.47G/256G\]平均負載:0.00 0.00 0.00 ``` Uptime: 432 days(!), 00:03:55 ``` PID USER PRI NI VIRT RES SHR S CPU% MEM% TIME+ 指令 9389 安德魯 20 0 23344 3848 2848 R 1.3 0.0 0:00.10 htop 10103 根 20 0 3216M 17896 2444 S 0.7 0.0 5h48:56 /usr/bin/dockerd ``` 1 root 20 0 181M 4604 2972 S 0.0 0.0 15:29.66 /lib/systemd/syst ``` 533 根 20 0 44676 6908 6716 S 0.0 0.0 11:19.77 /lib/systemd/syst 546 根 20 0 244M 0 0 S 0.0 0.0 0:01.39 /sbin/lvmetad -f 1526 根 20 0 329M 2252 1916 S 0.0 0.0 0:00.00 /usr/sbin/ModemMa 1544 根 20 0 329M 2252 1916 S 0.0 0.0 0:00.06 /usr/sbin/ModemMa F1Help F2Setup F3SearchF4FilterF5Tree F6SortByF7Nice -F8Nice +F9Kill F10Quit ``` <a name="REPLs-software-versions"></a> ## REPLs and Software Versions <a name="REPLs"></a> ### REPLs [[ Back to Table of Contents ]](#toc) A **REPL** is a Read-Evaluate-Print Loop, similar to the command line, but usually used for particular programming languages. You can open the Python REPL with the `python` command (and quit with the `quit()` function): ``` \[ andrew@pc01 ~ \]$ python Python 3.5.2(默認,2018 年 11 月 12 日,13:43:14)... > > > 辭職() ``` Open the R REPL with the `R` command (and quit with the `q()` function): ``` \[ andrew@pc01 ~ \]$ R R版3.5.2(2018-12-20)--「蛋殼冰屋」... > q() 儲存工作區影像? \[是/否/c\]: 否 ``` Open the Scala REPL with the `scala` command (and quit with the `:quit` command): ``` \[ andrew@pc01 ~ \]$ scala 歡迎使用 Scala 2.11.12 ... 斯卡拉>:退出 ``` Open the Java REPL with the `jshell` command (and quit with the `/exit` command): ``` \[ andrew@pc01 ~ \]$ jshell |歡迎使用 JShell——版本 11.0.1 ... jshell> /退出 ``` Alternatively, you can exit any of these REPLs with \^d (Ctrl+d). \^d is the EOF (end of file) marker on Unix and signifies the end of input. <a name="version"></a> ### `-version / --version / -v` [[ Back to Table of Contents ]](#toc) Most commands and programs have a `-version` or `--version` flag which gives the software version of that command or program. Most applications make this information easily available: ``` \[ andrew@pc01 ~ \]$ ls --version ls (GNU coreutils) 8.25 ... \[ andrew@pc01 ~ \]$ ncdu -版本 NCDU 1.11 \[ andrew@pc01 ~ \]$ python --version Python 3.5.2 ``` ...but some are less intuitive: ``` \[ andrew@pc01 ~ \]$ sbt scalaVersion … \[資訊\]2.12.4 ``` Note that some programs use `-v` as a version flag, while others use `-v` to mean "verbose", which will run the application while printing lots of diagnostic or debugging information: ``` SCP(1) BSD 通用指令手冊 SCP(1) 姓名 ``` scp -- secure copy (remote file copy program) ``` … -v 詳細模式。導致 scp 和 ssh(1) 列印偵錯訊息 ``` about their progress. This is helpful in debugging connection, ``` ``` authentication, and configuration problems. ``` … ``` <a name="env-vars-aliases"></a> ## Environment Variables and Aliases <a name="env-vars"></a> ### Environment Variables [[ Back to Table of Contents ]](#toc) **Environment variables** (sometimes shortened to "env vars") are persistent variables that can be created and used within your `bash` shell. They are defined with an equals sign (`=`) and used with a dollar sign (`$`). You can see all currently-defined env vars with `printenv`: ``` \[ andrew@pc01 ~ \]$ printenv SPARK\_HOME=/usr/local/spark 術語=xterm … ``` Set a new environment variable with an `=` sign (don't put any spaces before or after the `=`, though!): ``` \[ andrew@pc01 ~ \]$ myvar=你好 ``` Print a specific env var to the terminal with `echo` and a preceding `$` sign: ``` \[ andrew@pc01 ~ \]$ echo $myvar 你好 ``` Environment variables which contain spaces or other whitespace should be surrounded by quotes (`"..."`). Note that reassigning a value to an env var overwrites it without warning: ``` \[ andrew@pc01 ~ \]$ myvar="你好,世界!" && 回顯 $myvar 你好世界! ``` Env vars can also be defined using the `export` command. When defined this way, they will also be available to sub-processes (commands called from this shell): ``` \[ andrew@pc01 ~ \]$ export myvar="另一" && echo $myvar 另一個 ``` You can unset an environment variable by leaving the right-hand side of the `=` blank or by using the `unset` command: ``` \[ andrew@pc01 ~ \]$ 取消設定 mynewvar \[ andrew@pc01 ~ \]$ echo $mynewvar ``` <a name="aliases"></a> ### Aliases [[ Back to Table of Contents ]](#toc) **Aliases** are similar to environment variables but are usually used in a different way -- to replace long commands with shorter ones: ``` \[ andrew@pc01 apidocs \]$ ls -l -a -h -t 總計 220K drwxr-xr-x 5 安德魯 安德魯 4.0K 12 月 21 日 12:37 。 -rw-r--r-- 1 安德魯 安德魯 9.9K 十二月 21 12:37 help-doc.html -rw-r--r-- 1 安德魯 安德魯 4.5K 12 月 21 日 12:37 script.js … \[ andrew@pc01 apidocs \]$ 別名 lc="ls -l -a -h -t" \[ andrew@pc01 apidocs \]$ lc 總計 220K drwxr-xr-x 5 安德魯 安德魯 4.0K 12 月 21 日 12:37 。 -rw-r--r-- 1 安德魯 安德魯 9.9K 十二月 21 12:37 help-doc.html -rw-r--r-- 1 安德魯 安德魯 4.5K 12 月 21 日 12:37 script.js … ``` You can remove an alias with `unalias`: ``` \[ andrew@pc01 apidocs \]$ unalias lc \[ andrew@pc01 apidocs \]$ lc 目前未安裝程式“lc”。 … ``` > **Bonus:** > > [Read about the subtle differences between environment variables and aliases here.](http://bit.ly/2TDG8Tx) > > [Some programs, like **git**, allow you to define aliases specifically for that software.](http://bit.ly/2TG8X1A) <a name="basic-bash-scripting"></a> ## Basic `bash` Scripting <a name="bash-scripts"></a> ### `bash` Scripts [[ Back to Table of Contents ]](#toc) `bash` scripts (usually ending in `.sh`) allow you to automate complicated processes, packaging them into reusable functions. A `bash` script can contain any number of normal shell commands: ``` \[ andrew@pc01 ~ \]$ echo "ls && touch file && ls" > ex.sh ``` A shell script can be executed with the `source` command or the `sh` command: ``` \[ andrew@pc01 ~ \]$ 源 ex.sh 桌面 Git TEST c ex.sh 專案測試 桌面 Git TEST c ex.sh 檔案專案測試 ``` Shell scripts can be made executable with the `chmod` command (more on this later): ``` \[ andrew@pc01 ~ \]$ echo "ls && touch file2 && ls" > ex2.sh \[ andrew@pc01 ~ \]$ chmod +x ex2.sh ``` An executable shell script can be run by preceding it with `./`: ``` \[ andrew@pc01 ~ \]$ ./ex2.sh 桌面 Git TEST c ex.sh ex2.sh 檔案專案測試 桌面 Git TEST c ex.sh ex2.sh 檔案 file2 專案測試 ``` Long lines of code can be split by ending a command with `\`: ``` \[ andrew@pc01 ~ \]$ echo "for i in {1..3}; do echo \\ > \\"歡迎\\$i次\\";完成” > ex3.sh ``` Bash scripts can contain loops, functions, and more! ``` \[ andrew@pc01 ~ \]$ 源 ex3.sh 歡迎1次 歡迎2次 歡迎3次 ``` <a name="custom-prompt-ls"></a> ### Custom Prompt and `ls` [[ Back to Table of Contents ]](#toc) Bash scripting can make your life a whole lot easier and more colourful. [Check out this great bash scripting cheat sheet.](https://devhints.io/bash) `$PS1` (Prompt String 1) is the environment variable that defines your main shell prompt ([learn about the other prompts here](http://bit.ly/2SPgsmT)): ``` \[ andrew@pc01 ~ \]$ printf "%q" $PS1 $'\\n\\\[\\E\[1m\\\]\\\[\\E\[30m\\\]\\A'$'\\\[\\E\[37m\\\]|\\\[\\E\[36m\\\]\\u\\\[\\E\[37m \\\]@\\\[\\E\[34m\\\]\\h'$'\\\[\\E\[32m\\\]\\W\\\[\\E\[37m\\\]|'$'\\\[\\E(B\\E\[m\\\] ' ``` You can change your default prompt with the `export` command: ``` \[ andrew@pc01 ~ \]$ export PS1="\\n此處指令> " 此處指令> echo $PS1 \\n此處指令> ``` ...[you can add colours, too!](http://bit.ly/2TMbEit): ``` 此處指令> export PS1="\\e\[1;31m\\n程式碼: \\e\[39m" (這應該是紅色的,但在 Markdown 中可能不會這樣顯示) =============================== 程式碼:回顯$PS1 \\e\[1;31m\\n程式碼: \\e\[39m ``` You can also change the colours shown by `ls` by editing the `$LS_COLORS` environment variable: ``` (同樣,這些顏色可能不會出現在 Markdown 中) =========================== 程式碼:ls 桌面 Git TEST c ex.sh ex2.sh ex3.sh 檔案 file2 專案測試 程式碼:匯出 LS\_COLORS='di=31:fi=0:ln=96:or=31:mi=31:ex=92' 程式碼:ls 桌面 Git TEST c ex.sh ex2.sh ex3.sh 檔案 file2 專案測試 ``` <a name="config-files"></a> ## Config Files <a name="config-bashrc"></a> ### Config Files / `.bashrc` [[ Back to Table of Contents ]](#toc) If you tried the commands in the last section and logged out and back in, you may have noticed that your changes disappeared. _config_ (configuration) files let you maintain settings for your shell or for a particular program every time you log in (or run that program). The main configuration file for a `bash` shell is the `~/.bashrc` file. Aliases, environment variables, and functions added to `~/.bashrc` will be available every time you log in. Commands in `~/.bashrc` will be run every time you log in. If you edit your `~/.bashrc` file, you can reload it without logging out by using the `source` command: ``` \[ andrew@pc01 ~ \]$ nano ~/.bashrc ``` _...add the line `echo “~/.bashrc loaded!”` to the top of the file_... ``` \[ andrew@pc01 ~ \]$ 源 ~/.bashrc ~/.bashrc 已載入! ``` _...log out and log back in..._ ``` 最後登入:2019 年 1 月 11 日星期五 10:29:07 從 111.11.11.111 ~/.bashrc 已加載! \[ 安德魯@pc01 ~ \] ``` <a name="types-of-shells"></a> ### Types of Shells [[ Back to Table of Contents ]](#toc) _Login_ shells are shells you log in to (where you have a username). _Interactive_ shells are shells which accept commands. Shells can be login and interactive, non-login and non-interactive, or any other combination. In addition to `~/.bashrc`, there are a few other scripts which are `sourced` by the shell automatically when you log in or log out. These are: - `/etc/profile` - `~/.bash_profile` - `~/.bash_login` - `~/.profile` - `~/.bash_logout` - `/etc/bash.bash_logout` Which of these scripts are sourced, and the order in which they're sourced, depend on the type of shell opened. See [the bash man page](https://linux.die.net/man/1/bash) and [these](http://bit.ly/2TGCwA8) Stack Overflow [posts](http://bit.ly/2TFHFsf) for more information. Note that `bash` scripts can `source` other scripts. For instance, in your `~/.bashrc`, you could include the line: ``` 來源~/.bashrc\_addl ``` ...which would also `source` that `.bashrc_addl` script. This file can contain its own aliases, functions, environment variables, and so on. It could, in turn, `source` other scripts, as well. (Be careful to avoid infinite loops of script-sourcing!) It may be helpful to split commands into different shell scripts based on functionality or machine type (Ubuntu vs. Red Hat vs. macOS), for example: - `~/.bash_ubuntu` -- configuration specific to Ubuntu-based machines - `~/.bashrc_styles` -- aesthetic settings, like `PS1` and `LS_COLORS` - `~/.bash_java` -- configuration specific to the Java language I try to keep separate `bash` files for aesthetic configurations and OS- or machine-specific code, and then I have one big `bash` file containing shortcuts, etc. that I use on every machine and every OS. Note that there are also _different shells_. `bash` is just one kind of shell (the "Bourne Again Shell"). Other common ones include `zsh`, `csh`, `fish`, and more. Play around with different shells and find one that's right for you, but be aware that this tutorial contains `bash` shell commands only and not everything listed here (maybe none of it) will be applicable to shells other than `bash`. <a name="finding-things"></a> ## Finding Things <a name="whereis-which-whatis"></a> ### `whereis / which / whatis` [[ Back to Table of Contents ]](#toc) `whereis` searches for "possibly useful" files related to a particular command. It will attempt to return the location of the binary (executable machine code), source (code source files), and `man` page for that command: ``` \[ andrew@pc01 ~ \]$ whereis ls ls: /bin/ls /usr/share/man/man1/ls.1.gz ``` `which` will only return the location of the binary (the command itself): ``` \[ andrew@pc01 ~ \]$ 其中 ls /bin/ls ``` `whatis` prints out the one-line description of a command from its `man` page: ``` \[ andrew@pc01 ~ \]$ 什麼是哪裡是哪個什麼是 whereis (1) - 尋找指令的二進位、原始檔和手冊頁文件 which (1) - 定位指令 Whatis (1) - 顯示一行手冊頁描述 ``` `which` is useful for finding the "original version" of a command which may be hidden by an alias: ``` \[ andrew@pc01 ~ \]$ 別名 ls="ls -l" “original” ls 已被上面定義的別名“隱藏” =========================== \[ andrew@pc01 ~ \]$ ls 總計 36 drwxr-xr-x 2 安德魯 andrew 4096 Jan 9 14:47 桌面 drwxr-xr-x 4 安德魯 安德魯 4096 十二月 6 10:43 Git … 但我們仍然可以使用返回的位置來呼叫「原始」ls ======================= \[ andrew@pc01 ~ \]$ /bin/ls 桌面 Git TEST c ex.sh ex2.sh ex3.sh 檔案 file2 專案測試 ``` <a name="locate-find"></a> ### `locate / find` [[ Back to Table of Contents ]](#toc) `locate` finds a file anywhere on the system by referring to a semi-regularly-updated cached list of files: ``` \[ andrew@pc01 ~ \]$ 找到 README.md /home/andrew/.config/micro/plugins/gotham-colors/README.md /home/andrew/.jenv/README.md /home/andrew/.myshell/README.md … ``` Because it's just searching a list, `locate` is usually faster than the alternative, `find`. `find` iterates through the file system to find the file you're looking for. Because it's actually looking at the files which _currently_ exist on the system, though, it will always return an up-to-date list of files, which is not necessarily true with `locate`. ``` \[ andrew@pc01 ~ \]$ find ~/ -iname "README.md" /home/andrew/.jenv/README.md /home/andrew/.config/micro/plugins/gotham-colors/README.md /home/andrew/.oh-my-zsh/plugins/ant/README.md … ``` `find` was written for the very first version of Unix in 1971, and is therefore much more widely available than `locate`, which was added to GNU in 1994. `find` has many more features than `locate`, and can search by file age, size, ownership, type, timestamp, permissions, depth within the file system; `find` can search using regular expressions, execute commands on files it finds, and more. When you need a fast (but possibly outdated) list of files, or you’re not sure what directory a particular file is in, use `locate`. When you need an accurate file list, maybe based on something other than the files’ names, and you need to do something with those files, use `find`. <a name="downloading-things"></a> ## Downloading Things <a name="ping-wget-curl"></a> ### `ping / wget / curl` [[ Back to Table of Contents ]](#toc) `ping` attempts to open a line of communication with a network host. Mainly, it's used to check whether or not your Internet connection is down: ``` \[ andrew@pc01 ~ \]$ ping google.com PING google.com (74.125.193.100) 56(84) 位元組資料。 使用 32 位元組資料 Ping 74.125.193.100: 來自 74.125.193.100 的回覆:位元組=32 時間<1ms TTL=64 … ``` `wget` is used to easily download a file from the Internet: ``` \[ andrew@pc01 ~ \]$ wget \\ > http://releases.ubuntu.com/18.10/ubuntu-18.10-desktop-amd64.iso ``` `curl` can be used just like `wget` (don’t forget the `--output` flag): ``` \[ andrew@pc01 ~ \]$ 捲曲 \\ > http://releases.ubuntu.com/18.10/ubuntu-18.10-desktop-amd64.iso \\ > \--輸出ubuntu.iso ``` `curl` and `wget` have their own strengths and weaknesses. `curl` supports many more protocols and is more widely available than `wget`; `curl` can also send data, while `wget` can only receive data. `wget` can download files recursively, while `curl` cannot. In general, I use `wget` when I need to download things from the Internet. I don’t often need to send data using `curl`, but it’s good to be aware of it for the rare occasion that you do. <a name="apt-gunzip-tar-gzip"></a> ### `apt / gunzip / tar / gzip` [[ Back to Table of Contents ]](#toc) Debian-descended Linux distributions have a fantastic package management tool called `apt`. It can be used to install, upgrade, or delete software on your machine. To search `apt` for a particular piece of software, use `apt search`, and install it with `apt install`: ``` \[ andrew@pc01 ~ \]$ apt 搜尋漂白位 ...bleachbit/bionic、bionic 2.0-2 全部 從系統中刪除不需要的文件 您需要“sudo”來安裝軟體 ============== \[ andrew@pc01 ~ \]$ sudo apt installbleachbit ``` Linux software often comes packaged in `.tar.gz` ("tarball") files: ``` \[ andrew@pc01 ~ \]$ wget \\ > https://github.com/atom/atom/releases/download/v1.35.0-beta0/atom-amd64.tar.gz ``` ...these types of files can be unzipped with `gunzip`: ``` \[ andrew@pc01 ~ \]$gunzipatom-amd64.tar.gz && ls 原子 amd64.tar ``` A `.tar.gz` file will be `gunzip`-ped to a `.tar` file, which can be extracted to a directory of files using `tar -xf` (`-x` for "extract", `-f` to specify the file to "untar"): ``` \[ andrew@pc01 ~ \]$ tar -xfatom-amd64.tar && mv \\ 原子-beta-1.35.0-beta0-amd64 原子 && ls 原子atom-amd64.tar ``` To go in the reverse direction, you can create (`-c`) a tar file from a directory and zip it (or unzip it, as appropriate) with `-z`: ``` \[ andrew@pc01 ~ \]$ tar -zcf 壓縮.tar.gz 原子 && ls 原子atom-amd64.tar壓縮.tar.gz ``` `.tar` files can also be zipped with `gzip`: ``` \[ andrew@pc01 ~ \]$ gzipatom-amd64.tar && ls 原子 原子-amd64.tar.gz 壓縮.tar.gz ``` <a name="redirecting-io"></a> ## Redirecting Input and Output <a name="pipe-gt-lt-echo-printf"></a> ### `| / > / < / echo / printf` [[ Back to Table of Contents ]](#toc) By default, shell commands read their input from the standard input stream (aka. stdin or 0) and write to the standard output stream (aka. stdout or 1), unless there’s an error, which is written to the standard error stream (aka. stderr or 2). `echo` writes text to stdout by default, which in most cases will simply print it to the terminal: ``` \[ andrew@pc01 ~ \]$ 回顯“你好” 你好 ``` The pipe operator, `|`, redirects the output of the first command to the input of the second command: ``` 'wc'(字數)傳回檔案中的行數、字數、位元組數 ======================== \[ andrew@pc01 ~ \]$ echo "範例文件" |廁所 ``` 1 2 17 ``` ``` `>` redirects output from stdout to a particular location ``` \[ andrew@pc01 ~ \]$ echo "test" > 文件 && 頭文件 測試 ``` `printf` is an improved `echo`, allowing formatting and escape sequences: ``` \[ andrew@pc01 ~ \]$ printf "1\\n3\\n2" 1 3 2 ``` `<` gets input from a particular location, rather than stdin: ``` 'sort' 依字母/數字順序對檔案的行進行排序 ======================== \[ andrew@pc01 ~ \]$ sort <(printf "1\\n3\\n2") 1 2 3 ``` Rather than a [UUOC](#viewing-and-editing-files), the recommended way to send the contents of a file to a command is to use `<`. Note that this causes data to "flow" right-to-left on the command line, rather than (the perhaps more natural, for English-speakers) left-to-right: ``` \[ andrew@pc01 ~ \]$ printf "1\\n3\\n2" > 文件 && 排序 < 文件 1 2 3 ``` <a name="std-tee"></a> ### `0 / 1 / 2 / tee` [[ Back to Table of Contents ]](#toc) 0, 1, and 2 are the standard input, output, and error streams, respectively. Input and output streams can be redirected with the `|`, `>`, and `<` operators mentioned previously, but stdin, stdout, and stderr can also be manipulated directly using their numeric identifiers: Write to stdout or stderr with `>&1` or `>&2`: ``` \[ andrew@pc01 ~ \]$ 貓測試 回顯“標準輸出”>&1 回顯“標準錯誤”>&2 ``` By default, stdout and stderr both print output to the terminal: ``` \[ andrew@pc01 ~ \]$ ./測試 標準錯誤 標準輸出 ``` Redirect stdout to `/dev/null` (only print output sent to stderr): ``` \[ andrew@pc01 ~ \]$ ./test 1>/dev/null 標準錯誤 ``` Redirect stderr to `/dev/null` (only print output sent to stdout): ``` \[ andrew@pc01 ~ \]$ ./test 2>/dev/null 標準輸出 ``` Redirect all output to `/dev/null` (print nothing): ``` \[ andrew@pc01 ~ \]$ ./test &>/dev/null ``` Send output to stdout and any number of additional locations with `tee`: ``` \[ andrew@pc01 ~ \]$ ls && echo "測試" | tee 文件1 文件2 文件3 && ls 文件0 測試 文件0 文件1 文件2 文件3 ``` <a name="advanced"></a> # Advanced <a name="superuser"></a> ## Superuser <a name="sudo-su"></a> ### `sudo / su` [[ Back to Table of Contents ]](#toc) You can check what your username is with `whoami`: ``` \[ andrew@pc01 abc \]$ whoami 安德魯 ``` ...and run a command as another user with `sudo -u username` (you will need that user's password): ``` \[ andrew@pc01 abc \]$ sudo -u 測試觸摸 def && ls -l 總計 0 -rw-r--r-- 1 次測試 0 Jan 11 20:05 def ``` If `–u` is not provided, the default user is the superuser (usually called "root"), with unlimited permissions: ``` \[ andrew@pc01 abc \]$ sudo touch ghi && ls -l 總計 0 -rw-r--r-- 1 次測試 0 Jan 11 20:05 def -rw-r--r-- 1 root root 0 Jan 11 20:14 ghi ``` Use `su` to become another user temporarily (and `exit` to switch back): ``` \[ andrew@pc01 abc \]$ su 測試 密碼: test@pc01:/home/andrew/abc$ whoami 測試 test@pc01:/home/andrew/abc$ 退出 出口 \[ andrew@pc01 abc \]$ whoami 安德魯 ``` [Learn more about the differences between `sudo` and `su` here.](http://bit.ly/2SKQH77) <a name="click-click"></a> ### `!!` [[ Back to Table of Contents ]](#toc) The superuser (usually "root") is the only person who can install software, create users, and so on. Sometimes it's easy to forget that, and you may get an error: ``` \[ andrew@pc01 ~ \]$ apt 安裝 ruby E:無法開啟鎖定檔案 /var/lib/dpkg/lock-frontend - 開啟(13:權限被拒絕) E: 無法取得 dpkg 前端鎖定 (/var/lib/dpkg/lock-frontend),您是 root 嗎? ``` You could retype the command and add `sudo` at the front of it (run it as the superuser): ``` \[ andrew@pc01 ~ \]$ sudo apt install ruby 正在閱讀包裝清單... ``` Or, you could use the `!!` shortcut, which retains the previous command: ``` \[ andrew@pc01 ~ \]$ apt 安裝 ruby E:無法開啟鎖定檔案 /var/lib/dpkg/lock-frontend - 開啟(13:權限被拒絕) E: 無法取得 dpkg 前端鎖定 (/var/lib/dpkg/lock-frontend),您是 root 嗎? \[ andrew@pc01 ~ \]$ sudo !! sudo apt 安裝 ruby 正在閱讀包裝清單... ``` By default, running a command with `sudo` (and correctly entering the password) allows the user to run superuser commands for the next 15 minutes. Once those 15 minutes are up, the user will again be prompted to enter the superuser password if they try to run a restricted command. <a name="file-permissions"></a> ## File Permissions <a name="file-permissions-sub"></a> ### File Permissions [[ Back to Table of Contents ]](#toc) Files may be able to be read (`r`), written to (`w`), and/or executed (`x`) by different users or groups of users, or not at all. File permissions can be seen with the `ls -l` command and are represented by 10 characters: ``` \[ andrew@pc01 ~ \]$ ls -lh 總計 8 drwxr-xr-x 4 安德魯 安德魯 4.0K 1 月 4 日 19:37 品嚐 -rwxr-xr-x 1 安德魯 安德魯 40 Jan 11 16:16 測試 -rw-r--r-- 1 安德魯 安德魯 0 一月 11 16:34 tist ``` The first character of each line represents the type of file, (`d` = directory, `l` = link, `-` = regular file, and so on); then there are three groups of three characters which represent the permissions held by the user (u) who owns the file, the permissions held by the group (g) which owns the file, and the permissions held any other (o) users. (The number which follows this string of characters is the number of links in the file system to that file (4 or 1 above).) `r` means that person / those people have read permission, `w` is write permission, `x` is execute permission. If a directory is “executable”, that means it can be opened and its contents can be listed. These three permissions are often represented with a single three-digit number, where, if `x` is enabled, the number is incremented by 1, if `w` is enabled, the number is incremented by 2, and if `r` is enabled, the number is incremented by 4. Note that these are equivalent to binary digits (`r-x` -> `101` -> `5`, for example). So the above three files have permissions of 755, 755, and 644, respectively. The next two strings in each list are the name of the owner (`andrew`, in this case) and the group of the owner (also `andrew`, in this case). Then comes the size of the file, its most recent modification time, and its name. The `–h` flag makes the output human readable (i.e. printing `4.0K` instead of `4096` bytes). <a name="chmod-chown"></a> ### `chmod / chown` [[ Back to Table of Contents ]](#toc) File permissions can be modified with `chmod` by setting the access bits: ``` \[ andrew@pc01 ~ \]$ chmod 777 測試 && chmod 000 tit && ls -lh 總計 8.0K drwxr-xr-x 4 安德魯 安德魯 4.0K 1 月 4 日 19:37 品嚐 -rwxrwxrwx 1 安德魯 安德魯 40 Jan 11 16:16 測試 \---------- 1 安德魯 安德魯 0 一月 11 16:34 tist ``` ...or by adding (`+`) or removing (`-`) `r`, `w`, and `x` permissions with flags: ``` \[ andrew@pc01 ~ \]$ chmod +rwx Tist && chmod -w 測試 && ls -lh chmod:測試:新權限是 r-xrwxrwx,而不是 r-xr-xr-x 總計 8.0K drwxr-xr-x 4 安德魯 安德魯 4.0K 1 月 4 日 19:37 品嚐 -r-xrwxrwx 1 安德魯 安德魯 40 Jan 11 16:16 測試 -rwxr-xr-x 1 安德魯 安德魯 0 一月 11 16:34 tist ``` The user who owns a file can be changed with `chown`: ``` \[ andrew@pc01 ~ \]$ sudo chown 碼頭測試 ``` The group which owns a file can be changed with `chgrp`: ``` \[ andrew@pc01 ~ \]$ sudo chgrp hadoop tit && ls -lh 總計 8.0K drwxr-xr-x 4 安德魯 安德魯 4.0K 1 月 4 日 19:37 品嚐 \-----w--w- 1 瑪麗娜·安德魯 2011 年 1 月 40 日 16:16 測試 -rwxr-xr-x 1 安德魯 hadoop 0 一月 11 16:34 tist ``` <a name="users-groups"></a> ## User and Group Management <a name="users"></a> ### Users [[ Back to Table of Contents ]](#toc) `users` shows all users currently logged in. Note that a user can be logged in multiple times if -- for instance -- they're connected via multiple `ssh` sessions. ``` \[ andrew@pc01 ~ \]$ 用戶 安德魯·科林·科林·科林·科林·科林·克里希納·克里希納 ``` To see all users (even those not logged in), check `/etc/passwd`. (**WARNING**: do not modify this file! You can corrupt your user accounts and make it impossible to log in to your system.) ``` \[ andrew@pc01 ~ \]$ alias au="cut -d: -f1 /etc/passwd \\ > |排序| uniq”&& au \_易於 一個廣告 安德魯... ``` Add a user with `useradd`: ``` \[ andrew@pc01 ~ \]$ sudo useradd aardvark && au \_易於 土豚 一個廣告... ``` Delete a user with `userdel`: ``` \[ andrew@pc01 ~ \]$ sudo userdel aardvark && au \_易於 一個廣告 安德魯... ``` [Change a user’s default shell, username, password, or group membership with `usermod`.](http://bit.ly/2D4upIg) <a name="groups"></a> ### Groups [[ Back to Table of Contents ]](#toc) `groups` shows all of the groups of which the current user is a member: ``` \[ andrew@pc01 ~ \]$ 組 andrew adm cdrom sudo dial plugdev lpadmin sambashare hadoop ``` To see all groups on the system, check `/etc/group`. (**DO NOT MODIFY** this file unless you know what you are doing.) ``` \[ andrew@pc01 ~ \]$ alias ag=“cut -d: -f1 /etc/group \\ > |排序”&& ag 管理員 一個廣告 安德魯... ``` Add a group with `groupadd`: ``` \[ andrew@pc01 ~ \]$ sudo groupadd aardvark && ag 土豚 管理員 一個廣告... ``` Delete a group with `groupdel`: ``` \[ andrew@pc01 ~ \]$ sudo groupdel aardvark && ag 管理員 一個廣告 安德魯... ``` [Change a group’s name, ID number, or password with `groupmod`.](https://linux.die.net/man/8/groupmod) <a name="text-processing"></a> ## Text Processing <a name="uniq-sort-diff-cmp"></a> ### `uniq / sort / diff / cmp` [[ Back to Table of Contents ]](#toc) `uniq` can print unique lines (default) or repeated lines: ``` \[ andrew@pc01 man \]$ printf "1\\n2\\n2" > a && \\ > printf "1\\n3\\n2" > b \[ andrew@pc01 人 \]$ uniq a 1 2 ``` `sort` will sort lines alphabetically / numerically: ``` \[ andrew@pc01 man \]$ 排序 b 1 2 3 ``` `diff` will report which lines differ between two files: ``` \[ andrew@pc01 人 \]$ diff ab 2c2 < 2 --- > 3 ``` `cmp` reports which bytes differ between two files: ``` \[andrew@pc01 人\]$ cmp ab ab 不同:字元 3,第 2 行 ``` <a name="cut-sed"></a> ### `cut / sed` [[ Back to Table of Contents ]](#toc) `cut` is usually used to cut a line into sections on some delimiter (good for CSV processing). `-d` specifies the delimiter and `-f` specifies the field index to print (starting with 1 for the first field): ``` \[ andrew@pc01 人 \]$ printf "137.99.234.23" > c \[ andrew@pc01 man \]$ cut -d'.' c-f1 137 ``` `sed` is commonly used to replace a string with another string in a file: ``` \[ andrew@pc01 man \]$ echo "舊" | sed s/舊/新/ 新的 ``` ...but `sed` is an extremely powerful utility, and cannot be properly summarised here. It’s actually Turing-complete, so it can do anything that any other programming language can do. `sed` can find and replace based on regular expressions, selectively print lines of a file which match or contain a certain pattern, edit text files in-place and non-interactively, and much more. A few good tutorials on `sed` include: - [https://www.tutorialspoint.com/sed/](https://www.tutorialspoint.com/sed/) - [http://www.grymoire.com/Unix/Sed.html](http://www.grymoire.com/Unix/Sed.html) - [https://www.computerhope.com/unix/used.htm](https://www.computerhope.com/unix/used.htm) <a name="pattern-matching"></a> ## Pattern Matching <a name="grep"></a> ### `grep` [[ Back to Table of Contents ]](#toc) The name `grep` comes from `g`/`re`/`p` (search `g`lobally for a `r`egular `e`xpression and `p`rint it); it’s used for finding text in files. `grep` is used to find lines of a file which match some pattern: ``` \[ andrew@pc01 ~ \]$ grep -e " *.fi.* " /etc/profile /etc/profile:Bourne shell 的系統範圍 .profile 檔案 (sh(1)) =================================================== ``` # The file bash.bashrc already sets the default PS1. ``` ``` fi ``` ``` fi ``` … ``` ...or contain some word: ``` \[ andrew@pc01 ~ \]$ grep "andrew" /etc/passwd 安德魯:x:1000:1000:安德魯,,,:/home/andrew:/bin/bash ``` `grep` is usually the go-to choice for simply finding matching lines in a file, if you’re planning on allowing some other program to handle those lines (or if you just want to view them). `grep` allows for (`-E`) use of extended regular expressions, (`-F`) matching any one of multiple strings at once, and (`-r`) recursively searching files within a directory. These flags used to be implemented as separate commands (`egrep`, `fgrep`, and `rgrep`, respectively), but those commands are now deprecated. > **Bonus**: [see the origins of the names of a few famous `bash` commands](https://kb.iu.edu/d/abnd) <a name="awk"></a> ### `awk` [[ Back to Table of Contents ]](#toc) `awk` is a pattern-matching language built around reading and manipulating delimited data files, like CSV files. As a rule of thumb, `grep` is good for finding strings and patterns in files, `sed` is good for one-to-one replacement of strings in files, and `awk` is good for extracting strings and patterns from files and analysing them. As an example of what `awk` can do, here’s a file containing two columns of data: ``` \[ andrew@pc01 ~ \]$ printf "A 10\\nB 20\\nC 60" > 文件 ``` Loop over the lines, add the number to sum, increment count, print the average: ``` \[ andrew@pc01 ~ \]$ awk 'BEGIN {sum=0;計數=0; OFS=“”} {sum+=$2; count++} END {print "平均值:", sum/count}' 文件 平均:30 ``` `sed` and `awk` are both Turing-complete languages. There have been multiple books written about each of them. They can be extremely useful with pattern matching and text processing. I really don’t have enough space here to do either of them justice. Go read more about them! > **Bonus**: [learn about some of the differences between `sed`, `grep`, and `awk`](http://bit.ly/2AI3IaN) <a name="ssh"></a> ## Copying Files Over `ssh` <a name="ssh-scp"></a> ### `ssh / scp` [[ Back to Table of Contents ]](#toc) `ssh` is how Unix-based machines connect to each other over a network: ``` \[ andrew@pc01 ~ \]$ ssh –p安德魯@137.xxx.xxx.89 上次登入:2019 年 1 月 11 日星期五 12:30:52,來自 137.xxx.xxx.199 ``` Notice that my prompt has changed as I’m now on a different machine: ``` \[ andrew@pc02 ~ \]$ 退出 登出 與 137.xxx.xxx.89 的連線已關閉。 ``` Create a file on machine 1: ``` \[ andrew@pc01 ~ \]$ echo "你好" > 你好 ``` Copy it to machine 2 using `scp` (secure copy; note that `scp` uses `–P` for a port #, `ssh` uses `–p`) ``` \[ andrew@pc01 ~ \]$ scp –P你好安德魯@137.xxx.xxx.89:~ 你好 100% 0 0.0KB/秒 00:00 ``` `ssh` into machine 2: ``` \[ andrew@pc02 ~ \]$ ssh –p安德魯@137.xxx.xxx.89 上次登入:2019 年 1 月 11 日星期五 22:47:37,來自 137.xxx.xxx.79 ``` The file’s there! ``` \[ andrew@pc02 ~ \]$ ls 你好多xargs \[ andrew@pc02 ~ \]$ 貓你好 你好 ``` <a name="rsync"></a> ### `rsync` [[ Back to Table of Contents ]](#toc) `rsync` is a file-copying tool which minimises the amount of data copied by looking for deltas (changes) between files. Suppose we have two directories: `d`, with one file, and `s`, with two files: ``` \[ andrew@pc01 d \]$ ls && ls ../s f0 f0 f1 ``` Sync the directories (copying only missing data) with `rsync`: ``` \[ andrew@pc01 d \]$ rsync -off ../s/\* . 正在發送增量文件列表... ``` `d` now contains all files that `s` contains: ``` \[ andrew@pc01 d \]$ ls f0 f1 ``` `rsync` can be performed over `ssh` as well: ``` \[ andrew@pc02 r \]$ ls \[ andrew@pc02 r \]$ rsync -avz -e "ssh -p “ [email protected]:~/s/\* 。 接收增量檔案列表 f0 f1 發送 62 位元組 接收 150 位元組 141.33 位元組/秒 總大小為 0 加速率為 0.00 \[ andrew@pc02 r \]$ ls f0 f1 ``` <a name="long-running-processes"></a> ## Long-Running Processes <a name="yes-nohup-ps-kill"></a> ### `yes / nohup / ps / kill` [[ Back to Table of Contents ]](#toc) Sometimes, `ssh` connections can disconnect due to network or hardware problems. Any processes initialized through that connection will be “hung up” and terminate. Running a command with `nohup` insures that the command will not be hung up if the shell is closed or if the network connection fails. Run `yes` (continually outputs "y" until it’s killed) with `nohup`: ``` \[ andrew@pc01 ~ \]$ nohup 是 & \[1\]13173 ``` `ps` shows a list of the current user’s processes (note PID number 13173): ``` \[ andrew@pc01 ~ \]$ ps | sed -n '/是/p' 13173 分/10 00:00:12 是 ``` _...log out and log back into this shell..._ The process has disappeared from `ps`! ``` \[ andrew@pc01 ~ \]$ ps | sed -n '/是/p' ``` But it still appears in `top` and `htop` output: ``` \[ andrew@pc01 ~ \]$ 頂部 -bn 1 | sed -n '/是/p' 13173 安德魯 20 0 4372 704 636 D 25.0 0.0 0:35.99 是 ``` Kill this process with `-9` followed by its process ID (PID) number: ``` \[ andrew@pc01 ~ \]$ 殺死 -9 13173 ``` It no longer appears in `top`, because it’s been killed: ``` \[ andrew@pc01 ~ \]$ 頂部 -bn 1 | sed -n '/是/p' ``` <a name="cron"></a> ### `cron / crontab / >>` [[ Back to Table of Contents ]](#toc) `cron` provides an easy way of automating regular, scheduled tasks. You can edit your `cron` jobs with `crontab –e` (opens a text editor). Append the line: ``` - - - - - 日期 >> ~/datefile.txt ``` This will run the `date` command every minute, appending (with the `>>` operator) the output to a file: ``` \[ andrew@pc02 ~ \]$ head ~/datefile.txt 2019 年 1 月 12 日星期六 14:37:01 GMT 2019 年 1 月 12 日星期六
長話短說 ==== 在本文中,您將學習如何使用 Nextjs、CopilotKit 和 OpenAI 建立人工智慧驅動的 PowerPoint 應用程式。我們將涵蓋: - 利用 ChatGPT 建立您的 PowerPoint 簡報📊 - 與您的 PowerPoint 簡報聊天💬 - 將音訊和圖像新增至您的 PowerPoint 簡報🔉  --- CopilotKit:建構深度整合的應用內人工智慧聊天機器人💬 ------------------------------- CopilotKit 是[開源人工智慧副駕駛平台。](https://github.com/CopilotKit/CopilotKit)我們可以輕鬆地將強大的人工智慧聊天機器人整合到您的 React 應用程式中。完全可定制和深度集成。  {% cta https://github.com/CopilotKit/CopilotKit %} Star CopilotKit ⭐️ {% endcta %} ###### \*在布胡布上 現在回到文章。 --- **先決條件** -------- 要開始學習本教程,您需要在電腦上安裝以下軟體: - 文字編輯器(例如 Visual Studio Code) - Node.js - 套件管理器 使用 NextJS 建立 PowerPoint 應用程式前端 ------------------------------ **步驟 1:**使用下列指令 Git 複製 PowerPoint 應用程式樣板。 ``` git clone https://github.com/TheGreatBonnie/aipoweredpowerpointpresentation ``` **步驟 2:**在文字編輯器上開啟 PowerPoint 應用程式樣板,並使用下列指令安裝所有專案相依性。 ``` npm install ``` 步驟3: • 前往根目錄\*\*\*\*並建立一個名為**`.env.local`的檔案。**在該文件中,加入下面保存您的 ChatGPT API 金鑰的環境變數。 ``` OPENAI_API_KEY="Your ChatGPT API Key” ``` **步驟4:**在命令列執行命令*npm run dev* 。導航至 http://localhost:3000/,您應該會看到 PowerPoint 應用程式前端。  建立 PowerPoint 投影片功能 ------------------- 步驟 1:前往**`/[root]/src/app/components`** ,並建立一個名為`present.tsx`的檔案。然後在文件頂部導入以下相依性。 ``` "use client"; import { useCopilotContext } from "@copilotkit/react-core"; import { CopilotTask } from "@copilotkit/react-core"; import { useMakeCopilotActionable, useMakeCopilotReadable, } from "@copilotkit/react-core"; import { useEffect, useState } from "react"; import "./../presentation/styles.css"; import Markdown from "react-markdown"; ``` 步驟 2:定義一個名為 Slide 的 TypeScript 接口,其中包含 PowerPoint 簡報投影片的標題和內容屬性。 ``` // Define slide interface interface Slide { title: string; content: string; } ``` 步驟 3:建立一個名為`Presentation`函數,並使用usestate 初始化名為`allSlides`和`currentSlideIndex`狀態變數`usestate.`變數`allSlides`將保存幻燈片陣列,而`currentSlideIndex`將保存目前幻燈片索引。 ``` export function Presentation (){ const [allSlides, setAllSlides] = useState<Slide[]>([]); const [currentSlideIndex, setCurrentSlideIndex] = useState<number>(0); } ``` 步驟 4:在`Presentation`函數中,使用`useMakeCopilotReadable`掛鉤新增投影片的`allSlides`陣列作為應用程式內聊天機器人的上下文。 ``` useMakeCopilotReadable("Powerpoint presentation slides: " + JSON.stringify(allSlides)); ``` 步驟 5:使用`useMakeCopilotActionable`掛鉤設定一個名為`createNewPowerPointSlide`操作,其中包含描述和更新`allSlides`和`currentSlideIndex`狀態變數的實作函數,如下所示。 ``` useMakeCopilotActionable( { name: "createNewPowerPointSlide", description: "create slides for a powerpoint presentation. Call this function multiple times to present multiple slides.", argumentAnnotations: [ { name: "slideTitle", type: "string", description: "The topic to display in the presentation slide. Use simple markdown to outline your speech, like a headline.", required: true, }, { name: "content", type: "string", description: "The content to display in the presentation slide. Use simple markdown to outline your speech, like lists, paragraphs, etc.", required: true }, ], implementation: async (newSlideTitle, newSlideContent) => { const newSlide: Slide = { title: newSlideTitle, content: newSlideContent}; const updatedSlides = [...allSlides, newSlide]; setAllSlides(updatedSlides); setCurrentSlideIndex(updatedSlides.length - 1); }, }, [], ); ``` 步驟6:定義一個名為`displayCurrentSlide`的函數,用於在前端顯示目前投影片索引。 ``` // Display current slide const displayCurrentSlide = () => { const slide = allSlides[currentSlideIndex]; return slide ? ( <div className="h-screen flex flex-col justify-center items-center text-5xl text-white bg-cover bg-center bg-no-repeat p-10 text-center" style={{ textShadow: "1px 1px 0 #000, -1px -1px 0 #000, 1px -1px 0 #000, -1px 1px 0 #000", }} > <Markdown className="markdown">{slide.title}</Markdown> <Markdown className="markdown">{slide.content}</Markdown> </div> ) : ( <div className="h-screen flex flex-col justify-center items-center text-5xl text-white bg-cover bg-center bg-no-repeat p-10 text-center"> No Slide To Display </div> ); }; ``` 步驟 7: 定義一個名為 addSlide 的函數,該函數包含一個名為 CopilotTask 的類別。 CopilotTask 類別定義新增投影片的功能。 ``` // Add new slide function const addSlide = new CopilotTask({ instructions: "create a new slide", actions: [ { name: "newSlide", description: "Make a new slide related to the current topic.", argumentAnnotations: [ { name: "title", type: "string", description: "The title to display in the presentation slide.", required: true, }, { name: "content", type: "string", description: "The title to display in the presentation slide.", required: true, }, ], implementation: async (newSlideTitle,newSlideContent,) => { const newSlide: Slide = {title: newSlideTitle,content: newSlideContent,}; const updatedSlides = [...allSlides, newSlide]; setAllSlides(updatedSlides); setCurrentSlideIndex(updatedSlides.length - 1); }, }, ], }); const context = useCopilotContext(); const [randomSlideTaskRunning, setRandomSlideTaskRunning] = useState(false); ``` 步驟 8:定義兩個函數 goBack 和 goForward。 goBack 函數定義導覽到上一張投影片的功能,而 goForward 函數定義導覽到下一張投影片的功能。 ``` // Button click handlers for navigation const goBack = () => setCurrentSlideIndex((prev) => Math.max(0, prev - 1)); const goForward = () => setCurrentSlideIndex((prev) => Math.min(allSlides.length - 1, prev + 1)); ``` 步驟9:傳回一個呼叫displayCurrentSlide函數的元件,並包含呼叫addSlide、goBack和goForward函數的按鈕。 ``` return ( <div> {displayCurrentSlide()} <button disabled={randomSlideTaskRunning} className={`absolute bottom-12 left-0 mb-4 ml-4 bg-blue-500 text-white font-bold py-2 px-4 rounded ${randomSlideTaskRunning ? "opacity-50 cursor-not-allowed" : "hover:bg-blue-700"}`} onClick={async () => { try { setRandomSlideTaskRunning(true); await addSlide.run(context); } finally { setRandomSlideTaskRunning(false); } }} > {randomSlideTaskRunning ? "Loading slide..." : "Add Slide +"} </button> <button className={`absolute bottom-0 left-0 mb-4 ml-4 bg-blue-500 text-white font-bold py-2 px-4 rounded ${randomSlideTaskRunning ? "opacity-50 cursor-not-allowed" : "hover:bg-blue-700"}`} onClick={goBack}>Prev</button> <button className={`absolute bottom-0 left-20 mb-4 ml-4 bg-blue-500 text-white font-bold py-2 px-4 rounded ${randomSlideTaskRunning ? "opacity-50 cursor-not-allowed" : "hover:bg-blue-700"}`} onClick={goForward}>Next</button> </div> ); ``` 步驟10:在Presentation資料夾中,將以下程式碼加入page.tsx檔案。 ``` "use client"; import { CopilotKit } from "@copilotkit/react-core"; import { CopilotSidebar } from "@copilotkit/react-ui"; import {Presentation} from "../components/present"; import "./styles.css"; let globalAudio: any = undefined; let globalAudioEnabled = false; const Demo = () => { return ( <CopilotKit url="/api/copilotkit/openai"> <CopilotSidebar defaultOpen={true} labels={{ title: "Presentation Copilot", initial: "Hi you! 👋 I can give you a presentation on any topic.", }} clickOutsideToClose={false} onSubmitMessage={async (message) => { if (!globalAudioEnabled) { globalAudio.play(); globalAudio.pause(); } globalAudioEnabled = true; }} > <Presentation/> </CopilotSidebar> </CopilotKit> ); }; export default Demo; ``` 步驟11:導覽至http://localhost:3000/,點擊「開始」按鈕,您將被重定向到與聊天機器人整合的演示頁面,如下所示。  步驟12:給右側的聊天機器人一個提示,例如「在TypeScript上建立PowerPoint簡報」聊天機器人將開始產生回應,完成後,它將在頁面左側顯示產生的PowerPoint投影片,如下圖所示  步驟 13:關閉聊天機器人窗口,然後按一下新增投影片 + 按鈕將新投影片新增至 PowerPoint 簡報中,如下所示。  第 14 步:按一下「上一張」按鈕,您將導覽至上一張投影片。如果您按一下「下一步」按鈕,您將導覽至下一張投影片。  建立 PowerPoint 投影片 自動語音功能 ------------------------ 步驟1:在`present.tsx`檔案中,宣告一個名為`globalAudio`的變數,如下所示。 ``` let globalAudio: any = undefined; ``` 步驟2:在`Presentation`元件中,宣告一個`useEffect`鉤子,用一個新的**`Audio`**物件初始化**`globalAudio`** ,如下所示。 ``` useEffect(() => { if (!globalAudio) { globalAudio = new Audio(); } }, []); ``` 步驟 3:更新 useMakeCopilotActionable 掛鉤,透過 API 將 PowerPoint 幻燈片文字轉換為語音,如下所示。 ``` useMakeCopilotActionable( { name: "createNewPowerPointSlide", description: "create slides for a powerpoint presentation. Call this function multiple times to present multiple slides.", argumentAnnotations: [ { name: "slideTitle", type: "string", description: "The topic to display in the presentation slide. Use simple markdown to outline your speech, like a headline.", required: true, }, { name: "content", type: "string", description: "The content to display in the presentation slide. Use simple markdown to outline your speech, like lists, paragraphs, etc.", required: true }, { name: "speech", type: "string", description: "An informative speech about the current slide.", required: true, }, ], implementation: async (newSlideTitle, newSlideContent, speech) => { const newSlide: Slide = { title: newSlideTitle, content: newSlideContent }; const updatedSlides = [...allSlides, newSlide]; setAllSlides(updatedSlides); setCurrentSlideIndex(updatedSlides.length - 1); const encodedText = encodeURIComponent(speech); const url = `/api/tts?text=${encodedText}`; globalAudio.src = url; await globalAudio.play(); await new Promise<void>((resolve) => { globalAudio.onended = function () { resolve(); }; }); await new Promise((resolve) => setTimeout(resolve, 500)); }, }, [], ); ``` 步驟 4:更新 addSlide 函數,透過 API 將新的 PowerPoint 投影片文字轉換為語音,如下所示。 ``` // Add new slide function const addSlide = new CopilotTask({ instructions: "create a new slide", actions: [ { name: "newSlide", description: "Make a new slide related to the current topic.", argumentAnnotations: [ { name: "title", type: "string", description:"The title to display in the presentation slide.", required: true, }, { name: "content", type: "string", description:"The title to display in the presentation slide.", required: true, }, { name: "speech", type: "string", description: "An informative speech about the current slide.", required: true, }, ], implementation: async (newSlideTitle, newSlideContent, speech) => { const newSlide: Slide = { title: newSlideTitle, content: newSlideContent }; const updatedSlides = [...allSlides, newSlide]; setAllSlides(updatedSlides); setCurrentSlideIndex(updatedSlides.length - 1); const encodedText = encodeURIComponent(speech); const url = `/api/tts?text=${encodedText}`; globalAudio.src = url; await globalAudio.play(); await new Promise<void>((resolve) => { globalAudio.onended = function () { resolve(); }; }); await new Promise((resolve) => setTimeout(resolve, 500)); }, } ] }); ``` 步驟 5: 再次向聊天機器人發出「在 TypeScript 上建立 PowerPoint 簡報」提示,您應該會聽到簡報投影片的聲音。  建立圖像生成功能 -------- 步驟1:在present.tsx檔案中,新增一個名為backgroundImage的新屬性來鍵入介面Slide,如下所示。 ``` // Define slide interface interface Slide { title: string; content: string; backgroundImage: string; } ``` 步驟 2:更新 useMakeCopilotActionable 掛鉤以產生 PowerPoint 簡報投影片的圖片。 ``` useMakeCopilotActionable( { name: "createPowerPointSlides", description: "create slides for a powerpoint presentation. Call this function multiple times to present multiple slides.", argumentAnnotations: [ { name: "slideTitle", type: "string", description: "The topic to display in the presentation slide. Use simple markdown to outline your speech, like a headline.", required: true, }, { name: "content", type: "string", description: "The content to display in the presentation slide. Use simple markdown to outline your speech, like lists, paragraphs, etc.", required: true }, { name: "backgroundImage", type: "string", description: "What to display in the background of the slide (i.e. 'dog' or 'house').", required: true, }, { name: "speech", type: "string", description: "An informative speech about the current slide.", required: true, }, ], implementation: async (newSlideTitle, newSlideContent, newSlideBackgroundImage, speech) => { const newSlide: Slide = { title: newSlideTitle, content: newSlideContent, backgroundImage: newSlideBackgroundImage }; const updatedSlides = [...allSlides, newSlide]; setAllSlides(updatedSlides); setCurrentSlideIndex(updatedSlides.length - 1); const encodedText = encodeURIComponent(speech); const url = `/api/tts?text=${encodedText}`; globalAudio.src = url; await globalAudio.play(); await new Promise<void>((resolve) => { globalAudio.onended = function () { resolve(); }; }); await new Promise((resolve) => setTimeout(resolve, 500)); }, }, [], ); ``` 步驟 2:更新 addSlide 函數以產生新的 PowerPoint 簡報投影片的圖片。 **步驟3:**更新`slide.tsx`檔案中的`Slide`元件以透過[`unsplash.com`](http://unsplash.com/)產生映像 ``` // Add new slide function const addSlide = new CopilotTask({ instructions: "create a new slide", functions: [ { name: "newSlide", description: "Make a new slide related to the current topic.", argumentAnnotations: [ { name: "title", type: "string", description:"The title to display in the presentation slide.", required: true, }, { name: "content", type: "string", description:"The title to display in the presentation slide.", required: true, }, { name: "backgroundImage", type: "string", description: "What to display in the background of the slide (i.e. 'dog' or 'house').", required: true, }, { name: "speech", type: "string", description: "An informative speech about the current slide.", required: true, }, ], implementation: async (newSlideTitle, newSlideContent, newSlideBackgroundImage, speech) => { const newSlide: Slide = { title: newSlideTitle, content: newSlideContent, backgroundImage: newSlideBackgroundImage }; const updatedSlides = [...allSlides, newSlide]; setAllSlides(updatedSlides); setCurrentSlideIndex(updatedSlides.length - 1); const encodedText = encodeURIComponent(speech); const url = `/api/tts?text=${encodedText}`; globalAudio.src = url; await globalAudio.play(); await new Promise<void>((resolve) => { globalAudio.onended = function () { resolve(); }; }); await new Promise((resolve) => setTimeout(resolve, 500)); }, } ] }); ``` 步驟 3:更新 displayCurrentSlide 函數以將背景圖像新增至 PowerPoint 簡報投影片中。 ``` // Display current slide const displayCurrentSlide = () => { const slide = allSlides[currentSlideIndex]; return slide ? ( <div className="h-screen flex flex-col justify-center items-center text-5xl text-white bg-cover bg-center bg-no-repeat p-10 text-center" style={{ backgroundImage: 'url("https://source.unsplash.com/featured/?' + encodeURIComponent(allSlides[currentSlideIndex].backgroundImage) + '")', textShadow: "1px 1px 0 #000, -1px -1px 0 #000, 1px -1px 0 #000, -1px 1px 0 #000", }} > <Markdown className="markdown">{slide.title}</Markdown> <Markdown className="markdown">{slide.content}</Markdown> </div> ) : ( <div className="h-screen flex flex-col justify-center items-center text-5xl text-white bg-cover bg-center bg-no-repeat p-10 text-center"> No Slide To Display </div> ); }; ``` **步驟 4:**前往 Web 應用程式,您應該會看到背景圖像已新增至 PowerPoint 投影片中。  結論 -- 總而言之,您可以使用 CopilotKit 建立應用內 AI 聊天機器人,該機器人可以查看當前應用程式狀態並在應用程式內執行操作。 AI 聊天機器人可以與您的應用程式前端、後端和第三方服務對話。 筆記: - 告訴聊天機器人要寫什麼 - 建立包含文字、圖片和自動語音的幻燈片。 這是全部實作程式碼: https://github.com/CopilotKit/CopilotKit/blob/mme/tools/CopilotKit/examples/next-openai/src/app/helloworld/page.tsx 你可以拿程式碼寫文章,一定要截圖。 確保按照邏輯實現的順序寫文章: - 首先,外部 React 元件( `page.tsx`中的`HelloWorld`元件) ``` - cover `CopilotKit` and `CopliotSidebar` ``` - 然後覆蓋`Presentation`反應元件而不加入 Copilot 功能 ``` - include the `Slide` react component ``` - 最後,在建立基本的 React 應用程式後,加入描述 Copilot 特定功能的部分( `useMakeCopilotReadable`和`useMakeCopilotActionable` ) - 最後,介紹生成音訊+影像的函數。保持描述非常簡短,只需說“我們透過瀏覽器audio-gen API產生音訊”和“我們透過[`unsplash.com`](http://unsplash.com/)產生圖像” 執行演示: - 請參閱文件/貢獻指南,以了解如何執行 CopilotKit 儲存庫中包含的範例應用程式:https://docs.copilotkit.ai/contribute/quickstart-contribute - 執行 - 前往`/helloworld`頁面 --- 結論 -- 總而言之,您可以使用 CopilotKit 建立應用內 AI 聊天機器人,該機器人可以查看當前應用程式狀態並在應用程式內執行操作。 AI 聊天機器人可以與您的應用程式前端、後端和第三方服務對話。 對於完整的源程式碼: https://github.com/TheGreatBonnie/aipoweredpresentation 感謝@theGreatBonnie 在本文中所做的出色工作。 別忘了...  {% cta https://github.com/CopilotKit/CopilotKit %} Star CopilotKit ⭐️ {% endcta %} --- 原文出處:https://dev.to/copilotkit/how-to-build-ai-powered-powerpoint-app-nextjs-openai-copilotkit-ji2
什麼是 readme 文件? -------- 自述文件是用戶在查看儲存庫時首先看到的內容。它讓用戶了解專案的內容、使用的語言、條款和條件、您的專案可以做什麼、顯示正在執行的應用程式的螢幕截圖等。 為什麼它如此重要? --------- 該用戶可能是招募人員、您未來的老闆或客戶。因此,需要注意的是,專案的自述文件應該回答專案的內容、原因和方式。 因此,重要的是要包含最重要的訊息,對專案和所使用的技術堆疊進行清晰的描述,並提供可能不適合 README 文件的連結和進一步說明,以避免不必要地搜尋所有其他文件。可能會導致用戶失去興趣並轉向下一個潛在員工。 編寫有關該專案的良好文件是多麼重要,我怎麼強調都不為過。使用者不僅在尋找有關專案本身的訊息,而且還看到您的文件技能和對細節的關注,這可以讓您更接近找到工作。 如果您讀過我的其他文章,您可能已經注意到,除了程式設計之外,學習其他技能對我的職業生涯有多麼重要,這些技能最終幫助我找到了工作。良好的文件就是其中之一。 自述文件中應包含哪些內容? ------------- 以下是一些可以幫助您的指導性問題: - 該專案是關於什麼的? - 為什麼開發它,你的動機是什麼? - 它解決什麼問題? - 你學到了什麼? - 是什麼讓您的專案脫穎而出? 我將向您展示如何將這些問題轉換為文字。 ### 可能的結構 **描述** 專案的目的和描述,以便閱讀您的作品集的人可以在閱讀專案資訊的前幾秒鐘內了解該專案。 **技術堆疊** 技術堆疊,包括您的專案使用的程式語言、程式庫和框架(例如:Python、React 等)。如果您有使用外部公共 API 的前端應用程式,請提及這一點。 **設計** 與專案相關的使用者介面範例。如果專案有使用者介面,您可以插入使用者介面的 GIF、影片或圖像。 如果它是在終端上執行的應用程式,您可以建立一個 GIF 來展示如何使用它。這有助於了解如何與應用程式互動以及人們在執行專案時會看到什麼。 **特徵** 如果您的專案有很多功能,您應該加入**“功能”**部分並在此處列出它們。 **如何執行專案** 有關如何設定、執行和使用該專案的說明。如果有人想從頭開始該專案,這很好,他們應該在專案的自述文件中找到他們需要了解的所有內容,而不需要您的任何幫助。 如果很簡單,您可以將其包含在自述文件中。如果說明較長,您也可以參考專案中的另一個文件。 您還應該使用 Netlify 來託管您的專案,以便使用者可以打開已部署的應用程式並立即使用它來查看它是如何運作的。 (請記住,並非每個查看您 GitHub 個人資料的招募人員都充分了解如何在本地建立專案。) 如何設計自述文件的樣式? ------------ `README.md`中的`.md`副檔名代表 Markdown,這是一種輕量級標記語言,具有簡單的文字格式化語法。它是一種非常簡單的語言,用於為 GitHub 建立美觀且美觀的自述文件。 因此,您可以使用典型的 Markdown 語言,例如 ``` # Heading 1 ## Heading 2 ### Heading 3 Emphasis, aka italics, with *asterisks* or _underscores_. Strong emphasis, aka bold, with **asterisks** or __underscores__. Combined emphasis with **asterisks and _underscores_**. 1. First ordered list item 2. Another item ⋅⋅* Unordered sub-list. 1. Actual numbers don't matter, just that it's a number ⋅⋅1. Ordered sub-list 4. And another item. [I'm an inline-style link](https://www.google.com) [I'm an inline-style link with title](https://www.google.com "Google's Homepage")  ``` --- 原文出處:https://dev.to/yuridevat/how-to-create-a-good-readmemd-file-4pa2
> 最初發佈在我的[部落格](https://inspiredwebdev.com/article/5-best-note-taking-apps-for-programmers)上。 > 請查看我的[部落格](https://inspiredwebdev.com)以獲取更多文章,或[在 Github](https://github.com/AlbertoMontalesi/The-complete-guide-to-modern-JavaScript)上查看我的免費閱讀 JavaScript 電子書,其中涵蓋了從 ES6 到 2019 年的所有新功能 做筆記是學習的重要組成部分,作為程式設計師,我們有 Docs 或 Word 等軟體無法滿足的特定需求。這就是為什麼我列出了我最喜歡的 5 個筆記應用程式。 在過去的幾年裡,我已經使用了所有這些,其中一些我仍在使用,有些我已經停止使用,但這 5 個中的任何一個都會對您有所幫助。 您會看到它們都使用 Markdown(標準語法或自訂語法),這是因為我發現它是記筆記的最快方式,因為它允許快速建立具有簡單格式的文件,還允許您加入程式碼區塊語法高亮。 注意:這些應用程式都是免費的或有免費套餐,因此您無需花費一分錢即可開始使用它們。 1)[Notion](https://www.notion.so) ----------------------------- 適用於:Windows、MacOS、Android、iOS、Web。 這是我用來撰寫這篇文章的應用程式。 它很棒,因為它不僅僅是一個 Markdown 文字編輯器,您還可以做更多事情,包括在頁面中加入表格、看板、日曆。 你可以在你的裝置之間同步你的筆記,而且它有一個網頁版本,這意味著即使你像我一樣使用 Linux,你仍然可以使用它。 它對程式碼區塊有非常堅實的支持,具有突出顯示和包裝程式碼的能力。 免費版本包含足夠的空間,您應該可以使用一段時間。 2)[Stackedit](https://stackedit.io/app#) ----------------------------------- 適用於:網路 Stackedit 沒有行動應用程式,但您仍然可以透過瀏覽器輕鬆使用它。 它比 Notion 簡單得多,是一個與 Google Drive 同步的簡單的 Markdown 編輯器。 每當我需要寫下我的想法時,我每天都會用它來記錄我的工作筆記,並且我想確保我可以從我的辦公室和我自己的筆記型電腦存取它們。 它是完全免費的,並且 Markdown 文件存儲在您的 Google 雲端硬碟中,因此如果您想將它們遷移到其他地方,這將非常簡單。 對程式碼區塊的支援非常好,可以為您需要的任何語言提供語法突出顯示。 3)[Typora](https://www.typora.io/) ------------------------------- 適用於:Windows、MacOS、Linux Typora 簡單乾淨,是一款功能強大的 Markdown 編輯器。不幸的是,它沒有行動版本或網路用戶端,但桌面用戶端非常穩定且功能強大。 我用它編寫了我的第一本[JavaScript 電子書](https://github.com/AlbertoMontalesi/The-complete-guide-to-modern-JavaScript),我非常喜歡與 Pandoc 的集成,將我的 Markdown 電子書直接匯出為 epub、pdf 和 doc 文件。 它對程式碼區塊有很好的支持,使用 prism 進行語法突出顯示,並且還允許您建立 css 檔案來設定匯出的 PDF 檔案的樣式。 4)[Quip]([https://quip.com](https://quip.com/)) ---------------------------------------------- 適用於:Windows、MacO、Web、Android、iOS Quip 是我使用的第一個編輯器,雖然我不再使用它,但它仍然是一個很好的解決方案。 行動應用程式不是最好的,但網路用戶端堅固且功能強大,可讓您輕鬆加入表格等。 有些功能是付費的,但總的來說免費版本已經夠好了。 對突出顯示的程式碼區塊的支援是基本的,與其他程式碼區塊不在同一水平上 獎勵: [VSCode](https://code.visualstudio.com/) -------------------------------------------- 適用於:Windows、MacOS、Linux 儘管 VS Code 並非為此而生,但它是一個很棒的筆記應用程式。 在編寫[電子書](http://a-fwd.to/5gUojI8)的第二版時,我使用 VS Code 建立單獨的 Markdown 檔案和一個簡單的節點腳本將它們合併為一個檔案。 您還可以利用 GitBooks 連接您的儲存庫並在線上發布您的筆記,以私下或公開方式提供。 動態編輯並不是最簡單的,因為您無法在手機上使用 VS Code,但您仍然可以從 FastHub 或類似的第 3 方用戶端等應用程式直接編輯 Github 儲存庫中託管的檔案。 什麼是你最喜歡的? --------- 你呢?您已經使用過這些應用程式嗎?您最喜歡的筆記應用程式是什麼?在評論中讓我知道 --- 非常感謝您的閱讀。在[DevTo](https://dev.to/albertomontalesi)上關注我,或在我的 blog [inishedwebdev](https://inspiredwebdev.com/)上關注我,以了解更多資訊。 [](http://a-fwd.to/5gUojI8)  在[Amazon](http://a-fwd.to/5gUojI8)和[Leanpub](https://leanpub.com/thecompleteguidetomodernjavascript2019)上取得我的電子書 --- 原文出處:https://dev.to/albertomontalesi/5-best-free-note-taking-apps-for-programmers-2n81
身為開發人員,我總是在尋找那些小細節,因為細節很重要。 我們都是 DEV 上一個大社群的一部分,在這篇文章中,我很高興分享一些您可能不知道的這個平台上意想不到的功能和技巧。 讓我帶您了解在 DEV 上可以做的 12 件令人驚訝的事情,從建立自訂按鈕到建立評論範本! 請評論並讓我知道哪一點最讓你驚訝。 --- 1.使用標籤過濾貼文。 ----------- 隨著我們的提要中不斷出現帖子,擁有一些控制和過濾器至關重要。一種方法是使用標籤過濾貼文。 例如,要查看帶有`#discuss`標籤的帖子,只需導航到[dev.to/t/discuss](https://dev.to/t/discuss) 。 同樣,如果您想要帶有標籤`#softwaredevelopment`的帖子,請前往[dev.to/t/softwaredevelopment](https://dev.to/t/softwaredevelopment) 。 作為一般規則,您可以使用它。 ``` https://dev.to/t/paste_your_tag_without_spaces ``` 您可以將上述 URL 與您的標籤貼在一起,以查看相關類別中的熱門貼文。  您可以找到負責處理該特定標籤的標籤管理員。 如果您想知道,標籤管理員負責維護標籤與貼文的相關性。 您可以在[dev.to/dashboard/following\_tags](https://dev.to/dashboard/following_tags)檢查您關注的標籤。 所有標籤的完整清單可在[dev.to/tags](https://dev.to/tags)上找到。 --- 2.基於官方標籤的便利資源。 -------------- 它可能與第一個相關,但並非每個標籤都如此。 某些標籤提供了方便的官方資源,例如`tailwindcss`的文件或`nextjs`的有用指南。這些資源可能很有價值,尤其是當您不熟悉某個特定標籤時。  例如, `nextjs`標籤有不錯的資源:)  這些「小細節」讓DEV平台更加人性化、資訊豐富。 --- 3.RSS 源。 -------- 向 5 歲的孩子解釋 RSS feed: > 想像一下,您有一個最喜歡的卡通節目,每次有新劇集時,您的神奇電視就會向您展示它。 RSS 提要就像網站的神奇信使。當您最喜歡的網站上有新內容時,它會告訴您的計算機,這樣您就可以看到它,而無需一直檢查。這就像一個友好的通知,說:「嘿,您喜歡的網站上發生了一些有趣的事情!」。 這就像擁有來自多個來源的內容的個人化新聞源。 - 使用以下命令檢查您的 DEV RSS 提要: `dev.to/feed/your_username` - 檢查我用來尋找 RSS 來源 URL 的[Chrome 擴充功能](https://chromewebstore.google.com/detail/get-rss-feed-url/kfghpdldaipanmkhfpdcjglncmilendn)。 在本[指南](https://dev.to/p/publishing_from_rss_guide)中詳細了解如何從 DEV 的 Feed 建立草稿。 前往[dev.to/settings/extensions](https://dev.to/settings/extensions)貼上您的 RSS Feed URL 並將其與您的 DEV 設定檔整合。 假設您有自己的博客,每當您將博客發佈到您的網站時,開發人員都會將該博客作為草稿帖子獲取,您可以從儀表板發布該博客。  ### 什麼是規範 URL? 想像一下您有一個網頁,並且有它的一些副本或變體。 (您的個人部落格+DEV部落格) 規範 URL 就像將主要 URL 標記為老闆一樣——原始來源。 它可以幫助搜尋引擎了解哪個版本是最重要或首選的,從而防止混淆並提高網頁的搜尋引擎排名。 重新發佈內容以保持搜尋引擎的清晰度時,了解規範 URL 至關重要。 --- 4.許多創新事物的瘋狂徽章。 -------------- DEV 每週根據文章中介紹的技術授予多個徽章。從技術堆疊徽章到「喜愛的評論」徽章等古怪徽章,每個徽章都有自己的魅力。 例如,如果您使用 React 撰寫文章並被視為本週最佳作者,您將獲得 React 徽章。  我忍不住分享我對我看到的一些可愛徽章的興奮之情。  我認識幾個擁有這枚心愛徽章的人。 如果你知道,請評論!    誰有這個?哈哈!值得聚會。  我有這個,但沒有贏得任何遊戲🤣  前 7 位作者徽章通常被認為是最負盛名的,是我個人最喜歡的。獲得此徽章本身就是一種榮譽。  我無法一一列舉;否則,人們會生氣。哈哈! 在[dev.to/badges](https://dev.to/badges)上探索徽章的完整清單。 --- 5.軟體比較。 ------- 比較軟體並不是一個新趨勢。我們一直這樣做。 因此,開發團隊列出了社群建立的熱門貼文清單。人們通常會一遍又一遍地瀏覽這些帖子。 名單包含約 350 多家軟體公司。必須檢查! - [dev.to/software-comparisons](https://dev.to/software-comparisons) - 軟體比較  --- 6. 為圖像新增標題。 ----------- 在 DEV 貼文中,您可以為圖像加入標題,以提供上下文或附加資訊來補充所顯示的圖像。 這是在圖像中導航的一種有趣的方式。 以下是您可以如何做到這一點。 您必須在圖像後面使用`<figcaption>`標記。 例如,請參見下圖及其文法。  Anmol Baranwal 的 GitHub 簡介 ```  <figcaption> GitHub Profile of Anmol-Baranwal </figcaption> ``` --- 7.訂閱評論。 ------- 通常,作為帖子的作者,您會自動訂閱所有評論。 這意味著您將收到該帖子的每條評論的通知。 然而,有趣的是,您還可以訂閱其他貼文的評論。我建議這樣做,特別是對於帶有`#discuss`標籤的帖子,因為它可以讓您接觸到各種觀點,最終獲得寶貴的學習經驗。 - `top-level comments`的通知是一個方便的功能。  --- 8. 嵌入和換行。 --------- 大多數人都已經知道這一點了。 但對於那些不這樣做的人,您可以嵌入任何影片,以便可以播放影片而不是粘貼連結。 它允許觀眾直接觀看影片,而無需存取其他網站。 ``` {% embed paste_url_here %} ``` 例如,嵌入我的 DEV 設定檔將如下所示。 {% 嵌入 https://dev.to/anmolbaranwal %} 有些人可能不知道使用` `建立換行符。 這種簡單的技術可以提高貼文的可讀性。 例如,可以使用` `將第一個句子與下一個內容分開。 。 第二句話由換行符號分隔。 --- 9. 號召性用語按鈕。 ----------- 這是最酷的! 您知道您可以製作帶有描述的個人化按鈕嗎?如此令人興奮! 這是吸引註意力和增強參與度的便捷方式,而且非常容易實施。 例如,讓我們為我的 GitHub 個人資料建立一個 CTA: {% cta https://github.com/Anmol-Baranwal %} 🚀 造訪我的 GitHub 個人資料 {% endcta %} 您可以使用以下語法來建立該按鈕: ``` {% cta https://github.com/Anmol-Baranwal %} 🚀 Visit My GitHub Profile {% endcta %} ``` 這種個人化的風格可以為您的貼文增添全新的維度。 該語法使用 Shopify 建立的[Liquid 標籤](https://github.com/Shopify/liquid)。 --- 10. 完整的編輯指南。 ------------ 這是即使是頂級作者也可能不知道的隱藏寶石。 DEV 團隊製作了一份全面的編輯器指南,幾乎涵蓋了使用編輯器的各個方面。它是回答以下問題的一站式資源: - 如何為圖像加入標題 - 支援的 URL 嵌入 - 如何新增不會顯示在內容中的評論(作者註) - Markdown 基礎+推薦封面圖片尺寸(1000 \* 420) - 他們甚至涵蓋了可存取性等等。 請在[dev.to/p/editor\_guide](https://dev.to/p/editor_guide)閱讀完整指南。 非常感謝開發團隊建立瞭如此方便的指南!請關注官方開發團隊並加入其中:) {% 嵌入 https://dev.to/devteam %} --- 11.評論範本。 -------- DEV 提供的另一個很棒的功能是保存評論範本的能力。無論是自我介紹還是分享社群媒體 URL,這些範本都可以節省您的時間並提高互動的一致性。 它可能很小,但它的威力很大! 它與 GitHub 上常見的功能非常相似。  讓我們看看它是如何工作的。 若要設定評論模板,請造訪[dev.to/settings/response-templates](https://dev.to/settings/response-templates)  您可以輕鬆新增帶有短標題的新範本以供快速參考。  當您位於帖子的評論部分時,請點擊右下角的三個點 -> 然後點擊書籤符號。您將找到可以直接使用的模板清單。  值得信賴的用戶甚至可以獲得預先定義的模板列表,以更加方便。  --- 12. 播客?影片?以及隱藏標籤的力量。 -------------------- 您知道您可以在 DEV 上傳貼文影片嗎?  您可以在[dev.to/dashboard](https://dev.to/dashboard)的左下角找到上傳影片的選項  這是改進您的帖子的絕佳方法。在[dev.to/videos](https://dev.to/videos)上發現這些影片貼文。 DEV 還設有專門討論播客的部分。您甚至可以在[dev.to/pod](https://dev.to/pod)上提交自己的播客以供審查並探索其他各種播客。 > 個人化提要的隱藏標籤 隱藏標籤是一種讓您能夠更好地控制所看到的內容的方法,也是一種從 Feed 中隱藏您不想看到的內容的方法。  您可以在標籤頁面上隱藏標籤 - 使用搜尋來尋找您想要隱藏的特定標籤  您也可以在儀表板的「以下標籤」部分隱藏標籤 - 按三個點即可存取隱藏選項 - 您可以在[dev.to/dashboard/hidden\_tags](https://dev.to/dashboard/hidden_tags)找到隱藏標籤。  您可以查看儀表板上隱藏的標籤並取消隱藏它們 此功能可確保在 DEV 上提供更個人化和愉快的瀏覽體驗。 我不會討論 API,因為這會讓帖子變得很長。 不過,如果您有興趣,可以探索有關[Forem API 的](https://developers.forem.com/api/v1)更多資訊。 --- 獎金 -- 我知道我知道! 我承諾了 12 件事,但這裡還有一些關於「只要有人讀你的博客,你就可以賺錢!」的額外內容。 在這篇富有洞察力的[部落格文章](https://dev.to/hacksultan/web-monetization-like-i-m-5-1418)中探討網路貨幣化的概念。這是一本很棒的指南,解釋了您需要了解的一切。 您還可以閱讀有關如何成為[DEV Mod](https://dev.to/community-moderation)並與其他社區成員合作的更多資訊。 --- 我不知道你怎麼想,但我特別興奮, `DEV`團隊可能還隱藏著更多寶藏。哈哈! 我希望你今天學到了一些新東西。 我喜歡 DEV 社區,因為它是接觸各種精彩內容的絕佳場所:生動的討論帖子、深入的教程、庫更新、職業建議等等。 > 如果您熱衷於贊助這篇文章,請給我發訊息 [email protected] 或在 Twitter 上聯繫我! 🚀 如果您喜歡我的內容,請透過在我的 GitHub 和 Twitter 上關注我來支持我。 - [GitHub](https://github.com/Anmol-Baranwal) - 繼續建造! - [推特](https://twitter.com/Anmol_Codes) - [領英](https://www.linkedin.com/in/Anmol-Baranwal/) {% 嵌入 https://dev.to/anmolbaranwal %} 多寫,多啟發。  --- 原文出處:https://dev.to/anmolbaranwal/12-things-you-didnt-know-you-could-do-with-dev-2041
你的轉職路上,還缺少一份自學作業包!寫完這幾包,直接拿作品去面試上班!
本論壇另有附設一個 LINE 新手發問&交流群組!歡迎加入討論!


