## 課程目標 - 使用 ejs 模板並讀取變數 ## 課程內容 這一課來學習如何讀取變數之後,放進 ejs 模板呈現! 先來安裝之前用過的 readline-sync 套件 ``` npm install readline-sync ``` 替這課建立一個資料夾,然後建立 `index.js` `hello.ejs` `users.json` 這幾個檔案 此時資料夾會長類似這樣 ``` repo ├── package.json ├── package-lock.json ├── node_modules ├── lesson1 │ └── index.js ├── lesson2 │ ├── hello.ejs │ └── index.js └── lesson3 ├── users.json ├── hello.ejs └── index.js ``` 在 users.json 放入以下內容 ``` [ { "name": "小明", }, { "name": "小華", }, { "name": "小王", } ] ``` 在 hello.ejs 放入以下內容 ``` <div> <% for(var i = 0; i < users.length; i++) { %> <p> <%= users[i].name %>同學,你好! </p> <% } %> </div> ``` 在 index.js 放入以下內容 ``` const express = require('express'); const app = express(); const engine = require('ejs-locals'); const fs = require('fs'); app.engine('ejs', engine); app.set('views', './lesson3'); app.set('view engine', 'ejs'); app.get('/', function(req, res){ const data = fs.readFileSync('./lesson3/users.json'); const users = JSON.parse(data); res.render('hello', { users: users }); }); app.listen(3000); ``` 然後去終端機輸入 ``` node lesson3/index.js ``` 接著打開瀏覽器,在網址輸入 ``` http://localhost:3000/ ``` 你會看到很多則訊息,分別跟多位同學打招呼! --- 這段程式不用我多加說明了吧!檔案讀取也是之前教過的內容! 這邊唯一多學的東西,就是 ejs 關於 for 迴圈的語法,反正就是 `<%` 跟 `%>` 之類的東西包起來而已 ejs 還有支援很多豐富的語法&功能,有興趣的話,自行研究一下吧! ## 課後作業 這次要練習匯入資料到 ejs 模板 請新建立 hw3 資料夾,採用以下結構 ``` /repo /hw3 /index.js /homepage.ejs /posts.json ``` 請修改 homepage.ejs 內容,將文章內容移出來,放在 posts.json 裡面 ``` [ { "title": "第一篇日記", "content": "今天天氣很好,夏天太陽很大,讓我心情很好" }, { "title": "第二篇日記", "content": "早起出門運動,回家沖個澡,整天心情很好" }, { "title": "第三篇日記", "content": "下大雨一整天,整天在家追劇,滿舒服的" } ] ``` 這樣 homepage.ejs 內就不會只是 html 了,你會練習到 ejs 獨有的模板語法! 完成以上任務,你就完成這次的課程目標了! --- 請更新你的 github 專案內容,此時應該變成這樣 ``` /repo /hw1 /index.js /hw2 /index.js /homepage.ejs /hw3 /index.js /homepage.ejs /posts.json ``` 依此類推,之後就這樣交作業!
下列 ChatGPT-4 咒語,對開發者很有幫助。附上原文與中文指令,供您參考。 原文出處:https://dev.to/hackertab_org/50-chat-gpt-prompts-every-software-developer-should-know-tested-9al ### **程式碼生成** - Generate a boilerplate `[language]` code for a `[class/module/component]` named [name] with the following functionality: `[functionality description].` - 為名為 [name] 的 `[class/module/component]` 生成樣板 `[language]` 程式碼,具有以下功能:`[functionality description]。 - Create a [language] function to perform `[operation]` on `[data structure]` with the following inputs: [input variables] and expected output: `[output description]`. - 建立一個 [語言] 函數以使用以下輸入對 `[資料結構]` 執行 `[操作]`:[輸入變數] 和預期輸出:`[輸出描述]`。 - Generate a `[language]` class for a `[domain]` application that includes methods for `[methods list]` and properties `[properties list]`. - 為包含“[方法列表]”的方法和屬性“[屬性列表]”的“[域]”應用程式生成一個“[語言]”類。 - Based on the [design pattern], create a code snippet in [language] that demonstrates its implementation for a [use case]. - 基於[設計模式],用[語言]建立一個程式碼片段,演示其對[用例]的實現。 **例子:** ``` Generate a boilerplate Python code for a shopping cart module named "ShoppingCart" with the following functionality: - A constructor that initializes an empty list to store cart items. - A method called "add_item" that takes in an item object and adds it to the cart. - A method called "remove_item" that takes in an item object and removes it from the cart if it exists. - A method called "get_items" that returns the list of items in the cart. - A method called "get_total" that calculates and returns the total price of all items in the cart. ``` ### **程式碼完成** - In `[language]`, complete the following code snippet that initializes a [data structure] with `[values]`: `[code snippet]`. - 在“[語言]”中,完成以下使用“[值]”初始化[資料結構]的程式碼片段:“[程式碼片段]”。 - Finish the `[language]` function that calculates [desired output] given the following input parameters: `[function signature]`. - 在給定以下輸入參數的情況下完成計算[期望輸出]的[語言]函數:[函數簽名]。 - Complete the `[language]` code to make an API call to `[API endpoint]` with [parameters] and process the response: `[code snippet]`. - 完成“[語言]”程式碼以使用[參數]對“[API 端點]”進行 API 呼叫並處理響應:“[程式碼片段]”。 **Example** : Finish the Python function that calculates the average of a list of numbers given the following input parameters: **示例**:完成計算給定以下輸入參數的數字列表的平均值的 Python 函數: ``` def calculate_average(num_list) ``` ### **錯誤檢測** - Identify any potential bugs in the following [language] code snippet: `[code snippet]`. - 確定以下 [語言] 程式碼片段中的任何潛在錯誤:`[程式碼片段]`。 - Analyze the given [language] code and suggest improvements to prevent [error type]: `[code snippet]`. - 分析給定的[語言]程式碼並提出改進建議以防止[錯誤類型]:`[程式碼片段]`。 - Find any memory leaks in the following [language] code and suggest fixes: `[code snippet]`. - 在以下 [語言] 程式碼中查找任何內存洩漏並提出修復建議:`[程式碼片段]`。 **Example** : Identify any potential bugs in the following Python code snippet: **示例**:辨識以下 Python 程式碼片段中的任何潛在錯誤: ``` def calculate_sum(num_list): sum = 0 for i in range(len(num_list)): sum += num_list[i] return sum ``` ### **程式碼審查** - Review the following `[language]` code for best practices and suggest improvements: `[code snippet]`. - 查看以下“[語言]”程式碼以獲得最佳實踐並提出改進建議:“[程式碼片段]”。 - Analyze the given `[language]` code for adherence to `[coding style guidelines]`: `[code snippet]`. - 分析給定的“[語言]”程式碼是否符合“[編碼風格指南]”:“[程式碼片段]”。 - Check the following [language] code for proper error handling and suggest enhancements: `[code snippet]`. - 檢查以下 [語言] 程式碼以正確處理錯誤並提出改進建議:`[程式碼片段]`。 - Evaluate the modularity and maintainability of the given `[language]` code: `[code snippet]`. - 評估給定“[語言]”程式碼的模塊化和可維護性:“[程式碼片段]”。 **Example** : Review the following Python code for best practices and suggest improvements: **示例**:查看以下 Python 程式碼以獲得最佳實踐並提出改進建議: ``` def multiply_list(lst): result = 1 for num in lst: result *= num return result ``` ### **API 文件生成** - Generate API documentation for the following `[language]` code: `[code snippet]`. - 為以下“[語言]”程式碼生成 API 文件:“[程式碼片段]”。 - Create a concise API reference for the given `[language]` class: `[code snippet]`. - 為給定的“[語言]”類建立簡明的 API 參考:“[程式碼片段]”。 - Generate usage examples for the following `[language]` API: `[code snippet]`. - 為以下“[語言]”API 生成用法示例:“[程式碼片段]”。 **Example** : Generate API documentation for the following JavaScript code: **示例**:為以下 JavaScript 程式碼生成 API 文件: ``` /** * Returns the sum of two numbers. * @param {number} a - The first number to add. * @param {number} b - The second number to add. * @returns {number} The sum of a and b. */ function sum(a, b) { return a + b; } ``` ### **查詢優化** - Optimize the following SQL query for better performance: `[SQL query]`. - 優化以下 SQL 查詢以獲得更好的性能:`[SQL 查詢]`。 - Analyze the given SQL query for any potential bottlenecks: `[SQL query]`. - 分析給定的 SQL 查詢是否存在任何潛在瓶頸:`[SQL 查詢]`。 - Suggest indexing strategies for the following SQL query: `[SQL query]`. - 為以下 SQL 查詢建議索引策略:`[SQL 查詢]`。 - Optimize the following NoSQL query for better performance and resource usage: `[NoSQL query]`. - 優化以下 NoSQL 查詢以獲得更好的性能和資源使用:`[NoSQL 查詢]`。 **Example** : Optimize the following SQL query for better performance: **示例**:優化以下 SQL 查詢以獲得更好的性能: ``` SELECT * FROM orders WHERE order_date BETWEEN '2022-01-01' AND '2022-12-31' ORDER BY order_date DESC LIMIT 100; ``` ### **用戶界面設計** - Generate a UI mockup for a `[web/mobile]` application that focuses on [`user goal or task]`. - 為專注於 [`用戶目標或任務]` 的`[web/mobile]` 應用程式生成 UI 模型。 - Suggest improvements to the existing user interface of `[app or website]` to enhance `[usability, accessibility, or aesthetics]`. - 建議改進“[應用程式或網站]”的現有用戶界面,以增強“[可用性、可存取性或美學]”。 - Design a responsive user interface for a `[web/mobile]` app that adapts to different screen sizes and orientations. - 為適應不同螢幕尺寸和方向的“[web/mobile]”應用程式設計響應式用戶界面。 **Example** : Generate a UI mockup for a mobile application that focuses on managing personal finances. **示例**:為專注於管理個人財務的移動應用程式生成 UI 模型。 ### **自動化測試** - Generate test cases for the following [language] function based on the input parameters and expected output: `[function signature]`. - 根據輸入參數和預期輸出為以下 [語言] 函數生成測試用例:`[函數簽名]`。 - Create a test script for the given [language] code that covers [unit/integration/system] testing: `[code snippet]`. - 為涵蓋[單元/集成/系統]測試的給定[語言]程式碼建立測試腳本:`[程式碼片段]`。 - Generate test data for the following [language] function that tests various edge cases: `[function signature]`. - 為以下測試各種邊緣情況的[語言]函數生成測試資料:`[函數簽名]`。 - Design a testing strategy for a [web/mobile] app that includes [unit, integration, system, and/or performance] testing. - 為 [網絡/移動] 應用程式設計測試策略,包括 [單元、集成、系統和/或性能] 測試。 **Example:** Generate test cases for the following Python function based on the input parameters and expected output: **示例:** 根據輸入參數和預期輸出為以下 Python 函數生成測試用例: ``` def divide(a: float, b: float) -> float: if b == 0: raise ZeroDivisionError('division by zero') return a / b ``` ### **程式碼重構** - Suggest refactoring improvements for the following [language] code to enhance readability and maintainability: `[code snippet]`. - 建議對以下 [語言] 程式碼進行重構改進,以增強可讀性和可維護性:`[程式碼片段]`。 - Identify opportunities to apply [design pattern] in the given [language] code: `[code snippet]`. - 確定在給定的[語言]程式碼中應用[設計模式]的機會:`[程式碼片段]`。 - Optimize the following [language] code for better performance: `[code snippet]`. - 優化以下 [語言] 程式碼以獲得更好的性能:`[程式碼片段]`。 **Example** : Optimize the following Python code for better performance: **示例**:優化以下 Python 程式碼以獲得更好的性能: ``` def find_max(numbers): max_num = numbers[0] for num in numbers: if num > max_num: max_num = num return max_num ``` ### **設計模式建議** - Based on the given [language] code, recommend a suitable design pattern to improve its structure: `[code snippet]`. - 根據給定的[語言]程式碼,推薦合適的設計模式來改進其結構:`[程式碼片段]`。 - Identify opportunities to apply the [design pattern] in the following [language] codebase: `[repository URL or codebase description]`. - 確定在以下 [語言] 程式碼庫中應用 [設計模式] 的機會:`[存儲庫 URL 或程式碼庫描述]`。 - Suggest an alternative design pattern for the given [language] code that may provide additional benefits: `[code snippet]`. - 為可能提供額外好處的給定 [語言] 程式碼建議替代設計模式:`[程式碼片段]`。 **Example:** Based on the given Python code, recommend a suitable design pattern to improve its structure: **例子:** 根據給定的Python程式碼,推薦合適的設計模式來改進其結構: ``` class TotalPriceCalculator: def calculate_total(self, items): pass class NormalTotalPriceCalculator(TotalPriceCalculator): def calculate_total(self, items): total = 0 for item in items: total += item.price * item.quantity return total class DiscountedTotalPriceCalculator(TotalPriceCalculator): def calculate_total(self, items): total = 0 for item in items: total += item.price * item.quantity * 0.9 # apply 10% discount return total class Order: def __init__ (self, items, total_price_calculator): self.items = items self.total_price_calculator = total_price_calculator def calculate_total(self): return self.total_price_calculator.calculate_total(self.items) class Item: def __init__ (self, name, price, quantity): self.name = name self.price = price self.quantity = quantity ``` ### **算法開發** - Suggest an optimal algorithm to solve the following problem: `[problem description]`. - 建議解決以下問題的最佳算法:`[問題描述]`。 - Improve the efficiency of the given algorithm for `[specific use case]`: `[algorithm or pseudocode]`. - 為“[特定用例]”提高給定算法的效率:“[算法或偽程式碼]”。 - Design an algorithm that can handle `[large-scale data or high-throughput]` for `[specific task or operation]`. - 為“[特定任務或操作]”設計一種可以處理“[大規模資料或高吞吐量]”的算法。 - Propose a parallel or distributed version of the following algorithm to improve performance: `[algorithm or pseudocode]`. - 提出以下算法的並行或分佈式版本以提高性能:`[算法或偽程式碼]`。 ### **程式碼翻譯** - Translate the following `[source language]` code to `[target language]`: `[code snippet]`. - 將以下“[源語言]”程式碼翻譯成“[目標語言]”:“[程式碼片段]”。 - Convert the given `[source language]` class or module to `[target language]` while preserving its functionality and structure: `[code snippet]`. - 將給定的“[源語言]”類或模塊轉換為“[目標語言]”,同時保留其功能和結構:“[程式碼片段]”。 - Migrate the following `[source language]` code that uses `[library or framework]` to [target language] with a similar library or framework: `[code snippet]`. - 將以下使用“[庫或框架]”的“[源語言]”程式碼遷移到具有類似庫或框架的“目標語言”:“[程式碼片段]”。 **Example:** Translate the following Python code to JavaScript: **示例:**將以下 Python 程式碼轉換為 JavaScript: ``` def factorial(n): if n == 0: return 1 else: return n * factorial(n-1) ``` ### **個性化學習** - Curate a list of resources to learn `[programming language or technology]` based on my current skill level: `[beginner/intermediate/advanced]`. - 根據我目前的技能水平,策劃學習`[編程語言或技術]`的資源列表:`[初學者/中級/高級]`。 - Recommend a learning path to become proficient in `[specific programming domain or technology]` considering my background in `[existing skills or experience]`. - 考慮到我在“[現有技能或經驗]”方面的背景,推薦精通“[特定編程領域或技術]”的學習路徑。 - Suggest project ideas or coding exercises to practice and improve my skills in `[programming language or technology]`. - 建議專案想法或編碼練習,以練習和提高我在“[編程語言或技術]”方面的技能。 ### **程式碼可視化** - Generate a UML diagram for the following `[language]` code: `[code snippet]`. - 為以下“[語言]”程式碼生成一個 UML 圖:“[程式碼片段]”。 - Create a flowchart or visual representation of the given `[language]` algorithm: `[algorithm or pseudocode]`. - 建立給定“[語言]”算法的流程圖或可視化表示:“[算法或偽程式碼]”。 - Visualize the call graph or dependencies of the following `[language]` code: `[code snippet]`. - 可視化以下“[語言]”程式碼的呼叫圖或依賴關係:“[程式碼片段]”。 **Example** : Generate a UML diagram for the following Java code: **示例**:為以下 Java 程式碼生成 UML 圖: ``` public abstract class Vehicle { private String model; public Vehicle(String model) { this.model = model; } public String getModel() { return model; } public abstract void start(); public abstract void stop(); } public class Car extends Vehicle { public Car(String model) { super(model); } @Override public void start() { System.out.println("Starting car engine"); } @Override public void stop() { System.out.println("Stopping car engine"); } } public class Motorcycle extends Vehicle { public Motorcycle(String model) { super(model); } @Override public void start() { System.out.println("Starting motorcycle engine"); } @Override public void stop() { System.out.println("Stopping motorcycle engine"); } } ``` ### **資料可視化** - Generate a bar chart that represents the following data: `[data or dataset description]`. - 生成代表以下資料的條形圖:`[資料或資料集描述]`。 - Create a line chart that visualizes the trend in the following time series data: `[data or dataset description]`. - 建立一個折線圖,將以下時間序列資料的趨勢可視化:`[資料或資料集描述]`。 - Design a heatmap that represents the correlation between the following variables: `[variable list]`. - 設計一個表示以下變數之間相關性的熱圖:`[變數列表]`。 --- 以上,簡單分享,希望對您有幫助!
 [連結點這邊](https://online.visual-paradigm.com/tw/diagrams/features/flowchart-tool/) ## 介紹  超級好用,好用到爆,基本上我沒有花錢,也不太確定他是否要花錢 但看起來免費就可以使用了 超級方便的! 大推!
 ## 解決方法 1. 前往控制台 2. 點擊時鐘和區域  3. 點擊地區  4. 點選系統管理  5. 點選變更系統地區設定  6. 勾選 '使用 Unicode UTF-8 提供全球語言支援' (會要求重新啟動電腦)  7. 開啟 terminal 輸入 `chcp` 看查 VSCode 編碼 8. 輸入 `chcp 65001` 轉換 VSCode 編碼至 utf-8 ### 結果  ## 參考 [參考來源](https://github.com/anseki/readline-sync/issues/48)
## 課程目標 - 學習 node 匯入/匯出模組 ## 課程內容 教大家怎麼把多個程式組裝起來,變成一個強大的主程式 順便學習 node 裡面自訂模組,匯出、匯入的語法! --- 建立 `task1.js` 放入以下內容 ``` function task1() { console.log('====== start ======') console.log('this is task 1'); console.log('====== finish ======') } module.exports = { task1: task1 }; ``` 建立 `task2.js` 放入以下內容 ``` function task2() { console.log('====== start ======') console.log('this is task 2'); console.log('====== finish ======') } module.exports = { task2: task2 }; ``` 建立 `task3.js` 放入以下內容 ``` function task3() { console.log('====== start ======') console.log('this is task 3'); console.log('====== finish ======') } module.exports = { task3: task3 }; ``` --- 在 node 中,要匯出模組時,只要使用全域變數 `module` 物件的屬性 `exports` 即可,這樣 node 就知道怎麼處理了 我們設計這些 `task` 程式,不再是直接拿來執行的腳本,而是提供特定功能的模組,所以記得把要匯出的任務寫在函式裡面 --- 接著來寫主程式,通常會命名為 index 或 main 我們就建立 `main.js` 吧,放入以下內容 ``` const readlineSync = require('readline-sync'); var module1 = require('./task1'); var module2 = require('./task2'); var module3 = require('./task3'); function showMenu() { const answer = readlineSync.question('您要執行什麼?\n1. 任務1\n2. 任務2\n3. 任務3\n4. 離開\n'); if (answer === '1') { module1.task1(); showMenu(); } else if (answer === '2') { module2.task2(); showMenu(); } else if (answer === '3') { module3.task3(); showMenu(); } else if (answer === '4') { process.exit(); } else { showMenu(); } } showMenu(); ``` 注意看 `require('./task1')` 那個 `.` 是當前檔案路徑的意思,當 require 看到檔案路徑,就會去從檔案路徑匯入模組 如果看起來不是檔案路徑,而是純粹模組名稱 `require('readline-sync')` 那麼 node 就會從 node_modules 資料夾尋找模組 去終端機輸入 ``` node main.js ``` 很好玩吧!這已經很接近實務上會操作的 CLI 應用程式了! ## 課後作業 接續前一課的作業,現在來把之前的多個檔案,打包成一個程式吧! 請將之前的多的程式改寫,讓內容能夠匯出 接著建立一個 `index.js` 檔案,匯入上面提到的所有函式 使用者輸入 `node index.js` 之後,終端機會詢問 ``` 您要執行下列什麼指令? 1. 建立待辦事項 2. 讀取待辦事項 3. 更新待辦事項 4. 刪除待辦事項 5. 離開 ``` 使用者可以輸入數字,程式會分別去執行任務,也就是呼叫前面匯入的對應函式 完成以上任務,你就完成這次的課程目標了!
## 課程目標 - 替 CLI 應用程式加上顏色 ## 課程內容 這一課來做有趣的任務吧!很花俏的那種! 我們來替終端機的文字,加上顏色吧! 看一下這個套件的介紹 https://www.npmjs.com/package/colors 請先輸入指令安裝 ``` npm install colors ``` 安裝之後,記得觀察一下 `package.json` 與 `node_modules` 內容的變化喔! --- 建立 `try-colors.js` 程式,裡面輸入 ``` var colors = require('colors'); console.log(colors.green('hello')); console.log(colors.red.underline('i like cake and pies')) console.log(colors.inverse('inverse the color')); console.log(colors.rainbow('OMG Rainbows!')); console.log(colors.trap('Run the trap')); ``` 然後去終端機輸入 ``` node try-colors.js ``` 你會看到終端機出現,花俏、華麗的顏色文字! 更多用法可以參閱套件介紹 https://github.com/Marak/colors.js ## 課後作業 接續前一課的作業,現在來替我們的 CLI 應用程式,加上顏色! --- 請打開之前的所有檔案 目前這些程式,終端機訊息全都是預設的白色文字 請把這些訊息的文字顏色改變! 不用通通改變,改一部份,讓程式看起來更清楚即可 可以使用這款套件 完成以上任務,你就完成這次的課程目標了!
## 課程目標 - 把 node 非同步設計改寫為同步設計 ## 課程內容 前面我說過,node 有些地方的寫法設計,看起來很怪、很醜 在瀏覽器 js 環境,我們的確不知道用戶何時會點擊按鈕、不知道 AJAX 回應何時會拿到 不能讓網頁整個停下來卡住、等待上述事件發生,所以必須用「非同步程式設計」處理 可是檔案系統模組,絕大多數情況下,你就是要現在就讀取好檔案、讀取完才讓程式接著繼續跑,才有意義 實在沒必要用「非同步程式設計」處理! 取得用戶輸入就更不用說了,程式就是該停在這裡、等用戶輸入完再接著繼續執行,才有意義 何必用「非同步程式設計」處理! 其他程式語言,大多都是「同步程式設計」,例如用 Python 寫同樣程式時 就是一行一行寫下來即可,不用像這邊這樣把函式當參數傳進去 簡單講,javascript 的非同步設計,在網頁畫面上運作時,有其優勢與必要 但是在用來寫腳本時,顯得多餘而不必要 --- 來學習怎麼改寫吧,打開 `read-my-name.js`,改寫成以下內容 ``` var fs = require('fs'); var data = fs.readFileSync('my-name.txt'); console.log("您好," + data); process.exit(0); ``` 執行看看! ``` node read-my-name.js ``` 跑起來一模一樣,但是不是好讀多了? 注意 `fs.readFileSync` 後面的 sync,那就是同步的意思 --- 接著來改寫第二個程式吧,打開 `write-my-name.js`,改寫成以下內容 ``` var fs = require('fs'); const readlineSync = require('readline-sync'); var answer = readlineSync.question('請問您的大名?\n'); fs.writeFileSync('my-name.txt', answer); console.log('儲存成功。'); process.exit(0); ``` 是不是好讀多了? 新函式名稱,就是後面加上 sync 而已,node 官方知道大家的抱怨,所以有提供這些同步函式 但是,這段 code 不能直接執行,因為 `readline-sync` 不是官方內建模組,是社群開發的,需要透過 npm 安裝 怎麼辦? --- NPM 全稱為 Node Package Manager,也就是 Node 套件管理工具 關於 npm 的安裝,網路上有非常多教學,請根據你的作業系統,自己找一套安裝方法 安裝好之後,你就可以使用「終端機」運行 npm 指令 --- 請在終端機輸入 `npm install readline-sync` 即可安裝 `readline-sync` 套件 會多出兩個檔案 `package-lock.json` `package.json` 用來記錄目前專案用到的 npm 套件,你可以打開這兩個檔案看一看 還會多出一個資料夾 `node_modules`,套件本身會下載到這個地方,你可以打開資料夾逛一逛 接著執行看看! ``` node write-my-name.js ``` 跑起來一模一樣,但是好讀多了! ## 課後作業 接續前一課的作業,現在來嘗試「同步」的語法 請把「非同步」的語法改寫,通通改用「同步」的語法 改完之後,程式碼中,應該就不會出現 callback function 了 也就是不會出現「把一段函式定義當作參數傳進另一個函式」這種情況 完成以上任務,你就完成這次的課程目標了!
## 課程目標 - 用 node 寫入檔案內容 ## 課程內容 來學習一下用 node 寫入檔案的方法 學會這方法,可以用 node 寫腳本處理工作上的文書瑣事 --- 建立 `write-my-name.js` 程式,裡面輸入 ``` var fs = require('fs'); const readline = require('readline').createInterface({ input: process.stdin, output: process.stdout }); readline.question('請問您的大名?\n', function (answer) { fs.writeFile('my-name.txt', answer, function (err) { console.log('儲存成功。'); process.exit(0); }); }); ``` 然後去終端機輸入 ``` node write-my-name.js ``` 你會看到終端機要求你輸入內容,接著會去更新文字檔內容! --- 第一段的 `readline` 模組,是處理 `輸入/輸出` 資訊的模組,後面要呼叫 `createInterface` 並且用全域變數 `process` 來設定輸入、輸出來源 照做就好,背後意義不用細究,能用就好,有興趣自行 google `readline.question` 從終端機請求用戶輸入內容,`\n` 是換行字元,讓畫面更好看而已 注意 `readline.question` 後面還是把函式當參數傳,也就是依然採用「非同步程式設計」 很怪、很醜,對嗎?我同意,這語法設計實在意義不明 又不是在等待 AJAX 回應的同時,用戶可以先做別的事情 這邊就是要等用戶輸入完內容,程式往下走才有意義呀! 後面會教你如何改寫成「同步程式設計」,先照做就好 ## 課後作業 接續前一課的作業,現在來寫「新增」功能 請建立一個 `create.js` 檔案 使用者輸入 `node create.js` 之後,終端機會詢問 ``` 您要新增什麼待辦事項? ``` 使用者可以輸入內容,接著終端機會顯示 ``` 新增事項:XXXXXX ``` 打開 `todos.json` 查看,會看到剛剛輸入的項目出現在裡面 完成以上任務,你就完成這次的課程目標了!
身為網站工程師,對於 JavaScript 在 `瀏覽器還境` vs `Node.js 環境` 的關係,通常有點困惑 我認為單獨教一下 Node.js 開發,對於前端工程師的能力會有很大幫助! 坊間要教 Node.js 通常會教「網頁後端程式設計」,這種教法當然沒問題 不過,我找到了一個更好吸收的教學法,就是從「命令列程式設計」開始教起!嘿嘿! 命令列英文是 Command Line Interface,我們通常簡短稱呼為 CLI CLI 程式就是那種打開一個全黑的視窗,用戶需要手動打字,然後視窗又會跳出一堆字的程式 聽起來像是 40 年前人們使用電腦的方式,感覺是老派過氣的東西,對嗎? 其實大錯特錯! 工程師在 ssh 遠端處理主機的設定時,幾乎都還是操作透過 CLI 操作 使用 Linux 系列電腦的朋友(例如 Ubuntu 作業系統),日常中也會大量使用 CLI 即便是前端工程師,在開發過程,還是有大量的情況要使用 CLI,例如 NPM 相關指令通通會用到 --- 其實,CLI 是電腦程式最原始的 UI 介面! Windows 電腦是一種 UI、網頁是一種 UI、手機是一種 UI 工程師在開發工具給別的工程師使用時,很常會懶得設計 UI 比如我寫了一個很強的檔案壓縮程式、或是硬碟清理程式,核心演算法寫完,我就想發佈給大家用了 我幹嘛還要花時間去寫一個漂亮、五顏六色、有按鈕的 UI?程式就用 CLI 操作就可以了,反正用戶都是工程師 --- 因為 CLI 是最原始的 UI,我認為教你寫一些 CLI 應用程式,對於 Node.js 會有極大的幫助 別擔心,這門課非常簡單,也非常好玩,也會讓你知道 Node.js 拿來寫 CLI 是什麼感覺 雖然這年頭市面上沒有人會去教 CLI 程式開發了,不過我保證你會獲益良多,還能讓之後學 Node.js 網頁後端開發,吸收得更好 嘿嘿,讓我們馬上開始吧!
## 課程目標 - 學會處理 git 衝突 ## 課程內容 這課來學一下 commit 彼此有衝突,而 git 沒辦法自動合併的情況吧 先挑一個資料夾,把 `my-work-1.html` 裡面隨意加上幾行內容 ``` <p>我的第一個網頁檔案</p> <p>new content a</p> <p>new content b</p> <p>new content c</p> ``` 接著 ``` git add my-work-1.html git commit -m 'new content abc' git push ``` 順利送出! 然後去另一個資料夾,把 `my-work-1.html` 裡面隨意加上幾行內容 ``` <p>我的第一個網頁檔案</p> <p>new content x</p> <p>new content y</p> <p>new content z</p> ``` 接著 ``` git add my-work-1.html git commit -m 'new content xyz' git push ``` 結果失敗了!一如預期,被 git 喊停了 ``` To github.com:howtomakeaturn/my-first-testing-repo.git ! [rejected] main -> main (fetch first) error: failed to push some refs to 'github.com:howtomakeaturn/my-first-testing-repo.git' hint: Updates were rejected because the remote contains work that you do hint: not have locally. This is usually caused by another repository pushing hint: to the same ref. You may want to first integrate the remote changes hint: (e.g., 'git pull ...') before pushing again. hint: See the 'Note about fast-forwards' in 'git push --help' for details. ``` 預期之中,這時應該 pull 對吧? ``` git pull ``` ``` remote: Enumerating objects: 14, done. remote: Counting objects: 100% (12/12), done. remote: Compressing objects: 100% (4/4), done. remote: Total 8 (delta 3), reused 8 (delta 3), pack-reused 0 Unpacking objects: 100% (8/8), 792 bytes | 79.00 KiB/s, done. From github.com:howtomakeaturn/my-first-testing-repo d999c25..2cf01f4 main -> origin/main hint: Pulling without specifying how to reconcile divergent branches is hint: discouraged. You can squelch this message by running one of the following hint: commands sometime before your next pull: hint: hint: git config pull.rebase false # merge (the default strategy) hint: git config pull.rebase true # rebase hint: git config pull.ff only # fast-forward only hint: hint: You can replace "git config" with "git config --global" to set a default hint: preference for all repositories. You can also pass --rebase, --no-rebase, hint: or --ff-only on the command line to override the configured default per hint: invocation. Auto-merging my-work-1.html CONFLICT (content): Merge conflict in my-work-1.html Automatic merge failed; fix conflicts and then commit the result. ``` 在前一課,我們 pull 之後,會被 git 自動把雲端版本、跟本機你剛改過的版本,合併在一起,然後在終端機編輯器內,請你打一段小訊息,備註這次合併 這次,卻沒有進入終端機編輯器內,而是跳出一串訊息! 注意看最後幾行! ``` Auto-merging my-work-1.html CONFLICT (content): Merge conflict in my-work-1.html Automatic merge failed; fix conflicts and then commit the result. ``` 這就是 commit 衝突的情況:兩個 commit 都有改到同樣檔案,雖然先後時間不同,但是 git 不敢直接用新的蓋掉舊的! git status 看一下 ``` Unmerged paths: (use "git add <file>..." to mark resolution) both modified: my-work-1.html ``` 清楚寫出了:both modified,兩邊都修改過! 打開 `my-work-1.html` 看一下 ``` <p>我的第一個網頁檔案</p> <<<<<<< HEAD <p>new content x</p> <p>new content y</p> <p>new content z</p> ======= <p>new content a</p> <p>new content b</p> <p>new content c</p> >>>>>>> 2cf01f4f63f5ea9040610495688f08032761a170 ``` 看起來很嚇人,其實,只是 git 怕你看不清楚,用一種誇飾法,列出衝突的地方而已! HEAD 段落,是你剛提交的 commit 部份 `2cf01f4f63f5ea9040610495688f08032761a170` 的部份呢?則是剛剛從 github 抓下來的 commit 代號! 要如何處理衝突呢?其實,你就決定一下,衝突這幾行,到底要怎麼合併就可以了,然後把 git 誇飾法的地方刪掉 比方說,我決定讓行數交錯呈現吧 ``` <p>我的第一個網頁檔案</p> <p>new content a</p> <p>new content x</p> <p>new content b</p> <p>new content y</p> <p>new content c</p> <p>new content z</p> ``` 改完之後 ``` git add my-work-1.html ``` ``` git commit -m 'handle conflict' ``` 手動合併的 commit,我個人通常習慣訊息就寫 handle conflict ``` git push ``` 大功告成!這就是所謂的 git 衝突處理 ## 課後作業 接續前一課的作業 在上一次的作業,我們嘗試了兩個資料夾,同時 push 送出 commit,導致 git 比對 github 上的雲端版本時,發現有衝突,請你先 pull 再 push 的情況 上次的情況比較單純,因為雖然有衝突,但是 git 一看就知道影響不大,所以 pull 時自動處理了衝突,把事情都安排好了 這次的作業,我們要模擬「遇到衝突,而且 git 無法自動處理衝突」的情況 --- 請按照以下步驟,送出 commit **第一步** 到 `at-home` 資料夾,打開檔案 `about.html` 的內容,原本是 ``` <h1>我是誰</h1> <p>我是XXX,目前在自學網頁開發</p> ``` 請改成 ``` <h1>我是誰</h1> <p>我是XXX,目前在自學網頁開發,目標是成為厲害的前端工程師</p> ``` 然後送出 commit,接著 `git push` 出去 你會看到 github 上面就被更新了 **第二步** 到 `at-laptop` 資料夾,假設你今天出門工作,忘記先 pull 了,也忘記檔案其實你已經改好了 打開檔案 `about.html` 的內容,依然是 ``` <h1>我是誰</h1> <p>我是XXX,目前在自學網頁開發</p> ``` 請改成 ``` <h1>我是誰</h1> <p>我是XXX,目前在自學網頁開發,目標是成為厲害的軟體工程師</p> ``` 然後送出 commit,接著 `git push` 出去 這時 git 會請你先更新,於是你輸入 `git pull` 你會發現 git 表示遇到衝突,無法自動合併,請你處理! 原來有一邊是寫「前端工程師」,另一邊是寫「軟體工程師」 git 無法自動判斷你到底是想要以哪個為準!(其實用哪個都可以吧!) 請處理這個 conflict 衝突,處理完之後 push 到 github 上面 完成以上任務,你就完成這次的課程目標了! --- 交作業的方法: 可以把 github 專案連結,貼到留言區
- 原文出處:https://dev.to/j471n/vs-code-extensions-to-take-your-coding-to-the-next-level-50od ## Documatic 此外掛將 [Documatic](https://www.documatic.com/) 引入 VSCode:使用簡單查詢快速搜尋大型程式碼庫。 Documatic 使用 AI 連結您的查詢和程式碼片段之間的關係,因此您不必知道要查找的確切關鍵字! **⬇️** [**下載**](https://marketplace.visualstudio.com/items?itemName=Tyriar.sort-lines)  ## Sort lines 此外掛允許您按字母或數字快速對程式碼進行排序,從而在處理大文件時節省時間。當您有要排序的資料時,這會非常方便。 **⬇️** [**下載**](https://marketplace.visualstudio.com/items?itemName=Tyriar.sort-lines)  ## TabNine 此外掛使用 AI 提供程式碼自動完成建議,可以幫助您節省時間並提高程式碼品質。它支援很多語言和框架。但是要小心使用它,因為它會佔用你系統的很多資源。 **⬇️** [**下載**](https://marketplace.visualstudio.com/items?itemName=TabNine.tabnine-vscode) 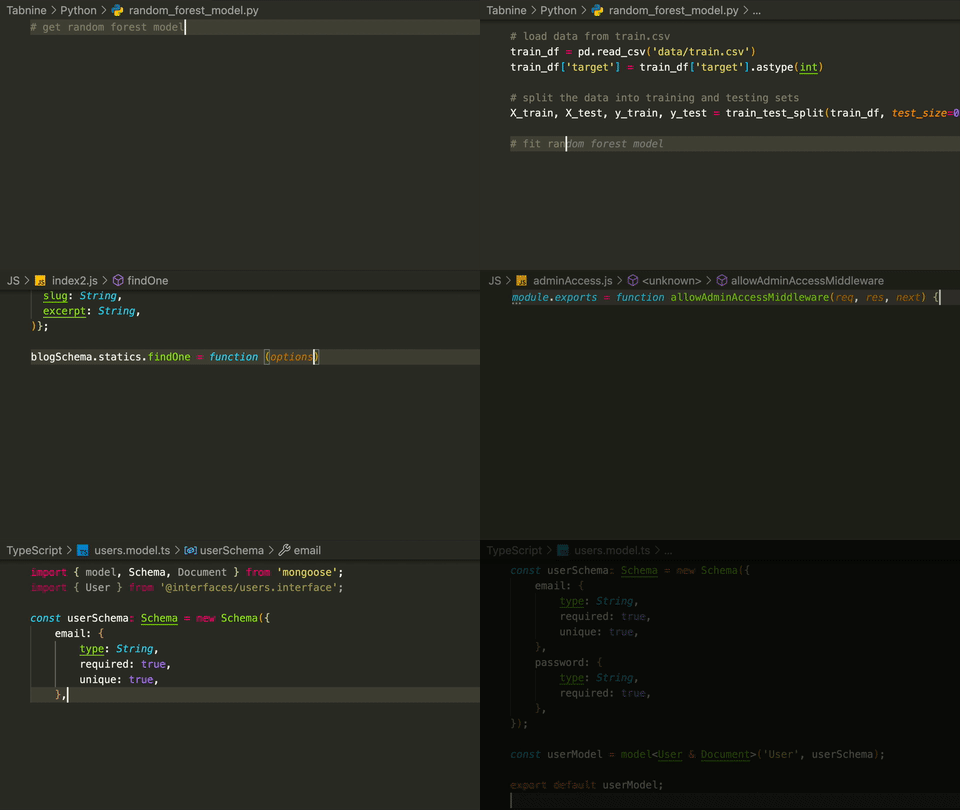 ## **Template String Converter** 可以在程式碼編輯器中鍵入“${”時將普通字串轉換為模板字串。 **⬇️** [**下載**](https://marketplace.visualstudio.com/items?itemName=meganrogge.template-string-converter)  ## **Error Lens** ErrorLens 增強了語言診斷功能,突出顯示語言生成診斷的整行,並連結相關訊息。 **⬇️** [**下載**](https://marketplace.visualstudio.com/items?itemName=usernamehw.errorlens)  ## **WakaTime** [WakaTime](https://wakatime.com/vs-code) 是一個開源 VS Code 外掛,用於從您的寫程式工時中,自動生成指標、分析和時間追蹤。 **⬇️** [**下載**](https://marketplace.visualstudio.com/items?itemName=WakaTime.vscode-wakatime) 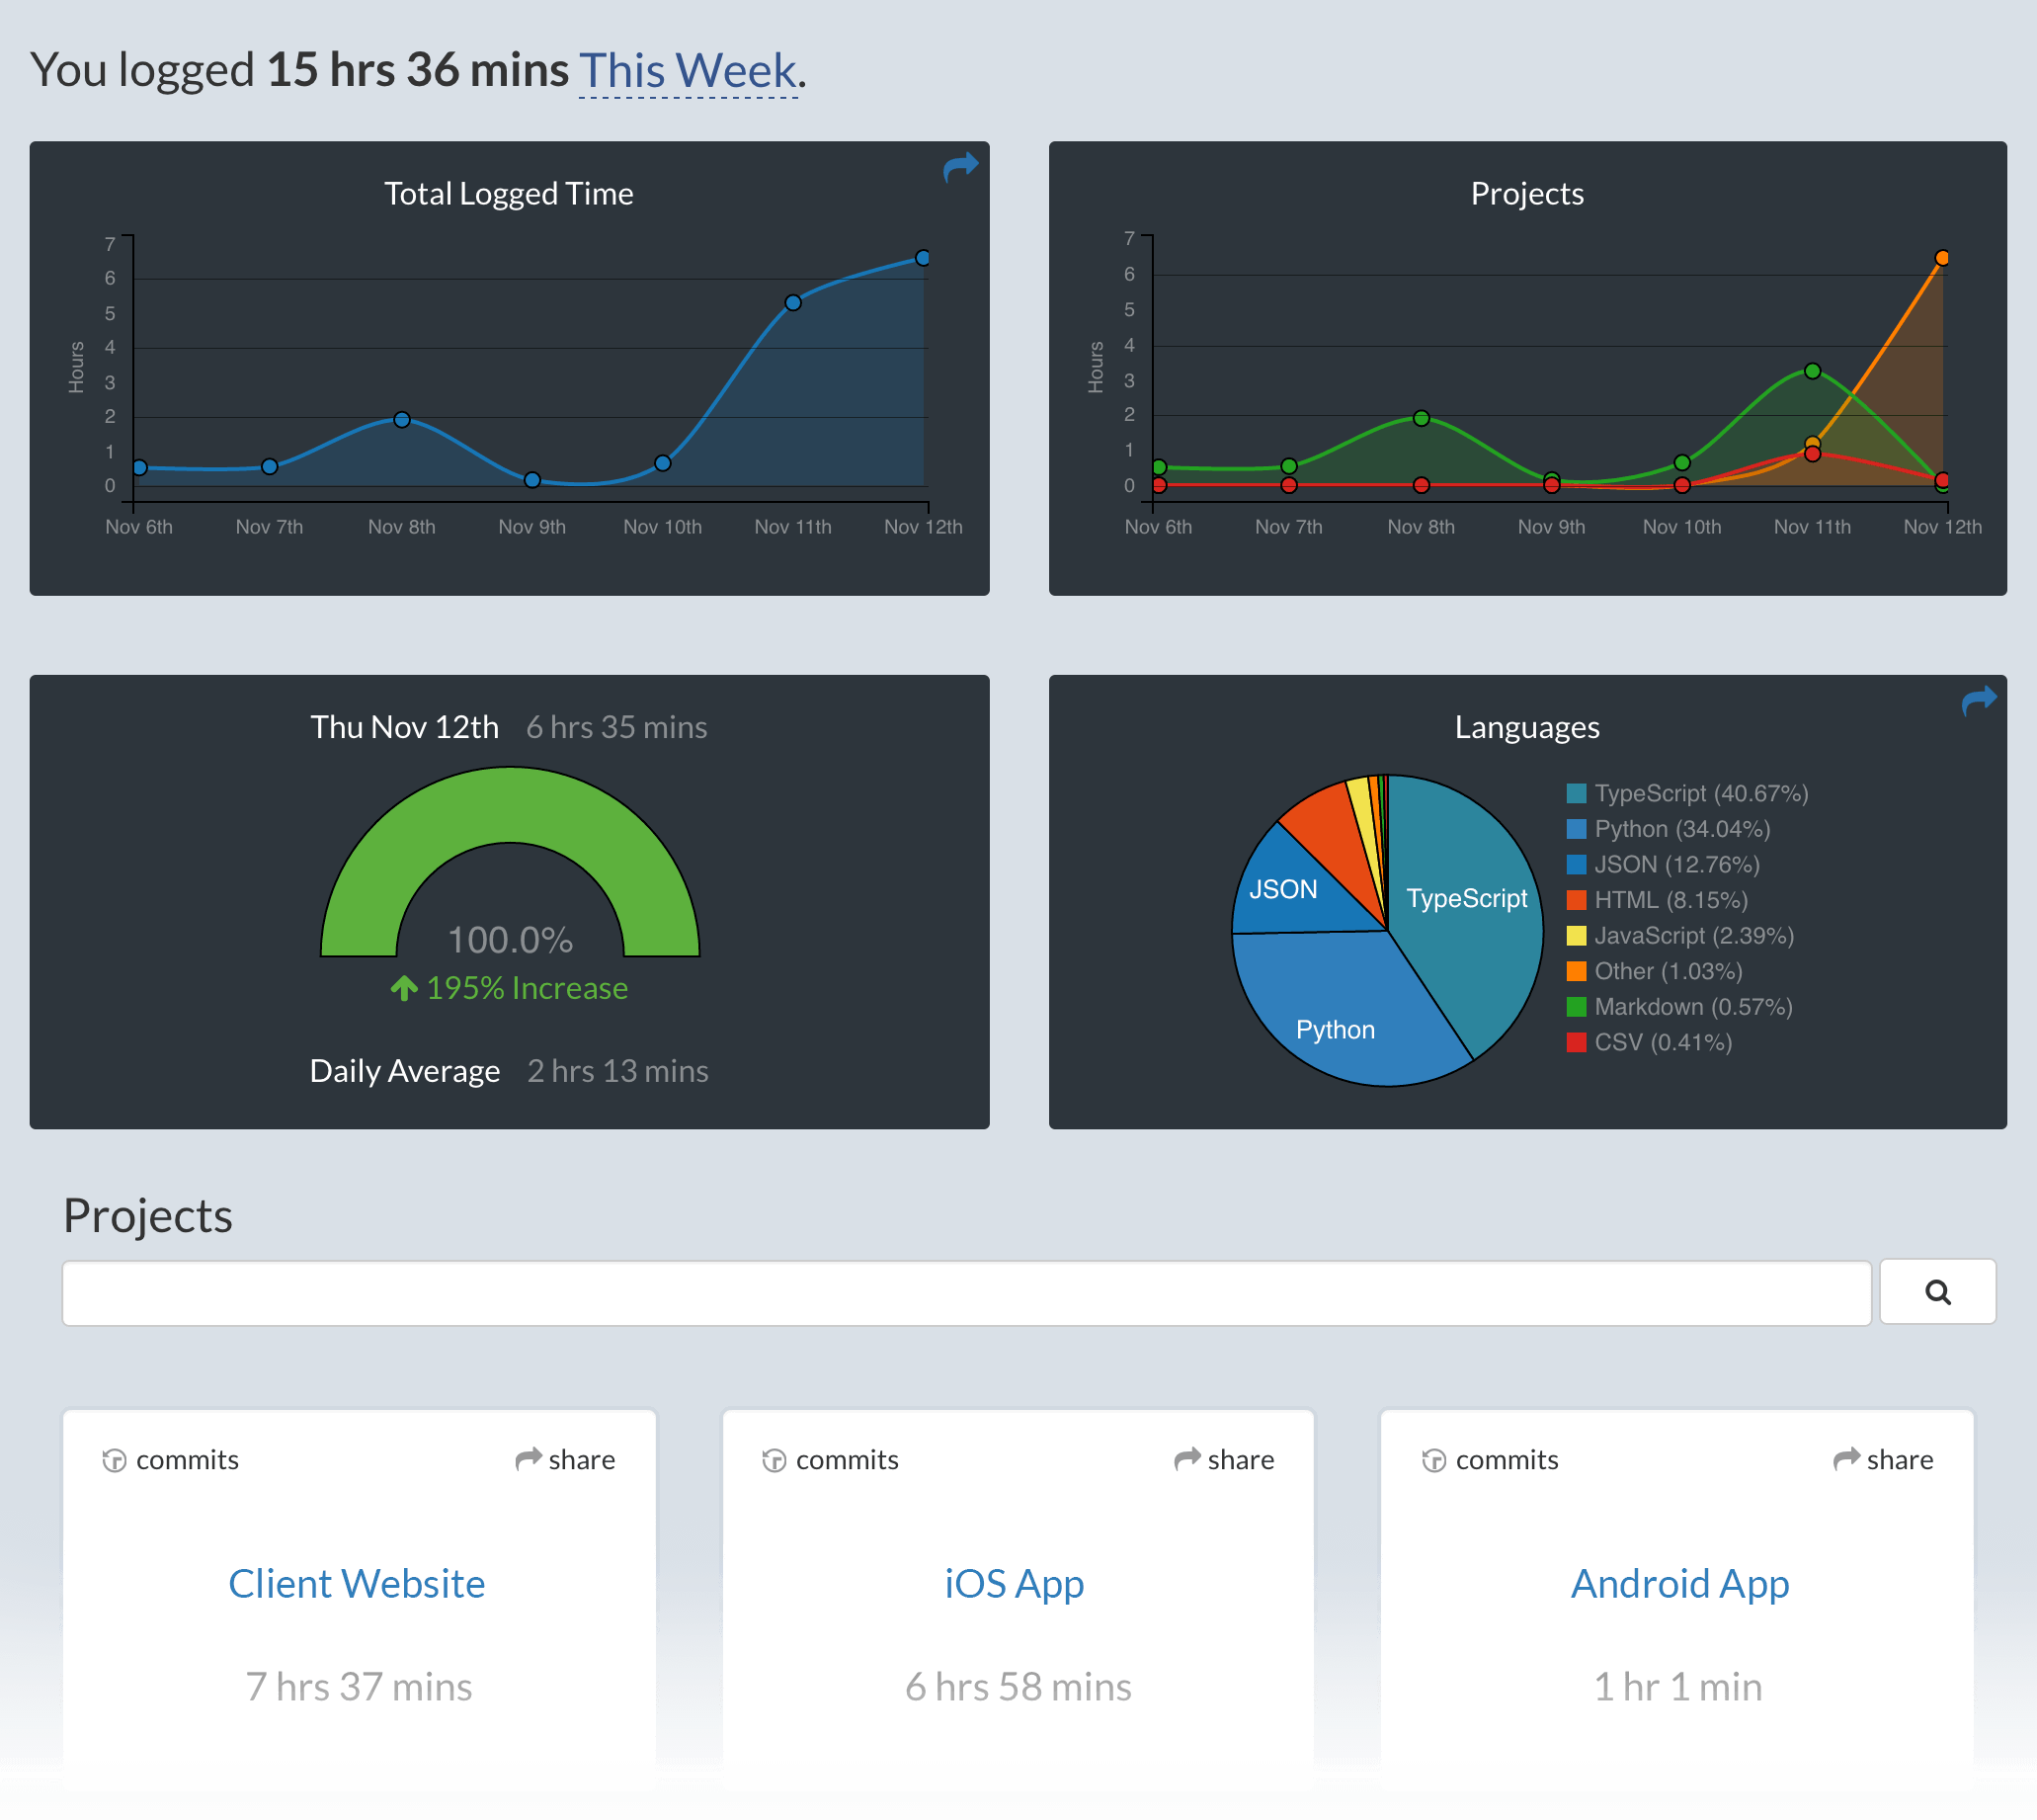 ## **Chat** 通過使用此外掛,您可以在 VS Code 中與您的 Slack 和 Discord 團隊聊天。 * **安靜的通知**:聊天應用程式可能會讓人分心。此外掛使聊天變得有用、上下文相關且不會分散注意力。 * **豐富的格式**:分享 Markdown 程式碼片段,並在您的聊天訊息中加入表情符號。 * **本地外觀**:在您喜歡的主題和網格編輯器佈局中使用聊天。 **⬇️** [**下載**](https://marketplace.visualstudio.com/items?itemName=karigari.chat) 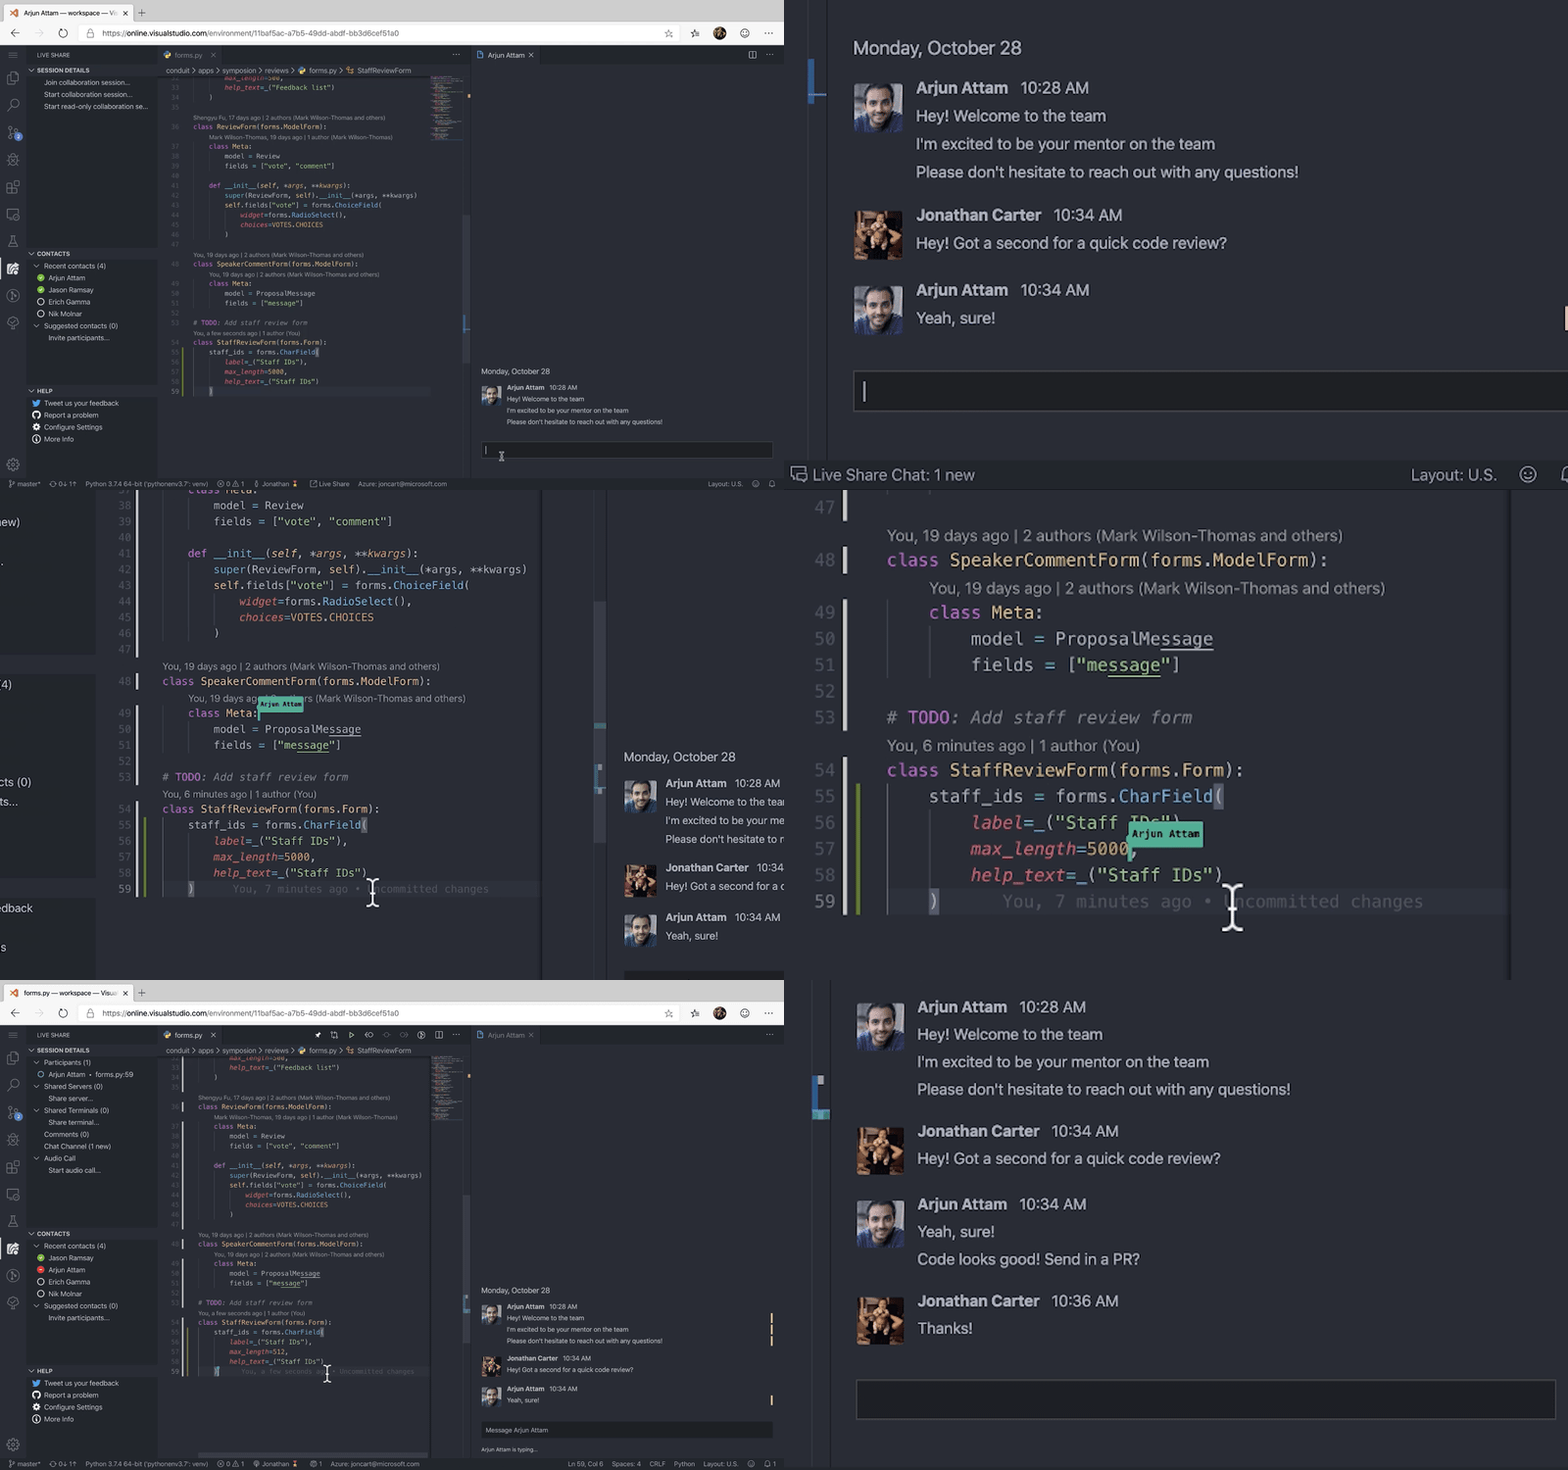 ## **SVG Preview** 允許您直接在 VS 程式碼中查看 SVG 文件。如果您在 vs 程式碼中打開 SVG 文件,那麼預設情況下它會顯示 SVG 程式碼。使用它後,您可以看到 SVG 的預覽。 **⬇️** [**下載**](https://marketplace.visualstudio.com/items?itemName=SimonSiefke.svg-preview)  ## **Headwind** Headwind 是用於 Visual Studio Code 的 Tailwind CSS 類排序器。它通過解析您的程式碼並重新打印類別標籤來強制執行一致的類別排序。 **⬇️** [**下載**](https://marketplace.visualstudio.com/items?itemName=heybourn.headwind) 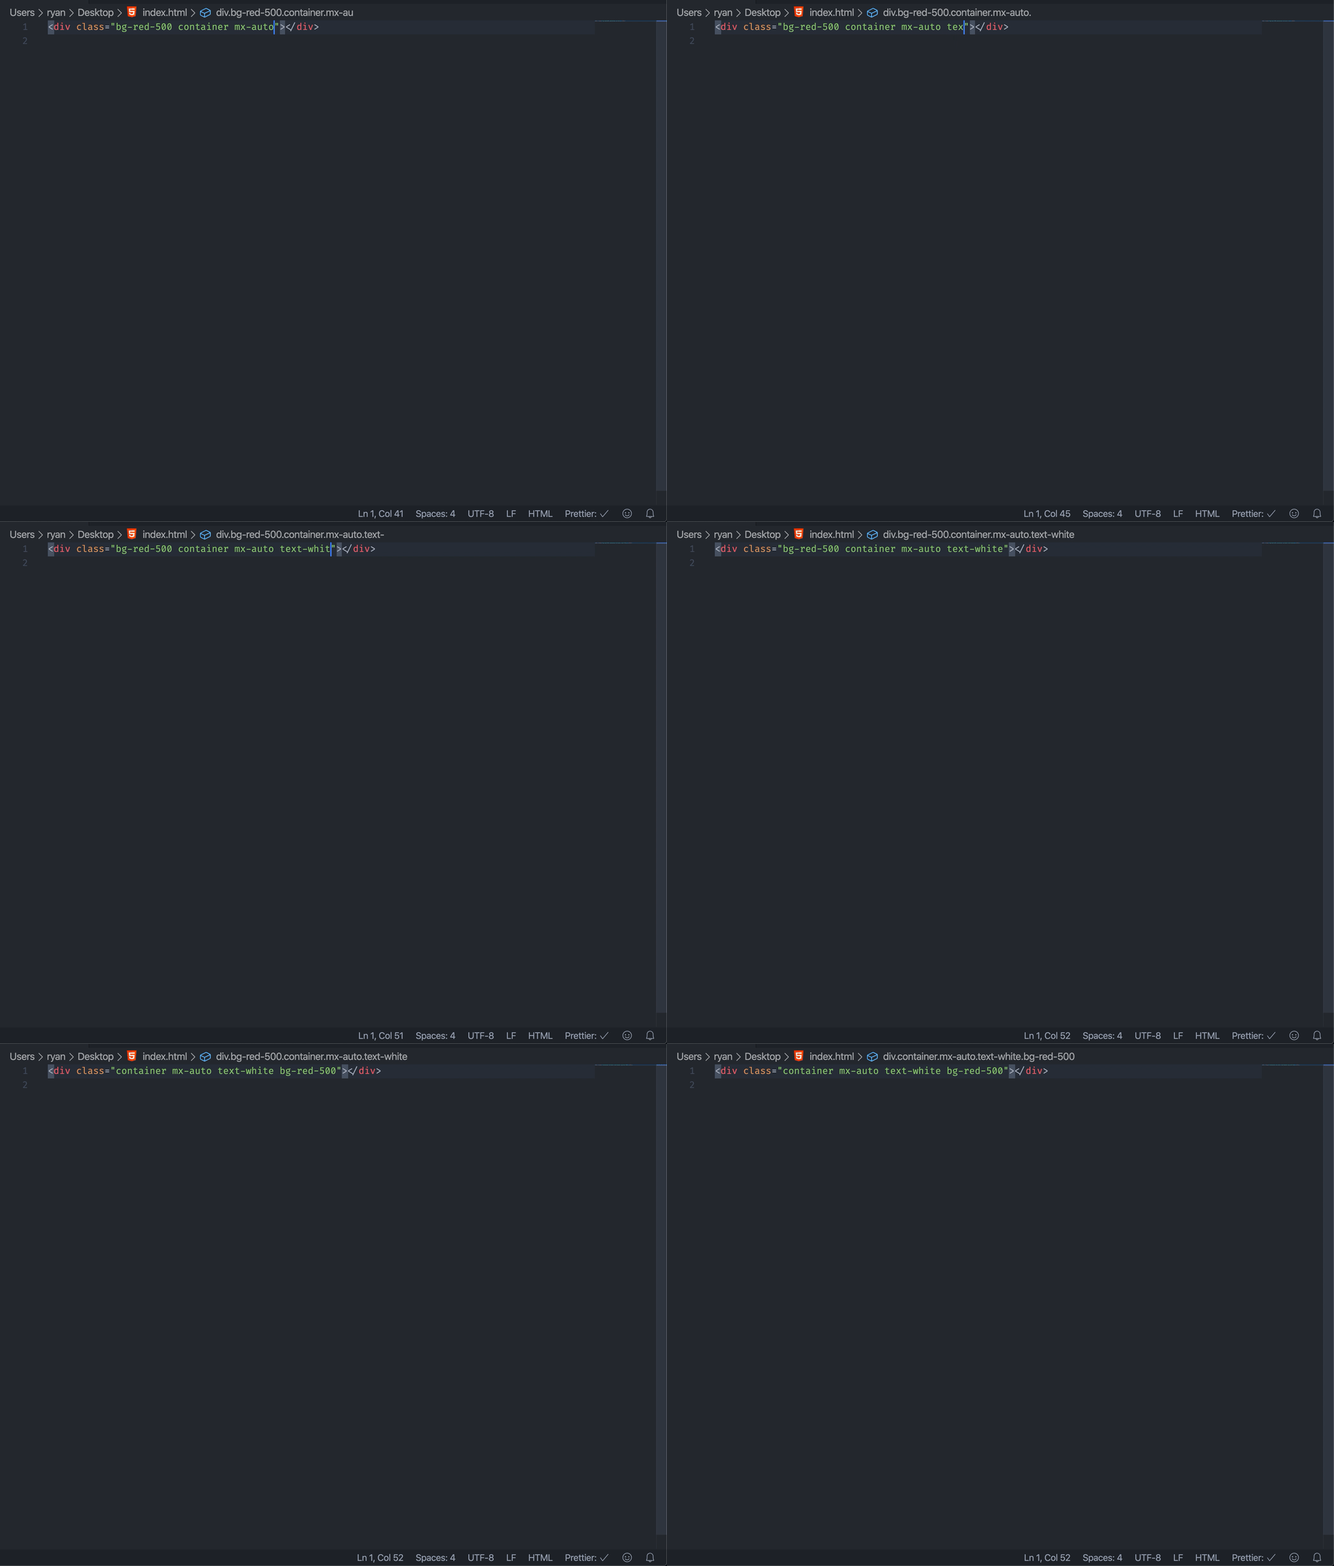 ## **Material Design Palette Generator** [Material Design Palette Generator](https://marketplace.visualstudio.com/items?itemName=piyush-bhatt.vscode-mat-palette) 是一個 VSCode 外掛,用於生成 [material 調色板](https://material.io/design/color/the-color-system.html#tools-for-picking-colors)。 **⬇️** [**下載**](https://marketplace.visualstudio.com/items?itemName=piyush-bhatt.vscode-mat-palette) 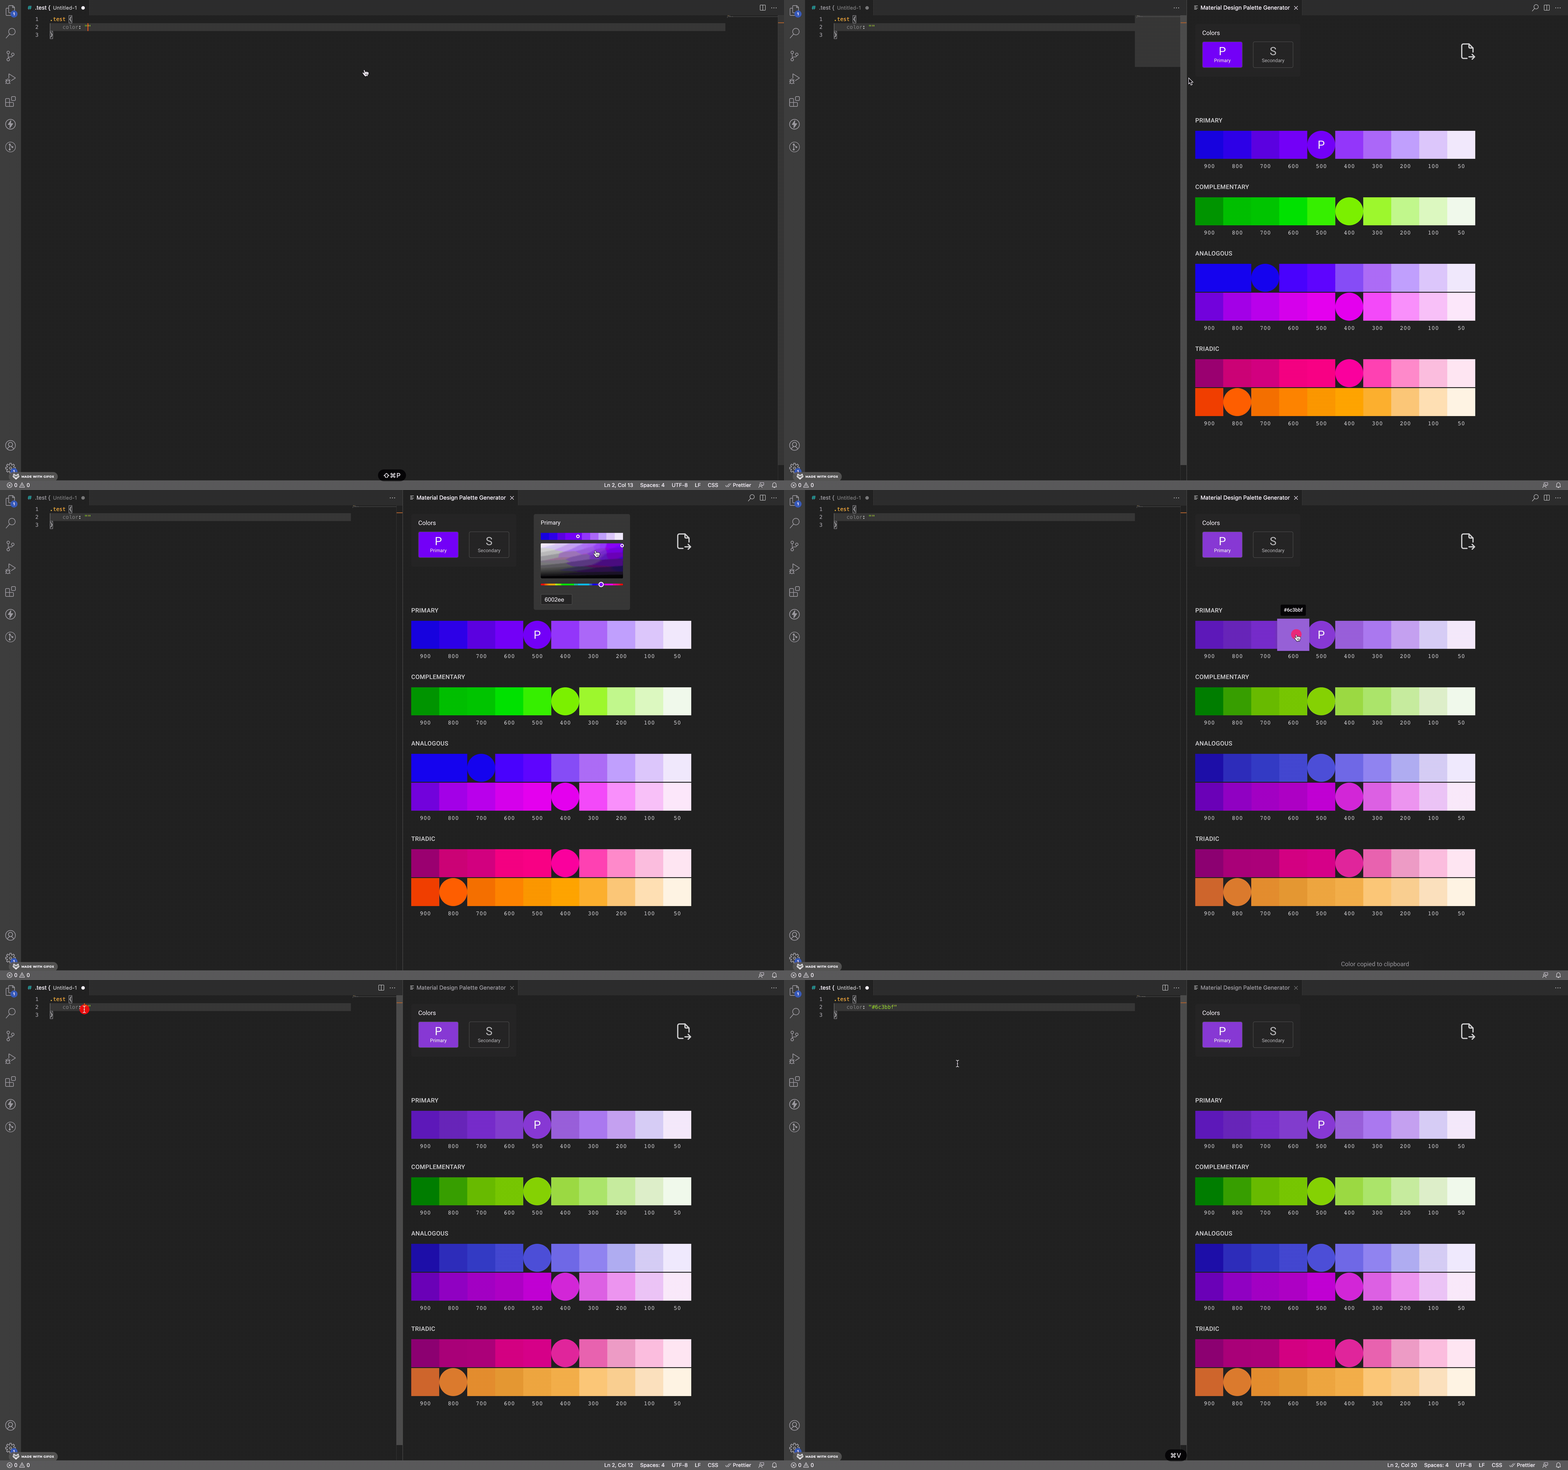 --- 以上,簡單分享,希望對您有幫助!
## 前情提要 逛論壇或網站常常有惱人的蓋板廣告,要馬就是要你登入、註冊, 要馬就是搞一堆課程的販售廣告, 對重視使用者體驗的人來說,真的是一場噩夢! 為了解決這個問題,我模擬了AdBlock的其中一個功能,刪除頁面上的元素! 乾乾淨淨才是王道阿。 ## 效果 按下ctrl+Q啟動刪除元素模式:  被選取的會加上邊框色彩,讓人確認是否要刪除:  點選確認後:  煩人的元素就此消失在這個永恆的宇宙裡。 ## 觀念筆記 ### 套件一:toastr ```javascript= //toast.js cdn匯入 const toastJS = ` <link href="https://cdnjs.cloudflare.com/ajax/libs/toastr.js/2.1.4/toastr.min.css" rel="stylesheet" /> <script src="https://cdnjs.cloudflare.com/ajax/libs/toastr.js/2.1.4/toastr.min.js"></script>` $('body').append(toastJS); ```  [測試效果反應網站](https://codeseven.github.io/toastr/demo.html)  [[十分鐘學習] toastr - 簡易提示訊息](https://ithelp.ithome.com.tw/articles/10197861) ### 套件二:SweetAlert2 ```javascript= //設定cdn使用Sweetalert套件 let Sweetalert2=`<script src="https://cdn.jsdelivr.net/npm/sweetalert2@11"></script>` $('html').append(Sweetalert2) ```   有提供很多API範例,還可以自己定義可愛的小動物XD [官方網站](https://sweetalert2.github.io/) ### 監聽鍵盤組合鍵 ``` document.addEventListener('keydown', function(e){ if(e.which==81 && e.ctrlKey==true){ //..... } ``` ### Object.assign 動態修改樣式  [用JS動態修改CSS的三種寫法,花式JS玩弄樣式,嚇死你的同事!](https://codelove.tw/@JsLover0018/post/Ja64Kx) ## 油猴程式碼 ```javascript= // ==UserScript== // @name 刪除廣告元素 // @namespace http://tampermonkey.net/ // @version 0.1 // @description try to take over the world! // @author You // @match *://*/* // @require https://code.jquery.com/jquery-3.6.3.min.js // @icon https://www.hexschool.com/ // @grant none // ==/UserScript== (function() { //--------------------------------------- // 宣告變數 let set let Check = true; let List=[] //設定選取的border色彩效果 let styleNeon = `@keyframes neon-color { from { filter: hue-rotate(0deg); } to { filter: hue-rotate(360deg); } }` $('style:last').append(styleNeon) //設定cdn使用Sweetalert套件 let Sweetalert2=`<script src="https://cdn.jsdelivr.net/npm/sweetalert2@11"></script>` $('html').append(Sweetalert2) //使用者點選某個元素 執行刪除元素function function SetDeleteEl(e){ e.preventDefault(); set=e.target.class console.log(set) const border={ border:"4px dotted red" } const Neon={ animation: "neon-color 2.5s linear infinite" } const NoBorder={ border:"none" } const StopNeon={ animation: "" } Object.assign(e.target.style,border) Object.assign(e.target.style,Neon) //e.target.remove() if (Check==true){ Swal.fire({ title: '確定要刪除這個元素?', showDenyButton: true, showCancelButton: false, confirmButtonText: '確認', denyButtonText: `取消`, }).then((result) => { /* Read more about isConfirmed, isDenied below */ if (result.isConfirmed) { e.target.remove() List.push(e.target.className) localStorage.setItem('List',List); Check=false; Swal.fire('成功刪除此元素!', '', 'success') } else if (result.isDenied) { Check=false; Swal.fire('動作已取消', '', 'info') Object.assign(e.target.style,NoBorder) Object.assign(e.target.style,StopNeon) }; }); } //選取流程結束後 解開選取流程的事件綁定 $('body').unbind('click',SetDeleteEl) } //toast.js cdn匯入 const toastJS = ` <link href="https://cdnjs.cloudflare.com/ajax/libs/toastr.js/2.1.4/toastr.min.css" rel="stylesheet" /> <script src="https://cdnjs.cloudflare.com/ajax/libs/toastr.js/2.1.4/toastr.min.js"></script>` $('body').append(toastJS); // 當使用者按下Ctrl+Q 就執行主程序 document.addEventListener('keydown', function(e){ if(e.which==81 && e.ctrlKey==true){ RemoveListItem(); toastr.options = { // 參數設定[註1] "closeButton": false, // 顯示關閉按鈕 "debug": false, // 除錯 "newestOnTop": false, // 最新一筆顯示在最上面 "progressBar": false, // 顯示隱藏時間進度條 "positionClass": "toast-bottom-right", "preventDuplicates": false, // 隱藏重覆訊息 "onclick": null, // 當點選提示訊息時,則執行此函式 "showDuration": "300", // 顯示時間(單位: 毫秒) "hideDuration": "1000", // 隱藏時間(單位: 毫秒) "timeOut": "2000", // 當超過此設定時間時,則隱藏提示訊息(單位: 毫秒) "extendedTimeOut": "1000", // 當使用者觸碰到提示訊息時,離開後超過此設定時間則隱藏提示訊息(單位: 毫秒) "showEasing": "swing", // 顯示動畫時間曲線 "hideEasing": "linear", // 隱藏動畫時間曲線 "showMethod": "fadeIn", // 顯示動畫效果 "hideMethod": "fadeOut" // 隱藏動畫效果 } toastr.success( "已開啟刪除元素模式!" ); $('body').on('click',SetDeleteEl) Check=true }}) function RemoveListItem(){ if (localStorage.getItem('List')!=null){ item=localStorage.getItem('List').split(',') for (i=0;i<item.length;i++){ item[i]='.'+item[i] item[i]=item[i].replaceAll(' ','.') try{ document.querySelector(item[i]).remove()} catch{} } // item='.'+item // item=item.replaceAll(' ','.') // document.querySelector(item).remove() } } //-------------------------------------------------------- })(); ``` ## 心得 短短150行左右的程式碼,就寫得好辛苦!(汗 過去寫過很多次類似的東西,所以基本上沒有卡關的地方, 只是設計邏輯、嘗試的過程還是比想像的還要耗精神( ´•̥̥̥ω•̥̥̥ ) 但寫出來比過去快很多,也比過去好看超級多的。 給自己一個讚讚! 重新把localstorge複習一遍,Object.assign、套件使用等。 算是一個確確實實的實力鞏固過程。 ## 延伸 未來可以新增控制黑名單元素的UI。 可以新增、刪除,看有哪些元素被列入要刪除的黑名單。
[第1課 ── 碼表應用程式](https://codelove.tw/@howtomakeaturn/post/k31583) [my code](https://replit.com/@hungYE/online-stopwatch) --- [第2課 ── 筆記應用程式](https://codelove.tw/@howtomakeaturn/post/waYLQ3) [my code](https://replit.com/@hungYE/online-notes) --- [第3課 ── 分帳應用程式](https://codelove.tw/@howtomakeaturn/post/13k0Va) [my code](https://replit.com/@hungYE/online-bill-split) --- [第4課 ── 行事曆應用程式](https://codelove.tw/@howtomakeaturn/post/9aWkka) [my code](https://replit.com/@hungYE/online-calendar) --- [第5課 ── 體重追蹤應用程式](https://codelove.tw/@howtomakeaturn/post/L3QRYa) [my code](https://replit.com/@hungYE/online-weight-tracking) --- [第6課 ── 天氣查詢應用程式](https://codelove.tw/@howtomakeaturn/post/1ayR0q) [my code](https://replit.com/@hungYE/weather) --- [第7課 ── 國家資訊與地圖應用程式](https://codelove.tw/@howtomakeaturn/post/Ex2GE3) [my code](https://replit.com/@hungYE/map)
## 課程目標 - 學習 vue 的 v-model ## 課程內容 來學一下 v-model 的用法 - https://vuejs.org/guide/components/v-model.html 老話一句,不要把這功能想得太神奇 這只是一種 props + events 的縮寫而已 功能完全一樣,只是讓元件更方便使用而已 如果真的很不喜歡,實務上完全不用,其實也不會怎樣 ## 課後作業 這一課作業,請先看一下 Input 輸入元件的用法 https://quasar.dev/vue-components/input --- 請使用官方的元件試玩工具:Vue SFC Playground https://sfc.vuejs.org/ - 請建立 `MyInput.vue` 元件,並支援下列功能 - `v-model` 能夠設定值、取得值 - `label` 能夠設定欄位名稱(可以不用像 Quasar 動畫那樣華麗,就簡單顯示在旁邊即可) - `filled` 樣式 - `outlined` 樣式 完成之後,請在 `App.vue` 之中匯入此元件,並用多個範例證明,有完成上述規格 做出以上功能,你就完成這次的課程目標了!
**🚨🚨注:**本文分享的所有tips、tricks都是GitHub repository[【css tips tricks】](https://github.com/devsyedmohsin/css-tips-tricks)的一部分。覺得有用的話請查看資源庫並給它一個star🌟 原文出處:https://dev.to/devsyedmohsin/22-useful-css-tips-and-tricks-every-developer-should-know-13c6 ## 1. Docs Layout 僅用兩行 CSS 建立響應式文件樣式的佈局。 ``` .parent{ display: grid; grid-template-columns: minmax(150px, 25%) 1fr; } ```  ## 2.自定義游標 查看 github 存儲庫 [css 提示技巧](https://github.com/devsyedmohsin/css-tips-tricks) 以了解更多訊息。 ``` html{ cursor:url('no.png'), auto; } ```  ## 3. 用圖片填充文本 ``` h1{ background-image: url('images/flower.jpg'); background-clip: text; color: transparent; background-color: white; } ```  **注意:** 在使用此技術時始終指定 `background-color`,因為這將用作後備值,以防圖像因某種原因無法加載。 ## 4. 給文本加入描邊 使用 text-stroke 屬性使文本更易讀和可見,它會向文本加入筆劃或輪廓。 ``` /* 🎨 Apply a 5px wide crimson text stroke to h1 elements */ h1 { -webkit-text-stroke: 5px crimson; text-stroke: 5px crimson; } ```  ## 5.暫停 Pseudo Class 使用 `:paused` 選擇器在暫停狀態下設置媒體元素的樣式 同樣 `:paused` 我們也有 `:playing`。 ``` /* 📢 currently, only supported in Safari */ video:paused { opacity: 0.6; } ```  ## 6.強調文字 使用 text-emphasis 屬性將強調標記應用於文本元素。您可以指定任何字串,包括表情符號作為其值。 ``` h1 { text-emphasis: "⏰"; } ```  ## 7.樣式首字下沉 避免不必要的 `<span>`,而是使用偽元素來為您的內容設置樣式,就像 `first-letter` 偽元素一樣,我們也有 `first-line` 偽元素。 ``` h1::first-letter{ font-size: 2rem; color:#ff8A00; } ```  ## 8.變數的回退值 ``` /* 🎨 crimson color will be applied as var(--black) is not defined */ :root { --orange: orange; --coral: coral; } h1 { color: var(--black, crimson); } ```  ## 9. 改變書寫模式 您可以使用書寫模式屬性來指定文本在您的網站上的佈局方式,即垂直或水平。 ``` <h1>Cakes & Bakes</h1> ``` ``` /* 💡 specifies the text layout direction to sideways-lr */ h1 { writing-mode: sideways-lr; } ``` 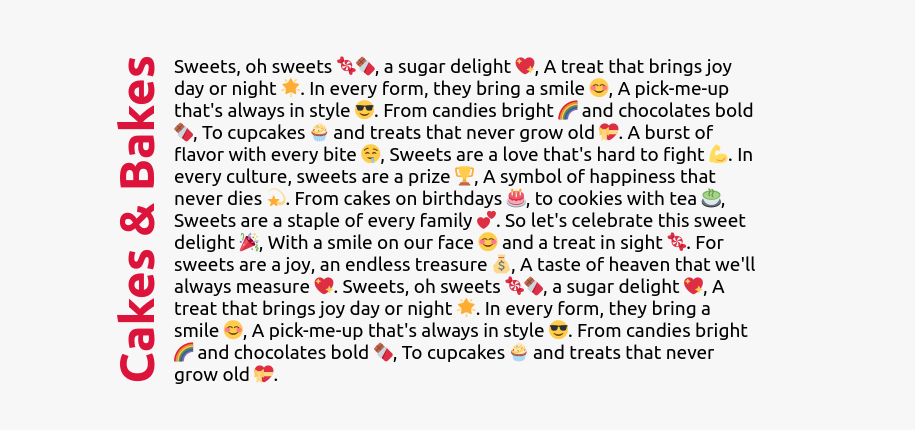 ## 10.彩虹動畫 為元素建立連續循環的彩色動畫以吸引用戶注意力。閱讀 [css 提示技巧](https://github.com/devsyedmohsin/css-tips-tricks#rainbow-animation) 存儲庫以了解何時使用“prefer-reduced-motion”媒體功能 ``` button{ animation: rainbow-animation 200ms linear infinite; } @keyframes rainbow-animation { to{ filter: hue-rotate(0deg); } from{ filter: hue-rotate(360deg); } } ```  ## 11.掌握Web開發 訂閱我們的 [YouTube 頻道](https://www.youtube.com/@nisarhassan12),讓您的網絡開發技能更上一層樓。 [最近的視頻系列](https://www.youtube.com/watch?v=1nchVfpMGSg&list=PLwJBGAxcH7GzdavgKlCACbESzr-40lw3L) 之一介紹了建立以下開源[投資組合模板](https://github.com/nisarhassan12 /投資組合模板)。  ## 12. 懸停時縮放 ``` /* 📷 Define the height and width of the image container & hide overflow */ .img-container { height: 250px; width: 250px; overflow: hidden; } /* 🖼️ Make the image inside the container fill the container */ .img-container img { height: 100%; width: 100%; object-fit: cover; transition: transform 200m ease-in; } img:hover{ transform: scale(1.2); } ```  ## 13.屬性選擇器 使用屬性選擇器根據屬性選擇 HTML 元素。 ``` <a href="">HTML</a> <a>CSS</a> <a href="">JavaScript</a> ``` ``` /* 🔗 targets all a elements that have a href attribute */ a[href] { color: crimson; } ``` 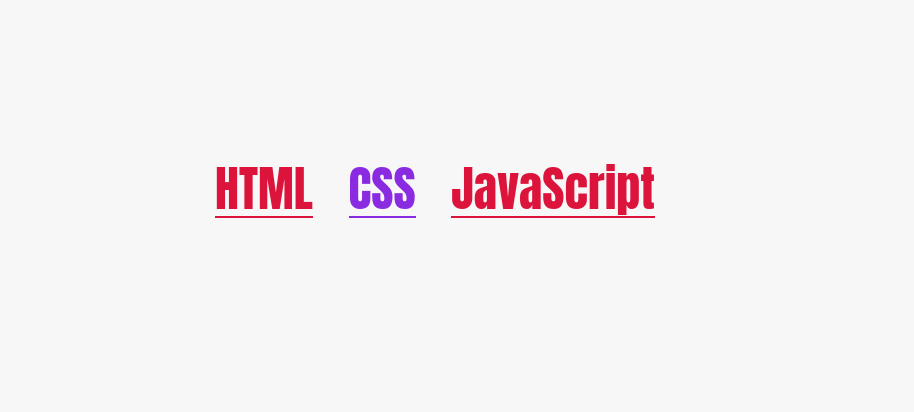 ## 14. 裁剪元素 使用 `clip-path` 屬性建立有趣的視覺效果,例如將元素剪裁成三角形或六邊形等自定義形狀。 ``` div { height: 150px; width: 150px; background-color: crimson; clip-path: polygon(50% 0%, 0% 100%, 100% 100%); } ```  ## 15.檢測屬性支持 使用 CSS `@support 規則` 直接在您的 CSS 中檢測對 CSS 特性的支持。查看 [css 提示技巧](https://github.com/devsyedmohsin/css-tips-tricks#check-if-property-is-supported) 存儲庫以了解有關功能查詢的更多訊息。 ``` @supports (accent-color: #74992e) { /* code that will run if the property is supported */ blockquote { color: crimson; } } ```  ## 16. CSS 嵌套 CSS 工作組一直在研究如何向 CSS 加入嵌套。通過嵌套,您將能夠編寫更直觀、更有條理和更高效的 CSS。 ``` <header class="header"> <p class="text">Lorem ipsum, dolor</p> </header> ``` ``` /* 🎉 You can try CSS nesting now in Safari Technology Preview*/ .header{ background-color: salmon; .text{ font-size: 18px; } } ``` ## 17.箝制函數 使用 `clamp()` 函數實現響應式和流暢的排版。 ``` /* Syntax: clamp(minimum, preferred, maximum) */ h1{ font-size: clamp(2.25rem,6vw,4rem); } ```  ## 18. 樣式化可選字段 你可以使用 `:optional` 偽類來設置表單字段的樣式,例如 input、select 和 textarea,這些字段沒有 required 屬性。 ``` /* Selects all optional form fields on the page */ *:optional{ background-color: green; } ``` ## 19. 字間距屬性 使用 `word-spacing` 屬性指定單詞之間的空格長度。 ``` p { word-spacing: 1.245rem; } ``` ## 20. 建立漸變陰影 這就是您如何建立漸變陰影以獲得獨特的用戶體驗。 ``` :root{ --gradient: linear-gradient(to bottom right, crimson, coral); } div { height: 200px; width: 200px; background-image: var(--gradient); border-radius: 1rem; position: relative; } div::after { content: ""; position: absolute; inset: 0; background-image: var(--gradient); border-radius: inherit; filter: blur(25px) brightness(1.5); transform: translateY(15%) scale(0.95); z-index: -1; } ```  ## 21. 改變標題位置 使用 `caption-side` 屬性將表格標題(表格標題)放置在表格的指定一側。 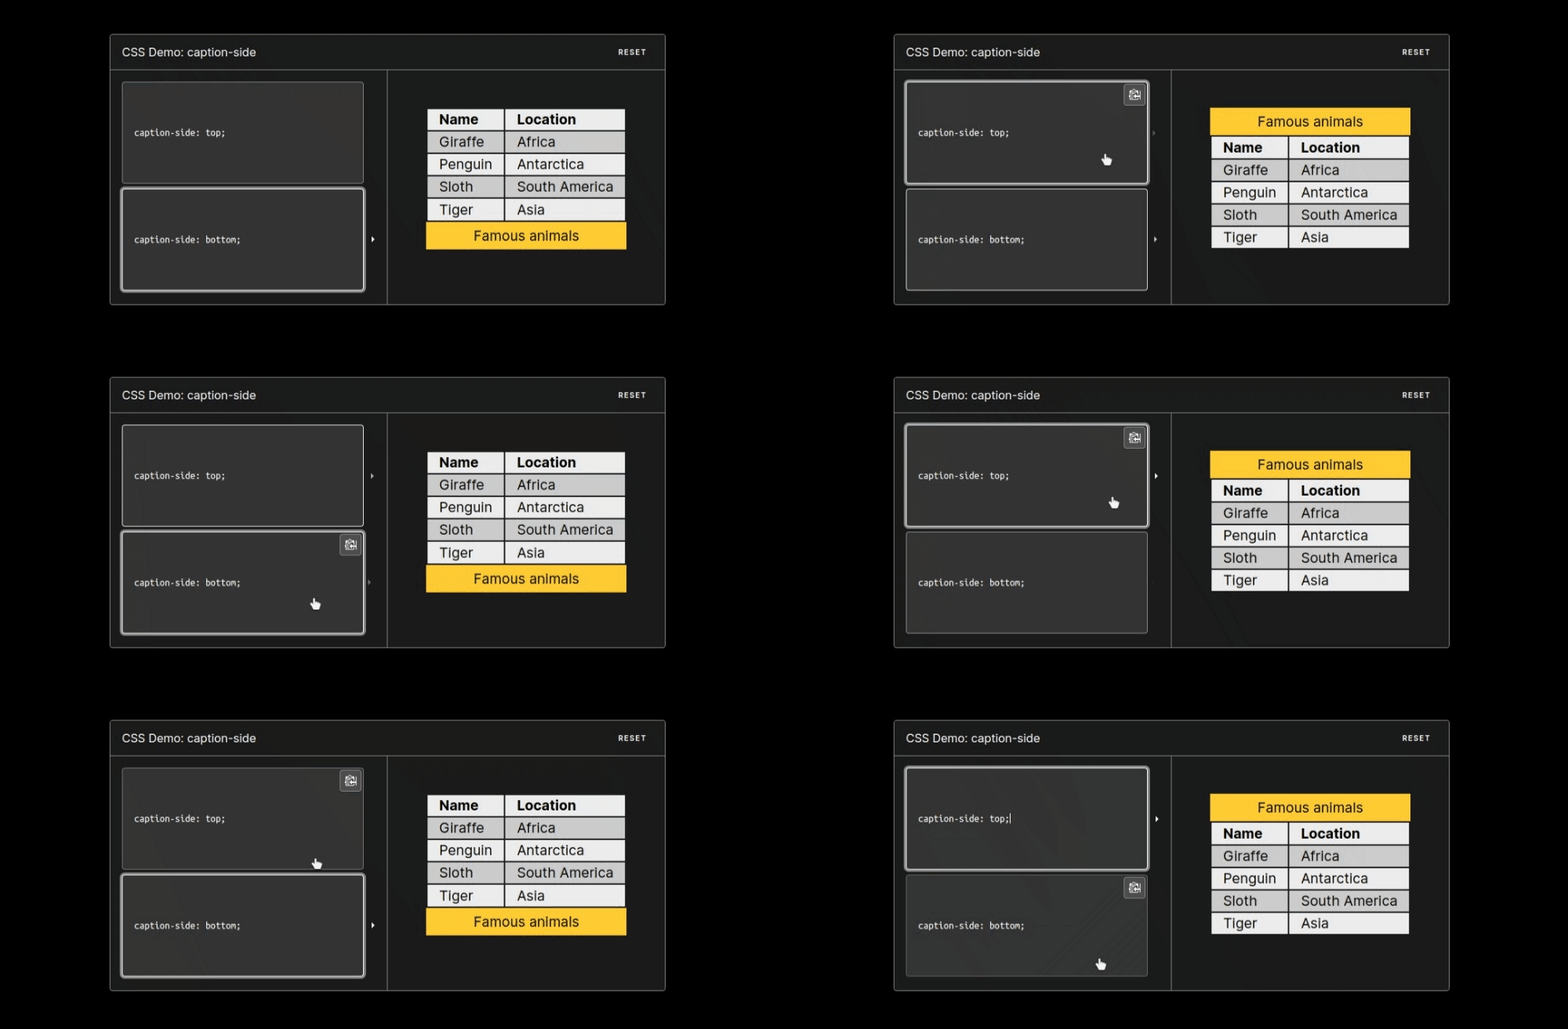 ## 22. 建立文本列 使用列屬性為文本元素製作漂亮的列佈局。 ``` /* 🏛️ divide the content of the "p" element into 3 columns */ p{ column-count: 3; column-gap: 4.45rem; column-rule: 2px dotted crimson; } ```  --- 以上分享,希望對您有幫助!
* [第1課 ── 碼表應用程式](https://replit.com/@birdiewu/Ma-Biao-Ying-Yong-Cheng-Shi-online-stopwatch?v=1) * [第2課 ── 筆記應用程式](https://replit.com/@birdiewu/Bi-Ji-Ying-Yong-Cheng-Shi-online-notepad?v=1) * [第3課 ── 分帳應用程式](https://replit.com/@birdiewu/Fen-Zhang-Ying-Yong-Cheng-Shi-online-split-the-bill?v=1) * [第4課 ── 行事曆應用程式](https://replit.com/@birdiewu/Xing-Shi-Li-Ying-Yong-Cheng-Shi-online-calendar?v=1) * [第5課 ── 體重追蹤應用程式](https://replit.com/@birdiewu/Ti-Zhong-Zhui-Zong-Ying-Yong-Cheng-Shi-online-weight-tracker?v=1) 備註:如果第五課卡關,說不定你遇到跟我一樣的問題,可以參考[這裡的討論串](https://codelove.tw/@birdie2019/post/Ja69K3) * [第6課 ── 天氣查詢應用程式](https://replit.com/@birdiewu/Tian-Qi-Cha-Xun-Ying-Yong-Cheng-Shi-weather-in-taiwan?v=1) * [第7課 ── 國家資訊與地圖應用程式](https://replit.com/@birdiewu/Guo-Jia-Zi-Xun-Yu-Di-Tu-Ying-Yong-Cheng-Shi-world-map?v=1) 心得分享: JavaScript第八系列的作業跟前七個系列相比真的有挑戰性和困難度,此系列讓我進入到學習的陣痛期,不習慣、沒自信地摸索著,在網路上東看看西看看方法,文件重複看了好多次,code也拼拼湊湊完成每個作業的規格,遇到卡關的問題學著自己解決(除了第五課的問題外,那邊卡關兩天,最後終於揮白旗XD),想想有什麼辦法可以做或可以找哪方面的資料,我認為自己不是很聰明和邏輯好的人,剛開始覺得作業規格條件好困難,一直出現卡關的問題,現在回頭看其實我都挑戰完成了欸!雖然回去翻作業看還是有小瑕疵和待優化的地方,但還是恭喜自己終於完成了! _(:з」∠)_
您好,請問幾個問題。 1.為什麼我使用position:relative,網頁會出現很大的空白,我該如何解決。 2.使用絕對位置,我該如何讓我的網頁隨著比例縮放。 問題1 :  問題2:   這是網頁全開的時候  HTML: ``` <!DOCTYPE html> <html> <head> <meta charset = "UTF-8"> <title>佳加安全帽</title> <link rel = "stylesheet" href = "style.css"> </head> <body class = "page"> <div class = "navbar"> <div class="container"> <div class = "logo"> <a href = "#"><img src = "jiajia.jpg"/></a> </div> <div class="menu"> <ul class="choose"> <li><a href = "">所有商品</a></li> <li><a href = "">特價商品</a></li> <li><a href = "">安全帽</a></li> <li><a href = "">藍芽耳機</a></li> <li><a href = "">裝備衣物</a></li> <li><a href = "">配件</a></li> <li><a href = "">包包</a></li> </ul> </div> <div class="user"> <ul> <li><a href = "">Log in 登入</a></li> <li>|</li> <li><a href = "">Sign up 註冊</a></li> </ul> </div> </div> </div> <div class="background"> <div class="content"> <h1>在危險的世界中,給你多一份安全</h1> </br> </br> <p>留下您的email,獲得新商品及最新優惠資訊</p> </br> <input type= "email" name = "email" value = "Your email"> </br> <input class="submit" type = "submit" name= "submit" value = "訂閱"> </div> </div> </body> </html> ``` CSS: ``` *{ margin: 0px; padding: 0px; list-style-type: none; text-decoration: none; } .navbar{ background-color: #272727; height: 50px; width: 100%; } .logo img{ height: 50px; } .menu{ position: relative; top: -50px; line-height: 45px; left: 500px; } .menu li{ float: left; } .menu a{ color: #D9B300; display: block; padding: 0 10px; } .menu a:hover{ background-color: #D9B300; color: #272727; } .user{ position: relative; top: -50px; left: 800px; line-height: 45px; } .user li{ float: left; color: #D9B300; } .user a{ color: #D9B300; display: block; padding: 0 10px; } .user a:hover{ background-color: #D9B300; color: #272727; } h1{ color: white; } p{ color: white; } .background{ background-image: url("motor.jpg"); background-size: cover; background-repeat: no-repeat; height: 660px; text-align: center; } .content input{ width: 400px; height: 40px; } .content h1{ font-size: 40px; } .content p{ font-size: 20px; } .content{ position: absolute; top: 50%; left: 50%; transform: translate(-50%, -50%); } .submit{ font-weight: bold; font-size: 20px; background-color: #D9B300; color: #272727; border-radius: 10px; border: 0px; } .submit:hover{ background-color: #272727; color: #D9B300; }
在自學網頁の嬰兒教材:第3課 ── 網頁排版,練習使用 inline-block 版面配置,但一直無法變成如圖下那樣,請問是少了甚麼東西嗎? 謝謝! https://jsfiddle.net/u2bkycxL/1/ 
https://replit.com/@birdiewu/Ti-Zhong-Zhui-Zong-Ying-Yong-Cheng-Shi-online-weight-tracker?v=1  JS部分加上第46~49和55~58行無法更新圖表(官網提供的功能) 新增和刪除資料時,圖表無法跟著一起改變,只能重新整理網頁才會改變 不知道哪邊出了問題@@
## 影片來源 https://youtu.be/EeZM5SXuCsU ##內容 ---------- 1. テキスト系 ---------- 02:02 line-clamp 02:56 text-stroke 03:22 background-clip: text; ---------- 2. 画像系 ---------- 03:47 object-fit 04:23 aspect-ratio 04:58 clip-path 05:30 filter 05:57 mix-blend-mode ---------- 3. サイズ ---------- 06:32 max-content 07:02 min, max, clamp 07:13 min 07:50 max 08:14 clamp ---------- 4. レイアウト系 ---------- 08:52 gridlayout 09:21 gap 10:03 display: contents; ---------- 5. 動き ---------- 11:08 position: sticky; 11:49 scroll-behavior: smooth; ---------- 6. その他 ---------- 12:30 Custom Properties 14:35 backdrop-filter 15:37 detail summary 先貼上來,有空補上mdn或是w3c的說明
你的轉職路上,還缺少一份自學作業包!寫完這幾包,直接拿作品去面試上班!
本論壇另有附設一個 LINE 新手發問&交流群組!歡迎加入討論!