為優秀的開源庫做出貢獻是建立作品集的好方法。 我已經編譯了 23 個優秀的開源程式庫和一些很好的入門問題。 不要忘記加星號並支持這些🌟  --- #產品中的人工智慧: ### 1. [CopilotKit](https://github.com/CopilotKit/CopilotKit) - 應用內 AI 聊天機器人與 AI 文字區域 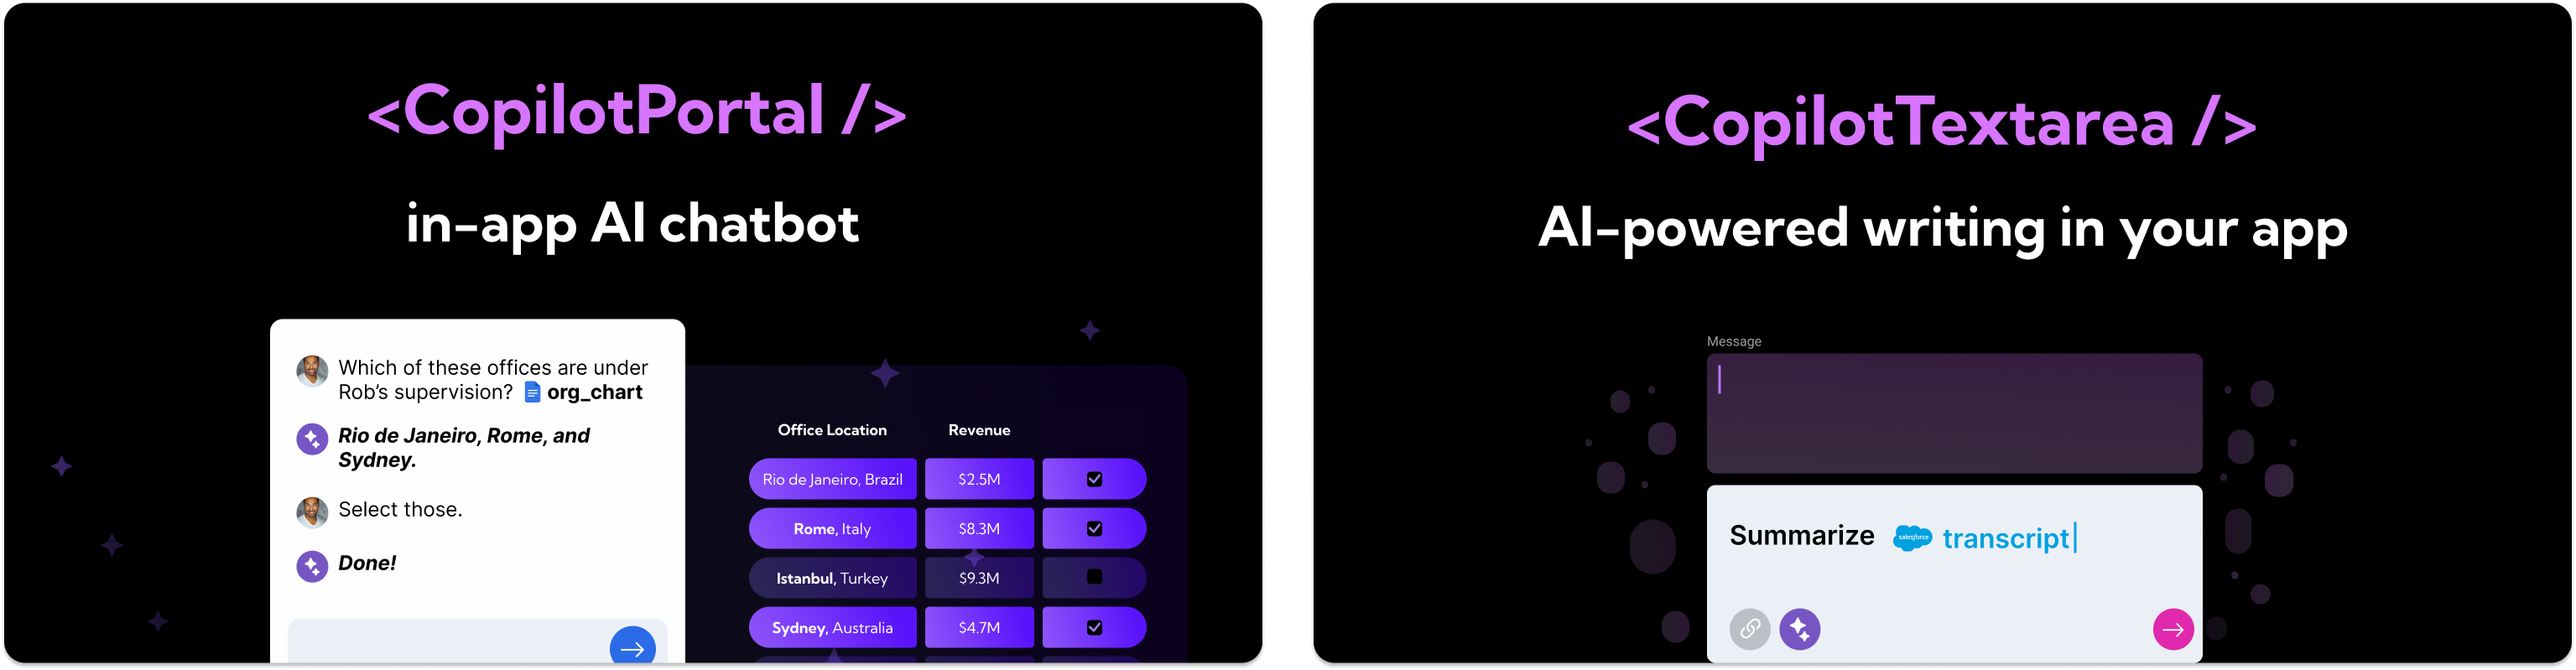 開源平台,用於使用兩個 React 元件將關鍵 AI 功能整合到 React 應用程式中。 CopilotPortal:應用程式內人工智慧聊天機器人,可以「查看」當前應用程式狀態並採取行動。 CopilotTextarea:AI 驅動的 <textarea /'> 替換。具有自動完成、插入和生成功能。 ###[好第一期:](https://github.com/CopilotKit/CopilotKit/issues/62) ``` Support bold and italicized text in CopilotTextarea Proposal: Add support for bold and italicized text in CopilotTextarea CopilotTextarea uses slate-js under the hood. Lots of examples for adding bold/italicized support Initially only add programatic support. UI support will be added separately in [TODO add issue] Implementation tips: changes will be made to render-element.tsx and base-copilot-textarea.tsx custom-editor.tsx structures may also require changes ``` {% cta https://github.com/CopilotKit/CopilotKit %} Star CopilotKit ⭐️ {% endcta %} --- ###2.[Tavily GPT 研究員](https://github.com/assafelovic/gpt-researcher){% embed https://github.com/assafelovic/gpt-researcher no-readme %} ###3.[Pezzo.ai](https://github.com/pezzolabs/pezzo){% 嵌入 https://github.com/pezzolabs/pezzo no-readme %} ###4.[Weaviate](https://github.com/weaviate/weaviate){% 嵌入 https://github.com/weaviate/weaviate no-readme %} ###5.[LangChain](https://github.com/langchain-ai/langchain){% 嵌入 https://github.com/langchain-ai/langchain no-readme %} --- #🛜網頁開發: ### 6. [Wasp](https://github.com/wasp-lang/wasp) - 使用 React 和 Node.js 開發全端 Web 應用程式  使用 React 和 Node.js 進行快速全端 Web 應用程式開發。 Wasp 提供了一種建立現代 Web 應用程式的簡化方法,將前端的 React 和後端的 Node.js 結合在一個緊密結合的框架中。 ###[好第一期:](https://github.com/wasp-lang/wasp/issues/874) ``` Add images (or link to the example app) of auth UI helpers Wasp provides At this point in docs (also in the tutorial if we're using it), it would be nice to add an image of UI helpers for Auth (login/signup form, Google/GitHub button, ...) so developers can immediately see what they are getting and how nice it looks. ``` {% cta https://github.com/wasp-lang/wasp %} 星黃蜂 ⭐️ {% endcta %} --- ###7.[ClickVote](https://github.com/clickvote/clickvote) {% 嵌入 https://github.com/clickvote/clickvote no-readme %} ###8.[ReactFlow](https://github.com/xyflow/xyflow) {% 嵌入 https://github.com/xyflow/xyflow no-readme %} ###9.[Trigger.dev](https://github.com/triggerdotdev/trigger.dev) {% 嵌入 https://github.com/triggerdotdev/trigger.dev no-readme %} ###10.[Novu](https://github.com/novuhq/novu) {% 嵌入 https://github.com/novuhq/novu no-readme %} --- #🧑💻DevOps: ### 11. [Logstash](https://github.com/elastic/logstash) - 由 elastic 傳輸和處理日誌和事件。  輕鬆將點讚、按讚和評論加入到您的網路應用程式中。 用於加入這些元件的簡單反應程式碼。 ### [第一期好](https://github.com/elastic/logstash/issues/15561) ``` Allow comments in pipeline config between hash entries Currently it seems not allowed to make comments between hash entries, this is a feature request to allow it. ``` {% cta https://github.com/elastic/logstash %} 明星 Logstash ⭐️ {% endcta %} --- ###12.[Odigos](https://github.com/keyval-dev/odigos) {% 嵌入 https://github.com/keyval-dev/odigos no-readme %} ###13.[Glasskube](https://github.com/glasskube/operator) {% 嵌入 https://github.com/glasskube/operator no-readme %} ###14.[鏡像](https://github.com/metalbear-co/mirrord){% 嵌入 https://github.com/metalbear-co/mirrord no-readme %} ###15.[挖土機](https://github.com/diggerhq/digger) {% 嵌入 https://github.com/diggerhq/digger no-readme %} --- #💽資料庫: ### 16. [Supabase](https://github.com/supabase/supabase) - 開源 Rirebase 替代品  使用託管 Postgres、身份驗證和即時功能建立現代資料驅動應用程式 ###[第一期好:](https://github.com/supabase/supabase/issues/19396) ``` Horizontal Scroll for CodeBlocks Currently when reading the dcs, it's not possible to view all of the code for alot of the samples. Is this the Component rendered across all of the web properties, if so I'll be happy to throw on a horizontal scroll bar that matches supabase branding. ``` {% cta https://github.com/supabase/supabase %} 明星 Supabase ⭐️ {% endcta %} --- ###17.[Appwrite](https://github.com/appwrite/appwrite){% 嵌入 https://github.com/appwrite/appwrite no-readme %} ###18.[Superduperdb] (https://github.com/SuperDuperDB/superduperdb){% 嵌入 https://github.com/SuperDuperDB/superduperdb no-readme %} ###19.[Milvus](https://github.com/milvus-io/milvus) {% 嵌入 https://github.com/milvus-io/milvus no-readme %} --- #👾其他: ### 21. [Snapify](https://github.com/MarconLP/snapify) - 開源螢幕錄製  螢幕錄製,但免費、開源,您負責自己的資料。 ###[好第一期:](https://github.com/MarconLP/snapify/issues/18) ``` Ability to create GIFs and take screenshots to also store in S3 ``` {% cta https://github.com/MarconLP/snapify %} 明星 Snapify ⭐️ {% endcta %} --- ###22.[ReactAgent](https://github.com/eylonmiz/react-agent){% 嵌入 https://github.com/eylonmiz/react-agent no-readme %} ###23.[對初學者來說很棒](https://github.com/MunGell/awesome-for-beginners){% embed https://github.com/MunGell/awesome-for-beginners no -readme %} --- #就是這樣,夥計們! ## 別忘了按讚、留言和收藏🫡 --- 原文出處:https://dev.to/copilotkit/23-open-source-libraries-to-launch-your-portfolio-to-the-moon-fe
# 長話短說;博士 我們都已經看到了 ChatGPT 的功能(這對任何人來說都不陌生)。 很多文章都是使用 ChatGPT 一遍又一遍地寫的。 **實際上**,DEV 上的文章有一半是用 ChatGPT 寫的。 你可以使用一些[AI內容偵測器](https://copyleaks.com/ai-content- detector)來檢視。 問題是,ChatGPT 永遠不會產生一些非凡的內容,除了它內部已經有(經過訓練/微調)的內容。 但有一種方法可以超越目前使用 RAG(OpenAI 助理)訓練的內容。 [上一篇](https://dev.to/triggerdotdev/train-chatgpt-on-your-documentation-1a9g),我們討論了在您的文件上「訓練」ChatGPT;今天,讓我們看看如何從中製作出很多內容。我們將: - 使用 Docusaurus 建立新的部落格系統。 - 詢問 ChatGPT,為我們寫一篇與文件相關的部落格文章。  --- ## 你的後台工作平台🔌 [Trigger.dev](https://trigger.dev/) 是一個開源程式庫,可讓您使用 NextJS、Remix、Astro 等為您的應用程式建立和監控長時間執行的作業! [](https://github.com/triggerdotdev/trigger.dev) 請幫我們一顆星🥹。 這將幫助我們建立更多這樣的文章💖 {% cta https://github.com/triggerdotdev/trigger.dev %} 為 Trigger.dev 儲存庫加註星標 ⭐️ {% endcta %} --- ## 上次回顧 ⏰ - 我們建立了一個作業來取得文件 XML 並提取所有 URL。 - 我們抓取了每個網站的 URL 並提取了標題和內容。 - 我們將所有內容儲存到文件中並將其發送給 ChatGPT 助手。 - 我們建立了一個 ChatBot 畫面來詢問 ChatGPT 有關文件的資訊。 您可以在此處找到上一個[教學]的完整原始程式碼(https://github.com/triggerdotdev/blog/tree/main/openai-assistant)。 ---  ## 稍作修改⚙️ 上次,我們建立了一個文件助理。我們寫: ``` You are a documentation assistant, loaded with documentation from ' + payload.url + ', return everything in an MD format. ``` 讓我們將其更改為部落格作者,請轉到“jobs/process.documentation.ts”第 92 行,並將其替換為以下內容: ``` You are a content writer assistant. You have been loaded with documentation from ${payload.url}, you write blog posts based on the documentation and return everything in the following MD format: --- slug: [post-slug] title: [post-title] --- [post-content] ``` 使用“slug”和“title”非常重要,因為這是 Docusaurus 的格式 - 我們的部落格系統可以接受(當然,我們也以 MD 格式發送所有輸出) ---  ## 多庫龍🦖 您可以使用多種類型的部落格系統! 對於我們的用例,我們將使用 Docusaurus,它可以讀取基於 MD 的格式(我們從 ChatGPT 請求的輸出)。 **我們可以透過執行來安裝 Docusaurus:** ``` npx create-docusaurus@latest blog classic --typescript ``` 接下來,我們可以進入已建立的目錄並執行以下命令: ``` npm run start ``` 這將啟動 Docusaurus。你可以關註一下。還有一個名為“blog”的附加目錄,其中包含所有部落格文章;這是我們保存 ChatGPT 產生的部落格文章的地方。  ---  ## 產生部落格 📨 我們需要創造一個就業機會 - 取得部落格標題 - 使用 ChatGPT 產生完整的部落格文章 - 將其保存到我們部落格上的 MD 文件中 我們可以輕鬆地使用 ChatGPT 來實現這一點! 前往“jobs”資料夾並新增一個名為“process.blog.ts”的新檔案。新增以下程式碼: ``` import { eventTrigger } from "@trigger.dev/sdk"; import { client } from "@openai-assistant/trigger"; import {object, string} from "zod"; import {openai} from "@openai-assistant/helper/open.ai"; import {writeFileSync} from "fs"; import slugify from "slugify"; client.defineJob({ // This is the unique identifier for your Job, it must be unique across all Jobs in your project. id: "process-blog", name: "Process Blog", version: "0.0.1", // This is triggered by an event using eventTrigger. You can also trigger Jobs with webhooks, on schedules, and more: https://trigger.dev/docs/documentation/concepts/triggers/introduction trigger: eventTrigger({ name: "process.blog.event", schema: object({ title: string(), aId: string(), }) }), integrations: { openai }, run: async (payload, io, ctx) => { const {title, aId} = payload; const thread = await io.openai.beta.threads.create('create-thread'); await io.openai.beta.threads.messages.create('create-message', thread.id, { content: ` title: ${title} `, role: 'user', }); const run = await io.openai.beta.threads.runs.createAndWaitForCompletion('run-thread', thread.id, { model: 'gpt-4-1106-preview', assistant_id: payload.aId, }); if (run.status !== "completed") { console.log('not completed'); throw new Error(`Run finished with status ${run.status}: ${JSON.stringify(run.last_error)}`); } const messages = await io.openai.beta.threads.messages.list("list-messages", run.thread_id, { query: { limit: "1" } }); return io.runTask('save-blog', async () => { const content = messages[0].content[0]; if (content.type === 'text') { const fileName = slugify(title, {lower: true, strict: true, trim: true}); writeFileSync(`./blog/blog/${fileName}.md`, content.text.value) return {fileName}; } }); }, }); ``` - 我們加入了一些必要的變數: - `title` 部落格文章標題 - `aId` 上一篇文章中新增的助手 ID。 - 我們為助手建立了一個新線程(`io.openai.beta.threads.create`) - 我們無法在沒有任何線程的情況下質疑它。與之前的教程不同,在這裡,我們對每個請求建立一個新線程。我們不需要對話中最後一條訊息的上下文。 - 然後,我們使用部落格標題為線程(`io.openai.beta.threads.messages.create`)新增訊息。我們不需要提供額外的說明 - 我們已經在第一部分完成了該部分😀 - 我們執行 `io.openai.beta.threads.runs.createAndWaitForCompletion` 來啟動進程 - 通常,您需要某種每分鐘執行一次的遞歸來檢查作業是否完成,但是 [Trigger.dev]( http://Trigger .dev)已經加入了一種執行進程並同時等待它的方法🥳 - 我們在查詢正文中執行帶有“limit: 1”的“io.openai.beta.threads.messages.list”,以從對話中獲取第一則訊息(在ChatGPT 結果中,第一則訊息是最後一條訊息) 。 - 然後,我們使用「writeFileSync」從 ChatGPT 取得的值來儲存新建立的部落格 - 確保您擁有正確的部落格路徑。 轉到“jobs/index.ts”並加入以下行: ``` export * from "./process.blog"; ``` 現在,讓我們建立一個新的路由來觸發該作業。 前往“app/api”,建立一個名為“blog”的新資料夾,並在一個名為“route.tsx”的新檔案中 新增以下程式碼: ``` import {client} from "@openai-assistant/trigger"; export async function POST(request: Request) { const payload = await request.json(); if (!payload.title || !payload.aId) { return new Response(JSON.stringify({error: 'Missing parameters'}), {status: 400}); } // We send an event to the trigger to process the documentation const {id: eventId} = await client.sendEvent({ name: "process.blog.event", payload }); return new Response(JSON.stringify({eventId}), {status: 200}); } ``` - 我們檢查標題和助理 ID 是否存在。 - 我們在 [Trigger.dev](http://Trigger.dev) 中觸發事件並發送訊息。 - 我們將事件 ID 傳送回客戶端,以便我們可以追蹤作業的進度。 ---  ## 前端🎩 沒什麼好做的! 在我們的「components」目錄中,建立一個名為「blog.component.tsx」的新檔案和以下程式碼: ``` "use client"; import {FC, useCallback, useEffect, useState} from "react"; import {ExtendedAssistant} from "@openai-assistant/components/main"; import {SubmitHandler, useForm} from "react-hook-form"; import {useEventRunDetails} from "@trigger.dev/react"; interface Blog { title: string, aId: string; } export const BlogComponent: FC<{list: ExtendedAssistant[]}> = (props) => { const {list} = props; const {register, formState, handleSubmit} = useForm<Blog>(); const [event, setEvent] = useState<string | undefined>(undefined); const addBlog: SubmitHandler<Blog> = useCallback(async (param) => { const {eventId} = await (await fetch('/api/blog', { method: 'POST', headers: { 'Content-Type': 'application/json' }, body: JSON.stringify(param) })).json(); setEvent(eventId); }, []); return ( <> <form className="flex flex-col gap-3 mt-5" onSubmit={handleSubmit(addBlog)}> <div className="flex flex-col gap-1"> <div className="font-bold">Assistant</div> <select className="border border-gray-200 rounded-xl py-2 px-3" {...register('aId', {required: true})}> {list.map(val => ( <option key={val.id} value={val.aId}>{val.url}</option> ))} </select> </div> <div className="flex flex-col gap-1"> <div className="font-bold">Title</div> <input className="border border-gray-200 rounded-xl py-2 px-3" placeholder="Blog title" {...register('title', {required: true})} /> </div> <button className="border border-gray-200 rounded-xl py-2 px-3 bg-gray-100 hover:bg-gray-200" disabled={formState.isSubmitting}>Create blog</button> </form> {!!event && ( <Blog eventId={event} /> )} </> ) } export const Blog: FC<{eventId: string}> = (props) => { const {eventId} = props; const { data, error } = useEventRunDetails(eventId); if (data?.status !== 'SUCCESS') { return <div className="pointer bg-yellow-300 border-yellow-500 p-1 px-3 text-yellow-950 border rounded-2xl">Loading</div> } return ( <div> <a href={`http://localhost:3000/blog/${data.output.fileName}`}>Check blog post</a> </div> ) }; ``` - 我們使用「react-hook-form」來輕鬆控制我們的輸入。 - 我們讓使用者選擇他們想要使用的助手。 - 我們建立一個包含文章標題的新輸入。 - 我們將所有內容傳送到先前建立的路由並傳回作業的「eventId」。 - 我們建立一個新的「<Blog />」元件,該元件顯示載入直到事件完成,並使用新建立的教程新增指向我們部落格的連結。 將元件加入我們的“components/main.tsx”檔案中: ``` {assistantState.filter(f => !f.pending).length > 0 && <BlogComponent list={assistantState} />} ``` 我們完成了! 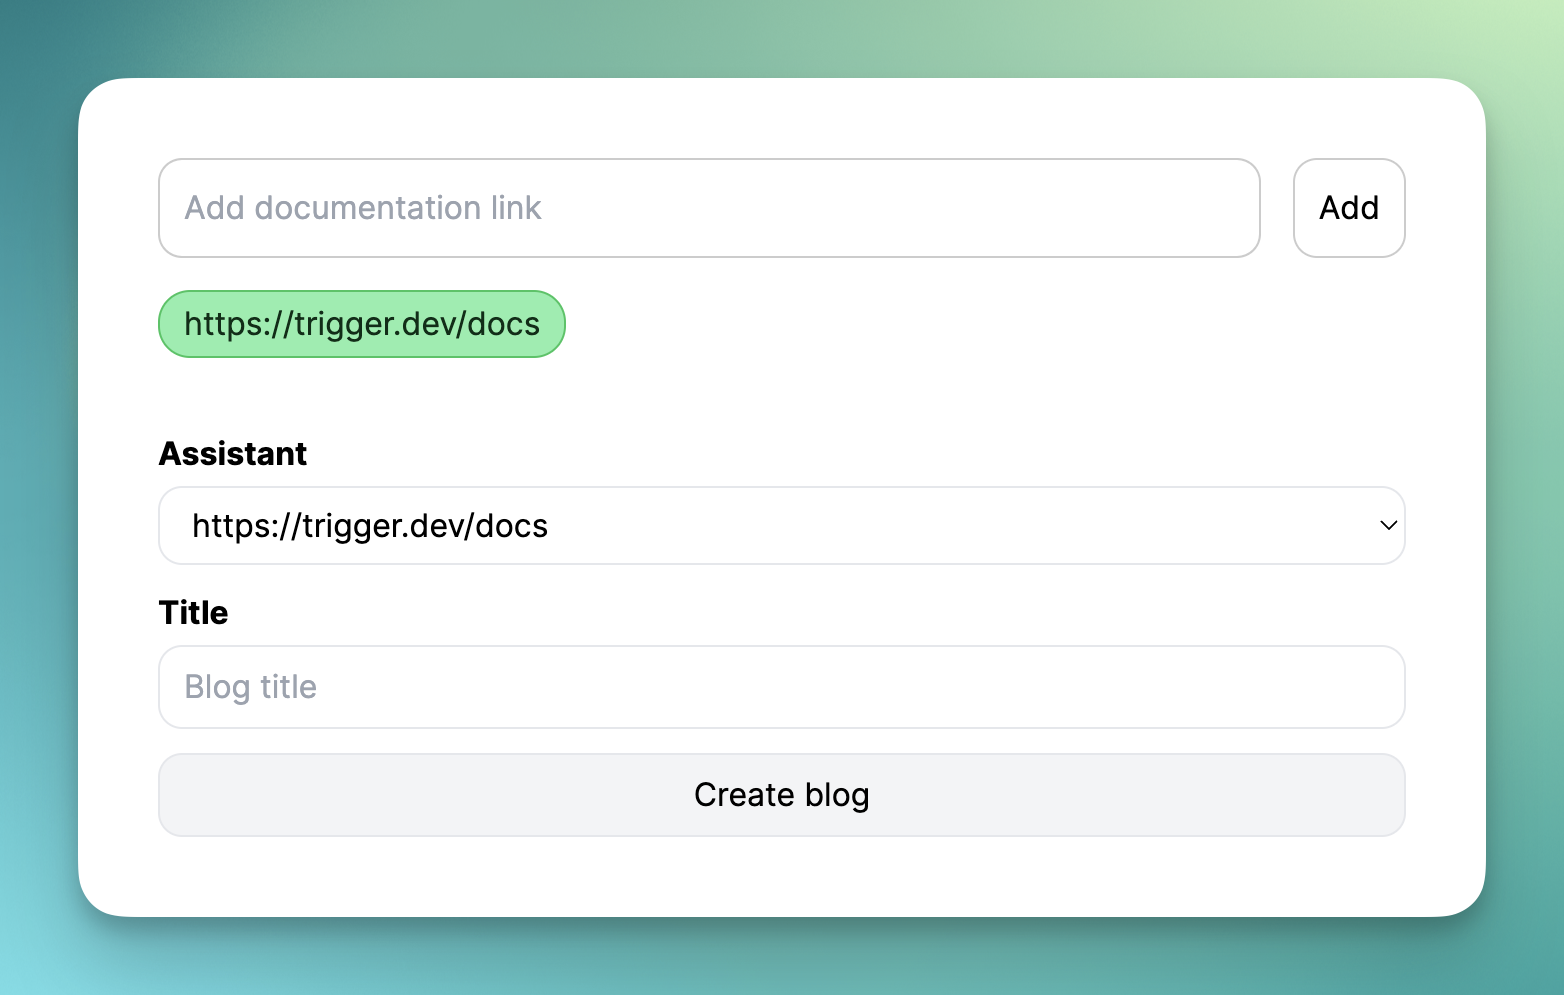 現在,讓我們新增部落格標題並點擊「生成」。  ---  ## 讓我們聯絡吧! 🔌 作為開源開發者,您可以加入我們的[社群](https://discord.gg/nkqV9xBYWy) 做出貢獻並與維護者互動。請隨時造訪我們的 [GitHub 儲存庫](https://github.com/triggerdotdev/trigger.dev),貢獻並建立與 Trigger.dev 相關的問題。 本教學的源程式碼可在此處取得: https://github.com/triggerdotdev/blog/tree/main/openai-blog-writer 感謝您的閱讀! --- 原文出處:https://dev.to/triggerdotdev/generate-blogs-with-chatgpt-assistant-1894
## 什麼是自架軟體? 自託管專案是指從使用者的伺服器或基礎架構安裝、管理和操作的軟體、應用程式或服務,而不是託管在外部或第三方伺服器(例如雲端服務供應商提供的伺服器)上。 這種模型可以更好地控制軟體和資料,並且通常在隱私、安全、客製化和成本效益方面受到青睞。 ### 自託管軟體對於新創公司的重要性🚀 - **資料控制和隱私🛡️**:完全控制您的資料。自託管意味著您新創公司的敏感資訊保留在內部,確保一流的隱私和安全。 - **客製化與靈活性 🔧**:客製化軟體以滿足您新創公司的獨特需求。與雲端託管服務不同,自架軟體允許進行廣泛的客製化。 - **成本效益💰**:從長遠來看更經濟實惠。自託管可以減少經常性的雲端服務費用,使其成為注重費用的新創公司的明智選擇。 - **可靠性和獨立性🌐**:不要受服務提供者的正常運作時間和政策的擺佈。自託管解決方案可確保一致的存取,這對於您的新創公司的順利運作至關重要。 - **合規性和安全性🔒**:輕鬆滿足特定的監管要求。透過管理您的伺服器,實施完全符合您新創公司需求的安全性和合規性措施。 ## 這些是您需要從 GitHub 取得的一些基本的自架開源儲存庫 👇 讓我們探索這些開源軟體,並了解它們如何徹底改變您的自架軟體解決方案方法。 ### [Swirl](https://github.com/swirlai/swirl-search):跨多個資料來源的人工智慧增強搜尋 [](https://github.com/swirlai/swirl-search) [**Swirl**](https://github.com/swirlai/swirl-search) 是一款創新的開源軟體,利用人工智慧搜尋各種內容和資料來源,使用讀者法學碩士智慧找到最佳結果。然後,它利用生成式人工智慧提供客製化答案,整合用戶特定的資料以獲得更相關的結果。 **它解決了什麼問題,以及它如何提供優秀的開源解決方案?** - 🌐 **多重來源搜尋**:Swirl 熟練地跨資料庫、公共資料服務和企業來源進行搜尋,提供全面的搜尋解決方案。 - 🤖 **人工智慧驅動的見解**:利用人工智慧和 ChatGPT(及更多)等大型語言模型來分析和排名搜尋結果,確保高相關性和準確性。 - 🔄 **輕鬆整合**:設定和使用簡單;從 Docker 下載開始,然後根據需要擴展以合併更多來源。 **GitHub 儲存庫連結:** [GitHub 上的 Swirl](https://github.com/swirlai/swirl-search) --- ### Clickvote:將社交反應無縫整合到您的內容中  Clickvote 是一款開源工具,可輕鬆為任何線上內容加入點讚、按讚和評論,從而增強用戶在各種環境中的互動和參與。 **它解決的問題及其開源優勢:** - 🔄 **即時互動**:提供按讚、按讚和評論的即時更新,增強用戶參與度。 - 🔍 **深度分析**:透過詳細分析提供對使用者行為的洞察,幫助了解受眾偏好。 - 🚀 **可擴展性**:每秒處理無限次點擊,即使在大流量下也能確保穩健的效能。 **GitHub 儲存庫連結:** [GitHub 上的 Clickvote](https://github.com/clickvote/clickvote) --- ### Wasp:使用 React 和 Node.js 徹底改變全端 Web 開發  Wasp 是一個尖端的開源框架,旨在簡化使用 React 和 Node.js 的全端 Web 應用程式的開發,只需一個 CLI 命令即可快速部署。 **它解決的問題及其開源優勢:** - 🚀 **快速開發**:只需幾行程式碼即可快速啟動,從而可以輕鬆建立和部署生產就緒的 Web 應用程式。 - 🛠️ **更少的樣板**:抽象複雜的全端功能,減少樣板並使維護和升級變得簡單 - 🔓 **無鎖定**:確保部署的靈活性,沒有特定的提供者鎖定和完整的程式碼控制。 **GitHub 儲存庫連結:** [GitHub 上的 Wasp](https://github.com/wasp-lang/wasp) --- ### Pezzo:利用雲端原生開源平台簡化 LLMOps  Pezzo 是一個革命性的開源、開發人員優先的 LLMOps 平台,完全雲端原生,旨在增強 AI 操作的提示設計、版本管理、即時交付、協作、故障排除和可觀察性。 **它解決的問題及其開源優勢:** - 🤖 **AI 營運效率**:促進 AI 營運的無縫監控和故障排除。 - 💡 **降低成本和延遲**:輔助工具可將成本和延遲降低高達 90%,從而優化營運效率。 - 🌐 **統一提示管理**:提供單一平台來管理提示,確保簡化協作和即時 AI 變更交付。 **GitHub 儲存庫連結:** [GitHub 上的片段](https://github.com/pezzolabs/pezzo) --- ### Flagsmith:開源功能標記和遠端設定服務  Flagsmith 是一個開源平台,提供功能標記和遠端設定服務,允許靈活的本地託管選項或透過其託管版本。 **它解決的問題及其開源優勢:** - 🚀 **功能管理**:簡化跨 Web、行動和伺服器端應用程式的功能標記的建立和管理。 - 🔧 **可自訂部署**:可部署在私有雲或在本地執行,提供託管選項的多功能性。 - 🎛️ **使用者和環境特定控制**:允許針對不同的使用者群體或環境開啟或關閉功能,增強使用者體驗和測試靈活性。 **GitHub 儲存庫連結:** [GitHub 上的 Flagsmith](https://github.com/Flagsmith/flagsmith) --- ## Digger:用於 CI 管道的開源 IaC 編排工具  Digger 是一款用於基礎設施即程式碼 (IaC) 編排的創新開源工具,可與現有 CI 管道無縫集成,以提高部署 Terraform 配置的效率和安全性。 **它解決的問題及其開源優勢:** - 🛠️ **CI/CD 整合**:將 Terraform 直接整合到現有的 CI/CD 管道中,避免需要單獨的專用 CI 系統。 - 🔐 **增強的安全性**:確保安全操作,因為雲端存取機密不與第三方服務共用。 - 💡 **經濟有效且高效**:無需額外的運算資源,可在現有 CI 基礎設施中本機執行 Terraform。 - 🎚️ **高級功能**:提供諸如拉取請求評論中的 Terraform 計劃和應用程式、私有執行器、對 RBAC 的 OPA 支援、PR 級鎖和漂移檢測等功能。 **GitHub 儲存庫連結:** [GitHub 上的 Digger](https://github.com/diggerhq/digger) --- ## Keep:開源警報管理和自動化平台  Keep 是一個開源平台,旨在集中和自動化警報管理。它允許用戶將所有警報整合到一個介面中,並有效地自動化端到端流程。 **它解決的問題及其開源優勢:** - 🚨 **集中警報管理**:將所有警報整合到一處,簡化監控和回應流程。 - ⚙️ **工作流程自動化**:支援工作流程編排以自動化端到端流程,類似於 Datadog 工作流程自動化功能。 - 🔄 **廣泛的工具相容性**:支援多種可觀測工具、資料庫、通訊平台、事件管理工俱全面整合。 **GitHub 儲存庫連結:** [保留在 GitHub 上](https://github.com/keephq/keep) --- ## MeetFAQ:將您的支援管道轉變為人工智慧支援的公共常見問題解答  MeetFAQ 是一款創新的開源工具,可連接到您的支援管道(例如Discord),並採用人工智慧(特別是ChatGPT)將對話轉換為全面的公共常見問題解答,可透過URL 或直接在您的網站上存取。 **它解決的問題及其開源優勢:** - 🤖 **人工智慧驅動的常見問題解答產生**:使用 ChatGPT 將支援頻道對話轉換為常見問題解答,以實現更廣泛的可存取性。 - 🌍 **公共可存取性**:向更廣泛的受眾(而不僅僅是支援管道上的受眾)提供常見問題解答,從而增強客戶聯繫。 - 💡 **客戶保留**:透過提供易於存取的公共常見問題解答來幫助防止客戶流失,確保不會遺漏任何客戶問題。 **GitHub 儲存庫連結:** [GitHub 上的 MeetFAQ](https://github.com/github-20k/meetqa) --- ### Jackson:Web 應用程式的進階 SSO 和目錄同步  Jackson 是一項開源單一登入 (SSO) 服務,可簡化 Web 應用程式驗證,支援 SAML 和 OpenID Connect 協定。它超越了 SSO,透過 SCIM 2.0 協定提供目錄同步,支援自動用戶和群組配置/取消配置。 **它解決的問題及其開源優勢:** - 🔒 **增強的身份驗證**:提供企業級 SSO 支持,簡化跨 Web 應用程式的身份驗證。 - 🔄 **目錄同步**:支援透過 SCIM 2.0 進行目錄同步,以實現高效的使用者和群組管理。 - 🌐 **協定支援**:促進 SAML 和 OpenID Connect 的集成,抽象化這些協定的複雜性以便於實施。 **GitHub 儲存庫連結:** [GitHub 上的傑克遜](https://github.com/boxyhq/jackson) --- ### 綜上所述 我們探索了九個出色的開源儲存庫。他們要不是一家新創公司,就是一個由獨立駭客變大的專案。 這些工具展示了自架的力量以及小型團隊和個人創作者蓬勃發展的創新。 感謝您與我一起經歷這些獨特專案的富有洞察力的旅程。一如既往,偉大即將到來!  --- 原文出處:https://dev.to/srbhr/discover-the-9-best-self-hosted-open-source-repositories-on-github-23oc
_「現在是2021 年了,我的飛行汽車在哪裡?」_ - Joel Spolsky(Stack Overflow 和Trello 的建立者)用這句話來表達他對Web 開發仍然與20 年前幾乎相同的感覺的幻滅。 但今天,有了 GPT,我們就可以再問這個問題了。我們看到了所有這些花哨的推文和演示,但是**當我需要啟動一個新的全端 Web 應用程式時**,這對我作為開發人員意味著什麼?我真的必須經歷“npm create vite my-new-app”,並再次從空白頁面開始嗎? 最後的答案是「否」——你可以使用很多很酷的東西來讓你的生活更輕鬆。它可能還不是超音速德羅寧,但它至少肯定是在地面上盤旋。 讓我們探討一下今天的 AI 場景為我們提供了什麼,以便更輕鬆地啟動和建立全端 Web 應用程式: ## 🐝 🤖 MAGE - 一分鐘內從單一提示到全端、React 和 Node.js 應用程式(免費使用!)  [MAGE](https://usemage.ai/) (*Magic App GEnerator*) 可能是最容易使用的 AI 編碼代理 - 一切都透過 Web 介面進行,**您所要做的就是輸入您要建立的應用程式的簡短描述**。這樣,MAGE 將在由 [Wasp](https://wasp-lang.dev/) 提供支援的 React、Tailwind、Node.js 和 Prisma 中產生完整的全端程式碼庫,您可以免費下載。 MAGE 最好的部分是**它是完全開源且完全免費使用** - 您所需要做的就是[使用您的 GitHub 登入](https://usemage.ai/),然後您就可以開始建立應用程式! MAGE [於7 月在Product Hunt 上推出](https://www.producthunt.com/products/wasp-lang-alpha#gpt-webapp-generator-for-react-node-js),從那時起就被用來建立近 30,000 個應用程式。 ## 📟 Aider - 終端機中的 AI 配對程式設計師  在您使用 MAGE 建立應用程式的 v1 版並獲得基本功能後,您可能會想要加入更多功能。為什麼不使用人工智慧來實現這一點呢?這就是 Aider 發揮作用的地方! Aider 的超能力在於您可以將其插入任何現有專案並開始使用!這感覺就像與坐在您旁邊的開發人員同事聊天 - 只需描述您的下一個功能,Aider 將盡力實現它,同時提供流程的所有詳細訊息,並自動向您的存儲庫加入新的提交!多麼酷啊? 您可以了解更多有關 Aider 的資訊並在這裡嘗試一下:https://github.com/paul-gauthier/aider ## 🦀 🚀 Shuttle AI - 使用 GPT 在 Rust 中建立後端! 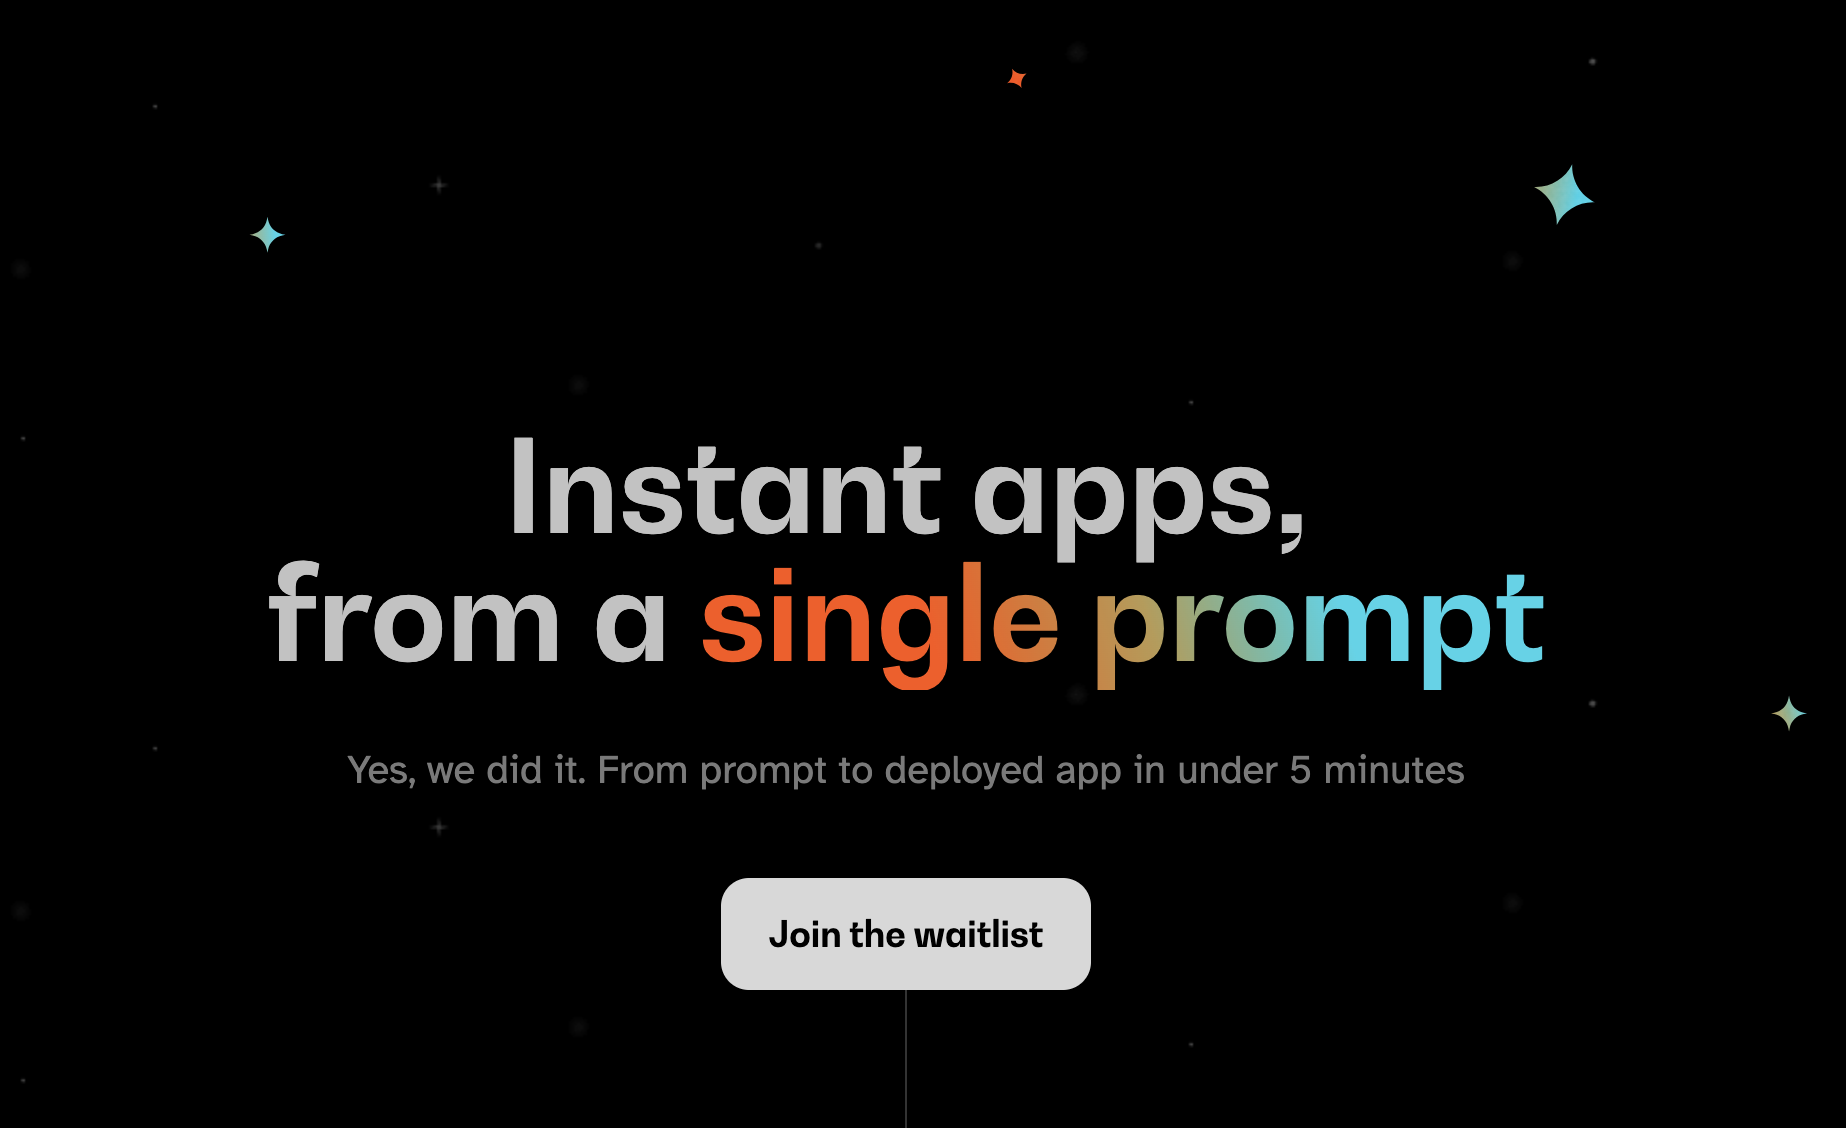 當您聽到“網頁應用程式”這個詞時,我們大多數人都會立即想到 JavaScript。雖然對於前端來說這在很大程度上是正確的,但我們可以用我們喜歡的任何技術來建立後端! 除了 Python、Java 和 PHP 等常見的嫌疑犯之外,Rust 又如何呢?它是開發人員最喜愛的語言之一,它不應該只用於低階演算法。 Shuttle AI 讓這一切成為可能 - 他們強大的基於 Rust 的框架已經使建置和部署後端變得容易,而頂部的 AI 使其變得輕而易舉! 在這裡了解更多:https://www.shuttle.rs/ai ## ⚡️📦 Supabase AI - 再見,複雜的 SQL 查詢 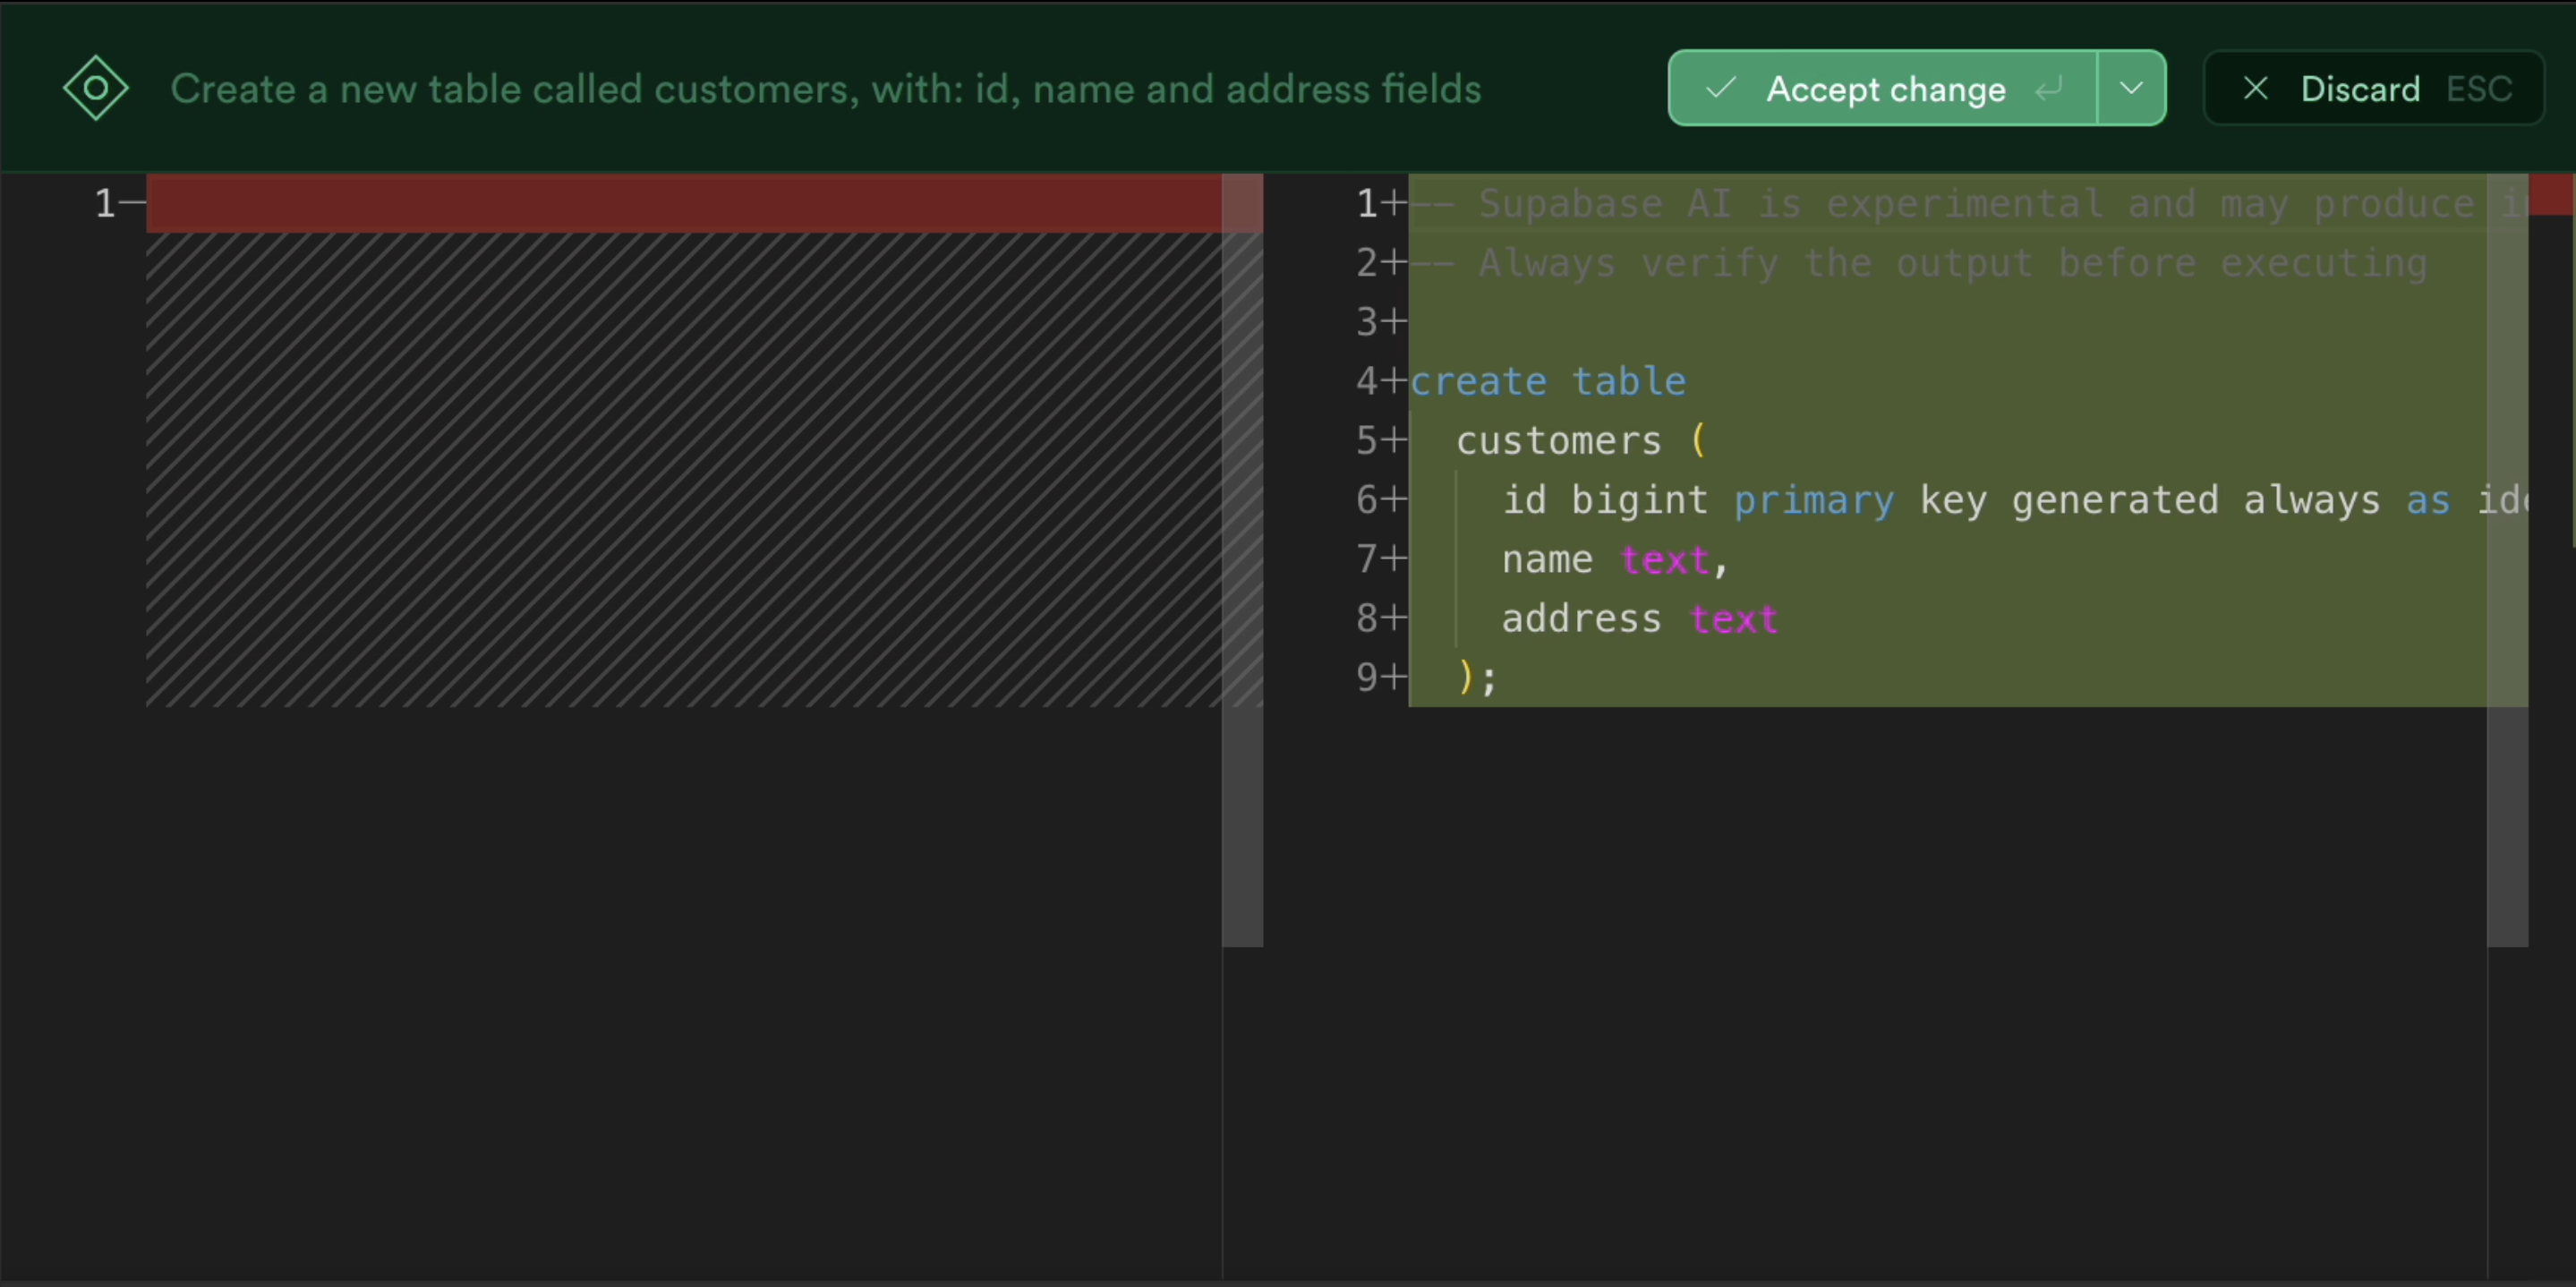 [Supabase](https://supabase.com/) 是為您的全端應用程式啟動和執行資料庫的最佳方法之一,除此之外您還可以獲得大量功能!由於它專門用於 Postgresql,這意味著您偶爾需要編寫一些 SQL。為什麼不從人工智慧得到一些幫助呢? Supabase 因其美觀且用戶友好的儀表板(帶有整合 SQL 編輯器)而聞名,現在他們透過加入自己的 AI 代理使其變得更好。要求它建立新的表和索引,甚至編寫資料庫函數! 在這裡了解更多:https://supabase.com/blog/supabase-studio-3-0 ## 👁️ 🧑✈️Visual Copilot - 將 Figma 設計編碼 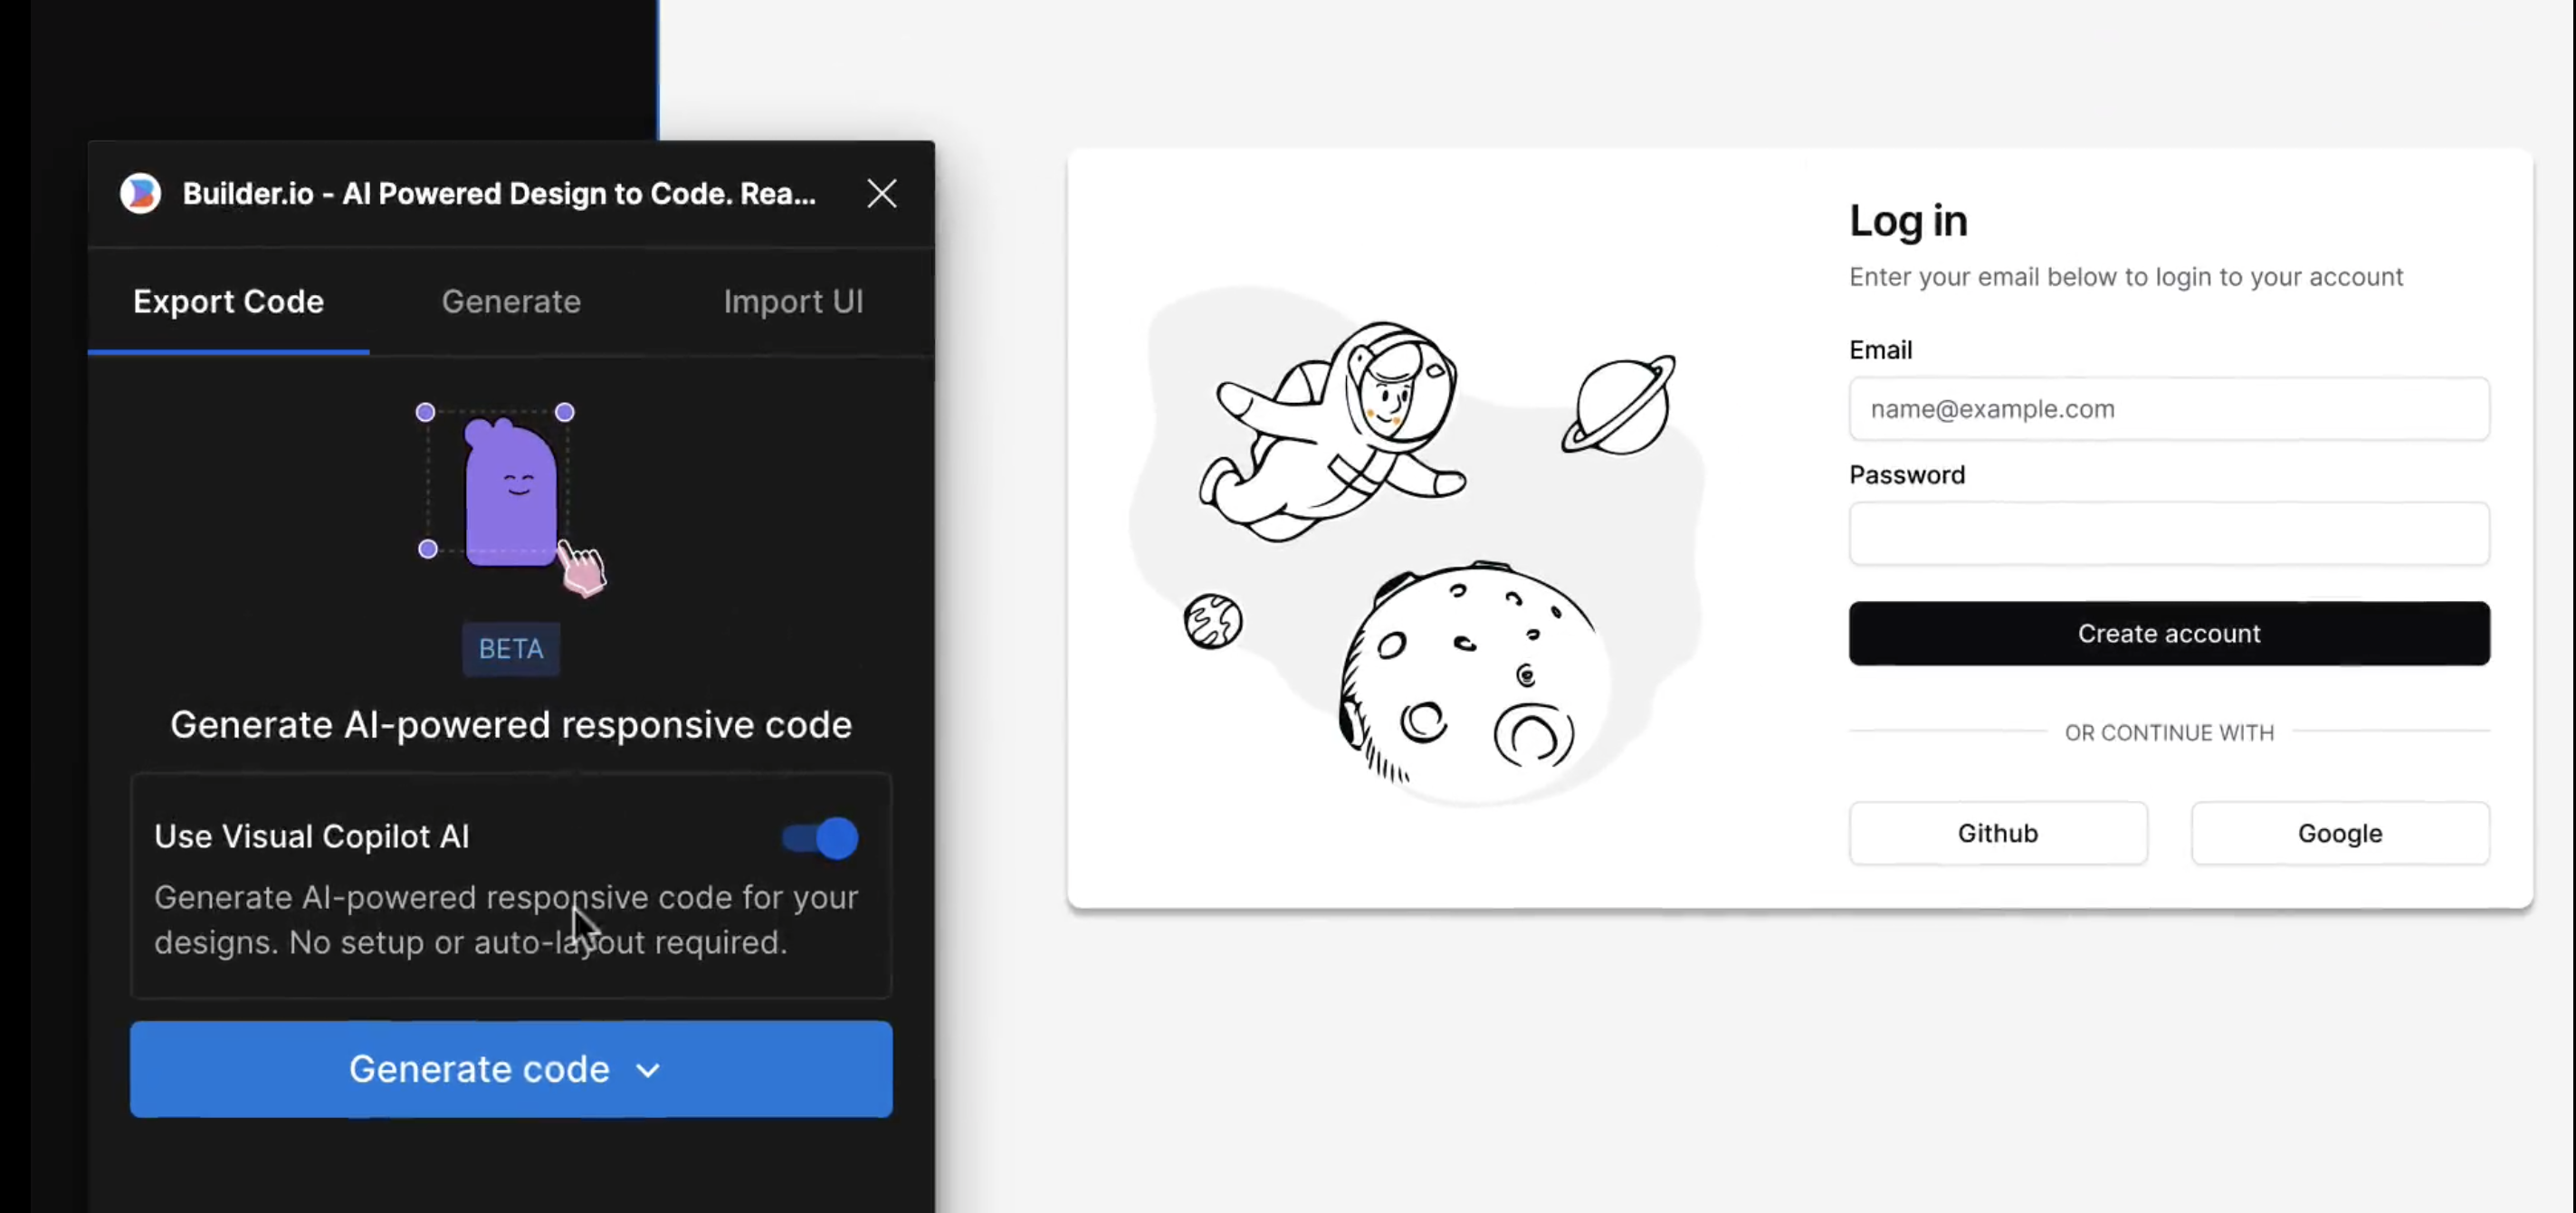 如果您曾經從設計師那裡獲得 Figma 設計講義,然後您的任務是用它來實現 UI,您是否想過是否有一種方法可以自動化此操作?這就是 Visual Copilot 所追求的! 只需點擊一下,並給出 Figma 設計,Visual Copilot 就會為其產生前端程式碼!它將盡最大努力使其具有響應性並保持程式碼整潔和可重複使用。 它目前可作為 [Figma 社群插件](https://www.figma.com/community/plugin/747985167520967365/builder-io-ai-powered-figma-to-code-react-vue-tailwind-more) 。 ## ✈️ 🤖 GPT Pilot - 使用協作 AI 啟動新應用程式 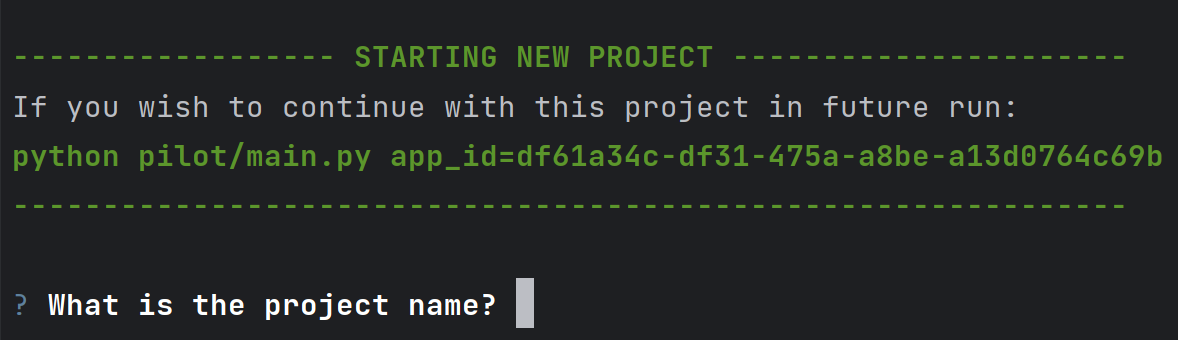 GPT Pilot 是專門用於從頭開始建立新應用程式的編碼代理程式。它獨特的做法是它與開發者合作——每當遇到困難時,它都會尋求你的幫助! 在內部,它由多個代理組成,這些代理一起協作並經歷應用程式開發的不同階段 - 從產品所有者和架構師到 DevOps 和開發人員! 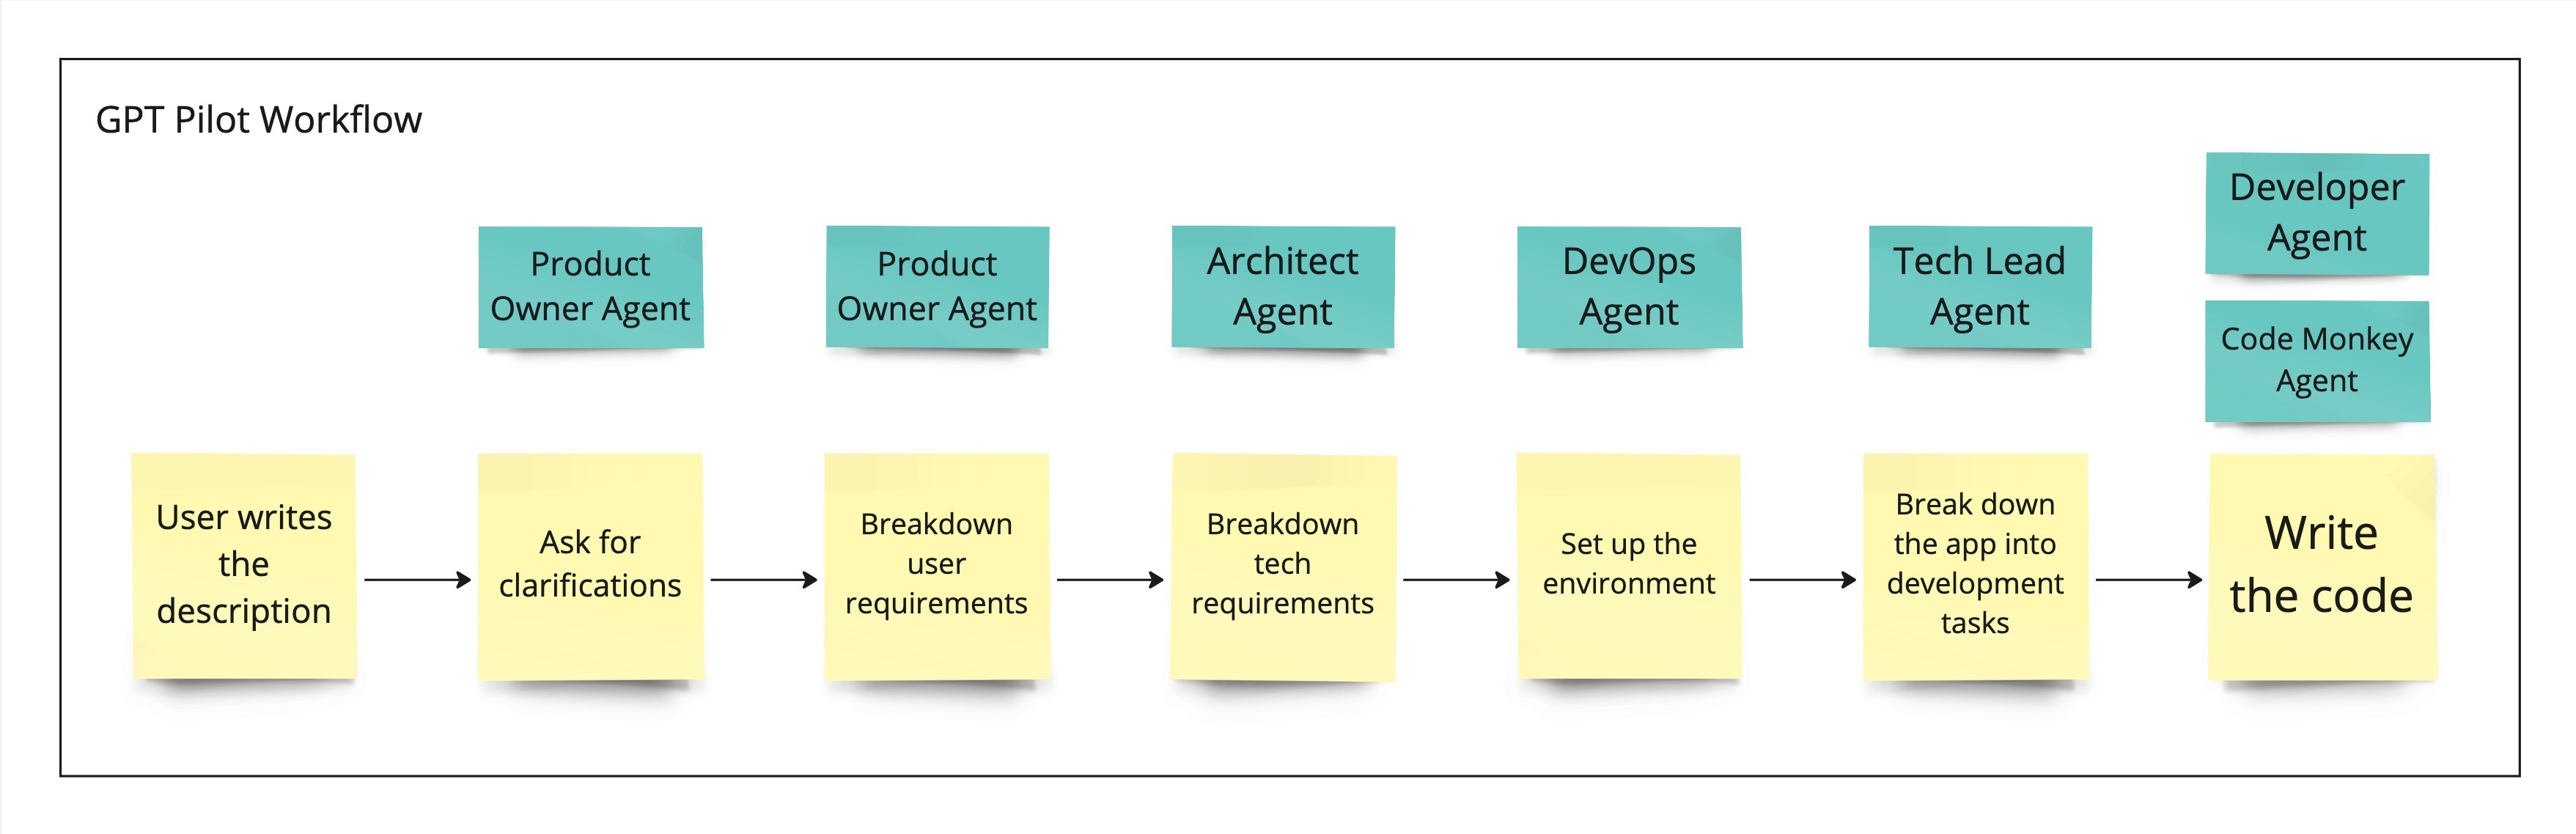 這是另一個完全開源的解決方案,最近受到了開發人員的喜愛,並多次出現在 GitHub 趨勢排行榜上。 了解更多並在這裡嘗試一下:https://github.com/Pythagora-io/gpt-pilot ## 概括  這就是一個包裝!還有更多的人工智慧工具,而且每天都有新的工具出現,但在本概述中,我們試圖專注於您今天可以用來啟動新的網路應用程式的工具。 希望您發現這很有幫助,並學到了一些可能派上用場的新東西!我也很想在評論中聽到您的意見 - 您最喜歡的 Web 開發人工智慧工具是什麼,無論是您每天使用的工具還是只是感到興奮的工具,接下來我們應該介紹什麼? --- 原文出處:https://dev.to/matijasos/6-tools-to-kickstart-your-full-stack-app-with-ai-4oh3
# 簡介 ChatGPT 訓練至 2022 年。 但是,如果您希望它專門為您提供有關您網站的資訊怎麼辦?最有可能的是,這是不可能的,**但不再是了!** OpenAI 推出了他們的新功能 - [助手](https://platform.openai.com/docs/assistants/how-it-works)。 現在您可以輕鬆地為您的網站建立索引,然後向 ChatGPT 詢問有關該網站的問題。在本教程中,我們將建立一個系統來索引您的網站並讓您查詢它。我們將: - 抓取文件網站地圖。 - 從網站上的所有頁面中提取資訊。 - 使用新資訊建立新助理。 - 建立一個簡單的ChatGPT前端介面並查詢助手。  --- ## 你的後台工作平台🔌 [Trigger.dev](https://trigger.dev/) 是一個開源程式庫,可讓您使用 NextJS、Remix、Astro 等為您的應用程式建立和監控長時間執行的作業! [](https://github.com/triggerdotdev/trigger.dev) 請幫我們一顆星🥹。 這將幫助我們建立更多這樣的文章💖 --- ## 讓我們開始吧🔥 讓我們建立一個新的 NextJS 專案。 ``` npx create-next-app@latest ``` >💡 我們使用 NextJS 新的應用程式路由器。安裝專案之前請確保您的節點版本為 18+ 讓我們建立一個新的資料庫來保存助手和抓取的頁面。 對於我們的範例,我們將使用 [Prisma](https://www.prisma.io/) 和 SQLite。 安裝非常簡單,只需執行: ``` npm install prisma @prisma/client --save ``` 然後加入架構和資料庫 ``` npx prisma init --datasource-provider sqlite ``` 轉到“prisma/schema.prisma”並將其替換為以下架構: ``` // This is your Prisma schema file, // learn more about it in the docs: https://pris.ly/d/prisma-schema generator client { provider = "prisma-client-js" } datasource db { provider = "sqlite" url = env("DATABASE_URL") } model Docs { id Int @id @default(autoincrement()) content String url String @unique identifier String @@index([identifier]) } model Assistant { id Int @id @default(autoincrement()) aId String url String @unique } ``` 然後執行 ``` npx prisma db push ``` 這將建立一個新的 SQLite 資料庫(本機檔案),其中包含兩個主表:“Docs”和“Assistant” - 「Docs」包含所有抓取的頁面 - `Assistant` 包含文件的 URL 和內部 ChatGPT 助理 ID。 讓我們新增 Prisma 客戶端。 建立一個名為「helper」的新資料夾,並新增一個名為「prisma.ts」的新文件,並在其中新增以下程式碼: ``` import {PrismaClient} from '@prisma/client'; export const prisma = new PrismaClient(); ``` 我們稍後可以使用“prisma”變數來查詢我們的資料庫。 ---  ## 刮擦和索引 ### 建立 Trigger.dev 帳戶 抓取頁面並為其建立索引是一項長期執行的任務。 **我們需要:** - 抓取網站地圖的主網站元 URL。 - 擷取網站地圖內的所有頁面。 - 前往每個頁面並提取內容。 - 將所有內容儲存到 ChatGPT 助手中。 為此,我們使用 Trigger.dev! 註冊 [Trigger.dev 帳號](https://trigger.dev/)。 註冊後,建立一個組織並為您的工作選擇一個專案名稱。 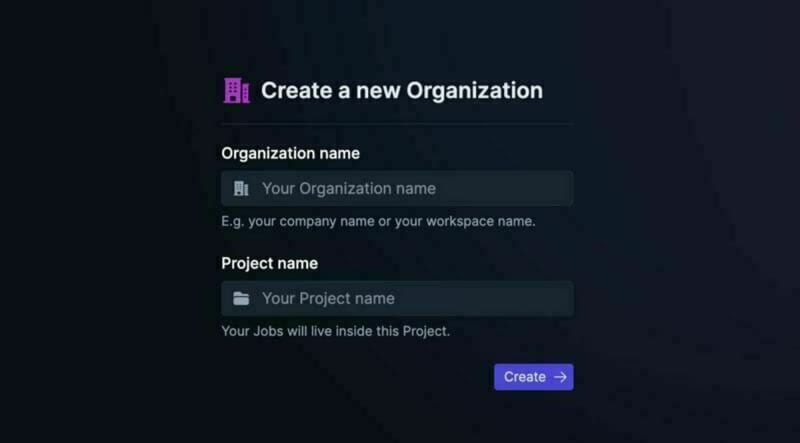 選擇 Next.js 作為您的框架,並按照將 Trigger.dev 新增至現有 Next.js 專案的流程進行操作。  否則,請點選專案儀表板側邊欄選單上的「環境和 API 金鑰」。  複製您的 DEV 伺服器 API 金鑰並執行下面的程式碼片段來安裝 Trigger.dev。 仔細按照說明進行操作。 ``` npx @trigger.dev/cli@latest init ``` 在另一個終端中執行以下程式碼片段,在 Trigger.dev 和您的 Next.js 專案之間建立隧道。 ``` npx @trigger.dev/cli@latest dev ``` ### 安裝 ChatGPT (OpenAI) 我們將使用OpenAI助手,因此我們必須將其安裝到我們的專案中。 [建立新的 OpenAI 帳戶](https://platform.openai.com/) 並產生 API 金鑰。  點擊下拉清單中的「檢視 API 金鑰」以建立 API 金鑰。  接下來,透過執行下面的程式碼片段來安裝 OpenAI 套件。 ``` npm install @trigger.dev/openai ``` 將您的 OpenAI API 金鑰新增至「.env.local」檔案。 ``` OPENAI_API_KEY=<your_api_key> ``` 建立一個新目錄“helper”並新增一個新檔案“open.ai.tsx”,其中包含以下內容: ``` import {OpenAI} from "@trigger.dev/openai"; export const openai = new OpenAI({ id: "openai", apiKey: process.env.OPENAI_API_KEY!, }); ``` 這是我們透過 Trigger.dev 整合封裝的 OpenAI 用戶端。 ### 建立後台作業 讓我們繼續建立一個新的後台作業! 前往“jobs”並建立一個名為“process.documentation.ts”的新檔案。 **新增以下程式碼:** ``` import { eventTrigger } from "@trigger.dev/sdk"; import { client } from "@openai-assistant/trigger"; import {object, string} from "zod"; import {JSDOM} from "jsdom"; import {openai} from "@openai-assistant/helper/open.ai"; client.defineJob({ // This is the unique identifier for your Job; it must be unique across all Jobs in your project. id: "process-documentation", name: "Process Documentation", version: "0.0.1", // This is triggered by an event using eventTrigger. You can also trigger Jobs with webhooks, on schedules, and more: https://trigger.dev/docs/documentation/concepts/triggers/introduction trigger: eventTrigger({ name: "process.documentation.event", schema: object({ url: string(), }) }), integrations: { openai }, run: async (payload, io, ctx) => { } }); ``` 我們定義了一個名為「process.documentation.event」的新作業,並新增了一個名為 URL 的必要參數 - 這是我們稍後要傳送的文件 URL。 正如您所看到的,該作業是空的,所以讓我們向其中加入第一個任務。 我們需要獲取網站網站地圖並將其返回。 抓取網站將返回我們需要解析的 HTML。 為此,我們需要安裝 JSDOM。 ``` npm install jsdom --save ``` 並將其導入到我們文件的頂部: ``` import {JSDOM} from "jsdom"; ``` 現在,我們可以新增第一個任務。 用「runTask」包裝我們的程式碼很重要,這可以讓 Trigger.dev 將其與其他任務分開。觸發特殊架構將任務拆分為不同的進程,因此 Vercel 無伺服器逾時不會影響它們。 **這是第一個任務的程式碼:** ``` const getSiteMap = await io.runTask("grab-sitemap", async () => { const data = await (await fetch(payload.url)).text(); const dom = new JSDOM(data); const sitemap = dom.window.document.querySelector('[rel="sitemap"]')?.getAttribute('href'); return new URL(sitemap!, payload.url).toString(); }); ``` - 我們透過 HTTP 請求從 URL 取得整個 HTML。 - 我們將其轉換為 JS 物件。 - 我們找到網站地圖 URL。 - 我們解析它並返回它。 接下來,我們需要抓取網站地圖,提取所有 URL 並返回它們。 讓我們安裝“Lodash”——陣列結構的特殊函數。 ``` npm install lodash @types/lodash --save ``` 這是任務的程式碼: ``` export const makeId = (length: number) => { let text = ''; const possible = 'ABCDEFGHIJKLMNOPQRSTUVWXYZabcdefghijklmnopqrstuvwxyz0123456789'; for (let i = 0; i < length; i += 1) { text += possible.charAt(Math.floor(Math.random() * possible.length)); } return text; }; const {identifier, list} = await io.runTask("load-and-parse-sitemap", async () => { const urls = /(http|ftp|https):\/\/([\w_-]+(?:(?:\.[\w_-]+)+))([\w.,@?^=%&:\/~+#-]*[\w@?^=%&\/~+#-])/g; const identifier = makeId(5); const data = await (await fetch(getSiteMap)).text(); // @ts-ignore return {identifier, list: chunk(([...new Set(data.match(urls))] as string[]).filter(f => f.includes(payload.url)).map(p => ({identifier, url: p})), 25)}; }); ``` - 我們建立一個名為 makeId 的新函數來為所有頁面產生隨機辨識碼。 - 我們建立一個新任務並加入正規表示式來提取每個可能的 URL - 我們發送一個 HTTP 請求來載入網站地圖並提取其所有 URL。 - 我們將 URL「分塊」為 25 個元素的陣列(如果有 100 個元素,則會有四個 25 個元素的陣列) 接下來,讓我們建立一個新作業來處理每個 URL。 **這是完整的程式碼:** ``` function getElementsBetween(startElement: Element, endElement: Element) { let currentElement = startElement; const elements = []; // Traverse the DOM until the endElement is reached while (currentElement && currentElement !== endElement) { currentElement = currentElement.nextElementSibling!; // If there's no next sibling, go up a level and continue if (!currentElement) { // @ts-ignore currentElement = startElement.parentNode!; startElement = currentElement; if (currentElement === endElement) break; continue; } // Add the current element to the list if (currentElement && currentElement !== endElement) { elements.push(currentElement); } } return elements; } const processContent = client.defineJob({ // This is the unique identifier for your Job; it must be unique across all Jobs in your project. id: "process-content", name: "Process Content", version: "0.0.1", // This is triggered by an event using eventTrigger. You can also trigger Jobs with webhooks, on schedules, and more: https://trigger.dev/docs/documentation/concepts/triggers/introduction trigger: eventTrigger({ name: "process.content.event", schema: object({ url: string(), identifier: string(), }) }), run: async (payload, io, ctx) => { return io.runTask('grab-content', async () => { // We first grab a raw html of the content from the website const data = await (await fetch(payload.url)).text(); // We load it with JSDOM so we can manipulate it const dom = new JSDOM(data); // We remove all the scripts and styles from the page dom.window.document.querySelectorAll('script, style').forEach((el) => el.remove()); // We grab all the titles from the page const content = Array.from(dom.window.document.querySelectorAll('h1, h2, h3, h4, h5, h6')); // We grab the last element so we can get the content between the last element and the next element const lastElement = content[content.length - 1]?.parentElement?.nextElementSibling!; const elements = []; // We loop through all the elements and grab the content between each title for (let i = 0; i < content.length; i++) { const element = content[i]; const nextElement = content?.[i + 1] || lastElement; const elementsBetween = getElementsBetween(element, nextElement); elements.push({ title: element.textContent, content: elementsBetween.map((el) => el.textContent).join('\n') }); } // We create a raw text format of all the content const page = ` ---------------------------------- url: ${payload.url}\n ${elements.map((el) => `${el.title}\n${el.content}`).join('\n')} ---------------------------------- `; // We save it to our database await prisma.docs.upsert({ where: { url: payload.url }, update: { content: page, identifier: payload.identifier }, create: { url: payload.url, content: page, identifier: payload.identifier } }); }); }, }); ``` - 我們從 URL 中獲取內容(之前從網站地圖中提取) - 我們用`JSDOM`解析它 - 我們刪除頁面上存在的所有可能的“<script>”或“<style>”。 - 我們抓取頁面上的所有標題(`h1`、`h2`、`h3`、`h4`、`h5`、`h6`) - 我們迭代標題並獲取它們之間的內容。我們不想取得整個頁面內容,因為它可能包含不相關的內容。 - 我們建立頁面原始文字的版本並將其保存到我們的資料庫中。 現在,讓我們為每個網站地圖 URL 執行此任務。 觸發器引入了名為“batchInvokeAndWaitForCompletion”的東西。 它允許我們批量發送 25 個專案進行處理,並且它將同時處理所有這些專案。下面是接下來的幾行程式碼: ``` let i = 0; for (const item of list) { await processContent.batchInvokeAndWaitForCompletion( 'process-list-' + i, item.map( payload => ({ payload, }), 86_400), ); i++; } ``` 我們以 25 個為一組[手動觸發](https://trigger.dev/docs/documentation/concepts/triggers/invoke)之前建立的作業。 完成後,讓我們將保存到資料庫的所有內容並連接它: ``` const data = await io.runTask("get-extracted-data", async () => { return (await prisma.docs.findMany({ where: { identifier }, select: { content: true } })).map((d) => d.content).join('\n\n'); }); ``` 我們使用之前指定的標識符。 現在,讓我們在 ChatGPT 中使用新資料建立一個新檔案: ``` const file = await io.openai.files.createAndWaitForProcessing("upload-file", { purpose: "assistants", file: data }); ``` `createAndWaitForProcessing` 是 Trigger.dev 建立的任務,用於將檔案上傳到助手。如果您在沒有整合的情況下手動使用“openai”,則必須串流傳輸檔案。 現在讓我們建立或更新我們的助手: ``` const assistant = await io.openai.runTask("create-or-update-assistant", async (openai) => { const currentAssistant = await prisma.assistant.findFirst({ where: { url: payload.url } }); if (currentAssistant) { return openai.beta.assistants.update(currentAssistant.aId, { file_ids: [file.id] }); } return openai.beta.assistants.create({ name: identifier, description: 'Documentation', instructions: 'You are a documentation assistant, you have been loaded with documentation from ' + payload.url + ', return everything in an MD format.', model: 'gpt-4-1106-preview', tools: [{ type: "code_interpreter" }, {type: 'retrieval'}], file_ids: [file.id], }); }); ``` - 我們首先檢查是否有針對該特定 URL 的助手。 - 如果我們有的話,讓我們用新文件更新助手。 - 如果沒有,讓我們建立一個新的助手。 - 我們傳遞「你是文件助理」的指令,需要注意的是,我們希望最終輸出為「MD」格式,以便稍後更好地顯示。 對於拼圖的最後一塊,讓我們將新助手儲存到我們的資料庫中。 **這是程式碼:** ``` await io.runTask("save-assistant", async () => { await prisma.assistant.upsert({ where: { url: payload.url }, update: { aId: assistant.id, }, create: { aId: assistant.id, url: payload.url, } }); }); ``` 如果該 URL 已經存在,我們可以嘗試使用新的助手 ID 來更新它。 這是該頁面的完整程式碼: ``` import { eventTrigger } from "@trigger.dev/sdk"; import { client } from "@openai-assistant/trigger"; import {object, string} from "zod"; import {JSDOM} from "jsdom"; import {chunk} from "lodash"; import {prisma} from "@openai-assistant/helper/prisma.client"; import {openai} from "@openai-assistant/helper/open.ai"; const makeId = (length: number) => { let text = ''; const possible = 'ABCDEFGHIJKLMNOPQRSTUVWXYZabcdefghijklmnopqrstuvwxyz0123456789'; for (let i = 0; i < length; i += 1) { text += possible.charAt(Math.floor(Math.random() * possible.length)); } return text; }; client.defineJob({ // This is the unique identifier for your Job; it must be unique across all Jobs in your project. id: "process-documentation", name: "Process Documentation", version: "0.0.1", // This is triggered by an event using eventTrigger. You can also trigger Jobs with webhooks, on schedules, and more: https://trigger.dev/docs/documentation/concepts/triggers/introduction trigger: eventTrigger({ name: "process.documentation.event", schema: object({ url: string(), }) }), integrations: { openai }, run: async (payload, io, ctx) => { // The first task to get the sitemap URL from the website const getSiteMap = await io.runTask("grab-sitemap", async () => { const data = await (await fetch(payload.url)).text(); const dom = new JSDOM(data); const sitemap = dom.window.document.querySelector('[rel="sitemap"]')?.getAttribute('href'); return new URL(sitemap!, payload.url).toString(); }); // We parse the sitemap; instead of using some XML parser, we just use regex to get the URLs and we return it in chunks of 25 const {identifier, list} = await io.runTask("load-and-parse-sitemap", async () => { const urls = /(http|ftp|https):\/\/([\w_-]+(?:(?:\.[\w_-]+)+))([\w.,@?^=%&:\/~+#-]*[\w@?^=%&\/~+#-])/g; const identifier = makeId(5); const data = await (await fetch(getSiteMap)).text(); // @ts-ignore return {identifier, list: chunk(([...new Set(data.match(urls))] as string[]).filter(f => f.includes(payload.url)).map(p => ({identifier, url: p})), 25)}; }); // We go into each page and grab the content; we do this in batches of 25 and save it to the DB let i = 0; for (const item of list) { await processContent.batchInvokeAndWaitForCompletion( 'process-list-' + i, item.map( payload => ({ payload, }), 86_400), ); i++; } // We get the data that we saved in batches from the DB const data = await io.runTask("get-extracted-data", async () => { return (await prisma.docs.findMany({ where: { identifier }, select: { content: true } })).map((d) => d.content).join('\n\n'); }); // We upload the data to OpenAI with all the content const file = await io.openai.files.createAndWaitForProcessing("upload-file", { purpose: "assistants", file: data }); // We create a new assistant or update the old one with the new file const assistant = await io.openai.runTask("create-or-update-assistant", async (openai) => { const currentAssistant = await prisma.assistant.findFirst({ where: { url: payload.url } }); if (currentAssistant) { return openai.beta.assistants.update(currentAssistant.aId, { file_ids: [file.id] }); } return openai.beta.assistants.create({ name: identifier, description: 'Documentation', instructions: 'You are a documentation assistant, you have been loaded with documentation from ' + payload.url + ', return everything in an MD format.', model: 'gpt-4-1106-preview', tools: [{ type: "code_interpreter" }, {type: 'retrieval'}], file_ids: [file.id], }); }); // We update our internal database with the assistant await io.runTask("save-assistant", async () => { await prisma.assistant.upsert({ where: { url: payload.url }, update: { aId: assistant.id, }, create: { aId: assistant.id, url: payload.url, } }); }); }, }); export function getElementsBetween(startElement: Element, endElement: Element) { let currentElement = startElement; const elements = []; // Traverse the DOM until the endElement is reached while (currentElement && currentElement !== endElement) { currentElement = currentElement.nextElementSibling!; // If there's no next sibling, go up a level and continue if (!currentElement) { // @ts-ignore currentElement = startElement.parentNode!; startElement = currentElement; if (currentElement === endElement) break; continue; } // Add the current element to the list if (currentElement && currentElement !== endElement) { elements.push(currentElement); } } return elements; } // This job will grab the content from the website const processContent = client.defineJob({ // This is the unique identifier for your Job; it must be unique across all Jobs in your project. id: "process-content", name: "Process Content", version: "0.0.1", // This is triggered by an event using eventTrigger. You can also trigger Jobs with webhooks, on schedules, and more: https://trigger.dev/docs/documentation/concepts/triggers/introduction trigger: eventTrigger({ name: "process.content.event", schema: object({ url: string(), identifier: string(), }) }), run: async (payload, io, ctx) => { return io.runTask('grab-content', async () => { try { // We first grab a raw HTML of the content from the website const data = await (await fetch(payload.url)).text(); // We load it with JSDOM so we can manipulate it const dom = new JSDOM(data); // We remove all the scripts and styles from the page dom.window.document.querySelectorAll('script, style').forEach((el) => el.remove()); // We grab all the titles from the page const content = Array.from(dom.window.document.querySelectorAll('h1, h2, h3, h4, h5, h6')); // We grab the last element so we can get the content between the last element and the next element const lastElement = content[content.length - 1]?.parentElement?.nextElementSibling!; const elements = []; // We loop through all the elements and grab the content between each title for (let i = 0; i < content.length; i++) { const element = content[i]; const nextElement = content?.[i + 1] || lastElement; const elementsBetween = getElementsBetween(element, nextElement); elements.push({ title: element.textContent, content: elementsBetween.map((el) => el.textContent).join('\n') }); } // We create a raw text format of all the content const page = ` ---------------------------------- url: ${payload.url}\n ${elements.map((el) => `${el.title}\n${el.content}`).join('\n')} ---------------------------------- `; // We save it to our database await prisma.docs.upsert({ where: { url: payload.url }, update: { content: page, identifier: payload.identifier }, create: { url: payload.url, content: page, identifier: payload.identifier } }); } catch (e) { console.log(e); } }); }, }); ``` 我們已經完成建立後台作業來抓取和索引文件🎉 ### 詢問助理 現在,讓我們建立一個任務來詢問我們的助手。 前往“jobs”並建立一個新檔案“question.assistant.ts”。 **新增以下程式碼:** ``` import {eventTrigger} from "@trigger.dev/sdk"; import {client} from "@openai-assistant/trigger"; import {object, string} from "zod"; import {openai} from "@openai-assistant/helper/open.ai"; client.defineJob({ // This is the unique identifier for your Job; it must be unique across all Jobs in your project. id: "question-assistant", name: "Question Assistant", version: "0.0.1", // This is triggered by an event using eventTrigger. You can also trigger Jobs with webhooks, on schedules, and more: https://trigger.dev/docs/documentation/concepts/triggers/introduction trigger: eventTrigger({ name: "question.assistant.event", schema: object({ content: string(), aId: string(), threadId: string().optional(), }) }), integrations: { openai }, run: async (payload, io, ctx) => { // Create or use an existing thread const thread = payload.threadId ? await io.openai.beta.threads.retrieve('get-thread', payload.threadId) : await io.openai.beta.threads.create('create-thread'); // Create a message in the thread await io.openai.beta.threads.messages.create('create-message', thread.id, { content: payload.content, role: 'user', }); // Run the thread const run = await io.openai.beta.threads.runs.createAndWaitForCompletion('run-thread', thread.id, { model: 'gpt-4-1106-preview', assistant_id: payload.aId, }); // Check the status of the thread if (run.status !== "completed") { console.log('not completed'); throw new Error(`Run finished with status ${run.status}: ${JSON.stringify(run.last_error)}`); } // Get the messages from the thread const messages = await io.openai.beta.threads.messages.list("list-messages", run.thread_id, { query: { limit: "1" } }); const content = messages[0].content[0]; if (content.type === 'text') { return {content: content.text.value, threadId: thread.id}; } } }); ``` - 該事件需要三個參數 - `content` - 我們想要傳送給助理的訊息。 - `aId` - 我們先前建立的助手的內部 ID。 - `threadId` - 對話的執行緒 ID。正如您所看到的,這是一個可選參數,因為在第一個訊息中,我們還沒有線程 ID。 - 然後,我們建立或取得前一個執行緒的執行緒。 - 我們在助理提出的問題的線索中加入一條新訊息。 - 我們執行線程並等待它完成。 - 我們取得訊息清單(並將其限制為 1),因為第一則訊息是對話中的最後一則訊息。 - 我們返回訊息內容和我們剛剛建立的線程ID。 ### 新增路由 我們需要為我們的應用程式建立 3 個 API 路由: 1、派新助理進行處理。 2. 透過URL獲取特定助手。 3. 新增訊息給助手。 在「app/api」中建立一個名為assistant的新資料夾,並在其中建立一個名為「route.ts」的新檔案。裡面加入如下程式碼: ``` import {client} from "@openai-assistant/trigger"; import {prisma} from "@openai-assistant/helper/prisma.client"; export async function POST(request: Request) { const body = await request.json(); if (!body.url) { return new Response(JSON.stringify({error: 'URL is required'}), {status: 400}); } // We send an event to the trigger to process the documentation const {id: eventId} = await client.sendEvent({ name: "process.documentation.event", payload: {url: body.url}, }); return new Response(JSON.stringify({eventId}), {status: 200}); } export async function GET(request: Request) { const url = new URL(request.url).searchParams.get('url'); if (!url) { return new Response(JSON.stringify({error: 'URL is required'}), {status: 400}); } const assistant = await prisma.assistant.findFirst({ where: { url: url } }); return new Response(JSON.stringify(assistant), {status: 200}); } ``` 第一個「POST」方法取得一個 URL,並使用用戶端傳送的 URL 觸發「process.documentation.event」作業。 第二個「GET」方法從我們的資料庫中透過客戶端發送的 URL 取得助手。 現在,讓我們建立向助手新增訊息的路由。 在「app/api」內部建立一個新資料夾「message」並新增一個名為「route.ts」的新文件,然後新增以下程式碼: ``` import {prisma} from "@openai-assistant/helper/prisma.client"; import {client} from "@openai-assistant/trigger"; export async function POST(request: Request) { const body = await request.json(); // Check that we have the assistant id and the message if (!body.id || !body.message) { return new Response(JSON.stringify({error: 'Id and Message are required'}), {status: 400}); } // get the assistant id in OpenAI from the id in the database const assistant = await prisma.assistant.findUnique({ where: { id: +body.id } }); // We send an event to the trigger to process the documentation const {id: eventId} = await client.sendEvent({ name: "question.assistant.event", payload: { content: body.message, aId: assistant?.aId, threadId: body.threadId }, }); return new Response(JSON.stringify({eventId}), {status: 200}); } ``` 這是一個非常基本的程式碼。我們從客戶端獲取訊息、助手 ID 和線程 ID,並將其發送到我們之前建立的「question.assistant.event」。 最後要做的事情是建立一個函數來獲取我們所有的助手。 在「helpers」內部建立一個名為「get.list.ts」的新函數並新增以下程式碼: ``` import {prisma} from "@openai-assistant/helper/prisma.client"; // Get the list of all the available assistants export const getList = () => { return prisma.assistant.findMany({ }); } ``` 非常簡單的程式碼即可獲得所有助手。 我們已經完成了後端🥳 讓我們轉到前面。 ---  ## 建立前端 我們將建立一個基本介面來新增 URL 並顯示已新增 URL 的清單:  ### 首頁 將 `app/page.tsx` 的內容替換為以下程式碼: ``` import {getList} from "@openai-assistant/helper/get.list"; import Main from "@openai-assistant/components/main"; export default async function Home() { const list = await getList(); return ( <Main list={list} /> ) } ``` 這是一個簡單的程式碼,它從資料庫中取得清單並將其傳遞給我們的 Main 元件。 接下來,讓我們建立“Main”元件。 在「app」內建立一個新資料夾「components」並新增一個名為「main.tsx」的新檔案。 **新增以下程式碼:** ``` "use client"; import {Assistant} from '@prisma/client'; import {useCallback, useState} from "react"; import {FieldValues, SubmitHandler, useForm} from "react-hook-form"; import {ChatgptComponent} from "@openai-assistant/components/chatgpt.component"; import {AssistantList} from "@openai-assistant/components/assistant.list"; import {TriggerProvider} from "@trigger.dev/react"; export interface ExtendedAssistant extends Assistant { pending?: boolean; eventId?: string; } export default function Main({list}: {list: ExtendedAssistant[]}) { const [assistantState, setAssistantState] = useState(list); const {register, handleSubmit} = useForm(); const submit: SubmitHandler<FieldValues> = useCallback(async (data) => { const assistantResponse = await (await fetch('/api/assistant', { body: JSON.stringify({url: data.url}), method: 'POST', headers: { 'Content-Type': 'application/json' } })).json(); setAssistantState([...assistantState, {...assistantResponse, url: data.url, pending: true}]); }, [assistantState]) const changeStatus = useCallback((val: ExtendedAssistant) => async () => { const assistantResponse = await (await fetch(`/api/assistant?url=${val.url}`, { method: 'GET', headers: { 'Content-Type': 'application/json' } })).json(); setAssistantState([...assistantState.filter((v) => v.id), assistantResponse]); }, [assistantState]) return ( <TriggerProvider publicApiKey={process.env.NEXT_PUBLIC_TRIGGER_PUBLIC_API_KEY!}> <div className="w-full max-w-2xl mx-auto p-6 flex flex-col gap-4"> <form className="flex items-center space-x-4" onSubmit={handleSubmit(submit)}> <input className="flex-grow p-3 border border-black/20 rounded-xl" placeholder="Add documentation link" type="text" {...register('url', {required: 'true'})} /> <button className="flex-shrink p-3 border border-black/20 rounded-xl" type="submit"> Add </button> </form> <div className="divide-y-2 divide-gray-300 flex gap-2 flex-wrap"> {assistantState.map(val => ( <AssistantList key={val.url} val={val} onFinish={changeStatus(val)} /> ))} </div> {assistantState.filter(f => !f.pending).length > 0 && <ChatgptComponent list={assistantState} />} </div> </TriggerProvider> ) } ``` 讓我們看看這裡發生了什麼: - 我們建立了一個名為「ExtendedAssistant」的新接口,其中包含兩個參數「pending」和「eventId」。當我們建立一個新的助理時,我們沒有最終的值,我們將只儲存`eventId`並監聽作業處理直到完成。 - 我們從伺服器元件取得清單並將其設定為新狀態(以便我們稍後可以修改它) - 我們新增了「TriggerProvider」來幫助我們監聽事件完成並用資料更新它。 - 我們使用「react-hook-form」建立一個新表單來新增助手。 - 我們新增了一個帶有一個輸入「URL」的表單來提交新的助理進行處理。 - 我們迭代並顯示所有現有的助手。 - 在提交表單時,我們將資訊傳送到先前建立的「路由」以新增助理。 - 事件完成後,我們觸發「changeStatus」以從資料庫載入助手。 - 最後,我們有了 ChatGPT 元件,只有在沒有等待處理的助手時才會顯示(`!f.pending`) 讓我們建立 `AssistantList` 元件。 在「components」內,建立一個新檔案「assistant.list.tsx」並在其中加入以下內容: ``` "use client"; import {FC, useEffect} from "react"; import {ExtendedAssistant} from "@openai-assistant/components/main"; import {useEventRunDetails} from "@trigger.dev/react"; export const Loading: FC<{eventId: string, onFinish: () => void}> = (props) => { const {eventId} = props; const { data, error } = useEventRunDetails(eventId); useEffect(() => { if (!data || error) { return ; } if (data.status === 'SUCCESS') { props.onFinish(); } }, [data]); return <div className="pointer bg-yellow-300 border-yellow-500 p-1 px-3 text-yellow-950 border rounded-2xl">Loading</div> }; export const AssistantList: FC<{val: ExtendedAssistant, onFinish: () => void}> = (props) => { const {val, onFinish} = props; if (val.pending) { return <Loading eventId={val.eventId!} onFinish={onFinish} /> } return ( <div key={val.url} className="pointer relative bg-green-300 border-green-500 p-1 px-3 text-green-950 border rounded-2xl hover:bg-red-300 hover:border-red-500 hover:text-red-950 before:content-[attr(data-content)]" data-content={val.url} /> ) } ``` 我們迭代我們建立的所有助手。如果助手已經建立,我們只顯示名稱。如果沒有,我們渲染`<Loading />`元件。 載入元件在螢幕上顯示“正在載入”,並長時間輪詢伺服器直到事件完成。 我們使用 Trigger.dev 建立的 useEventRunDetails 函數來了解事件何時完成。 事件完成後,它會觸發「onFinish」函數,用新建立的助手更新我們的客戶端。 ### 聊天介面  現在,讓我們加入 ChatGPT 元件並向我們的助手提問! - 選擇我們想要使用的助手 - 顯示訊息列表 - 新增我們要傳送的訊息的輸入和提交按鈕。 在「components」內部新增一個名為「chatgpt.component.tsx」的新文件 讓我們繪製 ChatGPT 聊天框: ``` "use client"; import {FC, useCallback, useEffect, useRef, useState} from "react"; import {ExtendedAssistant} from "@openai-assistant/components/main"; import Markdown from 'react-markdown' import {useEventRunDetails} from "@trigger.dev/react"; interface Messages { message?: string eventId?: string } export const ChatgptComponent = ({list}: {list: ExtendedAssistant[]}) => { const url = useRef<HTMLSelectElement>(null); const [message, setMessage] = useState(''); const [messagesList, setMessagesList] = useState([] as Messages[]); const [threadId, setThreadId] = useState<string>('' as string); const submitForm = useCallback(async (e: any) => { e.preventDefault(); setMessagesList((messages) => [...messages, {message: `**[ME]** ${message}`}]); setMessage(''); const messageResponse = await (await fetch('/api/message', { method: 'POST', body: JSON.stringify({message, id: url.current?.value, threadId}), })).json(); if (!threadId) { setThreadId(messageResponse.threadId); } setMessagesList((messages) => [...messages, {eventId: messageResponse.eventId}]); }, [message, messagesList, url, threadId]); return ( <div className="border border-black/50 rounded-2xl flex flex-col"> <div className="border-b border-b-black/50 h-[60px] gap-3 px-3 flex items-center"> <div>Assistant:</div> <div> <select ref={url} className="border border-black/20 rounded-xl p-2"> {list.filter(f => !f.pending).map(val => ( <option key={val.id} value={val.id}>{val.url}</option> ))} </select> </div> </div> <div className="flex-1 flex flex-col gap-3 py-3 w-full min-h-[500px] max-h-[1000px] overflow-y-auto overflow-x-hidden messages-list"> {messagesList.map((val, index) => ( <div key={index} className={`flex border-b border-b-black/20 pb-3 px-3`}> <div className="w-full"> {val.message ? <Markdown>{val.message}</Markdown> : <MessageComponent eventId={val.eventId!} onFinish={setThreadId} />} </div> </div> ))} </div> <form onSubmit={submitForm}> <div className="border-t border-t-black/50 h-[60px] gap-3 px-3 flex items-center"> <div className="flex-1"> <input value={message} onChange={(e) => setMessage(e.target.value)} className="read-only:opacity-20 outline-none border border-black/20 rounded-xl p-2 w-full" placeholder="Type your message here" /> </div> <div> <button className="border border-black/20 rounded-xl p-2 disabled:opacity-20" disabled={message.length < 3}>Send</button> </div> </div> </form> </div> ) } export const MessageComponent: FC<{eventId: string, onFinish: (threadId: string) => void}> = (props) => { const {eventId} = props; const { data, error } = useEventRunDetails(eventId); useEffect(() => { if (!data || error) { return ; } if (data.status === 'SUCCESS') { props.onFinish(data.output.threadId); } }, [data]); if (!data || error || data.status !== 'SUCCESS') { return ( <div className="flex justify-end items-center pb-3 px-3"> <div className="animate-spin rounded-full h-3 w-3 border-t-2 border-b-2 border-blue-500" /> </div> } return <Markdown>{data.output.content}</Markdown>; }; ``` 這裡正在發生一些令人興奮的事情: - 當我們建立新訊息時,我們會自動將其呈現在螢幕上作為「我們的」訊息,但是當我們將其發送到伺服器時,我們需要推送事件 ID,因為我們還沒有訊息。這就是我們使用 `{val.message ? <Markdown>{val.message}</Markdown> : <MessageComponent eventId={val.eventId!} onFinish={setThreadId} />}` - 我們用「Markdown」元件包裝訊息。如果您還記得,我們在前面的步驟中告訴 ChatGPT 以 MD 格式輸出所有內容,以便我們可以正確渲染它。 - 事件處理完成後,我們會更新線程 ID,以便我們從以下訊息中獲得相同對話的上下文。 我們就完成了🎉 ---  ## 讓我們聯絡吧! 🔌 作為開源開發者,您可以加入我們的[社群](https://discord.gg/nkqV9xBYWy) 做出貢獻並與維護者互動。請隨時造訪我們的 [GitHub 儲存庫](https://github.com/triggerdotdev/trigger.dev),貢獻並建立與 Trigger.dev 相關的問題。 本教學的源程式碼可在此處取得: [https://github.com/triggerdotdev/blog/tree/main/openai-assistant](https://github.com/triggerdotdev/blog/tree/main/openai-assistant) 感謝您的閱讀! --- 原文出處:https://dev.to/triggerdotdev/train-chatgpt-on-your-documentation-1a9g
## 長篇大論;博士 如今,任何開發人員都可以利用人工智慧來建立強大的東西。 無需成為機器學習專家。 這裡有 7 個最好的庫,您可以使用它來增強您的開發並透過最先進的 AI 功能給用戶留下深刻的印象。 這些可以為你的專案帶來神奇的力量,所以不要忘記給他們加星號並支持他們🌟  --- ## 1. [CopilotKit](https://github.com/RecursivelyAI/CopilotKit):將 AI 功能引入 React 應用程式。 (ChatBot 和 CopilotTexarea) 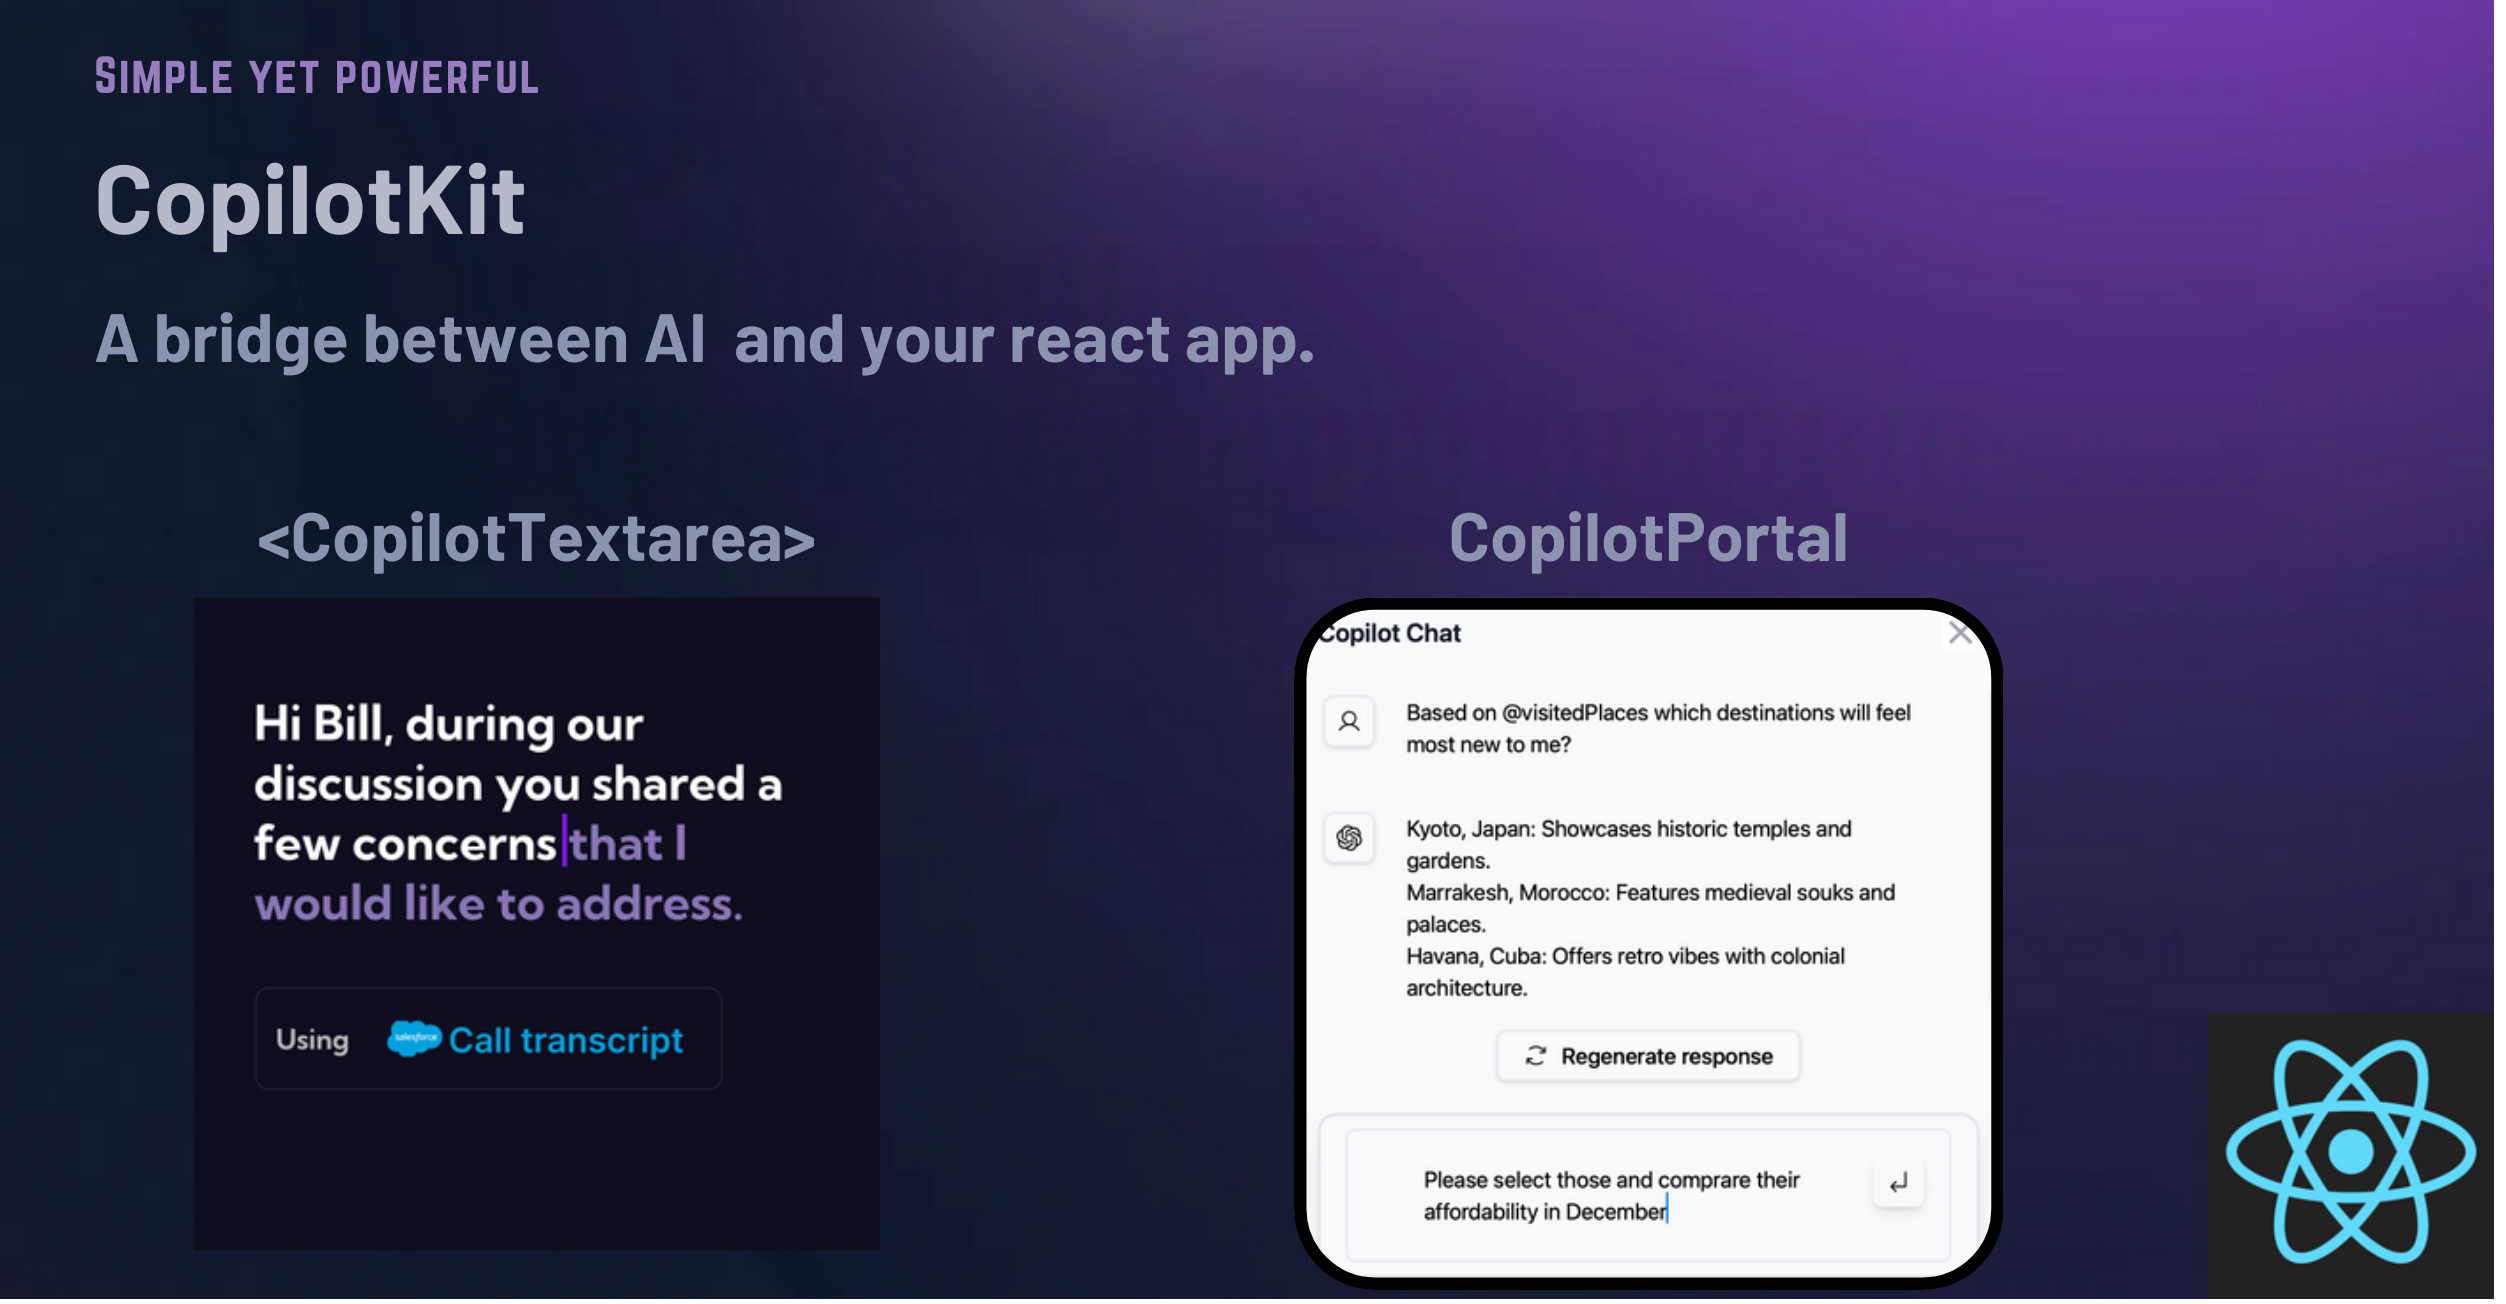 常見的法學碩士產品用例被製作成簡單且可自訂的反應元件。 具有兩個元件: CopilotPortal:加入可以在您的應用程式內回答問題並採取行動的法學碩士! CopilotTextarea:任何具有 Github Copilot 功能的 <textarea/> 的直接替代品。 ``` import "@copilotkit/react-ui/styles.css"; import { CopilotProvider } from "@copilotkit/react-core"; import { CopilotSidebarUIProvider } from "@copilotkit/react-ui"; export default function App(): JSX.Element { return ( <CopilotProvider chatApiEndpoint="/api/copilotkit/chat"> <CopilotSidebarUIProvider> <YourContent /> </CopilotSidebarUIProvider> </CopilotProvider> ); } ``` {% cta https://github.com/RecursivelyAI/CopilotKit %} Star CopilotKit ⭐️ {% endcta %} --- ## 2. Tavily GPT 研究員 - 取得法學碩士學位以搜尋網路和資料庫  Tavilly 可讓您將 GPT 支援的研究和內容產生工具新增至您的 React 應用程式中,從而增強其資料處理和內容建立功能。 ``` # Create an assistant assistant = client.beta.assistants.create( instructions=assistant_prompt_instruction, model="gpt-4-1106-preview", tools=[{ "type": "function", "function": { "name": "tavily_search", "description": "Get information on recent events from the web.", "parameters": { "type": "object", "properties": { "query": {"type": "string", "description": "The search query to use. For example: 'Latest news on Nvidia stock performance'"}, }, "required": ["query"] } } }] ) ``` {% cta https://github.com/assafelovic/gpt-researcher %} 明星塔維利 ⭐️ {% endcta %} --- ## 3. Pezzo.ai - 可觀測性、成本和即時工程平台  用於管理 OpenAI 通話的集中平台。 優化您的提示和令牌使用。追蹤您的人工智慧使用情況。 免費且易於整合。 ``` const prompt = await pezzo.getPrompt("AnalyzeSentiment"); const response = await openai.chat.completions.create(prompt); ``` {% cta https://github.com/pezzolabs/pezzo %} 明星 Pezzo ⭐️ {% endcta %} --- ## 4. LangChain - 將人工智慧整合到行動鏈中。  易於使用的 API 和函式庫,用於將 LLM 新增到應用程式中。 將不同的人工智慧元件和模型連接在一起。 輕鬆嵌入上下文和語義資料以實現強大的整合。 ``` from langchain.llms import OpenAI from langchain import PromptTemplate llm = OpenAI(model_name="text-davinci-003", openai_api_key="YourAPIKey") # Notice "food" below, that is a placeholder for another value later template = """ I really want to eat {food}. How much should I eat? Respond in one short sentence """ prompt = PromptTemplate( input_variables=["food"], template=template, ) final_prompt = prompt.format(food="Chicken") print(f"Final Prompt: {final_prompt}") print("-----------") print(f"LLM Output: {llm(final_prompt)}") ``` {% cta https://github.com/langchain-ai/langchain %} 星朗鏈 ⭐️ {% endcta %} --- ## 5. [Weaviate](https://github.com/weaviate/weaviate) - 用於人工智慧增強專案的向量資料庫  Weaviate 是一個針對大型資料集快速、高效搜尋而最佳化的向量資料庫。 它支援與 OpenAI 和 Hugging Face 等提供者的 AI 模型和服務集成,從而實現資料分類和自然語言處理等高級任務。 它是一種雲端原生解決方案,具有高度可擴展性,可以滿足不斷變化的資料需求。 ``` import weaviate import json client = weaviate.Client( embedded_options=weaviate.embedded.EmbeddedOptions(), ) uuid = client.data_object.create({ }) obj = client.data_object.get_by_id(uuid, class_name='MyClass') print(json.dumps(obj, indent=2)) ``` {% cta https://github.com/weaviate/weaviate %} 星織 ⭐️ {% endcta %} --- ## 6. [PrivateGPT](https://github.com/imartinez/privateGPT) - 與您的文件聊天,100% 私密 💡  PrivateGPT 允許在應用程式內進行安全的、GPT 驅動的文件交互,確保資料隱私並增強上下文感知處理能力。 PrivateGPT 透過本地處理和儲存文件和上下文來確保隱私,而無需將資料傳送到外部伺服器。 ``` from privategpt import PrivateGPT, DocumentIngestion, ChatCompletion client = PrivateGPT(api_key='your_api_key') def process_documents_and_chat(query, documents): ingestion_result = DocumentIngestion(client, documents) chat_result = ChatCompletion(client, query, context=ingestion_result.context) return chat_result documents = ['doc1.txt', 'doc2.txt'] query = "What is the summary of the documents?" result = process_documents_and_chat(query, documents) print(result) ``` {% cta https://github.com/weaviate/weaviate %} 星織 ⭐️ {% endcta %} --- ## 7. SwirlSearch - 人工智慧驅動的搜尋。  LLM 支援的搜尋、摘要和輸出。 同時搜尋多個內容來源並產生整合輸出。 功能強大,可自訂各種資料來源的應用程式內整合。 {% cta https://github.com/swirlai/swirl-search %} 星旋搜尋 ⭐️ {% endcta %} --- 謝謝閱讀! 我希望這些可以幫助您使用人工智慧建立一些很棒的東西。 如果您喜歡並評論您想看到的任何其他庫或主題,請按讚。 --- 原文出處:https://dev.to/copilotkit/7-ai-libraries-every-dev-needs-to-know-to-be-a-wiz-4lim
警告:所表達的觀點可能不適合所有受眾! 😂 ## 簡介 在本文結束時,您將了解並能夠根據使用者偏好 - **深色**或**淺色**模式展示您的 Markdown 影像。 1. 我將介紹如何在 GitHub README.md 中加入兩個圖像 - 根據所選的“主題”,您的圖像將正確回應。 2. 我將引導您在 Markdown 中合併影像的過程,並示範如何使用 React 使它們回應。 😎 ___ ## 你使用淺色還是深色? 我不了解你的情況,但無論平台如何,如果他們可以選擇在淺色和深色模式之間切換,那就沒有競爭了。 淺色主題正在切換為深色,事實上,當然在我寫這篇文章的時候! 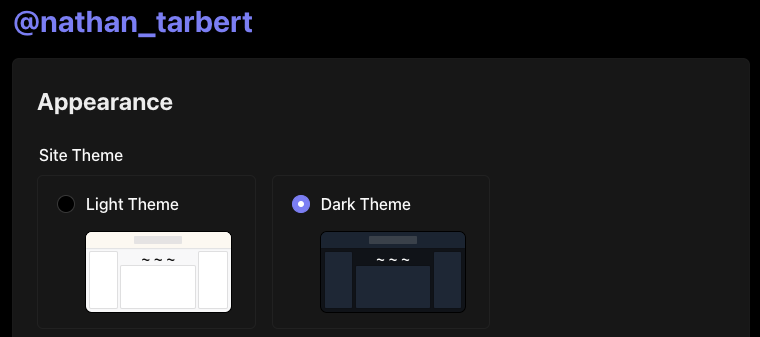 話雖如此,在軟體開發的快速發展中,創造無縫的使用者體驗至關重要。 這種體驗的一部分涉及適應使用者偏好,例如淺色和深色模式。 我還記得幾年前,Github 宣布了用戶可以切換到「深色模式」的選項,這是一件非常大的事情。  【Github揭曉黑暗主題的重要時刻】(https://t.co/HEotvXVJ7R) 🤩 2020 年 12 月 8 日🎆 近年來,使用者介面中深色和淺色模式選項的出現已成為一種流行趨勢。 我絕對不是唯一一個喜歡使用深色主題選項的人,根據 Android 用戶的說法,[91.8% 的用戶更喜歡深色模式](https://www.androidauthority.com/dark-mode-poll-results-1090716/) 所以我們可以猜測這個數字在所有作業系統中都相當高。 這當然可能會引起激烈的爭論,所以我會盡力將自己的觀點降到最低。  ## 改善使用者體驗 主要目標是透過在應用程式中提供選項來改善用戶體驗。 有多種方法可以建立每個圖像的多個版本,在本教程中我們不會深入討論細節。 只要確保您的圖像在兩個主題中脫穎而出並具有透明背景,您就會獲得成功。 **_讓我們開始派對吧!_** ## GitHub 自述文件中的響應式圖像 您有一個專案並想讓您的 GitHub 專案 README.md 真正流行嗎? 無論使用者使用什麼淺色主題,我們都需要一種方法來指定圖像應在 Markdown 中顯示哪種主題(淺色或深色)。 當您想要根據使用者選擇的配色方案優化圖片的顯示時,這特別有用,並且它涉及將 **HTML `<picture>`** 元素與 `prefers-color-scheme` 媒體功能結合使用如下所示。 繼續將圖片檔案直接拖曳到 GitHub 中並放在“srcset=”後面。 ``` <picture> <source media="(prefers-color-scheme: dark)" srcset="https://github.com/boxyhq/.github/assets/66887028/df1c9904-df2f-4515-b403-58b14a0e9093"> <source media="(prefers-color-scheme: light)" srcset="https://github.com/boxyhq/.github/assets/66887028/e093a466-72ea-41c6-a292-4c39a150facd"> <img alt="BoxyHQ Banner" src="https://github.com/boxyhq/jackson/assets/66887028/b40520b7-dbce-400b-88d3-400d1c215ea1"> </picture> ``` 瞧!   太好了,你有 5 秒嗎? https://github.com/boxyhq/jackson --- ## 使用 React 在 Markdown 中回應影像 假設今天我將像平常一樣用 Markdown 編寫博客,並將其發佈到我的網站上。 我使用的圖像需要根據使用者偏好做出回應,但在 Markdown 中不可能偵聽本地儲存和設定狀態中的「主題」變更。 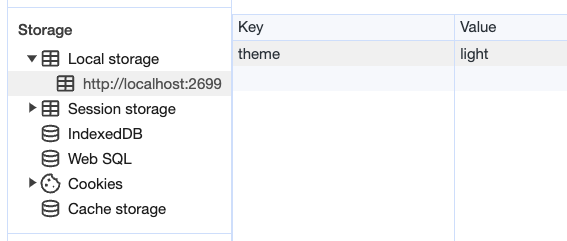 值得慶幸的是,如果我們將 React 匯入到 Markdown 檔案中,但先建立一個元件,就有一種方法可以解決這個困境。 ## 反應文件 ``` src/components/LightDarkToggle.js import React, { useEffect, useState } from 'react'; function ToggleImages() { // Define a state variable to track the user's login status const [currentTheme, setcurrentTheme] = useState(localStorage.getItem('theme')); // Add an event listener for the 'storage' event inside a useEffect useEffect(() => { const handleStorageChange = (event) => { console.log('Storage event detected:', event); // Check the changed key and update the state accordingly console.log("event", event.key) if (event.key === 'theme') { setcurrentTheme(event.newValue); } }; window.addEventListener('storage', handleStorageChange); // Clean up the event listener when the component unmounts return () => { window.removeEventListener('storage', handleStorageChange); }; }, []); // The empty dependency array ensures that this effect runs once when the component mounts return ( <div className="image-container"> {currentTheme == 'light'? ( <img id="light-mode-image" src="/img/blog/boxyhq-banner-light-bg.png" alt="Light Mode Image" ></img> ):( <img id="dark-mode-image" src="/img/blog/boxyhq-banner-dark-bg.png" alt="Dark Mode Image" ></img> )} </div> ); } export default ToggleImages; ``` 我在程式碼中加入了註釋和一些控制台日誌,以幫助了解正在發生的事情,但讓我們快速分解它。 - React useState 鉤子管理 `currentTheme` 的狀態,它代表使用者選擇的儲存在本機儲存中的主題。 - useEffect 掛鉤用於為「儲存」事件新增事件偵聽器。當儲存事件發生時(表示本機儲存發生變化),元件會檢查變更的鍵是否為“theme”,並相應地更新“currentTheme”狀態。 - 此元件根據使用者選擇的主題呈現不同的影像,如果主題是“淺色”,則顯示淺色模式影像;如果主題是其他主題,則顯示深色模式影像。 酷,讓我們繼續吧! ## 降價文件 讓我們為新部落格建立一個 .md 檔案。 ``` --- slug: light-and-dark-mode-responsive-images title: 'Light and Dark Mode Responsive Images' tags_disabled: [ developer, react, javascript, open-source, ] image: /img/blog/light-dark.png author: Nathan Tarbert author_title: Community Engineer @BoxyHQ author_url: https://github.com/NathanTarbert author_image_url: https://boxyhq.com/img/team/nathan.jpg --- import ToggleImages from '../src/components/LightDarkToggle.js'; ## 🤩 Let's start this blog off with a bang! Our business logo is now responsive with each user's preference, whether it's **light** or **dark** mode! <div> <ToggleImages /> </div> More blog words... ``` 此時,我們只需匯入 React 元件並將其呈現在 Markdown 檔案中。 由於這是一個 Next.js 應用程式,讓我們啟動伺服器“npm run dev”並查看結果。   並切換到淺色主題 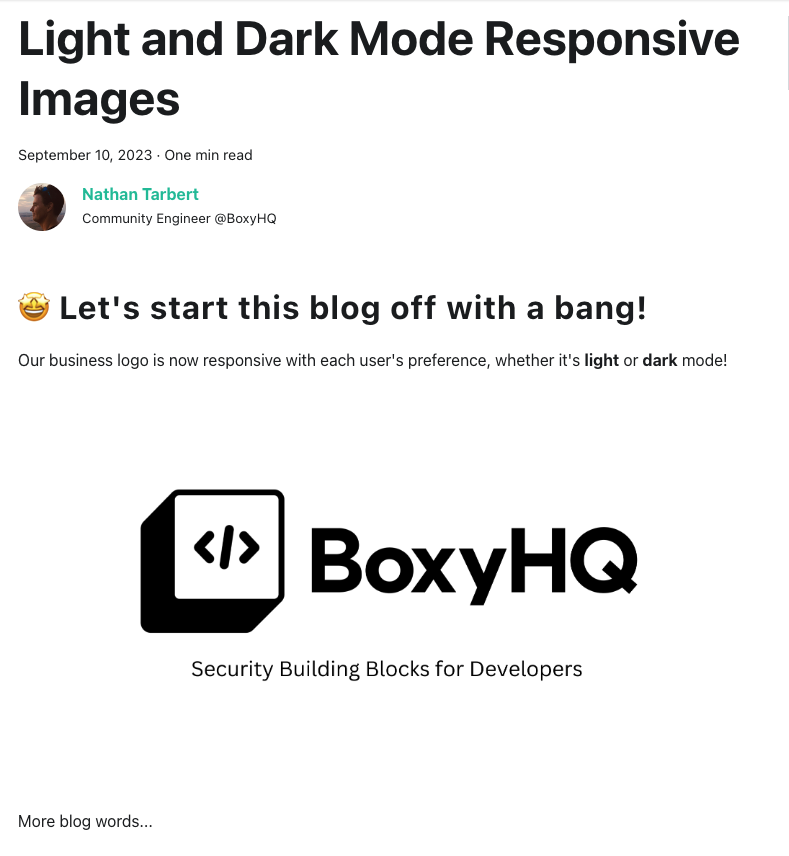 讓我們打開控制台來查看我們的事件 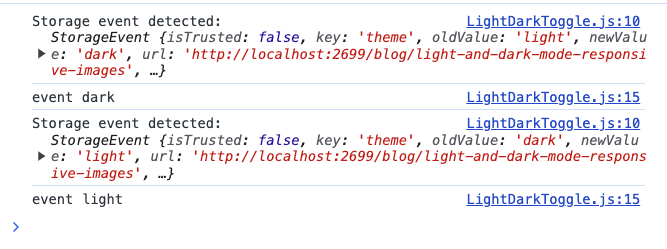 你有它! 這些是在 Markdown 中展示響應式映像的幾種方法,其中一個範例使用 React 來幫助我們在本地儲存中設定狀態。 我希望您喜歡這篇文章,如果您喜歡開發,請在 [X (Twitter)](https://twitter.com/nathan_tarbert) 上關注我,我們下次再見! --- 原文出處:https://dev.to/nathan_tarbert/the-zebras-guide-to-showcase-your-images-in-light-dark-17f5
## 你好!我是[鮑里斯](https://www.martinovic.dev/)! 我是一名軟體工程師,專門從事保險工作,教授其他開發人員,並在會議上發言。多年來,我使用了相當多的不同開發環境和作業系統,除了 .Net 開發之外,我個人從來不喜歡在 Windows 中進行開發。這是為什麼?讓我們更深入地研究一下。 好吧,我的大部分問題都可以歸結為一個詞:**麻煩**。無論是在日常使用中處理Windows,您都會經常遇到作業系統本身的不同方式帶給您的困擾。這樣的例子很多,無論是登錄問題、套件管理、切換節點版本或 Windows 更新,這些問題本身就可以讓人們放棄作業系統。 所以你可以明白為什麼我開始與下圖的烏鴉產生連結。  我並沒有放棄尋找可行的解決方案。而且,我(有點)找到了它。 ## 什麼是 WSL?我為什麼要對它感興趣? Windows Subsystem for Linux(或 WSL)讓開發人員可以直接在 Windows 上執行功能齊全的本機 GNU/Linux 環境。換句話說,我們可以直接執行Linux,而無需使用虛擬機器或雙重開機系統。 **第一個很酷的事情是 WSL 允許您永遠不用切換作業系統,但仍然可以在作業系統中擁有兩全其美的優點。** 這對我們普通用戶意味著什麼?當您查看WSL 在實踐中的工作方式時,它可以被視為一項Windows 功能,直接在Windows 10 或11 內執行Linux 作業系統,具有功能齊全的Linux 檔案系統、Linux 命令列工具、*** *** 和****** Linux GUI 應用程式(*真的很酷,順便說一句*)。除此之外,與虛擬機器相比,它使用的運作資源要少得多,並且不需要單獨的工具來建立和管理這些虛擬機器。 WSL 主要針對開發人員,因此本文將重點放在開發人員的使用以及如何使用 VS Code 設定完全工作的開發環境。在本文中,我們將介紹一些很酷的功能以及如何在實踐中使用它們。另外,理解新事物的最好方法就是實際開始使用它們。 ### 覺得這篇文章有用嗎? 我們正在 [Wasp](https://wasp-lang.dev/) 努力建立這樣的內容,更不用說建立一個現代的開源 React/NodeJS 框架了。 表達您支援的最簡單方法就是為 Wasp 儲存庫加註星標! 🐝 但如果您可以查看[存儲庫](https://github.com/wasp-lang/wasp)(用於貢獻,或只是測試產品),我們將不勝感激。點擊下面的按鈕給黃蜂星一顆星並表示您的支持!  https://github.com/wasp-lang/wasp ## 在 Windows 作業系統上安裝 WSL 為了在 Windows 上安裝 WSL,請先啟用 [Hyper-V](https://learn.microsoft.com/en-us/virtualization/hyper-v-on-windows/quick-start/enable-hyper-v )架構是微軟的硬體虛擬化解決方案。要安裝它,請右鍵單擊 Windows 終端機/Powershell 並以管理員模式開啟它。  然後,執行以下命令: ``` Enable-WindowsOptionalFeature -Online -FeatureName Microsoft-Hyper-V -All ``` 這將確保您具備安裝的所有先決條件。然後,在管理員模式下開啟 Powershell(最好在 Windows 終端機中完成)。然後,執行 ``` wsl —install ``` 有大量的 Linux 發行版需要安裝,但 Ubuntu 是預設安裝的。本指南將介紹許多控制台命令,但其中大多數將是複製貼上過程。 如果您之前安裝過 Docker,那麼您的系統上很可能已經安裝了 WSL 2。在這種情況下,您將收到安裝所選發行版的提示。由於本教程將使用 Ubuntu,因此我建議執行。 ``` wsl --install -d Ubuntu ``` 安裝 Ubuntu(或您選擇的其他發行版)後,您將進入 Linux 作業系統並出現歡迎畫面提示。在那裡,您將輸入一些基本資訊。首先,您將輸入您的用戶名,然後輸入密碼。這兩個都是 Linux 特定的,因此您不必重複您的 Windows 憑證。完成此操作後,安裝部分就結束了!您已經在 Windows 電腦上成功安裝了 Ubuntu!說起來還是感覺很奇怪吧? ### 等一下! 但在我們開始討論開發環境設定之前,我想向您展示一些很酷的技巧,這些技巧將使您的生活更輕鬆,並幫助您了解為什麼 WSL 實際上是 Windows 用戶的遊戲規則改變者。 WSL 的第一個很酷的事情是您不必放棄目前透過 Windows 資源管理器管理檔案的方式。在 Windows 資源管理器的側邊欄中,您現在可以在網路標籤下找到 Linux 選項。  從那裡,您可以直接從 Windows 資源管理器存取和管理 Linux 作業系統的檔案系統。這個功能真正酷的是,你基本上可以在不同的作業系統之間複製、貼上和移動文件,沒有任何問題,這開啟了一個充滿可能性的世界。實際上,您不必對文件工作流程進行太多更改,並且可以輕鬆地將許多專案和文件從一個作業系統移動到另一個作業系統。如果您在 Windows 瀏覽器上下載 Web 應用程式的映像,只需將其複製並貼上到您的 Linux 作業系統中即可。  我們將在範例中使用的另一個非常重要的事情是 WSL2 虛擬路由。由於您的作業系統中現在有作業系統,因此它們有一種通訊方式。當您想要存取 Linux 作業系統的網路時(例如,當您想要存取在 Linux 中本機執行的 Web 應用程式時),您可以使用 *${PC-name}.local*。對我來說,由於我的電腦名稱是 Boris-PC,所以我的網路位址是 boris-pc.local。這樣你就不必記住不同的 IP 位址,這真的很酷。如果您出於某種原因需要您的位址,您可以前往 Linux 發行版的終端,然後輸入 ipconfig。然後,您可以看到您的 Windows IP 和 Linux 的 IP 位址。這樣,您就可以毫無摩擦地與兩個作業系統進行通訊。 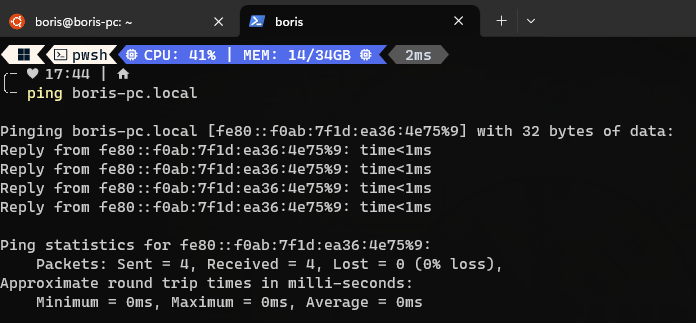 我想強調的最後一件很酷的事情是 Linux GUI 應用程式。這是一項非常酷的功能,有助於使 WSL 對普通用戶更具吸引力。您可以使用流行的套件管理器(例如 apt(Ubuntu 上的預設值)或 flatpak)在 Linux 系統上安裝任何您想要的應用程式。然後,您也可以從命令列啟動它們,應用程式將啟動並在 Windows 作業系統中可見。但這可能會引起一些摩擦並且不方便用戶使用。此功能真正具有突破性的部分是,您可以直接從 Windows 作業系統啟動它們,甚至無需親自啟動 WSL。因此,您可以建立捷徑並將它們固定到「開始」功能表或任務欄,沒有任何摩擦,並且實際上不需要考慮您的應用程式來自哪裡。為了演示,我安裝了 Dolphin 檔案管理器並透過 Windows 作業系統執行它。您可以在下面看到它與 Windows 資源管理器並排的操作。 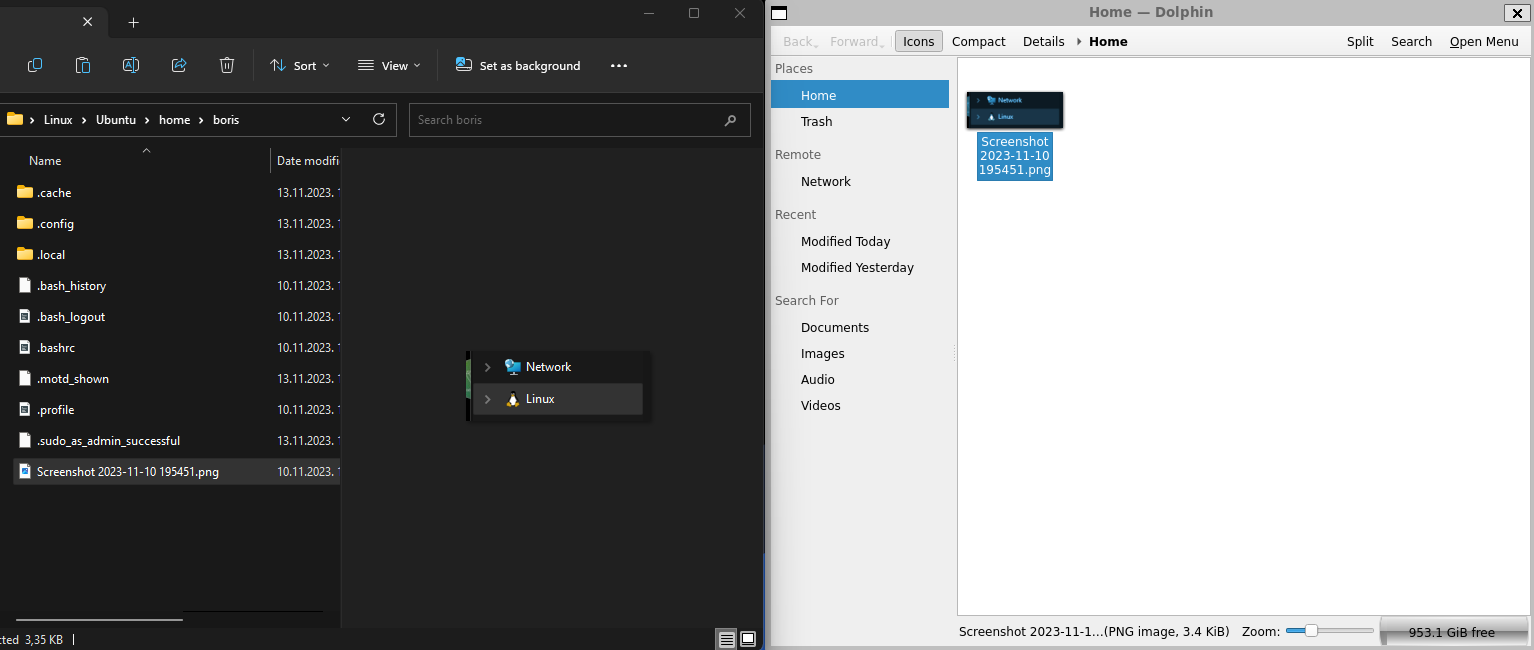 ## WSL 開發入門 在了解了 WSL 的所有酷炫功能後,讓我們慢慢回到教學的正軌。接下來是設定我們的開發環境並啟動我們的第一個應用程式。我將設定一個 Web 開發環境,我們將使用 [Wasp](https://wasp-lang.dev/) 作為範例。 如果你不熟悉的話,Wasp 是一個類似 Rails 的 React、Node.js 和 Prisma 框架。這是開發和部署全端 Web 應用程式的快速、簡單的方法。對於我們的教程,Wasp 是一個完美的候選者,因為它本身不支援 Windows 開發,而只能透過 WSL 來支持,因為它需要 Unix 環境。 讓我們先開始安裝 Node.js。目前,Wasp 要求使用者使用 Node v18(版本要求很快就會放寬),因此我們希望從 Node.js 和 NVM 的安裝開始。 但首先,讓我們先從 Node.js 開始。在 WSL 中,執行: ``` sudo apt install nodejs ``` 為了在您的 Linux 環境中安裝 Node。接下來是 NVM。我建議存取 https://github.com/nvm-sh/nvm 並從那裡獲取最新的安裝腳本。目前下載的是: ``` curl -o- [https://raw.githubusercontent.com/nvm-sh/nvm/v0.39.5/install.sh](https://raw.githubusercontent.com/nvm-sh/nvm/v0.39.5/install.sh) | bash ``` 之後,我們在系統中設定了 Node.js 和 NVM。 接下來是在我們的 Linux 環境中安裝 Wasp。 Wasp 安裝也非常簡單。因此,只需複製並貼上此命令: ``` curl -sSL [https://get.wasp-lang.dev/installer.sh](https://get.wasp-lang.dev/installer.sh) | sh ``` 並等待安裝程序完成它的事情。偉大的!但是,如果您從 0 開始進行 WSL 設置,您會注意到下面有以下警告:看起來“/home/boris/.local/bin”不在您的 PATH 上!您將無法透過終端名稱呼叫 wasp。 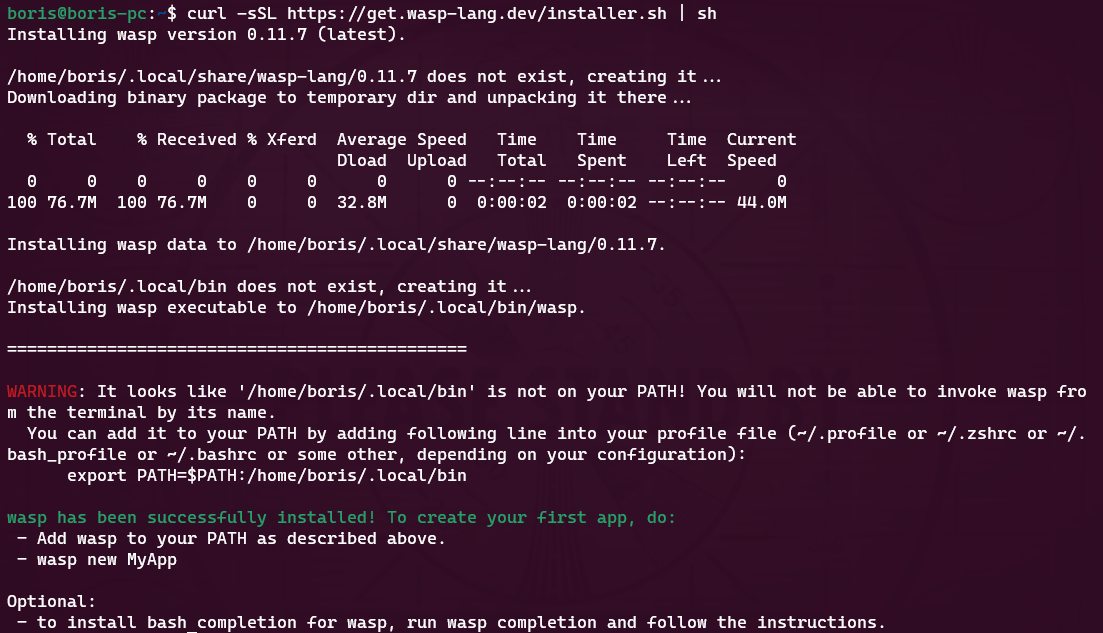 讓我們快速解決這個問題。為了做到這一點,讓我們執行 ``` code ~/.profile ``` 如果我們還沒有 VS Code,它會自動設定所需的一切並啟動,以便您可以將命令新增至檔案末端。每個人的系統名稱都會有所不同。例如我的是: ``` export PATH=$PATH:/home/boris/.local/bin ``` 偉大的!現在我們只需要將節點版本切換到 v18.14.2 即可確保與 Wasp 完全相容。我們將一次性安裝並切換到 Node 18!為此,只需執行: ``` nvm install v18.14.2 && nvm use v18.14.2 ``` 設定 Wasp 後,我們希望了解如何執行應用程式並從 VS Code 存取它。在幕後,您仍將使用 WSL 進行開發,但我們將能夠使用主機作業系統 (Windows) 中的 VS Code 來完成大多數事情。 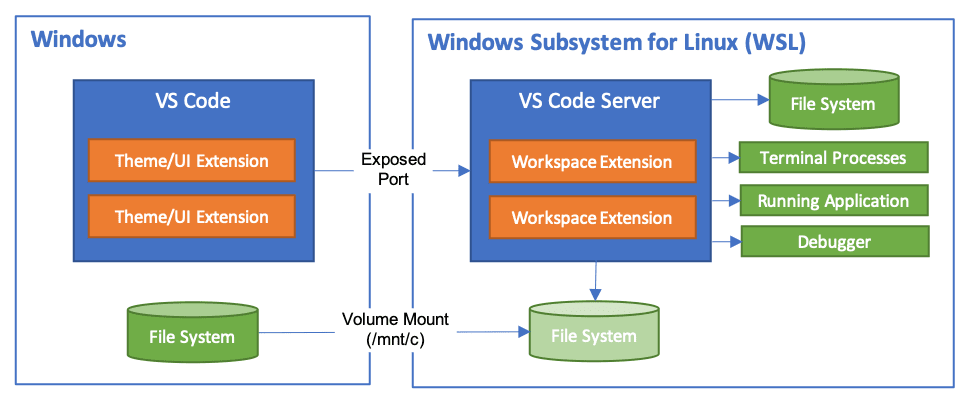 首先,將 [WSL 擴充功能](https://marketplace.visualstudio.com/items?itemName=ms-vscode-remote.remote-wsl) 下載到 Windows 中的 VS Code。然後,讓我們啟動一個新的 Wasp 專案來看看它是如何運作的。開啟 VS Code 命令面板(ctrl + shift + P)並選擇「在 WSL 中開啟資料夾」選項。 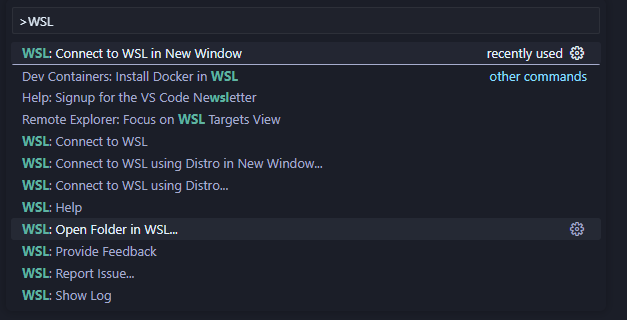 我打開的資料夾是 ``` \\wsl.localhost\Ubuntu\home\boris\Projects ``` 這是我在 WSL 中的主資料夾中的「Projects」資料夾。我們可以透過兩種方式知道我們處於 WSL 中:頂部欄和 VS Code 的左下角。在這兩個地方,我們都編寫了 WSL: Ubuntu,如螢幕截圖所示。   進入該資料夾後,我將打開一個終端。它還將已經連接到 WSL 中的正確資料夾,因此我們可以開始工作了!讓我們執行 ``` wasp new ``` 命令建立一個新的 Wasp 應用程式。我選擇了基本模板,但您可以自由建立您選擇的專案,例如[SaaS 入門](https://github.com/wasp-lang/SaaS-Template-GPT) 具有 GPT、Stripe 等預先配置。如螢幕截圖所示,我們應該將專案的當前目錄變更為正確的目錄,然後用它來執行我們的專案。 ``` wasp start ``` 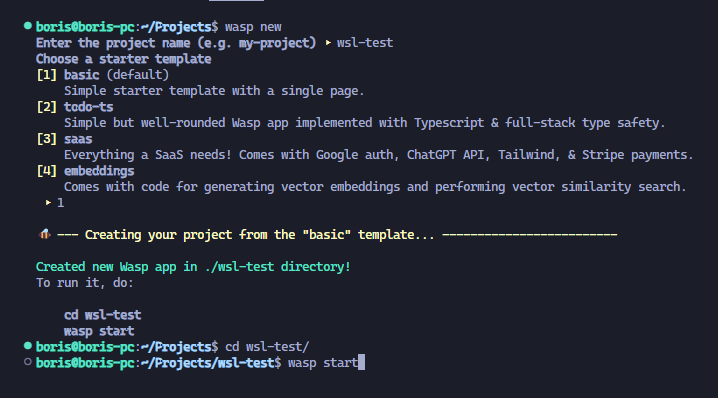 就像這樣,我的 Windows 電腦上將打開一個新螢幕,顯示我的 Wasp 應用程式已開啟。涼爽的!我的位址仍然是預設的 localhost:3000,但它是從 WSL 執行的。恭喜,您已透過 WSL 成功啟動了您的第一個 Wasp 應用程式。這並不難,不是嗎? 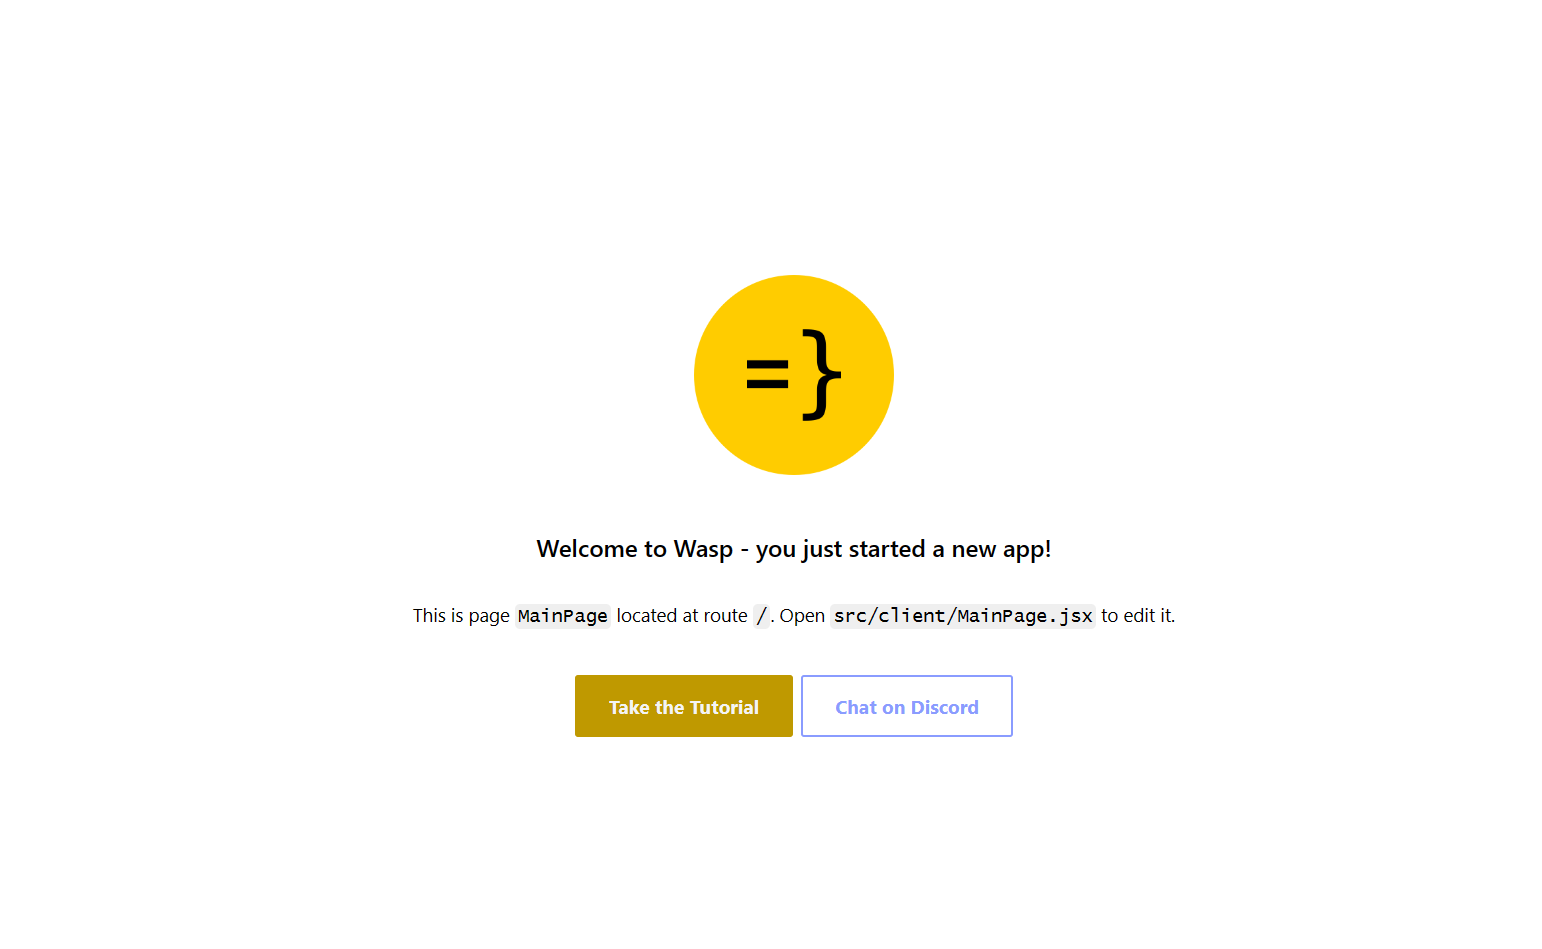 對於我們的最後一個主題,我想重點介紹使用 WSL 的 Git 工作流程,因為它的設定相對輕鬆。您始終可以手動進行 git config 設置,但我為您提供了一些更酷的東西:在 Windows 和 WSL 之間共享憑證。要設定共享 Git 憑證,我們必須執行以下操作。在 Powershell(在 Windows 上)中,設定 Windows 上的憑證管理員。 ``` git config --global credential.helper wincred ``` 讓我們在 WSL 中做同樣的事情。 ``` git config --global credential.helper "/mnt/c/Program\ Files/Git/mingw64/bin/git-credential-manager.exe" ``` 這使我們能夠共享 Git 使用者名稱和密碼。 Windows 中設定的任何內容都可以在 WSL 中運作(反之亦然),我們可以根據需要在 WSL 中使用 Git(透過 VS Code GUI 或透過 shell)。 ## 結論 透過我們在這裡的旅程,我們了解了 WSL 是什麼、它如何有助於增強 Windows PC 的工作流程,以及如何在其上設定初始開發環境。 Microsoft 在這個工具方面做得非常出色,並且確實使 Windows 作業系統成為所有開發人員更容易使用和可行的選擇。我們了解如何安裝啟動開發所需的開發工具以及如何掌握基本的開發工作流程。如果您想深入了解該主題,這裡有一些重要的連結: - [https://wasp-lang.dev/](https://wasp-lang.dev/) - [https://github.com/microsoft/WSL](https://github.com/microsoft/WSL) - [https://learn.microsoft.com/en-us/windows/wsl/install](https://learn.microsoft.com/en-us/windows/wsl/install) - [https://code.visualstudio.com/docs/remote/wsl](https://code.visualstudio.com/docs/remote/wsl) --- 原文出處:https://dev.to/wasp/supercharge-your-windows-development-the-ultimate-guide-to-wsl-195m
## 簡介 我收集了最好的 React 元件,您可以使用它來建立強大的 Web 應用程式。 每個都有自己的味道。 別忘了表達你的支持🌟 現在,讓我們仔細閱讀這段程式碼! 🍽️  --- ## 1. [CopilotPortal](https://github.com/RecursivelyAI/CopilotKit):將可操作的 GPT 聊天機器人嵌入您的網路應用程式中。  將 GPT 支援的聊天機器人插入您的 React 應用程式中。 可以將 RAG 與雲端和應用程式狀態即時整合。 需要幾行程式碼才能嵌入。 ``` import "@copilotkit/react-ui/styles.css"; import { CopilotProvider } from "@copilotkit/react-core"; import { CopilotSidebarUIProvider } from "@copilotkit/react-ui"; export default function App(): JSX.Element { return ( <CopilotProvider chatApiEndpoint="/api/copilotkit/chat"> <CopilotSidebarUIProvider> <YourContent /> </CopilotSidebarUIProvider> </CopilotProvider> ); } ``` https://github.com/RecursivelyAI/CopilotKit --- ## 2. [ClickVote](https://github.com/clickvote/clickvote) - 按讚、投票並查看任何上下文  輕鬆將點讚、按讚和評論加入到您的網路應用程式中。 用於加入這些元件的簡單反應程式碼。 ``` import { ClickVoteProvider } from '@clickvote/react'; import { ClickVoteComponent } from '@clickvote/react'; import { LikeStyle } from '@clickvote/react'; <ClickVoteProvider> <ClickVoteComponent id={CONTEXT} voteTo={ID}> {(props) => <LikeStyle {...props} />} </ClickVoteComponent> </ClickVoteProvider> ``` https://github.com/clickvote/clickvote --- ## 3. [React Flow](https://github.com/xyflow/xyflow) - 建立可拖曳工作流程的最佳方式!  專為建立基於節點的編輯器和互動式圖表而客製化的 React 元件。 它具有高度可自訂性,提供拖放功能以實現高效的工作流程建立。 ``` import ReactFlow, { MiniMap, Controls, Background, useNodesState, useEdgesState, addEdge, } from 'reactflow'; <ReactFlow nodes={nodes} edges={edges} onNodesChange={onNodesChange} onEdgesChange={onEdgesChange} onConnect={onConnect} > <MiniMap /> <Controls /> <Background /> </ReactFlow> ``` https://github.com/xyflow/xyflow --- ## 4. [CopilotTextarea](https://github.com/RecursivelyAI/CopilotKit/tree/main/CopilotKit/packages/react-textarea) - React 應用程式中的 AI 驅動寫作 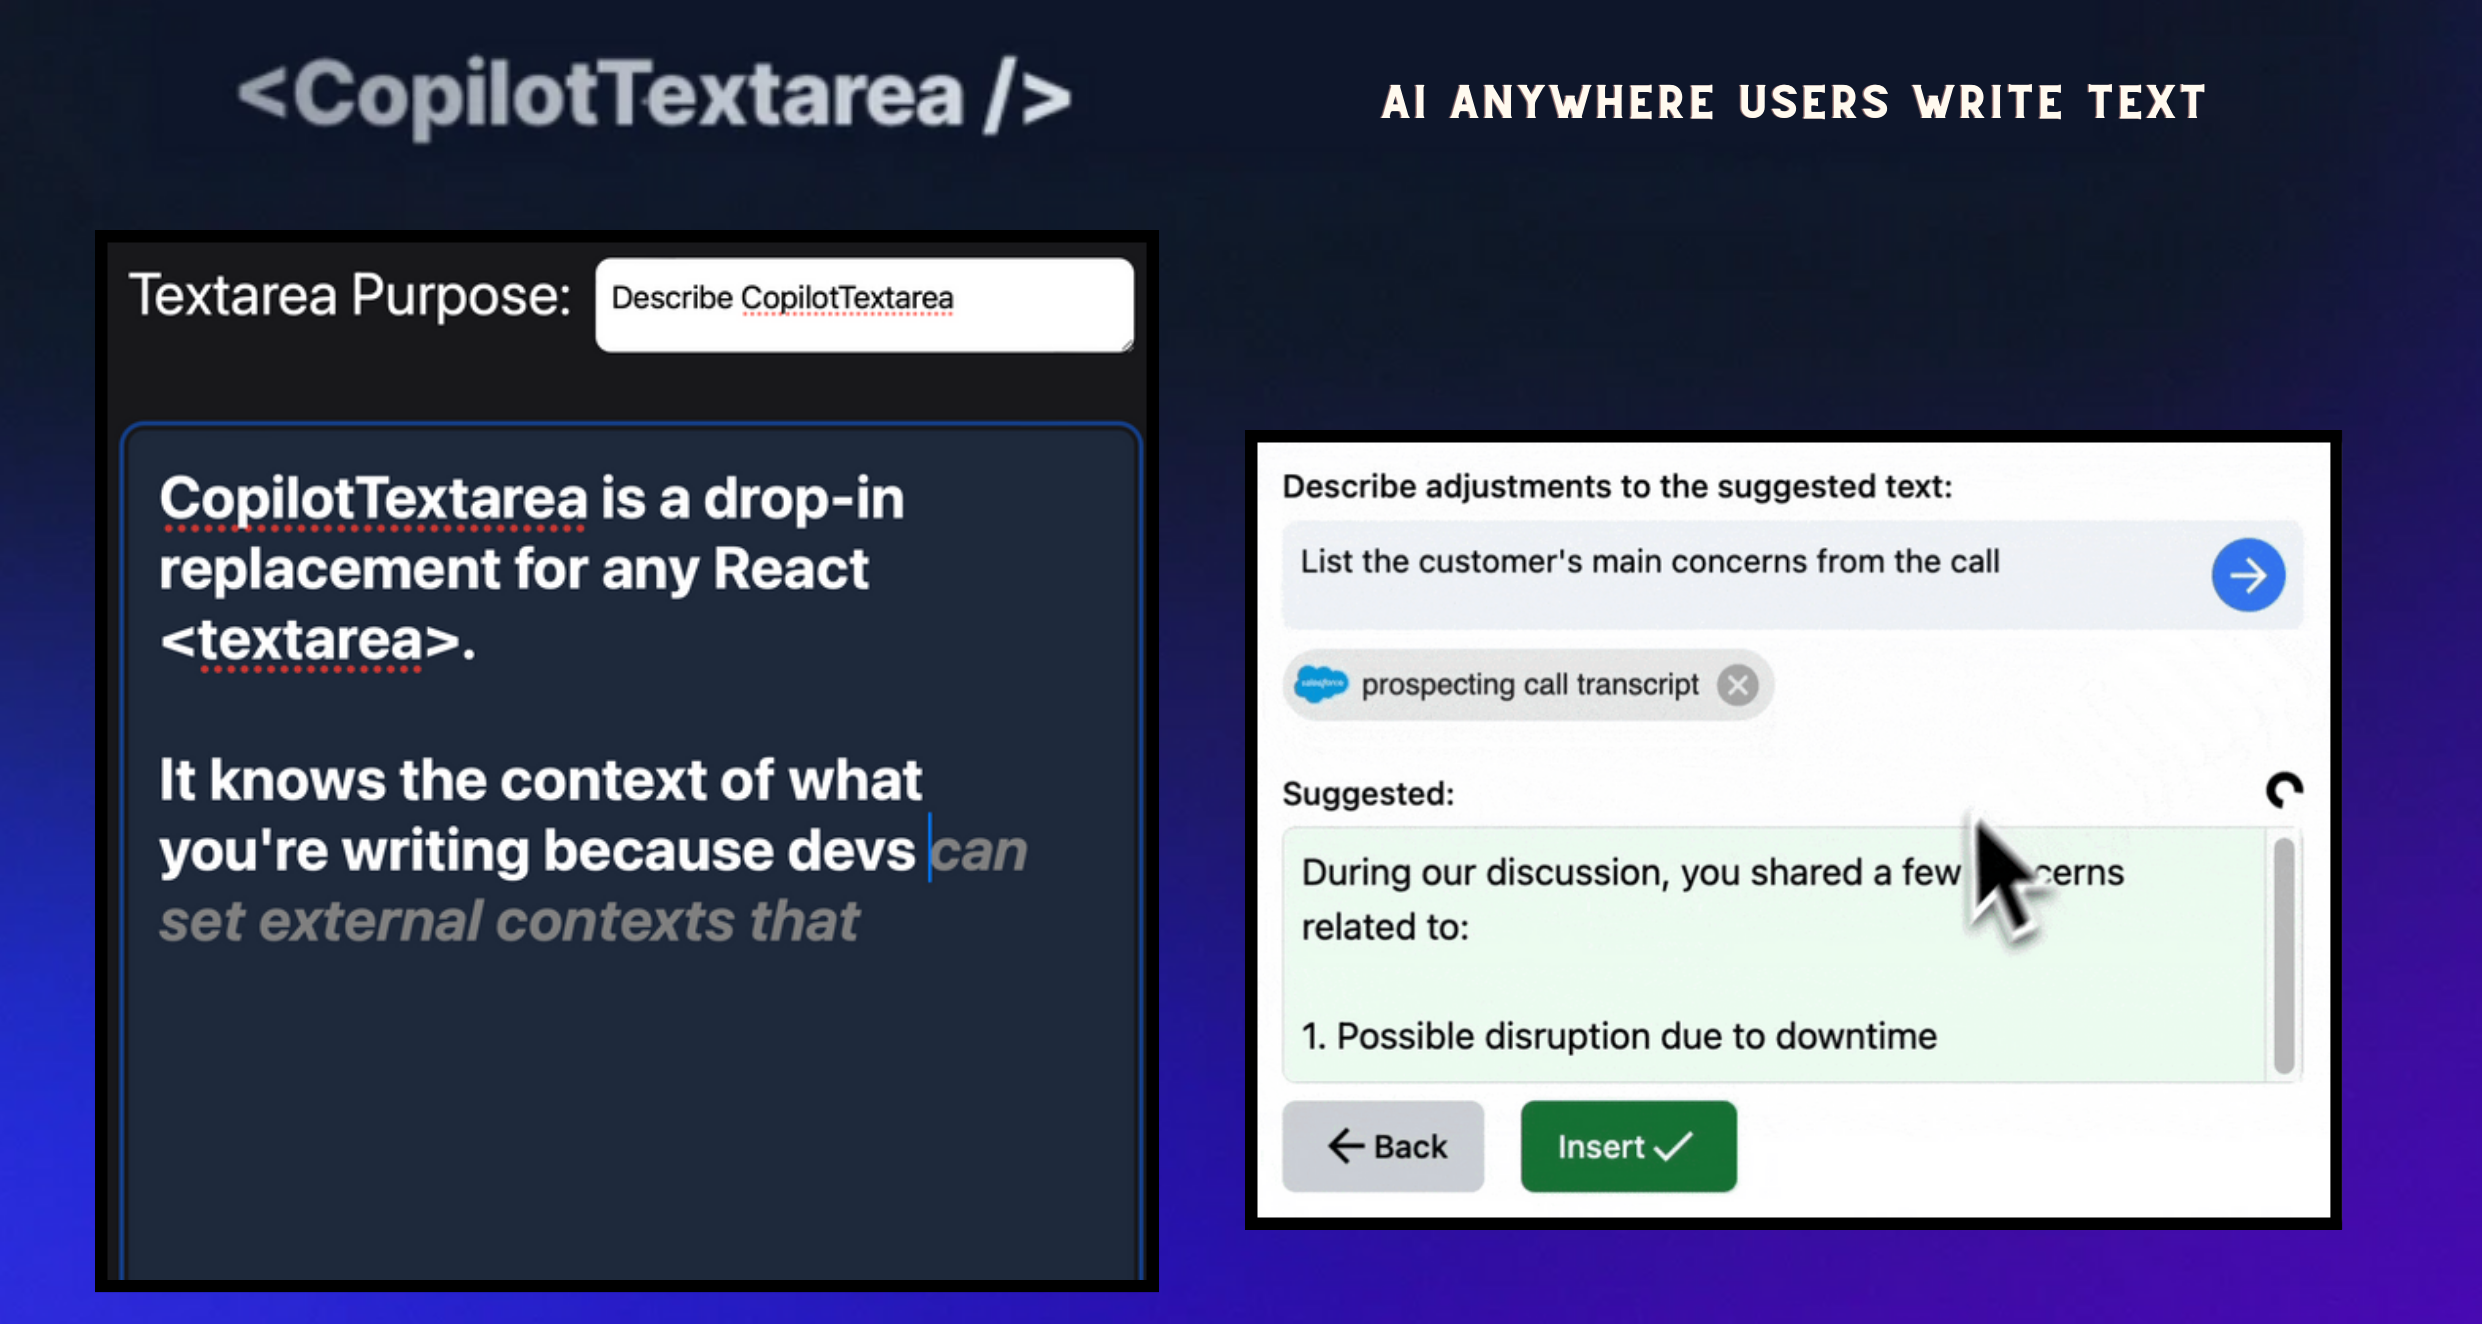 具有 Github CopilotX 功能的任何 React `<textarea>` 的直接替代品。 自動完成、插入、編輯。 可以即時或由開發人員提前提供任何上下文。 ``` import { CopilotTextarea } from "@copilotkit/react-textarea"; import { CopilotProvider } from "@copilotkit/react-core"; // Provide context... useMakeCopilotReadable(...) // in your component... <CopilotProvider> <CopilotTextarea/> </CopilotProvider>` ``` https://github.com/RecursivelyAI/CopilotKit --- ## 5. [Novu](https://github.com/novuhq/novu) - 將應用程式內通知新增至您的應用程式!  用於在一個地方管理所有通訊管道的簡單元件和 API:電子郵件、SMS、Direct 和 Push 您可以使用此 React 元件為您的應用程式新增應用程式內通知。 ``` import { NovuProvider, PopoverNotificationCenter, NotificationBell, IMessage, } from "@novu/notification-center"; <NovuProvider subscriberId={"SUBSCRIBER_ID"} applicationIdentifier={"APPLICATION_IDENTIFIER"} > <PopoverNotificationCenter colorScheme="dark"> {({ unseenCount }) => <NotificationBell unseenCount={unseenCount} />} </PopoverNotificationCenter> </NovuProvider> ``` https://github.com/novuhq/novu --- ## 6. [ReactIcons](https://github.com/react-icons/react-icons) - 最受歡迎的反應圖示集合  輕鬆將 Font Awesome、Material Design 等中的流行圖標加入到您的 React 應用程式中。 為開發人員提供簡單、廣泛的選擇。 ``` import { FaBeer } from "react-icons/fa"; function Question() { return ( <h3> Lets go for a <FaBeer />? </h3> ); } ``` https://github.com/react-icons/react-icons --- ## 7. [React-dropzone](https://github.com/react-dropzone/react-dropzone) - 新增 HTML5 拖放 UI。  用於實作 HTML5 拖放區域的簡單 React 鉤子,重點放在檔案互動。 它提供了一個易於使用的介面,用於向 React 應用程式加入檔案拖放功能。 ``` import React from 'react'; import {useDropzone} from 'react-dropzone'; const Basic = (props)=>{ const {acceptedFiles, getRootProps, getInputProps} = useDropzone(); const files = acceptedFiles.map(file => ( <li key={file.path}> {file.path} - {file.size} bytes </li> )); return ( <section className="container"> <div {...getRootProps({className: 'dropzone'})}> <input {...getInputProps()} /> <p>Drag 'n' drop some files here, or click to select files</p> </div> <aside> <h4>Files</h4> <ul>{files}</ul> </aside> </section> ); } export default Basic; ``` https://github.com/react-dropzone/react-dropzone --- ## 8. [React ChartJS 2](https://github.com/reactchartjs/react-chartjs-2) - 建立和整合各種圖表。  用於在 React 應用程式中繪製圖表的即插即用解決方案,類似於 Chart.js 功能。 啟用動態、互動式圖表。 適用於即時資料或預定義資料集。 ``` import React from 'react'; import { Chart as ChartJS, ArcElement, Tooltip, Legend } from 'chart.js'; import { Doughnut } from 'react-chartjs-2'; ChartJS.register(ArcElement, Tooltip, Legend); const data = { labels: ['Red', 'Blue', 'Yellow', 'Green', 'Purple', 'Orange'], datasets: [ { label: '# of Votes', data: [12, 19, 3, 5, 2, 3], backgroundColor: [ 'rgba(255, 99, 132, 0.2)', ], borderColor: [ 'rgba(255, 99, 132, 1)', ], borderWidth: 1, }, ], }; export default function ShowChart() { return <Doughnut data={data} />; } ``` https://github.com/reactchartjs/react-chartjs-2 ## 9. [Redux](https://github.com/reduxjs/redux) - 可預測的狀態容器庫  JavaScript 應用程式中 Redux 的無縫補充,提供可靠的狀態管理。 確保一致的應用程式行為。 便於輕鬆除錯和測試。 與各種庫整合。 https://github.com/reduxjs/redux --- ## 10. [Blueprint](https://github.com/palantir/blueprint) - Palantir 的密集 UI 庫  提供一組用於建立複雜且資料豐富的介面的元件和樣式。 設計和開發具有現代外觀和感覺的類似桌面的 Web 應用程式。 由 Palantir 開發 ``` import React from 'react'; import '@blueprintjs/core/lib/css/blueprint.css'; import { H3, H4, OL, Pre } from "@blueprintjs/core"; function App() { return ( <div style={{ display: 'block', width: 500, padding: 30 }}> <h4>ReactJS Blueprint HTML Elements Component</h4> Heading Component: <H4>H4 Size Heading</H4> <H3>H3 Size Heading</H3> <br></br> OrderList Component: <OL> <li>1st item</li> <li>2nd item</li> </OL> Pre Component: <Pre>Sample Pre</Pre> </div> ); } ``` https://github.com/palantir/blueprint --- ## 11. [Headless UI](https://github.com/tailwindlabs/headlessui) - 可存取的 Tailwind 整合 UI 元件。  在 React 和 Vue 應用程式中建立可存取的 UI 元件。 適用於即時資料或預定義資料集,使其成為現代 Web 開發專案的寶貴補充 ``` import React, { useState } from 'react'; import { Dialog } from '@headlessui/react'; function MyDialog() { let [isOpen, setIsOpen] = useState(true); return ( <Dialog open={isOpen} onClose={() => setIsOpen(false)} className="relative z-50"> {/* The backdrop, rendered as a fixed sibling to the panel container */} <div className="fixed inset-0 bg-black/30" aria-hidden="true" /> {/* Full-screen container to center the panel */} <div className="fixed inset-0 flex w-screen items-center justify-center p-4"> {/* Your dialog content goes here */} </div> </Dialog> ); } ``` https://github.com/tailwindlabs/headlessui --- 保存這些元件,以便像朝聖者一樣專業地建造。 謝謝大家,節日快樂! --- 原文出處:https://dev.to/copilotkit/reacts-giving-11-react-components-for-aspiring-pros-eck
在上一篇文章,我簡單介紹了 GraphQL 的好處,以及如何在 laravel 中實作 這一篇文章,接著介紹一下如何在前端使用 React 進行整合 # 實務範例與 API 線上試玩 上一篇文章我用 graphql + laravel 實作了簡單的電商後台 api https://graphql-laravel-example.tw/graphiql 這次我用 Next.js 開發了簡單的電商前端 web app https://graphql-react-example.vercel.app/ 歡迎試玩看看!可以瀏覽商品、輸入信箱訂閱電子報 --- 在前端發送 query 的程式碼,可以參考 https://github.com/howtomakeaturn/graphql-react-example/blob/main/app/page.js 在前端發送 mutation 的程式碼,可以參考 https://github.com/howtomakeaturn/graphql-react-example/blob/main/app/newsletter.js 我使用原生的 fetch 函數呼叫 graphql api,所以您用任何一款 http 函式庫也都可以做到 狀態管理我用 Next.js 社群的 swr 當作範例,您完全可以自由使用任何 state manager # 優點介紹 我認為前端可以自主決定,要撈取哪些資料,是 graphql 最強大的功能! 後端設計好各種 type 之後,前端就可以自行根據 playground 試玩 api! https://graphql-laravel-example.tw/graphiql 可以彈性、自由撈取資料,連關聯資料都可以巢狀撈取! ``` const gql = `query { products { id name description featured_image price comments { content user { name } } }, }`; ``` 大幅減低後端開發時間、前後端溝通時間、以及處理不同情境需要新增多組類似 api 的時間! # 完整程式碼 前端完整程式碼請參考 https://github.com/howtomakeaturn/graphql-react-example 上次的後端 graphql 試玩 https://graphql-laravel-example.tw/ 後端完整程式碼 https://github.com/howtomakeaturn/graphql-laravel-example # 結論 上面 graphql + laravel + react 的範例 我認為原始碼非常單純、易讀,容易開發、也容易維護 您應該可以根據我提供的範例,在專案中試著導入使用 我在替客戶導入 graphql + laravel + react 的時候,發現網路上教學雖然很多,但是缺少範例 所以我製作這些 sample project 方便大家參考&入門 大家有機會的話一定要試試看 graphql 的威力! (此為系列文章,更多內容會在近期發佈) --- # 系列文章 - [Laravel + GraphQL 接案心得&範例分享 Part 1:強大優點、API 線上試玩、工具介紹](https://codelove.tw/@howtomakeaturn/post/yx08mx) - [Laravel + GraphQL 接案心得&範例分享 Part 2:前端 Query/Mutation 與 React 串接範例](https://codelove.tw/@howtomakeaturn/post/2an0Gx)
狀態管理器到底是什麼?狀態管理器是一個智慧模組,能夠保留(應用程式或 Web 應用程式的)會話資料並對資料的變更做出反應。 您是網頁開發人員嗎?使用過 Redux、Mobx 或 Zustand 等函式庫嗎?恭喜!您已經使用了狀態管理器。 我記得我第一天嘗試為 React 設定(舊的)Redux。只要想到所有不必要的複雜性——調度程序、減速器、中間件,我就會患上創傷後壓力症候群(PTSD)!我只是想聲明一些變數,_請讓它停止_。  這是一個過度設計、臃腫的庫,每個人都在使用!由於某種瘋狂的、未知的原因,它成為了當時的行業標準。 ###一些背景故事 2021 年的一個晚上,當我無法入睡時,我漫無目的地打開 GitHub,注意到我以前的大學課程老師(我在 GH 上關注過他)為他現在的學生上傳了一份作業。該作業要求學生使用公共 Pokemon API 建立一個 Pokedex 網站。目標是用 Javascript 實現它(沒有框架或函式庫,因為他目前的學生是 Web 開發初學者,仍在學習 Javascript 和開發的基礎知識)。 作為一個笑話,主要是因為我睡不著,我開始在我的神奇寶貝網站上工作。最終,我能夠建立一些可行的東西,而無需使用任何外部庫。 ### 但一路走來,我很掙扎...... 你看,我已經習慣了擁有一個狀態管理器,以至於在不使用外部框架或庫的情況下建置一個簡單的兩頁應用程式的要求讓我開始思考 - _為什麼狀態管理器必須如此復雜?這只是變數和事件._ 長話短說,我發現自己在凌晨 2 點組裝了一個超級簡單的狀態管理器模組,只是為了管理我的 Pokemon Web 應用程式的狀態。我將我的網站部署到了 GitHub 頁面,然後就忘記了這一切。 幾個月過去了,但出於某種原因,我時不時地思考我的狀態管理解決方案...你看,它有其他庫沒有的東西 - _它太簡單了。_ _“嘿!”我心想,「我應該將它重寫為 NPM 套件」。_ 當天晚上,我就這麼做了——我把它寫成了一個獨立的 NPM 包。最後,它的重量為 2kB(相比之下 Redux 的 150kB),具有零依賴性,並且使用起來非常簡單,您只需 3 行程式碼即可完成設定。 ### 我稱之為 VSSM 代表**_非常小的狀態管理器_**。 您可以在[GitHub](https://github.com/lnahrf/Vssm)上查看原始程式碼。另外,請查看使用 React 和 VSSM 建立的[文件網站](https://lnahrf.github.io/Vssm-docs/)。 第二天,我發布了我的 NPM 包,然後又忘記了這件事。 同年晚些時候,我面試了兩家不同公司的全端開發人員職位。我在第一家公司的面試中取得了優異的成績,這是一家非常成熟的科技公司。作為面試過程的一部分,他們要求我告訴他們我是否在空閒時間編碼,或者是否有我貢獻過的任何開源專案等等。 當時我做的唯一很酷的事情就是 VSSM,所以我告訴了他們。他們對我自己建立一個「Redux 替代方案」的想法印象深刻。 另一方面,我在第二家公司的面試中慘敗。我的大腦一片空白,我很緊張,無法回答簡單的問題,例如 > “React 會在狀態變更時重新渲染整個應用程式,還是在使用 Redux 時僅更新受影響的元件及其子元件?” “每次狀態更新時,它都會重新渲染整個應用程式”,我說。  我很緊張,哈哈,顯然我知道正確的答案是「它只渲染註冊的元件以及可能受影響的子元件」。 直到今天我也不明白為什麼二號公司決定給我第二次機會。他們邀請我再次接受採訪(是的!)。 在我的第二次面試中,他們要求我告訴他們我是否在空閒時間編碼、開源貢獻,你知道該怎麼做。當我告訴面試官我的小副專案時,他看起來很高興,似乎他喜歡我只是因為我從頭開始編寫了一個狀態管理器。 我想情況確實如此,因為我第二次面試也失敗了(在程式設計挑戰期間耗盡了時間),但仍然得到了一份工作機會。 1 號公司打算向我發送報價,但我已經與 2 號公司簽署了報價。 我的底線是——我建立 VSSM 幫助我獲得了這兩個機會。  ### 我是怎麼做到的? 您是否知道 Javascript 內建了監視變數變更所需的所有功能? 它被稱為代理(它很神奇)。 Javascript 代理程式是程式碼和變數分配之間的附加邏輯層。 如果您要將物件包裝在代理程式中,您可以決定在每次更新時將其值記錄到控制台,除了為該物件指派新值之外,無需執行任何操作。 ``` const target = { v: "hello" } const proxyTarget = new Proxy(target, { set: (target, property, value) => { console.log(`${property} is now ${value}`); target[property] = value; return target[property]; } }); proxyTarget.v = "world!" // v is now world! ``` VSSM 是基於代理建置,它在變數賦值和其餘程式碼之間建立了一個層。使用代理,您可以設定 setter、getter,並在操作或請求目標值時實現任何類型的邏輯。 VSSM 不僅僅是一個代理,它是各種智慧代理,它們知道分配給變數的值是它的新值還是回調方法。 例如,使用 VSSM,您只需幾行程式碼即可設定狀態、監聽變更並發出事件。 ``` import { createVSSM, createState } from 'vssm'; import { getVSSM } from 'vssm'; // Create the initial state createVSSM({ user: createState('user', { address: '' }) }); // Get the user proxy reference const { user } = getVSSM(); // Listen to events on user.address user.address = () => { console.log(`Address updated! the new address is ${user.address}`); }; // Emit the mutation event user.address = 'P.Sherman 42 Wallaby Way, Sydney' ``` 正如您所看到的,我確保我的狀態管理器盡可能簡單。我的目標是擺脫僅僅為了分配一些變數而陷入減速器、中間件和極其複雜的配置的困境。 現在,一切都透過分配變數來進行!想要設定監聽器嗎?將回調函數指派給變數。想要編輯值並發出事件嗎?只需指派一個新值即可。 直到今天我仍然不明白為什麼流行的狀態管理器必須如此複雜,也許我永遠不會。 我鼓勵您繼續閱讀 [MDN Web Docs](https://developer.mozilla.org/en-US/docs/Web/JavaScript/Reference/Global_Objects/Proxy) 上有關 Javascript 代理的所有內容。 ### 這一切的結論是什麼? 我認為,對自己所做的事情充滿熱情是關鍵。 我建立 VSSM 只是為了突破自己的極限並發布合理的 NPM 包。它成功地給面試官和同事留下了深刻的印象,並讓我從那時起就進入了不同的職位。 沒有人會使用 VSSM,它不會流行。當我將其發佈到 NPM 時,我就意識到了這一事實。但我仍然選擇盡我所能,因為我熱衷於做一些我認為比行業標準更好的事情。我知道我可以做出一些必須更好的東西,即使這意味著它對我更好。 儘管 VSSM 已經死在 NPM 墓地裡,但它給我帶來了很多價值,並且因為這篇文章而繼續這樣做。 獲得開發工作的最佳方法是建立令人驚嘆的東西,即使您認為這一切以前都已經完成了 - 建置得更好。即使您認為沒有人會使用它,那又有什麼意義呢? - 現在建置,價值稍後顯現。 不要低估你的能力,如果你認為自己有不足,請知道你會進步。走出去,建構能夠帶來價值的專案,一次一小步。 祝您工程之旅順利。 --- 原文出處:https://dev.to/lnahrf/javascript-proxy-magic-how-i-built-a-2kb-state-manager-with-zero-dependencies-and-how-it-got-me-two-different-job-offers-2539
你有沒有想過... **如果軟體開發人員的需求如此之大,為什麼現在找到開發人員的工作這麼難?** 為什麼面試過程這麼長?為什麼會有數百次拒絕? 為什麼提供的工資低? 今天,您將了解混亂背後的原因。 我們是如何來到這裡的。以及為什麼。 我還將向您展示為什麼事情並不像大多數開發人員想像的那麼糟糕。以及您需要採取的 5 個步驟來利用這種情況為您帶來優勢。 因此,當大多數開發人員都在倒退時,您可以快速發展您的職業生涯。 如果您是一位雄心勃勃的開發人員,想要更上一層樓並增加薪水,那麼這就是適合您的。 **因為有一件事是真的,我們所知道的軟體開發在 2023 年已經發生了永遠的變化。** 「美好的舊時光」已經一去不復返了。 知道如何建立 React 應用程式將不再讓你獲得這份工作。我們不會很快回到那個狀態。 我們走吧。 這一切都要追溯到 2022 年,當時從谷歌到 Meta 和微軟等大型科技公司開始宣布裁員。不是各種裁員,是裁員開發者。 起初,大多數開發人員都很有信心。 他們說,_「軟體開發總是在成長並且需求旺盛,我們將會復甦」_。 現在,12 個多月過去了,許多程式設計師已經失去了樂觀情緒(免責聲明:我仍然對開發人員的未來非常樂觀,稍後會詳細介紹)。 許多開發者正在失去耐心等待就業市場的復甦。如果它永遠不會發生怎麼辦? 一些開發人員正在懷疑他們的職業選擇。正在考慮 B 計劃或已經轉向做其他事情。 其他人則被迫回到編寫程式碼之前的低薪工作。  最初的樂觀很快就變成了悲觀,許多開發者都在尋找 B 計畫。 **最好的情況是資料輸入或客戶服務工作。在最壞的情況下,它會回到咖啡店或倉庫。** 我認為這是一件非常悲傷的事情。僅僅因為你找不到擺脫困境的有效策略,就拋棄了你的夢想和多年的努力。 我相信,如果你進入軟體開發,那是有原因的。您可能工作勤奮、雄心勃勃且富有創造力。你至少應該有機會證明自己的價值。 在這篇文章中,我將向您展示該怎麼做。具體來說,無論市場表現如何,如何使用經過驗證的軟體工程原理來度過這場風暴,並將您的開發人員職業生涯提升到一個新的水平。 我是誰可以給你這方面的建議? 我叫 Dragos,在過去 3 年裡,我幫助超過 230 多名軟體開發人員提升了技能,快速晉升到高級級別,並獲得了他們應得的認可和報酬。  我不是大師或技術影響者。我並不打算成為其中之一。 但是,在作為自學成才的開發人員編寫程式碼期間,我一直在戰壕里工作,現在幫助其他開發人員升級,這使我很有資格為您提供這方面的建議。 首先,讓我們先了解一下軟體開發行業目前正在發生什麼… **🚨附:您是否希望快速晉升為擁有優質資源、回饋和責任的高階開發人員? [點擊此處加入我們的免費社區 - 高級開發學院。](https://bit.ly/46hbx3h)🚨** ## 現在的情況 像任何好醫生一樣,為了治療症狀,我們必須了解背後的問題。 開發人員就業市場就像任何市場一樣,受簡單的供需機制控制。對開發者的需求越大,開發者的議價能力就越大。 對開發者的需求越少,我們的談判能力就越小。 如果你不斷地感覺自己與其他開發者比較,無法要求高薪,並且很難找到工作,這意味著你在市場上的力量很小。  供需關係決定開發者就業市場。 傳統上,開發者在市場上擁有大部分權力,公司會不遺餘力地獲得最好的工程人才。 這就是為什麼開發人員的薪水不斷增長以及每個人都想學習如何編碼的原因。 **但是,在過去 12 個月裡,權力已經從開發者轉移到了公司(除了頂層的開發者,稍後會詳細介紹)。** 為什麼? 很多原因。讓我們一一回顧一下… ## 1.“效率時代” 戰爭、通貨膨脹和經濟衰退迫使世界各地的公司最大限度地利用資金。包括軟體公司。 企業需要找到更有效的做事方式——如果您正在建立軟體,這意味著擺脫一些開發人員並自動化盡可能多的任務。  糟糕的經濟狀況迫使科技公司的執行長提高公司的效率。 正如馬克·祖克柏在他關於 Meta 的「效率年」的文章中提到的那樣,公司希望提高開發人員的生產力和工具並減少員工人數。 **一言以蔽之:科技公司希望盡可能精簡。** 這意味著軟體開發團隊不能再龐大了。他們需要一些高技能的開發人員以及大量的自動化設備。  這意味著縮小團隊規模(即:解僱表現不佳的員工)、取消優先順序較低的專案並降低招募率。用更少的軟體開發人員完成更多的工作。 對於開發人員就業市場來說,這可不是好訊息… **🚨附:您是否希望快速晉升為擁有優質資源、回饋和責任的高階開發人員? [點擊此處加入我們的免費社區 - 高級開發學院。](https://bit.ly/46hbx3h)🚨** ## 2.人才海嘯 開發人員就業市場變得非常非常擁擠,有數百名候選人瞄準同一職位。 這是因為編碼技能變得越來越普遍。 在過去的十年中,訓練營和電腦科學學位一直在將軟體開發人員吸引到一個已經擁擠的市場中。尤其是訓練營,經過六週的編碼後,他們實現了六位數薪資的夢想。  這引發了一場「人才海嘯」。開發人員的工作被當作中產階級的金票出售。成千上萬的人放棄了學習編碼的希望。 然而,正如許多初級開發人員所看到的那樣,這主要是一種行銷承諾。 事實上,開發人員職位的競爭非常激烈,你在 3 個月的 Bootcamp 中學到的技能已經不足以脫穎而出。  由於大量開發者在尋找黃金,就業市場很快就飽和了。 2020 年的情況就已經如此,但後來情況變得更糟… ## 3.遠距工作 Covid-19 大流行推動全世界轉向遠距工作。鑑於編碼基本上可以在任何地方完成,開發人員的工作是適應速度最快的工作之一。 對許多開發人員來說,在家工作聽起來像是個夢想。 無需通勤,擁有更多屬於自己的時間,並以相同的薪水在舒適的家中進行編碼,這是大多數人在任何給定時間都需要的交易。 但事實證明,遠距工作是一把雙面刃。 因為最終,公司透過增加招募人數而受益最多。  遠距工作意味著軟體公司現在可以僱用來自世界各地的開發人員。 本地職缺吸引了數十名遠距求職者,他們願意以少得多的錢做同樣的工作。正如《紐約時報》所說: **“遠距工作者普遍面臨更多競爭,並且更加依賴運氣。” - 紐約時報** 如果您想知道為什麼現在有數百甚至數千名求職者,那麼答案就是:遠端候選人。 大多數職缺現在都在收到來自世界各地的申請。  隨著遠距工作的興起,本地工作現在面臨國際競爭。 當我可以在中西部找到具有相同技能且至少少兩倍的錢的人時,為什麼還要雇用矽谷的開發人員呢? 在歐洲也一樣。 一家位於柏林的公司可以聘請一位位於德國中部小村莊的開發者。讓他們每個月來辦公室兩次。並少付給他們幾十萬歐元。 當然,一些公司採取了重返辦公室政策。 但從長遠來看,我們將看到越來越多的公司採用完全遠端的思維方式。從經濟學的角度來看,遠距工作很有意義。 **🚨附:您是否希望快速晉升為擁有優質資源、回饋和責任的高階開發人員? [點擊此處加入我們的免費社區 - 高級開發學院。](https://bit.ly/46hbx3h)🚨** ## 4. 人工智慧與自動化 人工智慧已經存在很多年了,但從未像現在這樣出現在我們的生活中。 2023 年 10 月,OpenAI 發布了 ChatGPT。 近年來人工智慧創新的巔峰和迄今為止最好的人工智慧模型。它可以與您談論您的一天,也可以為您撰寫論文。 更糟的是,它可以編碼。  隨著人工智慧能夠編寫功能齊全的程式碼,許多開發人員都會問自己:“現在怎麼辦?” 如果有足夠好的提示,它可以比大多數人類開發人員更好、更快、更便宜地編寫程式碼。 當然,ChatGPT 無法自行思考。 這是一個巨大的統計機器。它會犯很多錯誤並且陷入循環。但是,這足以讓事情順利進行。而且情況只會變得更好。 GitHub 很快就做出了調整,將其整合到 GitHub Copilot 中,後者已直接在 VS Code 中可用。 從長遠來看,沒有人知道人工智慧將對就業市場產生什麼影響。 它會像某些人聲稱的那樣導致我們所知的編碼的終結嗎?或者它只是人類開發人員完成工作的工具? 我們所知道的是,在短期內,人工智慧透過自動化任務或完全取代一些工作,給就業市場帶來了更大的壓力。  高盛估計,大約 29% 的電腦相關任務可以透過人工智慧自動化。 結果? **找到一份體面的開發人員工作變得越來越難。** 回到報價和供應曲線,開發者數量增加,但就業機會數量保持不變。 隨著市場上數百名開發人員尋找職位,軟體開發產業正遭受「Tinder 效應」的困擾。類似網路約會的現象。 就像約會應用程式中的熱門個人資料一樣,軟體公司現在面臨著數百種不同的選擇。數百名候選人和簡歷。 整理噪音並不容易。 你必須更快地放棄候選人。即使你拒絕了一個合適的開發者,總會有其他人在門口等著。 好吧,現在對於開發者來說情況並不好。 忍住眼淚,因為我會告訴你為什麼事情並不像大多數開發人員想像的那麼糟糕... # 好訊息 這場「完美風暴」讓大多數開發者感到驚訝。許多人覺得薪水過低,但同時又沒有勇氣去市場。 這創造了一個“技能差距”,你可以利用它來跑得更快。  「在陽光明媚的天氣裡你無法超越 15 輛汽車…但在下雨天你可以。」- Ayrton Senna **風雨飄搖的就業市場實際上可能是您將開發人員職業提升到全新水平的完美時刻。** 首先,不要像其他人一樣屈服於恐懼。恐懼會讓你癱瘓,擾亂你的思考。不要驚慌失措,而是要超越噪音。 裁員開始一年後,公司意識到消除成本實際上會阻礙他們的成長。 在資本主義中,一家不成長的公司就是一家正在消亡的公司。 公司需要重新開始創造價值。緊急。 更多價值,因為我們正處於經濟衰退之中,消費者只想要最優惠的價格。而且速度更快,因為競爭是全球性的。 **在軟體開發中,價值意味著功能。這意味著高品質的程式碼。** 那麼人工智慧呢? AI實際上刺激了市場。軟體公司別無選擇,只能將人工智慧模型整合到現有的軟體中。否則就有倒閉的風險。 你需要什麼? 開發者、開發者、開發者… 好吧,這就是為什麼這可能是您作為一個雄心勃勃的開發人員超越競爭對手的最佳時機: ## 1. 質量重於數量 是的,市場上的開發者總數有所增加。但他們的技術技能品質卻沒有。 經濟衰退可能在一夜之間發生,但技術掌握需要時間。 即使在這樣的市場條件下,大多數公司仍然抱怨很難找到符合其工作要求的合格開發人員。 企業的要求是否過高? 或許。 但是,這正是您可以利用的差距來保持競爭優勢。  市場上有如此多的噪音,這與您發送的申請數量無關。追求數量只會產生更多垃圾郵件。 重要的是您的簡歷和申請的品質。 這並不意味著您應該成為完美主義者。數字仍然很重要。在開始找工作之前,只需在[您的簡歷和LinkedIn 個人資料上做更多工作](https://dev.to/dragosnedelcu/how-to-find-a-developer-job-in-2023-with-little-or-no-experience-27h7)。 並專注於技術掌握而不是數字! ## 2. 人工智慧作為補充 正如我所提到的,人工智慧模型無法思考,至少目前還不能。事實證明,它們更多的是對開發人員工作的補充,而不是替代品。 人工智慧帶來的是更多透過人工智慧整合進行的軟體開發。對正在開發的軟體的需求不斷增加。 這似乎有悖常理,但事實證明,人工智慧和自動化對軟體產業的影響與 70 年代修建高速公路對汽車交通的影響類似。 更多的高速公路意味著更多的汽車空間,因此更多的人使用汽車。導致汽車流量增加,而不是減少!  更多的高速公路,更多的汽車。更多人工智慧,更多程式碼。 人工智慧編碼工具將使產生的程式碼量倍增。 最終,這意味著更多的程式碼需要由人類檢查、驗證和維護。整體而言,需要更多的開發人員。 **🚨附:您是否希望快速晉升為擁有優質資源、回饋和責任的高階開發人員? [點擊此處加入我們的免費社區 - 高級開發學院。](https://bit.ly/46hbx3h)🚨** ## 3. 現金仍為王 $$$ 有趣的是,開發人員的薪資仍在增加。但它們的成長並不相同。 事實上,大多數開發者都無法跟上通貨膨脹的腳步。許多人根本沒有加薪,儘管在市場上待了很久卻找不到職位。 其他人則獲得小幅加薪,例如 3%。由於去年通膨率約為 10%,這並不是加薪。又是減薪! 但是,一小群幸運的程式設計師的薪酬正在打破記錄。 事實上,我們在 theSeniorDev.com 上看到了這一點。許多高級開發人員的薪資創下歷史新高,即使在歐盟市場也超過 6 位數。 幾年前,如此高的報價是非常不尋常的。 但是,如果你仔細想想,更高的薪水是有道理的。 一家公司面臨著交付一款可以為他們帶來數百萬美元收入的軟體的壓力,他們不會介意為能夠交付該軟體的開發人員額外花費數千美元。 這樣想吧,熟練勞力不是商品。 公司不會購買一雙一模一樣的鞋子並尋求優惠。有些鞋子會讓他們走得更快。為他們支付更多費用是有道理的。 **無論是矽谷或歐洲科技中心,趨勢都很明顯:熟練的開發人員需求量很大,公司願意為他們支付大量資金。** 正如您所看到的,事情並不像大多數開發人員想像的那麼糟糕。 至少不適合所有開發人員... 因為如果你和你的資深朋友交談過,你可能會發現有一群開發者做得併不差…。 ## 僅限資深開發人員的就業市場 儘管發生了一切,但高階開發人員的需求仍然非常大。您可以在招聘板上看到它,其中指定:僅限高級。 或查看誰正在被雇用並立即簽署工作合約。 Hired.com 的一份報告顯示,目前簽署工作合約的軟體開發人員中有超過 73% 擁有 7 到 5 年(或更長)的經驗。  高級開發人員受最近科技業裁員的影響最小。 感覺無論經濟如何發展,成為高級開發人員都會有回報。或多少程式碼 A.I.可以生成。  如果就業市場是動物農場。所有開發人員都是平等的,但高級開發人員比其他人更平等。 如果市場如此糟糕,為什麼高級開發人員仍然受歡迎? 從公司的角度來看,高階開發人員從第一天起就可以創造價值。 公司知道,他們比以往任何時候都更需要快速、優質的交付,才能在當前經濟狀況下保持競爭力。通貨膨脹,記住。 所有這些因素意味著整個軟體開發團隊將崩潰為少數開發人員利用兩個要素: 1. **高級開發人員** 2. **人工智慧工具和自動化** 儘管發生了這一切,但也不全然是壞訊息。堅持幾秒鐘,我會告訴你原因。 **事實是,您可以利用當前的情況來發揮自己的優勢。** **🚨附:您是否希望快速晉升為擁有優質資源、回饋和責任的高階開發人員? [點擊此處加入我們的免費社區 - 高級開發學院。](https://bit.ly/46hbx3h)🚨** # 真相 為了在這個充滿活力的就業市場中取得成功,您將需要比與您競爭的其他數千名開發人員更可靠的策略和更有效率的流程。 您需要立即採取行動,因為… 提供高薪、酷炫技術堆疊、良好福利和遠距工作的開發人員工作每天都變得越來越有競爭力。 這並不意味著他們不可能到達。簡而言之,獲得開發人員工作的舊方法不再有效。 如果您需要其他 5 名開發人員的幫助才能將程式碼投入生產,那麼您的日子就很寶貴了。還有另一個開發人員可以提供端到端的服務,他們將取代您的位置。 所以你會怎麼做? 正如我的一位招募人員朋友所說: **「你最好的選擇是盡快成為高級開發人員」。** 盡快達到高級水平是目前在軟體開發市場中生存的唯一途徑。 成為高級開發人員將使您從眾多編碼人員中脫穎而出,提供端到端的價值,並被視為對公司的投資,而不僅僅是另一個昂貴的開發人員。  聰明的開發人員正在尋找提供更多服務並脫穎而出的方法。他們正在尋找快速實現這一目標的方法。 他們首先需要解決的是如何提升自己的技術能力。 好訊息是,您不需要在周末花費無數時間或編碼來實現這一目標。您不需要啟動數百個線上課程和副專案。 而且您不需要等待數年才能做到這一點。因為有更好的方法可以做到這一點。 你只需要專注在那些不會改變的事情上。 **那麼,如何獲得對自己技能的完全信心、端到端交付並釋放高級信心?** 您遵循基於經過驗證的軟體開發原則的逐步過程。就像高級開發人員每天使用的那樣。我們稱之為技術掌握藍圖。 在接下來的幾行中,我將更深入地討論具體步驟,但這不是本文的目標。 如果您有興趣了解更多訊息,可以單擊下面的連結並觀看我為您準備的免費培訓。 [這是免費培訓的連結。](https://bit.ly/3udWD0m) **免責聲明**:您必須加入您最好的電子郵件才能存取它。別擔心我不會寄垃圾郵件給你。我只會與您分享有關如何快速晉升高級開發人員並讓您的開發人員職業生涯提升到一個全新水平的相關資訊。您可以隨時取消訂閱。 **🚨附:您是否希望快速晉升為擁有優質資源、回饋和責任的高階開發人員? [點擊此處加入我們的免費社區 - 高級開發學院。](https://bit.ly/46hbx3h)🚨** ### 1. 首先,你要採取資深開發人員的心態🧠 成為高級開發人員的第一步是改變您對軟體開發職業和整個生活的看法。 這意味著要以更高的標準要求自己。對您目前的開發者職業生涯承擔全部責任。並掌控你的職涯道路。 你也必須擺脫限制性信念或任何內在的關於自己的負面情緒。你必須養成新的習慣並培養紀律技能。 這意味著設定明確的重點目標,為自己定義一個在情感上令人信服的願景,並在執行這些目標時對自己負責。 **🚀[行動專案]**:準確定義您想要在未來 12 個月內實現的目標。為什麼想實現它?到達那裡需要採取哪些步驟?你是否缺乏任何知識和技能?你需要做一些與現在不同的事情才能到達那裡嗎?寫下來。 當你走向高級開發的旅程時,這將是讓你的火焰保持活力的燃料。大多數開發人員從未到達那裡,因為他們退出得太早。他們忘記了過程就是目標。 ### 2. 其次,你掌握了「基礎知識」📚 大多數開發人員,特別是 JavaScript 開發人員已經習慣相信軟體開發中的資歷就像一個購物袋。 新增的庫和框架越多,其等級就越高。 事實上,情況完全相反。高級開發人員平均編寫的程式碼比初級開發人員少。他們使用不太閃亮的庫和框架來解決問題。 沉迷於框架和庫會讓你成為炒作列車的受害者。當一個圖書館失寵時,另一個圖書館就會出現,需要您投入時間和注意力。這是一場你無法獲勝的遊戲。 如何才能逃脫炒作機器? 透過專注於**「不會改變的事情」**。我們所說的基礎知識。 模式和原則是大多數框架和函式庫的核心。對基礎知識的深入理解將確保您無論情況如何變化都能掌握最新資訊。 它還可以保護您免受人工智慧和自動化的影響。在程式碼在幾秒鐘內產生的世界中,清晰的思維變得越來越有價值。雙贏。 基礎知識取決於您的技術堆疊。 如果您是 JavaScript 開發人員,您主要需要掌握 2 組基礎知識。電腦科學基礎知識和 JavaScript 基礎知識。 這不是本文的範圍,但我整理了一個路線圖,供您準確了解這些內容,請參見下文。 🚨 PS有關“計算機科學基礎知識”的詳細列表,請查看[計算機科學基礎知識掌握路線圖](https://mm.tt/app/map/2980765378?t=LsjjpEBYky)。🚨 🚨附言有關「JavaScript 基礎知識」的詳細列表,請查看我們的 2023 年 [JavaScript 基礎知識掌握路線圖](https://mm.tt/app/map/2962635113?t=ILeYm71vU3)。🚨 順便說一句,我們免費社群的開發人員可以存取獨家內容和針對基礎知識的客製化練習。請在下面註冊! **🚨附:您是否希望快速晉升為擁有優質資源、回饋和責任的高階開發人員? [點擊此處加入我們的免費社區 - 高級開發學院。](https://bit.ly/46hbx3h)🚨** ### 3. 第三,您學習如何端到端交付🎯 任何科技公司執行長現在最不想做的就是僱用更多的開發人員。但他們確實想解決問題。很多問題。 但是,你無法真正解決問題,我的意思是,當你只建構孤立的功能時,會出現有價值的問題。或者當您需要另外 5 名開發人員的幫助才能將您的東西投入生產時。 **高級開發人員之所以需求如此巨大,是因為他們可以提供端到端的服務。** 他們可以與產品經理或其他利害關係人獨立工作,並從第一天起就交付價值。掌握了這一點,你的價值就會增加10倍。 端到端交付並不意味著您必須了解一切。 這意味著您需要了解後端以及基礎設施方面的情況。目前無需深入研究各個元件。但從大局來看是的。 **[進階開發提示]**:學習如何端到端交付的最快方法不是 100 小時的雲端憑證課程(這些課程的重點是向您推銷品牌,而不是教您東西) )。 相反,請嘗試規劃您公司的 CI/CD 流程。 找出他們擁有的任何架構圖,然後自己參與其中。如果他們沒有,請自己建造一些。這已經可以給你一個良好的開始,並在你的下一次技術面試中談論很多事情。 🚨附言要確切了解您需要掌握哪些端對端交付心理模型,請查看我們的[JavaScript 開發人員的「端對端交付」路線圖](https://mm.tt/app/map/2974013323?t=pqAIdWZ7W2 ).🚨 **🚨附:您是否希望快速晉升為擁有優質資源、回饋和責任的高階開發人員? [點擊此處加入我們的免費社區 - 高級開發學院。](https://bit.ly/46hbx3h)🚨** ### 4.第四,成為「AI驅動」🚀 當我接到想要加入我們專案的開發人員的電話時,最令我驚訝的事情之一是他們每天很少使用人工智慧。 有些人多次使用 ChatGPT 來執行日常任務(樣板檔案、測試)。真正使用過 GitHub Copilot 的人就更少了。 他們告訴我他們不相信它的未來。或者他們的公司並沒有真正使用它。 如果你在飛機上,氧氣會耗盡,我敢打賭,即使機組人員沒有給你,你也會尋找氧氣面罩。 ChatGPT 和 GitHub Copilot 不只是更好的自動完成工具。自動完成無法重構、尋找程式碼中的錯誤或擴充功能。 人工智慧模型可以優化、重構,甚至可以比許多開發人員提出更好的程式碼。事實上,到 2023 年,在人工智慧工具的幫助下,初級開發人員可以完成與沒有人工智慧工具的高級開發人員一樣多的工作。 重點很明確:如果您是願意轉為高級的 JavaScript 開發人員,您需要成為「人工智慧驅動」。 如果您已經是大四學生並希望在未來幾年保持相關性,情況也是如此。潮流正在改變。透過升級這些技能來確保您處於正確的位置。 您是否必須學習 Python、Numpy、深度學習以及 AI 堆疊中的十幾種工具?並不真地。這是一項完全不同的工作。 **這意味著你應該將人工智慧工具整合到你所做的一切中。** 從建置功能到程式碼審查,再到測試和效能優化。如果您希望我寫一篇有關如何做到這一點的文章,請在評論中告訴我。 **🚨附:您是否希望快速晉升為擁有優質資源、回饋和責任的高階開發人員? [點擊此處加入我們的免費社區 - 高級開發學院。](https://bit.ly/46hbx3h)🚨** ### 5.第五,有效推銷自己🏆 如果你找不到一家公司來支付你的技能費用,那麼無論你是多麼優秀的開發人員,也沒有用。由於開發人員就業市場已經過度飽和,這一點更加正確。 為了脫穎而出並獲得頂級軟體開發人員的職位,您必須以盡可能最好的方式將自己推向市場。 作為一名員工,這一點更為重要,因為您應該始終擔心的一件事是您的就業能力。 **如果你明天被解僱,你找到另一個職位有多容易?** 你越有就業能力就越好。 您的就業能力取決於兩件事。您的產品(在這種情況下,您的開發技能和支持這些技能的過去經驗)。 其次,你如何推銷自己和你的人脈。有多少人認識你?如果你現在被解僱,明天有人可以提供你工作嗎? 要改進您的產品,請提高您的開發技能。我們在前面的幾點中討論過這一點。但如何改進自我推銷的方式呢? **好吧,如果你想要高級開發人員的薪水,你首先必須看起來像高級開發人員。** 這意味著建立一份相關的履歷,以最好的方式量化以展示您為市場帶來的東西。 如果您想讓我寫一篇關於如何打造一流開發人員履歷表的文章,請在評論中告訴我! ## 總結與後續步驟 好吧,現在你知道了。 下次當你問自己為什麼現在找到開發人員的工作如此困難時,請考慮這些原因。您還了解如何透過盡快成為高級開發人員來解決這個問題。 能夠落實這 5 個支柱並以最快的速度適應這個新市場範式的開發人員將獲得工作保障、對自己的技能充滿信心並獲得最高的薪水。 無法適應的開發者將慢慢被淘汰,並面臨被完全擠出市場的風險。 按照我在本文中概述的步驟操作,您不僅可以輕鬆找到開發人員工作,而且可以「快速」晉升到高級開發人員級別,並將您的開發人員職業生涯提升到一個全新的水平。 他們為我和世界各地 230 多名其他開發人員工作,他們也將為您工作! 我們下一篇再見 德拉戈斯 **🚨附:您是否希望快速晉升為擁有優質資源、回饋和責任的高階開發人員? [點擊此處加入我們的免費社區 - 高級開發學院。](https://bit.ly/46hbx3h)🚨** --- 原文出處:https://dev.to/dragosnedelcu/why-is-it-so-hard-to-find-a-developer-job-in-2023-and-how-to-fix-it-2d13
我們正在開發 [Wasp](https://github.com/wasp-lang/wasp) - 一個基於 React、Node.js 和 Prisma 建置的全端 Web 框架。自從 GPT 出現以來,我們想知道是否可以使用它來更快地建立 Web 應用程式。這讓我們想到了 [MAGE - 一個由 GPT 驅動的 Web 應用程式產生器](https://usemage.ai/),它可以根據簡短的描述建立完整的堆疊程式碼庫。 我們已經寫過[MAGE 可以(和不能)做什麼](https://dev.to/wasp/gpt-web-app-generator-let-ai-create-a-full-stack-react-nodejs-codebase-based-on-your-description-2g39)和[它在幕後的工作原理](https://wasp-lang.dev/blog/2023/07/17/how-we-built-gpt-web-app-generator)。這是關於它的起源和採用的故事 - 為什麼我們決定建立它,開發人員如何發現它,以及他們實際上用它做什麼。 ## 為什麼要建構另一個 AI 編碼代理? 我們很晚才進入整個 GPT 編碼代理遊戲。在我們開始考慮建立自己的工具之前,Smol AI、GPT Engineer 和 MetaGPT 等工具就已經受到了廣泛的關注,我們對此也很清楚。 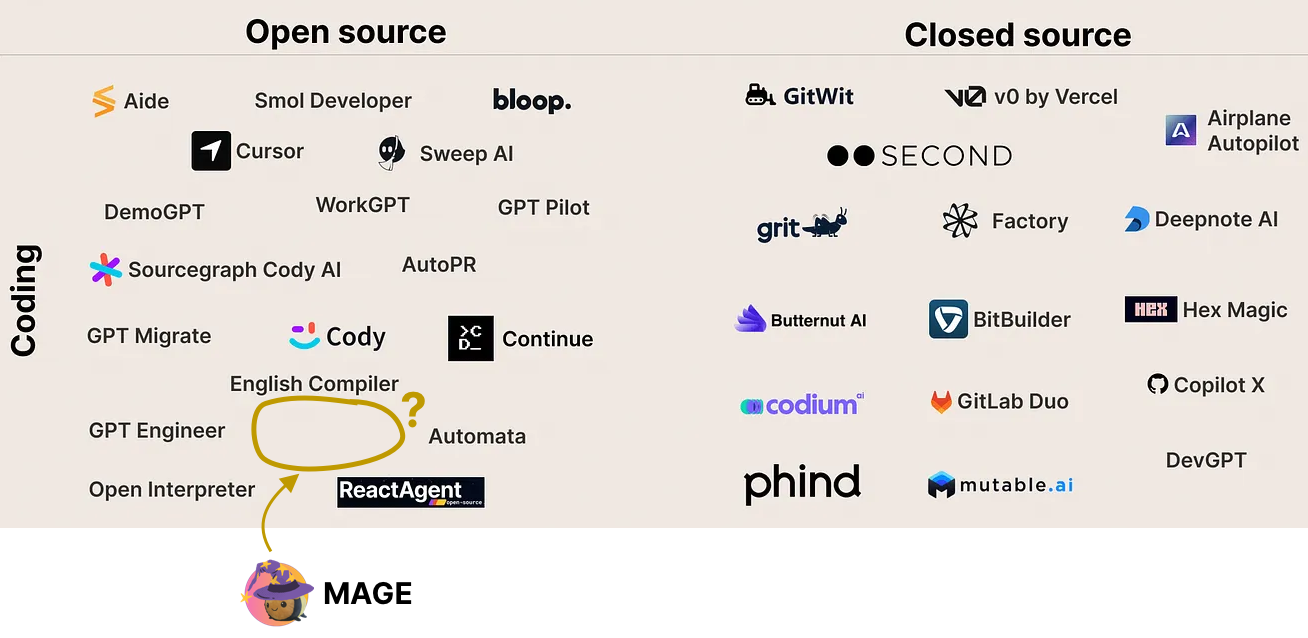 那為什麼還要麻煩呢?事實是,這些代理程式都不是專門為建立 Web 應用程式而設計的,而這正是我們看到機會的地方。 儘管使用 GPT 代理進行編碼可以讓人感覺超級強大,但它們通常會很慢並且沒有抓住要點,需要多次迭代,最終使該過程相當麻煩且昂貴。 有了這些經驗,我們想知道,*「如果我們為特定堆疊中的 Web 應用程式製作一個高度專業化的編碼代理,而不做其他事情會怎麼樣?它能變得更容易、更快、更便宜嗎?」* 儘管我們對此很感興趣,但作為一個兼顧多個優先事項的小團隊,我們仍然相當懷疑,幾乎放棄了整個專案。事實證明,它的效果比我們預期的還要好。 ## 第 1 步:建造它🛠️  在決定 MAGE(*Magic App Generator*)的 v0 版本時,我們考慮了多種選擇。第一個也是最直接的一個是將其與 Wasp CLI 集成,因為我們已經擁有了圍繞它的所有工具。然後,開發人員將執行“wasp new myProject -ai”,而不是執行“wasp new myProject -ai”,CLI 會要求他們提供應用程式描述和其他所需的輸入,然後在終端中完成所有工作。 另一方面,我們知道在開始描述您的應用程式之前下載並安裝 Wasp 是一個很大的要求。最重要的是,CLI 中的使用者介面功能非常有限。這就是我們選擇網路介面的原因 - 零摩擦開始,我們可以讓應用程式建立流程變得非常簡單且美觀。 花了幾週的時間來建構它,最終的結果是一個[用Wasp 製作的完全開源的Web 應用程式](https://github.com/wasp-lang/wasp/tree/wasp-ai/wasp-ai)可以在 https://usemage.ai/ 上免費使用,或在本地託管以獲得更多控制和靈活性(例如,使用您自己的 OpenAI API 金鑰)。 ### 超級具體(僅限網頁應用程式)得到了回報! 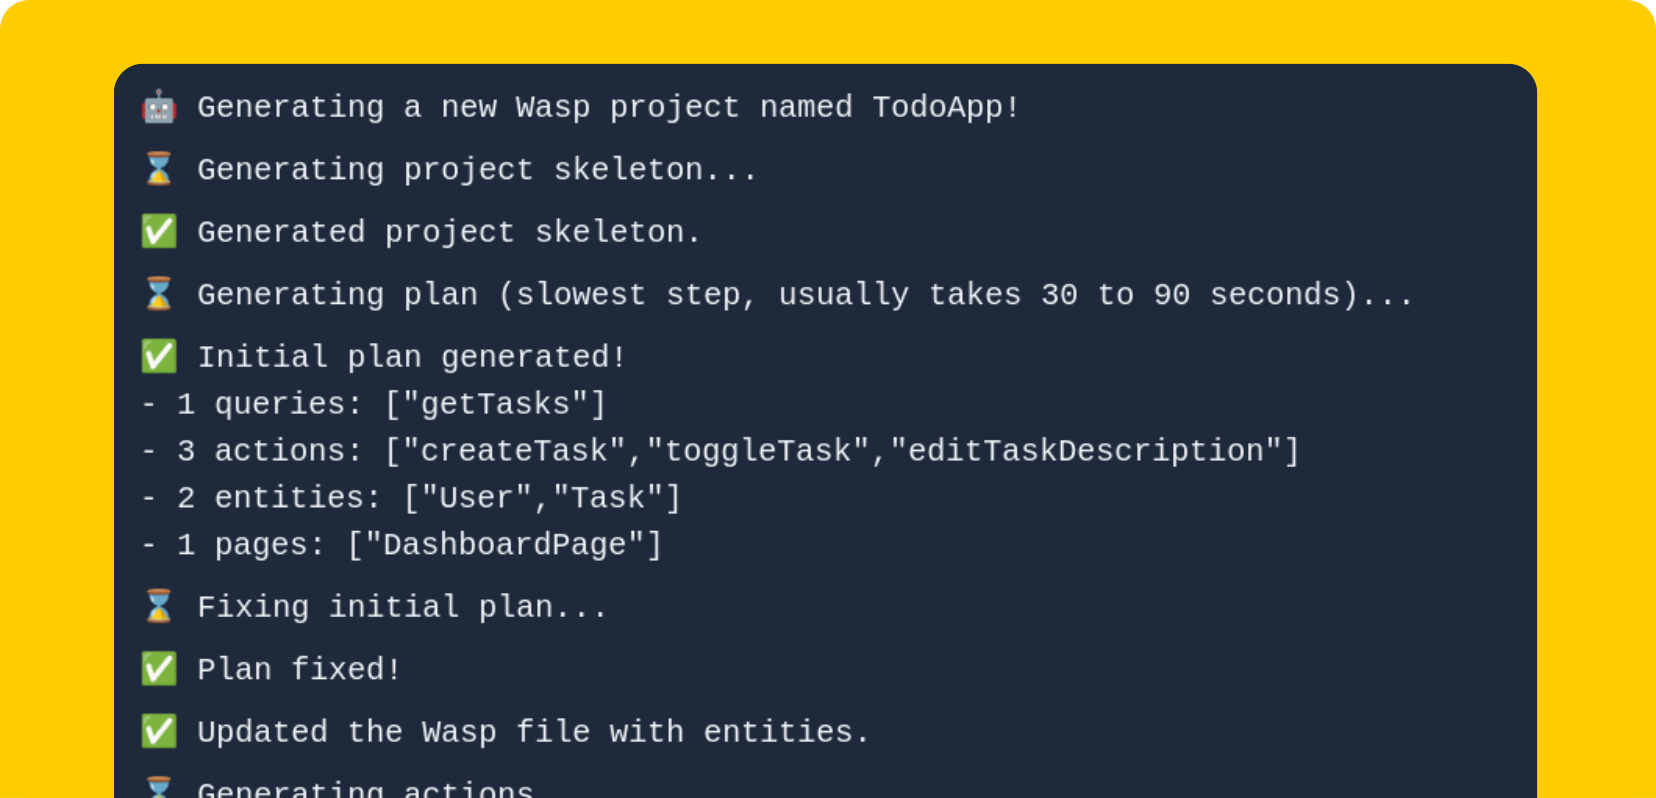 如上所述,我們的主要賭注是建立一個專門的編碼代理來建立全端 Web 應用程式,而不是其他任何東西,這得到了回報。它使我們能夠預先為代理提供大量上下文和結構,並引入專門的啟發式方法來修復錯誤。此外,由於 Wasp 的高級抽象(例如身份驗證、專案結構、查詢和作業系統等),我們顯著減少了錯誤的表面積。 另一個結果是執行時間顯著減少,甚至更重要的是成本減少。典型的MAGE 建立的Web 應用程式成本在0.10 至0.20 美元之間,而一般編碼代理[同一應用程式的花費可能高達10 美元](https://wasp-lang.dev/blog/2023/08/01/smol-ai-vs-wasp-ai#thoughts--further-considerations)(所有價格均在 OpenAI 23 年 11 月 7 日定價更新公告之前)。 您可以閱讀有關Wasp 內部工作原理的更多資訊[此處](https://wasp-lang.dev/blog/2023/07/17/how-we-built-gpt-web-app-generator),以及它的比較其他編碼代理[此處](https://wasp-lang.dev/blog/2023/07/17/how-we-built-gpt-web-app-generator)。 ## 第 2 步:啟動它🚀 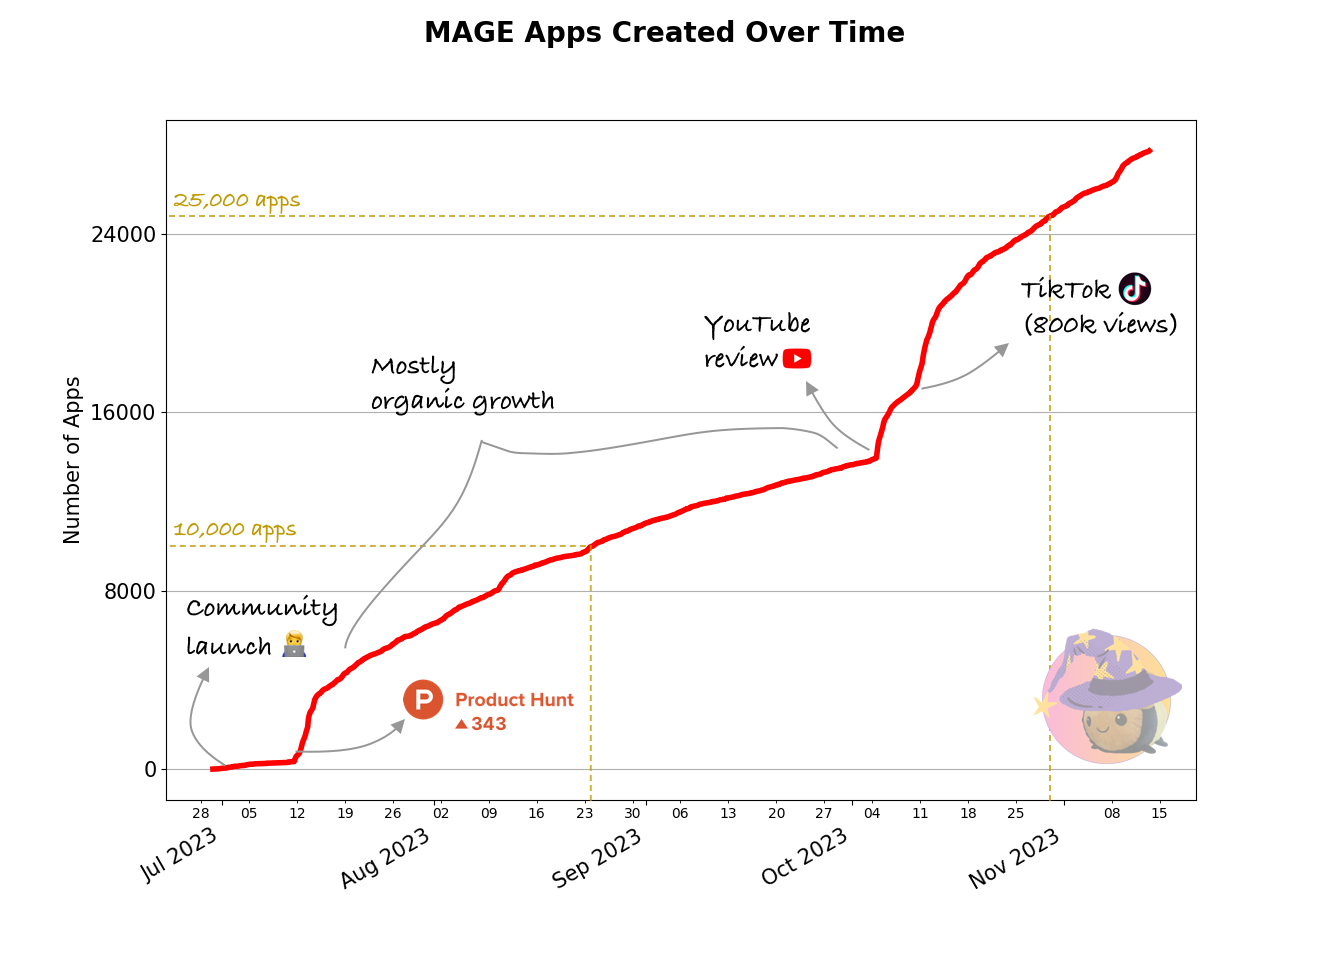 開發產品是一回事,但傳播產品並讓人們使用它則完全是另一回事。在我們建立了 MAGE 並在團隊內對其進行了測試之後,問題是下一步該做什麼?我們如何真正聯繫開發人員並開始接收回饋? ### 社區啟動 - 生命的證明  由於當時我們已經擁有一個[擁有大約 1,000 名成員的 Wasp 社區](https://discord.gg/rzdnErX),因此我們[發布了 MAGE 作為我們發布週 #3 的一部分](https://wasp-lang.dev/blog/2023/06/22/wasp-launch-week-third#gpt-web-app-generator--friday-waspularity---tutorial-o-thon)。這是一個很好的測試平台,我們可以看到第一個應用程式正在建置。儘管如此,更多的開發人員本可以從更簡單的方式來啟動他們的 React 和 Node.js 專案中受益,但他們卻無法找到 MAGE。 ### 啟動 Product Hunt — 首次「真正」使用  這就是為什麼我們決定在內部社群啟動後將 MAGE 放在 Product Hunt 上。儘管Product Hunt 不是一個特定於開發工具的平台,並且吸引了來自不同背景的人群,但仍然有很多開發人員在使用它,而且我們[之前有很好的經驗](https://www.producthunt.com/products/wasp-lang-alpha/launches) 與它。 Product Hunt 對於[獲得Wasp 的第一批用戶並在GitHub 上獲得1,000 顆星](https://wasp-lang.dev/blog/2022/09/29/journey-to-1000-gh-stars) 至關重要,因此我們想再試一次。 有些人在發布準備工作上投入了大量精力,需要提前幾個月才能準備好,但我們沒有那個時間,只是想盡快完成。我們要求我們的朋友和社區查看 [MAGE on Product Hunt](https://www.producthunt.com/products/wasp-lang-alpha#gpt-webapp-generator-for-react-node-js) 並提供支持我們在發布當天就進入了當天的前十名產品,後來又躋身本週排名第二的開發者工具! 這就是我們的目標,因為排名前十的產品最終會出現在第二天的電子報中,有超過 100 萬訂閱者閱讀。很快,我們看到建立的應用程式數量顯著增加,新的人開始加入我們的 Discord 社群! ### 有機成長(又稱「無所事事」)階段 在 Product Hunt 推出後,我們放鬆了行銷工作,因為其他與 Wasp 相關的任務趕上了團隊。我們必須為即將到來的[發布週#4](https://wasp-lang.dev/blog/2023/10/13/wasp-launch-week-four)做準備,所以 MAGE 最終被擱置了。在我們決定投入更多資源之前,我們也想看看社區如何接受它。 我們發布了更多後續文章,「[它是如何在後台工作的](https://wasp-lang.dev/blog/2023/07/17/how-we-built-gpt-web-app-generator)”和“[MAGE vs. 一般編碼代理](https://wasp-lang.dev/blog/2023/08/01/smol-ai-vs-wasp-ai)”,獲得平均數量牽引力,但沒有爆炸。我們在 Reddit 和 Hackernews 上也沒有什麼成功,感覺社群已經厭倦了所有的人工智慧內容。 儘管如此,使用 MAGE 建立的應用程式數量持續增長(約 200 個應用程式/天),偶爾會出現小規模爆炸。我們無法真正追蹤用戶來自哪裡 - MAGE 似乎是透過封閉社區和時事通訊中的口碑傳播的。 ### YouTube 和 TikTok 影片 - 病毒式傳播(每天 1,300 個應用程式!) 在我們的第 4 週發布週結束後,我們意識到,在近 2 個月的時間裡,在我們付出最小努力的情況下,MAGE 一直在不斷成長。這向我們表明它具有一定的實際價值,因此我們決定對其進行更多投資。  我們決定與該領域的影響者碰碰運氣。我們不想簡單地支付廣告費用,而是希望與真正對我們正在建立的產品感興趣並且想要客觀地審查 MAGE 的人合作。我們發現 [Matthew Berman](https://www.youtube.com/watch?v=KQrGu8cnwvA&t=2s&ab_channel=MatthewBerman) 涵蓋了 LLM 領域從最新模型到工具的所有內容,他將 MAGE 視為非常適合他的觀眾。 該影片在幾週內就準備好了,當它發佈時,觀看次數很快就達到了約 25,000 次。許多觀眾對透過 Web 介面從單一提示中獲取全端程式碼庫的可能性感到興奮,我們看到使用率和開發人員再次嘗試。  大約一周後,我們看到建立的應用程式數量再次大幅增加,但無法弄清楚它來自哪裡。我們做了一些搜尋,在TikTok 上找到了一位開發者@techfren,他製作了[一個關於它的短影片](https://www.tiktok.com/@techfren/video/7288306291733269778)(MAGE 甚至最終無法在就是那個!),一天之內瀏覽量猛增至 20 萬次,並迅速走紅。如今,它的瀏覽量已接近 100 萬。 ## 現實 - 所有這些應用程式會發生什麼? 儘管 25,000 個建立的應用程式聽起來令人印象深刻,但退後一步並進一步細分是很好的。 與大多數人工智慧驅動的編碼工具一樣,想要建立自己產品的開發人員和非開發人員都對該領域抱持極大的興趣和好奇心。許多人甚至沒有想要建立的具體專案,但他們熱衷於嘗試一下,看看它是如何運作的。此外,由於法學碩士不是確定性的,因此還沒有任何工具能夠完美執行,並且經常會出現需要手動幹預和編碼知識的小錯誤。 雖然我們對此非常明確(https://wasp-lang.dev/blog/2023/07/10/gpt-web-app-generator#what-kind-of-apps-can-i-build-with-it )和其他[挑戰](https://wasp-lang.dev/blog/2023/07/10/gpt-web-app-generator#challenges)GPT驅動的工具面臨,MAGE仍然吸引了一部分的用戶對建置自己的產品感到興奮,但不精通編碼,需要幫助下載、執行和修復應用程式。另一方面,它是一種非常友好且易於參與 Web 開發和編碼的方式。我們不會阻止非編碼人員嘗試,而是盡可能透明地管理期望。 因此,大約 40% 的所有建立的應用程式都會下載並在本地執行。 ## 結論 事實證明,我們對 MAGE 的實驗非常成功,甚至超越了我們最初的預期。除了許多現有的通用編碼代理之外,高度專業化和結構化的方法可以以低廉的價格產生更好、更一致的結果。 此外,開發人員對啟動全端應用程式的簡單方法(其中包含最佳實踐)感到興奮,並且正在積極尋找這樣的解決方案並在彼此之間共享。 我預計人工智慧輔助的 SaaS 新創公司將成為 Web 開發的未來。如果有人可以使用已經為其應用程式定制的資料模型和 CRUD 邏輯來建立他們的應用程式,那麼為什麼有人會使用通用樣板啟動器呢?另一個問題是誰以及如何具體實現這一點,但我預計未來每個主流框架都會有一個。 ## 祝你好運! 我希望這篇概述對您有所幫助,並讓您了解建立和行銷新的(人工智慧驅動的)開發工具時幕後的情況。請記住,這是我們獨特的經歷,每個故事都是不同的,因此對一切都持保留態度,只選擇對您和您的產品有意義的內容。 我們祝您好運,如果您有任何疑問或想了解 [MAGE](https://usemage.ai/) 和 [Wasp](https://github.com/wasp-lang/wasp)! --- 原文出處:https://dev.to/wasp/how-we-built-a-gpt-web-app-generator-for-react-nodejs-from-idea-to-25000-apps-in-4-months-1aol
### console.log 拿掉吧。 刪除生產程式碼中的 console.log 對於防止敏感資訊洩漏並提高效能非常重要。 ### 控制台錯誤和警告 調查並修復。 解決生產程式碼中的控制台錯誤對於保持流暢且無錯誤的使用者體驗非常重要。 ### TypeScript 中的 any 把型別設定好吧。 應盡量減少在 TypeScript 中使用“any”,轉而使用明確類型,以增強程式碼的可靠性和可維護性。 ### 註解未使用的程式碼 刪掉吧。 註解掉未使用的程式碼是一種不好的做法,因為它會使程式碼變得混亂,妨礙維護,並可能導致註解資訊過時。 ### 超級元件和功能 如果您的元件很大,那麼就該將其分成更小的元件了。 想想 SOLID 的古老原則「單一職責」。 無論您是編寫函數程式碼還是類別程式碼。 ### 多次重寫CSS 為了阿達·洛夫萊斯、艾倫·圖靈和蒂姆·伯納斯·李的愛… 不要重複重寫顏色、字體和大小,使用設計標記來發揮自己的優勢,建立全域 CSS 變數或使用函式庫。 與您的團隊討論使用設計令牌的優勢。 ### 忽略 Linter 的標誌 範例:使用 `/* eslint-disable @typescript-eslint/no-unused-vars */` 修復你的程式碼。 不要傳送帶有 linter 錯誤的 Pull 請求。 如果您確實需要忽略,請仔細考慮可以忽略哪些 linter 警告。 ### 重新渲染和循環消耗大量資源或崩潰 範例:JavaScript 循環函數或 React 中的 useEffect 應用不佳。 這可能會導致 API 呼叫或值無限重複,從而導致記憶體溢出並導致應用程式崩潰。 修正你的邏輯。 * 注意:您的應用程式在瀏覽器中執行並消耗有限的最終用戶記憶體資源。 ### 前端的業務規則 請勿放置且不允許。 人們普遍認為,任何前端應用程式都不能有業務規則,只有使用者介面固有的規則,用於互動和使用者的成功旅程。 前端是客戶端,不是伺服器。 大公司和企業級應用程式採取的做法是不將業務規則和資料處理暴露在前端,而將其放在後端。 * 注意:對於簡單的無伺服器 Web 應用程式或參考第三方 API 的應用程式,可能有必要在前端放置一些業務規則 - 小心不要向客戶端暴露敏感或成本高昂的處理。 ### 不測試的文化 在您的程式碼庫上進行測試。沒有程式碼是完美的。 單元、整合、安全性、使用者體驗、效能和可存取性測試。使用測試工具產生錯誤報告和改進以糾正您的應用程式。 範例:部署管道中的 Cypress、Lighthouse、SAST 等。 與使用者體驗、品質保證和網路安全/滲透測試團隊合作(如果您公司有)。 ### 溝通恐懼 你是一個人。 當您遇到困難時,請致電其他開發人員或技術主管來分享您面臨的問題。 透過結對程式設計和共同思考,可以更快解決問題! 請記住:他們曾經處於您的位置並且會提供幫助! --- 我希望你喜歡! 😃✌🏻 **你還有更多的TIPS嗎?** 支持我在 [Patreon.com/lucasm](https://patreon.com/lucasm) 上的工作 --- 原文出處:https://dev.to/lucasm/frontend-best-practices-guide-or-dont-do-it-on-frontend-32n4
#### 如何儲存並使用本機開發的環境變數 API 和第三方整合要求開發人員使用稱為**環境或配置變數**的配置資料。這些變數通常儲存在受密碼保護的地方,例如 CI 工具或部署管道,但是當我們在本地開發應用程式時如何使用它們? 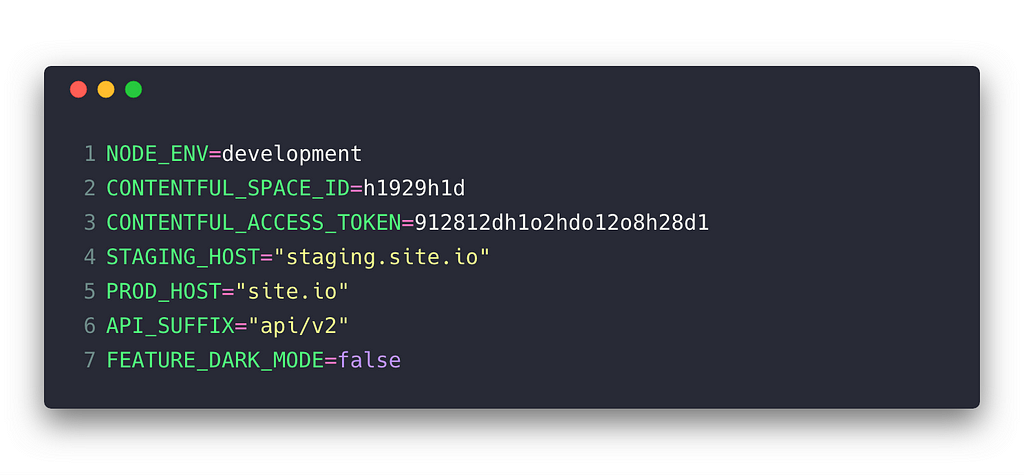 #### 簡介 - 不要在原始碼管理中儲存環境變數 - 使用 [dotenv](https://github.com/motdotla/dotenv) 從 .env 檔案讀取資料 - create-react-app 在環境變數上強制命名空間 這個簡短的教程將解釋在本地開發時將環境變數載入到程式碼中的一種方法。主要好處是 API 金鑰等秘密不會提交給原始碼控制,以確保您的應用程式更安全。 #### 要求: - 一個 JavaScript 應用程式 - 套件管理器(yarn 和 npm 都很棒) - Node 7+ ### 設定變數 在儲存庫的根目錄中建立一個名為「.env」的檔案。該文件稱為“點文件”,與常規文件不同,它通常隱藏在文件瀏覽器中。 大多數 IDE 允許使用者建立沒有名稱的文件,但如果情況並非如此,請轉到終端並 cd 進入應用程式的根資料夾。 ``` touch .env ``` 接下來,使用格式 key=value 設定變數,並以換行符號分隔: ``` API_KEY=abcde API_URL=https://my-api.com/api ``` 最後,確保 .env 檔案未提交到您的儲存庫。這可以透過開啟(或建立).gitignore 檔案並新增以下行來實現: ``` .env # This contains secrets, don't store in source control ``` ### 使用變數 前往終端使用您首選的套件管理器安裝 [dotenv](https://github.com/motdotla/dotenv): ``` # Using npm: npm i dotenv # Using yarn: yarn add dotenv ``` 現在您已準備好讀取 .env 檔案。儘早在您的應用程式中加入這行程式碼。對於 React 應用程式,通常是 index.js 或 App.js,但這完全取決於您的設定: ``` require('dotenv').config(); ``` 就是這樣!您的應用程式應該可以透過 process.env 物件存取環境變數。您可以透過撥打以下電話進行雙重檢查: ``` console.log(process.env); ``` 如果一切順利,您應該會看到類似以下內容: ``` { NODE_ENV: "development", API_KEY: "abcde", API_URL: "https://my-api.com/api" } ``` 🎉 現在您可以在應用程式中使用環境變數了! 現在,對於我們這些使用 create-react-app 的人來說,有一個問題,我希望它能被更好地記錄下來。 ### 使用 create-react-app Facebook 的 [create-react-app](https://github.com/facebook/create-react-app) 的工作方式略有不同。如果您按照上述步驟操作但沒有彈出應用程式,那麼您應該看到的只是 NODE\_ENV 變數。這是因為 **create-react-app 只允許應用程式讀取帶有** **REACT\_APP\_ 前綴的變數。** 因此,為了使我們的變數起作用,我們需要像這樣更新我們的 .env 檔案: ``` REACT_APP_API_KEY=abcde REACT_APP_API_URL=https://my-api.com/api ``` 再次透過將 process.env 記錄到控制台來驗證您的設定: ``` { NODE_ENV: "development", REACT_APP_API_KEY: "abcde", REACT_APP_API_URL: "https://my-api.com/api" } ``` 你就完成了😎 ### 小技巧 .env 檔案中的變數不需要引號,除非值中有空格。 ``` NO_QUOTES=thisisokay QUOTES="this contains spaces" ``` 最好建立一個 .env.sample 檔案來追蹤應用程式應該期望的變數。這是我目前專案中的範例文件的樣子。請注意,它解釋了人們可以在哪裡找到這些金鑰和 URL。 ``` CONTENTFUL_SPACE_TOKEN="see Contentful dashboard" CONTENTFUL_API_KEY="see Contentful dashboard" S3_BUCKET_URL="check AWS" SHOW_DEBUG_SIDEBAR="if true, show debug sidebar" ``` ### 進一步閱讀: - [在 12-Factor App 方法中讀取環境中的設定](https://12factor.net/config) 感謝您的閱讀!您是否喜歡另一種在本地載入環境變數的方法?我很想在下面的評論中聽到它! --- 原文出處:https://dev.to/deammer/loading-environment-variables-in-js-apps-1p7p
在本文中,您將學習如何建立 **GitHub 星數監視器** 來檢查您幾個月內的星數以及每天獲得的星數。 - 使用 GitHub API 取得目前每天收到的星星數量。 - 在螢幕上每天繪製美麗的星星圖表。 - 創造一個工作來每天收集新星星。  --- ## 你的後台工作平台🔌 [Trigger.dev](https://trigger.dev/) 是一個開源程式庫,可讓您使用 NextJS、Remix、Astro 等為您的應用程式建立和監控長時間執行的作業! [](https://github.com/triggerdotdev/trigger.dev) 請幫我們一顆星🥹。 這將幫助我們建立更多這樣的文章💖 https://github.com/triggerdotdev/trigger.dev --- ## 這是你需要知道的 😻 取得 GitHub 上星星數量的大部分工作將透過 GitHub API 完成。 GitHub API 有一些限制: - 每個請求最多 100 名觀星者 - 最多 100 個同時請求 - 每小時最多 60 個請求 [TriggerDev](https://github.com/triggerdotdev/trigger.dev) 儲存庫擁有超過 5000 顆星,實際上不可能在合理的時間內(即時)計算所有星數。 因此,我們將採用與 [GitHub Stars History](https://star-history.com/) 相同的技巧。 - 取得星星總數 (**5,715**) 除以每頁 **100** 結果 = **58 頁** - 設定我們想要的最大請求量(**20 頁最大**)除以 **58 頁** = 跳過 3 頁。 - 從這些頁面中獲取星星**(2000 顆星)**,然後獲取剩餘的星星,我們將按比例加入到其他日期(**3715 顆星**)。 它會為我們繪製一個漂亮的圖表,並在需要的地方用星星凸起。 當我們每天獲取新數量的星星時,事情就會變得容易得多。 我們將用目前擁有的星星總數減去 GitHub 上的新星星數量。 **我們不再需要迭代觀星者。** --- ## 讓我們來設定一下 🔥 我們的申請將包含一頁: - 新增您想要監控的儲存庫。 - 查看儲存庫清單及其 GitHub 星圖。 - 刪除那些你不再想要的。 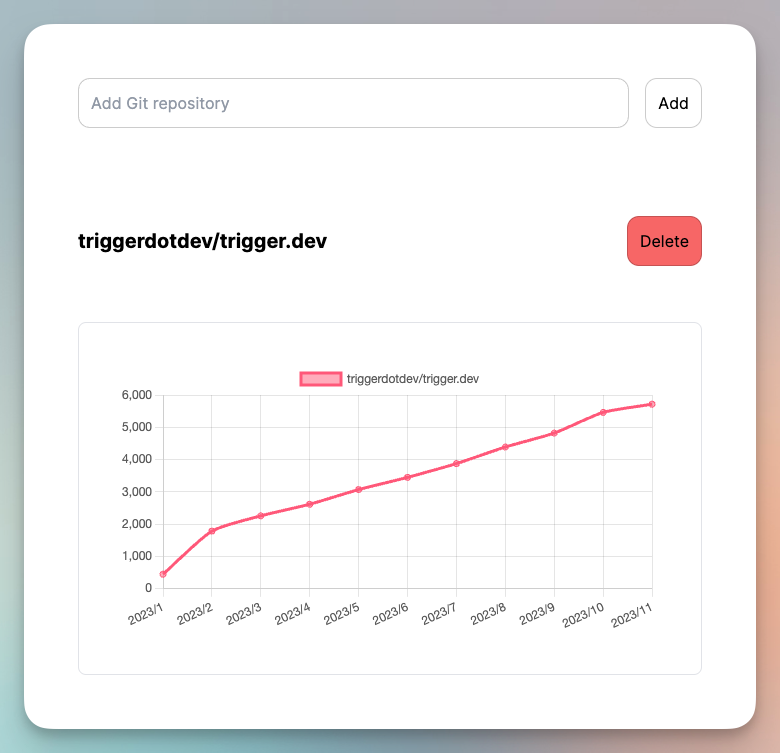 > 💡 我們將使用 NextJS 新的應用程式路由器,在安裝專案之前請確保您的節點版本為 18+。 > 使用 NextJS 設定一個新專案 ``` npx create-next-app@latest ``` 我們必須將所有星星保存到我們的資料庫中! 在我們的示範中,我們將使用 SQLite 和 `Prisma`。 它非常容易安裝,但可以隨意使用任何其他資料庫。 ``` npm install prisma @prisma/client --save ``` 在我們的專案中安裝 Prisma ``` npx prisma init --datasource-provider sqlite ``` 轉到“prisma/schema.prisma”並將其替換為以下模式: ``` generator client { provider = "prisma-client-js" } datasource db { provider = "sqlite" url = env("DATABASE_URL") } model Repository { id String @id @default(uuid()) month Int year Int day Int name String stars Int @@unique([name, day, month, year]) } ``` 然後執行 ``` npx prisma db push ``` 我們基本上已經在 SQLite 資料庫中建立了一個名為「Repository」的新表: - 「月」、「年」、「日」是日期。 - `name` 儲存庫的名稱 - 「星星」以及該特定日期的星星數量。 你還可以看到我們在底部加入了一個`@@unique`,這意味著我們可以將`name`,`month`,`year`,`day`一起重複記錄。它會拋出一個錯誤。 讓我們新增 Prisma 客戶端。 建立一個名為「helper」的新資料夾,並新增一個名為「prisma.ts」的新文件,並在其中新增以下程式碼: ``` import {PrismaClient} from '@prisma/client'; export const prisma = new PrismaClient(); ``` 我們稍後可以使用該「prisma」變數來查詢我們的資料庫。 --- ## 應用程式 UI 骨架 💀 我們需要一些函式庫來完成本教學: - **Axios** - 向伺服器發送請求(如果您覺得更舒服,可以隨意使用 fetch) - **Dayjs -** 很棒的處理日期的函式庫。它是 moment.js 的替代品,但不再完全維護。 - **Lodash -** 很酷的資料結構庫。 - **react-hook-form -** 處理表單的最佳函式庫(驗證/值/等) - **chart.js** - 我選擇繪製 GitHub 星圖的函式庫。 讓我們安裝它們: ``` npm install axios dayjs lodash @types/lodash chart.js react-hook-form react-chartjs-2 --save ``` 建立一個名為“components”的新資料夾並新增一個名為“main.tsx”的新文件 新增以下程式碼: ``` "use client"; import {useForm} from "react-hook-form"; import axios from "axios"; import {Repository} from "@prisma/client"; import {useCallback, useState} from "react"; export default function Main() { const [repositoryState, setRepositoryState] = useState([]); const {register, handleSubmit} = useForm(); const submit = useCallback(async (data: any) => { const {data: repositoryResponse} = await axios.post('/api/repository', {todo: 'add', repository: data.name}); setRepositoryState([...repositoryState, ...repositoryResponse]); }, [repositoryState]) const deleteFromList = useCallback((val: List) => () => { axios.post('/api/repository', {todo: 'delete', repository: `https://github.com/${val.name}`}); setRepositoryState(repositoryState.filter(v => v.name !== val.name)); }, [repositoryState]) return ( <div className="w-full max-w-2xl mx-auto p-6 space-y-12"> <form className="flex items-center space-x-4" onSubmit={handleSubmit(submit)}> <input className="flex-grow p-3 border border-black/20 rounded-xl" placeholder="Add Git repository" type="text" {...register('name', {required: 'true'})} /> <button className="flex-shrink p-3 border border-black/20 rounded-xl" type="submit"> Add </button> </form> <div className="divide-y-2 divide-gray-300"> {repositoryState.map(val => ( <div key={val.name} className="space-y-4"> <div className="flex justify-between items-center py-10"> <h2 className="text-xl font-bold">{val.name}</h2> <button className="p-3 border border-black/20 rounded-xl bg-red-400" onClick={deleteFromList(val)}>Delete</button> </div> <div className="bg-white rounded-lg border p-10"> <div className="h-[300px]]"> {/* Charts Component */} </div> </div> </div> ))} </div> </div> ) } ``` **超簡單的React元件** - 允許我們新增新的 GitHub 庫並將其發送到伺服器 POST 的表單 - `/api/repository` `{todo: 'add'}` - 刪除我們不需要 POST 的儲存庫 - `/api/repository` `{todo: 'delete'}` - 所有新增的庫及其圖表的清單。 讓我們轉到本文的複雜部分,新增儲存庫。 --- ## 數星星  在「helper」內部建立一個名為「all.stars.ts」的新檔案並新增以下程式碼: ``` import axios from "axios"; import dayjs from "dayjs"; import utc from 'dayjs/plugin/utc'; dayjs.extend(utc); const requestAmount = 20; export const getAllGithubStars = async (owner: string, name: string) => { // Get the amount of stars from GitHub const totalStars = (await axios.get(`https://api.github.com/repos/${owner}/${name}`)).data.stargazers_count; // get total pages const totalPages = Math.ceil(totalStars / 100); // How many pages to skip? We don't want to spam requests const pageSkips = totalPages < requestAmount ? requestAmount : Math.ceil(totalPages / requestAmount); // Send all the requests at the same time const starsDates = (await Promise.all([...new Array(requestAmount)].map(async (_, index) => { const getPage = (index * pageSkips) || 1; return (await axios.get(`https://api.github.com/repos/${owner}/${name}/stargazers?per_page=100&page=${getPage}`, { headers: { Accept: "application/vnd.github.v3.star+json", }, })).data; }))).flatMap(p => p).reduce((acc: any, stars: any) => { const yearMonth = stars.starred_at.split('T')[0]; acc[yearMonth] = (acc[yearMonth] || 0) + 1; return acc; }, {}); // how many stars did we find from a total of `requestAmount` requests? const foundStars = Object.keys(starsDates).reduce((all, current) => all + starsDates[current], 0); // Find the earliest date const lowestMonthYear = Object.keys(starsDates).reduce((lowest, current) => { if (lowest.isAfter(dayjs.utc(current.split('T')[0]))) { return dayjs.utc(current.split('T')[0]); } return lowest; }, dayjs.utc()); // Count dates until today const splitDate = dayjs.utc().diff(lowestMonthYear, 'day') + 1; // Create an array with the amount of stars we didn't find const array = [...new Array(totalStars - foundStars)]; // Set the amount of value to add proportionally for each day let splitStars: any[][] = []; for (let i = splitDate; i > 0; i--) { splitStars.push(array.splice(0, Math.ceil(array.length / i))); } // Calculate the amount of stars for each day return [...new Array(splitDate)].map((_, index, arr) => { const yearMonthDay = lowestMonthYear.add(index, 'day').format('YYYY-MM-DD'); const value = starsDates[yearMonthDay] || 0; return { stars: value + splitStars[index].length, date: { month: +dayjs.utc(yearMonthDay).format('M'), year: +dayjs.utc(yearMonthDay).format('YYYY'), day: +dayjs.utc(yearMonthDay).format('D'), } }; }); } ``` 那麼這裡發生了什麼事: - `totalStars` - 我們計算圖書館擁有的星星總數。 - `totalPages` - 我們計算頁數 **(每頁 100 筆記錄)** - `pageSkips` - 由於我們最多需要 20 個請求,因此我們檢查每次必須跳過多少頁。 - `starsDates` - 我們填充每個日期的星星數量。 - `foundStars` - 由於我們跳過日期,我們需要計算實際找到的星星總數。 - `lowestMonthYear` - 尋找我們擁有的恆星的最早日期。 - `splitDate` - 最早的日期和今天之間有多少個日期? - `array` - 一個包含 `splitDate` 專案數量的空陣列。 - `splitStars` - 我們缺少的星星數量,需要按比例加入每個日期。 - 最終返回 - 新陣列包含自開始以來每天的星星數量。 所以,我們已經成功建立了一個每天可以給我們星星的函數。 我嘗試過這樣顯示,結果很混亂。 您可能想要顯示每個月的星星數量。 此外,您可能想要累積星星**而不是:** - 二月 - 300 顆星 - 三月 - 200 顆星 - 四月 - 400 顆星 **如果有這樣的就更好了:** - 二月 - 300 顆星 - 三月 - 500 顆星 - 四月 - 900 顆星 兩個選項都有效。 **這取決於你想展示什麼!** 因此,讓我們轉到 helper 資料夾並建立一個名為「get.list.ts」的新檔案。 這是文件的內容: ``` import {prisma} from "./prisma"; import {groupBy, sortBy} from "lodash"; import {Repository} from "@prisma/client"; function fixStars (arr: any[]): Array<{name: string, stars: number, month: number, year: number}> { return arr.map((current, index) => { return { ...current, stars: current.stars + arr.slice(index + 1, arr.length).reduce((acc, current) => acc + current.stars, 0), } }).reverse(); } export const getList = async (data?: Repository[]) => { const repo = data || await prisma.repository.findMany(); const uniqMonth = Object.values( groupBy( sortBy( Object.values( groupBy(repo, (p) => p.name + '-' + p.year + '-' + p.month)) .map(current => { const stars = current.reduce((acc, current) => acc + current.stars, 0); return { name: current[0].name, stars, month: current[0].month, year: current[0].year } }), [(p: any) => -p.year, (p: any) => -p.month] ),p => p.name) ); const fixMonthDesc = uniqMonth.map(p => fixStars(p)); return fixMonthDesc.map(p => ({ name: p[0].name, list: p })); } ``` 首先,它將所有按日的星星轉換為按月的星星。 稍後我們會累積每個月的星星數量。 這裡要注意的一件主要事情是 `data?: Repository[]` 是可選的。 我們制定了一個簡單的邏輯:如果我們不傳遞資料,它將為我們資料庫中的所有儲存庫傳遞資料。 如果我們傳遞資料,它只會對其起作用。 為什麼問? - 當我們建立一個新的儲存庫時,我們需要在將其新增至資料庫後處理特定的儲存庫資料。 - 當我們重新載入頁面時,我們需要取得所有資料。 現在,讓我們來處理我們的星星建立/刪除路線。 轉到“src/app/api”並建立一個名為“repository”的新資料夾。在該資料夾中,建立一個名為「route.tsx」的新檔案。 在那裡加入以下程式碼: ``` import {getAllGithubStars} from "../../../../helper/all.stars"; import {prisma} from "../../../../helper/prisma"; import {Repository} from "@prisma/client"; import {getList} from "../../../../helper/get.list"; export async function POST(request: Request) { const body = await request.json(); if (!body.repository) { return new Response(JSON.stringify({error: 'Repository is required'}), {status: 400}); } const {owner, name} = body.repository.match(/github.com\/(?<owner>.*)\/(?<name>.*)/).groups; if (!owner || !name) { return new Response(JSON.stringify({error: 'Repository is invalid'}), {status: 400}); } if (body.todo === 'delete') { await prisma.repository.deleteMany({ where: { name: `${owner}/${name}` } }); return new Response(JSON.stringify({deleted: true}), {status: 200}); } const starsMonth = await getAllGithubStars(owner, name); const repo: Repository[] = []; for (const stars of starsMonth) { repo.push( await prisma.repository.upsert({ where: { name_day_month_year: { name: `${owner}/${name}`, month: stars.date.month, year: stars.date.year, day: stars.date.day, }, }, update: { stars: stars.stars, }, create: { name: `${owner}/${name}`, month: stars.date.month, year: stars.date.year, day: stars.date.day, stars: stars.stars, } }) ); } return new Response(JSON.stringify(await getList(repo)), {status: 200}); } ``` 我們共享 DELETE 和 CREATE 路由,這些路由通常不應在生產中使用,但我們在本文中這樣做是為了讓您更輕鬆。 我們從請求中取得 JSON,檢查「repository」欄位是否存在,並且它是 GitHub 儲存庫的有效路徑。 如果是刪除請求,我們使用 prisma 根據儲存庫名稱從資料庫中刪除儲存庫並傳回請求。 如果是建立,我們使用 getAllGithubStars 來獲取資料以保存到我們的資料庫中。 > 💡 由於我們已經在 `name`、`month`、`year` 和 `day` 上放置了唯一索引,如果記錄已經存在,我們可以使用 `prisma` `upsert` 來更新資料 最後,我們將新累積的資料回傳給客戶端。 最困難的部分完成了🍾 --- ## 主頁人口 💽 我們還沒有建立我們的主頁元件。 **我們開始做吧。** 前往“app”資料夾建立或編輯“page.tsx”並新增以下程式碼: ``` "use server"; import Main from "@/components/main"; import {getList} from "../../helper/get.list"; export default async function Home() { const list: any[] = await getList(); return ( <Main list={list} /> ) } ``` 我們使用與 getList 相同的函數來取得累積的所有儲存庫的所有資料。 我們還修改主要元件以支援它。 編輯 `components/main.tsx` 並將其替換為: ``` "use client"; import {useForm} from "react-hook-form"; import axios from "axios"; import {Repository} from "@prisma/client"; import {useCallback, useState} from "react"; interface List { name: string, list: Repository[] } export default function Main({list}: {list: List[]}) { const [repositoryState, setRepositoryState] = useState(list); const {register, handleSubmit} = useForm(); const submit = useCallback(async (data: any) => { const {data: repositoryResponse} = await axios.post('/api/repository', {todo: 'add', repository: data.name}); setRepositoryState([...repositoryState, ...repositoryResponse]); }, [repositoryState]) const deleteFromList = useCallback((val: List) => () => { axios.post('/api/repository', {todo: 'delete', repository: `https://github.com/${val.name}`}); setRepositoryState(repositoryState.filter(v => v.name !== val.name)); }, [repositoryState]) return ( <div className="w-full max-w-2xl mx-auto p-6 space-y-12"> <form className="flex items-center space-x-4" onSubmit={handleSubmit(submit)}> <input className="flex-grow p-3 border border-black/20 rounded-xl" placeholder="Add Git repository" type="text" {...register('name', {required: 'true'})} /> <button className="flex-shrink p-3 border border-black/20 rounded-xl" type="submit"> Add </button> </form> <div className="divide-y-2 divide-gray-300"> {repositoryState.map(val => ( <div key={val.name} className="space-y-4"> <div className="flex justify-between items-center py-10"> <h2 className="text-xl font-bold">{val.name}</h2> <button className="p-3 border border-black/20 rounded-xl bg-red-400" onClick={deleteFromList(val)}>Delete</button> </div> <div className="bg-white rounded-lg border p-10"> <div className="h-[300px]]"> {/* Charts Components */} </div> </div> </div> ))} </div> </div> ) } ``` --- ## 顯示圖表! 📈 前往“components”資料夾並新增一個名為“chart.tsx”的新檔案。 新增以下程式碼: ``` "use client"; import {Repository} from "@prisma/client"; import {useMemo} from "react"; import React from 'react'; import { Chart as ChartJS, CategoryScale, LinearScale, PointElement, LineElement, Title, Tooltip, Legend, } from 'chart.js'; import { Line } from 'react-chartjs-2'; ChartJS.register( CategoryScale, LinearScale, PointElement, LineElement, Title, Tooltip, Legend ); export default function ChartComponent({repository}: {repository: Repository[]}) { const labels = useMemo(() => { return repository.map(r => `${r.year}/${r.month}`); }, [repository]); const data = useMemo(() => ({ labels, datasets: [ { label: repository[0].name, data: repository.map(p => p.stars), borderColor: 'rgb(255, 99, 132)', backgroundColor: 'rgba(255, 99, 132, 0.5)', tension: 0.2, }, ], }), [repository]); return ( <Line options={{ responsive: true, }} data={data} /> ); } ``` 我們使用“chart.js”函式庫來繪製“Line”類型的圖表。 這非常簡單,因為我們在伺服器端完成了所有資料結構。 這裡需要注意的一件大事是我們「匯出預設值」我們的 ChartComponent。那是因為它使用了「Canvas」。這在伺服器端不可用,我們需要延遲載入該元件。 讓我們修改“main.tsx”: ``` "use client"; import {useForm} from "react-hook-form"; import axios from "axios"; import {Repository} from "@prisma/client"; import dynamic from "next/dynamic"; import {useCallback, useState} from "react"; const ChartComponent = dynamic(() => import('@/components/chart'), { ssr: false, }) interface List { name: string, list: Repository[] } export default function Main({list}: {list: List[]}) { const [repositoryState, setRepositoryState] = useState(list); const {register, handleSubmit} = useForm(); const submit = useCallback(async (data: any) => { const {data: repositoryResponse} = await axios.post('/api/repository', {todo: 'add', repository: data.name}); setRepositoryState([...repositoryState, ...repositoryResponse]); }, [repositoryState]) const deleteFromList = useCallback((val: List) => () => { axios.post('/api/repository', {todo: 'delete', repository: `https://github.com/${val.name}`}); setRepositoryState(repositoryState.filter(v => v.name !== val.name)); }, [repositoryState]) return ( <div className="w-full max-w-2xl mx-auto p-6 space-y-12"> <form className="flex items-center space-x-4" onSubmit={handleSubmit(submit)}> <input className="flex-grow p-3 border border-black/20 rounded-xl" placeholder="Add Git repository" type="text" {...register('name', {required: 'true'})} /> <button className="flex-shrink p-3 border border-black/20 rounded-xl" type="submit"> Add </button> </form> <div className="divide-y-2 divide-gray-300"> {repositoryState.map(val => ( <div key={val.name} className="space-y-4"> <div className="flex justify-between items-center py-10"> <h2 className="text-xl font-bold">{val.name}</h2> <button className="p-3 border border-black/20 rounded-xl bg-red-400" onClick={deleteFromList(val)}>Delete</button> </div> <div className="bg-white rounded-lg border p-10"> <div className="h-[300px]]"> <ChartComponent repository={val.list} /> </div> </div> </div> ))} </div> </div> ) } ``` 您可以看到我們使用“nextjs/dynamic”來延遲載入元件。 我希望將來 NextJS 能為客戶端元件加入類似「使用延遲載入」的內容 😺 --- ## 但是新星呢?來認識一下 Trigger.Dev! 每天加入新星星的最佳方法是執行 cron 請求來檢查新加入的星星並將其加入到我們的資料庫中。 不要使用 Vercel cron / GitHub 操作,或(上帝禁止)為此建立一個新伺服器。 我們可以使用 [Trigger.DEV](http://Trigger.DEV) 直接與我們的 NextJS 應用程式搭配使用。 那麼就讓我們來設定一下吧! 註冊 [Trigger.dev 帳號](https://trigger.dev/)。 註冊後,建立一個組織並為您的工作選擇一個專案名稱。 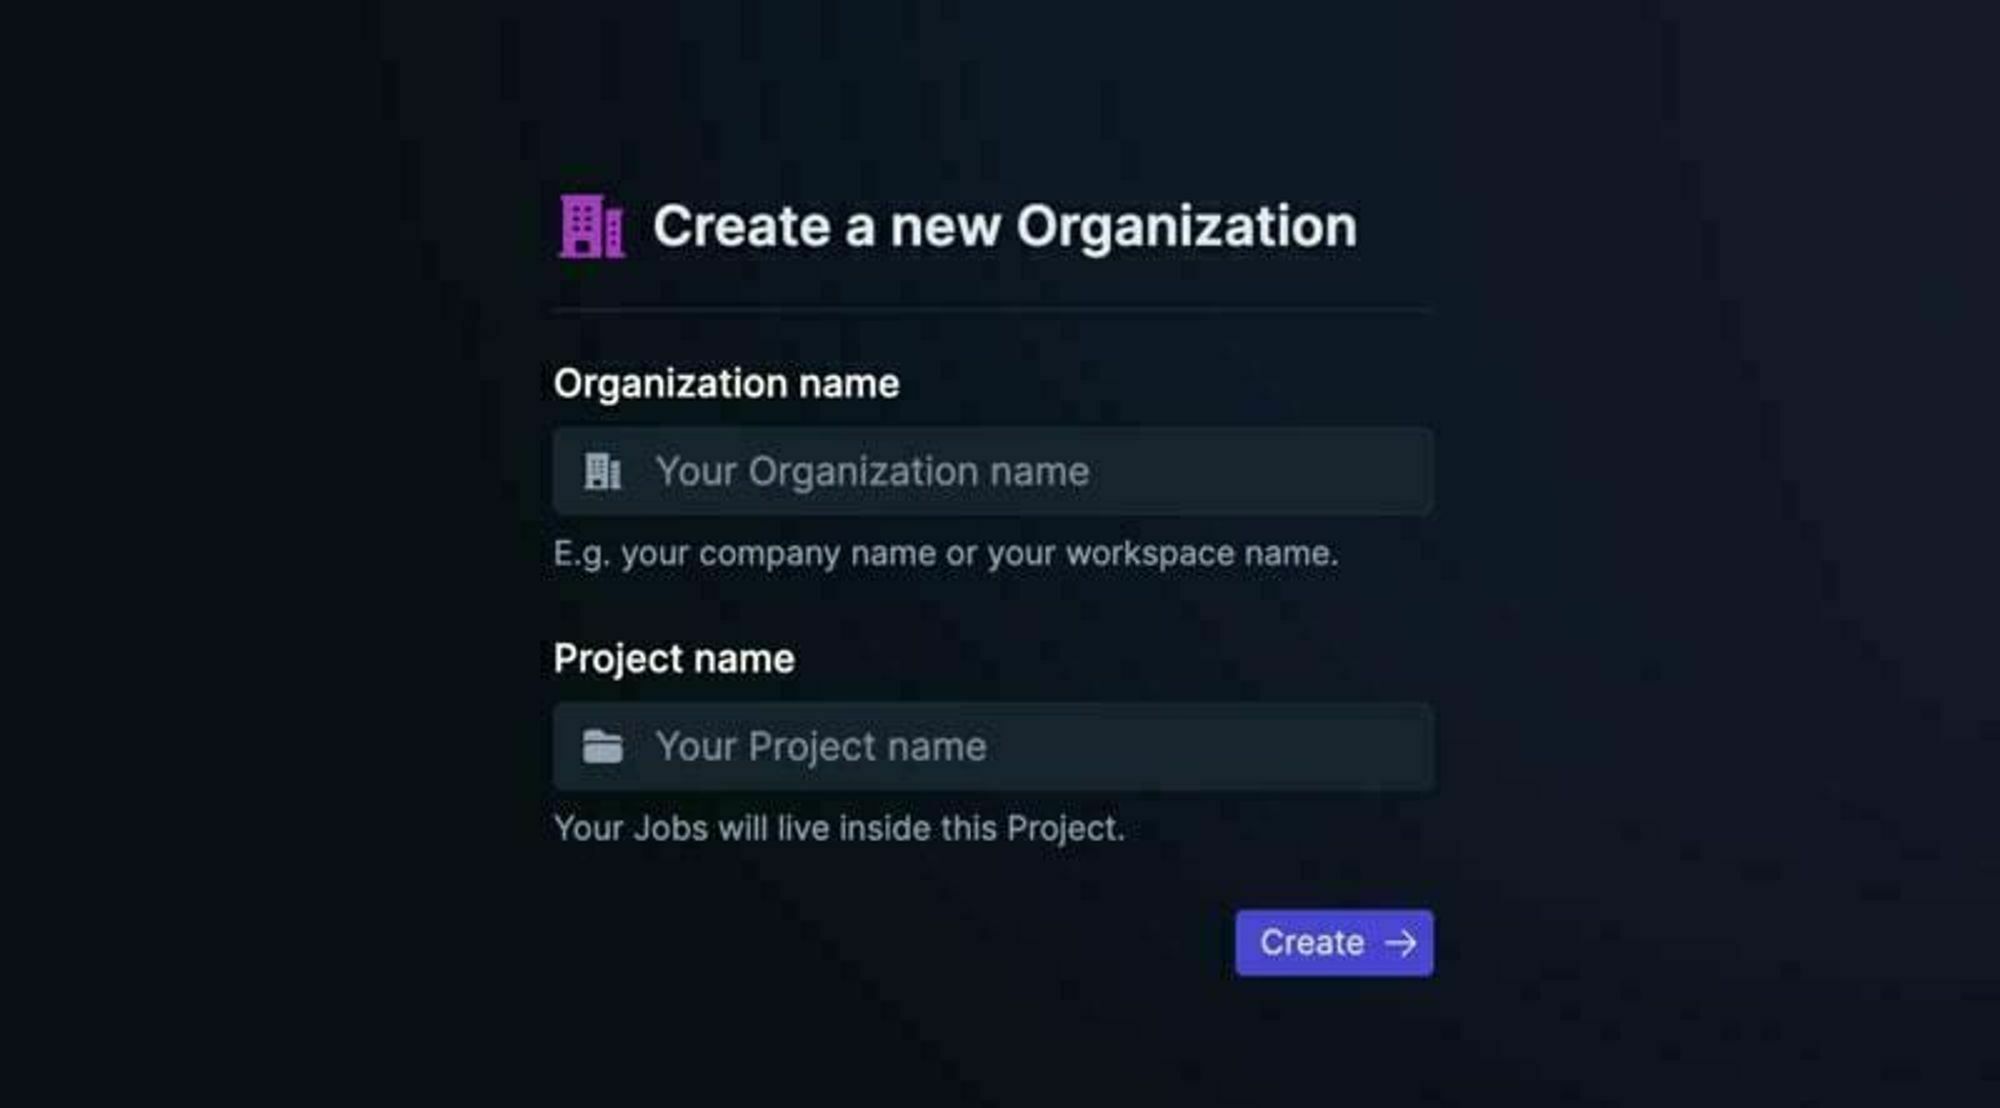 選擇 Next.js 作為您的框架,並按照將 Trigger.dev 新增至現有 Next.js 專案的流程進行操作。 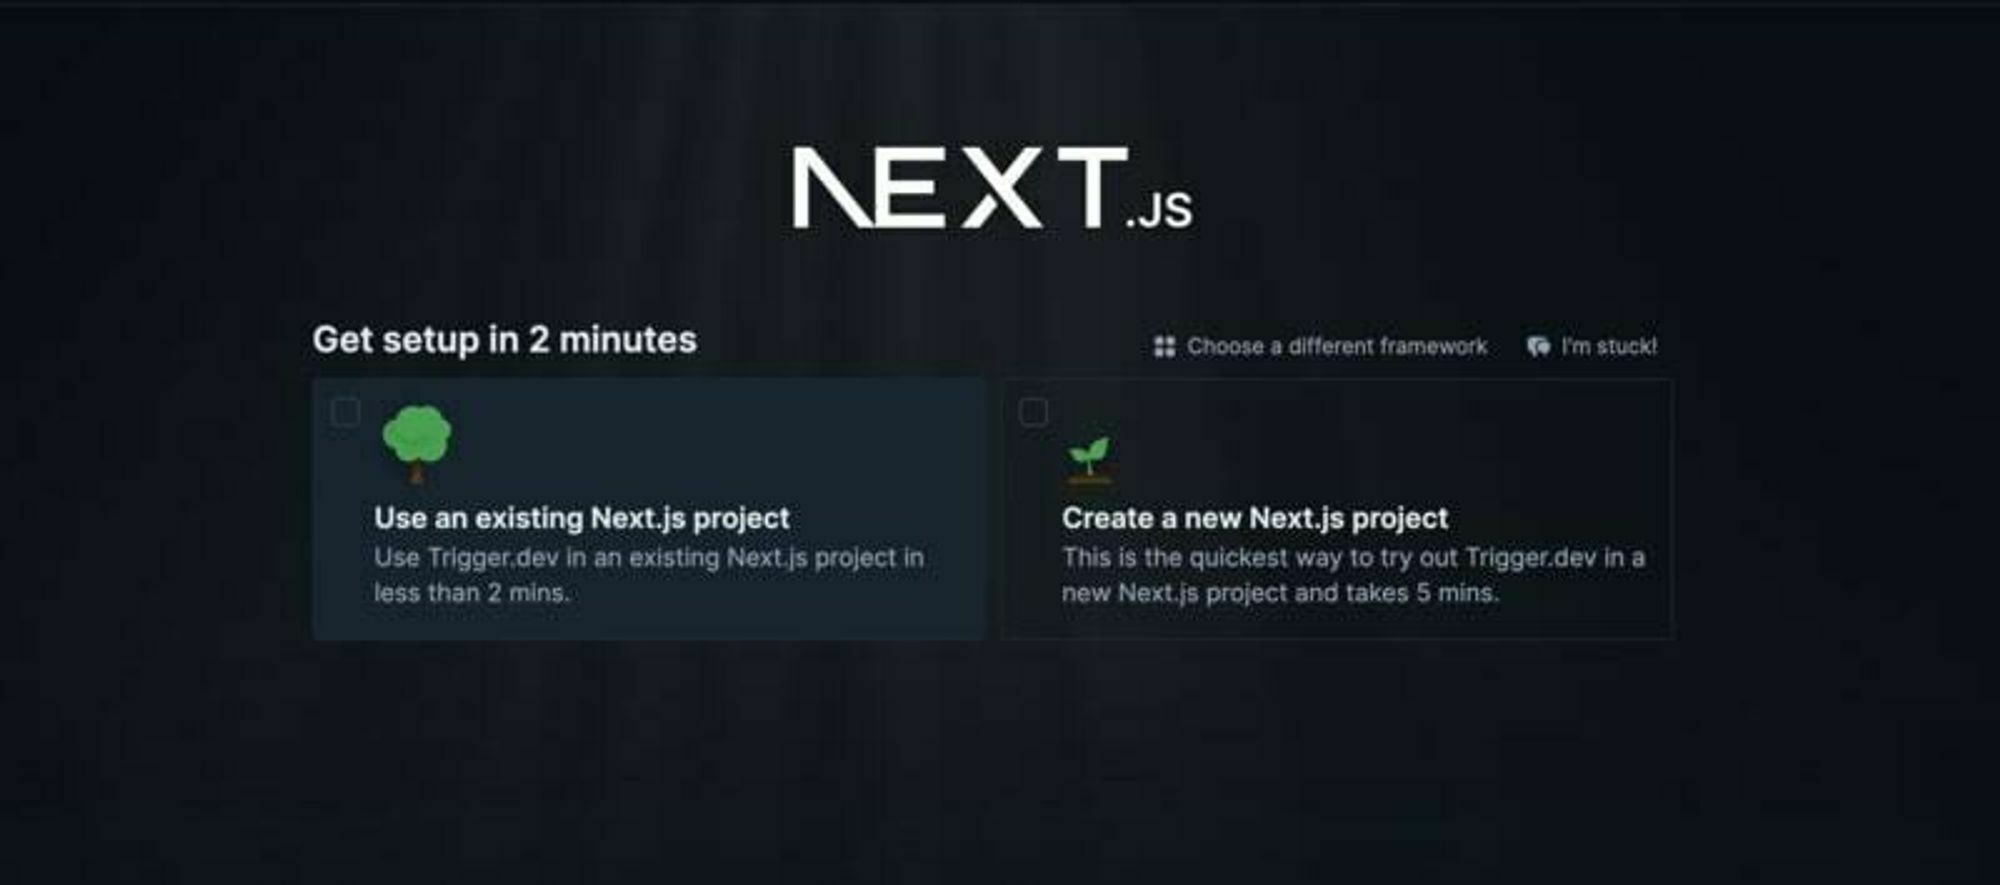 否則,請點選專案儀表板側邊欄選單上的「環境和 API 金鑰」。  複製您的 DEV 伺服器 API 金鑰並執行下面的程式碼片段以安裝 Trigger.dev。 仔細按照說明進行操作。 ``` npx @trigger.dev/cli@latest init ``` 在另一個終端中執行以下程式碼片段,在 Trigger.dev 和您的 Next.js 專案之間建立隧道。 ``` npx @trigger.dev/cli@latest dev ``` 讓我們建立 TriggerDev 作業! 您將看到一個新建立的資料夾,名為“jobs”。 在那裡建立一個名為“sync.stars.ts”的新文件 新增以下程式碼: ``` import { cronTrigger, invokeTrigger } from "@trigger.dev/sdk"; import { client } from "@/trigger"; import { prisma } from "../../helper/prisma"; import axios from "axios"; import { z } from "zod"; // Your first job // This Job will be triggered by an event, log a joke to the console, and then wait 5 seconds before logging the punchline. client.defineJob({ id: "sync-stars", name: "Sync Stars Daily", version: "0.0.1", // Run a cron every day at 23:00 AM trigger: cronTrigger({ cron: "0 23 * * *", }), run: async (payload, io, ctx) => { const repos = await io.runTask("get-stars", async () => { // get all libraries and current amount of stars return await prisma.repository.groupBy({ by: ["name"], _sum: { stars: true, }, }); }); //loop through all repos and invoke the Job that gets the latest stars for (const repo of repos) { getStars.invoke(repo.name, { name: repo.name, previousStarCount: repo?._sum?.stars || 0, }); } }, }); const getStars = client.defineJob({ id: "get-latest-stars", name: "Get latest stars", version: "0.0.1", // Run a cron every day at 23:00 AM trigger: invokeTrigger({ schema: z.object({ name: z.string(), previousStarCount: z.number(), }), }), run: async (payload, io, ctx) => { const stargazers_count = await io.runTask("get-stars", async () => { const { data } = await axios.get( `https://api.github.com/repos/${payload.name}`, { headers: { authorization: `token ${process.env.TOKEN}`, }, } ); return data.stargazers_count as number; }); await prisma.repository.upsert({ where: { name_day_month_year: { name: payload.name, month: new Date().getMonth() + 1, year: new Date().getFullYear(), day: new Date().getDate(), }, }, update: { stars: stargazers_count - payload.previousStarCount, }, create: { name: payload.name, stars: stargazers_count - payload.previousStarCount, month: new Date().getMonth() + 1, year: new Date().getFullYear(), day: new Date().getDate(), }, }); }, }); ``` 我們建立了一個名為“Sync Stars Daily”的新作業,該作業將在每天下午 23:00 執行 - 它在 cron 文本中的表示為:`0 23 * * *` 我們在資料庫中取得所有目前儲存庫,按名稱將它們分組,並對星星進行求和。 由於一切都在 Vercel 無伺服器上執行,因此我們可能會在檢查所有儲存庫時遇到逾時。 為此,我們將每個儲存庫傳送到不同的作業。 我們使用“invoke”建立新作業,然後在“獲取最新的星星”中處理它們 我們迭代所有新儲存庫並獲取當前的星星數量。 我們用舊的星星數量去除新的星星數量,得到今天的星星數量。 我們使用“prisma”將其新增至資料庫。沒有比這更簡單的了! 最後一件事是編輯“jobs/index.ts”並將內容替換為: ``` export * from "./sync.stars"; ``` 你就完成了🥳 --- ## 讓我們聯絡吧! 🔌 作為開源開發者,我們邀請您加入我們的[社群](https://discord.gg/nkqV9xBYWy),以做出貢獻並與維護者互動。請隨時造訪我們的 [GitHub 儲存庫](https://github.com/triggerdotdev/trigger.dev),貢獻並建立與 Trigger.dev 相關的問題。 本教學的源程式碼可在此處取得: [https://github.com/triggerdotdev/blog/tree/main/stars-monitor](https://github.com/triggerdotdev/blog/tree/main/stars-monitor) 感謝您的閱讀! --- 原文出處:https://dev.to/triggerdotdev/take-nextjs-to-the-next-level-create-a-github-stars-monitor-130a
## 簡介 最佳的易於建構的人工智慧產品整合清單。 這些可以為你的專案帶來魔力,所以別忘了向他們表達支持🌟 現在讓我們一起走上AI之路👨🌾 --- ## 1. [CopilotPortal](https://github.com/RecursivelyAI/CopilotKit):將可操作的 LLM 聊天機器人嵌入您的應用程式中。  應用程式中的上下文感知 LLM 聊天機器人可以回答問題並採取行動。 只需幾行程式碼即可獲得一個可用的聊天機器人,然後根據需要進行自訂和嵌入。 ``` import "@copilotkit/react-ui/styles.css"; import { CopilotProvider } from "@copilotkit/react-core"; import { CopilotSidebarUIProvider } from "@copilotkit/react-ui"; export default function App(): JSX.Element { return ( <CopilotProvider chatApiEndpoint="/api/copilotkit/chat"> <CopilotSidebarUIProvider> <YourContent /> </CopilotSidebarUIProvider> </CopilotProvider> ); } ``` https://github.com/RecursivelyAI/CopilotKit --- ## 2. [LinguiJS](https://github.com/lingui/js-lingui) - 自動且簡單的國際化  簡單而強大的開源國際化函式庫。 易於整合的框架,用於建立多語言反應應用程式。 ``` import { Trans } from "@lingui/macro" function App() { return ( <Trans id="msg.docs" /* id is optional */> Read the <a href="https://lingui.dev">documentation</a> for more info. </Trans> ) } ``` https://github.com/lingui/js-lingui --- ## 3. Pezzo.ai - 可觀測性、成本和即時工程平台  用於管理 OpenAI 通話的集中平台。 優化您的提示和令牌使用。追蹤您的人工智慧使用情況。 免費且易於整合。 ``` const prompt = await pezzo.getPrompt("AnalyzeSentiment"); const response = await openai.chat.completions.create(prompt); ``` https://github.com/pezzolabs/pezzo --- ## 4. CopilotTextarea - React 應用程式中的 AI 驅動寫作  具有 Github CopilotX 功能的任何 React `<textarea>` 的直接替代品。 自動完成、插入、編輯。 可以即時或由開發人員提前提供任何上下文。 ``` import { CopilotTextarea } from "@copilotkit/react-textarea"; import { CopilotProvider } from "@copilotkit/react-core"; // Provide context... useMakeCopilotReadable(...) // in your component... <CopilotProvider> <CopilotTextarea/> </CopilotProvider>` ``` https://github.com/RecursivelyAI/CopilotKit --- ## 5. LangChain - 將人工智慧整合到鏈中。  易於使用的 API 和函式庫,用於將 LLM 新增到應用程式中。 將不同的人工智慧元件和模型連接在一起。 輕鬆嵌入上下文和語義資料以實現強大的整合。 https://github.com/langchain-ai/langchain --- ## 6. SwirlSearch - 人工智慧驅動的搜尋。  LLM 支援的搜尋、摘要和輸出。 同時搜尋多個內容來源並產生整合輸出。 功能強大,可自訂各種資料來源的應用程式內整合。 https://github.com/swirlai/swirl-search --- ## 7. ReactAgent - 用於從使用者故事產生 React 元件的實驗性 LLM 代理  使用 GPT-4 將使用者故事轉化為可用的 React 元件的實驗工具。 為其提供本地設計以實現一致的輸出和設計語言。 https://github.com/eylonmiz/react-agent --- 感謝大家! --- 原文出處:https://dev.to/copilotkit/7-easy-ai-product-integrations-to-keep-up-with-the-times--1cg2
## 簡介 在本文中,您將學習如何使用 NextJS、Trigger.dev、Resend 和 OpenAI 建立簡歷產生器。 😲 - 加入基本詳細訊息,例如名字、姓氏和最後工作地點。 - 產生詳細訊息,例如個人資料摘要、工作經歷和工作職責。 - 建立包含所有資訊的 PDF。 - 將所有內容傳送到您的電子郵件  *** ## 你的後台工作平台🔌 [Trigger.dev](https://trigger.dev/) 是一個開源程式庫,可讓您使用 NextJS、Remix、Astro 等為您的應用程式建立和監控長時間執行的作業! [](https://github.com/triggerdotdev/trigger.dev) 請幫我們一顆星🥹。 這將幫助我們建立更多這樣的文章💖 https://github.com/triggerdotdev/trigger.dev --- ## 讓我們來設定一下吧🔥 使用 NextJS 設定一個新專案 ``` npx create-next-app@latest ``` 我們將建立一個包含基本資訊的簡單表單,例如: - 名 - 姓 - 電子郵件地址 - 你的頭像 - 以及你今天為止的經驗!  我們將使用 NextJS 的新應用程式路由器。 開啟`layout.tsx`並加入以下程式碼 ``` import { GeistSans } from "geist/font"; import "./globals.css"; const defaultUrl = process.env.VERCEL_URL ? `https://${process.env.VERCEL_URL}` : "http://localhost:3000"; export const metadata = { metadataBase: new URL(defaultUrl), title: "Resume Builder with GPT4", description: "The fastest way to build a resume with GPT4", }; export default function RootLayout({ children, }: { children: React.ReactNode; }) { return ( <html lang="en" className={GeistSans.className}> <body className="bg-background text-foreground"> <main className="min-h-screen flex flex-col items-center"> {children} </main> </body> </html> ); } ``` 我們基本上是為所有頁面設定佈局(即使我們只有一頁。) 我們設定基本的頁面元資料、背景和全域 CSS 元素。 接下來,讓我們打開“page.tsx”並加入以下程式碼: ``` <div className="flex-1 w-full flex flex-col items-center"> <nav className="w-full flex justify-center border-b border-b-foreground/10 h-16"> <div className="w-full max-w-6xl flex justify-between items-center p-3 text-sm"> <span className="font-bold select-none">resumeGPT.</span> </div> </nav> <div className="animate-in flex-1 flex flex-col opacity-0 max-w-6xl px-3"> <Home /> </div> </div> ``` 這設定了我們的resumeGPT 的標題和主要的家庭元件。 <小時/> ## 建立表單的最簡單方法 保存表單資訊並驗證欄位最簡單的方法是使用react-hook-form。 我們將上傳個人資料照片。 為此,我們不能使用基於 JSON 的請求。 我們需要將 JSON 轉換為有效的表單資料。 那麼就讓我們把它們全部安裝吧! ``` npm install react-hook-form object-to-formdata axios --save ``` 建立一個名為 Components 的新資料夾,新增一個名為「Home.tsx」的新文件,並新增以下程式碼: ``` "use client"; import React, { useState } from "react"; import {FormProvider, useForm} from "react-hook-form"; import Companies from "@/components/Companies"; import axios from "axios"; import {serialize} from "object-to-formdata"; export type TUserDetails = { firstName: string; lastName: string; photo: string; email: string; companies: TCompany[]; }; export type TCompany = { companyName: string; position: string; workedYears: string; technologies: string; }; const Home = () => { const [finished, setFinished] = useState<boolean>(false); const methods = useForm<TUserDetails>() const { register, handleSubmit, formState: { errors }, } = methods; const handleFormSubmit = async (values: TUserDetails) => { axios.post('/api/create', serialize(values)); setFinished(true); }; if (finished) { return ( <div className="mt-10">Sent to the queue! Check your email</div> ) } return ( <div className="flex flex-col items-center justify-center p-7"> <div className="w-full py-3 bg-slate-500 items-center justify-center flex flex-col rounded-t-lg text-white"> <h1 className="font-bold text-white text-3xl">Resume Builder</h1> <p className="text-gray-300"> Generate a resume with GPT in seconds 🚀 </p> </div> <FormProvider {...methods}> <form onSubmit={handleSubmit(handleFormSubmit)} className="p-4 w-full flex flex-col" > <div className="flex flex-col lg:flex-row gap-4"> <div className="flex flex-col w-full"> <label htmlFor="firstName">First name</label> <input type="text" required id="firstName" placeholder="e.g. John" className="p-3 rounded-md outline-none border border-gray-500 text-white bg-transparent" {...register('firstName')} /> </div> <div className="flex flex-col w-full"> <label htmlFor="lastName">Last name</label> <input type="text" required id="lastName" placeholder="e.g. Doe" className="p-3 rounded-md outline-none border border-gray-500 text-white bg-transparent" {...register('lastName')} /> </div> </div> <hr className="w-full h-1 mt-3" /> <label htmlFor="email">Email Address</label> <input type="email" required id="email" placeholder="e.g. [email protected]" className="p-3 rounded-md outline-none border border-gray-500 text-white bg-transparent" {...register('email', {required: true, pattern: /^\S+@\S+$/i})} /> <hr className="w-full h-1 mt-3" /> <label htmlFor="photo">Upload your image 😎</label> <input type="file" id="photo" accept="image/x-png" className="p-3 rounded-md outline-none border border-gray-500 mb-3" {...register('photo', {required: true})} /> <Companies /> <button className="p-4 pointer outline-none bg-blue-500 border-none text-white text-base font-semibold rounded-lg"> CREATE RESUME </button> </form> </FormProvider> </div> ); }; export default Home; ``` 您可以看到我們從「使用客戶端」開始,它基本上告訴我們的元件它應該只在客戶端上執行。 為什麼我們只需要客戶端? React 狀態(輸入變更)僅在用戶端可用。 我們設定兩個接口,「TUserDetails」和「TCompany」。它們代表了我們正在使用的資料的結構。 我們將“useForm”與“react-hook-form”一起使用。它為我們的輸入建立了本地狀態管理,並允許我們輕鬆更新和驗證我們的欄位。您可以看到,在每個「輸入」中,都有一個簡單的「註冊」函數,用於指定輸入名稱和驗證並將其註冊到託管狀態。 這很酷,因為我們不需要使用像“onChange”這樣的東西 您還可以看到我們使用了“FormProvider”,這很重要,因為我們希望在子元件中擁有“react-hook-form”的上下文。 我們還有一個名為「handleFormSubmit」的方法。這是我們提交表單後呼叫的方法。您可以看到我們使用“serialize”函數將 javascript 物件轉換為 FormData,並向伺服器發送請求以使用“axios”啟動作業。 您可以看到另一個名為“Companies”的元件。該元件將讓我們指定我們工作過的所有公司。 那麼讓我們努力吧。 建立一個名為「Companies.tsx」的新文件 並加入以下程式碼: ``` import React, {useCallback, useEffect} from "react"; import { TCompany } from "./Home"; import {useFieldArray, useFormContext} from "react-hook-form"; const Companies = () => { const {control, register} = We(); const {fields: companies, append} = useFieldArray({ control, name: "companies", }); const addCompany = useCallback(() => { append({ companyName: '', position: '', workedYears: '', technologies: '' }) }, [companies]); useEffect(() => { addCompany(); }, []); return ( <div className="mb-4"> {companies.length > 1 ? ( <h3 className="font-bold text-white text-3xl my-3"> Your list of Companies: </h3> ) : null} {companies.length > 1 && companies.slice(1).map((company, index) => ( <div key={index} className="mb-4 p-4 border bg-gray-800 rounded-lg shadow-md" > <div className="mb-2"> <label htmlFor={`companyName-${index}`} className="text-white"> Company Name </label> <input type="text" id={`companyName-${index}`} className="p-2 border border-gray-300 rounded-md w-full bg-transparent" {...register(`companies.${index}.companyName`, {required: true})} /> </div> <div className="mb-2"> <label htmlFor={`position-${index}`} className="text-white"> Position </label> <input type="text" id={`position-${index}`} className="p-2 border border-gray-300 rounded-md w-full bg-transparent" {...register(`companies.${index}.position`, {required: true})} /> </div> <div className="mb-2"> <label htmlFor={`workedYears-${index}`} className="text-white"> Worked Years </label> <input type="number" id={`workedYears-${index}`} className="p-2 border border-gray-300 rounded-md w-full bg-transparent" {...register(`companies.${index}.workedYears`, {required: true})} /> </div> <div className="mb-2"> <label htmlFor={`workedYears-${index}`} className="text-white"> Technologies </label> <input type="text" id={`technologies-${index}`} className="p-2 border border-gray-300 rounded-md w-full bg-transparent" {...register(`companies.${index}.technologies`, {required: true})} /> </div> </div> ))} <button type="button" onClick={addCompany} className="mb-4 p-2 pointer outline-none bg-blue-900 w-full border-none text-white text-base font-semibold rounded-lg"> Add Company </button> </div> ); }; export default Companies; ``` 我們從 useFormContext 開始,它允許我們取得父元件的上下文。 接下來,我們使用 useFieldArray 建立一個名為 Companies 的新狀態。這是我們擁有的所有公司的一個陣列。 在「useEffect」中,我們新增陣列的第一項以對其進行迭代。 當點擊“addCompany”時,它會將另一個元素推送到陣列中。 我們已經和客戶完成了🥳 --- ## 解析HTTP請求 還記得我們向“/api/create”發送了一個“POST”請求嗎? 讓我們轉到 app/api 資料夾並在該資料夾中建立一個名為「create」的新資料夾,建立一個名為「route.tsx」的新檔案並貼上以下程式碼: ``` import {NextRequest, NextResponse} from "next/server"; import {client} from "@/trigger"; export async function POST(req: NextRequest) { const data = await req.formData(); const allArr = { name: data.getAll('companies[][companyName]'), position: data.getAll('companies[][position]'), workedYears: data.getAll('companies[][workedYears]'), technologies: data.getAll('companies[][technologies]'), }; const payload = { firstName: data.get('firstName'), lastName: data.get('lastName'), photo: Buffer.from((await (data.get('photo[0]') as File).arrayBuffer())).toString('base64'), email: data.get('email'), companies: allArr.name.map((name, index) => ({ companyName: allArr.name[index], position: allArr.position[index], workedYears: allArr.workedYears[index], technologies: allArr.technologies[index], })).filter((company) => company.companyName && company.position && company.workedYears && company.technologies) } await client.sendEvent({ name: 'create.resume', payload }); return NextResponse.json({ }) } ``` > 此程式碼只能在 NodeJS 版本 20+ 上運作。如果版本較低,將無法解析FormData。 該程式碼非常簡單。 - 我們使用 `req.formData` 將請求解析為 FormData - 我們將基於 FormData 的請求轉換為 JSON 檔案。 - 我們提取圖像並將其轉換為“base64” - 我們將所有內容傳送給 TriggerDev --- ## 製作履歷並將其發送到您的電子郵件📨 建立履歷是我們需要的長期任務 - 使用 ChatGPT 產生內容。 - 建立 PDF - 發送到您的電子郵件 由於某些原因,我們不想發出長時間執行的 HTTP 請求來執行所有這些操作。 1. 部署到 Vercel 時,無伺服器功能有 10 秒的限制。我們永遠不會準時到達。 2.我們希望讓用戶不會長時間掛起。這是一個糟糕的使用者體驗。如果用戶關閉窗口,整個過程將失敗。 ### 介紹 Trigger.dev! 使用 Trigger.dev,您可以在 NextJS 應用程式內執行後台進程!您不需要建立新伺服器。 他們也知道如何透過將長時間執行的作業無縫地分解為短期任務來處理它們。 註冊 [Trigger.dev 帳號](https://trigger.dev/)。註冊後,建立一個組織並為您的工作選擇一個專案名稱。 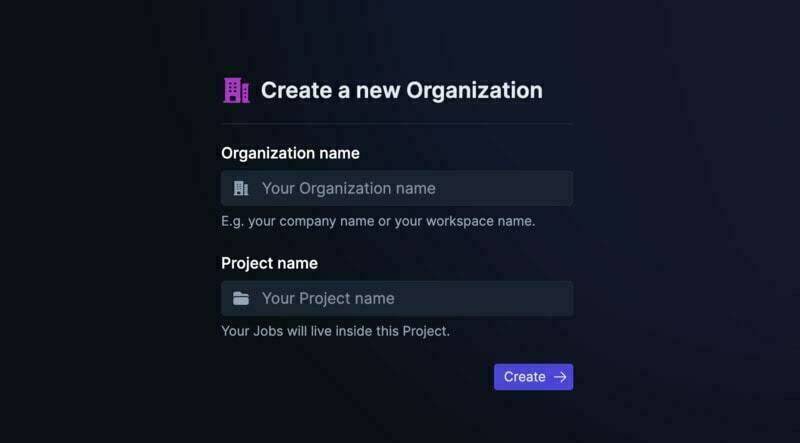 選擇 Next.js 作為您的框架,並按照將 Trigger.dev 新增至現有 Next.js 專案的流程進行操作。 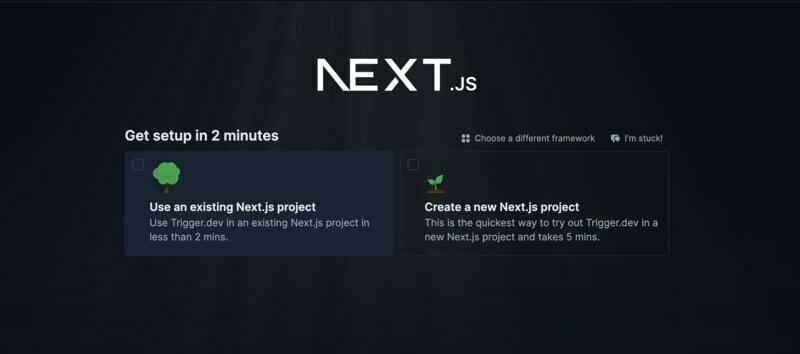 否則,請點選專案儀表板側邊欄選單上的「環境和 API 金鑰」。 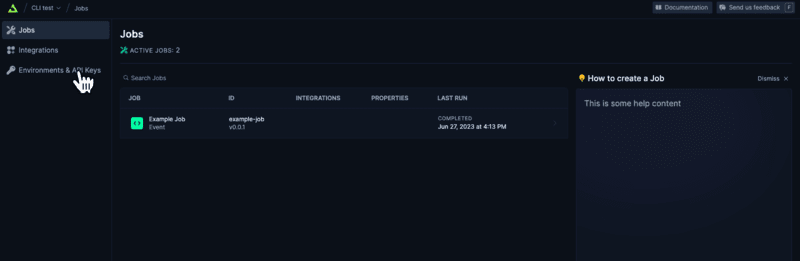 複製您的 DEV 伺服器 API 金鑰並執行下面的程式碼片段以安裝 Trigger.dev。仔細按照說明進行操作。 ``` npx @trigger.dev/cli@latest init ``` 在另一個終端中,執行以下程式碼片段以在 Trigger.dev 和 Next.js 專案之間建立隧道。 ``` npx @trigger.dev/cli@latest dev ``` 讓我們建立 TriggerDev 作業! 前往新建立的資料夾 jobs 並建立一個名為「create.resume.ts」的新檔案。 新增以下程式碼: ``` client.defineJob({ id: "create-resume", name: "Create Resume", version: "0.0.1", trigger: eventTrigger({ name: "create.resume", schema: z.object({ firstName: z.string(), lastName: z.string(), photo: z.string(), email: z.string().email(), companies: z.array(z.object({ companyName: z.string(), position: z.string(), workedYears: z.string(), technologies: z.string() })) }), }), run: async (payload, io, ctx) => { } }); ``` 這將為我們建立一個名為「create-resume」的新工作。 如您所見,我們先前從「route.tsx」發送的請求進行了架構驗證。這將為我們提供驗證和“自動完成”。 我們將在這裡執行三項工作 - 聊天GPT - PDF建立 - 電子郵件發送 讓我們從 ChatGPT 開始。 [建立 OpenAI 帳戶](https://platform.openai.com/) 並產生 API 金鑰。 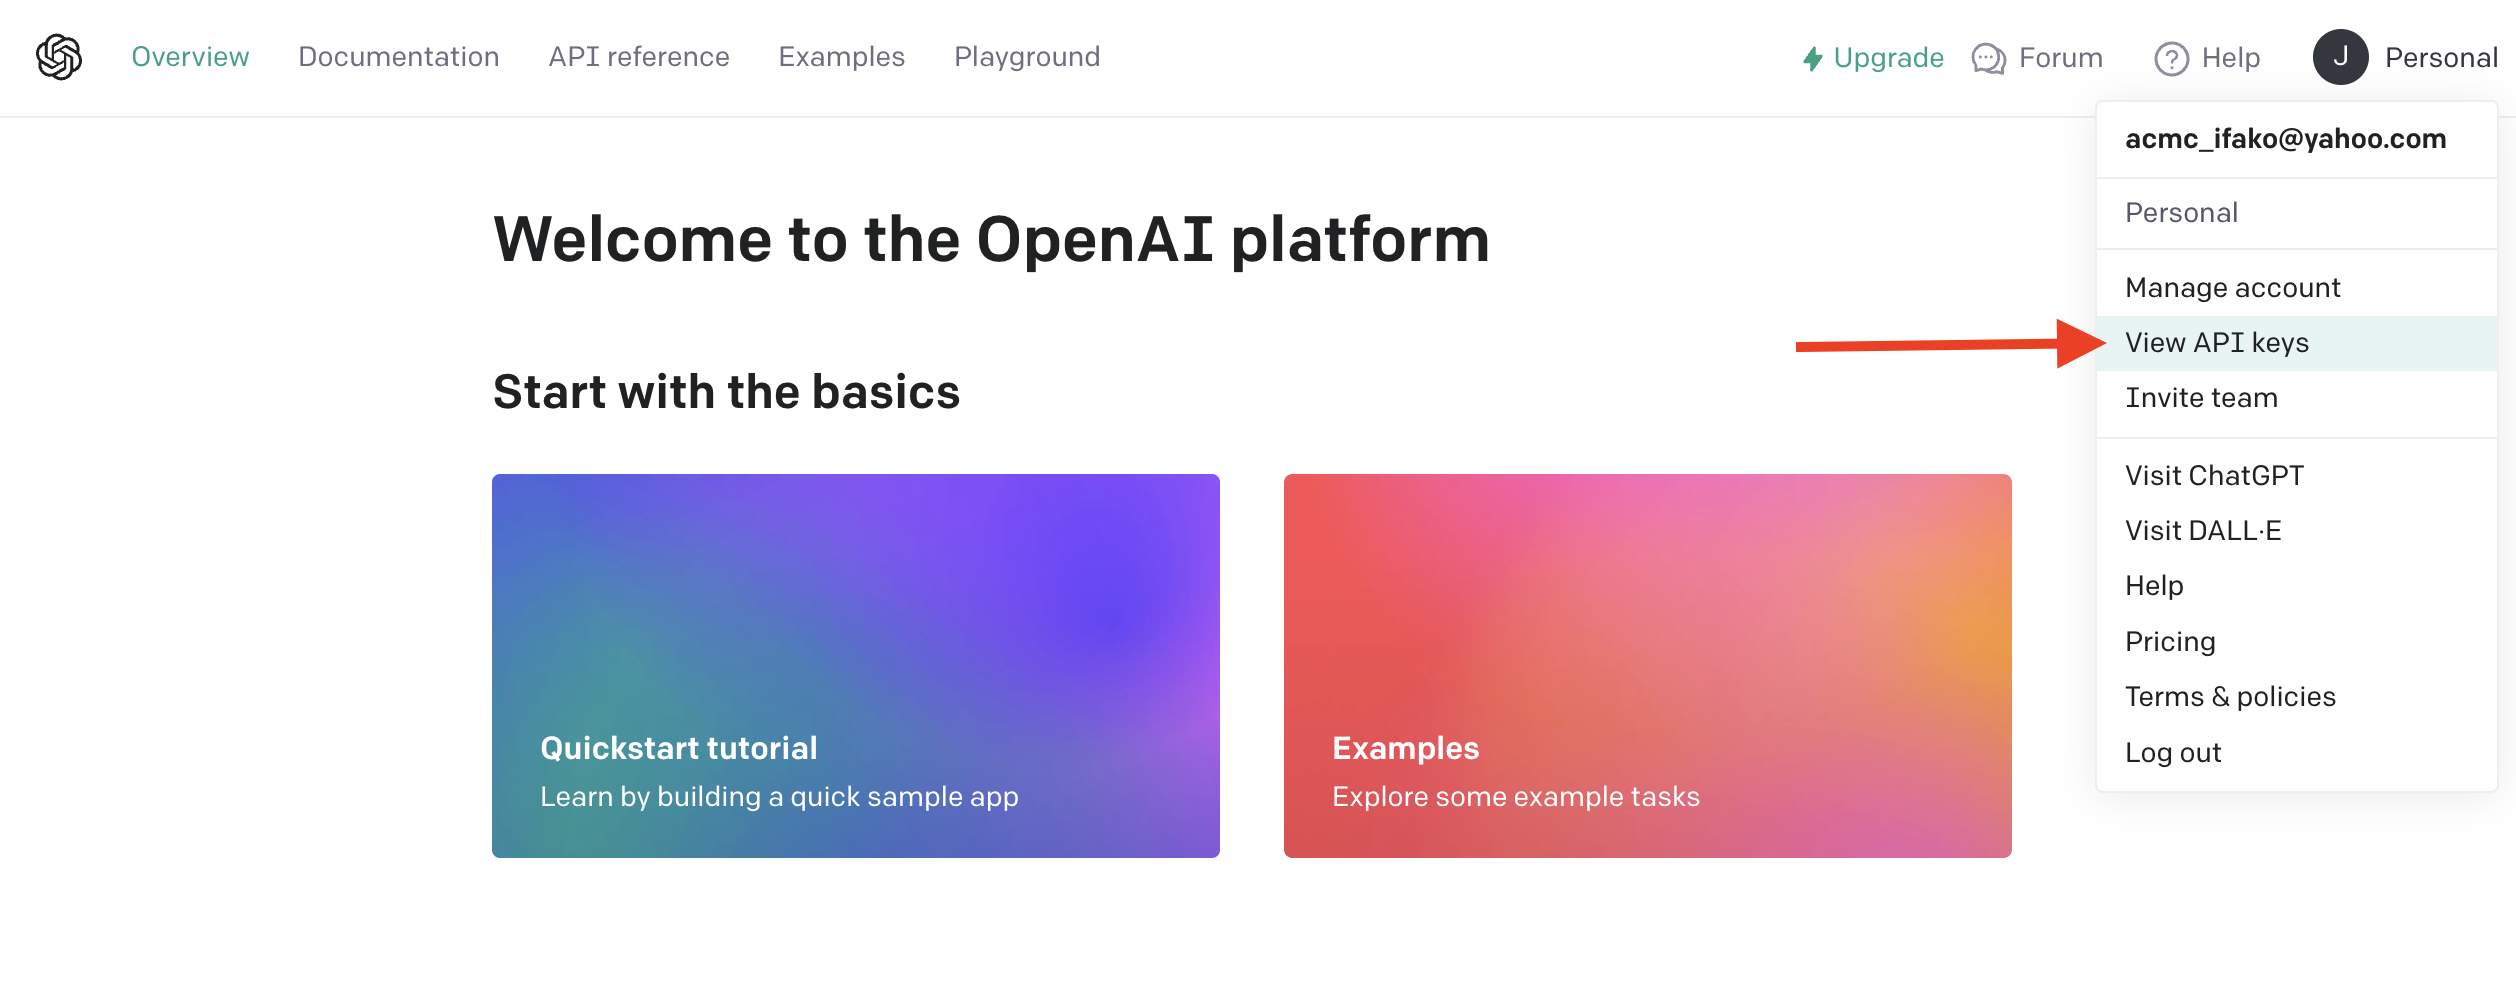 從下拉清單中按一下「檢視 API 金鑰」以建立 API 金鑰。 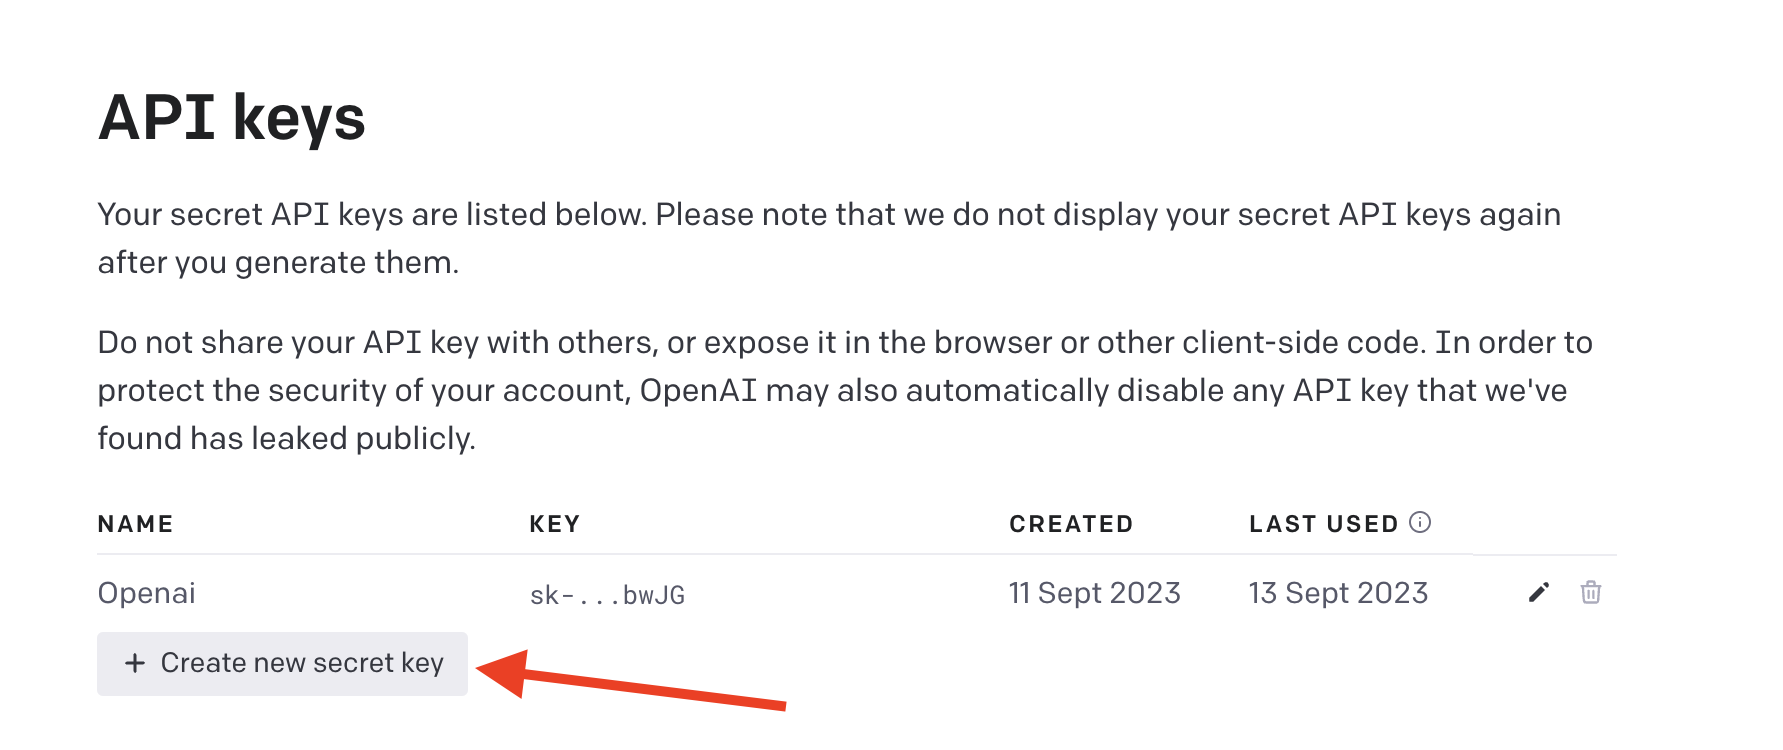 接下來,透過執行下面的程式碼片段來安裝 OpenAI 套件。 ``` npm install @trigger.dev/openai ``` 將您的 OpenAI API 金鑰新增至 `.env.local` 檔案中。 ``` OPENAI_API_KEY=<your_api_key> ``` 在根目錄中建立一個名為「utils」的新資料夾。 在該目錄中,建立一個名為「openai.ts」的新文件 新增以下程式碼: ``` import { OpenAI } from "openai"; const openai = new OpenAI({ apiKey: process.env.OPENAI_API_KEY!, }); export async function generateResumeText(prompt: string) { const response = await openai.completions.create({ model: "text-davinci-003", prompt, max_tokens: 250, temperature: 0.7, top_p: 1, frequency_penalty: 1, presence_penalty: 1, }); return response.choices[0].text.trim(); } export const prompts = { profileSummary: (fullName: string, currentPosition: string, workingExperience: string, knownTechnologies: string) => `I am writing a resume, my details are \n name: ${fullName} \n role: ${currentPosition} (${workingExperience} years). \n I write in the technologies: ${knownTechnologies}. Can you write a 100 words description for the top of the resume(first person writing)?`, jobResponsibilities: (fullName: string, currentPosition: string, workingExperience: string, knownTechnologies: string) => `I am writing a resume, my details are \n name: ${fullName} \n role: ${currentPosition} (${workingExperience} years). \n I write in the technolegies: ${knownTechnologies}. Can you write 3 points for a resume on what I am good at?`, workHistory: (fullName: string, currentPosition: string, workingExperience: string, details: TCompany[]) => `I am writing a resume, my details are \n name: ${fullName} \n role: ${currentPosition} (${workingExperience} years). ${companyDetails(details)} \n Can you write me 50 words for each company seperated in numbers of my succession in the company (in first person)?`, }; ``` 這段程式碼基本上建立了使用 ChatGPT 的基礎設施以及 3 個函數:「profileSummary」、「workingExperience」和「workHistory」。我們將使用它們來建立各部分的內容。 返回我們的「create.resume.ts」並新增作業: ``` import { client } from "@/trigger"; import { eventTrigger } from "@trigger.dev/sdk"; import { z } from "zod"; import { prompts } from "@/utils/openai"; import { TCompany, TUserDetails } from "@/components/Home"; const companyDetails = (companies: TCompany[]) => { let stringText = ""; for (let i = 1; i < companies.length; i++) { stringText += ` ${companies[i].companyName} as a ${companies[i].position} on technologies ${companies[i].technologies} for ${companies[i].workedYears} years.`; } return stringText; }; client.defineJob({ id: "create-resume", name: "Create Resume", version: "0.0.1", integrations: { resend }, trigger: eventTrigger({ name: "create.resume", schema: z.object({ firstName: z.string(), lastName: z.string(), photo: z.string(), email: z.string().email(), companies: z.array(z.object({ companyName: z.string(), position: z.string(), workedYears: z.string(), technologies: z.string() })) }), }), run: async (payload, io, ctx) => { const texts = await io.runTask("openai-task", async () => { return Promise.all([ await generateResumeText(prompts.profileSummary(payload.firstName, payload.companies[0].position, payload.companies[0].workedYears, payload.companies[0].technologies)), await generateResumeText(prompts.jobResponsibilities(payload.firstName, payload.companies[0].position, payload.companies[0].workedYears, payload.companies[0].technologies)), await generateResumeText(prompts.workHistory(payload.firstName, payload.companies[0].position, payload.companies[0].workedYears, payload.companies)) ]); }); }, }); ``` 我們建立了一個名為「openai-task」的新任務。 在該任務中,我們使用 ChatGPT 同時執行三個提示,並返回它們。 --- ## 建立 PDF 建立 PDF 的方法有很多種 - 您可以使用 HTML2CANVAS 等工具並將 HTML 程式碼轉換為映像,然後轉換為 PDF。 - 您可以使用「puppeteer」之類的工具來抓取網頁並將其轉換為 PDF。 - 您可以使用不同的庫在後端建立 PDF。 在我們的例子中,我們將使用一個名為「jsPdf」的簡單函式庫,它是在後端建立 PDF 的非常簡單的函式庫。我鼓勵您使用 Puppeteer 和更多 HTML 來建立一些更強大的 PDF 檔案。 那我們來安裝它 ``` npm install jspdf @typs/jspdf --save ``` 讓我們回到「utils」並建立一個名為「resume.ts」的新檔案。該文件基本上會建立一個 PDF 文件,我們可以將其發送到使用者的電子郵件中。 加入以下內容: ``` import {TUserDetails} from "@/components/Home"; import {jsPDF} from "jspdf"; type ResumeProps = { userDetails: TUserDetails; picture: string; profileSummary: string; workHistory: string; jobResponsibilities: string; }; export function createResume({ userDetails, picture, workHistory, jobResponsibilities, profileSummary }: ResumeProps) { const doc = new jsPDF(); // Title block doc.setFontSize(24); doc.setFont('helvetica', 'bold'); doc.text(userDetails.firstName + ' ' + userDetails.lastName, 45, 27); doc.setLineWidth(0.5); doc.rect(20, 15, 170, 20); // x, y, width, height doc.addImage({ imageData: picture, x: 25, y: 17, width: 15, height: 15 }); // Reset font for the rest doc.setFontSize(12); doc.setFont('helvetica', 'normal'); // Personal Information block doc.setFontSize(14); doc.setFont('helvetica', 'bold'); doc.text('Summary', 20, 50); doc.setFontSize(10); doc.setFont('helvetica', 'normal'); const splitText = doc.splitTextToSize(profileSummary, 170); doc.text(splitText, 20, 60); const newY = splitText.length * 5; // Work history block doc.setFontSize(14); doc.setFont('helvetica', 'bold'); doc.text('Work History', 20, newY + 65); doc.setFontSize(10); doc.setFont('helvetica', 'normal'); const splitWork = doc.splitTextToSize(workHistory, 170); doc.text(splitWork, 20, newY + 75); const newNewY = splitWork.length * 5; // Job Responsibilities block doc.setFontSize(14); doc.setFont('helvetica', 'bold'); doc.text('Job Responsibilities', 20, newY + newNewY + 75); doc.setFontSize(10); doc.setFont('helvetica', 'normal'); const splitJob = doc.splitTextToSize(jobResponsibilities, 170); doc.text(splitJob, 20, newY + newNewY + 85); return doc.output("datauristring"); } ``` 該文件包含三個部分:「個人資訊」、「工作歷史」和「工作職責」區塊。 我們計算每個區塊的位置和內容。 一切都是以“絕對”的方式設置的。 值得注意的是“splitTextToSize”將文字分成多行,因此它不會超出螢幕。  現在,讓我們建立下一個任務:再次開啟 `resume.ts` 並新增以下程式碼: ``` import { client } from "@/trigger"; import { eventTrigger } from "@trigger.dev/sdk"; import { z } from "zod"; import { prompts } from "@/utils/openai"; import { TCompany, TUserDetails } from "@/components/Home"; import { createResume } from "@/utils/resume"; const companyDetails = (companies: TCompany[]) => { let stringText = ""; for (let i = 1; i < companies.length; i++) { stringText += ` ${companies[i].companyName} as a ${companies[i].position} on technologies ${companies[i].technologies} for ${companies[i].workedYears} years.`; } return stringText; }; client.defineJob({ id: "create-resume", name: "Create Resume", version: "0.0.1", integrations: { resend }, trigger: eventTrigger({ name: "create.resume", schema: z.object({ firstName: z.string(), lastName: z.string(), photo: z.string(), email: z.string().email(), companies: z.array(z.object({ companyName: z.string(), position: z.string(), workedYears: z.string(), technologies: z.string() })) }), }), run: async (payload, io, ctx) => { const texts = await io.runTask("openai-task", async () => { return Promise.all([ await generateResumeText(prompts.profileSummary(payload.firstName, payload.companies[0].position, payload.companies[0].workedYears, payload.companies[0].technologies)), await generateResumeText(prompts.jobResponsibilities(payload.firstName, payload.companies[0].position, payload.companies[0].workedYears, payload.companies[0].technologies)), await generateResumeText(prompts.workHistory(payload.firstName, payload.companies[0].position, payload.companies[0].workedYears, payload.companies)) ]); }); console.log('passed chatgpt'); const pdf = await io.runTask('convert-to-html', async () => { const resume = createResume({ userDetails: payload, picture: payload.photo, profileSummary: texts[0], jobResponsibilities: texts[1], workHistory: texts[2], }); return {final: resume.split(',')[1]} }); console.log('converted to pdf'); }, }); ``` 您可以看到我們新增了一個名為「convert-to-html」的新任務。這將為我們建立 PDF,將其轉換為 base64 並返回。 --- ## 讓他們知道🎤 我們即將到達終點! 剩下的唯一一件事就是與用戶分享。 您可以使用任何您想要的電子郵件服務。 我們將使用 Resend.com 造訪[註冊頁面](https://resend.com/signup),建立帳戶和 API 金鑰,並將其儲存到 `.env.local` 檔案中。 ``` RESEND_API_KEY=<place_your_API_key> ```  將 [Trigger.dev Resend 整合套件](https://trigger.dev/docs/integrations/apis/resend) 安裝到您的 Next.js 專案。 ``` npm install @trigger.dev/resend ``` 剩下要做的就是加入我們的最後一項工作! 幸運的是,Trigger 直接與 Resend 集成,因此我們不需要建立新的「正常」任務。 這是最終的程式碼: ``` import { client } from "@/trigger"; import { eventTrigger } from "@trigger.dev/sdk"; import { z } from "zod"; import { prompt } from "@/utils/openai"; import { TCompany, TUserDetails } from "@/components/Home"; import { createResume } from "@/utils/resume"; import { Resend } from "@trigger.dev/resend"; const resend = new Resend({ id: "resend", apiKey: process.env.RESEND_API_KEY!, }); const companyDetails = (companies: TCompany[]) => { let stringText = ""; for (let i = 1; i < companies.length; i++) { stringText += ` ${companies[i].companyName} as a ${companies[i].position} on technologies ${companies[i].technologies} for ${companies[i].workedYears} years.`; } return stringText; }; client.defineJob({ id: "create-resume", name: "Create Resume", version: "0.0.1", integrations: { resend }, trigger: eventTrigger({ name: "create.resume", schema: z.object({ firstName: z.string(), lastName: z.string(), photo: z.string(), email: z.string().email(), companies: z.array(z.object({ companyName: z.string(), position: z.string(), workedYears: z.string(), technologies: z.string() })) }), }), run: async (payload, io, ctx) => { const texts = await io.runTask("openai-task", async () => { return Promise.all([ await generateResumeText(prompts.profileSummary(payload.firstName, payload.companies[0].position, payload.companies[0].workedYears, payload.companies[0].technologies)), await generateResumeText(prompts.jobResponsibilities(payload.firstName, payload.companies[0].position, payload.companies[0].workedYears, payload.companies[0].technologies)), await generateResumeText(prompts.workHistory(payload.firstName, payload.companies[0].position, payload.companies[0].workedYears, payload.companies)) ]); }); console.log('passed chatgpt'); const pdf = await io.runTask('convert-to-html', async () => { const resume = createResume({ userDetails: payload, picture: payload.photo, profileSummary: texts[0], jobResponsibilities: texts[1], workHistory: texts[2], }); return {final: resume.split(',')[1]} }); console.log('converted to pdf'); await io.resend.sendEmail('send-email', { to: payload.email, subject: 'Resume', html: 'Your resume is attached!', attachments: [ { filename: 'resume.pdf', content: Buffer.from(pdf.final, 'base64'), contentType: 'application/pdf', } ], from: "Nevo David <[email protected]>", }); console.log('Sent email'); }, }); ``` 我們在檔案頂部的「Resend」實例載入了儀表板中的 API 金鑰。 我們有 ``` integrations: { resend }, ``` 我們將其加入到我們的作業中,以便稍後在“io”內部使用。 最後,我們的工作是發送 PDF `io.resend.sendEmail` 值得注意的是其中的附件,其中包含我們在上一步中產生的 PDF 文件。 我們就完成了🎉 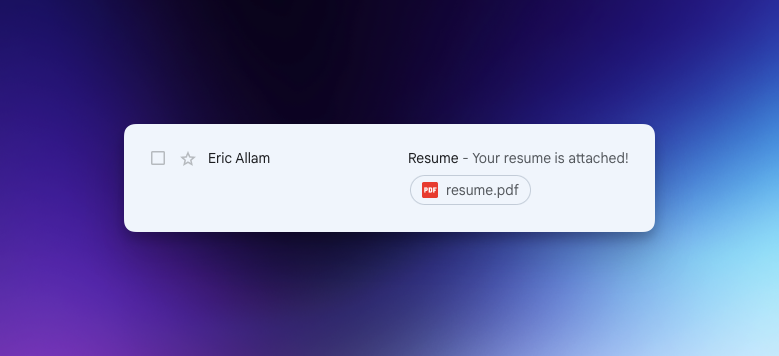 您可以在此處檢查並執行完整的源程式碼: https://github.com/triggerdotdev/blog --- ## 讓我們聯絡吧! 🔌 作為開源開發者,我們邀請您加入我們的[社群](https://discord.gg/nkqV9xBYWy),以做出貢獻並與維護者互動。請隨時造訪我們的 [GitHub 儲存庫](https://github.com/triggerdotdev/trigger.dev),貢獻並建立與 Trigger.dev 相關的問題。 本教學的源程式碼可在此處取得: https://github.com/triggerdotdev/blog/tree/main/blog-resume-builder 感謝您的閱讀! --- 原文出處:https://dev.to/triggerdotdev/creating-a-resume-builder-with-nextjs-triggerdev-and-gpt4-4gmf
 ## 介紹: React 開發人員可以透過使用設計模式來節省時間和精力,設計模式提供了一種使用經過測試且可信賴的解決方案來解決問題的快速方法。它們支援低耦合的內聚模組,從而幫助 React 開發人員建立可維護、可擴展且高效的應用程式。在本文中,我們將探索 React 設計模式並研究它們如何改進 React 應用程式的開發。 ## 容器和表示模式 容器和表示模式是一種旨在將反應程式碼中的表示邏輯與業務邏輯分離的模式,從而使其模組化、可測試並遵循關注點分離原則。 大多數情況下,在 React 應用程式中,我們需要從後端/儲存取得資料或計算邏輯並在 React 元件上表示該計算的結果。在這些情況下,容器和表示模式大放異彩,因為它可用於將元件分為兩類,即: * 容器元件,充當負責資料取得或計算的元件。 * 表示元件,其工作是將獲取的資料或計算值呈現在 UI(使用者介面)上。 容器和表示模式的範例如下所示: ``` import React, { useEffect } from 'react'; import CharacterList from './CharacterList'; const StarWarsCharactersContainer:React.FC = () => { const [characters, setCharacters] = useState<Character>([]) const [isLoading, setIsLoading] = useState<boolean>(false); const [error, setError] = useState<boolean>(false); const getCharacters = async () => { setIsLoading(true); try { const response = await fetch("https://akabab.github.io/starwars-api/api/all.json"); const data = await response.json(); setIsLoading(false); if (!data) return; setCharacters(data); } catch(err) { setError(true); } finally { setIsLoading(true); } }; useEffect(() => { getCharacters(); }, []); return <CharacterList loading={loading} error={error} characters={characters} />; }; export default StarWarsCharactersContainer; ``` ``` // the component is responsible for displaying the characters import React from 'react'; import { Character } from './types'; interface CharacterListProps { loading: boolean; error: boolean; users: Character[]; } const CharacterList: React.FC<CharacterListProps> = ({ loading, error, characters }) => { if (loading && !error) return <div>Loading...</div>; if (!loading && error) return <div>error occured.unable to load characters</div>; if (!characters) return null; return ( <ul> {characters.map((user) => ( <li key={user.id}>{user.name}</li> ))} </ul> ); }; export default CharacterList; ``` ## 有 Hooks 的元件組合 Hooks 是 React 16.8 中首次推出的全新功能。從那時起,他們在開發 React 應用程式中發揮了至關重要的作用。掛鉤是基本函數,可授予功能元件存取狀態和生命週期方法(以前僅可用於類別元件)的功能。另一方面,掛鉤可以專門設計來滿足元件要求並具有其他用例。 我們現在可以隔離所有狀態邏輯(一種需要反應性狀態變數的邏輯),並使用自訂掛鉤在元件中組合或使用它。因此,程式碼更加模組化和可測試,因為鉤子鬆散地綁定到元件,因此可以單獨測試。 帶有鉤子的元件組合示例如下所示: ``` // creating a custom hook that fetches star wars characters export const useFetchStarWarsCharacters = () => { const [characters, setCharacters] = useState<Character>([]) const [isLoading, setIsLoading] = useState(false); const [error, setError] = useState(false); const controller = new AbortController() const getCharacters = async () => { setIsLoading(true); try { const response = await fetch( "https://akabab.github.io/starwars-api/api/all.json", { method: "GET", credentials: "include", mode: "cors", headers: { 'Content-Type': 'application/json', 'Access-Control-Allow-Origin': '*' }, signal: controller.signal } ); const data = await response.json(); setIsLoading(false); if (!data) return; setCharacters(data); } catch(err) { setError(true); } finally { setIsLoading(true); } }; useEffect(() => { getCharacters(); return () => { controller.abort(); } }, []); return [ characters, isLoading, error ]; }; ``` 建立自訂鉤子後,我們將其導入到我們的 **StarWarsCharactersContainer** 元件中並使用它; ``` // importing the custom hook to a component and fetch the characters import React from 'react'; import { Character } from './types'; import { useFetchStarWarsCharacters } from './useFetchStarWarsCharacters'; const StarWarsCharactersContainer:React.FC = () => { const [ characters, isLoading, error ] = useFetchStarWarsCharacters(); return <CharacterList loading={loading} error={error} characters={characters} />; }; export default StarWarsCharactersContainer; ``` --- <橫幅隨機/> --- ## 使用Reducers進行狀態管理 大多數情況下,處理元件中的許多狀態會導致許多未分組狀態的問題,這可能是處理起來很麻煩且具有挑戰性的。在這種情況下,減速器模式可能是有用的選擇。我們可以使用減速器將狀態分類為某些操作,這些操作在執行時可以變更分組的狀態。 此模式允許使用它的開發人員控制元件和/或掛鉤的狀態管理,讓他們在發送事件時管理狀態變更。 使用減速器模式的範例如下所示:  在上面的程式碼中,元件調度兩個操作: * “**login**”操作類型會觸發狀態更改,影響三個狀態值,即 **loggedIn**、**user**、**token**。 *“**註銷**”操作只是將狀態重設為其初始值。 ## 提供者的資料管理 提供者模式對於資料管理非常有用,因為它利用上下文 API 透過應用程式的元件樹傳遞資料。這種模式是一種有效的解決支柱鑽井問題的方法,這一直是 React 開發中普遍關注的問題。 為了實現提供者模式,我們首先建立一個提供者元件。 Provider 是 Context 物件提供給我們的一個高階元件。我們可以利用React提供的createContext方法來建構一個Context物件。 ``` export const ThemeContext = React.createContext(null); export function ThemeProvider({ children }) { const [theme, setTheme] = React.useState("light"); return ( <ThemeContext.Provider value={{ theme, setTheme }}> {children} </ThemeContext.Provider> ); } ``` 建立提供者後,我們將使用建立的提供者元件封裝依賴上下文 API 中的資料的元件。 為了從上下文 API 取得資料,我們呼叫 useContext 鉤子,它接受上下文作為參數(在本例中為 **ThemeContext**)。 ``` import { useContext } from 'react'; import { ThemeProvider, ThemeContext } from "../context"; const HeaderSection = () => { <ThemeProvider> <TopNav /> </ThemeProvider>; }; const TopNav = () => { const { theme, setTheme } = useContext(ThemeContext); return ( <div style={{ backgroundColor: theme === "light" ? "#fff" : "#000 " }}> ... </div> ); }; ``` ## 使用 HOC(高階元件)增強元件 高階元件接受一個元件作為參數,並傳回一個注入了附加資料或功能的增壓元件。 React 中 HOC 的可能性是由於 React 更喜歡組合而不是繼承。 高階元件 (HOC) 模式提供了一種增加或修改元件功能的機制,促進元件重複使用和程式碼共用。 HOC 模式的範例如下所示: ``` import React from 'react' const higherOrderComponent = Component => { return class HOC extends React.Component { state = { name: 'John Doe' } render() { return <Component name={this.state.name {...this.props} /> } } const AvatarComponent = (props) => { return ( <div class="flex items-center justify-between"> <div class="rounded-full bg-red p-4"> {props.name} </div> <div> <p>I am a {props.description}.</p> </div> </div> ) } const SampleHOC = higherOrderComponent(AvatarComponent); const App = () => { return ( <div> <SampleHOC description="Frontend Engineer" /> </div> ) } export default App; ``` 在上面的程式碼中, **<AvatarComponent/>** 由 **higherOrderComponent** 提供 props,它將在內部使用。 ## 複合元件 複合元件模式是一種 React 設計模式,用於管理由子元件組成的父元件。 這種模式背後的原理是將父元件分解為更小的元件,然後使用 props、上下文或其他反應資料管理技術來管理這些較小元件之間的互動。 當需要建立由較小元件組成的可重複使用、多功能元件時,這種模式會派上用場。它使開發人員能夠建立複雜的 UI 元件,這些元件可以輕鬆自訂和擴展,同時保持清晰簡單的程式碼結構。 複合元件模式的用例範例如下所示: ``` import React, { createContext, useState } from 'react'; const ToggleContext = createContext(); function Toggle({ children }) { const [on, setOn] = useState(false); const toggle = () => setOn(!on); return ( <ToggleContext.Provider value={{ on, toggle }}> {children} </ToggleContext.Provider> ); } Toggle.On = function ToggleOn({ children }) { const { on } = useContext(ToggleContext); return on ? children : null; } Toggle.Off = function ToggleOff({ children }) { const { on } = useContext(ToggleContext); return on ? null : children; } Toggle.Button = function ToggleButton(props) { const { on, toggle } = useContext(ToggleContext); return <button onClick={toggle} {...props} />; } function App() { return ( <Toggle> <Toggle.On>The button is on</Toggle.On> <Toggle.Off>The button is off</Toggle.Off> <Toggle.Button>Toggle</Toggle.Button> </Toggle> ); } ``` ## 道具組合 這需要從幾個相關的 props 建立一個物件,並將其作為單個 props 傳遞給元件。 這種模式允許我們清理程式碼並使管理 props 變得更簡單,當我們想要將大量相關屬性傳遞給元件時,它特別有用。 ``` import React from 'react'; function P(props) { const { color, size, children, ...rest } = props; return ( <p style={{ color, fontSize: size }} {...rest}> { children } </p> ); } function App() { const paragraphProps = { color: "red", size: "20px", lineHeight: "22px" }; return <P {...paragraphProps}>This is a P</P>; } ``` ## 受控輸入 受控輸入模式可用於處理輸入欄位。此模式涉及使用事件處理程序在輸入欄位的值發生變更時更新元件狀態,以及將輸入欄位的目前值儲存在元件狀態中。 由於React 控制元件的狀態和行為,因此該模式使程式碼比不受控制的輸入模式更具可預測性和可讀性,後者不使用元件的狀態,而是直接透過DOM(文件物件模型)對其進行控制。 受控輸入模式的用例範例如下所示: ``` import React, { useState } from 'react'; function ControlledInput() { const [inputValue, setInputValue] = useState(''); const handleChange = (event) => { setInputValue(event.target.value); }; return ( <input type="text" value={inputValue} onChange={handleChange} /> ); } ``` ## 使用forwardRefs 管理自訂元件 稱為 ForwardRef 的高階元件將另一個元件作為輸入並輸出一個傳遞原始元件引用的新元件。透過這樣做,子元件的 ref(可用於檢索底層 DOM 節點或元件實例)可供父元件存取。 當建立與第三方程式庫或應用程式中的另一個自訂元件互動的自訂元件時,在工作流程中包含 ForwardRef 模式非常有幫助。透過授予對庫的 DOM 節點或另一個元件的 DOM 實例的存取權限,它有助於將此類元件的控制權轉移給您。 forwardRef 模式的用例範例如下所示: ``` import React from "react"; const CustomInput = React.forwardRef((props, ref) => ( <input type="text" {...props} ref={ref} /> )); const ParentComponent = () => { const inputRef = useRef(null); useEffect(() => { inputRef.current.focus(); }, []); return <CustomInput ref={inputRef} />; }; ``` 在上面的程式碼中,我們使用「forwardRefs」從元件「<ParentComponent/>」觸發了另一個元件「<CustomInput/>」的焦點。 # 結論 我們在本文中討論了 React 設計模式,包括高階元件、容器呈現元件模式、複合元件、受控元件等等。透過將這些設計模式和最佳實踐合併到您的 React 專案中,您可以提高程式碼質量,促進團隊協作,並使您的應用程式更具可擴展性、靈活性和可維護性。 --- 原文出處:https://dev.to/refine/react-design-patterns-230o
我將談論我使用每個文字編輯器的經驗,也許這對於評估文字編輯器的人花時間學習可能有用。 ## Sublime Text 我在高中時開始學習編程,編寫一些程式碼並在瀏覽器上查看結果非常有趣。我使用 Sublime Text 是因為我正在透過部落格文章和影片進行學習,而且大部分內容都提到了 Sublime Text。而且,它速度很快,而且我安裝了一些外掛程式來處理 php、html、javascript 和 css。我在工作中也使用了它幾年,直到有一天我加入了一家擁有 vim 和 emacs 用戶的公司。 ## vim vim 使用者從事的專案與我自己的專案更接近,所以我開始檢查他們是如何做事的,然後我開始學習 vim。這並不酷,學習如何使用它太難了,要加載新的配置文件我每次都必須重新啟動 vim 以及許多其他問題,但既然他們這樣做了,我說服自己我也可以學習它,所以我做過。 我使用 vim 幾個月了,我最喜歡 vim 的是它針對編輯檔案而不是建立新檔案進行了最佳化。大多數時候,我們都在編輯檔案並在程式碼行之間移動,這樣才有意義。最後,我對 vim 的使用感到高興並且富有成效。 ## neovim 有一天,我聽說了 neovim,但不確定為什麼我轉而使用它,但請查看這兩個專案的 github 專案:   等等什麼? vim 儲存庫上只有一位貢獻者?怎麼只有一個人就能做到這一點?檢查拉取請求列表,我發現作者應用了其他人的更改,因為這是他的更改。好吧,我不喜歡這樣,所以我改用 neovim,當人們做出貢獻時,它會給他們帶來榮譽。 更新:我同意我的調查太淺薄。我看到[此評論](https://dev.to/heast/comment/4gk4)。但我還是不喜歡這樣。 ## nvim + tmux 當時人們正在談論“tmux”,它是一個終端多路復用器,因此您可以拆分終端並擁有選項卡並自定義所有內容,從快捷方式到tmux 的外觀,例如向狀態欄加入有用的訊息。我嘗試過並且喜歡。由於我在終端中使用 nvim,它執行得非常好,我甚至找到了一些插件來順利整合它們。它是這樣的:  我不再使用 nvim,但你仍然可以找到我的 [vim](https://github.com/lucasprag/vimlociraptor) 和 [tmux](https://github.com/lucasprag/dotfiles/blob) 設定/ master/tmux.conf)。 我使用這個堆疊三年了,我很高興。 然後我看到自己管理 nvim、tmux、zsh 的配置和插件,以便在工作中的 Debian 上的 terminator 和家裡的 macOS 上的 iTerm 上執行良好。插件之間也不是一切都工作得很好,例如,我在nvim 上有自動完成功能,它工作得很好,除非我使用多個遊標,這是另一個插件的功能,自動完成功能僅適用於第一個遊標,因為它們沒有彼此融為一體。我還遇到了類似的其他令人沮喪的問題,而且我發現自己花了太多時間除錯或嘗試替代插件,所以我傾向於嘗試一些不同的東西,這就是 emacs 引起我注意的地方。 ## emacs Emacs 有一個 GUI 應用程式,它讓我不再需要 terminator 或 iTerm,它有自己的 shell,用 elist 編寫,稱為 eshell,所以我對所有事情都有一個配置和插件。我嘗試像使用 vim 一樣從頭開始寫下每個配置,但要學的東西太多了,而且我必須完成一些工作,所以我嘗試了 spacemacs,在一些幫助下我很快就能提高工作效率。 Spacemacs 有 vim 鍵綁定,所以我在家裡,我只需要學習處理 spacemacs 的不同方面,例如佈局和工作區。做事情更容易,因為它會即時顯示可用的鍵綁定,所以當您鍵入時,您可以看到您的選項,它也是助記符,所以如果您想要佈局,您可以使用“SPC + l” ,如果需要的話要切換某些內容,請使用“SPC + t”,如果需要緩衝區,請使用“SPC + b”,對於專案,請使用“SPC + p”,對於文件,請使用“SPC + f”,並儲存您需要的檔案組合“SPC + fs”(意指“spacemacs -> 檔案 -> save”)和“SPC + pt”等指令來檢視檔案的專案樹。非常簡單吧? 我花了大約一個月的時間才理解一切並順利工作。我對一切都不滿意,我遇到了一些錯誤,這沒關係,我報告了並嘗試修復它們,但我必須再學習一種語言(elisp)才能做到這一點。這是一次很棒的經歷,因為我學習了很多 elisp,在我看來這是一門很棒的語言,所以我玩得很開心,這讓我使用了 spacemacs 6 個月。 然後我看到了這個影片: https://www.youtube.com/watch?v=8kCd4w4kc68 等等什麼?一週的 VSCode 就毀了對 Emacs 10 年的熱愛?我有一些朋友也對 vscode 很滿意,他們強烈推薦它。好吧,讓我們試試看。 ## vscode 我必須在周末做一些編碼,所以我切換到 vscode,總的來說,體驗很棒,但一開始我不得不經常使用滑鼠。 我安裝了vim 鍵綁定,令我驚訝的是,它還支援常見的vim 插件,例如「vim-easymotion」、「vim-surround」、「vim-commentary」以及其他我從未聽說過的插件。 我在 vscode 中發現的殺手級功能: - `cmd + p` 使用模糊搜尋開啟檔案更快、更聰明(它將最近的檔案放在頂部) - 快捷方式與瀏覽器快捷方式更相似,這讓我作為網頁開發人員的生活更輕鬆 - 設定檔是「JSON」文件,不需要太多自訂(我的設定檔有 22 行,僅此而已) - 整合的多終端運作得非常好,並且像 tmux 一樣有分割功能 - vscode 由 Microsoft 維護,我認為有一個團隊致力於它並加入彼此集成良好的功能真是太好了 - 我不需要除錯 vscode 並且到目前為止我沒有發現任何錯誤 - 我不需要安裝太多插件 - 跳到 React 的定義 我安裝的VScode外掛: - [Vim 鍵綁定](https://marketplace.visualstudio.com/items?itemName=vscodevim.vim) - [專案管理器](https://marketplace.visualstudio.com/items?itemName=alefragnani.project-manager) - 使用「ALT + CMD + p」更輕鬆地在專案之間切換 - [書籤](https://marketplace.visualstudio.com/items?itemName=alefragnani.Bookmarks) - `ALT + CMD + k` 加書籤,`ALT + CMD + l` 跳到下一個書籤 - [檔案實用程式](https://marketplace.visualstudio.com/items?itemName=sleistner.vscode-fileutils) - 無需使用滑鼠即可輕鬆複製或重新命名文件 - [對 Ruby 的支持](https://marketplace.visualstudio.com/items?itemName=rebornix.Ruby) - [對 Ruby Haml 的支持](https://marketplace.visualstudio.com/items?itemName=vayan.haml) - [Ruby 自動補全](https://marketplace.visualstudio.com/items?itemName=castwide.solargraph) - [Ruby 的 Linting](https://marketplace.visualstudio.com/items?itemName=misogi.ruby-rubocop) - [Python 支援](https://marketplace.visualstudio.com/items?itemName=ms-python.python) - [Elixir 支援](https://marketplace.visualstudio.com/items?itemName=mjmcloug.vscode-elixir) - [React 支援](https://marketplace.visualstudio.com/items?itemName=dsznajder.es7-react-js-snippets) - [ESLint](https://marketplace.visualstudio.com/items?itemName=dbaeumer.vscode-eslint) - [One Dark Pro Monokai Darker 主題](https://marketplace.visualstudio.com/items?itemName=eserozvataf.one-dark-pro-monokai-darker) - 我最喜歡的配色方案  這是我使用文字編輯器的經驗。今天,我不必除錯我的編輯器來使簡單的事情發生,而且我仍然可以根據我的需要對其進行自訂。是的,我對 vscode 非常滿意,也許你也應該嘗試一下。我希望它對某人有用。 我也期待聽到您對這些文字編輯器的意見和經驗。謝謝。 --- 原文出處:https://dev.to/lucasprag/my-editor-journey-sublime-vim-emacs-vscode-19k0
你的轉職路上,還缺少一份自學作業包!寫完這幾包,直接拿作品去面試上班!
本論壇另有附設一個 LINE 新手發問&交流群組!歡迎加入討論!


